2 Developing and Managing Dataspace Projects
This chapter describes the concepts of data service validation during deployment, and how to create, build, clean, configure, remove, export, import, and build dataspace projects.
This chapter contains the following topics:
2.1 Data Service File Validation During Deployment
In the Eclipse IDE a dataspace project's data service (.ds) files are validated automatically according to the following deployment model:
-
The publish to server action validates the dataspace projects.
-
All the project's artifacts are collected.
-
The collected artifacts are deployed to the server.
2.2 How-to
This section describes the following topics:
-
Section 2.2.1, "How To Create, Build, Clean, and Delete Dataspace Projects"
-
Section 2.2.2, "How to Publish, Configure, and Remove Dataspace Projects"
-
Section 2.2.3, "Exporting Dataspace Projects or Project Folders"
-
Section 2.2.6, "How To Handle Error Conditions in a Dataspace Project"
2.2.1 How To Create, Build, Clean, and Delete Dataspace Projects
This section describes the following topics:
A dataspace project is developed in Eclipse for WebLogic and deployed to a local server. While the development process typically is an iterative cycle of modification and deployment, it is important to keep in mind that the existence of a project in Eclipse for WebLogic is only loosely coupled with its deployed status. This loose coupling has implications for several types of operations:
-
Development and deployment to the server
-
Publishing to the server
-
Configuring projects on the server
-
Removal of the project
-
Removal of the project from the server
2.2.1.1 Creating a Dataspace Project
You can create a new dataspace projects using the Eclipse for WebLogic File menu.
File > New > Dataspace Project
For more information, see "Creating a Dataspace Project".
2.2.1.2 Building a Dataspace Project
In Eclipse for WebLogic it is often a good practice to set your project to be built automatically every time you modify a file in your project. You can establish this setting through the Eclipse for WebLogic Project menu:
Project > Build Automatically
A checkbox appears when this option is selected.
2.2.1.3 Cleaning a Dataspace Project
Applying a "clean" to a project clears out any existing build problems and build states. If your build runs into error conditions or other problems, cleaning and redeploying your project is a recommended first step.
Project > Clean...
WARNING:
A dataspace project can only be deployed when no other process has an editing lock on the Oracle Data Service Integrator configuration that contains your dataspace. The Oracle Data Service Integrator configuration can be locked through the Oracle Data Service Integrator Administration Console (Lock and Edit), by a client process (MBean API or WLST script), or during deployment from Eclipse/WebLogic for Eclipse.
2.2.1.4 Deleting a Dataspace Project
Dataspace projects are both created and deleted through the Project Explorer.
To delete a project:
-
Right-click on the project's name in the Project Explorer.
-
Select Delete.
You will be given two options:
-
Delete content from the file system? If you choose:
Do not delete content
you will be able to import the project at a later time.
-
Delete the dataspace on the server? The deployed dataspace will be removed from the server. If this option is not selected, the dataspace will remain in one of two states, depending on selected options:
-
Available to be configured on the server
-
Configured on the server
Note:
Data services can also be removed from their server through the Oracle Data Service Integrator Administration Console.
-
2.2.2 How to Publish, Configure, and Remove Dataspace Projects
Dataspace projects are created in the Eclipse for WebLogic Eclipse plugin framework. A project that builds successfully is ready to be made available from a local supported version of Oracle WebLogic server.
Several terms can be used to describe the process of managing a server's dataspace projects.
-
Publish. All projects associated with a server can be deployed at once.
-
Available. These are projects that have been published and are available to be configured on the server. A project must both present on the server and configured before it can be access by client applications. A project with an Available status can be thought of as staged.
-
Configured. A configured project is available to authorized calling applications. A project with Configured status on the server can be thought of as released.
Tip:
Use the Add and Remove Projects dialog to move projects between Available and Configured state.
This section describes the following topics:
-
Section 2.2.2.3, "Managing Configured Projects Through the Servers Window"
-
Section 2.2.2.4, "Removing Dataspace Projects from a Server"
2.2.2.1 Publishing Server Projects
You can publish all the dataspace projects associated with a workspace.
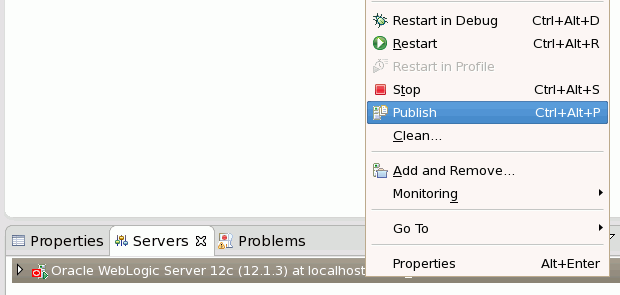
Right-click on the name of your server in the Servers window and choose Publish.
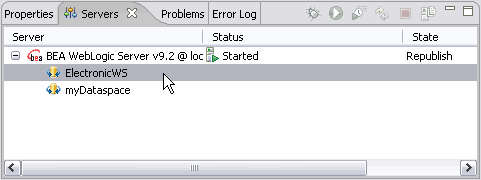
The state in the Servers window will be changed to Republish.
Publishing or republishing a set of projects does not affect the configuration status of each project on the server. You can modify the configuration status through the Add and Remove Projects... dialog.
2.2.2.2 Configuring Server Projects
Projects on a server are considered either configured on the server or available to be configured on the server. Configuration status is managed either through the Add and Remove Projects... dialog or directly from the Servers window.
Note:
Only configured projects are available to client applications.
2.2.2.2.1 Managing Configured Projects Through Dialog
To access the dialog:
-
Right-click on the name of the server in the Servers window.
-
Select Add and Remove Projects...
Figure 2-2 Add and Remove Projects Dialog
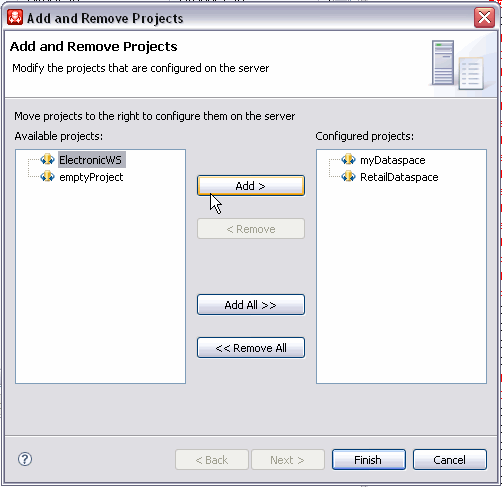
Description of "Figure 2-2 Add and Remove Projects Dialog"
2.2.2.3 Managing Configured Projects Through the Servers Window
You can also change a project's configuration status through the Servers window.
-
Click on the + symbol next to the server name.
-
Right-click on the project you wish to unconfigure.
-
Select Remove.
Alternatively, just select your project and click the Delete key.
You can use the Add and Remove Projects Dialog to change the configuration status of your project.
2.2.2.4 Removing Dataspace Projects from a Server
You can permanently remove a project from the server through the right-click menu Delete option in the Project Explorer.
For more information, see "Deleting a Dataspace Project".
2.2.3 Exporting Dataspace Projects or Project Folders
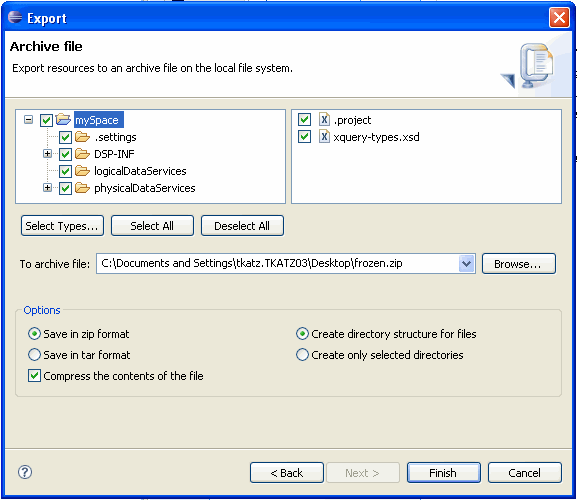
Oracle Data Service Integrator dataspace projects or their component folders can be exported in EAR (archive) format using standard Eclipse mechanisms. The export target is the local file system.
If an entire project is exported as an EAR, it constitutes a back-up of the project which can then be re-imported into an Eclipse-compatible IDE.
To create an archive file of a dataspace project:
-
In Project Explorer right-click on your project (or folder).
-
Navigate to:
Export > General > Archive File
-
In the Archive File wizard select the entire project or one or several folders.
-
Select from available export options.
-
Click Finish.
Figure 2-4 Creating an EAR File for a Dataspace Project
Description of "Figure 2-4 Creating an EAR File for a Dataspace Project"
See Eclipse Documentation (http://www.eclipse.org/documentation/) for general information about the Export operation.
2.2.4 Exporting Dataspace Project Artifacts Using Oracle Data Service Integrator Export Wizards
This section describes the various types of export operations available for Oracle Data Service Integrator dataspace projects.
-
Section 2.2.4.2, "Generating a Data Service Definitions and Artifacts JAR"
-
Section 2.2.4.4, "Generating a JAR File Containing Data Service-to-Web Service Maps"
2.2.4.1 Exporting Dataspace Artifacts
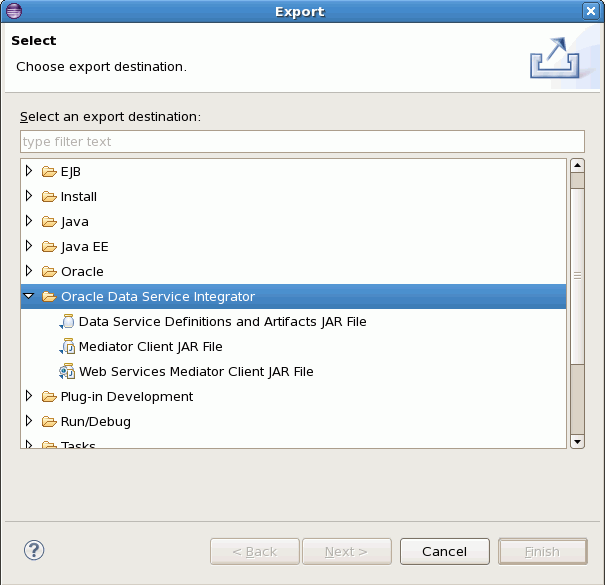
The Oracle Data Service Integrator export wizards can be accessed using the File > Export menu, then expand on the Oracle Data Service Integrator export wizard category.
File > Export... > Oracle Data Service Integrator
Note:
Artifacts can only be exported from deployable dataspace projects; if your project is not deployable, the export operation will not succeed.
In the Oracle Data Service Integrator category there are three wizards. Each generates a specific type of JAR file.
Table 2-1 Types of Oracle Data Service Integrator JAR File Export Operations
| Export Type | Effect |
|---|---|
|
Data service definitions and artifacts |
All Oracle Data Service Integrator deployable artifacts are bundled into a JAR file. |
|
Mediator client |
A Java interface for accessing data services is created. |
|
Web services mediator client |
A web services interface for accessing data services is created. |
Any dataspace projects pre-selected in the Project Explorer will automatically be selected in the export wizard.
2.2.4.2 Generating a Data Service Definitions and Artifacts JAR
An exported JAR file containing a single project's server-deployable definitions and artifacts. Such a file can be imported into another Oracle Data Service Integrator-enabled version of Eclipse. In addition, the definitions and artifacts JAR can be useful:
-
As a means of transporting a dataspace from one application to another.
-
In conjunction with certain refactoring operations.
-
For deployment on multiple servers (clusters) at a later time.
-
For debugging purposes.
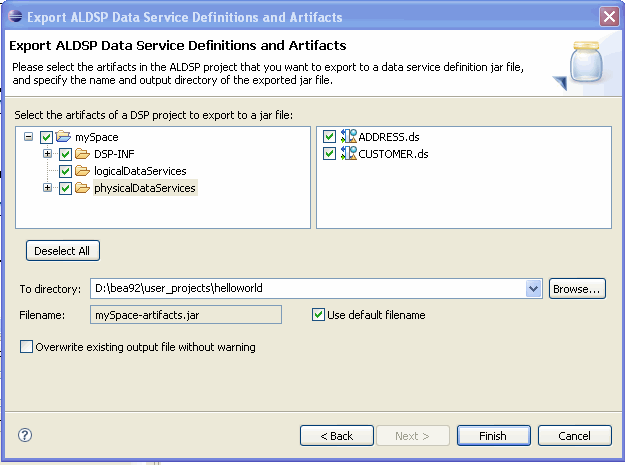
Figure 2-6 Export Data Service Definitions and Artifacts
Description of "Figure 2-6 Export Data Service Definitions and Artifacts"
In the wizard, the contents you identify using their adjacent checkbox will be exported. For example if you check the box next to the project name, all of that projects server-deployable components will be selected.
You can fine-tune your selection by clicking on a folder. The folder's contents will appear in the right-hand column where you can use a checkbox to control which artifact will be exported.
Table 2-2 Actions Associated with Generating a Data Service Definitions and Artifacts JAR
| Item | Recommended Setting or Action | Details – Comments | |
|---|---|---|---|
|
1 |
Export Data Service Definitions and Artifacts Page |
||
|
2 |
Check folders or their contents that you want to export |
||
|
3 |
Deselect All |
Convenience if more than one project is selected. |
|
|
4 |
To Directory: |
|
JAR file can be exported anywhere on the system. |
|
5 |
Filename: |
-artifacts.jar |
Example: mySpace-dsp-client.jar |
|
6 |
Use default filename option |
Selected |
When selected editing of the generated filename is not allowed. |
|
7 |
Overwrite existing file without warning option |
Unselected |
If unselected you will be asked if you want to overwrite any existing file of the same name. |
|
8 |
Success message |
Finish |
Identifies project and target name. |
2.2.4.3 Generating a Mediator Client JAR File
This wizard presents a list of open Oracle Data Service Integrator projects to select from, and it generates an Oracle Data Service Integrator mediator client JAR file from the currently selected project. Projects are exported one at a time.
Java programs access data services through the Oracle Data Service Integrator Mediator API. This API is generated from the Oracle Data Service Integrator Eclipse platform and is based on a project that can be successfully built and deployed.
For more information, see Accessing Data Services from Java Clients.
Figure 2-7 Export Mediator Client JAR Wizard

Description of "Figure 2-7 Export Mediator Client JAR Wizard"
Table 2-3 Steps Associated with Generating a Mediator Client API JAR File
| Item | Recommended Setting or Action | Details – Comments | |
|---|---|---|---|
|
1 |
Select the Mediator Client JAR File export wizard |
||
|
2 |
Type: |
Mediator Client JAR File |
|
|
3 |
Select a Dataspace Project Page |
Next |
|
|
4 |
Pick a dataspace project |
mySpace |
Only one project at a time can be exported. |
|
5 |
Deselect All |
Convenience if more than one project is selected. |
|
|
6 |
To Directory: |
/user_projects/helloworld |
JAR file can be exported anywhere on the system. |
|
7 |
Filename: |
-dsp-client.jar |
Example: mySpace-dsp-client.jar |
|
8 |
Use default filename option |
Selected |
When selected editing of the generated filename is not allowed. |
|
9 |
Overwrite existing file without warning option |
Unselected |
If unselected you will be asked if you want to overwrite any existing file of the same name. |
|
10 |
Success message |
Finish |
Identifies project and target name. |
2.2.4.4 Generating a JAR File Containing Data Service-to-Web Service Maps
After you have created a web service map of one or more data services you can create an exported JAR file containing these maps.
Then the created JAR file can be used as your applications web service interface to available data services.
Note:
Only publicly available operations can be turned into web service operations. You can adjust access level to a data service function through the Properties window.
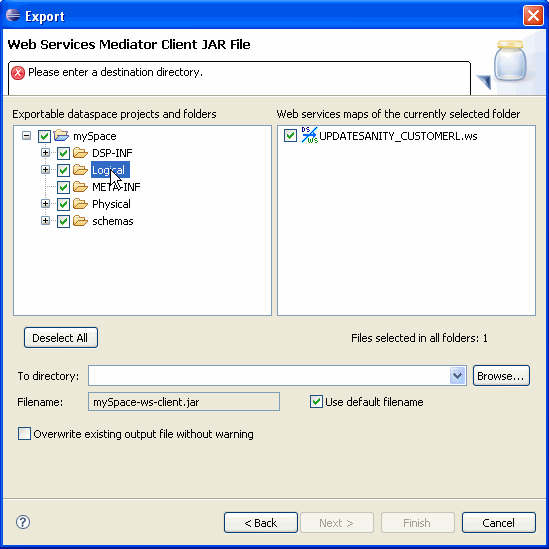
Figure 2-8 Exporting a Web Services Mediator Client JAR File
Description of "Figure 2-8 Exporting a Web Services Mediator Client JAR File"
Table 2-4 Actions Associated with Generating a Web Services Mediator Client JAR File
| Item | Recommended Setting or Action | Details – Comments | |
|---|---|---|---|
|
1 |
Export Web Services Mediator Client JAR File |
||
|
2 |
Check folders or their contents that contain web service maps |
Select folder |
Click on the exportable dataspace folder to located selected WS file. |
|
3 |
Deselect All |
Convenience if more than one project is selected. |
|
|
4 |
To Directory: |
/user_projects/helloworld |
JAR file can be exported anywhere on the system. |
|
5 |
Filename: |
-ws-client.jar |
Example: mySpace-ws-client.jar |
|
6 |
Use default filename option |
Selected |
When selected editing of the generated filename is not allowed. |
|
7 |
Overwrite existing file without warning option |
Unselected |
If unselected you will be asked if you want to overwrite any existing file of the same name. |
|
8 |
Success message |
Finish |
Identifies project and target name. |
2.2.5 Importing a Dataspace Project
A JAR file containing an Oracle Data Service Integrator project can be imported into your workspace.
-
Create a dataspace project, naming it appropriately. (Alternatively you may be able to use an existing project if there are no naming conflicts.)
File > New > Dataspace Project
-
Click on your new project.
-
Choose:
File > Import > General > Archive File
-
Next.
-
Browse to the directory location of your JAR file.
-
Open.
-
Answer Yes to All to the question regarding overwriting
xquery-types.xsd. -
Finish.
-
Deploy your project to verify a successful build and deployment.
2.2.5.1 Importing a File-based Project
A project in an accessible file system can be imported into Eclipse for WebLogic. You can import one or several projects at the same time.
-
Choose:
File > Import... > General > Existing Projects into Workspace
-
Browse to your dataspace project directory.
-
Select the project or projects you wish to import.
2.2.6 How To Handle Error Conditions in a Dataspace Project
During the course of creating your project there are times when the project will be in an error condition. There are many reasons for this. Generally speaking the way to handle such conditions is to either:
-
Go forward because you understand why the condition has occurred.
-
Revert using Undo.
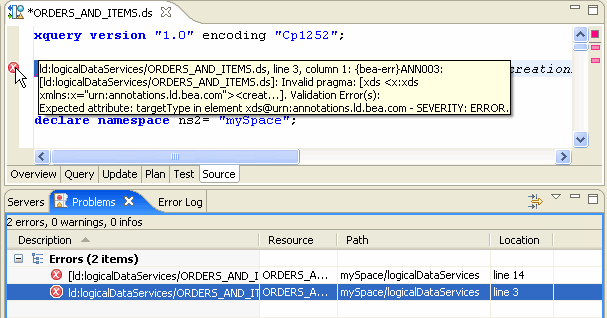
There may be some cases, however, when the error condition comes as a surprise and/or there is no easy way to revert. Information about such conditions can be found in two places.
Table 2-5 Problem Reporting in Dataspace Projects
| Tabular window | Purpose |
|---|---|
|
Problems (Window > Show View > Problems) |
Collects and displays errors in the data service source file. |
|
Error Log (Window > Show View > Error Log) |
Collects and displays project-related error conditions. |
Figure 2-9 Problem and Error Log Tabs in a Dataspace
Description of "Figure 2-9 Problem and Error Log Tabs in a Dataspace"
The error log contains several types of messages; icons are used to differentiate their type.
Table 2-6 Error Log Icons and Their Meaning
| Icon | Meaning |
|---|---|
|
Error. |
|
|
Error with log or stack trace. |
|
|
Warning. |
|
|
Informational. |
|
|
Process icon. |
Double-clicking on each line in the Error Log window will open a separate dialog that will allow you to see more information. Examples:
-
Double-clicking or an error might open a dialog that will contain the related stack trace.
-
Double-clicking on each line in the Problems view will, if possible, open the file having errors and highlight the error.
2.2.7 How To Validate, Build, Export, and Package Dataspace Projects from the Command Line
This section describes how to validate, build, export and package Oracle Data Service Integrator dataspace projects from the command line.
-
Section 2.2.7.1, "Data Service File Validation During Deployment"
-
Section 2.2.7.2, "Dataspace Packaging from the Command-line"
2.2.7.1 Data Service File Validation During Deployment
In the Eclipse IDE a dataspace project's data service (.ds) files are validated automatically according to the following deployment model:
-
The publish to server action validates the dataspace projects.
-
All the project's artifacts are collected.
-
The collected artifacts are deployed to the server.
The Oracle Data Service Integrator Export mechanism allows for a dataspace project's artifacts to be packaged in a JAR the contents of which are identical to what would be generated from the IDE for deployment to an Oracle WebLogic server.
2.2.7.2 Dataspace Packaging from the Command-line
There is also an occasional need for operations such as validate, build, export, and package to be available in a scripting environment. This section describes an Ant script file, cmdline_build.xml, provided in the "bin" directory under the Oracle Data Service Integrator installation that can be invoked by a user to:
-
Validate a dataspace project
-
Generate a deployment JAR file of a dataspace project
Note:
For those not wishing or able to use Ant, Java equivalent command-line options are also described.
2.2.7.3 Syntax Summary
This section describes commands and syntax.
| Command | Syntax |
|---|---|
|
|
help [ {cmd} | all ] |
|
|
validate-project {project} |
|
|
validate-dataspace {dataspace-path} |
|
|
export-mediator-client {project} {jardir} [jarname[.jar]] |
|
|
export-ws-client {project} {jardir} [jarname[.jar]] [ws_locator,...] |
|
|
export-artifacts {project} {jardir} [jarname[.jar]] |
2.2.7.4 Command-Line Ant Build Targets
This section describes available Oracle Data Service Integrator ant build targets. It describes the following topics:
2.2.7.4.1 Build XML File
The build XML file:
cmdline_build.xml
will be provided in the directory:
<odsi_home>/bin
To see a list of build targets with short descriptions in the Ant build XML file, invoke the command below at the prompt window:
ant -f <bea_home>/odsi_10.3/bin/cmdline_build.xml -projecthelp
Note:
-
It is assumed that Ant is available on your computer and is on your path. Some targets require:
-
ECLIPSE_HOMEenvironment variable points to the Eclipse installation directory. -
javacbe available on thePATHvariable.
-
-
Commands other than "
help" involving an Eclipse project requires specification of the Eclipse workspace directory that contains the project.-
For Java commands the directory is specified via the "
-data" option. -
For Ant command, it is specified as the "
-Dworkspace" property.
-
2.2.7.4.2 "help"
The "help" target is the default build target. It shows a list of available Oracle Data Service Integrator commands and the syntax needed to invoke the command in Java.
| Command | Syntax |
|---|---|
|
|
help [ {cmd} | "all"] |
2.2.7.4.3 Build Invocation Syntax via Java
Note that the syntax shows the portion starting with "odsi_command" below. However, the full syntax to be entered for Java at the prompt window is:
java -cp <eclipse_home_dir>/startup.jar org.eclipse.core.launcher.Main -data <workspace_dir>
-application com.bea.dsp.ide.app.runCmdline <odsi_command> <cmd_param> ...
2.2.7.4.4 Build Invocation Syntax via Ant
If invoked via Ant, Oracle Data Service Integrator command parameters should be specified as Ant properties. For example, to get help about the "export-artifacts" command, enter:
ant -f <odsi_install_dir>/bin/cmdline_build.xml help -Dcmd=export-artifacts
To get help on all Oracle Data Service Integrator commands, specify the following property:
-Dcmd=all
or omit the optional -Dcmd property completely:
ant -f <odsi_install_dir>/bin/cmdline_build.xml help
2.2.7.4.5 "validate-project"
The "validate-project" target validates the data service (.ds) files in the specified dataspace project. Data service error messages that would appear in the Eclipse IDE's Problems view are sent to stdout when this target is invoked. A "fail" status is returned by this target if any error exists in a .ds data service file in the project.
ant -f <odsi_install_dir>/bin/cmdline_build.xml -Dworkspace=/bea/projects/myworkspace
 -Dproject=MyODSIProject validate-project
| Command | Syntax |
|---|---|
|
|
validate-project {project} |
2.2.7.4.6 "validate-dataspace"
The validate-dataspace target validates the dataspace project at the specified path.
ant -f <odsi_install_dir>/bin/cmdline_build.xml -Ddataspace-path=dataspace-path validate-dataspace
| Command | Syntax |
|---|---|
|
|
validate-dataspace {dataspace-path} |
2.2.7.4.7 "export-mediator-client"
The export-mediator-client target is for generating an Oracle Data Service Integrator mediator client JAR file of a dataspace project.
ant -f <odsi_install_dir>/bin/cmdline_build.xml -Dworkspace=/bea/projects/myworkspace
-Dproject=MyODSIProject  -Djardir=/temp  -Djarname=myoutput.jar  export-mediator-client
The default value for the output JAR file name is:
<project>-dsp-client.jar
| Command | Syntax |
|---|---|
|
|
export-mediator-client {project} {jardir} [jarname.[jar]] |
2.2.7.4.8 "export-ws-client"
The export-ws-client target generates a web services mediator client JAR file from the specified comma-separated list of wsmap file locators in a dataspace project.
ant -f <odsi_install_dir>/bin/cmdline_build.xml -Dworkspace=/bea/projects/myworkspace
-Dproject=MyODSIProject  -Djardir=/temp  -Djarname=myoutput.jar
-Dws_locators=ld:customer.ws,ld:order.ws  export-ws-client
The default value of the ws_locators is all wsmap file locators in the project.
<project>-ws-client.jar
An example of a wsmap file locator is:
ld:logical/wsmaps/CUSTOMER.ws
| Command | Syntax |
|---|---|
|
|
export-ws-client {project} {jardir} [jarname[.jar]] [ws_locator,...] |
2.2.7.4.9 "export-artifacts"
The "export-artifacts" target creates a JAR file containing the definitions and artifacts of the dataspace project.
ant -f <odsi_install_dir>/bin/cmdline_build.xml -Dworkspace=/bea/projects/myworkspace
-Dproject=MyODSIProject  -Djardir=/temp  -Djarname=myoutput.jar  export-artifacts
The content would be identical to the artifact JAR file created in the IDE. By default, the name of the artifact JAR file is:
<project>-artifacts.jar
| Command | Syntax |
|---|---|
|
|
export-artifacts {project} {jardir} [jarname[.jar]] |
Notes:
Referenced Java Projects
Since a dataspace project may reference other Java projects in the same Eclipse workspace, you should make certain that:
-
Referenced projects in your build script are also built.
-
The resulting JAR files and dependent JAR files are copied to the dataspace project's
DSP-INF/libdirectory.
This needs to be done prior to exporting a deployable JAR file using the export-artifacts command in order for all referenced/required JAR files to be included in the artifact JAR file.
Invoking Build Commands Without Ant
The Ant targets described in the previous sections are actually implemented in Java. So the actual implementation can be invoked at the prompt window using Java directly -- or any script process -- instead of Ant.
2.2.7.5 Command-line Examples using Ant and Java
This section contains several examples of invoking the Oracle Data Service Integrator command using Ant and Java. It describes the following topics:
2.2.7.5.1 Getting the help text of all the commands using Ant and Java at the prompt window
Ant:
ant -f <bea_home>\odsi_10.3\bin\cmdline_build.xml help -Dcmd=all
Java:
java -cp <eclipse_home>/eclipse/startup.jar org.eclipse.core.launcher.Main
-application com.bea.dsp.ide.app.runCmdline help all
2.2.7.5.2 Getting the help text of a specific command using Ant and Java at the prompt window
Ant:
ant -f <bea_home>\odsi_10.3\bin\cmdline_build.xml help -Dcmd=export-artifacts
Java:
java -cp <eclipse_home>/startup.jar org.eclipse.core.launcher.Main
-application com.bea.dsp.ide.app.runCmdline help export-artifacts
2.2.7.5.3 Exporting the artifacts of a dataspace project
This example exports the project:
DspProj
in workspace:
/MyWorkspace
to:
/temp
directory using the default JAR file name:
<project>-artifacts.jar
Ant:
ant -f <bea_home>\odsi_10.3\bin\cmdline_build.xml -Dworkspace=/MyWorkspace
-Dproject=DspProj -Djardir=/temp export-artifacts
Java:
java -cp <eclipse_home>/startup.jar org.eclipse.core.launcher.Main -data /MyWorkspace
 /MyWorkspace -application com.bea.dsp.ide.app.runCmdline
-application com.bea.dsp.ide.app.runCmdline export-artifacts DspProj /temp
2.3 Reference
This section describes the following topics:
2.3.1 Dataspace Projects Cheatsheet
The following table presents the tasks involved with managing dataspace projects.
Table 2-7 Dataspace Projects Cheatsheet
| Task | Location | Action | Comments |
|---|---|---|---|
|
Build a project with every save |
Project menu |
Build Automatically |
|
|
Clean selected project |
Project menu |
Clean |
|
|
Close a project |
Project Explorer |
Right-click > Close Project |
|
|
Close a project |
Project menu |
Project > Close Project |
|
|
Close unrelated projects |
Project Explorer |
Right-click > Close Unrelated Projects |
|
|
Copy-Paste a project |
Project Explorer |
Right-click on project name > Copy-Paste |
|
|
Create a new project |
File menu |
File > New > Dataspace Project |
|
|
Delete selected project from a workspace |
Project Explorer |
Right-click > Delete |
|
|
Export selected project |
File menu |
Export |
|
|
Import selected project into a workspace |
File menu |
Import |
|
|
Open selected project |
Project Explorer |
Open |
|
|
Project properties |
Project menu |
Right-click > Properties |
|
|
Project properties |
File menu |
Properties |
|
|
Publish all the projects in a workspace |
Server window |
Right-click > Publish |
|
|
Refactor Rename-Remove |
Project Explorer |
Right-click > Refactor > Rename-Remove |
Refactor provides for "safe" renaming or deleting of projects or project components. |
|
Refresh display |
Project Explorer |
Right-click > Refresh File > Refresh |
|
|
Remove a previously deployed (configured) project from the server |
Server window |
Right-click > Delete > Yes > Yes to 'Delete the dataspace on the server?' |
|
|
Rename a project |
File menu |
Rename |
See Safely rename... |
|
Rename a project safely |
Project Explorer |
Right-click > Refactor > Rename... |
|
|
Safely delete selected project from a workspace |
Project Explorer |
Right-click > Refactor > Delete... |
See Safely delete... |
|
Search for a project in a workspace |
Search menu |
|
|
|
See dataspaces currently deployed on the server |
Server window |
Click the + next to the name of the running server. |
|
|
Show project explorer |
Window menu |
Show View > Project Explorer |
|
|
Show project in Service Assembly Modeler |
Project Explorer |
Right-click > Show in Service Assembly Modeler |
|
|
Submit a project to the Oracle Enterprise Repository |
Project Explorer |
Right-click > Show in Service Assembly Modeler |
|
|
Undeploy a project |
Server window |
Right-click > Delete > Yes > Yes to 'Delete the dataspace on the server?' |
|
|
Update a project's metadata |
Project Explorer |
Right-click > Update metadata |
|
|
Validate project artifacts |
Project Explorer |
Right-click > Validate... |
2.3.2 Setting Eclipse for WebLogic Initialization Parameters (.ini)
Eclipse for WebLogic is an Eclipse plugin. As such, it uses an initialization file that is similar to the eclipse.ini file available in basic installations of Eclipse. This file in turn provides directives to the Java Virtual Machine (JVM) in which the application runs.
The default parameters provides with Oracle Data Service Integrator are located in the following file:
{BEA_HOME}/workshop_10.3/workshop.ini
Note:
When running workshop.exe the settings in this file supersede any configuration settings in the eclipse.ini file.
By default the workshop.ini memory settings are:
-vmargs
-Xms384m
-Xmx768m
If you encounter out-of-memory errors associated with running an Oracle Data Service Integrator project, try increasing the maximum memory setting. For example:
-Xmx1024m
2.4 Related Topics
For more information, see "Example: How to Create Your First Data Services".
