1 Introduction to Data Services
This chapter provides information, examples, and tutorials on data services basics.
This chapter includes the following sections:
1.1 Concepts
This section presents the following topics:
1.1.1 Data in the 21st Century
In modern enterprises data is generally readily available. While this has reduced the need to move physical data into data warehouses, data marts, data mines, or other costly replications of existing data structures, the problems of dynamic data integration, immediate secured access and update, data transformation, and data synchronization remain some of the most vexing challenges facing the IT world.
Oracle Data Service Integrator provides a comprehensive approach to this challenge by:
-
Providing a unified means of importing metadata representing the structure of any data source using its Metadata Import wizard.
-
Allowing for the creation of hierarchical data structures from traditional column-row data.
-
Providing a query-driven interface to extend the physical model so data specialists can create powerful transformations of existing data and queries.
-
Automatically creating data models that introspect physical data structures (and their contents) in situ, normalizes representation of diverse data, and allow the representation of the relationship of physical and logical data.
-
Maintaining the accuracy of metadata through automated updates from the data source.
Oracle Data Service Integrator can be used to create, refine, and validate logical data structures through a process of importing data sources, creating physical and logical models, and designing queries for use by applications in an infrastructure that provides for easy maintenance, while enhancing security and performance.
Through standardized Service Data Objects (SDO) technology, web-based applications can automatically read and update relational data. Through simple Java programs Oracle Data Service Integrator update capabilities can be extended to support any logical data source.
1.1.2 Data Access Integration Architecture
In contemporary enterprise computing, data typically passes through multiple processing and storage layers. While enterprise data can easily be accessed, turning that data into useful information economically and efficiently, particularly updateable information, remains a difficult and high-maintenance task.
Oracle Data Service Integrator approaches the problem of creating integration architectures by building logical data services around physical data sources and then allowing business logic to be added as part of easily maintained, graphically designed XML query functions (also called XQueries).
Any Eclipse for WebLogic application can include Oracle Data Service Integrator-based projects. And any application can access Oracle Data Service Integrator queries — including update functions — through a mediator API or an Oracle Data Service Integrator Control. In the case of relational data, updates can be performed automatically through Service Data Objects (SDO) (For details see "Programming with Service Data Objects" in the Oracle Data Service Integrator Client Application Developer's Guide.)
Oracle Data Service Integrator provides for the development of integrated queries within any Eclipse for WebLogic application. Each application can contain multiple Oracle Data Service Integrator-based projects, as well as any other types of projects offered by Eclipse for WebLogic.
1.1.3 Oracle Data Service Integrator: Roles and Responsibilities
The following summarizes typical roles and responsibilities related to creating and maintaining data services.
-
Physical Data Service Development. Any team member can quickly create a set of physical data services from enterprise data sources.
-
Entity Data Service Development. A data architect with knowledge of the relationships between enterprise data sources can then create data services based on physical and previously developed logical data services.
-
Query Development. Once data services are created, an IT team member can create reusable query functions using the graphical XQuery Editor. The editor is directly tied to a Source View that facilitates code-based modifications to automatically-generated designs.
-
Deployment. Once data services are developed, they can be deployed from the IDE or by an administrator through the Oracle Data Service Integrator Administration Console.
-
Application Development. Application designers can use data service query functions in their Oracle WebLogic applications. Through Service Data Objects (SDO) and the Mediator API or an Oracle Data Service Integrator Eclipse Control, applications can retrieve and update data, yet remaining insulated from the complexities of managing the underlying data interaction.
-
Metadata Management.Administrators, architects, and designers can use the Service Explorer for real-time introspection of disparate data source metadata that has been developed through Oracle Data Service Integrator.
1.2 How-to
This section presents the following sections:
1.2.1 How to Configure the Retail Dataspace Sample Application for Oracle Data Service Integrator
This section describes how to set up the Retail Dataspace Sample Application after completing the installation of Oracle Data Service Integrator.
-
Section 1.2.1.2, "About WorkSpace Studio, Data Services Studio, and Eclipse"
-
Section 1.2.1.6, "Create the Retail Dataspace Sample Web Application"
1.2.1.1 Prerequisites
A prerequisite to configuring the retail dataspace sample application is to have the Oracle Data Service Integrator installed on a supported platform.
Choose the guide for the version you are running:
-
Installation Guide for OSDI
1.2.1.2 About WorkSpace Studio, Data Services Studio, and Eclipse
Note:
WorkSpace Studio was formerly named Data Services Studio.
This tutorial uses the version of Eclipse that is installed with Oracle Data Service Integrator.
The Eclipse framework often provides multiple ways of achieving same result. In many cases there is no "correct" or "better" way. In other words, there are often many paths to the same results.
1.2.1.3 Start WorkSpace Studio
Open ODSI from Eclipse by selecting:
Window > Open Perspective > Oracle Data Service Integrator
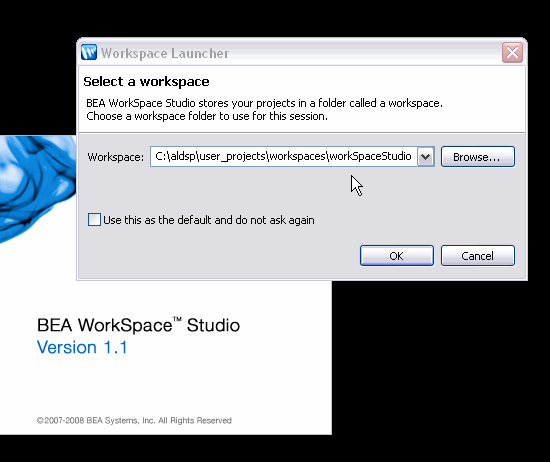
1.2.1.3.1 Select a Workspace
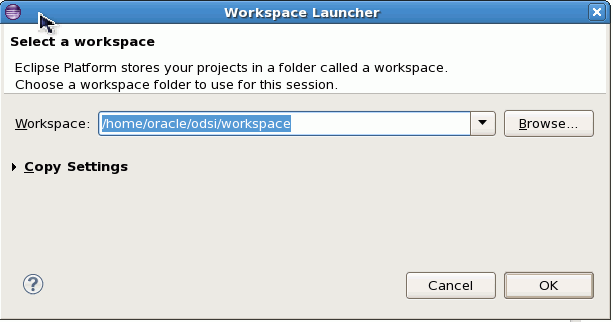
OSDI Studio projects are called dataspace projects. These Projects in turn are located in a workspace folder.
The first step in creating a dataspace is to select a workspace.
-
Use the default location:
Install Retail Dataspace
-
Click OK.
Figure 1-2 Oracle Data Service IntegratorSelecting a Workspace
Description of "Figure 1-2 Oracle Data Service IntegratorSelecting a Workspace"
In the Samples section click on:
Install Retail Dataspace Sample
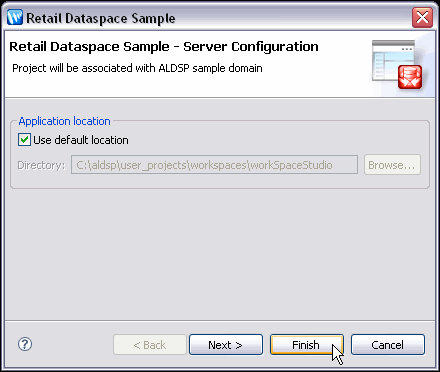
Figure 1-3 Retail Dataspace Server Configuration Dialog
Description of "Figure 1-3 Retail Dataspace Server Configuration Dialog"
-
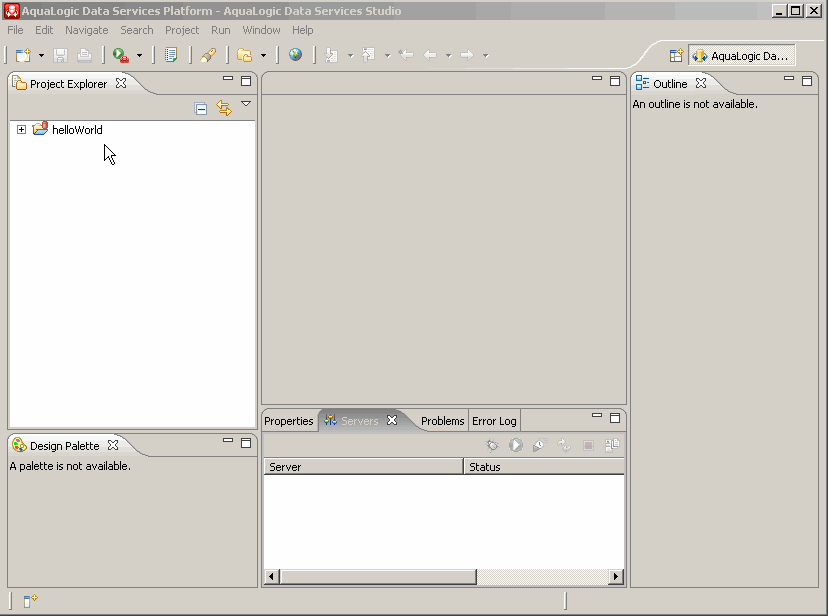
Click Finish. This imports the RetailDataspace project and finds or creates a server for the Oracle Data Service Integrator sample domain and associates it with the project.
-
Answer Yes to the question about associating your project with the Oracle Data Service Integrator perspective.
Figure 1-4 Initial Oracle Data Service Integrator Perspective
Description of "Figure 1-4 Initial Oracle Data Service Integrator Perspective"
1.2.1.3.2 Start the Server
An Oracle Data Service Integrator-enabled server is a version of WebLogic Server with additional functionality to support Oracle Data Service Integrator deployment and runtime. The Oracle Data Service Integrator server must be running in order to access sample data and to deploy your project.
To start your server from Studio:
-
Locate the Servers window. If it isn't visible, use the following option command:
Window > Show View > Servers
1.2.1.4 Start the Server
An Oracle Data Service Integrator-enabled server is a version of WebLogic Server with additional functionality to support Oracle Data Service Integrator deployment and runtime. The Oracle Data Service Integrator server must be running in order to access sample data and to deploy your project.
To start your server from Studio:
-
Locate the Servers window. If it isn't visible, use the following option command:
Window > Show View > Servers
-
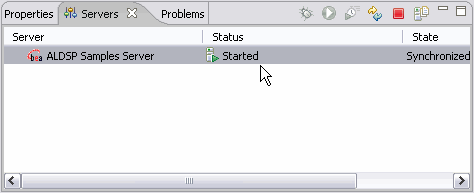
In the Servers window locate the Oracle Data Service Integrator Samples Server (this may be the only server listed). Notice that its status is Stopped.
-
Right-click on the server name and select Start. (The start-up operation can take several minutes.) Notice the running log of server startup actions in the Console window.
You can also start the server by selecting the server and clicking the Start icon.
1.2.1.5 Deploy Your Projects
Each project should be deployed to validate the installation.
-
Right-click on the server.
-
Choose Publish from the menu. A message should appear indicating successful deployment.
-
Click OK.
Also deploy the RetailDataspace project.
1.2.1.6 Create the Retail Dataspace Sample Web Application
If Eclipse for WebLogic Platform 10.2 is installed into the same BEA_HOME which contains ALDSP_HOME, you can create the a web-based sample application.
Caution:
Platform 10.0 MP1 contains version 10.0 of Eclipse. However, the sample application required features available in Eclipse 10.2. The workaround is to install the 10.2 version of Eclipse for WebLogic Platform. This version is available from the download site. Current that link is:
http://commerce.bea.com/showproduct.jsp?family=WLW&major=10.2&minor=0
Follow these steps to access the web-based sample application:
-
To make sure the necessary dataspaces are deployed, redeploy (right-click > Deploy Project):
-
ElectronicsWS and
RetailDataspace projects
-
-
From the WorkSpace 1.1 menu select:
Window > Show View > Servers
-
Locate the option:
Retail Dataspace Sample Web Application (WebLogic Eclipse only)
-
Click Next, then Finish.
-
If asked if you want to open the OSDI Studio Perspective, click Yes.
-
In the Project Explorer view, right-click on the RTLSelfService project, and choose:
Run As > Run on Server
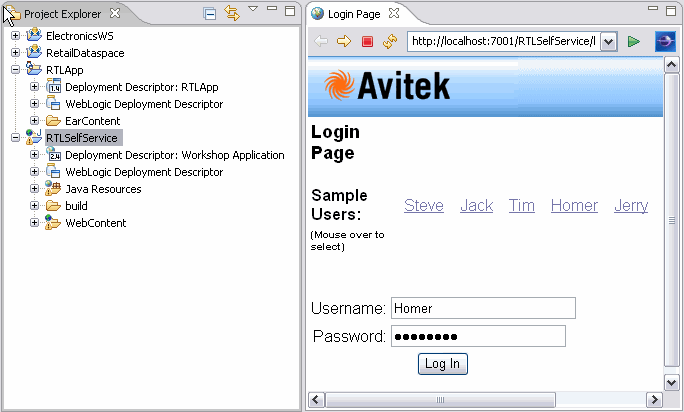
This will initially deploy your projects and then open the sample Avitek login page.
-
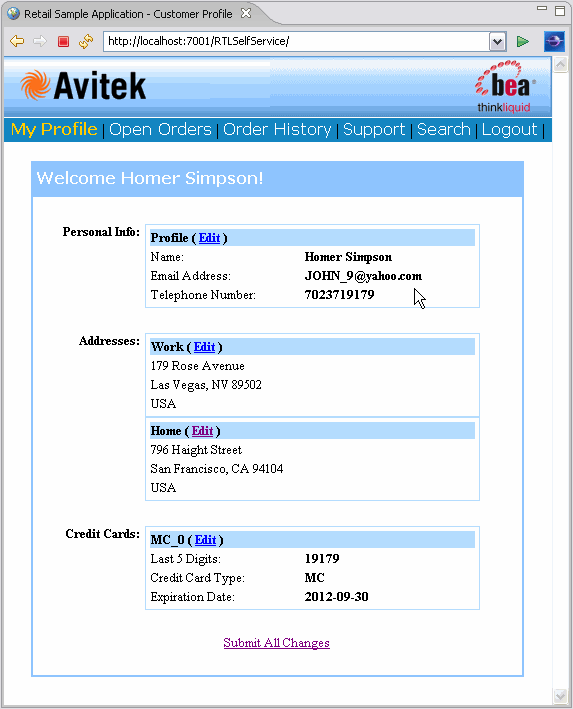
Mouse over one of the names and log in. After a few moments information about the fictitious customer will appear.
1.2.1.7 See Also
-
Retail Database Sample Application Guide
1.2.2 How to Configure the Retail Dataspace Sample Application for OSDI Studio
This section describes how to set up the Retail Dataspace Sample Application after completing the installation of OSDI Studio.
1.2.2.1 Prerequisites
A prerequisite to configuring the retail dataspace sample application is to have the ODSI Data Services Studio installed on a supported platform.
1.2.2.2 About WorkSpace Studio, Data Services Studio, and Eclipse
Note:
Data Services Studio became part of WorkSpace Studio with Eclipse. Where possible, the generic term Studio is used.
This tutorial uses the version of Eclipse that is installed with ODSI.
The Eclipse framework often provides multiple ways of achieving same result. In many cases there is no "correct" or "better" way. In other words, there are often many paths to the same results.
1.2.2.3 Start Studio
Open Studio using the following Windows Start menu command:
Start > All Programs > BEA Products > BEA AquaLogic Data Services Platform 3.0 > Data Services Studio
1.2.2.3.1 Select a Workspace
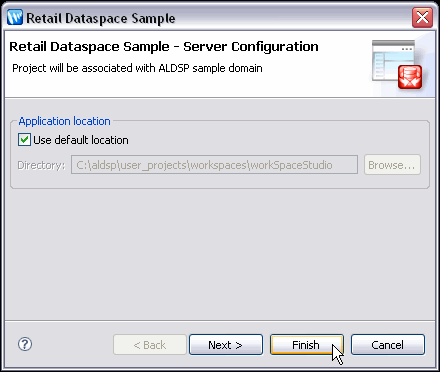
In the Install Sample Applications section click on:
Retail Dataspace Sample
Figure 1-9 Retail Dataspace Server Configuration Dialog
Description of "Figure 1-9 Retail Dataspace Server Configuration Dialog"
-
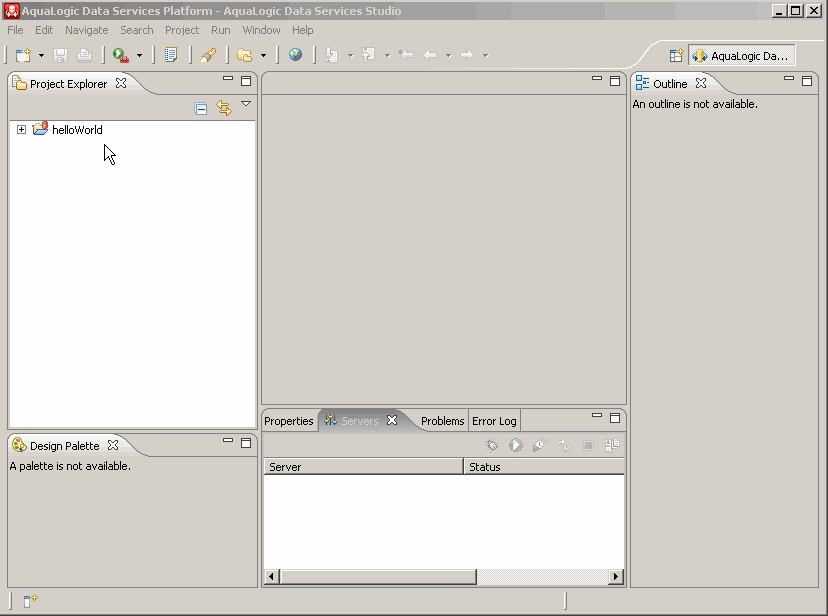
Click Finish. This will import the RetailDataspace project and find or create a server for the OSDI Studio sample domain and associate it with the project.
-
Click Yes if you are asked about associating your project with the OSDI Studio perspective.
Figure 1-10 Initial OSDI Studio Perspective
Description of "Figure 1-10 Initial OSDI Studio Perspective"
1.2.2.4 Start the Server
An OSDI Studio-enabled server is a version of WebLogic Server with additional functionality to support OSDI Studio deployment and runtime. The OSDI Studio server must be running in order to access sample data and to deploy your project.
-
Locate the Servers window. If it isn't visible, use the following option command:
Window > Show View > Servers
-
In the Servers window locate the OSDI Studio Samples Server (this may be the only server listed). Notice that its status is Stopped.
-
Right-click on the server name and select Start. (The start-up operation can take several minutes.) Notice the running log of server startup actions in the Console window.
1.2.2.5 Deploy Your Projects
Each project should be deployed to validate the installation.
-
Right-click on the server.
-
Choose Publish from the menu. A message should appear indicating successful deployment.
-
Click OK.
Also deploy the RetailDataspace project.
1.2.2.6 See Also
-
Install the OSDI Studio Sample Retail Application
-
Retail Dataspace Sample Application Guide
1.3 Example: How to Create Your First Data Services
Creating a data service from scratch — as you will if you follow this tutorial — is a good way to get the feel of working with Eclipse for WebLogic, as well as other aspects of data services. In the process of creating a logical data service you also automatically create several physical data services. Physical data services represent physical data sources.
This tutorial contains the following sections:
-
Section 1.3.5, "Creating, Saving, and Associating the XML Type"
-
Section 1.3.7, "Adding Create-Update-Delete Functions to Your Data Service"
1.3.1 Goal of the Tutorial
The goal of this tutorial is to illustrate an approach to creating a logical data service, including creating an XML Type (schema), using Eclipse for WebLogic. Along the way you will use many of the facilities:
-
Drag-and-drop Query Map
-
Source Editor
-
Test Editor
-
Query Plan
-
Update Map
This example uses data provided with the Retail Dataspace Sample Application (RTLApp).
1.3.1.1 Requirements
The requirement for the demonstration project are to develop a logical data service from several physical data services. When run by a client, the data service will return a consolidated view of a particular customer's orders, as well as all the items in each order.
1.3.1.2 Before You Begin
Before you can begin the tutorial make sure you:
-
Properly install Oracle Data Service Integrator.
Reference:
Oracle Data Service Integrator Installation Guide
-
Configure the Retail Dataspace Sample Application.
-
Configure the Retail Dataspace Sample Application
-
Configure the Retail Dataspace Sample Application for ODSI
-
-
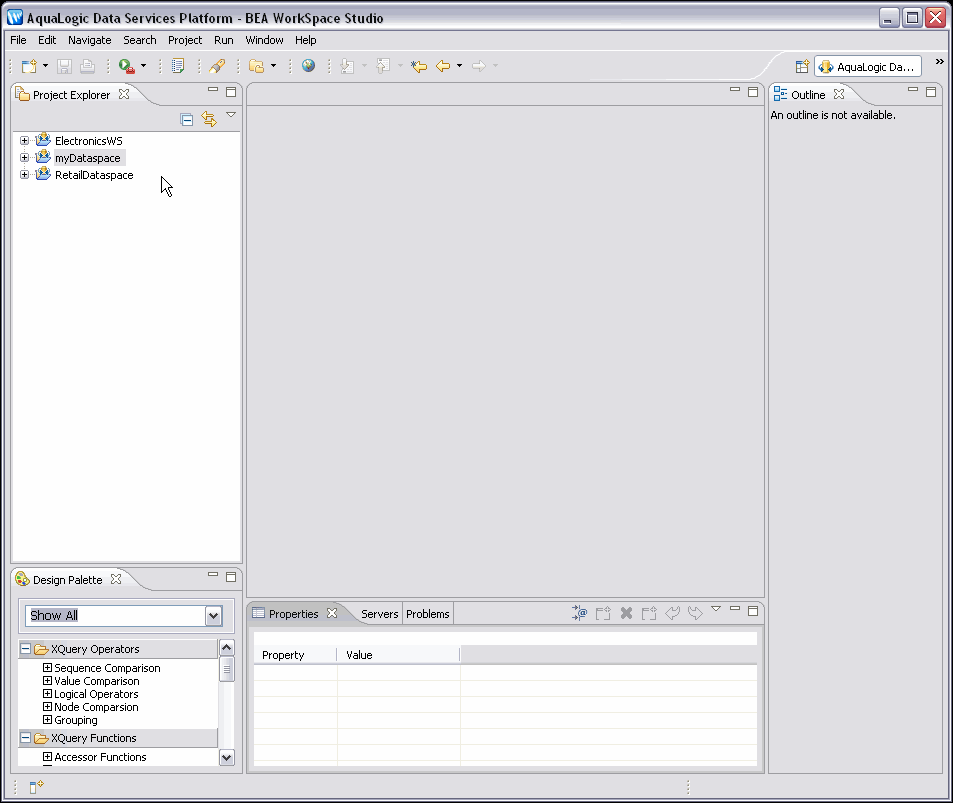
Have the application open in Eclipse for WebLogic and the Oracle Data Service Integrator-enabled Oracle WebLogic 10.3 server running.
Also describe in "Configure the Retail Dataspace Sample Application."
Figure 1-12 Oracle Data Service Integrator Default Perspective After Adding myDataspace
Description of "Figure 1-12 Oracle Data Service Integrator Default Perspective After Adding myDataspace"
Note:
Click on image to view it enlarged in a separate window.
1.3.2 Creating a Dataspace Project
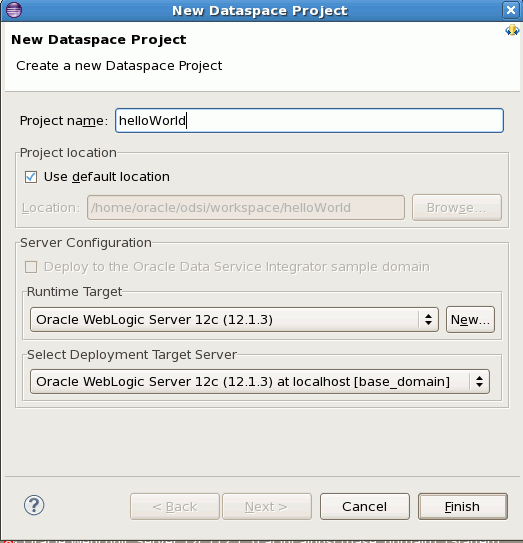
Data services are created within Eclipse for WebLogic as Eclipse projects, called dataspace projects. With the Oracle Data Service Integrator-enabled server running, the first step is to create a new dataspace project.
-
From the menu select:
File > New > Dataspace Project
-
Give your project a name such as:
myDataspace
-
Click the Finish button.
Figure 1-13 Creating a New Dataspace Project
Description of "Figure 1-13 Creating a New Dataspace Project"
1.3.2.1 Set Up a Folder for Physical Data Services
Data services are typically created inside project folders. The recommended first step in creating one or several data services is to create containers (folders).
In this tutorial two folders will be created:
-
One for physical data services.
-
One for logical data services.
-
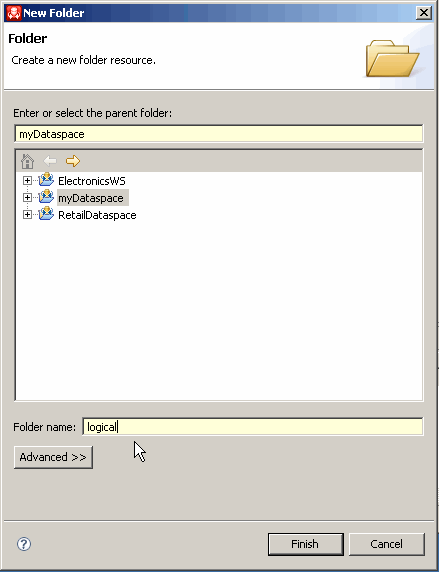
In the Project Explorer window right-click on myDataspace, choose:
New > Folder
-
Name your folder:
logical
-
Click the Finish button.
-
Create another folder under myDataspace named:
physical
-
Click the Finish button.
Physical data services represent physical data such as tables in relational databases or web services. Logical data services are build upon existing physical or logical data services.
-
Right-click on your new physical folder and choose:
New > Physical Data Service
1.3.3 Creating Physical Data Services
Physical data services are based on existing data sources.
Whenever you create physical data services, you must first identify the data source. Available options include:
-
Relational
-
Web Service
-
Java Function
-
Delimited Data
-
XML Data
To take advantage of data provided with the sample application, a relational data source is used.
The sample databases RTLAPPLOMS and RTLCUSTOMER provided with the Retail Sample Application contain five tables. In this section you will create physical data services corresponding to those tables.
Table 1-1 Data Sources and Data Services
| Data Source | Name | Table | Data Service |
|---|---|---|---|
|
RTL Appliance Order Management System |
RTLAPPOMS |
|
|
|
RTL Customer Data |
RTLCUSTOMER |
|
|
1.3.3.1 Select a Data Source
The select a data source dialog initially allows you to select a data source type (such as relational or web service). Once that selection is made, additional options appear. The following table lists the actions required to select the relational data sources that will be used throughout this tutorial.
Format similar to that shown in the table below is used to describes the steps needed to work through multi-page wizards.
Table 1-2 Setting Up Sources for Data Services
| Step | Dialog | Field/Column | Action | Comment |
|---|---|---|---|---|
|
Select Data Source |
Save in: |
Use default (/myDataspace/physical) |
||
|
1. |
Data source type: |
Select Relational |
From dropdown list. |
|
|
2. |
Data source: |
Select dspSamplesDataSource |
||
|
3. |
Click the Next button. |
|||
|
4. |
Select SQL Sources |
Select SQL objects: |
|
Expand (+ symbol to left of data source name) to see tables in the data sources. |
|
5. |
Click the Next button. |
The information retrieved through introspection of relational data sources is represented as the potential creation of the five primary Read operations, as well as their containing data services. |
||
|
6. |
Review New/Updated Data Service Operation(s) |
Public |
Mark all five operations Public by clicking the checkbox in the Public column. |
Public operations are available to any authorized calling application. Note: The Primary option only applies to create, update, and delete functions. |
|
7. |
Select Common XML Type Namespace... button |
Click the button. |
Because you are building up an XML Type for your logical data service from several physical data services that each have an underlying XML type, it is necessary for each type to share a namespace. |
|
|
8. |
XML Type Namespace |
Select XML Type Namespace: |
Enter custOrdersItems. |
|
|
9. |
Click the OK button. |
Notice that the target namespace column now shows the new namespace for your operations. |
||
|
10. |
Review New/Updated Data Service Operation(s) |
Click the Next button. |
||
|
11. |
Review New Data Service(s) |
Click the Finish button. |
It is necessary to modify names when:
|
|
|
12. |
Open Data Service Files |
Option to open each new physical data service in Eclipse for WebLogic |
Select No. |
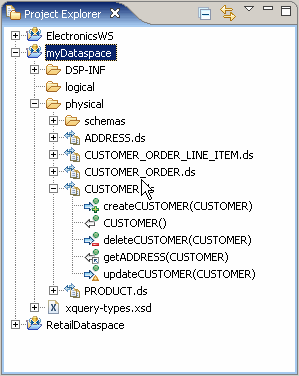
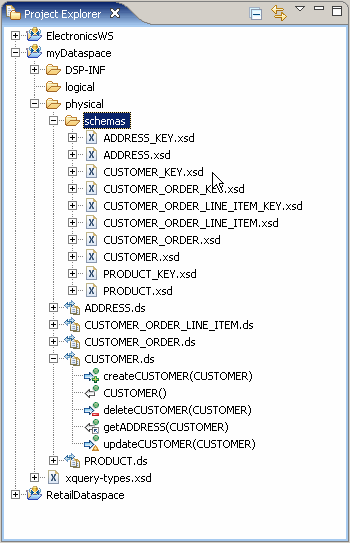
Your new data services appear in your physical folder in the Project Explorer.
If you expand your new data services you will see that each physical data service has been created with functions corresponding to standard relational operations. For example the CUSTOMER.ds data service contains the following operations:
-
createCUSTOMER(CUSTOMER) -
CUSTOMER() -
deleteCUSTOMER(CUSTOMER) -
getADDRESS(CUSTOMER) -
updateCUSTOMER(CUSTOMER)
Some relationship operations (such as getADDRESS(CUSTOMER)) have been created automatically. This operation returns an ADDRESS type when it is passed a CUSTOMER type as a parameter. The operation can be inferred during the data service creation process because ADDRESS contains a foreign key that is a unique custID in the CUSTOMER data service (and underlying source). Relationship functions are described in detail in the Modeling Data Services Relationships section.
1.3.3.2 Schemas Directory
You should find a schemas folder adjacent to the newly created data services. This folders contains schema files created during the metadata import process. For relational sources, schemas are created for both the data source (table or view) and the primary keys found during the introspection of the relational source. For example:
-
CUSTOMER.xsd -
CUSTOMER_KEY.xsd
If you look in the schemas directory you will see that for each physical data service created, two schemas were created. One representing the physical data service and the other to describe the primary keys in the data source.
Figure 1-16 Expanded View of Project Explorer
Description of "Figure 1-16 Expanded View of Project Explorer"
When a logical entity data service is created, it is either:
-
Associated with an existing schema or
-
A return type associated with a function becomes the basis of a generated XML type that is then associated with the data service.
1.3.3.3 Publish Your Projects
Using Eclipse for WebLogic, you can publish your dataspace projects to a server when it is ready for testing and debugging. Publishing is also useful during the project development phase because in its default configuration, when you publish a project in Eclipse for WebLogic, it is automatically built and validated. The validation process identifies error conditions, if any.
Note:
When publishing a project to a server, the project is validated and only valid projects are successfully published.
A dialog displays the progress and, upon successful completion, the status of the server changes to Synchronized.
1.3.4 Creating a Logical Data Service
This section describes the following topics:
A logical data service can be thought of as a "virtual" data source. Logical data services are built upon existing physical or logical data services.
Note:
The Oracle Data Service Integrator Retail Sample Application is a good source for best practices associated with creating layered data services.
To create a logical data service:
-
Right-click on the folder named logical that you previously created.
New > Logical Data Service
-
Set the data service name to:
CUST_ORDERS_ITEMS
-
Click Finish.
After making these selections, your new entity data service appears in Overview mode.
Since no functions have yet been added to your data service, the work area of the data service is empty.
Options available for creating and testing your new data service appear at the bottom of the workspace. In addition to Overview, you will see the following tabs:
-
Query Map
-
Update Map
-
Plan
-
Test
-
Source
1.3.4.1 Attempt To Publish Your Dataspace Project
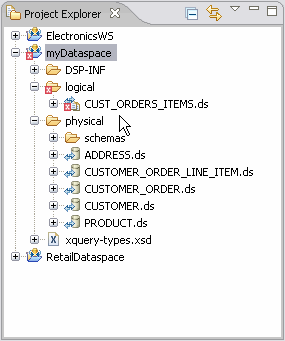
There are times when attempts to publish your data service under development will not be successful. This is expected since as you create your query in the Query Map, source is created simultaneously. (When a data service is in such a state, you will notice a red x on its associated icon in Project Explorer.)
Figure 1-17 Project After Unsuccessful Publish Effort
Description of "Figure 1-17 Project After Unsuccessful Publish Effort"
Unlike the previously successful publish operation, you will now get a message indicating that your project contains build errors and cannot be published.
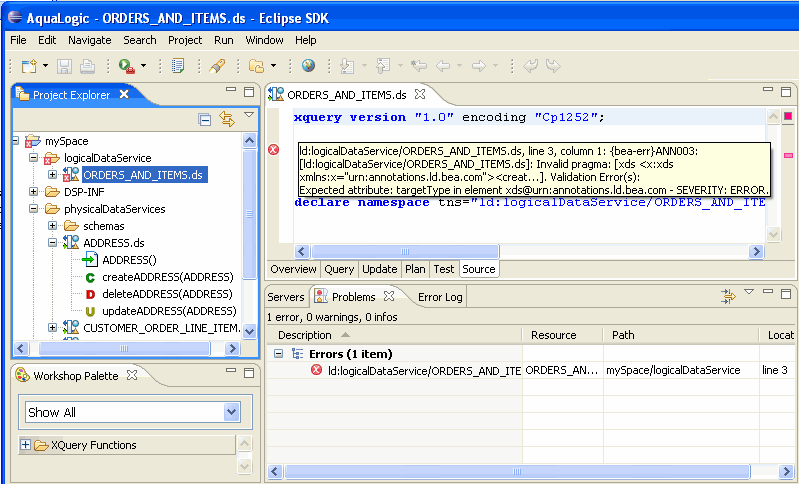
In this case your newly created CUST_ORDERS_ITEMS data service is invalid. You can verify this several ways after clicking OK.
-
Inspect your code by clicking on the Source tab.
-
Double-click on the error reported in the Problems window.
-
Inspect the contents of the Error log window.
Figure 1-18 Incomplete Logical Data Service Validation Error
Description of "Figure 1-18 Incomplete Logical Data Service Validation Error"
Although an error condition exists, you can continue creating on your data service.
1.3.4.2 Bottom Up or Top Down
Data services can be designed from the top-down or bottom-up. The following table compares these two approaches.
Table 1-3 Data Service Design Models
| Data Service Design Model | Description |
|---|---|
|
Top-down |
The new data service is based on an existing XML Type (schema) that is either drawn from an existing data service or developed externally. |
|
Bottom-up |
The new data service is created by:
|
This tutorial uses a bottom-up design.
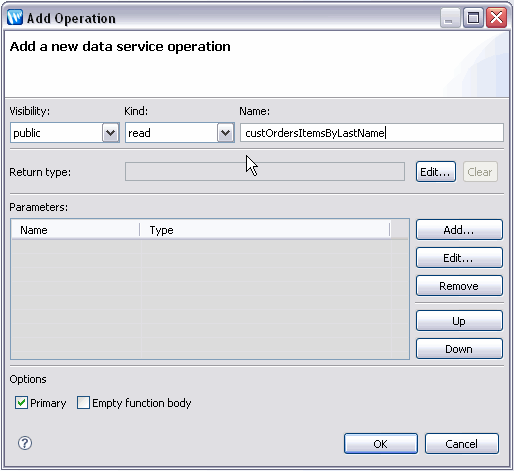
1.3.4.3 Add an Operation to CUST_ORDERS_ITEMS
The next step is to add a read function to your new data service that will return a document containing all the orders placed by a particular customer, and all the items in each order.
To add your new function:
-
Select the Overview tab.
-
Right-click in the CUST_ORDERS_ITEMS data service's work area.
-
Choose Add Operation... from available options.
The next steps will create a publicly available Read function for your new data service.
Table 1-4 Add Operation Dialog Options
| Step | Option | Action | Comment/Reference |
|---|---|---|---|
|
Visibility |
Options are private (internal to data service), protected (from public), and public. Default setting is public. |
||
|
Kind |
All operations are functions other than library procedures. The Read function simply retrieves information from your data source. Default operation is read. |
||
|
1. |
Name |
custOrdersItemsByLastName |
Any valid XML name can be entered; spaces are not allowed. |
|
Return Type: |
Bottom-up designs of a data service create the Return type in the Query Map. |
||
|
Parameters: |
Can be added here or in the Query Map. Leave unselected. |
||
|
Options: Primary |
Defines function as the Primary Read function in the entity data service. Default is selected. |
||
|
Options: Empty Function Body |
Default is not selected. |
||
|
2. |
Click OK. |
Every artifact and artifact element in Overview has properties. In some cases these properties — such as name and type — are either directly editable or adjustable through dropdown list boxes. The Properties window is, by default, visible in the Eclipse for WebLogic perspective. If the Properties window is not visible you can retrieve it using the command:
Window > Reset Perspective
Figure 1-21 New Data Service Operation and Properties
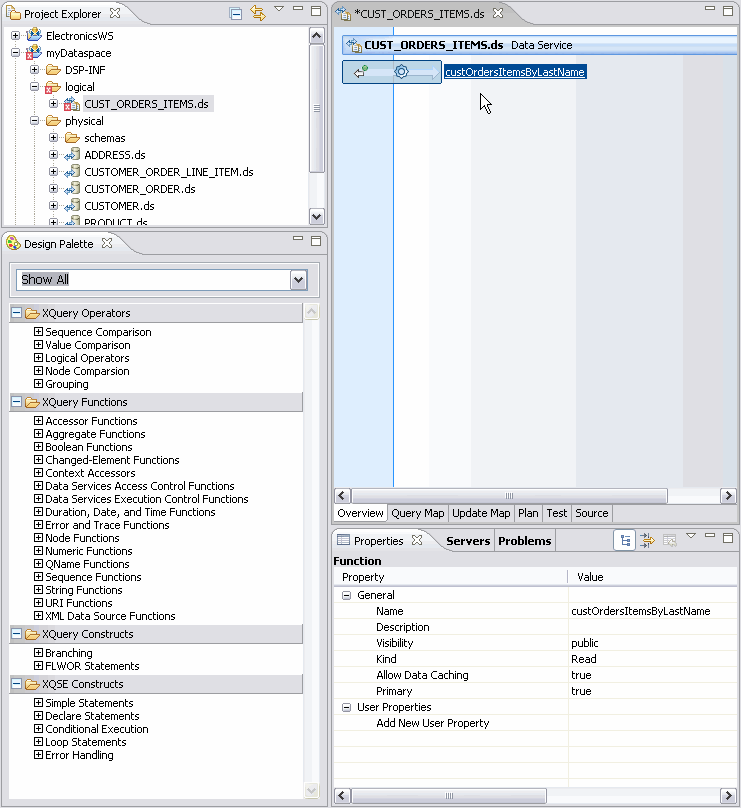
Description of "Figure 1-21 New Data Service Operation and Properties"
1.3.4.4 Building Your Query
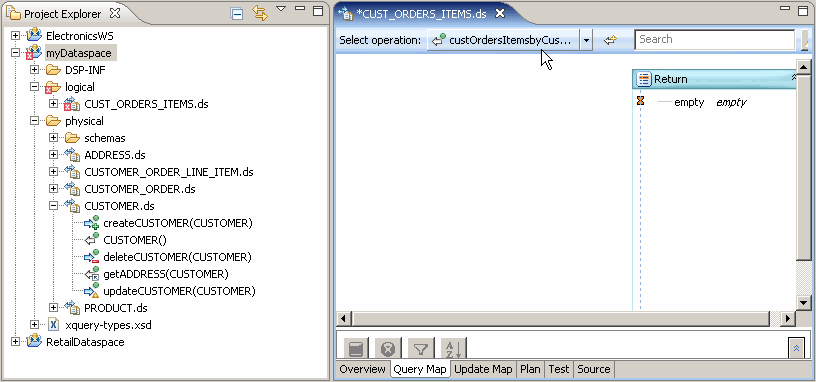
Click on the custOrdersItemsByLastName function name in the work area to enter Query Map mode
Changes made in the Query Map editor are immediately reflected in source and vice-versa. When there is an error is source, the Query map may not be available. You can typically correct such a condition using the Undo menu option or Ctrl-Z. Alternatively, click the Source tab and edit as needed.
1.3.4.5 Building Your FLWR Statement Graphically
XQueries are often described as being build upon "FLWR" statements:
-
For/Let
-
Where
-
Return
Changes made in source are immediately rendered graphically in the query map.
1.3.4.5.1 Adding Data Sources to Query View - the For/Let Statements
It is through the Query Map that you can bring together representations of existing data sources and associate their elements with the Return type of a new data service.
In the current example your new data service is to provide a consolidated view drawn from the CUSTOMER, CUSTOMER_ORDER, and CUSTOMER_ORDER_LINE_ITEM data services. The Read functions from these physical data services therefore need to be represented in the work area of the new data service.
Follow these steps to add these representations to your Query map:
-
In the physical folder expand the following data services:
-
CUSTOMER.ds -
CUSTOMER_ORDER.ds -
CUSTOMER_ORDER_LINE_ITEM.ds
-
-
Drag and drop the Read operations of the following data services CUSTOMER, CUSTOMER_ORDER, and CUSTOMER_ORDER_LINE_ITEM into the query work area. Read operations are identified by the a white-arrow-with-green-ball icon as shown below.
Each of these operational building blocks will become for statements in the XQuery description of your new data service.
Figure 1-24 Data Source Representations in Work Area
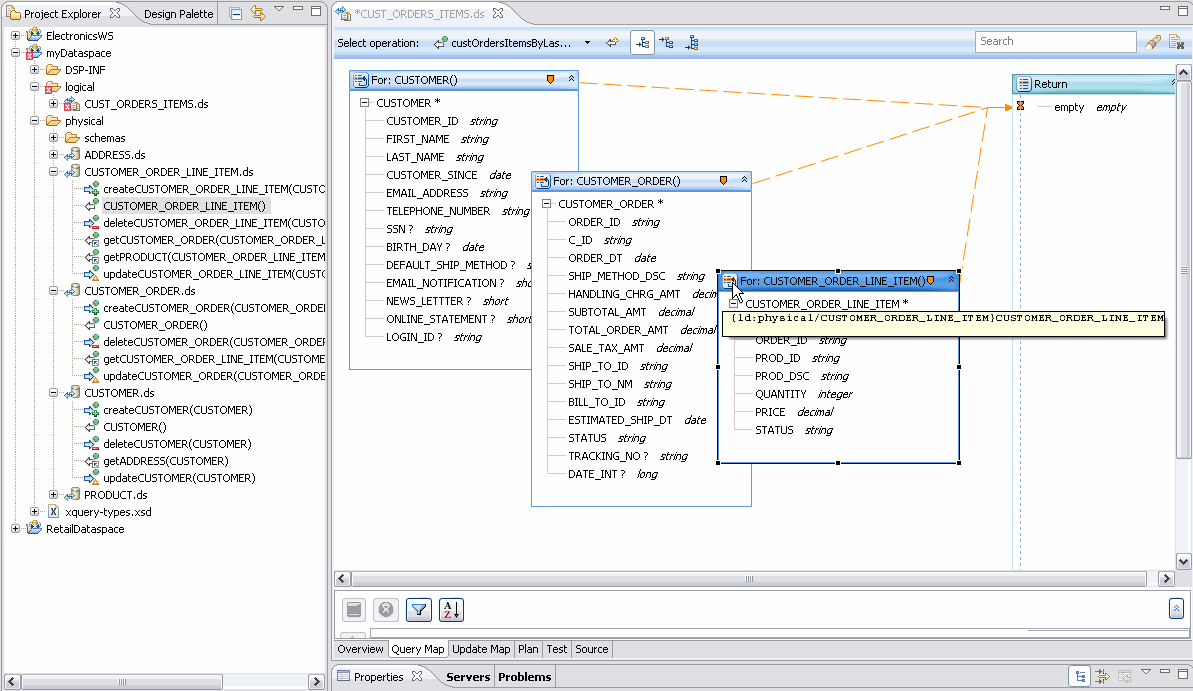
Description of "Figure 1-24 Data Source Representations in Work Area"
1.3.4.6 Add a Parameter
Parameters can be added when your operation is created or in the Query Map. Parameters can be of simple (primitive) type or complex, such as the XMLtype from another data service.
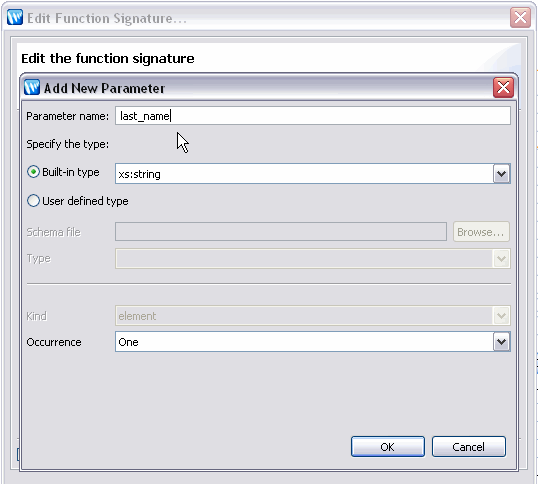
In this case you create a single xs:string parameter that will allow retrieval of one or more records by a customer's last name.
To add a parameter:
-
In the Query Map work area right-click in a blank area and select:
Edit Signature...
-
If asked to save modified resources click OK.
-
If asked to save modified resources click
-
Complete the Edit Function Signature... dialog.
Table 1-5 Edit Function Signature Dialog Options
| Step | Field | Action | Comment/Reference |
|---|---|---|---|
|
1. |
Parameter name |
last_name |
|
|
Parameter type |
xs:string is the default primitive type. |
||
|
Occurrence |
Default is One. |
||
|
2. |
Click OK |
||
|
3. |
Click OK |
In the Edit Function Signatures dialog. |
The last_name parameter appears in the work area.
Example 1-1 Partial Source of CUST_ORDERS_ITEMS After Addition of Read Functions and last_name Parameter
xquery version "1.0" encoding "UTF-8";

(:: pragma ... ::)

declare namespace cus2= "ld:physical/CUSTOMER";
declare namespace cus1= "ld:physical/CUSTOMER_ORDER";
declare namespace ust= "custOrdersItems";
declare namespace cus= "ld:physical/CUSTOMER_ORDER_LINE_ITEM";
declare namespace tns="ld:logical/CUST_ORDERS_ITEMS";

(:: pragma ... ::)

declare function tns:custOrdersItemsByLastName(){
for $CUSTOMER in cus:CUSTOMER()
for $CUSTOMER_ORDER in cus1:CUSTOMER_ORDER()
for $CUSTOMER_ORDER_LINE_ITEM in cus2:CUSTOMER_ORDER_LINE_ITEM()
return
    ()
};
1.3.4.7 Map Elements to the Return Type
Three icons associated with projecting elements to the Return type appear above the Query Map work area. (You may need to widen your window to see all three icons.)
| Icon | Mapping Mode | Keyboard Equivalent | Description |
|---|---|---|---|
|
Value |
None |
Maps simple or complex elements to identical values in the Return type. For example, a simple element can be projected to a comparable simple element in the Return type. |
|
|
Overwrite |
Ctrl-Drag object |
Overwrites simple or complex element in the Return type with the selected simple or complex element. |
|
|
|
Append |
Ctrl-Shift-Drag object |
Maps simple or complex object as a child to the Return type element it is associated with. |
You will use these options to map representations of source data to the Return type of your new data service.
1.3.4.8 Populating the Return Clause
From the three mapping icons in the Select operation line at the top of the query map, select the second of the three icons, Overwrite mapping:
Drag the CUSTOMER complex element
CUSTOMER*
over the global element placeholder labeled "empty" in the Return type.
Figure 1-26 Mapping Complex Element to Return Type
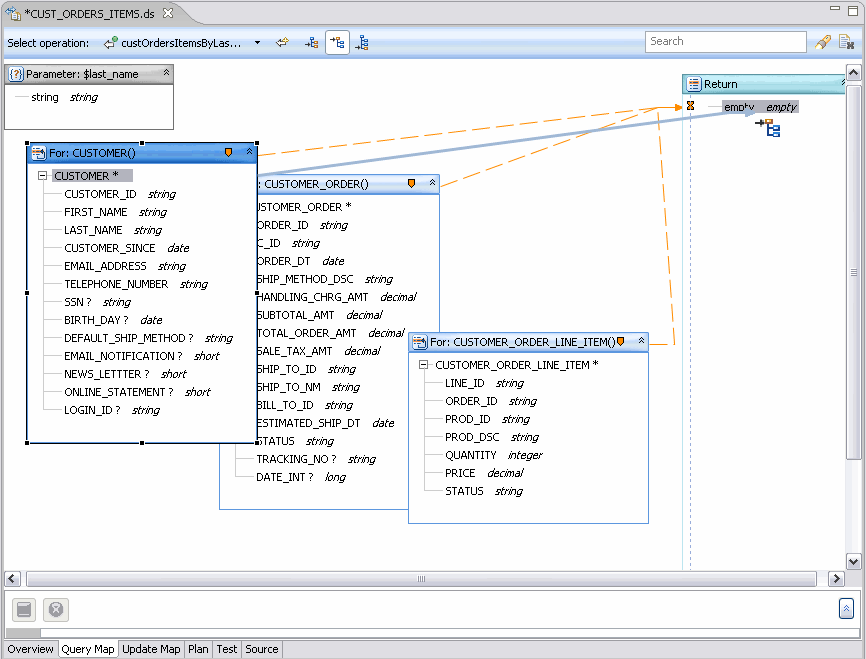
Description of "Figure 1-26 Mapping Complex Element to Return Type"
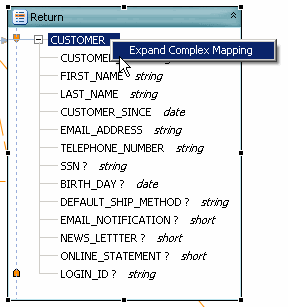
Right-click on the new CUSTOMER element in the Return type and select:
Expand Complex Mapping
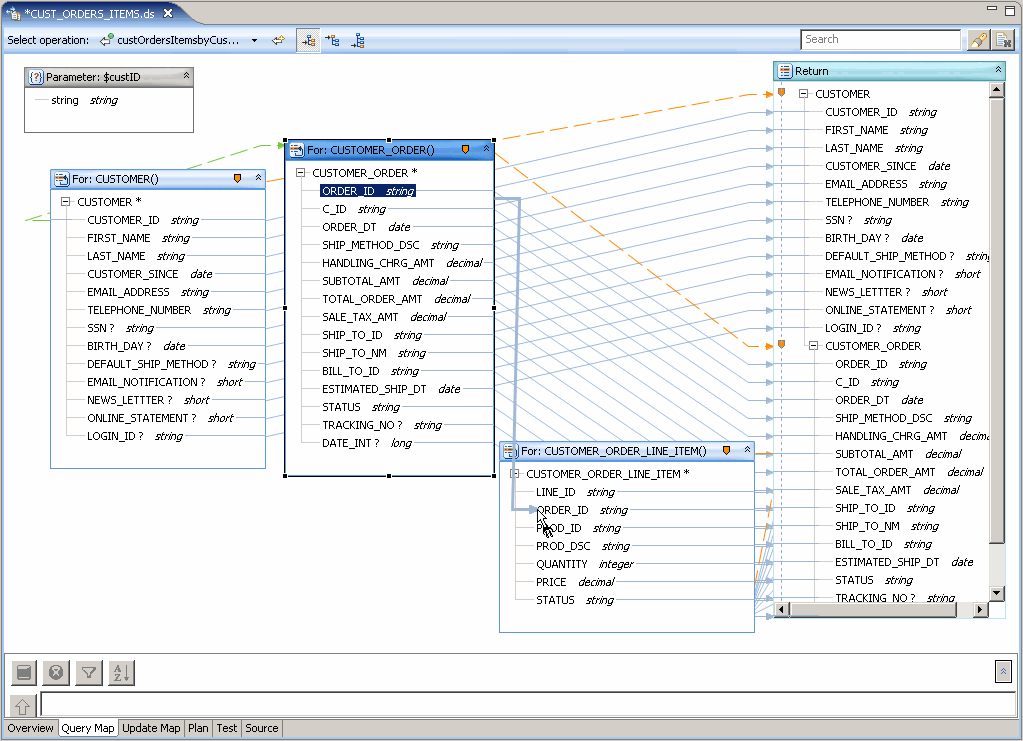
This gesture is a shortcut for drawing lines from each element for the statement into the Return type. This gesture is also necessary if you want to add a complex child element to the type. Notice that individual mapping lines now connect each element in the For: node with an element in the Return type. Individual mappings can be added or deleted using drag-and-drop or the Delete key, respectively. The next steps will add elements from the CUSTOMER_ORDER data service to your Return type.
-
Select Append Mapping mode.
-
Drag the CUSTOMER_ORDER complex element CUSTOMER_ORDER* over the CUSTOMER element in the Return type. Notice that the CUSTOMER_ORDER global element and the names of its children now appear after the CUSTOMER elements.
-
Expand complex mapping for the CUSTOMER_ORDER global element.
-
From the work area drag the CUSTOMER_ORDER_LINE_ITEM complex element over the CUSTOMER_ORDER element in the Return type.
-
Expand complex mapping for these elements.
Figure 1-28 Adding Child Elements to Return Type
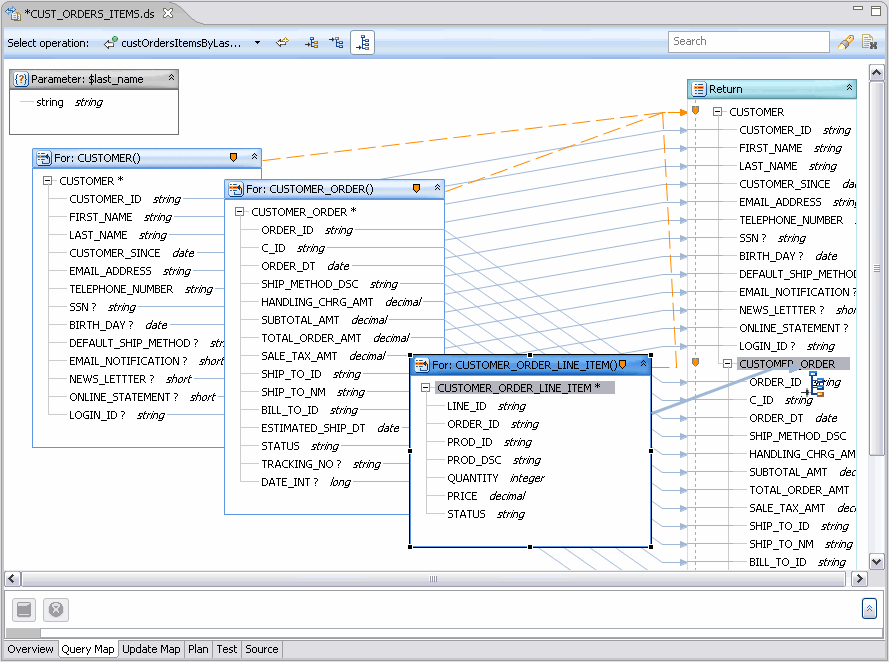
Description of "Figure 1-28 Adding Child Elements to Return Type"
1.3.4.9 Set Statement Scoping
Click the Source tab to inspect your generated code. Notice that the Return type contains all three For: statements.
Example 1-2 Function cust_orders_items_byLastName(string) in Source View
declare function tns:custOrdersItemsByLastName($last_name as xs:string) {
for $CUSTOMER in cus:CUSTOMER()
for $CUSTOMER_ORDER in cus1:CUSTOMER_ORDER()
for $CUSTOMER_ORDER_LINE_ITEM in cus2:CUSTOMER_ORDER_LINE_ITEM()
return
    <ust:CUSTOMER>
        <CUSTOMER_ID>{fn:data($CUSTOMER/CUSTOMER_ID)}</CUSTOMER_ID>
        <FIRST_NAME>{fn:data($CUSTOMER/FIRST_NAME)}</FIRST_NAME>
        <LAST_NAME>{fn:data($CUSTOMER/LAST_NAME)}</LAST_NAME>
        <CUSTOMER_SINCE>{fn:data($CUSTOMER/CUSTOMER_SINCE)}</CUSTOMER_SINCE>
        <EMAIL_ADDRESS>{fn:data($CUSTOMER/EMAIL_ADDRESS)}</EMAIL_ADDRESS>
        <TELEPHONE_NUMBER>{fn:data($CUSTOMER/TELEPHONE_NUMBER)}</TELEPHONE_NUMBER>
        <SSN?>{fn:data($CUSTOMER/SSN)}</SSN>
        <BIRTH_DAY?>{fn:data($CUSTOMER/BIRTH_DAY)}</BIRTH_DAY>
        <DEFAULT_SHIP_METHOD?>{fn:data($CUSTOMER/DEFAULT_SHIP_METHOD)}</DEFAULT_SHIP_METHOD>
        <EMAIL_NOTIFICATION?>{fn:data($CUSTOMER/EMAIL_NOTIFICATION)}</EMAIL_NOTIFICATION>
        <NEWS_LETTTER?>{fn:data($CUSTOMER/NEWS_LETTTER)}</NEWS_LETTTER>
        <ONLINE_STATEMENT?>{fn:data($CUSTOMER/ONLINE_STATEMENT)}</ONLINE_STATEMENT>
        <LOGIN_ID?>{fn:data($CUSTOMER/LOGIN_ID)}</LOGIN_ID>
        {
                <ust:CUSTOMER_ORDER>
                    <ORDER_ID>{fn:data($CUSTOMER_ORDER/ORDER_ID)}</ORDER_ID>
                    <C_ID>{fn:data($CUSTOMER_ORDER/C_ID)}</C_ID>
                    <ORDER_DT>{fn:data($CUSTOMER_ORDER/ORDER_DT)}</ORDER_DT>
                    <SHIP_METHOD_DSC>{fn:data($CUSTOMER_ORDER/SHIP_METHOD_DSC)}</SHIP_METHOD_DSC>
                    <HANDLING_CHRG_AMT>{fn:data($CUSTOMER_ORDER/HANDLING_CHRG_AMT)}
                         </HANDLING_CHRG_AMT>
                    <SUBTOTAL_AMT>{fn:data($CUSTOMER_ORDER/SUBTOTAL_AMT)}</SUBTOTAL_AMT>
                    <TOTAL_ORDER_AMT>{fn:data($CUSTOMER_ORDER/TOTAL_ORDER_AMT)}</TOTAL_ORDER_AMT>
                    <SALE_TAX_AMT>{fn:data($CUSTOMER_ORDER/SALE_TAX_AMT)}</SALE_TAX_AMT>
                    <SHIP_TO_ID>{fn:data($CUSTOMER_ORDER/SHIP_TO_ID)}</SHIP_TO_ID>
                    <SHIP_TO_NM>{fn:data($CUSTOMER_ORDER/SHIP_TO_NM)}</SHIP_TO_NM>
                    <BILL_TO_ID>{fn:data($CUSTOMER_ORDER/BILL_TO_ID)}</BILL_TO_ID>
                    <ESTIMATED_SHIP_DT>{fn:data($CUSTOMER_ORDER/ESTIMATED_SHIP_DT)}
                         </ESTIMATED_SHIP_DT>
                    <STATUS>{fn:data($CUSTOMER_ORDER/STATUS)}</STATUS>
                    <TRACKING_NO?>{fn:data($CUSTOMER_ORDER/TRACKING_NO)}</TRACKING_NO>
                    <DATE_INT?>{fn:data($CUSTOMER_ORDER/DATE_INT)}</DATE_INT>
                    {
                            <ust:CUSTOMER_ORDER_LINE_ITEM>
                                <LINE_ID>{fn:data($CUSTOMER_ORDER_LINE_ITEM/LINE_ID)}</LINE_ID>
                                <ORDER_ID>{fn:data($CUSTOMER_ORDER_LINE_ITEM/ORDER_ID)}</ORDER_ID>
                                <PROD_ID>{fn:data($CUSTOMER_ORDER_LINE_ITEM/PROD_ID)}</PROD_ID>
                                <PROD_DSC>{fn:data($CUSTOMER_ORDER_LINE_ITEM/PROD_DSC)}</PROD_DSC>
                                <QUANTITY>{fn:data($CUSTOMER_ORDER_LINE_ITEM/QUANTITY)}</QUANTITY>
                                <PRICE>{fn:data($CUSTOMER_ORDER_LINE_ITEM/PRICE)}</PRICE>
                                <STATUS>{fn:data($CUSTOMER_ORDER_LINE_ITEM/STATUS)}</STATUS>
                            </ust:CUSTOMER_ORDER_LINE_ITEM>
                    }
                </ust:CUSTOMER_ORDER>
        }
    </ust:CUSTOMER>
};
Note:
The current query is — in relational terminology — a cross-product or a Cartesian join. Such queries when run are very CPU intensive. In the case of this example, scoping and joining should occur before the query is run.
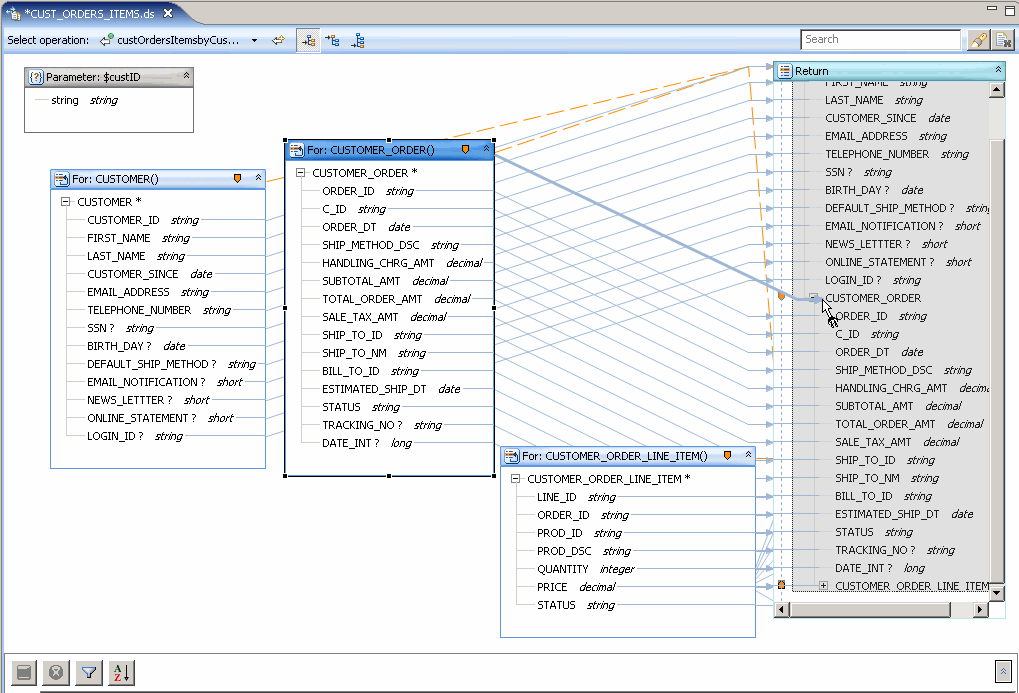
Using the Query Map you can adjust this quite easily by changing the scoping of the subordinate data services in the Return type, as shown in the following steps.
Figure 1-29 Adjusting Scoping Rules in the Return Type
Description of "Figure 1-29 Adjusting Scoping Rules in the Return Type"
-
Return to Query Map mode.
-
With your mouse select the zone icon in the node:
For: $CUSTOMER_ORDER()
-
Drag the zone icon over the corresponding CUSTOMER_ORDER element in the Return type.
Notice that the zone line from the CUSTOMER_ORDER node moves to the subordinate complex type (CUSTOMER_ORDER).
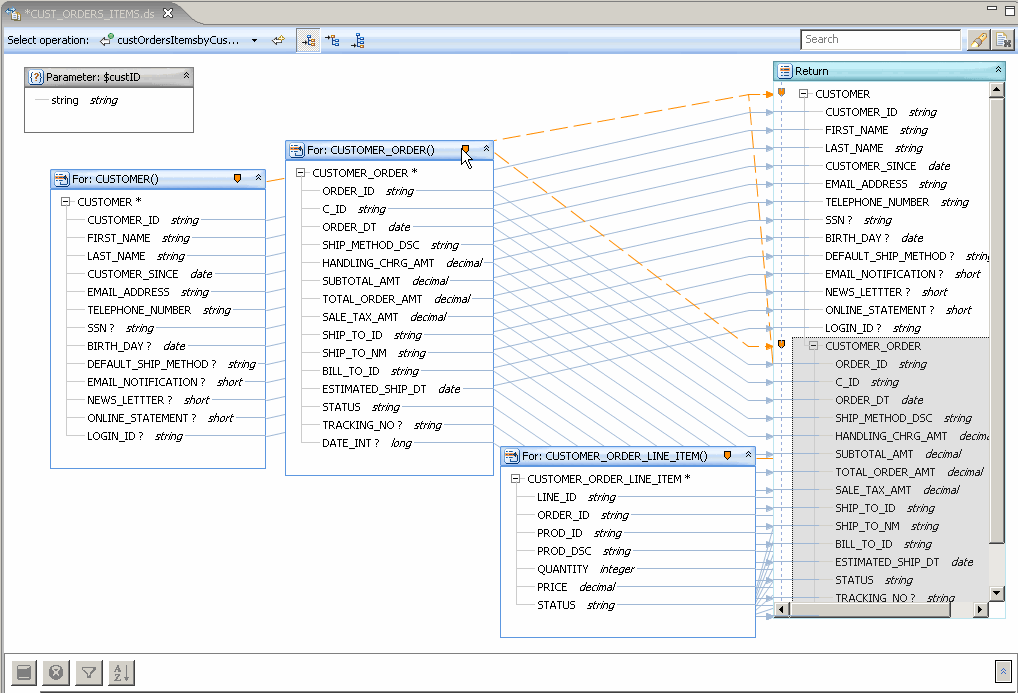
-
Drag the zone icon of CUSTOMER_ORDER_LINE_ITEM to its corresponding element in the Return type.
Figure 1-30 Nested Zoning in the Return Type
Description of "Figure 1-30 Nested Zoning in the Return Type"
Switch to Source view to verify that the for statements are nested in the Return clause. Now, when a parameter is passed with the operation, all the customers with a particular last name will be returned which contains orders and order line items associated with that customer.
Example 1-3 Source View of Return Type with Nested Return Types
declare function tns:custOrdersItemsByLastName($last_name as xs:string) {
for $CUSTOMER in cus:CUSTOMER()

return
    <ust:CUSTOMER>
        <CUSTOMER_ID>{fn:data($CUSTOMER/CUSTOMER_ID)}</CUSTOMER_ID>
        <FIRST_NAME>{fn:data($CUSTOMER/FIRST_NAME)}</FIRST_NAME>
        <LAST_NAME>{fn:data($CUSTOMER/LAST_NAME)}</LAST_NAME>
        <CUSTOMER_SINCE>{fn:data($CUSTOMER/CUSTOMER_SINCE)}</CUSTOMER_SINCE>
        <EMAIL_ADDRESS>{fn:data($CUSTOMER/EMAIL_ADDRESS)}</EMAIL_ADDRESS>
        <TELEPHONE_NUMBER>{fn:data($CUSTOMER/TELEPHONE_NUMBER)}</TELEPHONE_NUMBER>
        <SSN?>{fn:data($CUSTOMER/SSN)}</SSN>
        <BIRTH_DAY?>{fn:data($CUSTOMER/BIRTH_DAY)}</BIRTH_DAY>
        <DEFAULT_SHIP_METHOD?>{fn:data($CUSTOMER/DEFAULT_SHIP_METHOD)}</DEFAULT_SHIP_METHOD>
        <EMAIL_NOTIFICATION?>{fn:data($CUSTOMER/EMAIL_NOTIFICATION)}</EMAIL_NOTIFICATION>
        <NEWS_LETTTER?>{fn:data($CUSTOMER/NEWS_LETTTER)}</NEWS_LETTTER>
        <ONLINE_STATEMENT?>{fn:data($CUSTOMER/ONLINE_STATEMENT)}</ONLINE_STATEMENT>
        <LOGIN_ID?>{fn:data($CUSTOMER/LOGIN_ID)}</LOGIN_ID>
        {
                for $CUSTOMER_ORDER in cus1:CUSTOMER_ORDER()
                return
                <ust:CUSTOMER_ORDER>
                    <ORDER_ID>{fn:data($CUSTOMER_ORDER/ORDER_ID)}</ORDER_ID>
                    <C_ID>{fn:data($CUSTOMER_ORDER/C_ID)}</C_ID>
                    <ORDER_DT>{fn:data($CUSTOMER_ORDER/ORDER_DT)}</ORDER_DT>
                    <SHIP_METHOD_DSC>{fn:data($CUSTOMER_ORDER/SHIP_METHOD_DSC)}</SHIP_METHOD_DSC>
                    <HANDLING_CHRG_AMT>{fn:data($CUSTOMER_ORDER/HANDLING_CHRG_AMT)}
                         </HANDLING_CHRG_AMT>
                    <SUBTOTAL_AMT>{fn:data($CUSTOMER_ORDER/SUBTOTAL_AMT)}</SUBTOTAL_AMT>
                    <TOTAL_ORDER_AMT>{fn:data($CUSTOMER_ORDER/TOTAL_ORDER_AMT)}</TOTAL_ORDER_AMT>
                    <SALE_TAX_AMT>{fn:data($CUSTOMER_ORDER/SALE_TAX_AMT)}</SALE_TAX_AMT>
                    <SHIP_TO_ID>{fn:data($CUSTOMER_ORDER/SHIP_TO_ID)}</SHIP_TO_ID>
                    <SHIP_TO_NM>{fn:data($CUSTOMER_ORDER/SHIP_TO_NM)}</SHIP_TO_NM>
                    <BILL_TO_ID>{fn:data($CUSTOMER_ORDER/BILL_TO_ID)}</BILL_TO_ID>
                    <ESTIMATED_SHIP_DT>{fn:data($CUSTOMER_ORDER/ESTIMATED_SHIP_DT)}
                         </ESTIMATED_SHIP_DT>
                    <STATUS>{fn:data($CUSTOMER_ORDER/STATUS)}</STATUS>
                    <TRACKING_NO?>{fn:data($CUSTOMER_ORDER/TRACKING_NO)}</TRACKING_NO>
                    <DATE_INT?>{fn:data($CUSTOMER_ORDER/DATE_INT)}</DATE_INT>
                    {
                           for $CUSTOMER_ORDER_LINE_ITEM in cus2:CUSTOMER_ORDER_LINE_ITEM()
                           return
                           <ust:CUSTOMER_ORDER_LINE_ITEM>
                                <LINE_ID>{fn:data($CUSTOMER_ORDER_LINE_ITEM/LINE_ID)}</LINE_ID>
                                <ORDER_ID>{fn:data($CUSTOMER_ORDER_LINE_ITEM/ORDER_ID)}</ORDER_ID>
                                <PROD_ID>{fn:data($CUSTOMER_ORDER_LINE_ITEM/PROD_ID)}</PROD_ID>
                                <PROD_DSC>{fn:data($CUSTOMER_ORDER_LINE_ITEM/PROD_DSC)}</PROD_DSC>
                                <QUANTITY>{fn:data($CUSTOMER_ORDER_LINE_ITEM/QUANTITY)}</QUANTITY>
                                <PRICE>{fn:data($CUSTOMER_ORDER_LINE_ITEM/PRICE)}</PRICE>
                                <STATUS>{fn:data($CUSTOMER_ORDER_LINE_ITEM/STATUS)}</STATUS>
                            </ust:CUSTOMER_ORDER_LINE_ITEM>
                    }
                </ust:CUSTOMER_ORDER>
        }
    </ust:CUSTOMER>

};
1.3.4.10 Creating Joins - the Where Clauses
Where clauses satisfy either specific conditions (such as where $i=5) or join conditions such as:
where $CUSTOMER_ORDER/ORDER_ID eq $CUSTOMER_ORDER_LINE_ITEM/ORDER_ID
-
Return to Query Map mode.
-
To establish join conditions among your data sources, drag the specified element in one
For:statement to the specified element in the targetForstatement:Source and element Target and element $CUSTOMER/CUSTOMER_ID
$CUSTOMER_ORDER/C_ID
$CUSTOMER_ORDER/ORDER_ID
$CUSTOMER_ORDER_LINE_ITEM/ORDER_ID
Note:
You may need to move the For: nodes around in the work area to expose the elements.
You can verify your first join clause by clicking on target (CUSTOMER_ORDER) object. Alternatively, you can look in Source view to verify that the new where clause is modifying the CUSTOMER_ORDER_LINE_ITEM type.
1.3.4.11 Associate a Parameter with a For Node
An additional necessity where the condition that directs the query results to a particular customer can be created by adding a parameter to an element in a node. Parameters can be simple or complex.
This project requires use of a single parameter: last_name.
In the Query Map drag the element:
string string
in the $last_name parameter over the LAST_NAME element in the CUSTOMER node.
Figure 1-32 Mapped Parameter and Where Clause
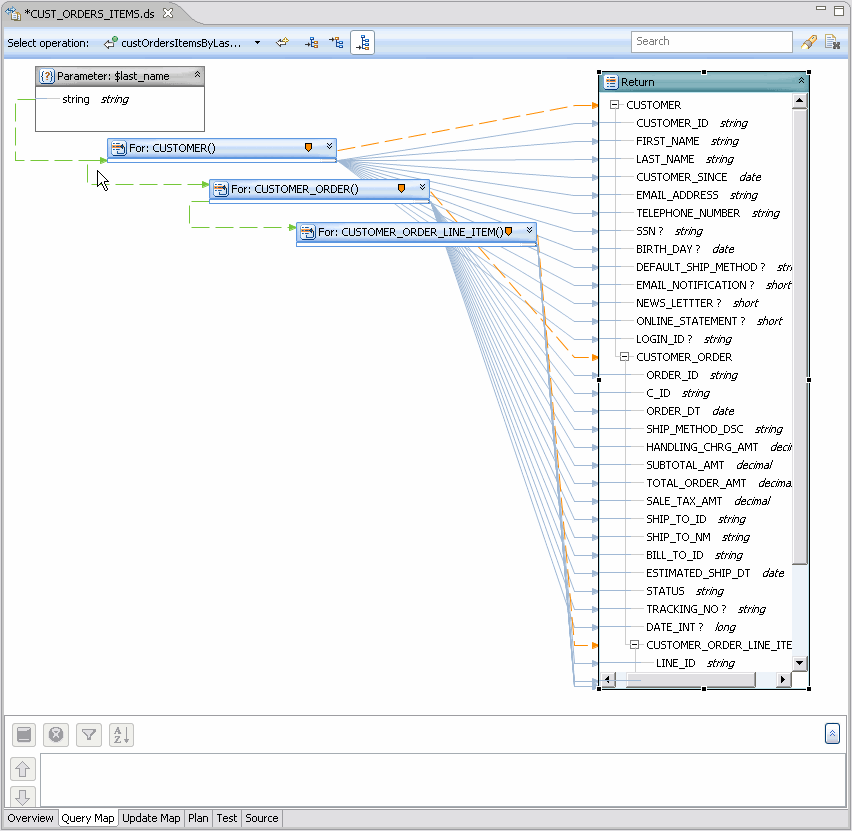
Description of "Figure 1-32 Mapped Parameter and Where Clause"
The results of this operation can also be viewed in the Source tab.
declare function tns:custOrdersItemsByLastName($last_name as xs:string) /
as element(ust1:CUST_ORDERS_ITEMS)* {
for $CUSTOMER in cus:CUSTOMER() where $last_name eq $CUSTOMER/LAST_NAME
return...
In Source you will also notice that the for statements now contain where clauses based on your graphical gestures.
for $CUSTOMER in cus:CUSTOMER()
where $last_name eq $CUSTOMER/LAST_NAME
return
...
for $CUSTOMER_ORDER in cus1:CUSTOMER_ORDER()
where $CUSTOMER/CUSTOMER_ID eq $CUSTOMER_ORDER/C_ID
return
...
for $CUSTOMER_ORDER_LINE_ITEM in cus2:CUSTOMER_ORDER_LINE_ITEM()
where $CUSTOMER_ORDER/ORDER_ID eq $CUSTOMER_ORDER_LINE_ITEM/ORDER_ID
return
...
1.3.5 Creating, Saving, and Associating the XML Type
Since this entity data service is being created "bottom up", it is not yet associated with an XML Type (schema).
Now that you have a Return type, however, you create a valid XML Type by saving your Return type and associating it with a namespace that is unique to the project.
-
Go to Query Map.
-
Right-click on the Return type's title bar.
-
Select Save and Associate XML type.
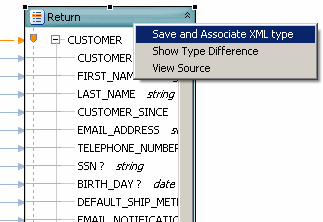
Description of the illustration saveand.gif
-
When asked if you want to save modified resources, choose OK.
-
In the Save and Associate XML Type dialog you will notice that the current name and namespace setting of the Return type conflicts with that of an existing type in the
CUSTOMER.xsdfile. Change the Name of the Return type global element from:CUSTOMER
to:
CUST_ORDERS_ITEMS
-
Leave the Update references option selected. (This option — which is by default selected — means that XML Type references in source will be updated to reflect the changes you are making.)
-
Click Preview. This mode shows what changes will be performed by the name change (refactoring) operation. In this case a new schema file will be created and the target type will be renamed to CUST_ORDERS_ITEMS.
-
Click OK.
-
Notice that the target type (root element) in your Return type has been renamed.
-
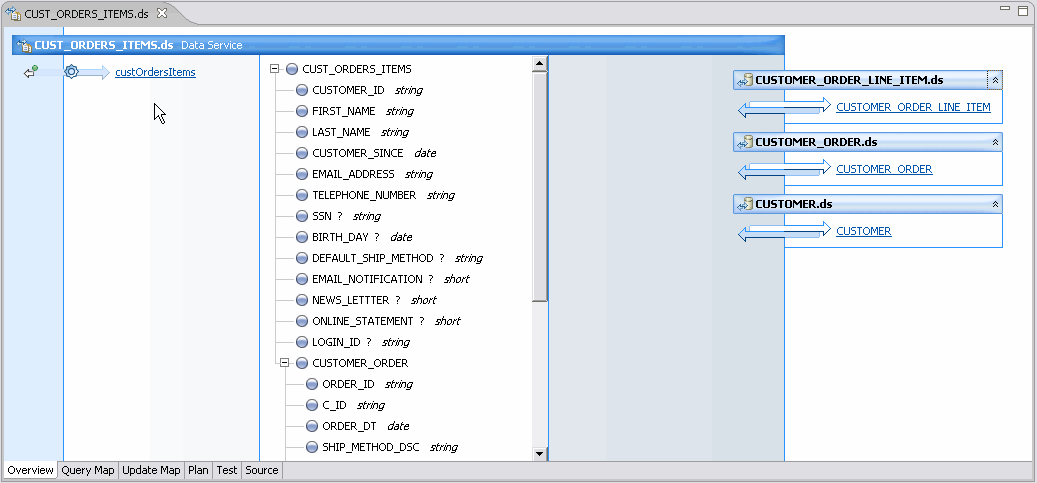
Click Overview; you will see that your entity data service is now associated with an XML type.
-
Publish your project. This operation should be successful.
1.3.5.1 Modifying the XML Type
When an XML Type is generated, complex elements by default return a single instance of their type (for example, one CUSTOMER_ORDER will be returned even if there are many).
In order to return all customer orders and all of each orders' line items minor changes to the data service's XML type are needed. The XML markup for this is:
maxOccurs="unbounded"
In other words, the element returns n, any number of document fragments that meet the criteria.
To modify your new CUST_ORDERS_ITEMS XML Type:
-
Click on the Overview tab, if it is not already selected.
-
Right-click on the topmost element in the XML type: CUST_ORDER_ITEMS.
-
Select Edit Schema. The Eclipse schema editor opens.
-
Click the schema editor's Source tab (below the editor's work area).
-
Locate the first qualified element: CUSTOMER_ORDER.
-
Place your cursor where you want to add the statement (just between the double-quote and the closing angle bracket ( > ) at the end of the line)
-
Enter a space.
-
Activate the code assistant with the combination:
Ctrl + spacebar
You will get a code completion dialog.
-
Perform the Ctrl+space operation twice, once for the
max_occurs, and again to add the unbounded statement. The line now appears as:<xs:element form="qualified" name="CUSTOMER_ORDER" maxOccurs="unbounded">
-
Follow Steps 5-9 for the second qualified element,
CUSTOMER_ORDER_LINE_ITEM. -
Save the
CUST_ORDERS_ITEMS.xsdfile.File > Close
Example 1-4 CUST_ORDERS_ITEMS Schema (XSD File)
<?xml version="1.0" encoding="UTF-8"?>
<xs:schema targetNamespace="custOrdersItems" xmlns:xs="http://www.w3.org/2001/XMLSchema">
  <xs:element name="CUST_ORDERS_ITEMS">
    <xs:complexType>
      <xs:sequence>
        <xs:element name="CUSTOMER_ID" type="xs:string"/>
        <xs:element name="FIRST_NAME" type="xs:string"/>
        <xs:element name="LAST_NAME" type="xs:string"/>
        <xs:element name="CUSTOMER_SINCE" type="xs:date"/>
        <xs:element name="EMAIL_ADDRESS" type="xs:string"/>
       <xs:element name="TELEPHONE_NUMBER" type="xs:string"/>
        <xs:element name="SSN" maxOccurs="1" minOccurs="0" type="xs:string"/>
        <xs:element name="BIRTH_DAY" maxOccurs="1" minOccurs="0" type="xs:date"/>
        <xs:element name="DEFAULT_SHIP_METHOD" maxOccurs="1" minOccurs="0" type="xs:string"/>
        <xs:element name="EMAIL_NOTIFICATION" maxOccurs="1" minOccurs="0" type="xs:short"/>
        <xs:element name="NEWS_LETTTER" maxOccurs="1" minOccurs="0" type="xs:short"/>
        <xs:element name="ONLINE_STATEMENT" maxOccurs="1" minOccurs="0" type="xs:short"/>
        <xs:element name="LOGIN_ID" maxOccurs="1" minOccurs="0" type="xs:string"/>
        <xs:element form="qualified" name="CUSTOMER_ORDER" maxOccurs="unbounded">
          <xs:complexType>
            <xs:sequence>
             <xs:element name="ORDER_ID" type="xs:string"/>
              <xs:element name="C_ID" type="xs:string"/>
              <xs:element name="ORDER_DT" type="xs:date"/>
              <xs:element name="SHIP_METHOD_DSC" type="xs:string"/>
              <xs:element name="HANDLING_CHRG_AMT" type="xs:decimal"/>
              <xs:element name="SUBTOTAL_AMT" type="xs:decimal"/>
              <xs:element name="TOTAL_ORDER_AMT" type="xs:decimal"/>
              <xs:element name="SALE_TAX_AMT" type="xs:decimal"/>
              <xs:element name="SHIP_TO_ID" type="xs:string"/>
              <xs:element name="SHIP_TO_NM" type="xs:string"/>
              <xs:element name="BILL_TO_ID" type="xs:string"/>
              <xs:element name="ESTIMATED_SHIP_DT" type="xs:date"/>
              <xs:element name="STATUS" type="xs:string"/>
              <xs:element name="TRACKING_NO" maxOccurs="1" minOccurs="0" type="xs:string"/>
              <xs:element name="DATE_INT" maxOccurs="1" minOccurs="0" type="xs:long"/>
              <xs:element form="qualified" name="CUSTOMER_ORDER_LINE_ITEM" maxOccurs="unbounded">
                <xs:complexType>
                  <xs:sequence>
                    <xs:element name="LINE_ID" type="xs:string"/>
                    <xs:element name="ORDER_ID" type="xs:string"/>
                    <xs:element name="PROD_ID" type="xs:string"/>
                    <xs:element name="PROD_DSC" type="xs:string"/>
                    <xs:element name="QUANTITY" type="xs:integer"/>
                    <xs:element name="PRICE" type="xs:decimal"/>
                    <xs:element name="STATUS" type="xs:string"/>
                  </xs:sequence>
                </xs:complexType>
              </xs:element>
            </xs:sequence>
          </xs:complexType>
        </xs:element>
      </xs:sequence>
    </xs:complexType>
  </xs:element>
</xs:schema>
1.3.6 Testing Your Data Service Function
Having created a parameterized read function for your logical data service, you can now test it.
-
Having created a parameterized read function for your logical data service, you can now test it.
-
Using the dropdown in the Select operation field, choose the function:
custOrdersItemsByLastName(string) -
Enter:
Black
as the last name parameter.
Note:
Entries are case-sensitive.
-
Click Run. Your project should republished successfully and your data then appear.
-
Click the + to the left of CUST_ORDERS_ITEMS to view your data in Tree format. Notice that all the customer's orders are listed under customer information. If you open CUSTOMER_ORDER you will see that items for each order are also listed.
Figure 1-35 Testing a Parameterized Query

Description of "Figure 1-35 Testing a Parameterized Query"
1.3.6.1 View Test Run Results
Test results from this function can be viewed in two ways:
-
Tree
-
Text
Note:
The Tabular option is only available for flat (non-nested) results.
Figure 1-36 Test Run Results in Tree Style Format
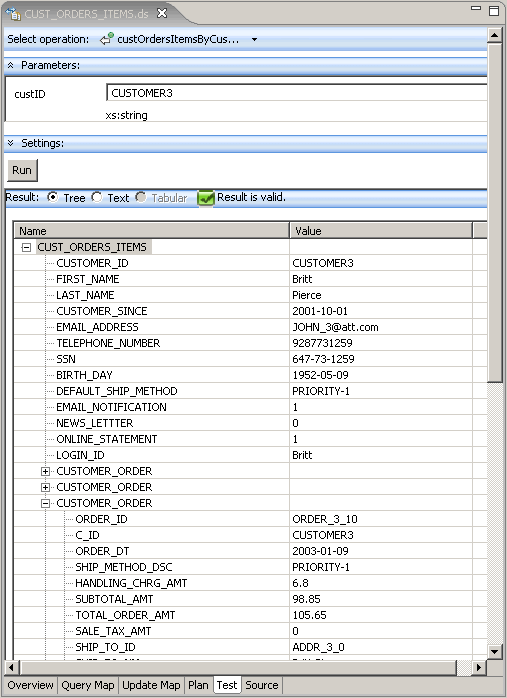
Description of "Figure 1-36 Test Run Results in Tree Style Format"
1.3.6.1.1 Query Statistics in the Console Window
The Console window will always contain information on a successfully executed query. Access the Console with:
Window > Show View > Other... > General > Console
Click OK.
Sample console output is shown below.
Figure 1-37 Query Details in the Console Window
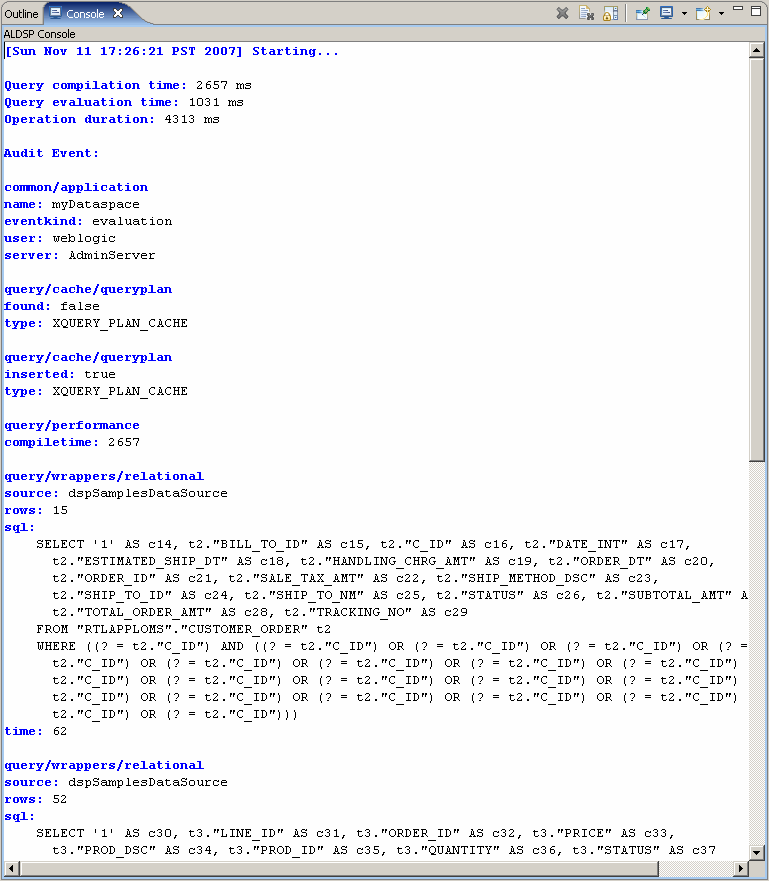
Description of "Figure 1-37 Query Details in the Console Window"
1.3.7 Adding Create-Update-Delete Functions to Your Data Service
You can also edit results in the Test area. In other words, you can update your data.
To do this an update procedure based on your data service must exist. Until then, the Edit, Submit and Cancel buttons at the bottom of the Test mode work area ![]()
will be grayed out.
The easiest way to create an update procedure for your logical data service is to generate a default update map procedure. When you do this you will also be given the option of creating delete and insert procedures.
To add the new procedures:
-
In the Overview tab, right-click in the work area choose Add Update Map Procedures...
Figure 1-38 Add Update Map Procedures Dialog
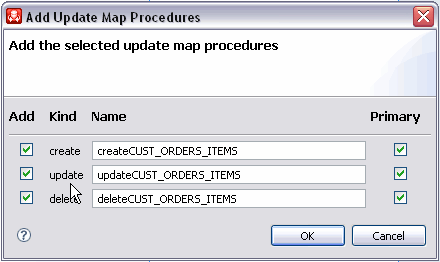
Description of "Figure 1-38 Add Update Map Procedures Dialog"
-
Leave the default Add and Primary checkbox options selected for each function and click OK.
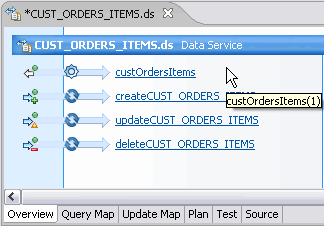
Notice that the procedures are added to your data service.
1.3.8 Updating Your Results
Now that you have an updateCUST_ORDERS_ITEMS procedure, you can update data -- either through the Test tab or through authorized client applications. Here are the steps:
-
Click on the Test tab and scroll to the top of the window.
-
From the Select operation dropdown select the
createCUST_ORDERS_ITEMS(CUST_ORDERS_ITEMS()operation to review the generated type. -
From the Select operation dropdown select the read function
custOrdersItemsByLastName(). -
Run the function using Black as the
last_namevalue. -
Your project may need to be saved.
-
Click Edit.
-
Expand the top element in the CUST_ORDERS_ITEMS tree.
-
Change the customer's first name from Jack to Sachin using the built-in line editor. Optionally change the email address as well.
-
Click the Submit button at the bottom of the work area. A message indicating that your data has been successfully submitted appears.
Figure 1-40 Changing an Element in Test View
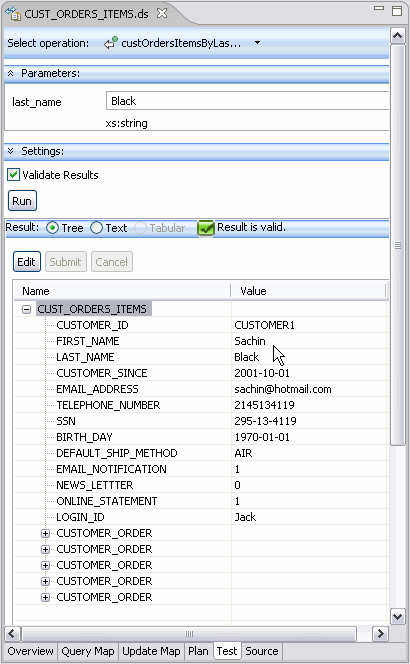
Description of "Figure 1-40 Changing an Element in Test View"
-
Re-run your function to see that the first name field reflects the changes you made.
1.3.9 Reviewing the Query Plan
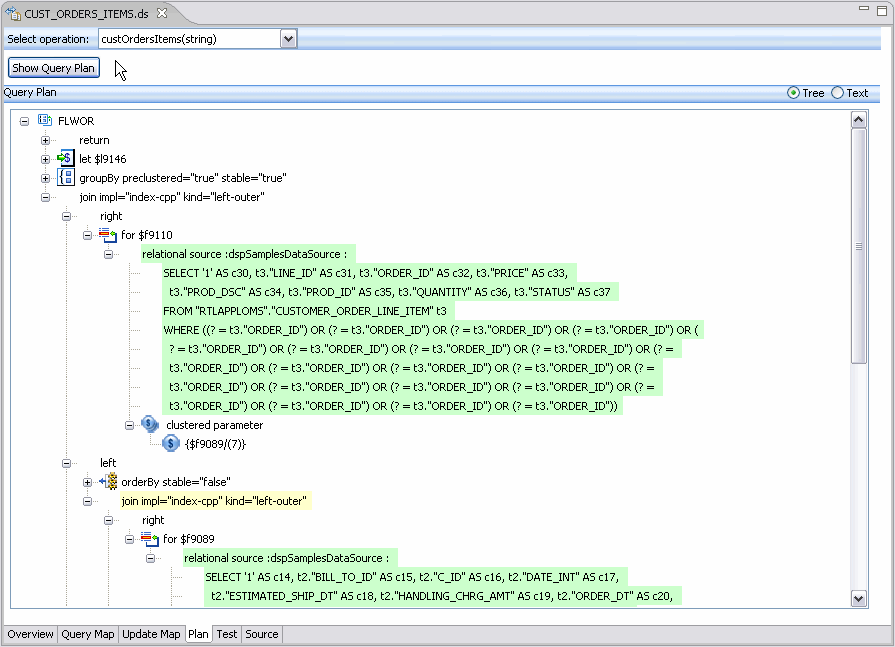
After a data service has been successfully published, the query plan for the service's read functions can be examined through the Plan tab. The plan can be display in tree or text mode.
-
Click the Plan tab.
-
Choose the
custOrdersItemsByLastName(string)function from the Select operation dropdown. -
Click Show Query Plan.
1.3.10 Reviewing the Update Map
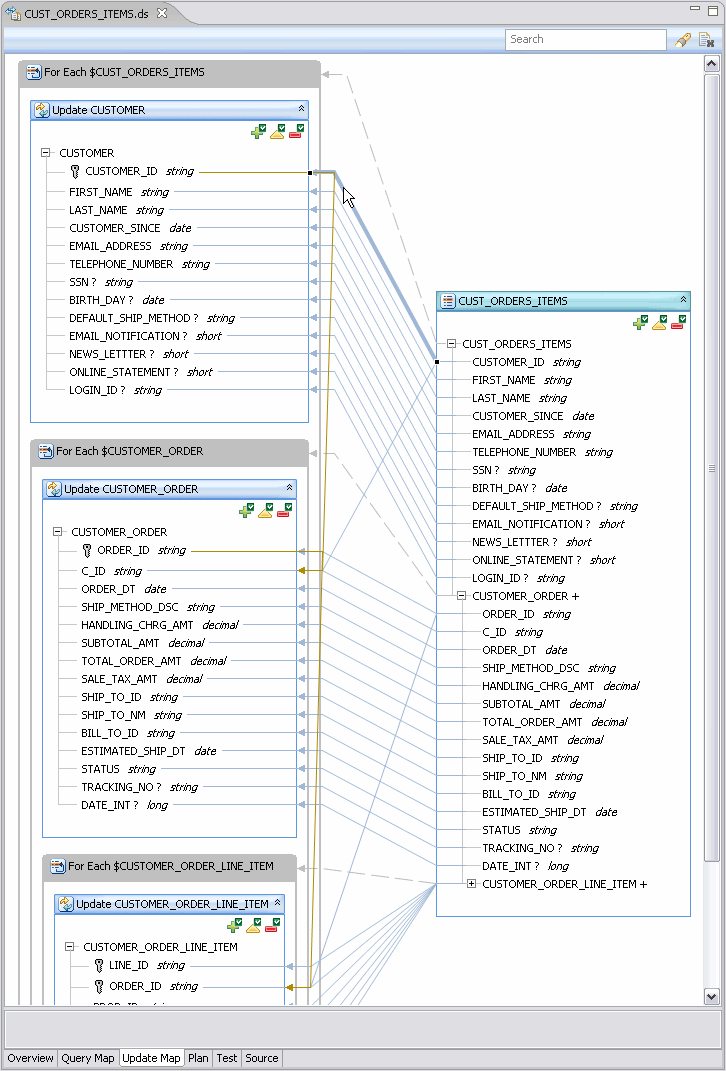
After an entity data service is successfully published and contains an update function, its update map can be inspected and, as necessary, edited.
-
Click the Update Map tab.
For more information, see "Understanding Update Maps".
1.3.11 Archiving Your Project
You can save your entire project to a ZIP file. Then, when you need to load it again, you can do so with a simple Import operation.
Other examples in the Oracle Data Service Integrator documentation use this or similar examples, so having this project available will be make it easier to experiment with other Oracle Data Service Integrator faculties.
-
In Project Explorer, right-click on the myDataspace Project.
-
Choose Export.
-
In the Export dialog choose:
General > Archive File
-
Click Next.
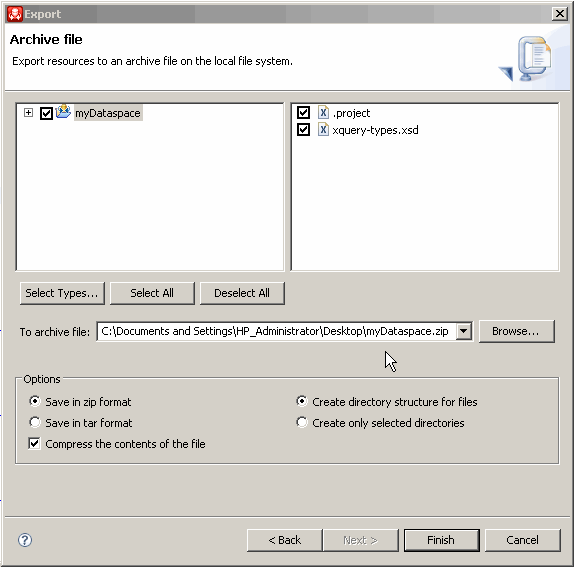
1.3.11.1 Saving Project to a ZIP File
-
In the Archive file dialog the myDataspace project is pre-selected. Browse to the location where you want to put your archive file.
-
Name your file:
myDataspaceLeave all other options unchanged.
-
Click Save.
-
Click Finish.
A file myDataspace.zip will be created in the directory you specified.
1.3.12 Summary
Congratulations! In just a few minutes you have:
-
Started Oracle Data Service Integrator.
-
Created several physical data services based on existing data.
-
Created a logical data service based on elements from three physical sources.
-
Build a function to retrieve based on information on a particular customer, the customer's orders, and each item in each order.
-
Created an XML Type based on the Return type of your function.
-
Modified the XML Type to better support a master-detail arrangement of information.
-
Tested your results.
-
Edited your results.
-
Viewed the query plan and the updated map.
-
Create an archive file of your dataspace.
About 150 lines of XQuery have been generated.
1.4 Reference
This section describes the following sections:
1.4.1 Oracle Data Service Integrator Start Menu
The Oracle Data Service Integrator Start menu provides easy access to components used to develop Oracle Data Service Integrator data services. Access is from the Windows Start menu:
Start > All Programs > Oracle WebLogic
1.4.1.1 Oracle Data Service Integrator Start Menu
The following table describes the menu options available from the main Oracle WebLogic menu.
| Option | Usage |
|---|---|
|
Oracle Data Service Integrator |
Provides access to the Oracle Data Service Integrator online documentation. |
|
Online Documentation |
The Oracle WebLogic documentation home page. |
|
QuickStart |
Provides links to help get started with installed Oracle products |
|
SmartUpdate |
Used in conjunction with your Oracle Support ID to download any applicable patches and maintenance packs. |
|
Uninstall Oracle Data Service Integrator |
Uninstalls Oracle Data Service Integrator. |
|
Eclipse for WebLogic |
Oracle Data Service Integrator Eclipse-based IDE |
|
User Projects |
User-created domains. |
1.4.2 Data Service Types and Functions
Oracle Data Service Integrator functions can have a number of attributes. This section describes those attributes and the conditions under which they are applicable.
Figure 1-44 Oracle Data Service Integrator Data Service Types and Attributes

Description of "Figure 1-44 Oracle Data Service Integrator Data Service Types and Attributes"
1.4.3 Data Service Characteristics
The following table describes the characteristics of Oracle Data Service Integrator data services. Data service characteristics are defined in the XQuery source pragma.
Table 1-8 Data Service Characteristics
| Characteristic | Description |
|---|---|
|
Type |
There are two types of data services:
|
|
Shape |
The shape of a data service is determined by its XML type, or underlying schema, if any. Shapes are:
|
For more information, see Chapter 6, "Building XQueries."
1.4.4 Operational Characteristics
The following table describes the characteristics that can be used to describe functional routines in Oracle Data Service Integrator. These characteristic descriptions are also part of the function's signature, visible in data service Source editor.
Table 1-9 Oracle Data Service Integrator Operations Characteristics
| Characteristic | Description |
|---|---|
|
Access |
Access or visibility to a functional routine can be set as:
|
|
Primacy |
Every logical entity data service identifies a single primary function for each kind of function. For example, if there are several read functions, one will be set as primary. In the case of read functions, the data service relies on the primary read function in the data service to determine the shape of the Return type. For create, update, and delete functions, the primacy setting is used by update templates of component data services. In an entity data service, a function can be set as primary. Other functions of a similar type are automatically considered non-primary. Note that library functions have no Return type and are not categorized as primary or non-primary. |
|
Kind |
Oracle Data Service Integrator has several kinds of functions. For physical data services, the kind of function is inferred during the data service creation process, when metadata is imported. Four of the functions are actually CRUD (create-read-update-delete) procedures, which operate on the underlying data.
|
|
Operation |
There are two types of operations:
|
|
Implementation |
Functions can be implemented in the following ways:
|
1.5 Related Topics
This section describes the following topics:
-
Section 1.5.1, "Getting the Most from the WebLogic Eclipse Plugin Framework"
-
Section 1.5.2, "Create a Data Service with a Flat Return Type"
1.5.1 Getting the Most from the WebLogic Eclipse Plugin Framework
Oracle Data Service Integrator dataspaces are initially created as projects in the WebLogic Eclipse plugin framework. The Eclipse IDE is a rich, open development environment.
While some aspects of Eclipse are described in this section, no attempt is made to replicate the large body of documentation available for Eclipse developers.
References
-
Eclipse home site
-
Eclipse Help documentation
-
Eclipse user guides
1.5.1.1 Data Services Eclipse for WebLogic
Eclipse for WebLogic run inside the Eclipse framework.
Table 1-10 Workshop for WebLogic Artifacts in the Oracle Data Service Integrator Perspective
| Artifact | Purpose |
|---|---|
|
Project Explorer |
Contains project artifacts including data services and their functions. |
|
Properties editor |
Contains read/write and read only properties associated with the selected artifact. For example a function may be set to public, protected, or private through its Properties editor. |
|
Outline manager |
Provides a scrollable view of your model, query, or update mapper. This is particularly useful in large projects since the work area may not be large enough to show all the artifacts. |
|
Console |
The console appears whenever the server is accessed. |
|
Servers tab |
Display the status of the Oracle Data Service Integrator server which in turn provides clients with access to data services and their underlying data sources. |
|
Problems tab |
Displays problems encountered by the project. |
|
Error Log tab |
Displays errors associated with the project. |
The Windows > Show View menu option can be used to add additional windows to the perspective.
In addition, several Oracle Data Service Integrator Perspective menu options are provided under:
File > New
These allow you to, first, create an Oracle Data Service Integrator dataspace project and then to add various types of data services, models and web service mapper.
1.5.2 Create a Data Service with a Flat Return Type
This topic shows you how to create an update map from a logical data service with a flat, non-nested return type, using the sample database that ships with Oracle Data Service Integrator.
1.5.2.1 Overview
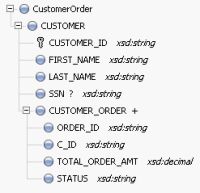
A return type can be non-nested, or flat, even if it joins two relational tables, where one table has a one-to-many relationship with the other table. An example is one customer in a CUSTOMER table with many Orders in an ORDERS table. One approach to the return type is to nest an Orders element of multiple cardinality beneath the Customer element.
Figure 1-45 A Nested Customer-and-Orders Schema
Description of "Figure 1-45 A Nested Customer-and-Orders Schema"
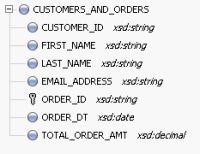
Because you can design a logical data service with any structure, regardless of the underlying data sources, it is just as valid to define a flat return type to model the relationship between Customers and Orders.
Figure 1-46 A Flat Customer-and-Orders Schema
Description of "Figure 1-46 A Flat Customer-and-Orders Schema"
1.5.2.2 Create a Dataspace Project
First, create a new dataspace project to contain your physical and logical data services:
-
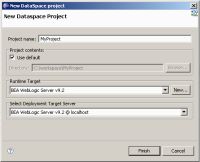
In Eclipse for WebLogic, choose File > New > Dataspace Project.
-
Enter a project name such as
FlatReturnType, then click Finish. -
Right-click the new dataspace project name, and choose New > Folder.
-
Create folders named physical and logical. Within logical, create a folder named schemas.
Using separate folders for physical and logical services helps separate the physical and logical integration layers.
Figure 1-47 Adding a New Dataspace Project
Description of "Figure 1-47 Adding a New Dataspace Project"
1.5.2.3 Create the Return Type
The return type the logical data service uses combines data from the CUSTOMER table and the ORDERS table. It has a non-nested XML structure, even though the data shows that customers and orders have a one-to-many relationship.
You can define the return type by creating an XML schema (XSD) file. In an XML editor, create a schema file like this one:
Example 1-5 XML schema (XSD) File
<?xml version="1.0" encoding="UTF-8" ?>
<xs:schema targetNamespace="ld:logical/FlatReturnType" xmlns:xs="http://www.w3.org/2001/XMLSchema">
   <xs:element name="CUSTOMERS_AND_ORDERS">
      <xs:complexType>
         <xs:sequence>
            <xs:element name="CUSTOMER_ID" type="xs:string"/>
            <xs:element name="FIRST_NAME" type="xs:string"/>
            <xs:element name="LAST_NAME" type="xs:string"/>
            <xs:element name="EMAIL_ADDRESS" type="xs:string"/>
            <xs:element name="ORDER_ID" type="xs:string"/>
            <xs:element name="ORDER_DT" type="xs:date"/>
            <xs:element name="TOTAL_ORDER_AMT" type="xs:decimal"/>
         </xs:sequence>
      </xs:complexType>
   </xs:element>
</xs:schema>
Be sure to:
-
Define
targetNamespaceto make sense for your dataspace project.Make sure you have only one top-level element of the name you choose (here,
CUSTOMERORDER) in your target namespace. You can give thetargetNamespacethe same name as the dataspace project, but you are not required to. -
Save the schema file in the logical/schemas folder within your dataspace project.
Note that the cardinality of all elements uses the default values, minOccurs="1" and maxOccurs="1". Each customer has many orders, but there is only one combination of customer and order, so the cardinality of the order elements (ORDER_ID, ORDER_DT, and TOTAL_ORDER_AMT) is still 1.
1.5.2.4 Create Physical Data Services
Now, create physical data services based on the sample database or your own physical data sources.
-
In Project Explorer, right-click the physical folder in your dataspace project.
-
Choose New > Physical Data Service.
-
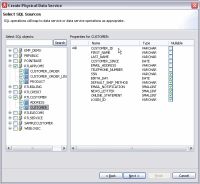
Choose Relational for Data source type and dspSamplesDataSource for Data source, then click Next.
-
Expand RTLCUSTOMER and select CUSTOMER.
-
Select Public for both CUSTOMER and CUSTOMER_ORDER, then click Next.
-
Click Finish.
-
When asked if you want to open the new data services, click No.
Figure 1-48 Adding Physical Data Services
Description of "Figure 1-48 Adding Physical Data Services"
1.5.2.5 Create a Logical Data Service
Now that you have physical data services and a schema for the return type, you can create the logical data service.
-
Right-click the logical folder, then choose New > Logical Data Service.
-
Enter a name for the service, such as
FlatCustomersAndOrders. -
Make sure Entity Data Service is selected, then click Finish.
Now associate a return type with the service:
-
Right-click in the Overview tab and choose Associate XML Type.
-
Select the schema and click OK.
Figure 1-49 A New Logical Data Service with a Return Type

Description of "Figure 1-49 A New Logical Data Service with a Return Type"
You also need to define a primary Read function, in order to create both the query map and update map.
-
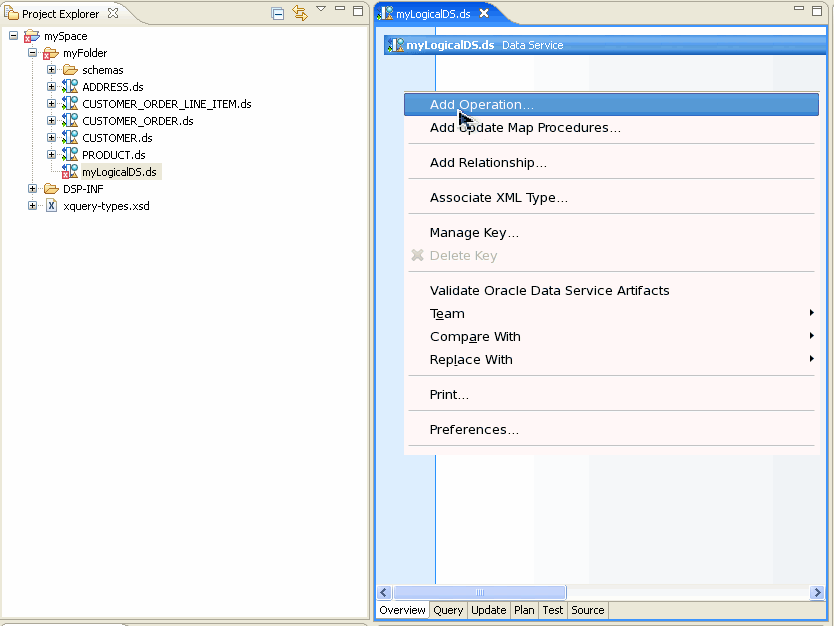
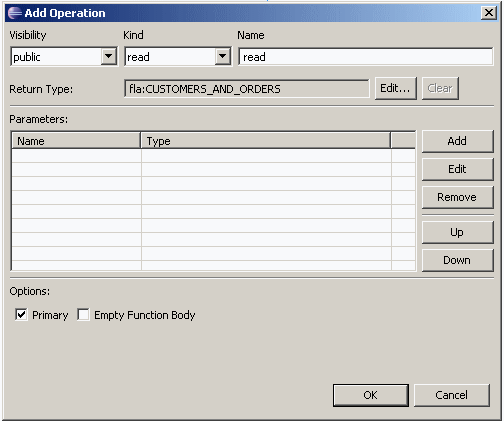
Right-click in the service name bar at the top, and choose Add Operation.
-
Make sure Kind is set to read, then enter a function name, such as
read. -
Make sure Primary is selected, then click OK.
Figure 1-50 Creating a Primary Read Function
Description of "Figure 1-50 Creating a Primary Read Function"
1.5.2.6 Create the Query Map
Now you need to create the query map visually in Eclipse for WebLogic, which in turn generates an update map.
-
Click the Query Map tab.
-
In Project Explorer, expand the physical data services CUSTOMER.ds and CUSTOMER_ORDER.ds.
-
Drag the Read function from each physical service to the mapping area.
Notice that you cannot scope the
CUSTOMER_ORDERblock to a subtype in the return type, because the return type has no subtypes. -
Drag mappings from the
CUSTOMERblock on the left to the return type forCUSTOMER_ID,FIRST_NAME,LAST_NAME, andEMAIL_ADDRESS. -
Drag mappings from the
CUSTOMER_ORDERblock on the left to the return type forORDER_ID,ORDER_DT, andTOTAL_ORDER_AMT. -
In the For blocks, drag from
CUSTOMER/CUSTOMER_IDtoCUSTOMER_ORDER/CUSTOMER_ID.This creates a join between the two data sources.
At this point, the query map looks like this.
Figure 1-51 A Query Map with Mappings and a Join
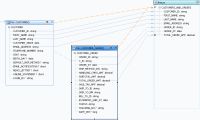
Description of "Figure 1-51 A Query Map with Mappings and a Join"
If you click the Source tab and expand the Read function, you see XQuery code like this:
Example 1-6 XQuery Code for read function
declare function tns:read() as element(fla:CUSTOMERS_AND_ORDERS)*{
for $CUSTOMER_ORDER in cus1:CUSTOMER_ORDER()
for $CUSTOMER in cus:CUSTOMER()
where $CUSTOMER/CUSTOMER_ID eq $CUSTOMER_ORDER/C_ID
return
        <fla:CUSTOMERS_AND_ORDERS>
            <CUSTOMER_ID>{fn:data($CUSTOMER/CUSTOMER_ID)}</CUSTOMER_ID>
            <FIRST_NAME>{fn:data($CUSTOMER/FIRST_NAME)}</FIRST_NAME>
            <LAST_NAME>{fn:data($CUSTOMER/LAST_NAME)}</LAST_NAME>
            <EMAIL_ADDRESS>{fn:data($CUSTOMER/EMAIL_ADDRESS)}</EMAIL_ADDRESS>
            <ORDER_ID>{fn:data($CUSTOMER_ORDER/ORDER_ID)}</ORDER_ID>
            <ORDER_DT>{fn:data($CUSTOMER_ORDER/ORDER_DT)}</ORDER_DT>
            <TOTAL_ORDER_AMT>{fn:data($CUSTOMER_ORDER/TOTAL_ORDER_AMT)}</TOTAL_ORDER_AMT>
        </fla:CUSTOMERS_AND_ORDERS>
};
Notice that the XQuery code has a for statement nested directly within another for statement. This creates an inner join between the two tables in SQL. To confirm the SQL that is created:
-
Click the Test tab.
-
At Select operation, make sure the primary Read function is selected.
-
Click Run (saving your data service as necessary).
You should see an XQuery FLWOR statement node. If you expand it, you should see a SQL query like this, showing an inner join:
SELECT t1."ORDER_DT" AS c1, t1."ORDER_ID" AS c2, t1."TOTAL_ORDER_AMT" AS c3,
  t2."CUSTOMER_ID" AS c4, t2."EMAIL_ADDRESS" AS c5, t2."FIRST_NAME" AS c6, t2."LAST_NAME" AS c7
FROM "RTLAPPLOMS"."CUSTOMER_ORDER" t1
JOIN "RTLCUSTOMER"."CUSTOMER" t2
ON (t2."CUSTOMER_ID" = t1."C_ID"
The inner join is created because the logical data service has a flat return type. When you mouse over the SQL query, you see this message:
Generated SQL query does not have a WHERE clause. This may cause the query to take longer to finish
and use excessive memory resources.
