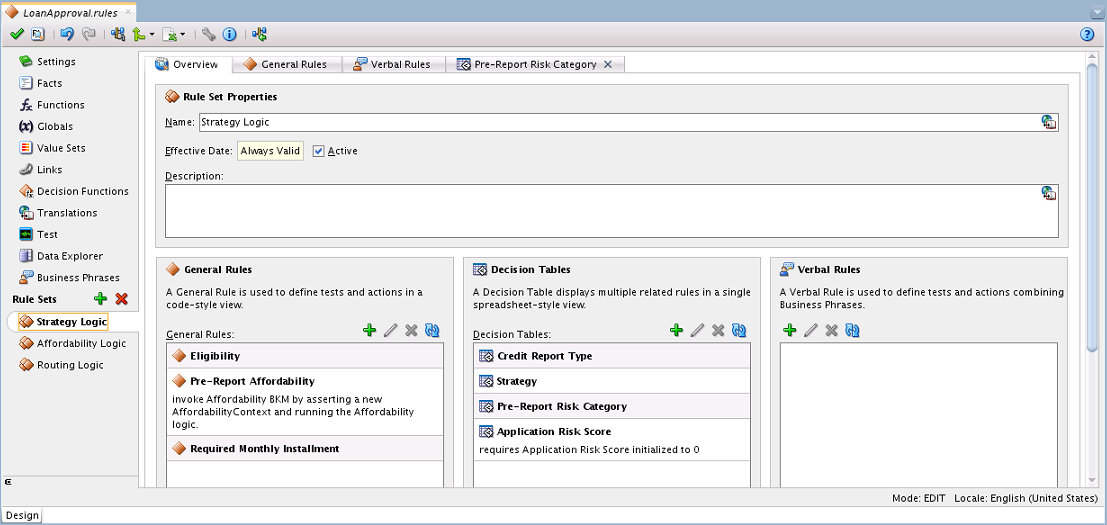
5 Working with Decision Tables
This chapter describes how to use Decision Tables to create and use business rules in an easy to understand format that provides an alternative to the IF/THEN rule format. It also covers the various components of a Decision Table such as conditions, conflicts, actions, and discusses the various operations that you can perform on a Decision Table.
The chapter includes the following sections:
5.1 Introduction to Working with Decision Tables
Businesses invest in software to automate their business processes. Historically, this automation focused on the collection, presentation, and manipulation of data to facilitate human decision-making about that data. Increasingly, however, software designers and developers are called upon to automate the decision making process by putting detailed rules about business processes into software architectures. In addition, many enterprises are experiencing increasing pressure to make software systems more responsive to business changes.
In some cases, the role of writing and testing business rules is no longer assigned to software engineers, but is passed to trained business users. Alternatively, some organizations attempt to separate changes in the business behavior of software from the traditional software development cycles, and tie changes to business driven imperatives like product or sales cycles.
A Decision Table provides a mechanism for describing data processing tasks, especially when that description is done by business analysts rather than computer programmers.
The Decision Table format is intuitive for business analysts who are familiar with spreadsheets. The formal structure that a Decision Table provides makes it easier to author, understand, and change multiple similar rules and lets software check for rule completeness and consistency.
Oracle Business Rules Decision Tables provide the following features:
-
Powerful Visualization: Compact and structured presentation. This visualization matches the way real world business policies are expressed: with many tables, declarative, and organized into simple steps.
-
Error Prevention: Avoids incompleteness and inconsistency. Because a Decision Table is well structured, automated tools can check for conflicts, redundancy, and incompleteness to speed development of valid, consistent business rules.
-
Modular Knowledge Organization: Group rules into a single table. A spreadsheet metaphor puts groups of rules that work together onto a single viewable pane. For example, if there are six rules that check an applicant's eligibility, it is more convenient to see all the rules than to view the rules as individual but related rules.
-
Optimization of Rules and Performance Benefits: Oracle Business Rules Decision Tables provide automated features that can reduce the number of required rules, as compared to the IF/THEN rules (this is called rule coalescing).
-
Rule Validation and Verification: Provides capabilities for ensuring the logical consistency of rules before deployment. Automated tools for checking conflicts or incompleteness help speed development of valid, consistent business rules.
Ease of verification and visualization are the major reasons for using Decision Tables.
For information, see Working with Rulesets and Rules.
5.1.1 What is a Decision Table?
A Decision Table displays multiple related rules in a single spreadsheet-style view. In Rules Designer a Decision Table presents a collection of related business rules with condition rows, rules, and actions presented in a tabular form that is easy to understand. Business users can compare cells and their values at a glance and can use Decision Table rule analysis features by clicking buttons and selecting values in Rules Designer to help identify and correct conflicting or missing rules.
To help understand Decision Table concepts, consider a set of IF/THEN rules that determines if a driver is eligible for a license, and an equivalent Decision Table. Note if a driver has taken a driver training class then the driver has training certification.
The IF/THEN rules follow:
if driver.age < 20 and driver.has_training then training = true
if driver.age < 20 and driver.has_training = false then driver.eligible = false
if driver.age >= 20 then driver.eligible = true (do not care about training for this case)
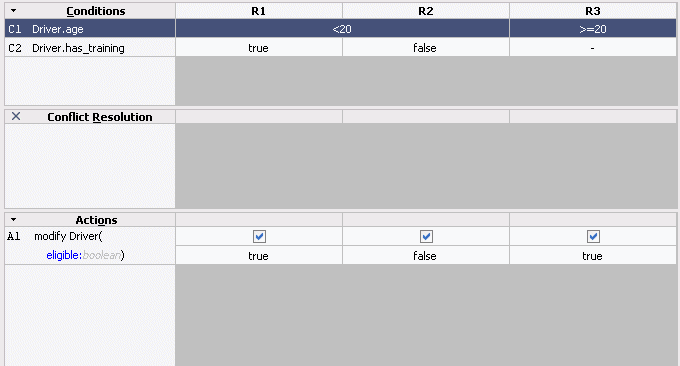
Figure 5-1 shows a Decision Table representation of these rules that includes areas for Decision Table Conditions and Actions.
Figure 5-1 Sample Decision Table with Conditions and Actions
Description of "Figure 5-1 Sample Decision Table with Conditions and Actions"
5.1.1.1 What You Need to Know About Decision Table Conditions
The Conditions area in a Decision Table includes one or more condition rows. Each condition row has a condition expression and, for each rule, a condition cell. A condition expression is an expression that you build in Rules Designer. The condition expression is often a fact property or a function result, but it can be any expression that has a type that can be associated with a value set. Test expressions are often used, such as Driver.age<16. These expressions are associated with the built-in boolean value set, with values true and false. The value or the range for a given condition cell takes its value or its range from one or more values or ranges in the associated LOV or Ranges value set. For more information on value sets, see Working with Value Sets.
For example, Figure 5-1 shows the condition expression for a Driver fact with the Driver.age property. The corresponding row in the Decision Table shows condition cells including values for the ranges <20, and >=20. The values in the cells come from the global value set named driver_ages.
Figure 5-1 also shows a condition row for the Driver fact with the Driver.has_training property. This condition row shows condition cells with the values, true, false, and -. The hyphen (-) means "do not care" (that is, Driver.has_training could be true or false in this case). The values for these condition cells come from the default value set associated with boolean types (this consists of default values for the values true and false).
The '-' (don't care) value is useful to ensure that a decision table will not have gaps when new values are added to a value set. For example, if a valueset initially contains 1, 2, and otherwise, a rule matching otherwise will fire if the input is 3. But after 3 is explicitly added to the valueset, then otherwise no longer matches an input value of 3. If no rule contains a '-' for this input, then no rule will fire when the input value is 3 and the decision table is said to have a gap.
Use 'otherwise' when you explicitly want to match the 'otherwise' value in the valueset, and not any other value. 'Otherwise' is useful to avoid conflicts in a decision table. '-' is used to match any value, and will often cause conflicts. These conflicts can be automatically resolved using the 'auto override' conflict policy.
Decision Tables show rules in bucket order, and to change the order of rules you need to change the order of buckets in the value set. Thus, the order of the buckets in the value set associated with a condition row determines the order of the condition cells, and thus the order of the rules. You can control rule ordering in a Decision Table by changing the relative position of the buckets in an LOV value set associated with a condition row; however, you cannot reorder range buckets (values). For information on ordering buckets in a value set, see How to Define a List of Values Global Value Set.
5.1.1.2 What You Need to Know About Decision Table Actions
Actions are associated with rules in a Decision Table. At runtime, when facts match for condition cells, the Rules Engine prepares to run the actions associated with the rule.
Table 5-1 shows the types of actions you can choose in the Actions area. Thus, in an action you can call a function, assert a new fact, retract a fact, or modify a fact, and so on. In the Actions area the cells corresponding to an individual action for a rule are called action cells. For more information on advanced mode, see How to Select the Advanced Mode Option.
Table 5-1 Decision Table Actions for Action Cells
| Action | Description |
|---|---|
|
|
Assert a new fact. |
|
|
Assign a value to a variable. |
|
|
Call a function. |
|
|
Modify a data value associated with a matched fact. |
|
|
Retract a fact. |
|
|
Assert a fact. |
|
|
Asserts a tree of facts given the root. |
|
|
Assign a value to a new variable. |
|
|
Perform expression. |
|
|
The return action returns from the action block of a function or a rule. A return action in a rule pops the ruleset stack, so that execution continues with the activations on the agenda that are from the ruleset that is currently at the top of the ruleset stack. |
|
|
Throw an exception, which must be a Java object that implements java.lang.Throwable. A thrown exception may be caught by a catch in a try action block. |
When you add multiple actions the actions that you add in the Actions area are ordered; actions appearing in the higher rows run before actions in the following rows.
The Decision Table actions such as modify can refer to facts matched in the condition cells. For example, given a Decision Table with condition rows on the Driver fact that includes condition rows for Driver.age and Driver.has_training, actions can modify the property Driver.eligible and you can specify a value for Driver.eligible for each action cell.
Certain types of actions in the Actions area include a Parameterized check box. This check box specifies that a property from the action can have its value set in the action cell associated with a rule in the Decision Table. When the parameterized check box is selected, the value you supply for the expression value in the action, in the Actions area, becomes the default value for the property if a value is not supplied in the action cell. For example, see Figure 5-2 where the value false is assigned as the default value for the action property eligible.
Figure 5-2 Action Editor Showing Parameterized Action with Default Value
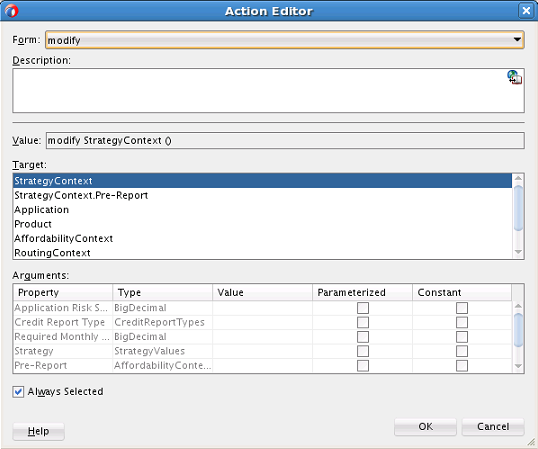
Description of "Figure 5-2 Action Editor Showing Parameterized Action with Default Value"
5.1.1.3 What You Need to Know About Decision Table Rules
A ruleset contains a Decision Table; this provides a way to group the Decision Table along with IF/THEN rules. When rules and Decision Tables are grouped in a ruleset, the IF/THEN rules and the Decision Table rules all execute as a set of interrelated rules.
A rule in a Decision Table is not named. Although Rules Designer shows rules in a Decision Table with labels, for example, R1, R2, and R3, these rule labels are not names for individual rules but are labels derived from the current ordering of the rules in the Decision Table. Thus, a rule with the label R1 could be moved to position 3 and then Rules Designer relabels this rule R3.
Rules in a Decision Table are organized as a table that contains a tree of condition cells. The condition cells in the first row span the cells of later condition rows. A parent cell in row i spans its children in row i+1.
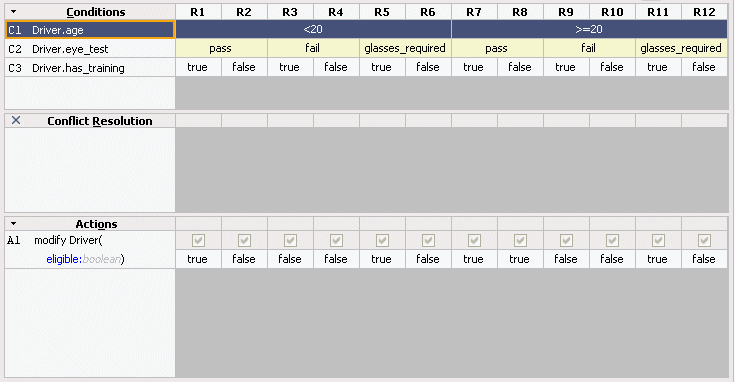
Figure 5-3 shows rules in a Decision Table where each rule consists of one cell from each row in the Conditions area, and an associated action cell in the same column in the Actions area. Figure 5-3 shows the rule with the label R3 defined by the first cell from condition 1 (the Driver.age < 20 value), the second cell from condition 2 (the Driver.eye_test equals fail value), and the third cell from condition 3 (the Driver.has_training equals true value). Likewise for each of the other rules, R1 to R12, there is a unique path through the Decision Table.
As shown in Figure 5-3, it is significant for a cell to be a parent of another cell and a parent cell spans lower cells. In the Conditions area, when condition cells have the same parent condition cell the cells are called siblings. Certain operations only apply for condition cells that are siblings. For example, Figure 5-4 shows two sibling cells that are selected; with these cells selected the Merge Selected Cells operation is valid. For these cells, the corresponding value set with the value fail for Driver.eye_test is also a sibling (as shown in the R3 and R4 columns in Figure 5-4). For more information, see How to Merge or Split Conditions in a Decision Table.
Figure 5-4 Sibling Condition Cells in a Decision Table

Description of "Figure 5-4 Sibling Condition Cells in a Decision Table"
Rules Designer lets you easily reorder rows by selecting the row and clicking a Move button. By reordering rows in the Conditions area you can perform operations on condition cells at the desired granularity. Thus, the move operations can assist you when you want to split, merge, or assign certain values that might only be appropriate at a particular level in the tree, depending on the location of a condition cell or depending on the location of the parent, children, or siblings of a condition cell.
5.1.2 Understanding Condition Cell Values
By default, when you create a condition row, Rules Designer creates a single condition cell and assigns the "?" value to the cell. A condition cell with the value "?" indicates that the value of the cell is undefined in the value set. For example, Figure 5-5 shows a "?" value for StrategyContext. Note that contiguous value ranges in a condition cell are combined. For example, if you select <20 and [20..40] it will display as <=40.
Figure 5-5 Sample Decision Table Showing Undefined in Condition Cell

Description of "Figure 5-5 Sample Decision Table Showing Undefined in Condition Cell"
5.1.3 Understanding Action Cell Values
In the Decision Table Actions area you can specify that an action cell "do nothing." In this case, clear the action cell. When the action cell check box is cleared, this means do not perform this action when the pattern matches for the specified condition values in the Decision Table. Thus, for each action cell you can specify whether the rule associated with the action cell should activate the action, or does not perform the action.
In a Decision Table, when a condition cell represents a value that has been removed from the value set, Rules Designer provides a validation warning such as the following:
RUL-05831: Decision table value reference not found
To fix this type of validation warning you can do one of the following:
-
Define a value by double-clicking the condition cell and selecting one or more values from the list.
-
Add the missing value to the value set or associate the condition with another value set that contains the missing value.
5.1.4 What You Need to Know About Decision Table Loops
A Decision Table loop occurs when the value for a condition row is changed by an action. Loops can occur across the rules in a single Decision Table or spread over several Decision Tables, or spread over rules and Decision Tables in the same ruleset. Try not to create Decision Table actions that modify fact properties that are used in Decision Table conditions. This could cause an infinite loop.
Note:
You can prevent infinite loops by using the rule firing limit on the containing decision function.
5.2 Creating Decision Tables
You add a Decision Table by performing several steps.
These steps include creating a Decision Table, creating value sets, and then adding conditions and actions to Decision Table, and using the Decision Table to operate to validate, correct, and modify the Decision Table.
5.2.1 How to Create a Decision Table
To work with a Decision Table, start by creating a Decision Table in a ruleset.
To create a decision table:
Note:
When you add a Decision Table the rules validation log displays validation warnings. The Decision Table is not complete and does not validate without warnings until you add conditions and actions to the Decision Table.
5.2.2 How to Add Condition Rows to a Decision Table
A Decision Table includes a Conditions area where you specify Decision Table condition rows. The condition rows determine the facts that the Oracle Rules Engine matches at runtime. To create a Decision Table you need to add one or more condition rows to the Decision Table.
To add condition rows to a decision table:
5.2.3 How to Use or Specify the Value Set for a Decision Table Condition
For more information on creating value sets, see Working with Value Sets.
5.2.4 How to Add Actions to a Decision Table
A Decision Table includes an Actions area where you specify Decision Table actions. The actions determine actions for rules in a Decision Table. To create a valid Decision Table, add actions to a Decision Table. For each action cell, where specific values apply, set the values for the action cells. For each action cell, when the action does not apply to the rule, deselect the action cell. By default when you add an action to a Decision Table, actions for all the rules are unselected
To add actions to a decision table:
5.2.4.2 How to Deselect an Action Cell in a Decision Table
To deselect an action cell:
- From Rules Designer select a ruleset from the Rulesets navigation tab and select the Decision Table where you want deselect an action cell.
- In the Actions area, select the action cell and deselect the check box in the action cell. You are not allowed to deselect action cell values when Always Selected is selected for the action.
When you add actions, you may need to change the order of the actions. In Rules Designer you can use the Move Down button or Move Up button to change the order of actions.
5.2.5 How to Add a Rule to a Decision Table
You can add a rule to a Decision Table. Rules Designer adds a column for the rule to the left of the existing rules and each condition cell is initialized to "?", which actually means a validation error prompting you to populate the cell with relevant values.
To add a rule to a decision table:
- From Rules Designer select a ruleset from the Rulesets navigation tab and select the Decision Table where you want to add the rule.
- From the list next to the Add button, select Rule.
- Enter values for the condition cells. Notice that the new rule is added as the first rule of the Decision Table on the left and the other rules have moved as required to keep the values in their defined order.
- Enter values for the action cells.
The Order Rules By Bucket check box under the Advanced Settings of a Decision Table is selected by default. In this case, the Decision Table layout changes automatically on adding new rules.
When you add a new rule to a Decision Table, the new rule is added as the first rule of the Decision Table and the other rules move as required to keep the values in their defined order. This is because Order Rules By Bucket is enabled, which means rule ordering in a Decision Table is set according to the relative position of values associated with a condition expression. If Order Rules By Bucket is not enabled when you add a rule, the new rule is added as the last rule of the Decision Table. In either case, the cells in the new rule column have "?" symbols, indicating the cells do not have values yet.
Note:
When Order Rules By Bucket is selected, the rules are ordered and duplicate rules (rules with exactly the same values) are combined. So, you cannot add two rules without any values to a Decision Table, because in that case, the rules are duplicates and would immediately be combined. When Order Rules By Bucket is cleared, then duplicate rules are allowed.
In addition, the Move buttons pertaining to a rule column are also enabled. You can use them to reposition rules. Use the Flip the Table Rows and Columns button to change the view of the Decision Table. This also affects the Move buttons: the move direction may be Up or Down, Left or Right. The Merge, Compact and Span options are also enabled. You can also cut, copy, or paste rules.
For more information, see Introduction to Decision Table Operations.
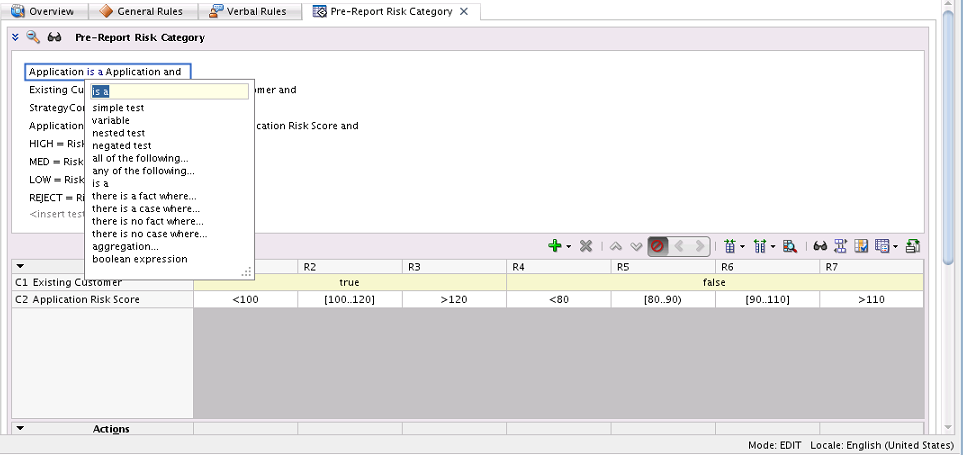
5.2.6 How to Define Tests in a Decision Table
You can define tests in a Decision Table. The tests must evaluate to true for any rule in the decision table to fire. For more information about defining tests and working with rule conditions, see Working with Rules.
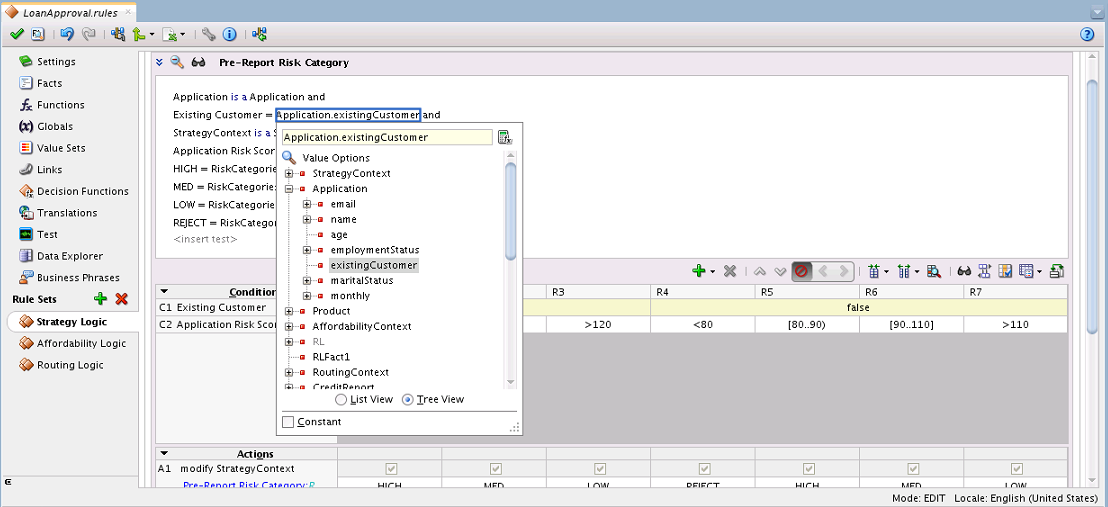
You can use the Data Explorer tab to find fact types and value sets in the data model.
To add tests to a Decision Table:
For more information about writing tests, see Testing and Validating Business Rules.
5.3 Introduction to Decision Table Operations
After you create a Decision Table you may want to modify the contents of the Decision Table to produce a Decision Table that includes a complete set of rules for all cases, or to produce a Decision Table that provides the least number of rules for the cases.
After you create a Decision Table there are operations that you may want to perform on the Decision Table, including the following:
-
Compact or split cells in a Decision Table.
-
Merge a condition or split a condition in a Decision Table.
-
Finding and resolving conflicts between rules in a Decision Table.
-
Find and fix gaps (missing rules) in a Decision Table.
5.3.1 Understanding Decision Table Split and Compact Operations
The split and compact operations enable you to manipulate the contents of the condition cells in a Decision Table.
The split table operation creates a rule for every combination of values across the conditions. For example, in a Decision Table with 3 boolean conditions, 2 x 2 x 2 = 8 rules are created. In a Decision Table with 32 boolean conditions, 2**32 ~ 2 billion rules are created. Thus, you only use split table when the number of rules created is small enough that filling in the action cells is feasible.
When you want to apply match conditions for the "do not care" values in a Decision Table and create a match case for each cell, you use the split table operation.
Split can be applied to an entire Decision Table or to a single condition row. Additionally, split may be performed on an individual condition cell.
Depending on what is selected in the Decision Table, the split operation can create condition cells. Thus, using the split operation you can create rules in a Decision Table. Table 5-3 summarizes the split operation for a selected condition cell, condition row, or for a complete Decision Table.
Table 5-3 Summary of Split Operation
| Operator | Description |
|---|---|
|
Condition Cell |
Creates one sibling condition cell for each value represented by the cell. If the condition cell value is "do not care", then the cell is split into one sibling cell for each value in the valueset that is not represented by a sibling condition cell, and "do not care" is no longer represented. |
|
Condition Row |
For each condition cell in the proceeding condition expression, create a sibling group which contains a cell for each value in the value set. The effect of this operation is the same as adding a "do not care" to each sibling group and calling split on each condition cell in each sibling group. |
|
Decision Table |
Same as calling split on each condition row in the Decision Table. |
Depending on what is selected in the Decision Table, the compact table or merge cells operations remove condition cells. The compact table operation can be applied to an entire Decision Table. Additionally, the merge operation may be performed on sibling cells or on an entire condition row. Thus, using compact table or merge you can remove rules from a Decision Table. Table 5-4 summarizes the compact table and merge operations.
Table 5-4 Summary of Merge Operation
| Operator | Description |
|---|---|
|
Condition Cell |
Merging two or more condition cells adds all values in the cells to a single cell, and removes all but one of the cells. If one of the cells represents "do not care", then the merged cell represents "do not care". This operation may merge action cells and this can create warnings for duplicate action cells, such as, |
|
Condition Row |
Combine all values in each sibling group into a single "do not care" cell for each condition cell in the proceeding condition expression. The effect of this is the same as calling merge on all cells in each sibling group. This operation may merge action cells and this can create warnings for duplicate action cells, such as, |
|
Decision Table |
Compacts the Decision Table by merging conditions of rules with identical actions. |
Split and merge are inverse operations when conflicting action cells are not associated with the operation. In this case, without conflicting action cells, a merge operation combines all the values from the siblings into one sibling, and discards the other sibling condition cells, and as a result of merging the condition cells, when a Decision Table contains action cells, the action cells are also merged. Thus, the merge operation combines multiple condition cells into a single condition cell and adds all values to the single cell.
When there are conflicting values for the action cells, a merge operation merges the action cells in a form that requires additional manual steps. Thus, if two action cells have conflicting parameters, after the merge the action cell contains multiple conflicting parameter values. These conflicting values are appended to the action cell and must be manually resolved by selecting and deleting the unwanted duplicate parameters. For example, see Figure 5-12 that shows conflicting values in an action cell.
An action cell that contains multiple values for a property is invalid. When you select the action cell Rules Designer shows a popup window with check boxes to allow you to select a single value for the action cell. As shown in the validation log in Figure 5-12, Rules Designer shows a validation warning until you select a single value.
Figure 5-12 Conflicting Properties to be Resolved for a Merged Action Cell
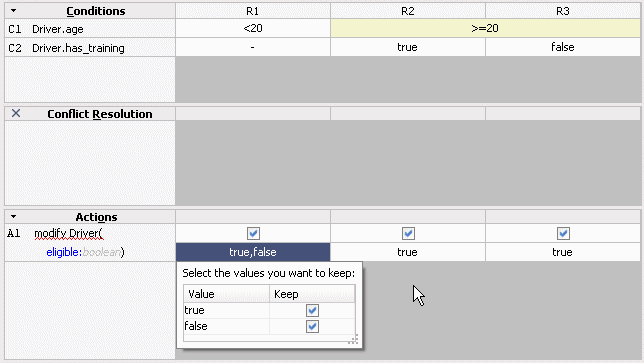
Description of "Figure 5-12 Conflicting Properties to be Resolved for a Merged Action Cell"
5.3.1.1 Understanding Decision Table Move Operations
You can move the conditions or actions in a Decision Table. The Move buttons let you reorder condition rows in the Conditions area and actions in the Actions area. Moving conditions up or down may reorder visual display of the rules, but these operations does not change the logic in any way. For example, if (x.a == 1 and x.b == 1) is logically the same as if (x.b == 1 and x.a == 1).
When you work with Decision Tables some operations only apply for condition cells that are siblings. Using the Move button you can reorder rows so that Decision Table operations apply to the tree at the desired granularity. For example, when you want to change the action of a condition cell for a single rule, then you need to move that condition cell to the last row in the Decision Table Conditions area. For example, consider the Decision Table shown in Figure 5-13.
To view this table with granularity for the Driver.age, move the Driver.age condition from the first row to the third row, as shown in Figure 5-14.
Figure 5-14 Decision Table After Move Down with Age Condition Last
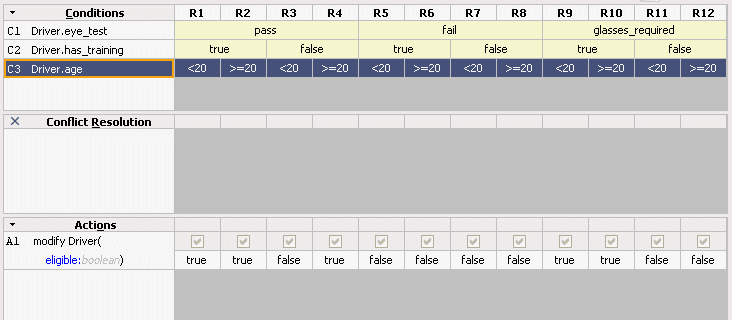
Description of "Figure 5-14 Decision Table After Move Down with Age Condition Last"
Now to make the Driver.age conditions "do not care" for the first two rules, where the driver passes the eyesight test and has had driver training is true, you can easily apply changes to these particular conditions when the Driver.age condition is in the last row. Thus, in this table, it is easier to view and modify age related rules when Driver.age is in the last row, with the finest granularity.In general, the move operations can assist you when you want to split, merge, or assign certain values that might only be appropriate at a particular level in the tree, depending on the location of a condition cell, or depending on the location of the parent, children, or siblings of a condition cell.
For actions in the Actions area, clicking Move Up or Move Down lets you reorder the actions. Actions are ordered so that when multiple actions apply, the first action runs before subsequent actions. Thus, using the Move Up or Move Down operation on an action may be appropriate, depending on your application.
5.3.1.2 Understanding Decision Table Gap Checking
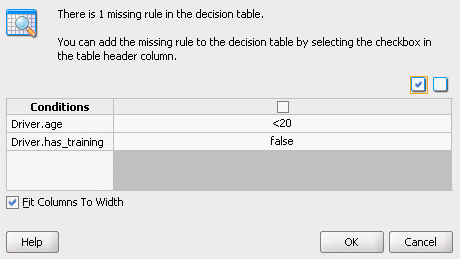
A gap is a "missing" rule in a Decision Table. A Decision Table has a gap if there is a combination of values, one from each condition, that is not covered by an existing rule. Rules Designer provides Gap Checking to check for gaps. When you click the Gap Analysis button, Rules Designer finds gaps and presents a dialog to fix any gaps that are found.
You can choose to make existence of gaps a validation warning. When you clear Allow Gaps in the Advanced Settings area, the Decision Table reports a validation warning when a gap is found. For more information, see Using Advanced Settings with Rules and Decision Tables.
For example, using the Driver example if you create a gap by deleting the rule that covers the case for Driver.age < 20 and Driver.has_training false, and then you click Gap Analysis, Rules Designer shows the Gap Analysis dialog as shown in Figure 5-15. Clicking OK with the check boxes selected adds either all rules or the selected rules to the Decision Table (this example only shows a single rule to add).
Gap checking generates different new rules for the following cases:
-
Sibling rules: multiple missing sibling rules are added as a single new rule. For example, consider a rule with two conditions,
Driver.ageandDriver.hair. When there are two missing rules for different hair colors and the rules are siblings, that is, they have a common parent, then gap checking shows a single rule as shown in Figure 5-16. -
Non-sibling rules: multiple missing non-sibling rules are added as individual new rules. For example, when there are two different rules missing that do not have the same parent, then gap checking provides two rules, as shown in Figure 5-17.
Figure 5-16 Gap Checking with Missing Sibling Rules
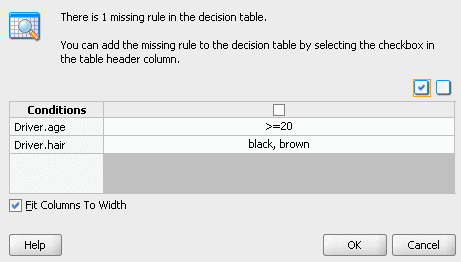
Description of "Figure 5-16 Gap Checking with Missing Sibling Rules"
Figure 5-17 Gap Checking with Missing Non-Sibling Rules
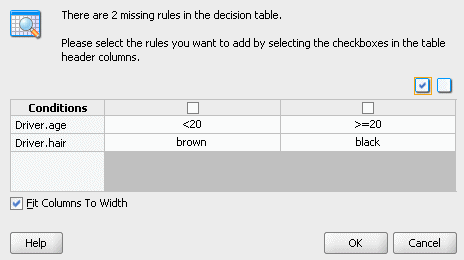
Description of "Figure 5-17 Gap Checking with Missing Non-Sibling Rules"
In both of these cases shown in Figure 5-16 and Figure 5-17 there are two missing values, but for sibling rules the multiple values are combined in a single new rule. Thus, in general gap checking suggests fewer more general rules in preference to many more specific rules.
For sibling rules you can add multiple rules then edit each cell to pick the values you want. Alternatively, you can use Find Gaps to add a rule and then split the cell with multiple values, and delete the rules you do not want to keep.
5.3.1.3 Understanding Decision Table Conflict Analysis
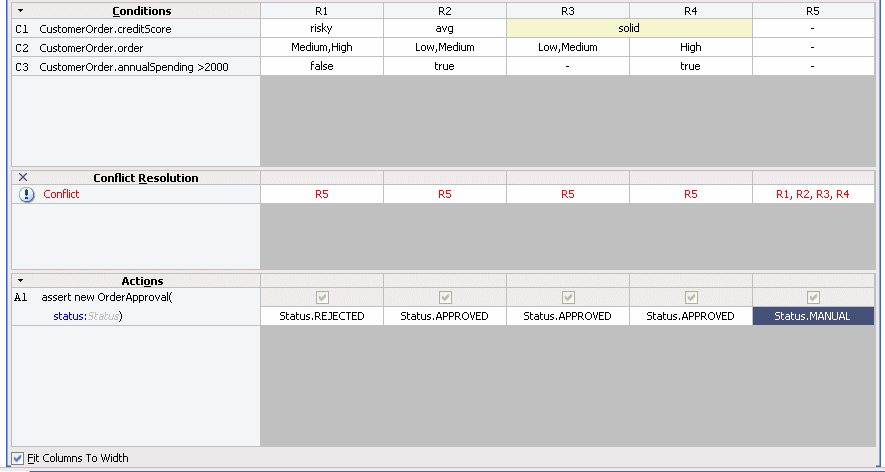
The rules in a Decision Table can conflict. Two rules conflict when they overlap and they have different actions. Two rules overlap when at least one of their condition cells has a value in common. Overlap is common when a Decision Table contains "do not care" condition cells. Overlap without conflict is common and harmless.
Rules Designer finds conflicts and you can see the conflicts in the Conflict Resolution row in the Decision Table when you click Show Conflicts. How you handle and resolve conflicts depends on the specified conflict policy. You can choose a conflict policy or use the default manual conflict policy. When you set a conflict policy using the Conflict Policy option in the Advanced Settings area, Rules Designer sets the conflict policy for the Decision Table. The Conflict Policy specifies the Decision Table conflict policy and is one of the following:
-
manual: Conflicts are resolved by manually specifying a conflict resolution for each conflicting rule.
-
auto override: Conflicts are resolved automatically using an override conflict resolution when this is possible, using the Oracle Business Rules automatic conflict resolution policies.
-
ignore: Conflicts are ignored.
For more information, see Using Advanced Settings with Rules and Decision Tables. For example, Figure 5-18 shows a Decision Table with conflicting rules that you resolve with the default manual conflict policy.
Figure 5-18 Decision Table Showing Conflicting Rules in the Conflicts Area
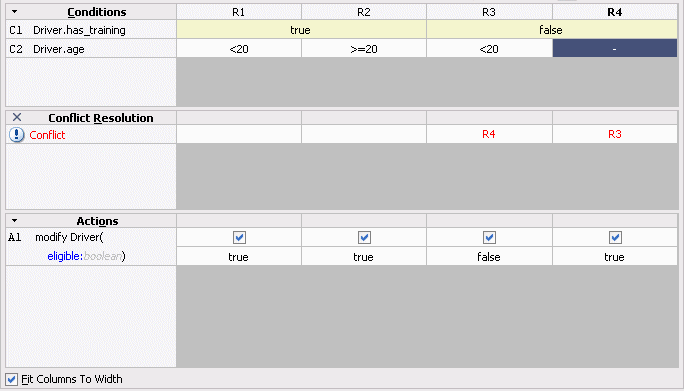
Description of "Figure 5-18 Decision Table Showing Conflicting Rules in the Conflicts Area"
By clicking on the cells in the Decision Table Conflict Resolution area Rules Designer lets you resolve conflicts between rules as follows:
-
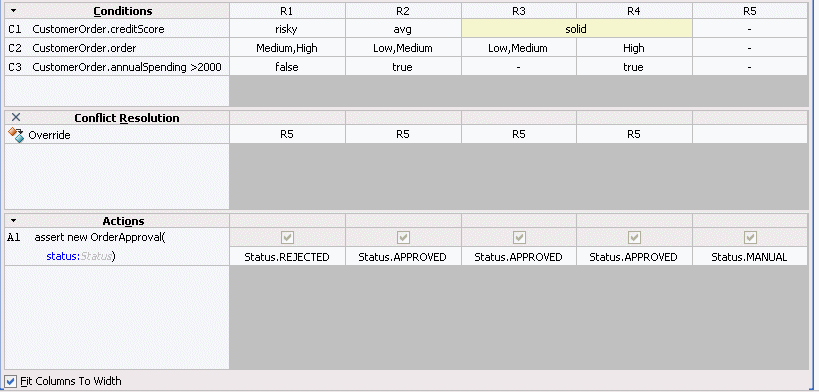
Override (Override and OverriddenBy): You override one rule with the other. Override specifies that one rule fires. Override is a combination of prioritization and mutual exclusion. Prioritization is transitive and not symmetric. Mutual exclusion is both transitive and symmetric. If A overrides C and B overrides C, then A or B runs before C but only one of A, B, or C runs.
-
Run Before (RunBefore and RunAfter): You prioritize the rules. Run before lets the two rules fire in a prescribed order. Prioritization is transitive but not symmetric. That is, if A runs before B runs before C, then A runs before C but B does not run before A. This uses a Decision Table runBefore list specifying that the rule that runs before has a higher priority than rules in the list.
-
Ignore (NoConflict): You OK the conflict. Ignore lets the two rules fire in arbitrary order. For example, consider the following conflicting rules in a decision table:
rule1: everybody gets a 10% raise (as specified with a do not care value in a decision table condition cell)
rule2: employee with Top Performer set to true gets a 5% raise
In these rules, if rule2 overrides rule1, then a top performer gets a 5% raise, and everyone else gets a 10% raise. However, in this case, you would like to have both rules fire. Because it does not matter which rule fires first, and there is no conflict, then a top performer gets a 15.5% raise either way. In this case, use the NoConflict list to remove the conflict. Note that no conflict is what you get with IF/THEN rules with equal priorities, only you are not warned of a conflict and you have to think carefully if you want one rule to override the other.
Figure 5-19 shows the Rules Designer Conflict Resolution dialog shown when you select a conflicting rule in the Conflict Resolution area. This dialog lets you resolve conflicts between rules by selecting overrides, prioritization with RunBefore or RunAfter options, and a NoConflict option.
Figure 5-19 Using the Decision Table Conflict Resolution Dialog
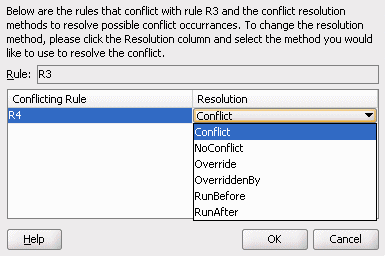
Description of "Figure 5-19 Using the Decision Table Conflict Resolution Dialog"
You can use the Decision Table Advanced Settings Conflict Policy auto override option to specify that, where possible, conflicts are automatically resolved. The automatic override conflict resolution policy specifies that a special case overrides a more general case. For more information, see Using Advanced Settings with Rules and Decision Tables.
Thus, when there are conflicts in a Decision Table, you can do one or more of the following to resolve the conflicts:
-
Use auto override conflict resolution by selecting the Conflict Policy and then auto override option in the Decision Table.
-
Ignore conflicts by selecting the Conflict Policy and then ignore option in the Decision Table.
-
Use manual conflict resolution by selecting the Conflict Policy and then manual option in the Decision Table and set Conflict Resolution for each conflicting rule in the dialog by selecting cells in the Conflict Resolution area with the Show Conflicts check box selected.
-
Change the Decision Table to remove an overlap.
-
Combine actions to remove conflicts.
5.3.2 How to Compact or Split a Decision Table
Use the Compact Table and Split Table buttons to compact or split cells in a Decision Table. For more information, see Understanding Decision Table Split and Compact Operations.
To compact or split cells in a decision table:
- In Rules Designer, select a rule set from the Rule Sets navigation tab. On the Overview tab, select the Decision Table and click Edit.
- Click the Compact Table button to compact or the Split Table button to split the cells.
5.3.3 How to Merge or Split Conditions in a Decision Table
Use the merge condition and split condition operations to merge or split a condition in a Decision Table. For more information, see Understanding Decision Table Split and Compact Operations.
To merge or split a condition in a decision table:
- In Rules Designer, select a rule set from the Rule Sets navigation tab. On the Overview tab, select the Decision Table where you want to merge or split a condition and click Edit.
- In the Conditions area, select the condition you want to merge or split.
- Right-click, and from the list select Merge Condition or Split Condition.
5.3.4 How to Use the Condition Cell Operations
Use the condition cell operations to split a condition cell, to merge sibling condition cells, or to specify a "do not care" value for a condition cell in a Decision Table. For more information, see Understanding Decision Table Split and Compact Operations.
5.3.4.1 How to Merge Sibling Cells in a Condition in a Decision Table
- In Rules Designer, select a rule set from the Rule Sets navigation tab. On the Overview tab, and select the Decision Table where you want to merge condition cells and click Edit.
- Select the sibling condition cells to merge.
- Right-click, and from the list select Merge selected cells.
5.3.4.2 How to Split a Cell in a Condition in a Decision Table
- In Rules Designer, select a rule set from the Rule Sets navigation tab. On the Overview tab, and select the Decision Table where you want to split a condition cell and click Edit.
- Select the cell to split.
- Right-click, and from the list select Split selected cell.
5.3.4.3 How to a "Do Not Care" Value for a Cell in a Condition in a Decision Table
- From Rules Designer select a ruleset from the Rulesets navigation tab and select the Decision Table where you want to set the "do not care" value.
- Select the appropriate condition cell.
- Right-click, and from the list select Do Not Care.
5.3.4.4 How to Select all Value Sets to Specify a "Do Not Care" Value for a Cell in a Condition:
- In Rules Designer, select a rule set from the Rule Sets navigation tab. On the Overview tab, and select the Decision Table where you want to set the "do not care" value and click Edit.
- Select the appropriate condition cell.
- Double-click, and from the list select all the available check boxes for all possible values.
5.3.5 How to Perform Decision Table Gap Checking
A gap is a "missing" rule in a Decision Table. A Decision Table has a gap if there is a combination of values, one from each condition, that is not covered by an existing rule. Rules Designer provides Gap Checking to check for gaps. When you use this operation Rules Designer presents a window to fix gaps. For more information, see Understanding Decision Table Gap Checking.
You can choose to make existence of gaps a validation warning. When you clear Allow Gaps in the Advanced Settings area, the Decision Table reports a validation warning when a gap is found. For more information, see Using Advanced Settings with Rules and Decision Tables.
To perform decision table gap checking:
- In Rules Designer, select a rule set from the Rule Sets navigation tab. On the Overview tab, and select the Decision Table where you want to perform gap checking and click Edit.
- Click the Gap Analysis button.
5.3.6 How to Perform Decision Table Manual Conflict Resolution
The rules in a Decision Table can conflict. Two rules conflict when they overlap and they have different actions. Two rules overlap when at least one of their condition cells has a value in common. For more information, see Understanding Decision Table Conflict Analysis.
To perform manual decision table conflict resolution:
- In Rules Designer, select a rule set from the Rule Sets navigation tab. On the Overview tab, and select the Decision Table where you want to check conflicts and click Edit.
- Set the conflict policy to manual (this is the default conflict policy). For more information, see Understanding Decision Table Conflict Analysis.
- In the Conditions area, in the conflicts area, when conflicts exist for each rule with a conflict double-click the appropriate condition cell to display the Conflict Resolution dialog.
- In the Conflict Resolution dialog, for each conflicting rule, in the Resolution field select a resolution from the list.
5.3.7 How to Set the Decision Table Auto Override Conflict Resolution Policy
When you select the Advanced Settings option in a Decision Table, you can select that Decision Table conflicts are automatically resolved using the auto override conflict policy (this applies only when it is possible to resolve the conflict using the Oracle Business Rules automatic conflict resolution policies). The automatic override conflict resolution uses a policy where when there is a rule conflict a special case overrides a more general case. For more information, see Understanding Decision Table Conflict Analysis.
To select the auto override policy:
- Select the rule or Decision Table where you want to use ignore conflict policy.
- Click the Show Advanced Settings button next to the rule or Decision Table name.
- From the Conflict Policy option select auto override.
5.3.8 How to Set the Decision Table Ignore Conflicts Policy
When you select the Advanced Settings option in a Decision Table, you can select that the Decision Table conflicts are ignored using the ignore conflict policy. The ignore policy tells Oracle Business Rules to ignore conflicts in the Decision Table. For more information, see Understanding Decision Table Conflict Analysis.
To select the ignore conflict policy:
- Select the rule or Decision Table where you want to use the ignore conflicts policy.
- Click the Show Advanced Settings button next to the rule or Decision Table name.
- From the Conflict Policy option select ignore.
5.4 Creating and Running an Oracle Business Rules Decision Table Application
The Order Approval application demonstrates the integration of a SOA composite application with Oracle Business Rules and the use of a Decision Table.
In this application a process is modeled that uses the decision component to:
-
Process rules from XML inputs including: a credit score and the annual spending of a customer, and the total cost of the incoming order.
-
Provide output that determines if an order is approved, rejected, or requires manual processing.
To complete this procedure, you need to:
-
Obtain the Source Files for the Order Approval Application
-
Create an Application for Order Approval
-
Create a Business Rule Service Component for Order Approval
-
View Data Model Elements for Order Approval
-
Add Value Sets to the Data Model for Order Approval
-
Associate Value Sets with Order and CreditScore Properties
-
Add a Decision Table for Order Approval
-
Split the Cells in the Decision Table and Add Actions
-
Compact the Decision Table
-
Replace Several Specific Rules with One General Rule
-
Add a General Rule
-
-
Check Dictionary Business Rule Validation Log for Order Approval
-
Deploy the Order Approval Application
-
Test the Order Approval Application
5.4.1 How to Obtain the Source Files for the Order Approval Application
The source code for Oracle Business Rules-specific samples and SOA samples are available online in the Oracle SOA Suite samples page.
To work with the Order Approval application, you first need to obtain the order.xsd schema file either from the sample project that you obtain online or you can create the schema file and create all the application, project, and other files in Oracle JDeveloper. You can save the schema file provided in the following example locally to make it available to Oracle JDeveloper.
The following example shows the order.xsd schema file.
<?xml version="1.0" ?>
<schema attributeFormDefault="qualified" elementFormDefault="qualified"
        targetNamespace="http://example.com/ns/customerorder"
        xmlns:tns="http://example.com/ns/customerorder"
        xmlns="http://www.w3.org/2001/XMLSchema">
  <element name="CustomerOrder">
    <complexType>
      <sequence>
        <element name="name" type="string" />
        <element name="creditScore" type="int" />
        <element name="annualSpending" type="double" />
        <element name="value" type="string" />
        <element name="order" type="double" />
      </sequence>
    </complexType>
  </element>
  <element name="OrderApproval">
    <complexType>
      <sequence>
        <element name="status" type="tns:Status"/>
      </sequence>
    </complexType>
  </element>
  <simpleType name="Status">
    <restriction base="string">
        <enumeration value="manual"/>
        <enumeration value="approved"/>
        <enumeration value="rejected"/>
    </restriction>
  </simpleType>
 </schema>
5.4.2 How to Create an Application for Order Approval
To work with Oracle Business Rules, you first create an application in Oracle JDeveloper.
To create an application for order approval:
-
In the Application Navigator, click New Application.
-
In the Name your application dialog, enter the name and location for the new application.
-
In the Application Name field, enter an application name. For example, enter
OrderApprovalApp. -
In the Directory field, specify a directory name or accept the default.
-
In the Application Package Prefix field, enter an application package prefix, for example
com.example.order.The prefix, followed by a period, applies to objects created in the initial project of an application.
-
For a SOA composite with Oracle Business Rules, in the Application Template area select SOA Application for the application template. For example, see Figure 5-20.
-
Click Next.
Figure 5-20 Adding the Order Approval Application
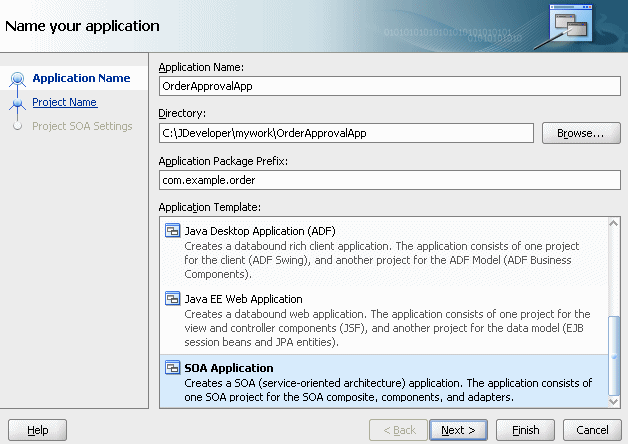
Description of "Figure 5-20 Adding the Order Approval Application"
-
-
In the Name your project page enter the name and location for the project.
-
In the Project Name field, enter a name. For example, enter
OrderApproval. -
Enter or browse for a directory name, or accept the default.
-
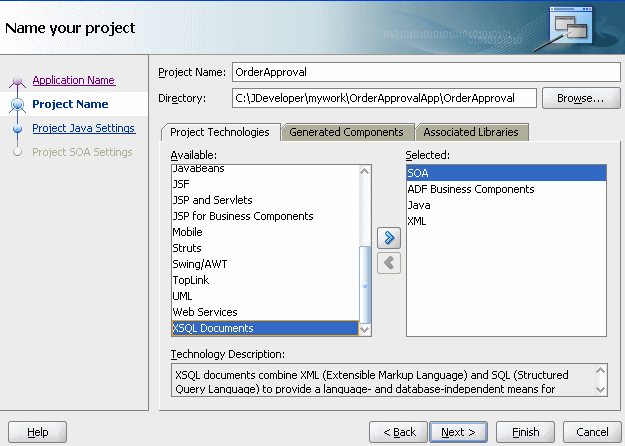
For an Oracle Business Rules project, in the Project Technologies area ensure that SOA, ADF Business Components, Java, and XML are in the Selected area on the Project Technologies tab, as shown in Figure 5-21. If an item is missing, select it in the Available pane and add it to the Selected pane using the Add button.
Figure 5-21 Adding a Project to an Application
Description of "Figure 5-21 Adding a Project to an Application"
-
-
Click Finish.
5.4.3 How to Create a Business Rule Service Component for Order Approval
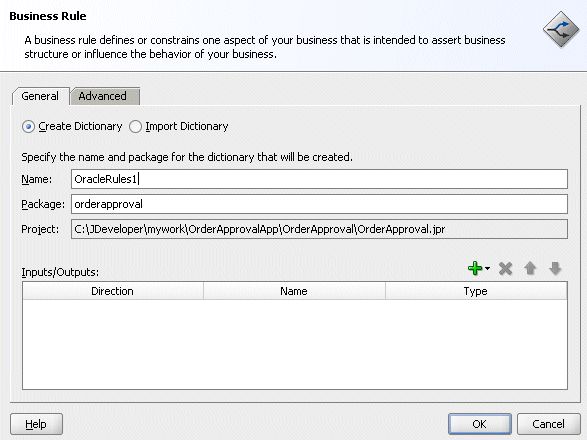
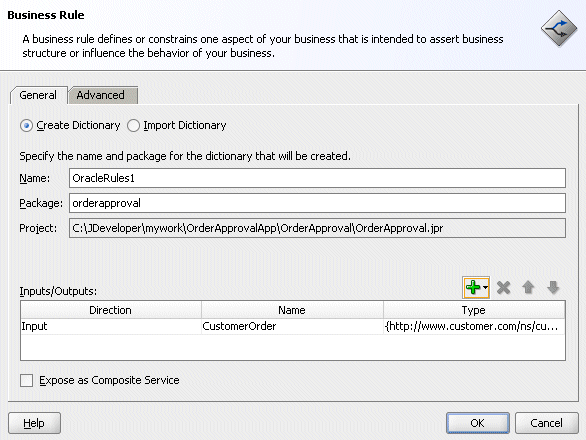
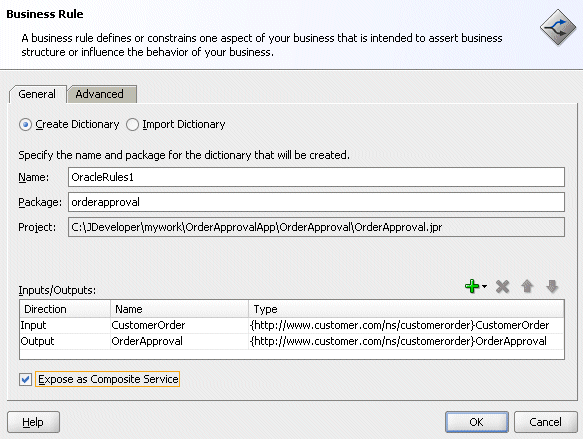
After creating a project in Oracle JDeveloper you need to create a Business Rule Service component within the project. When you add a business rule you can create input and output variables to provide input to the service component and to obtain results from the service component.
To use business rules with Oracle JDeveloper, you do the following:
-
Add a business rules service component
-
Create input and output variables for the service component
-
Create an Oracle Business Rules dictionary in the project
To create a business rule service component:
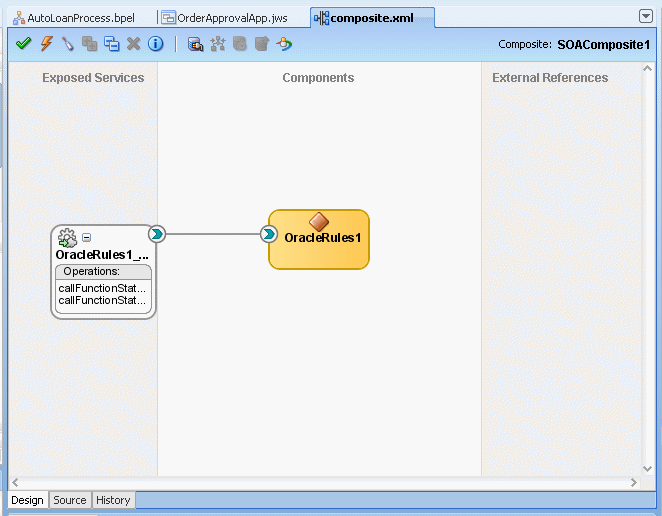
The business rule service component enables you to integrate your SOA composite application with a business rule. This creates a business rule dictionary and enables you to execute business rules and make business decisions based on the rules.
5.4.4 How to View Data Model Elements for Order Approval
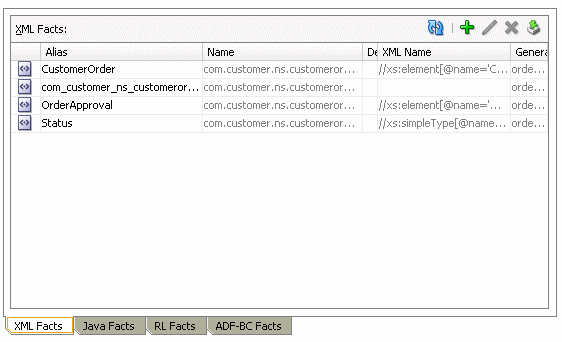
Before adding rules you need to create the Oracle Business Rules data model. The data model contains the business data definitions (types) and definitions for facts that you use to create rules. For example, for this sample the data model includes the XML schema elements from order.xsd that you specify when you define inputs and outputs for the business rule activity.
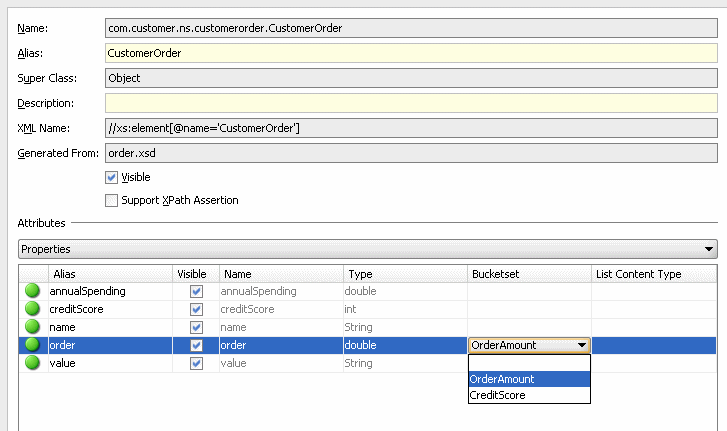
At times when you work with Rules Designer to create a rule or a Decision Table, you may need to create or modify elements in the data model.
To view data model elements for Oracle business rules:
5.4.5 How to Add Value Sets to the Data Model for Order Approval
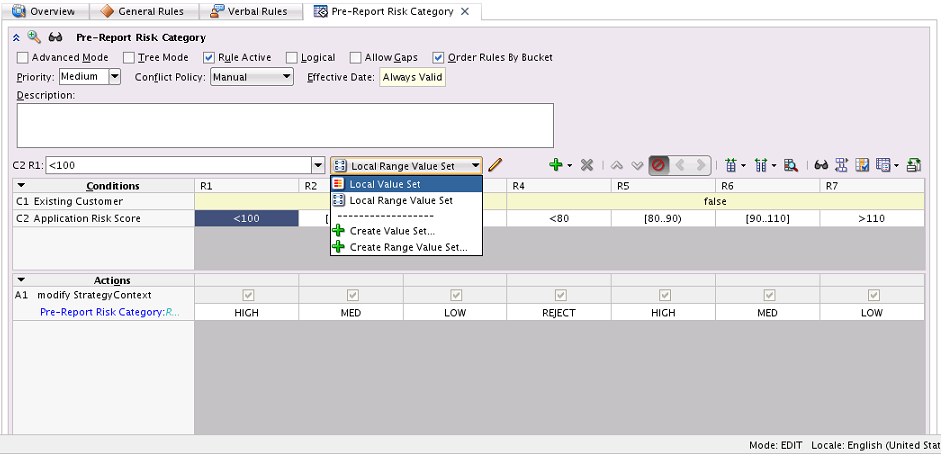
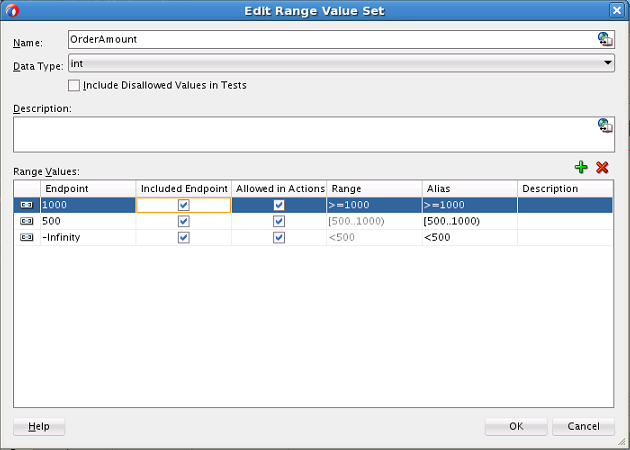
To use a Decision Table you need to define value sets that specify how to draw values for each cell for the conditions that constitute the Decision Table. For this example the value sets are defined with a list of ranges that you define in Rules Designer.
To add OrderAmount value set to the data model:
5.4.5.1 How to Add CreditScore Value Set to the Data Model
To add CreditScore value set:
- In Rules Designer select the Value Sets navigation tab.
- From the drop down next to the Create Valueset... button, select List of Ranges.
- In the Name field, enter
CreditScore. - Double-click the CreditScore valueset icon to display the Edit Valueset dialog.
- Click Add Value to add a value.
- Click Add Value again to add another value.
- In the top valueset, in the Endpoint field enter
750. - For the middle valueset, in the Endpoint field enter
400. - In the Included Endpoint field for each valueset, ensure the check box is selected.
- Modify the Alias field for each endpoint value to solid for 750, avg for 400, and risky for -Infinity. Click OK.
5.4.6 How to Associate Value Sets with Order and CreditScore Properties
To prepare for creating Decision Tables you can associate a value set with fact properties in the data model. In this way condition cells in a Decision Table Conditions area can use the valuesets when you create a Decision Table.
Note that the OrderApproval.status property is associated with the Status value set when the OrderApproval fact type is imported from the XML schema. In the schema, Status is a restricted String type and is therefore represented as an enum valueset. Rules Designer creates the status value set. For more information, see What You Need to Know About XML Facts.
To associate value sets with Order and CreditScore properties:
5.4.7 How to Add a Decision Table for Order Approval
You create a Decision Table to process input facts and to produce output facts, or to produce intermediate conclusions that Oracle Business Rules can further process using additional rules or in another Decision Table.
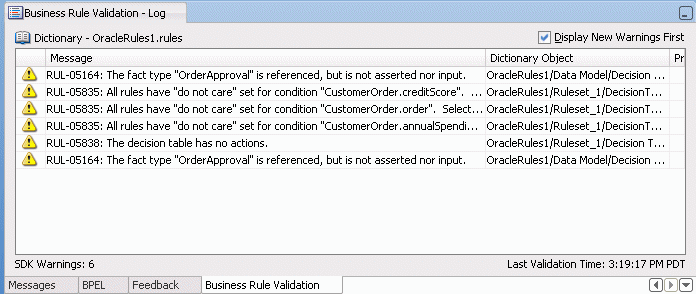
While you work with rules you can use the rule validation features in Rules Designer to assist you. Rules Designer performs dictionary validation when you make any change to the dictionary. To show the validation log window, click the Validate button or select View>Log and select the Business Rule Validation tab. If you view the rules validation log you should see warning messages. You remove these warning messages as you create the Decision Table. For more information on rule validation see Understanding Rule Validation.
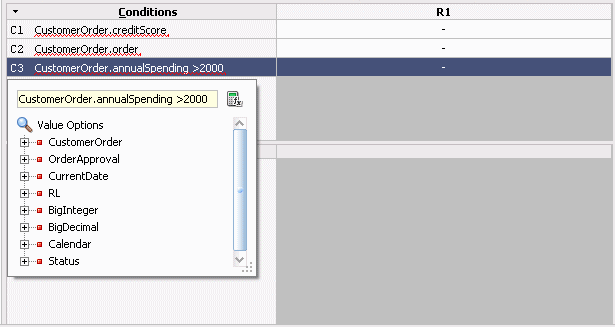
To use a Decision Table for rules in this sample application you work with facts representing a customer spending level and a customer credit risk for a particular customer and a particular order. Then, you use a Decision Table to create rules based on customer spending, the order amount, and the credit risk of the customer.
To add a Decision Table for order approval:
5.4.7.1 How to Create an action in a Decision Table
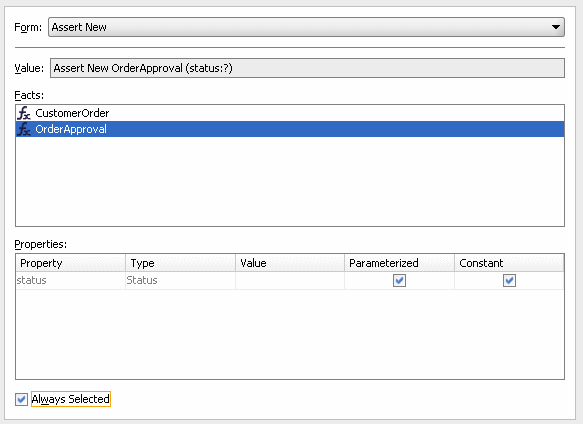
To create an action in a Decision Table:
Next you need to add rules to the Decision Table and specify an action for each rule.
5.4.7.2 Split the Cells in the Decision Table and Add Actions
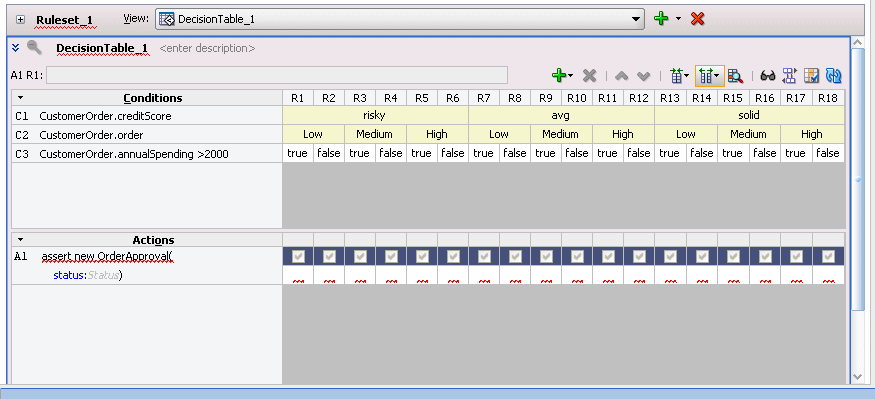
You can use the Decision Table split operation to create rules for the valuesets associated with the condition rows in the Decision Table. This creates one rule for every combination of condition valuesets. There are three order amount valuesets, three credit score valuesets, and two boolean valuesets for the annual spending amount for a total of eighteen rules (3 x 3 x 2 = 18).
To split cells in a decision table:
- Select the Decision Table.
- In the Decision Table, click the Split Table button and from the list select Split Table. The split table operation eliminates the "do not care" cells from the table. The table now shows eighteen rules that cover all ranges as shown in Figure 5-34.
These steps produce validation warnings for action cells with missing expressions. You fix these in later steps.
Figure 5-34 Splitting a Decision Table Using Split Table Operation
Description of "Figure 5-34 Splitting a Decision Table Using Split Table Operation"
5.4.7.3 How to Add Actions for Each Rule in the Decision Table
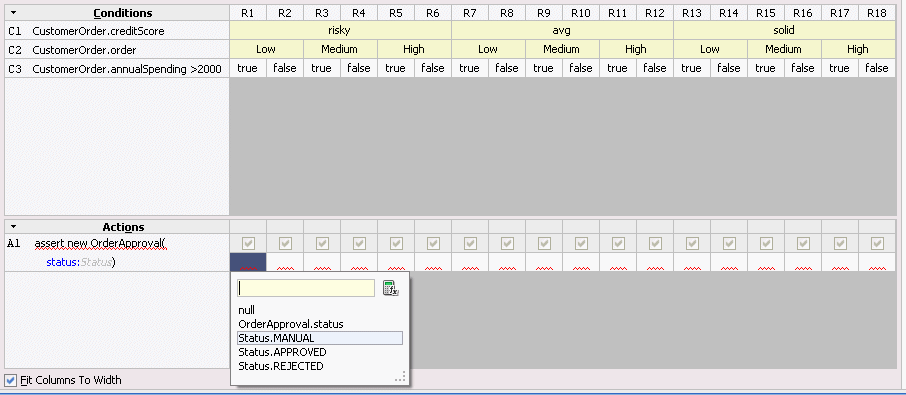
In the Decision Table you specify a value for the status property associated with OrderApproval for each action cell in the Actions area. The possible choices are: Status.MANUAL, Status.REJECTED, or Status.ACCEPTED. In this step you fill in a value for status for each of the 18 rules. The values you enter correspond to the conditions that form each rule in the Decision Table.
To add actions for each rule in the decision table:
Table 5-5 Values for Decision Table Actions
| Rule | C1 creditScore | C2 order | C3 annualSpending > 2000 | A1 OrderApproval status |
|---|---|---|---|---|
|
R1 |
risky |
Low |
true |
|
|
R2 |
risky |
Low |
false |
|
|
R3 |
risky |
Medium |
true |
|
|
R4 |
risky |
Medium |
false |
|
|
R5 |
risky |
High |
true |
|
|
R6 |
risky |
High |
false |
|
|
R7 |
avg |
Low |
true |
|
|
R8 |
avg |
Low |
false |
|
|
R9 |
avg |
Medium |
true |
|
|
R10 |
avg |
Medium |
false |
|
|
R11 |
avg |
High |
true |
|
|
R12 |
avg |
High |
false |
|
|
R13 |
solid |
Low |
true |
|
|
R14 |
solid |
Low |
false |
|
|
R15 |
solid |
Medium |
true |
|
|
R16 |
solid |
Medium |
false |
|
|
R17 |
solid |
High |
true |
|
|
R18 |
solid |
High |
false |
|
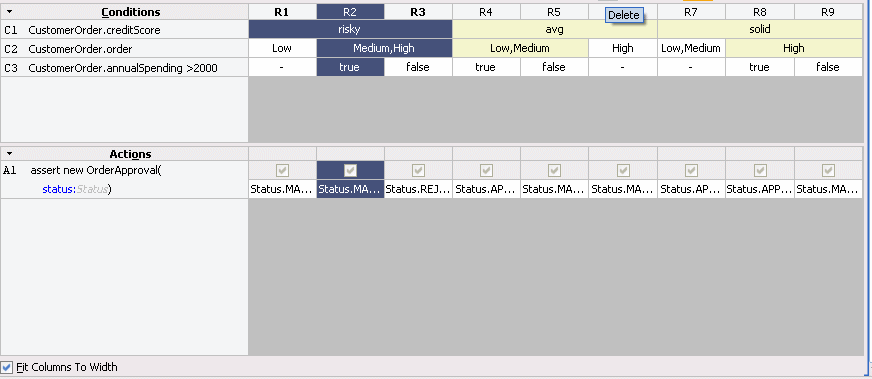
5.4.7.4 Compact the Decision Table
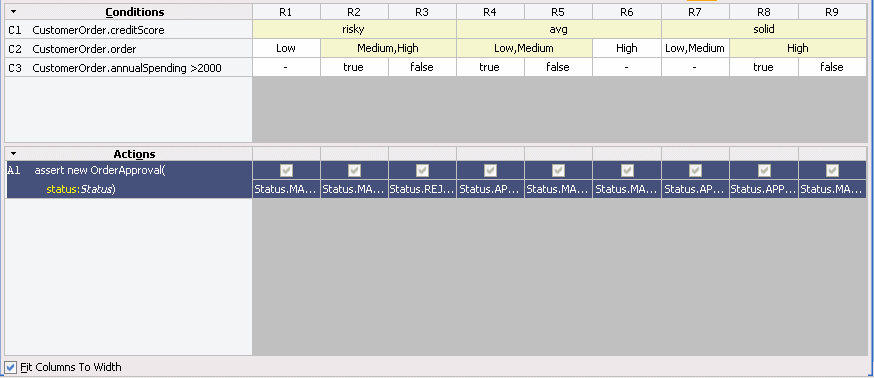
In this step you compact the rules to merge from eighteen rules to nine rules. This automatically eliminates the rules that are not needed and preserves the no gap, no conflict properties for the Decision Table.
To compact the decision table:
- Select the Decision Table.
- Click the Resize All Columns to Same Width button.
- Click the Compact Table button and from the list select Compact Table. The compact table operation eliminates rules from the Decision Table. The Decision Table now shows nine rules, as shown in Figure 5-36.
Figure 5-36 Compacting a Decision Table Using Compact Table
Description of "Figure 5-36 Compacting a Decision Table Using Compact Table"
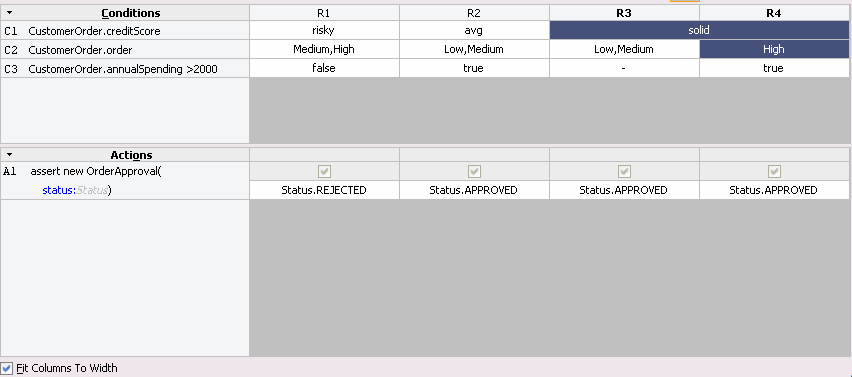
5.4.7.5 Replace Several Specific Rules with One General Rule
Notice that five of the nine remaining rules result in a manual order approval status. You can reduce the number of rules by deleting these five rules. Note it is often best practice to not do this (that is not replace several specific rules with one general rule). You need to compare the benefits of having fewer rules with the added complexity of managing the conflicts introduced when you reduce the number of rules.
To replace several specific rules with one general rule:
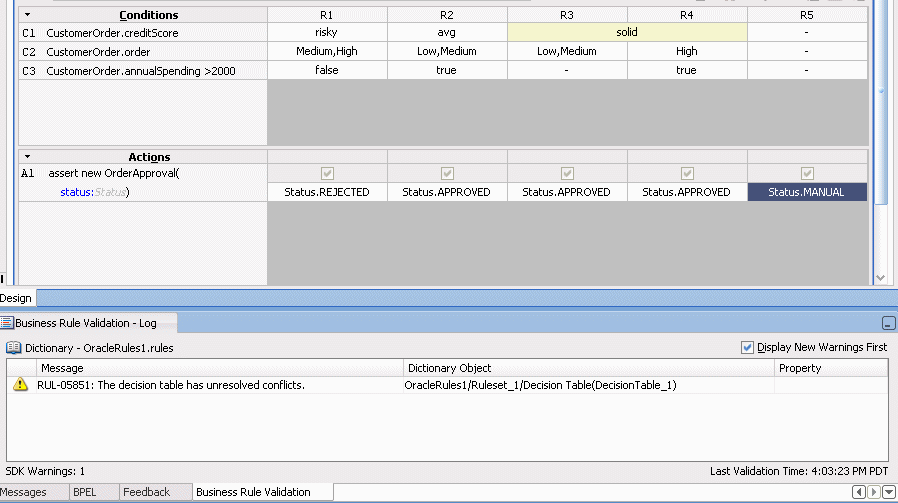
5.4.7.6 Add a General Rule
Now you can add a single rule to handle the manual case. After adding this rule you set the conflict policy with the option Conflict Policy auto override for conflict resolution.
To add a general rule:
5.4.8 How to Check the Business Rule Validation Log for Order Approval
Before you can deploy the application you need to make sure the dictionary validates without warnings. If there are any validation warnings, you need to fix any associated problems. To validate the dictionary, in the Business Rule Validation Log, check for any validation warnings. If there are warnings, perform appropriate actions to correct the problems.
5.4.9 How to Deploy the Order Approval Application
Business rules created in a SOA application are deployed as part of the SOA composite when you create a deployment profile in Oracle JDeveloper. You deploy a SOA composite application to Oracle WebLogic Server.
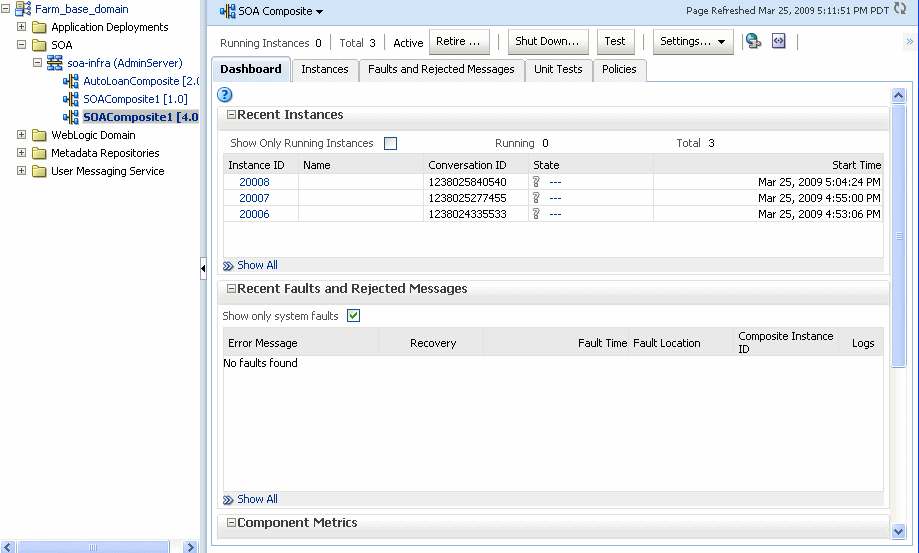
To deploy and run the order approval application:
5.5 Editing Decision Tables in Microsoft Excel
Business users may find that editing Decision Tables is easier to do in Microsoft Excel. New functionality enables both developers and business users to export and edit Decision Tables in Excel and then import the Decision Tables back into the dictionary.
You can export and edit Decision Tables at design-time in Oracle JDeveloper or Business Process Composer. At runtime, you can export and edit in SOA Composer. You can export one or more Decision Tables from a Rule dictionary to the same Excel workbook.
When you import back into the dictionary, you can create a new dictionary, overwrite the existing dictionary, or perform a Diff-Merge. The Diff-Merge enables you to compare dictionaries and accept (merge) or reject any differences.
For more information about comparing dictionaries, see How to Compare or Merge Two or More Dictionaries.
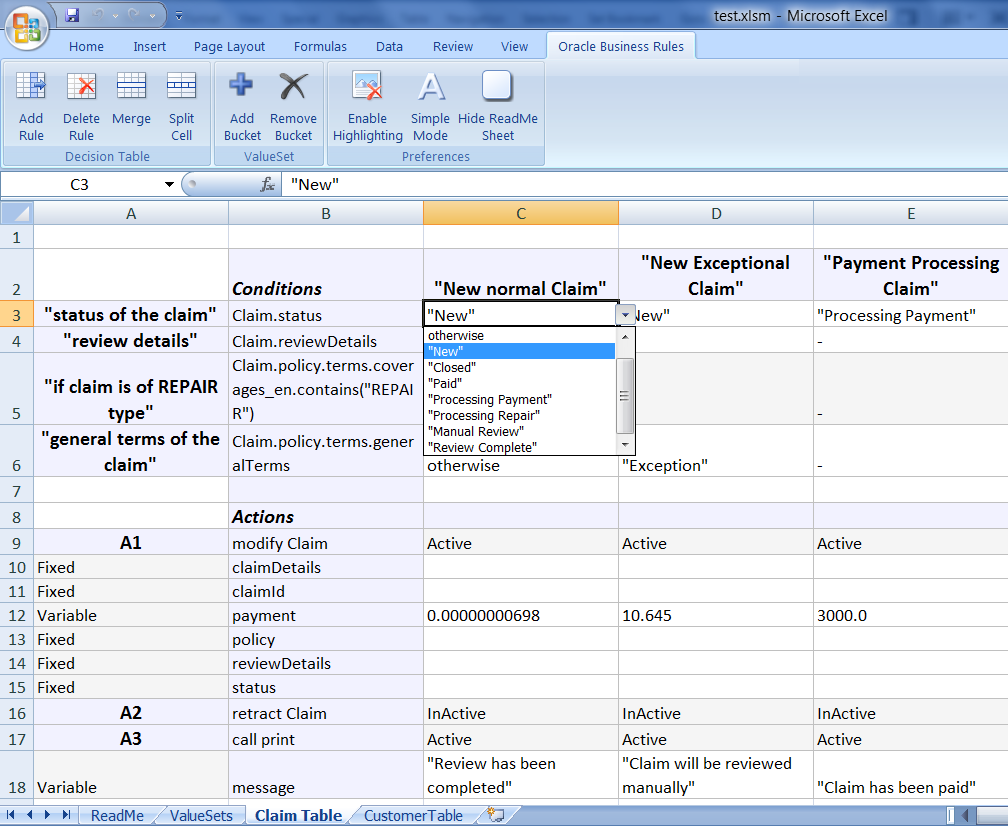
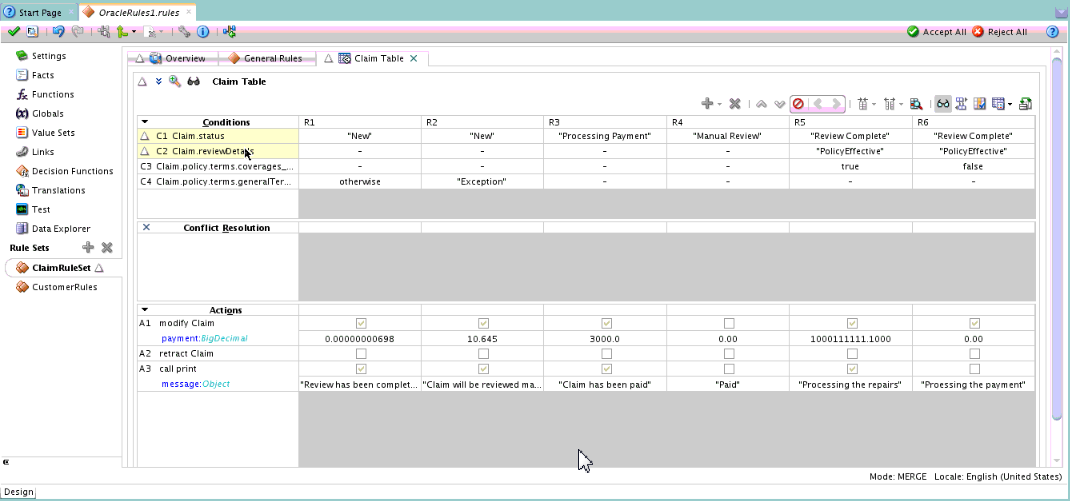
The Excel workbook structure consists of several worksheets: a Readme sheet, a Value Set sheet, and one sheet for each exported Decision Table, as shown in Figure 5-43. Only Rules and Value Sets can be edited in Excel. You can export to .xlsm (default) or .xls.
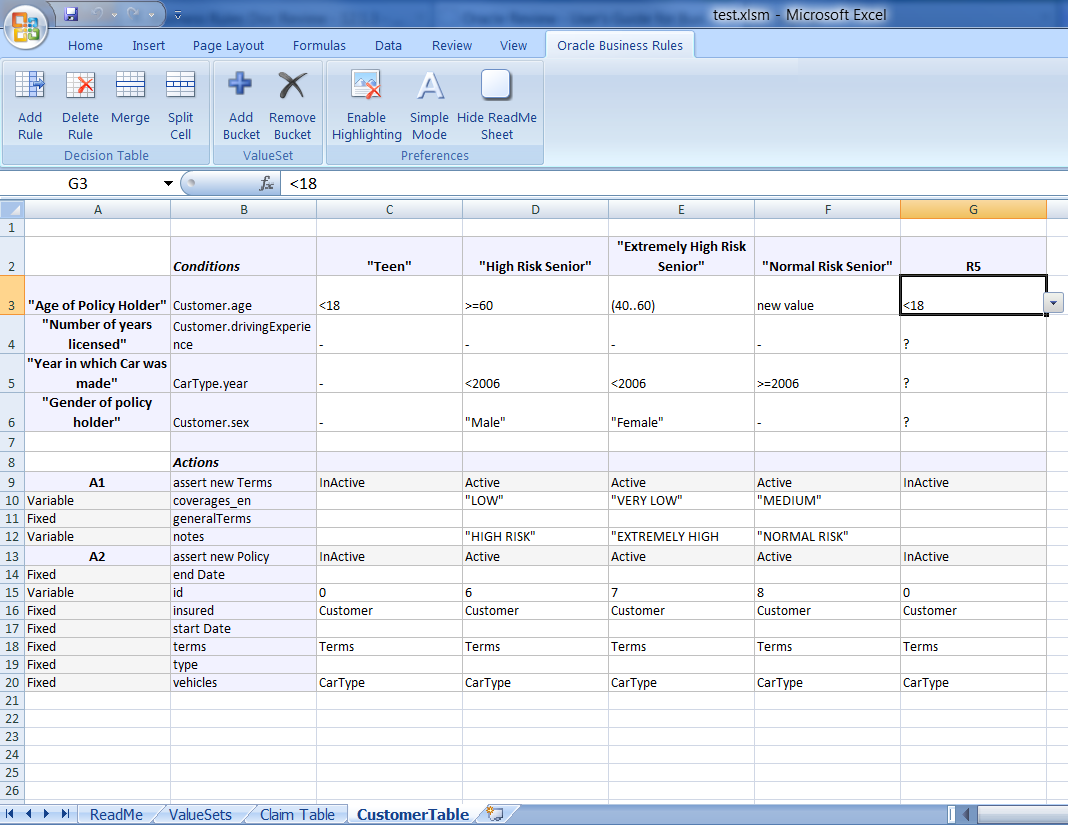
When you open the Excel workbook, the macros are disabled by default. If you enable the macros, a new tab called Oracle Business Rules, appears. This tab enables you to add or delete rules, merge or split cells, and add or remove values from value sets. You can also disable or enable highlighting, use a simple or advanced mode and hide or show the Readme worksheet.
You can edit with the macros disabled, though you will not be able to:
-
Choose values from drop lists for restricted cells.
-
Edit free form cells.
-
Copy and paste a range of cells to add a rule or Value Set.
-
Delete a range of cells to delete a rule or Value Set.
-
Split or merge cells.
-
Create Value Sets automatically.
-
Validate the structure of Decision Tables or Value Sets.
Using the predefined macros, you can:
-
Add and delete rules.
-
Split or merge cells.
-
Add or delete Value Sets.
-
Editable cells include:
-
Description for Rules, Conditions, Actions.
-
Condition and Action nodes.
-
Action state.
-
Parameterized options for Action parameters.
-
-
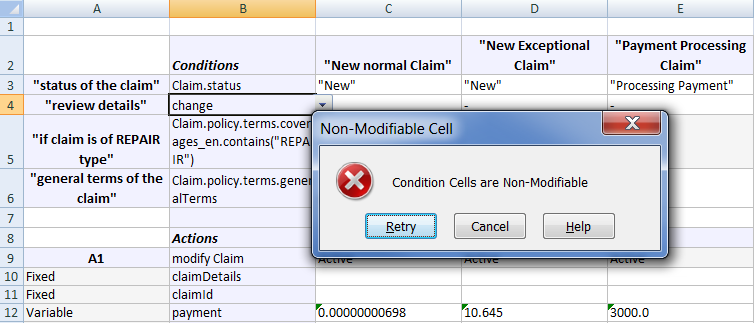
Non-editable cells include:
-
Condition expressions.
-
Action expressions.
-
Action parameters.
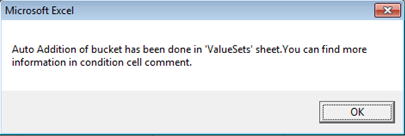
If you try to edit these cells, you will get an error message, as shown in Figure 5-44.
-
5.5.1 Understanding What is Exported
In the SDK, there are shared Value Sets that can be associated with multiple conditions across Decision Tables. However, in Excel there are no shared Value Sets--each condition has its own Value Set--so you can only export a Value Set if it is modifiable in Excel. The Value Sets that are non-modifiable include:
-
Linked Dictionary Value Sets.
-
Enums.
-
Internal Value Sets, for example, boolean Value Sets.
In the worksheet, you can only select values from the drop down for the conditions associated with non-modifiable Value Sets. A highlighting mechanism informs you which conditions are associated with non-modifiable Value Sets.
5.5.2 How to Export Decision Tables
The export and import functionality is invoked using the toolbar button, as shown in Figure 5-45.
Figure 5-45 Export and Import Toolbar Button

Description of "Figure 5-45 Export and Import Toolbar Button"
To export Decision Table:
- In Rules Designer, click Export to Excel.
- In the Export to Excel dialog box, select the Format and browse to the folder where you want to save the workbook.
- Click Add and select the Decision Table(s) to export and click OK.
- Check the Read Only Value Set check box to make all of the value sets read-only in Excel. There will not be any Value Sets sheet in the Excel workbook. All conditions will have drop down menus from which values can be selected but no values can be added or removed.
- Click Export. You can now open the workbook and edit the Decision Table.
5.5.3 How to Import Edited Decision Tables Back to the Dictionary
The export and import functionality is invoked using the toolbar button, as shown in Figure 5-45. You can only import Excel workbooks that have been previously exported.
To import edited Decision tables:
5.5.4 How to Edit Decision Tables in Excel
In Excel, enable the macros to view the Oracle Business Rules tab, which provides you with options to author rules, edit Value Sets, and set preferences.
5.5.4.1 Adding or Deleting Rules and Merging or Splitting Cells
For each Decision Table worksheet, you can add a rule, as shown in Figure 5-47, delete rules, and merge or split cells.
Figure 5-47 Oracle Business Rules tab in Excel
Description of "Figure 5-47 Oracle Business Rules tab in Excel"
5.5.4.2 Adding or Removing Value Sets
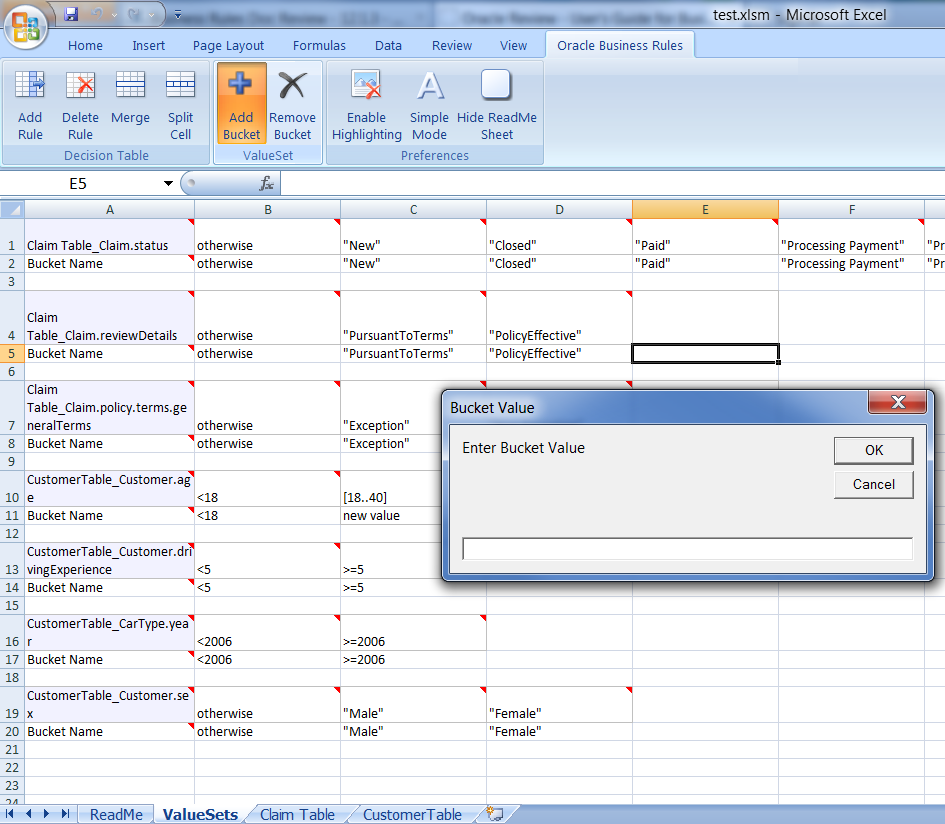
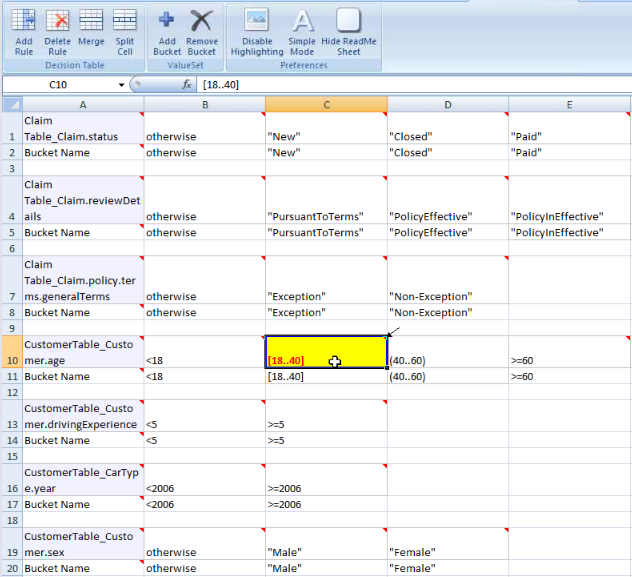
In the ValueSets tab, you can add or remove Value Sets, as shown in Figure 5-48. Depending on the cell you click in, your options will vary: endpoints or values.
5.5.4.3 Showing or Hiding Value Sets and Editing the Description
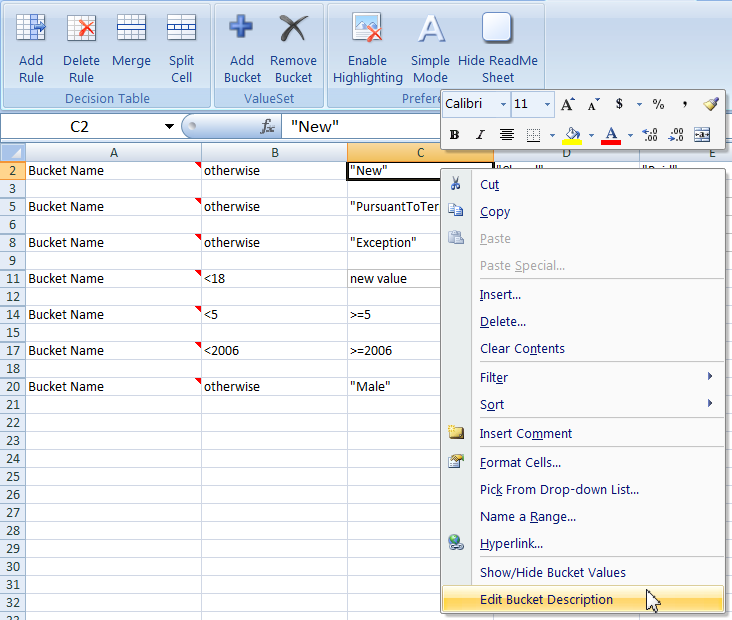
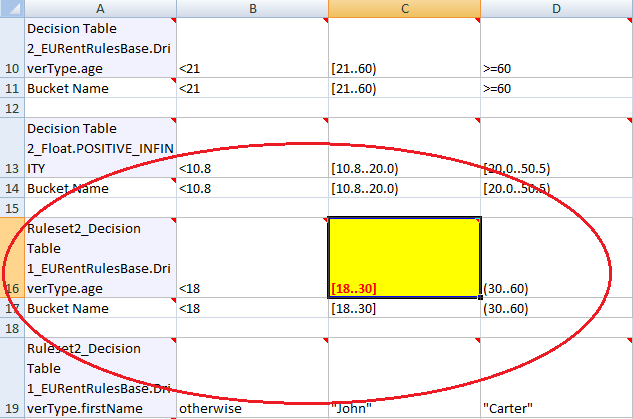
On the Value Sets worksheet, right click and select Show/Hide Values to toggle between viewing or hiding values as shown in Figure 5-49. You can also right click and select Edit Bucket Description to change the description.
5.5.4.4 Setting Preferences
In the Value Sets tab, click Enable Highlighting or Disable Highlighting, as shown in Figure 5-50.
5.5.4.5 Using Simple or Advanced Mode
In your worksheet, click Simple Mode or Advanced Mode to toggle between the two modes.
Simple mode displays only the descriptions of conditions and actions and not the actual expressions. Also, action parameters are displayed, but you cannot specify them as fixed or variable.
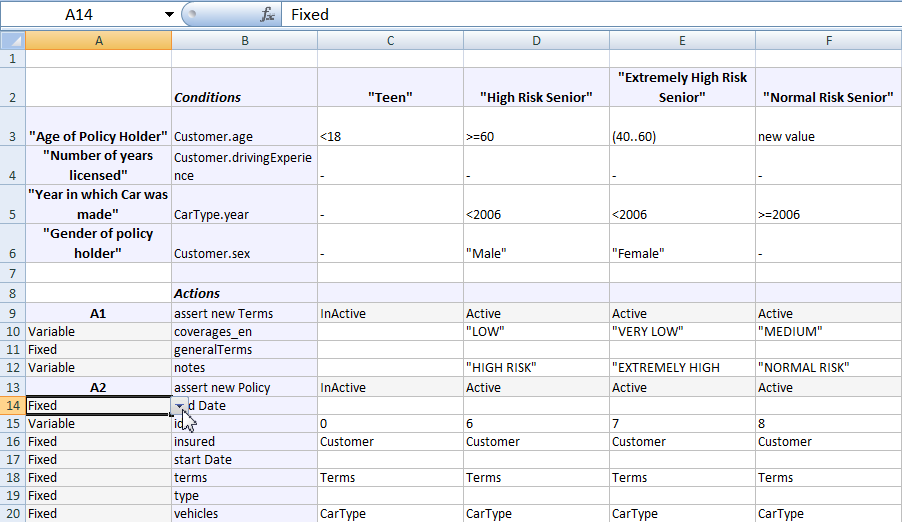
Advanced mode displays both the descriptions and expressions for conditions and actions, as shown in Figure 5-51. Also, you can specify the action parameter type from fixed and variable, which is equivalent to specifying "Parameterized/Constant" in the SDK.
5.5.4.6 Hiding or Showing the Readme Worksheet
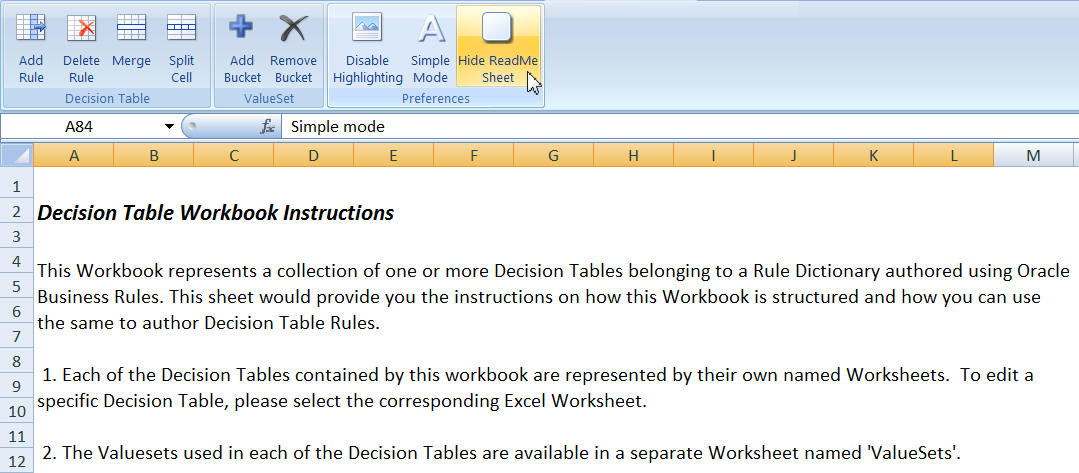
Click Hide or Show ReadMe Sheet to toggle between the modes, as shown in Figure 5-52. The ReadMe worksheet provides helpful information about how to use the features on the Oracle Business Rules tab.
5.5.4.7 Editing Condition Cells
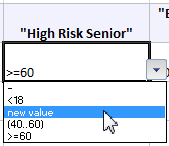
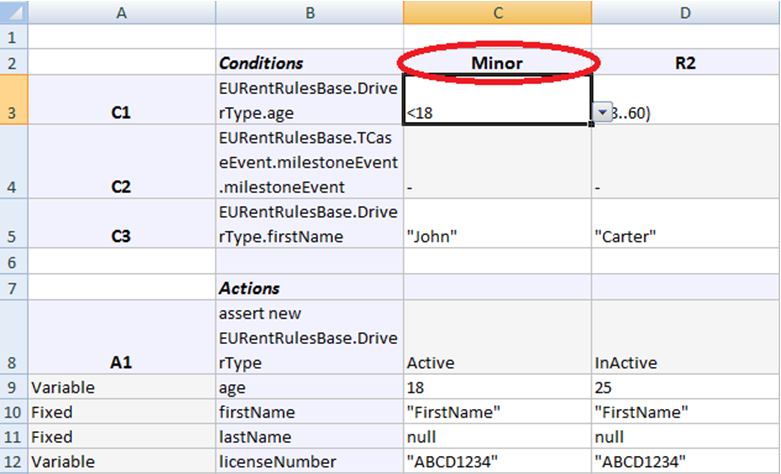
You can choose from the drop down or use auto-addition to add new values, shown in Figure 5-53. For some of the condition cells, you can only choose values from the drop down menu. These cells have been differentiated by using color code. Any conditions you change between a Value Set or Decision Table are automatically synced.
5.5.4.8 Editing Actions
You can select the action state (active/inactive) from the drop down, as shown in Figure 5-54.
5.5.4.9 Editing Expressions
You can edit the values of action expression cells. Use care to maintain the validity of these cells when editing.
5.5.4.10 Editing Action Expression Parameters
You can make action parameters fixed or variable, as shown in Figure 5-55. If the action parameter is fixed, then all the rules will have the same value for that particular parameter. If the action parameter is variable, then different rules can have different values for that particular parameter.
Figure 5-55 Editing Action Expression Parameters

Description of "Figure 5-55 Editing Action Expression Parameters"
5.5.4.11 Editing Descriptions
You can edit descriptions for actions, conditions, and rules. If the description is not provided for any of the action or condition or rule then it will be defaulted to "A", "C" or "R" followed by a number which denotes its position in the decision table, respectively.
5.5.4.13 Aliases of Values in the Value Sets Worksheet
In the value sets sheet, there are two rows for every value set. The first row denotes the value and the second one denotes the alias of the value. It is the alias of the value that is shown in the drop-down of condition cells.The aliases can be edited. Any change made in aliases will be immediately available in corresponding condition cells.
5.5.4.14 Syncing Value Sets and Conditions
The value sets and condition cells are always in sync. Any change made in value set is promptly synced with the condition cells whether it is an addition/deletion of any value, or any change in the alias. The sync is always maintained between value set and the corresponding condition cells.

