52 Customizing Blog Components
You can customize the default blog components such as Blog flex family hierarchy, RSS feed URLs to render custom pages. You can also create blog pages and modify the code.
Topics:
52.1 Customizing the Blog Asset Form
You can modify the Blog flex family hierarchy as you need. When you want to display the attribute as a field in the blog asset form, all you need to do is, create a new blog attribute and then add that attribute to the blog asset definition.
Note:
To see the hierarchical relationships between blog categories and blog assets, create a tree tab for your own reference. For instructions about creating a tree tab, see Creating a Tree Tab in Administering Oracle WebCenter Sites.
This section includes the following topics:
52.1.1 Creating a Blog Attribute
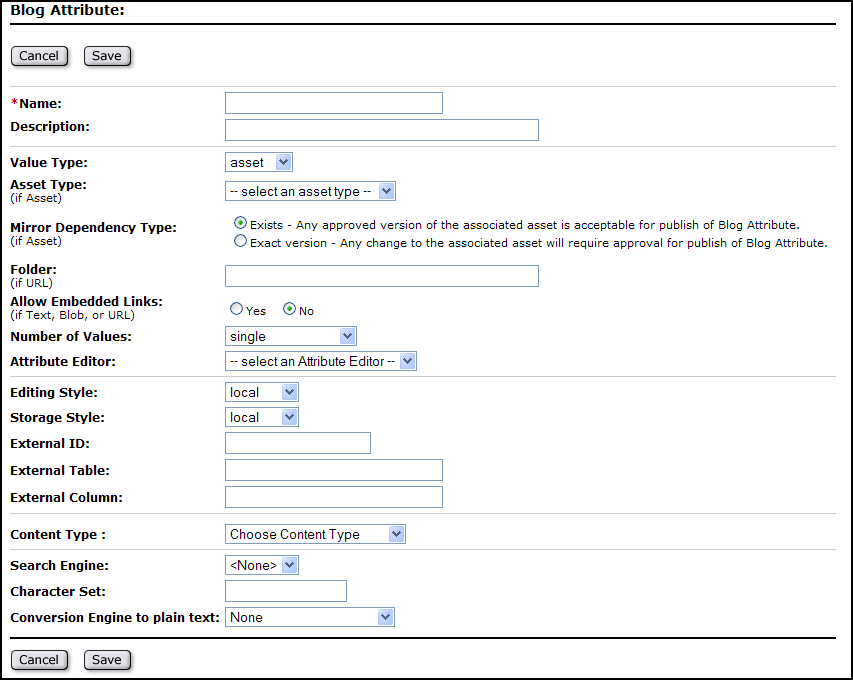
The blog attribute you create will be displayed as a field in the blog asset form once you add the attribute to the blog asset definition.
To create a blog attribute:
52.1.2 Adding a Blog Attribute to the Blog Asset Definition
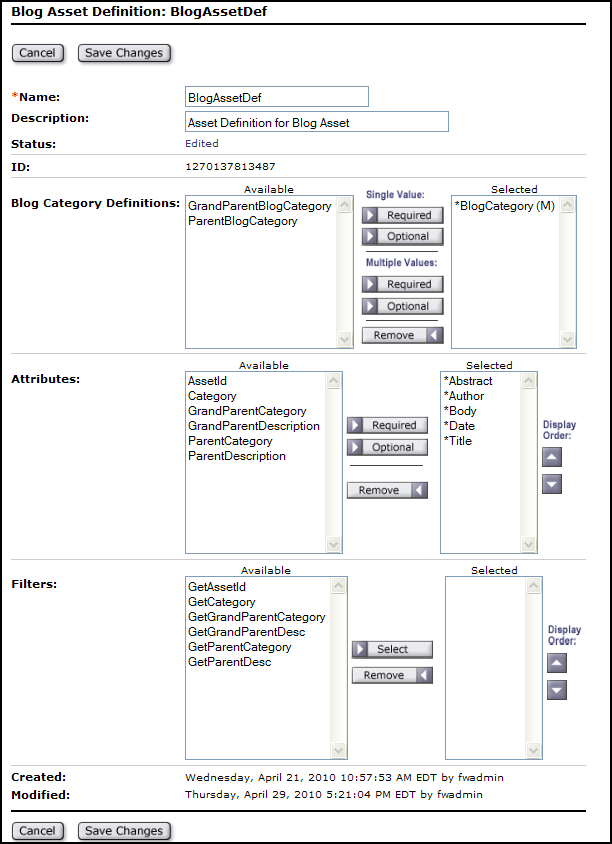
To add an attribute to the blog asset form you must add the attribute to the blog asset definition.
To add an attribute to the blog asset definition:
-
Log in to the Admin interface as a general administrator, and select the site on which the Blogs component is enabled.
-
Access the blog asset definition's Inspect form:
-
In the button bar, click Search.
-
In the Search form, click Find Blog Asset Definition, and click Search.
-
Select BlogAssetDef.
-
-
In the Inspect form, click Edit.
-
In the Attributes field, select the attribute(s) from the Available list and use the Required or Optional button to move the attribute(s) to the Selected list. Which button you choose determines whether the attribute(s) will be required or optional in the blog asset form.
-
Click Save.
The attributes you selected are now included as fields in the blog asset form. When a user creates a blog asset, the new attributes will be displayed as either required or optional fields.
52.2 Adding Blog Functionality to CM Sites
Would you like to use the Blogs component on a different CM site? You need to first create blog pages for that site.
To add blog functionality to your website:
-
Create pages on the content management site that will be used to render blog assets on the website.
-
Copy the blog code from the default blog templates and CSElements to your site's templates and CSElements. How your site is set up determines the modifications you must make to the default code once you insert it into your templates and CSElements.
-
Add the
blogsperpageparameter that is specified in the Blogs component’s SiteEntry asset to your own site's SiteEntry asset.
See these topics:
52.2.1 Creating Blog Pages
Before creating blog pages, map out their types: the main blog page (which is the FW_RecentBlogs page in the Blogs component), category pages, and so on. Also determine your site's graphical, navigational, and functional features to create blog pages that will conform to the layout of your website.
To create blog pages:
52.2.2 Adding Blog Code
The Blogs component is configured to render sample blog pages. Your own site's layout is likely to differ from the layout of the sample blog pages. For example, your site may call a left navigation, while the sample blog pages call a right navigation. Instead of coding your templates from scratch to incorporate blog functionality, reuse the sample code by inserting it into your own templates and CSElements, then reconfiguring the code as necessary.
Note:
Your site's wrapper element renders the layout of your site. To ensure that your wrapper element renders blog pages in addition to existing pages, copy the relevant blog code from the default FW_Wrapper element to your site's wrapper element.
To add blog code to your site's layout template:
-
Log in to the Admin interface as a general administrator.
-
Select the site on which the Blogs component was installed.
-
Access the
FW_BlogLayouttemplate:-
In the button bar, click Search.
-
In the Search list, select Find Template.
-
In the Search field, enter
FW_BlogLayout, and then click Search. -
Click FW_BlogLayout.
-
-
In the layout template's Inspect form, click Edit.
-
Copy the necessary code from the Blogs component's layout template and insert it into your own layout template:
The following lines retrieve the site description from the wrapper and load the site:
<ics:if condition='<%=ics.GetVar("tid")!=null%>'>
  <ics:then>
    <render:logdep cid='<%=ics.GetVar("tid")%>' c="Template"/>
  </ics:then>
</ics:if>

<publication:load name='Publication' field="name"
    value='<%=ics.GetVar("site")%>'/>
<publication:get name='Publication' field="id" output="spubid"/>
<publication:get name='Publication' field="description" output="pubdesc"/>
The following line retrieves the body of the page:
String sContainerTName = "FW_BlogContainer";
The following lines load the site, page, and asset descriptions:
   String sTitle = "";
  if (!"Page".equals(ics.GetVar("c")))
  {
     %><asset:load name='t2' type='<%=ics.GetVar("c")%>'
     objectid='<%=ics.GetVar("cid")%>' /><%
     %><asset:get name='t2' field='name' output='t2Name' /><%
     %><asset:get name='t2' field='description' output='t2Desc' /><%
     sTitle += ": "+(Utilities.goodString(ics.GetVar("t2Desc")) ?
     ics.GetVar("t2Desc") : ics.GetVar("t2Name"));
     } else if (Utilities.goodString( ics.GetVar("p") )) {
     %><asset:load name='t1' type='Page' objectid='<%=ics.GetVar("p")%>' /><%
     %><asset:get name='t1' field='name' output='t1Name' /><%
     %><asset:get name='t1' field='description' output='t1Desc' /><%
     sTitle += ": "+(Utilities.goodString(ics.GetVar("t1Desc")) ?
     ics.GetVar("t1Desc") : ics.GetVar("t1Name"));
}
The following line calls the style sheet for the blog layout template. The style sheet defines the look and feel of the sample blog pages. Because your site has its own style sheet, copy the parameters you need from the Blogs component's style sheet and insert them into your own site's style sheet. Make sure you resolve any conflicts between the Blogs component's style sheet and your own style sheet:
<render:callelement elementname="FW_Blogs/CSS/blogsCSS/">
The following lines are the JavaScript method that retrieves the More link for the Archive blogs page:
<script type="text/javascript">
function getMoreBlogs(url) {
  var xhtReq = getXMLHttpRequest();
  xhtReq.open(GET, url, true);
  xhtReq.onreadystatechange = function() {
    if(xhtReq.readyState==3) {
      document.getElementById('moreLink').innerHTML =
        ' <img src="<%=ics.GetSSVar("baseurl")%>images/wait_ax_tiny.gif/>';
    }
    else if(xhtReq.readyState==4) {
      document.getElementById('archiveDiv').innerHTML = xhtReq.responseText;
    }
  };
  xhtReq.send(null);
}

function getXMLHttpRequest() {
  try { return new XMLHttpRequest(); } catch(e) {}
  try { return new ActiveXObject("Msxml2.XMLHTTP"); } catch (e) {}
  alert("XMLHttpRequest not supported");
  return null;
}
</script>
The following lines call the main blog page or the body of a given asset. These lines also call the header and footer for the blog sample pages. Since your site has its own headers and footers, copy only the code you require for your site's blog functionality, and retain your own site's headers and footers:
<!--main start--> <div id="main"> <!--header start--> <%-- <div id="header"> <!--Call header from here--> </div> --%> <!--header end container start--> <div id="container"> <!--Body --> <%-- Call the container template for the current page subtype --%> <render:calltemplate tname='<%=sContainerTName%>' site='<%=sSite%>' tid='<%=ics.GetVar("tid")%>' slotname="BlogBodyContainer" c='<%=ics.GetVar("c")%>' cid='<%=ics.GetVar("cid")%>' ttype="Template"> <render:argument name=p value='<%=ics.GetVar("p")%>' /> <render:argument name=locale value='<%=ics.GetVar("locale")%>'/> <render:argument name=packedargs value='<%=ics.GetVar("packedargs")%>'/> <render:argument name=site value='<%=ics.GetVar("site")%>'/> <render:argument name=spubid value='<%=ics.GetVar("spubid")%>'/> <render:argument name=blogsperpage value='<%=ics.GetVar("blogsperpage")%>'/> </render:calltemplate> </div><!-- End of container --> </div><!-- End of main --> <!-- Footer --> <%-- <div id="footer"> <!--Call footer from here--> </div> --%> </body> -
Reconfigure the blog code you inserted into your site's layout template to fit your requirements.
-
Inspect the code of the other default blog templates and CSElements and copy the relevant sections into your own templates and CSElements.
52.2.3 Adding Blog Parameters to Your Site's SiteEntry Asset
The Blogs component's SiteEntry asset specifies the blogsperpage parameter, which enables you to specify the number of blog assets that can be displayed on a Web page at one time. You can specify this parameter in your own site's SiteEntry asset.
Note:
If you do not specify the blogsperpage parameter in your site's SiteEntry asset, then the default number of blogs per page, which is 10, will be used.
To add the blogsperpage parameter to your custom SiteEntry asset:
-
Log in to the Admin interface as a general administrator.
-
Select the site to which you are adding blog functionality.
-
In the button bar, click Search to find your site's SiteEntry asset.
-
In the Search form, click Find SiteEntry.
-
Click Search.
-
Select your site's SiteEntry asset.
-
-
In the SiteEntry asset's Inspect form, click Edit.
-
In the Pagelet Parameters field, add the following:
-
Name: Enter
blogsperpage. -
Value: Enter the number of blogs that can be displayed on a page at one time.
-
-
Click Save.
52.3 Customizing URLs for the RSS Feed
The right navigation panel of the sample blog pages contains an RSS Feed link. When a visitor clicks the RSS Feed link, it renders an up-to-date listing of the titles and summaries of the blog assets that are published to the sample blog pages. When a visitor clicks the title of a blog, the entire content of the selected blog is rendered. External URLs for the blog assets included in the RSS Feed are created by the GetExternalURL CSElement.
By default this element creates the local WebCenter Sites URL:
http://<host name>:<port number>/<application context>/<path to file>
where <host name> is the host name of the WebCenter Sites installation from which the assets of the RSS Feed are accessible, <port number> is the port number of the WebCenter Sites application, and <application context> is the context of the WebCenter Sites application on which the Blogs component is running.
-
To use the RSS Feed with your own site's external URLs, modify the
GetExternalURLelement's URL string, and add the parameters listed in the following table to thefuturetense_xcel.inifile with the values for the host information and context of your site. TheGetExternalURLelement reads these parameters from thefuturetense_xcel.inifile to create the external URLs for the blog assets listed in your site's RSS Feed.Table 52-1 Parameters read by GetExternalURL element to create external URLs
Parameter Description fwblogs.hostschemeSpecifies the top level of the URL naming structure. For example,
http.fwblogs.hostnameSpecifies the host name of the WebCenter Sites installation from which the assets of the RSS Feed are accessible.
fwblogs.portnumberSpecifies the port number of the WebCenter Sites application.
fwblogs.contextinfoSpecifies the context of the WebCenter Sites installation on which the Blogs component is running.


