10 Improving Service Performance with Split-Join
This chapter provides an overview of split-joins and how to create them, and also demonstrates static and dynamic split-join scenarios. Split-join is an advanced mediation feature that helps you improve service performance by concurrently processing individual messages in a request.
This chapter includes the following sections:
10.1 Introduction to Split-Joins
A split-join is a mediation pattern that can be used in a Service Bus to direct the flow and processing of messages. A split-join greatly improves service performance over standard sequential processing.
A Split-join splits an input message payload, such as an order, into submessages (split). The messages are then routed concurrently to their destinations., and the responses are aggregated into one overall return message (join). This process of payload splitting and response aggregation is called a split-join pattern.
Split-joins are useful for optimizing overall response times in scenarios where payloads delivered by faster systems are being directed to responding services on slower systems. Without split-join, individual messages in a payload are normally resolved in sequential order by the recipient, which can take a long time if the responding system is slow. With split-joins, multiple messages are processed simultaneously, which reduces burden on the responding system and greatly improves response times. Without a split-join, the overall response time is the sum of the individual response times for each message. With a split-join, the overall response time is roughly that of the longest individual message response time plus some minor system overhead.
You create and design split-joins in the JDeveloper Split-Join Definition Editor. You can then export the split-join and its associated resources, and import those resources to the Oracle Service Bus Console for testing and production. A split-join is saved to a .flow file in JDeveloper, and is always based on a WSDL operation. A split-join can be invoked from a proxy service, a pipeline, or another split-join. A split-join can invoke a proxy or business service, a pipeline, or another split-join.
There are two types of split-join pattern: static split-join to handle a known number of requests, and dynamic split-join to handle a variable number of requests. These patterns are described in the following sections.
Note:
A split-join can invoke another split-join in the same Service Bus configuration. This feature provides more flexibility in service design by letting you split up complex split-join functionality into multiple split-joins. This feature allows for componentization and reuse of split-join functionality. Performance is maintained, because there is no marshalling and unmarshalling of data between the split-joins.
Ensure that you do not create circular split-join references; Service Bus does not check for circular references.
10.1.1 Static Split-Joins
A static split-join branches from the main execution thread of a Service Bus message flow by splitting a payload into a fixed number of new branches according to the configuration of the split-join. At design time you determine the number and variety of services to be invoked. For instance, a customer places an order for a cable package that includes three separate services: internet service, TV service, and telephone service. In the static use case, you could execute all three requests in separate parallel branches to improve performance time over the standard sequential execution.
10.1.1.1 Static Split-Join – Sample Scenario
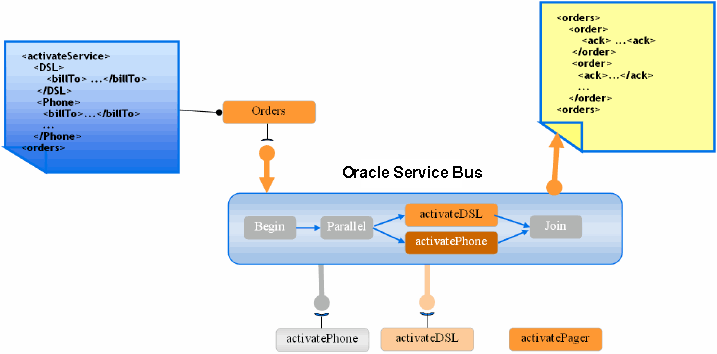
This scenario illustrates a telco company that employs static split-join to process a customer's order for a communications services package. In this case, the customer might sign up for DSL and voice services all at once. Rather than executing each request in the payload separately in order, the telco can execute the messages in parallel using a static split-join.
Static split-join is the ideal pattern in this case because you know there will always be exactly two incoming service requests for this particular service package: DSL and voice. Splitting the requests into parallel branches allows them to be processed concurrently, which improves the overall response time for processing the payload. After all messages are processed, the generated responses are aggregated back into one reply in the execution thread.
Figure 10-1 illustrates a static split-join that splits two known service requests, DSL activation and phone activation, processes each request in parallel, and joins the responses into a single reply.
Figure 10-1 Static Split-Join – Known Number of Service Requests
Description of "Figure 10-1 Static Split-Join – Known Number of Service Requests"
10.1.2 Dynamic Split-Join
A dynamic split-join branches from the main execution thread of a Service Bus pipeline by dynamically creating new branches according to the contents of the incoming payload. The number of message requests created is variable. A dynamic split-join uses conditional logic to determine the number of branches to create. All requests are handled simultaneously, and the responses are aggregated into a single reply. For instance, a retailer places a batch order containing a variable number of individual purchase orders. In the dynamic use case, you could parse the batch order and create a separate message request for each purchase. Like the static use case, these messages are then executed in parallel for improved performance.
10.1.2.1 Dynamic Split-Join – Sample Scenario
This scenario illustrates a company that uses dynamic split-join when it places automated stationery orders for its employees. If the orders are automatically placed every week based on employee submissions, there is no way to know how many individual orders are included in any one weekly order. Rather than placing each order separately, the company could use a dynamic split-join to place the orders concurrently using a dynamic split-join.
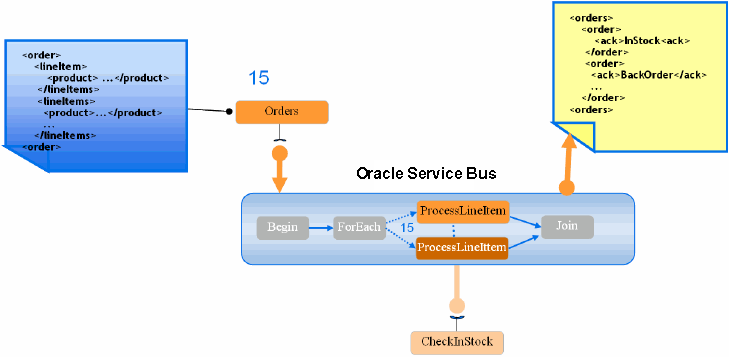
Dynamic split-join is the ideal pattern in this case, because there is no way of knowing how many orders will be submitted each week. The dynamic split-join loops through all the orders and places them in parallel. You can also limit the number of orders that are processed. After all of the orders have been processed, the generated order responses are aggregated back into one reply in the execution thread.
Figure 10-2 illustrates a dynamic split-join that splits 15 orders, processes them concurrently, and joins the responses into a single reply.
Figure 10-2 Dynamic Split-Join – Unknown Number of Service Requests
Description of "Figure 10-2 Dynamic Split-Join – Unknown Number of Service Requests"
10.1.3 Split-Join Operations
The Split-Join Components window lists all the operations you can use to construct a split-join. The operations are divided into the following categories: Communication, Flow Control, and Assign.
10.1.3.1 Split-Join Communication Operations
Communication operations define how the split-join interacts with external services. The available operations are described in Table 10-1.
Table 10-1 Split-Join Communication Operations
| Operation | Description |
|---|---|
|
Invoke Service |
This operation invokes a WSDL-based, non-transport-typed business service, a WSDL-based proxy service, a WSDL-based proxy service, or a split-join. See How to Invoke a Service. |
|
Reply |
This operation sends a response or fault back to the Oracle Service Bus message flow. See How to Configure a Reply. |
10.1.3.2 Split-Join Flow Control Operations
Flow control operations define how incoming messages flow through the split-join.
Table 10-2 Split-Join Flow Control Operations
| Operation | Description |
|---|---|
|
For Each |
This operation executes the logic configured within its Scope a specified number of times. See How to Iterate Through a Variable Number of Requests. |
|
Condition Operations |
Condition operations let you define conditions that evaluate to true or false, and then carry out the behavior defined for each condition. You can define any of the following conditions:
|
|
Parallel |
This operation creates a fixed number of configured parallel branches, so you can define a static split-join that handles a fixed number of message requests. Parallels contain one or more Scope branches. See How to Process a Fixed Number of Requests in Parallel. |
|
Raise Error |
This operation generates an error that causes the split-join to stop normal processing. If the error is not handled using an error handler, the split-join will terminate and a Fault will be sent to the Oracle Service Bus message flow. See How to Raise an Error. |
|
Re-Raise Error |
This operation lets you re-raise an error caught by an error handler catch or catch all. You can configure a name and description for a Re-Raise Error operation. See How to Re-Raise an Error. |
|
Scope |
This operation creates a context that influences the behavior of its enclosed operations. Local variables and the error handler defined within the scope are restricted to this context. There are no configuration properties for a Scope operation. See How to Create a Container Node. |
|
Wait |
This operation inserts a pause in the split-join flow for a short duration to wait for other dependent jobs to complete. After the specified duration is reached, the split-join execution resumes. See How to Insert a Pause in Processing . |
10.1.3.3 Split-Join Assign Operations
The assign operations let you manipulate the data in the message you process, including initializing and updating a variable. You can perform the following operations in an assign node: assign, copy, delete, insert, Java callout, log, and replace.
Table 10-3 Split-Join Assign Operations
| Operation | Description |
|---|---|
|
Assign |
This operation lets you assign the result of an XQuery expression to a variable. See How to Assign a Value to a Variable. |
|
Copy |
This operation lets you copy the information specified by an XPath expression from a source document to a destination document. See How to Copy a Value from a Source to a Destination Document. |
|
Delete |
This operation lets you delete a set of nodes specified by an XPath Expression. See How to Delete a Set of Nodes. |
|
Insert |
This operation lets you insert the result of an XQuery expression at an identified place relative to nodes selected by an XPath Expression. See How to Insert the Result of an XQuery Expression. |
|
Java Callout |
This operation lets you invoke a static Java method from a split-join for custom actions to be handled in Java such as validation, transformation, and logging. See How to Invoke a Java Method in a Split-Join. |
|
Log |
This operation lets you log data at a specified severity so that administrators can take appropriate action. See How to Log Split-Join Data. |
|
Replace |
This operation lets you replace a node or the contents of a node specified by an XPath expression. See How to Replace a Node or Its Contents. |
10.1.4 Using Split-Join with Content in SOAP Headers
You can use split-join to enhance the performance of services that place message content in SOAP headers. By default, split-joins do not propagate SOAP headers; however, you can modify the WSDL file to accommodate this, allowing proxy services to pass SOAP headers into split-joins and allowing split-joins to pass SOAP headers to proxy and business services as an invocation or response.
To enable this capability, you must declare the header parts along with the body parts in a single request/response message in the split-join WSDL file and in the WSDL file of the proxy or business services invoked by the split-join. With the message parts declared in the WSDL files, SOAP header content is available to split-joins in the request/response message variables.
Following is an example of the message and binding definitions in the WSDL file.
Message
<wsdl:message name="retrieveCustomerOverviewByIdRequestMessage">
    <wsdl:part name="retrieveCustomerOverviewByIdRequest"
     element="co:retrieveCustomerOverviewByIdRequest"/>
    <wsdl:part name="serviceContext" element="sc:serviceContext"/>
</wsdl:message>
Binding
<wsdl:input>
<soap:body use="literal" parts="retrieveCustomerOverviewByIdRequest"/>
    <soap:header message="tns:retrieveCustomerOverviewByIdRequestMessage"
     part="serviceContext" use="literal"/>
</wsdl:input>
10.1.5 Transaction Support
Split-joins provide support for propagating transactions. Many split-join operations provide an option for setting specific quality of service (QoS) values, which control transaction support. The QoS value of Exactly Once on a split-join operation ensures the operation executes in the context of a transaction if one exists.
Setting QoS values on individual operations gives you the flexibility to execute multiple operations in the context of a transaction and execute other operations outside of a transaction in a single split-join. Operations set with a QoS of Exactly Once are executed in the transaction. Operations set with a QoS of Best Effort do not execute in the context of a transaction.
Split-joins do not handle transaction rollback in the case of exceptions. It is the responsibility of the service component that called the split-join to handle transaction exceptions and rollback.
The following split-join operations support transaction propagation:
-
Invoke Service
-
Assign
-
Delete
-
Insert
-
Java Callout
-
Replace
10.1.6 Security with Split-Joins
Split-joins do not enforce security policies, which means you cannot create a split-join with a WSDL file that includes policies, and you cannot call a WSDL-based business service that contains WSDL policies from a split-join.
To ensure security enforcement when using split-joins, use proxy services to handle security enforcement in the following ways:
-
Use the inbound proxy that invokes the split-join to enforce policies.
-
If the split-join needs to invoke a WSDL business service that contains policies, have the split-join call a local proxy (configured without the security policies), which in turn invokes the business service with the required policies.
10.2 Service Level Agreement Alert Rules
Service Level Agreement (SLA) alert rules define conditions under which an alert is generated. These conditions are typically indicators of the overall health of the Service Bus application or of a specific service component.
For information about defining SLA alert rules for a split-join, see "Creating Service Level Agreement Alert Rules" in Administering Oracle Service Bus.
10.3 Working with Split-Joins in JDeveloper
You can only create and configure split-joins in JDeveloper.
JDeveloper provides a graphical modeling editor so you can easily model split-joins by dragging operations to the canvas, and configuring properties in the Properties window.
10.3.1 How to Create a Split-Join in JDeveloper
You create and configure split-joins in JDeveloper. If you develop Service Bus projects in the Oracle Service Bus Console, you can import the split-joins created in JDeveloper into the console. Split-Joins are defined in a .flow file, which is generated when you create a split-join in JDeveloper. The file might have references to proxy services, business services, or to external WSDL resources. Resources on which the split-join depends must be present on the server before you can activate the split-join.
To create a split-join in JDeveloper:
10.3.2 How to Generate a Split-Join from a WSDL Document in JDeveloper
You can use a WSDL document that already exists in the Service Bus application to generate a split-join. If the WSDL document does not exist in the application, import it and then perform the following steps.
To generate a split-join from a WSDL document in JDeveloper:
- In the Application Navigator, right-click the existing WSDL document, point to Service Bus, and then select Generate Split Join.
- Name and configure the service, as described in How to Create a Split-Join in JDeveloper..
10.3.3 How to Display the Components Window and Properties Windows
You select the operations you add to a split-join from the Components window, so the window must be visible in JDeveloper in order to configure a split-join. You configure each operation using the JDeveloper Properties window, which also must be visible.
10.3.3.1 Displaying the Components Window
To display the Components Window
-
If the Components window is not visible on the JDeveloper window, select Window > Components.
The Components window appears on the right side of the JDeveloper window.
10.3.3.2 Displaying the Properties Window
To display the Properties Window
-
If the Properties window is not visible on the JDeveloper window, select Window > Properties.
The Properties window appears on the right side of the JDeveloper window. You can move this window to a different location, such as below the Split-Join Definition Editor, for better readability.
10.3.4 How to Configure the Start Node
The Start Node is generated automatically when you create a new split-join. It is the starting point from which all the other nodes proceed. The only element to configure in the Start Node is its name.
To change the Start Node name:
To change the name of the label for the Start Node, click the name of the node. In the field that appears, enter a unique, identifying string for the node. The name you enter appears underneath the node in the split-join editor
10.3.5 How to View External Services
The external services listed in the Start Node are those invoked outside the context of the split-join. They are specified in an Invoke Service node but are listed here for convenience.
To view external services:
To view external services, click the left-arrow button on the Start Node. The External Services box appears to the left of the Start Node. Hover your mouse over an external service to view the complete path of the service resource.
10.3.6 How to Configure Global and Local Variables
Variables in the Start Node store data that can be referenced globally, that is by any node in the split-join. By default, every Start Node is assigned both a request and a response variable when the split-join is initially created. From the Start Node, you can either create a new global variable or edit an existing global variable.
Variables in a Scope store data that can be referenced locally, that is only by the node to which it is attached. From a Scope, you can create new local variables or edit an existing local variable.
For more information about global and local variables, see How to Create a Container Node.
10.3.7 How to Configure the Receive Operation
A Receive operation is generated automatically whenever you create a new split-join. The Receive operation places incoming request data in a variable and makes the contents available for later nodes to use. To configure the receive operation, you can specify the incoming message variable the Receive operation initializes and, optionally, a new name and description for the operation. A default variable, request, is automatically defined for the Receive operation.
To configure the receive operation:
10.4 Adding Communication Operations in JDeveloper
Communication operations define how the split-join interacts with external services. They include the Invoke Service and Reply operations.
10.4.1 How to Invoke a Service
Use the Invoke Service operation to invoke external, WSDL-based business services, WSDL-based proxy services, WSDL-based pipelines, and split-joins.
To invoke a service from a split-join:
10.4.2 How to Configure a Reply
A global Reply node is generated automatically when you create a new split-join. The purpose of the global Reply is to send a response back to the calling service. However, you can also create a Reply elsewhere in the split-join, including within error handlers.
The Reply can either send a response or a fault back to the client, depending on how you configure the variable. The available fault options vary depending upon whether the Reply is global or local.
-
A global Reply (that is, a Reply in a split-join outside of an Error Handler) can never have a SOAP Fault but can have a WSDL Fault. This is why the SOAP Fault option is disabled in this case.
-
A local Reply (that is, a Reply attached to an Error Handler) can have either a WSDL Fault or a SOAP Fault. WSDL Faults are available only if they were defined in the WSDL file upon which the split-join is based. The SOAP Fault option is always available provided one has been previously defined in the Error Handler.
Note:
Switching back and forth between the Response and Fault buttons will clear either configuration. For instance, if you previously selected Propagate SOAP Fault and you then switch to the Response configuration, Propagate SOAP Fault is no longer selected.
The default Reply operation automatically includes an implicit exit operation to end that instance of the flow without triggering a fault. The exit operation is not visible in the development environment.
To configure a reply:
In some circumstances, no Faults or only a SOAP Fault will be available for a Reply operation.
-
To add a new Reply operation, under Communication in the Components window, click Reply and drag it onto the editor in the appropriate location.
-
Select a Reply node to configure it.
-
In the Properties window, click the Reply tab.
-
To send a response back to the calling service, do the following:
-
Select the Response option.
-
In the Response field, select a message variable whose type matches the operation's output message type. Select from the list of available variables or click Create Variable to define a new message variable.
-
-
To send a WSDL fault as a response, do the following:
-
Select the Fault Name option.
-
In the Fault Name field, select the name of the fault to send back to the message flow from the list of existing faults.
-
In the Fault Variable field, select the variable to which the fault will be assigned. Select from the list of available variables or click Create Variable to define a new fault variable.
-
-
To propagate the SOAP fault in the SOAP fault variable defined in the Error Handler, select Propagate SOAP Fault.
-
To change the name of the Reply node, click the General tab of the Properties window, and enter a unique, identifying string in the Name field.
The new name appears beneath the node in the Split-Join Definition Editor.
-
In the Description field, enter any notes that you think are important.
-
On the JDeveloper toolbar, click Save.
10.5 Adding Flow Control Operations in JDeveloper
Flow control operations define how incoming messages move through the split-join. They let you define conditional logic, define error handling, and define parallel processing.
10.5.1 How to Create a Container Node
A Scope is a container that groups various elements together. The container creates a context that influences the behavior of its enclosed elements. Local variables and any error handlers defined within the scope are restricted to this context. However, some nodes within the scope may operate both locally (that is, within the scope) and globally (that is, outside of the scope.) For instance, an Invoke Service within a certain scope might call upon an service external to the scope's context.
Although variables are visible in the scope in which they are defined and in all scopes nested within that scope, a variable declared in an outer scope is hidden when you declare a variable with an identical name in an inner scope. For example, if you define variable myVar in an outer scope (So) and then define variable myVar again in an inner scope (Si) which is contained by the outer scope So, then you can only access the myVar you defined in the inner scope (Si). This myVar overrides the myVar you defined in the outer scope So.
To create a container node:
10.5.2 How to Iterate Through a Variable Number of Requests
A For Each node executes logic configured within its scope a specified number of times.Use the For Each operation to create conditional logic for iterating through a variable number of requests. It is primarily used to create dynamic Split-Joins.
To iterate through a variable number of requests:
10.5.3 How to Process a Fixed Number of Requests in Parallel
A Parallel operation creates a fixed number of configured parallel branches, letting you create a static split-join that handles a fixed number of message requests. Each branch has its own Scope, which in turn can contain any number of operations.
A Parallel node is essentially a placeholder for a fixed number of processing branches, each with its own scope. Two branches are automatically generated when you add a Parallel operation to the flow. You can define the unique processing logic for each scope by dragging the appropriate operations into the scope. You can also add more branches with the Add Scope button.
To process a fixed number of requests in parallel:
10.5.4 How to Define If-Else Conditional Logic
An If Activity provides conditional logic within a split-join. It is composed of a number of nodes that determine the behavior for the overall If activity. Each node must be individually configured. When you create an If activity, an If branch and an Else branch are automatically generated within it.
Each If and Else If branch provides a unit of conditional logic (defined by an XPath Expression) within the overall If activity. Those branches also define the processing logic to carry out when the conditions are met. The Else branch defines the processing logic to carry out when the conditions are not met. You can add an unlimited number of Else If nodes to the If operation.
To define if-else conditional logic:
-
Under Flow Control in the Components window, click If and drag it onto the editor in the appropriate location in the flow.
An If node appears with an If branch and an Else branch.
-
To configure the If branch, do the following:
-
In the new If node, select the If branch.
-
In the Properties window, click the Condition tab.
-
Next to the Condition field, click the Expression Builder icon to launch the XPath Expression Builder and define an expression that defines the If condition.
-
To define the processing that occurs if the If condition is met, drag operations from the Components window to the If branch and then configure them in the Properties window.
For information about the operations you can add, see Adding Flow Control Operations in JDeveloper and Adding Assign Operations in JDeveloper.
-
-
To add an Else If branch, do the following:
-
Click the yellow diamond-shaped icon in the upper right corner of the If node, or right-click in the If node and select Add Elseif.
A new Else If branch appears to the left of the Else branch.
-
Configure the Else If branch in the same way as the If branch, described in step 2.
-
-
To define the processing that occurs if none of the conditions are met, drag operations from the Components window to the Else branch and then configure them in the Properties window.
-
To change the name of the If node or any of the branches, select the node or branch icon, click the General tab of the Properties window, and enter a unique, identifying string in the Name field.
-
In the Description field, enter any notes you think are important.
-
On the JDeveloper toolbar, click Save.
10.5.5 How to Create Error Handlers
An error handler and receives and handles errors. An error handler can be attached to a Start Node or a Scope. When attached to a Start Node, it is a global error handler and serves as a catch-all for the output of all local Raise Error nodes. When attached to a Scope, it only handles errors raised locally.
To create an error handler:
10.5.6 How to Raise an Error
The Raise Error generates an error that causes the split-join to stop normal processing. If the error is not handled using an Error Handler, the split-join will terminate and a Fault will be sent to the Service Bus message flow. Configuring a Raise Error can optionally include documenting the nature of the error in the General Information tab.
To raise an error:
- Under Flow Control in the Components window, click Raise Error and drag it onto the editor in the appropriate location in the flow.
- Select the new Raise Error node.
- In the Properties window, click the Raise Error tab.
- To invoke a fault that you define, select User-defined Fault and click the Edit icon. On the Edit QName dialog, enter the fault's name and namespace.
- To invoke a predefined fault, select Pre-defined Fault and select a fault from the list of options.
- To change the name of the Raise Error node, select the node or branch icon, click the General tab of the Properties window, and enter a unique, identifying string in the Name field.
- In the Description field, enter any notes you think are important.
- On the JDeveloper toolbar, click Save.
10.5.7 How to Re-Raise an Error
You can add a Re-Raise Error operation to an error handler. This operation lets you re-raise an error caught by an error handler Catch or Catch All operation. This operation does not require any configuration, but you can modify the name and add a description.
To re-raise an error:
- Under Flow Control in the Components window, click Re-Raise Error and drag it onto the editor in the appropriate location in the flow.
- Select the new Re-Raise Error node.
- To change the name of the Re-Raise Error node, enter a unique, identifying string in the Name field on the Properties window.
- In the Description field, enter any notes you think are important.
- On the JDeveloper toolbar, click Save.
10.5.8 How to Repeat an Operation Until it Evaluates to True
A Repeat Until node provides conditional logic within a split-join. When you define a Repeat Until node, the associated operations repeat until the condition you define evaluates to true. The associated operations are defined in the loop of the Repeat Until node. The condition is evaluated after each loop finishes.
To repeat an operation until it evaluates to true:
10.5.9 How to Repeat an Operation Until it Evaluates to False
A While node provides conditional logic within a split-join. When you define a While node, the associated operations repeat until the condition you define evaluates to false. The associated operations are defined in the loop of the Repeat Until node. The condition is evaluated before each loop finishes.
To repeat an operation until it evaluates to false:
10.6 Adding Assign Operations in JDeveloper
Assign operations include Assign, Copy, Delete, Insert, Java Callout, Log, and Replace. Every Assign is composed of one or more of these operations, which you can add to the Assign using the Design view.
The assign operations you can use in a split-join are:
-
Assign: Assigns the result of an XQuery or XSLT expression to a variable.
-
Copy: Copies the information specified by an XPath expression from a source document to a destination document.
-
Delete: Deletes a set of nodes specified by an XPath expression.
Note:
Unlike the Service Bus delete, only an XPath expression can be deleted in a split-join, not the entire variable.
-
Insert: Inserts the result of an XQuery Expression at an identified place relative to nodes selected by an XPath expression.
-
Java Callout: Invokes a Java method for processing such as validation, transformation, and logging.
-
Log: Logs split-join data at a specified severity to the server log file.
-
Replace: Replaces a node or the contents of a node specified by an XPath expression.
10.6.1 About Transformations and Expressions in Assign Operations
You can use a variety of XQuery and XSLT resources to define the transformations and expressions that derive values for the assign operations. Most assign operations support the following methods. You can find more information in the links given below.
-
Working With Expression Editors in Oracle Service Bus Console
-
"Creating Transformations with the XQuery Mapper" in Developing SOA Applications with Oracle SOA Suite
-
"Creating Transformations with the XSLT Map Editor" in Developing SOA Applications with Oracle SOA Suite
Note:
The Assign operations in the split-join editor are similar to the corresponding pipeline actions. However, one important difference is that when you are using the XQuery, XSLT, or XPath Editors to edit expressions in the split-join context, only variables and namespaces internal to the split-join are available.
10.6.2 Assign Operation Expression Resolution
The assign functionality in split-joins conforms to the WS-BPEL specification for resolution of XPath, XQuery, and XSLT expressions to simple type variables. Supported simple types for binding expressions to variables in split-joins are String, Boolean, and Float. The Assign operation converts the value you provide to the type with which the variable is defined.
For example:
-
If you assign
<order><number>4</number></order>to a response variable defined as a String ($response.result), Service Bus returns<number>4</number>as a String in the result through a simple copy of the child element and value. -
If you map
<order><number>4</number></order>to a String variable (such asmyStr), then assign$myStrto$response.result, Service Bus returns<result>4</result>, because it first converts the value in$myStrto a String before it makes the assignment to the$response.resultString variable.
10.6.3 How to Assign a Value to a Variable
Use an Assign to manipulate data by initializing and updating a variable using XSLT or XQuery expressions or resources. You can also use dynamic XSLT or XQuery.
When Service Bus binds variables in an inline XQuery, it assumes the type is xs:string. This can cause parser errors in operations with constants that are incompatible with xs:string. To ensure compatible types, use an explicit XQuery cast. For example, the following inline XQuery will fail. Although the $itemsTotal is of type xs:double, it is bound as an xs:string, which is incompatible in the test against 10000.
if ($itemsTotal < 10000) then . . .
To make this inline XQuery work, explicitly cast the $itemsTotal to an xs:double:
if (($itemsTotal cast as xs:double) < 10000) then . . .
When creating an assign operation to a String result or variable, make sure your expression returns a String value. Assigning a non-String value to a String result or String global variable does not cause a MismatchedAssignmentFailure exception, as specified by the WS-BPEL specification.
To assign a value to a variable:
10.6.4 How to Copy a Value from a Source to a Destination Document
The Copy operation lets you copy the information specified by an XPath expression or literal value from a source document to a destination document. It is an operation unique to the split-join editor.
To copy a value:
10.6.5 How to Delete a Set of Nodes
The Delete operation lets you delete a set of nodes specified by an XPath expression.
Note:
Unlike the Service Bus delete, only an XPath expression may be deleted in a split-join, not the entire variable.
To delete a set of nodes:
10.6.6 How to Insert the Result of an XQuery Expression
The Insert operation inserts the result of an XQuery expression at an identified place relative to nodes selected by an XPath expression.
To insert the result of an XQuery expression:
10.6.7 How to Invoke a Java Method in a Split-Join
A Java callout operation lets you invoke a static Java method from a split-join for custom operations to be handled in Java such as validation, transformation, and logging.
To invoke a Java method in a split-join:
10.6.8 How to Log Split-Join Data
A log operation lets you log split-join data of a specified severity to the server log file. Administrators can use log information to take appropriate actions based on the severity of the data logged.
To log split-join data:
10.7 Working with Split-Joins in the Oracle Service Bus Console
You create and configure split-joins in JDeveloper, but you can import split-joins into the Oracle Service Bus Console to add them to projects in the console.
You can also import them by importing the entire project. From the console, you can specify dispatch policies, update the XQuery version, and define SLA alerts.
10.7.1 How to Import a Split-Join into the Console
Before you can work with a split-join in the console, you need to export it from JDeveloper and then import it into the console. Once the resource is in the console, you can open it in the Split-Join Definition Editor to configure certain properties and define SLA alert rules. For information about exporting and importing resources, see Importing and Exporting Resources in the Oracle Service Bus Console .
10.7.2 How to Configure Split-Joins in the Console
You can only configure certain properties of split-joins in the Oracle Service Bus Console; you cannot configure the processing logic of the split-join.
To configure split-joins in the Console:
10.7.3 How to Define Service Level Agreement Rules for a Split-Join
Service level agreement (SLA) alerts let system administrators know when certain conditions are met that indicate the health of a split-join. You can define alerts based on statistics such as error counts, message counts, elapsed time, and failure or success ratios for message processing. For more information about defining SLA alerts, see "Creating Service Level Agreement Alert Rules" in Administering Oracle Service Bus.
10.8 Static and Dynamic Split-Join Samples
This section describes how to create static and dynamic split-joins using sample scenarios.
10.8.1 Designing a Static Split-Join
This scenario creates a new split-join called Service Availability that handles orders for a telco's cable service package including TV, phone, and internet service. The idea is for the split-join to receive an incoming package order and to reply with an order acknowledgment for each type of service. In this case, Service Availability is designed as a Static split-join because there are three message requests per order, one for each type of service. In this particular example the customer requests only TV and DSL service.
Creating the Service Availability split-join may include the following tasks:
Adding an Assign for Each Branch
10.8.1.1 Creating a New Split-Join
Create a new split-join based on the WSDL operation you want to use for placing the order. In this case the WSDL operation we want is called "telecom."
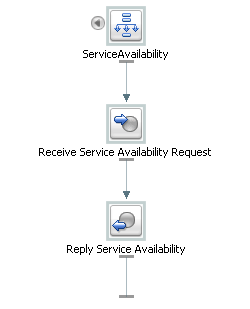
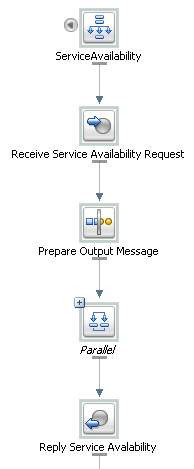
After you select the WSDL operation, a skeleton of the newly created split-join appears in the split-join editor, as shown in the following figure. It consists of a Start Node, a Receive, a Reply. Edit the labels in the Properties window to better reflect the specific function of each node in this particular split-join.
The Start Node contains both a Request variable and a Response variable that were determined by the WSDL operation initially selected. The Receive receives the incoming request message (in this case for the three or fewer different kinds of cable service), and the Reply generates a response message and sends it back to the client.
Note:
The Receive node requires no further configuration. Similarly the Reply requires no further configuration, unless to generate an error fault, which is not the case in this scenario.
10.8.1.2 Adding an Assign
The first Assign, Prepare Output Message, contains an Assign operation that prepares the Response variable in a form such that the later nodes can work on the data within it. This output message is relayed to the final Reply node in the split-join and, in turn, returned to the original client.
10.8.1.3 Adding a Parallel Node
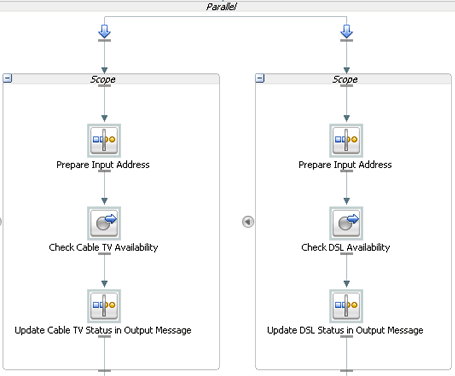
The Parallel node contains two main branches, one to check cable TV availability and one to check DSL availability. Each branch is composed of a number of actions, the sequence and general configuration being the same for both branches.
10.8.1.4 Adding an Assign for Each Branch
The first Assign in each Parallel branch, Prepare Input Address, copies the incoming customer address data into a Variable that is referenced to check the availability of the service at that location. The Assigns are the same for each branch and would be for additional branches as well.
10.8.1.5 Adding an Invoke Service
An External Service is then invoked to check whether the requested service type is available at the customer's location. Each branch contains one Invoke Service, Check Cable TV Availability and Check DSL Availability. Each invocation calls an External Service, which compares the customer's address (stored in the Variable initialized in the previous step) to the availability of the service at that location. The result is then stored in an output Variable that is passed on to the final Assign in the Branch below.
10.8.1.6 Adding an Assign for Each Branch
The final two Assigns, Update Cable TV Status in Output Message and Update DSL Status in Output Message, take the results of the external service invocations and put them into the output message using a Replace operation. The aggregated response are then sent to the original client in the final Reply node, which requires no further configuration.
10.8.1.7 Exporting and Testing the Split-Join
After you design the split-join, you can export it to the Oracle Service Bus Console for testing and production.
Figure 10-7 Completed Split-Join Ready for Testing
Description of "Figure 10-7 Completed Split-Join Ready for Testing"
Related Topics
10.8.2 Designing a Dynamic Split-Join
This scenario illustrates a split-join that handles a batch order from a retailer containing a variable number of individual purchase orders (as opposed to a fixed number of orders). The idea is for the split-join to receive the batch order and to reply with an order acknowledgment for each order within. This would be a Dynamic split-join because the number of individual purchase order requests is variable and unknown at design time.
Creating this split-join may include the following tasks:
10.8.2.1 Creating a New Split-Join
Create a new split-join based off of the WSDL operation you want to use for placing the order. In this case the WSDL operation we want is called "batchOrders." After the operation is selected, a skeleton of the newly created split-join appears in the split-join editor consisting of a Start Node, a Receive, a Reply. The labels are then edited in the general properties tab to better reflect the specific function of each node in this particular split-join.
Figure 10-8 New Split-Join With Edited Labels
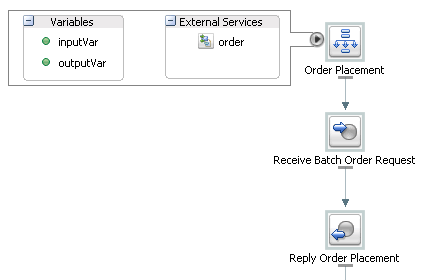
Description of "Figure 10-8 New Split-Join With Edited Labels"
The Start Node, Order Placement, contains both a request variable, inputVar, and an response variable, outputVar. The Receive, Receive Batch Order Request, will initialize the contents of the Request Variable (in this case purchase orders), and the Reply, Reply Order Placement, will send a response, based on the order acknowledgments aggregated into the Response Variable, back to the client. In this example Order Placement also contains a callout to an External Service, "Order" that will be invoked to approve individual orders.
Note:
The Receive node requires no further configuration. Similarly, the Reply requires no further configuration, unless you would like to generate an error fault—which is not the case in this scenario (see How to Configure a Replyfor more information on generating faults).
10.8.2.2 Adding an Assign
The first Assign, Prepare Output Message, contains an Assign operation that prepares the response variable (here labeled an "Output Message" for readability) in a form such that the later nodes can work on the data captured within it (that is, Copy/Insert/Assign/Replace/Delete into the Variable). In this case, that data would consist of order acknowledgments and/or errors.This Output Message is relayed to the final Reply node in the split-join and, in turn, returned to the original client.
10.8.2.3 Adding a For Each
The For Each, Iterate Through Orders, contains logic that will parse through each order in the batch, send it to an external proxy for approval, and capture an order acknowledgment in response. If there is a problem with an order, an error is sent from the invoked proxy and captured in the Error Handler. The following figure depicts the entire scope of the For Each logic.
Figure 10-9 For Each Node Labeled "Iterate Through Orders"
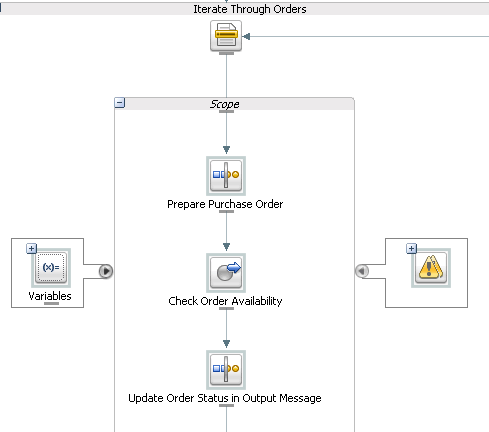
Description of "Figure 10-9 For Each Node Labeled "Iterate Through Orders""
10.8.2.4 Adding an Assign
The Assign, Prepare Purchase Order, copies the incoming purchase order requests into a variable that is referenced to check approval of the order in the next step.
10.8.2.5 Adding an Invoke Service
An external service, Check Order Availability, is then invoked to approve each individual purchase order. If the order is accepted, the service responds with an order acknowledgment. If the order is not accepted, the service responds with an error.The result is then stored in an output variable that is passed on to the final Assign in the next step.
10.8.2.6 Adding an Assign
The final Assign, Update Order Status in Output Message, takes the results of the external service invocation and copies them into the output message using an Insert operation. The aggregated response is then sent to the original client in the final Reply node, which requires no further configuration.
10.8.2.7 Adding an Error Handler
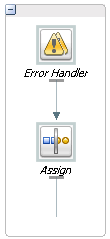
The Error Handler captures any Errors returned by the invoked service. It takes these errors and inserts them into the output message using an Assign operation.
10.8.2.8 Exporting and Testing the Split-Join
After you design the split-join, you can export it to the Oracle Service Bus Console for testing and production.
Figure 10-11 Completed Split-Join Ready for Testing
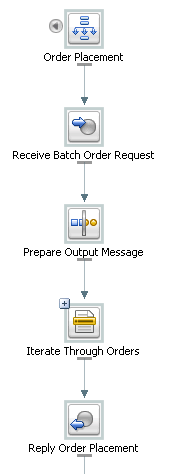
Description of "Figure 10-11 Completed Split-Join Ready for Testing"
