5.3 Test Web Service Page in Fusion Middleware Control
This section describes how to use the Test Web Service page in Fusion Middleware Control to verify that you are receiving the expected results from a SOAP web service (WSDL) or a RESTful (WADL) service.
Using the Test Web Service page, you can:
-
Test basic functionality to ensure that the web service was deployed and is operating as expected.
-
Test advanced features, such as web services addressing, reliable messaging, MTOM, and HTTP headers.
-
Test security features.
-
Stress test the web service endpoint.
The Test Web Service page allows you to test any of the operations exposed by a WSDL or WADL document. You can test web services that are deployed on any accessible host; the web service does not have to be deployed on this host.
Note:
The Test Web Service page can parse WSDL or WADL URLs that contain ASCII characters only. If the URL contains non-ASCII characters, the parse operation fails. To test a web service that has non-ASCII characters in the URL, allow your browser to convert the WSDL or WADL URL and use the resulting encoded WSDL or WADL URL in the Test Web Service page.
When testing web services that use policies, the OWSM component must be installed in the same domain from which Fusion Middleware Control is being run. Otherwise, an invalid policy exception will be returned.
For more information, refer to the following sections:
5.3.1 Accessing a Web Service for Testing
You can navigate to the Test Web Service page in many ways. The following sections describes two typical ways to do so.
Access your web service from the Oracle WebLogic Server Domain Home page
-
In the navigation pane, expand WebLogic Domain to show the domain in which you want to test a web service.
-
Select the domain.
-
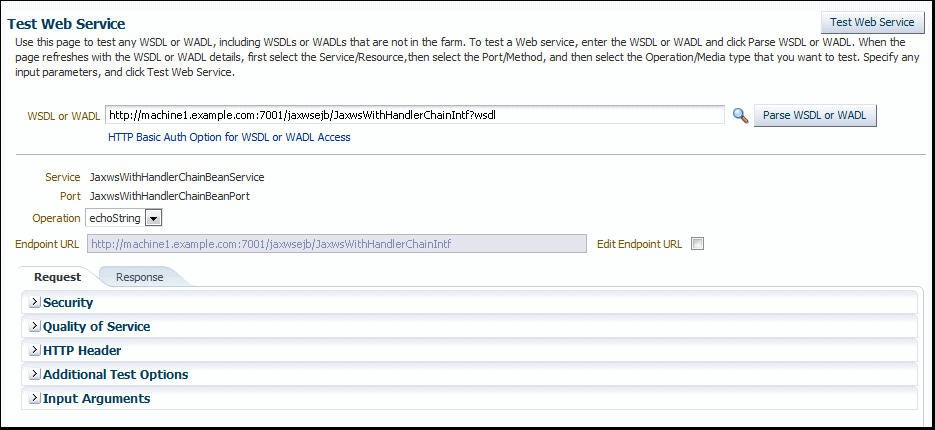
From the WebLogic Domain menu, select Web Services, and then Test Web Service. The Test Web Service input page appears.
-
Enter the WSDL or WADL URL of the web service you want to test. If you do not know the WSDL or WADL, click the search icon and select from the registered web services, if any.
-
Click Parse WSDL or WADL.
If the WSDL or WADL is secured with HTTP Basic Authentication, click HTTP Basic Auth Option for WSDL or WADL Access and enter the username and password before parsing the WSDL or WADL.
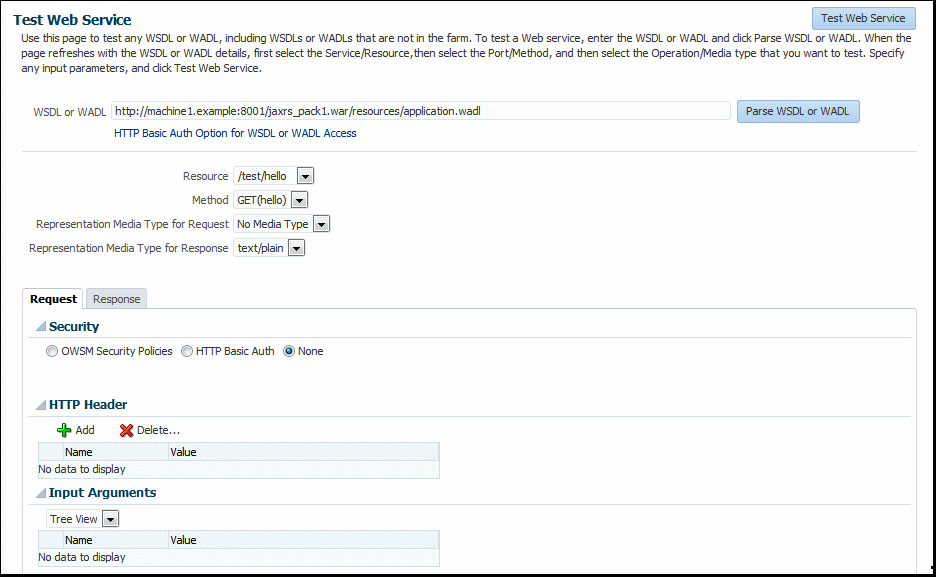
The complete Test Web Services page displays, as shown in Figure 5–1 for a WSDL and in Figure 5–8 for a WADL.
Access your web service from the Web Service Application Home page
5.3.2 Testing a SOAP Web Service
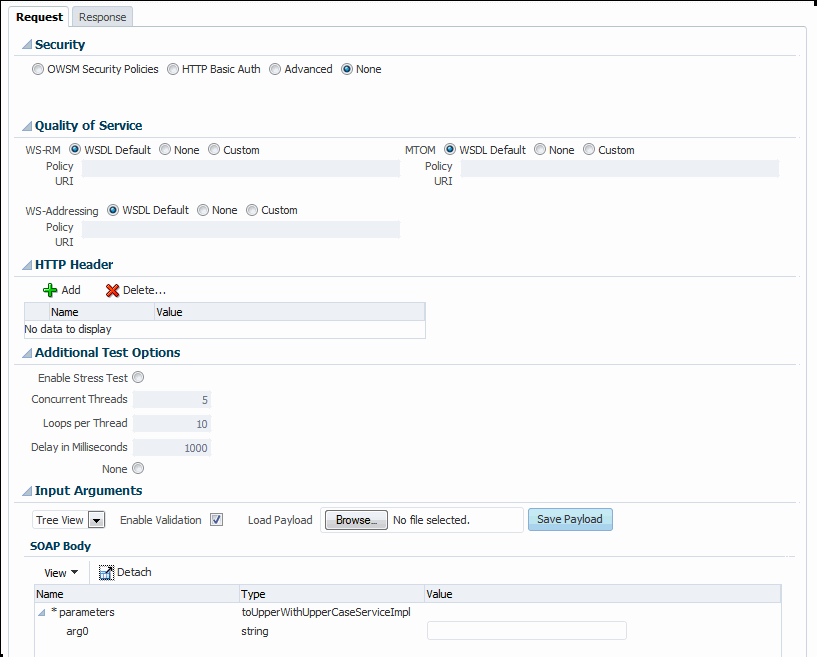
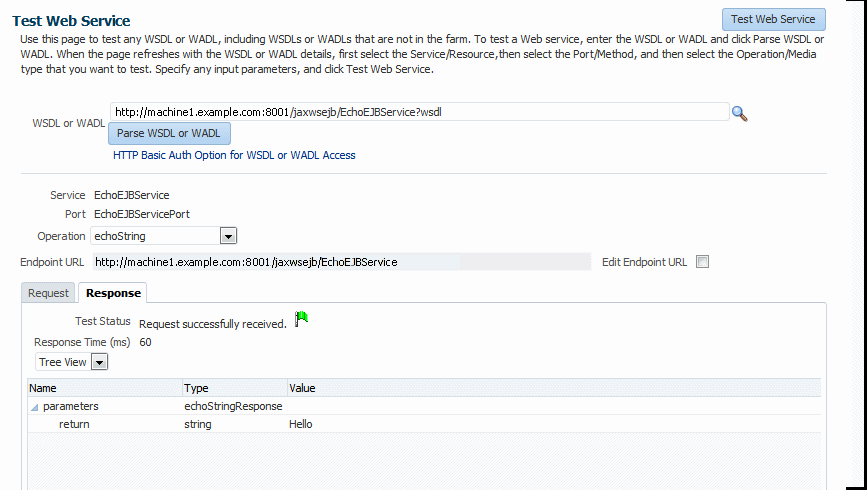
When the Test Web Services page refreshes with the WSDL details for the SOAP web service, you can select the Service, Port, and Operation type that you want to test, as well as specify a variety of input parameters.
5.3.3 Testing an Asynchronous Web Service
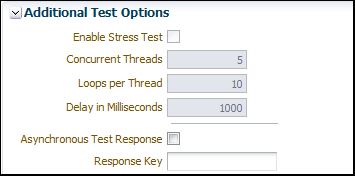
When the Test Web Services page refreshes with the WSDL details for an asynchronous web service, it is nearly identical the Test Web Services page for a SOAP web service, except that the following test response options are available in the Additional Test Options section, as shown in (Figure 5–5).
-
Asynchronous Test Response – Specifies whether to request an asynchronous response upon running the test.
-
Response Key – Enter a value (for example, myasynctest), which will correlate with the test's asynchronous response. Each response key must be unique. The asynchronous response can also be tracked later on the Asynchronous Test Response page by specifying the corresponding response key.
Figure 5-5 Asynchronous Testing Options on the Test Web Service Page
Description of "Figure 5-5 Asynchronous Testing Options on the Test Web Service Page"
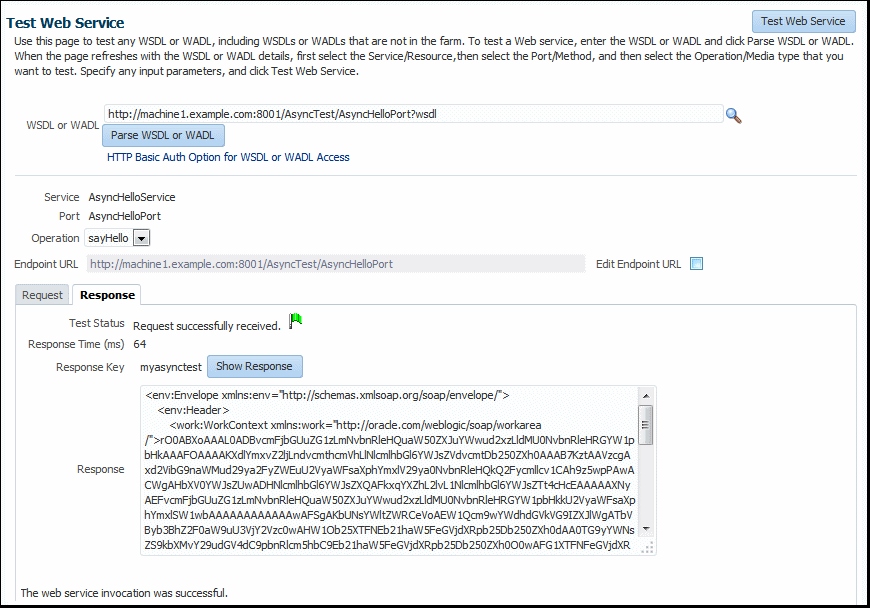
If the test is successful, the Test Status field indicates Request Successfully received with the response time. The user-defined Response Key value that corresponds with the asynchronous response is also displayed.
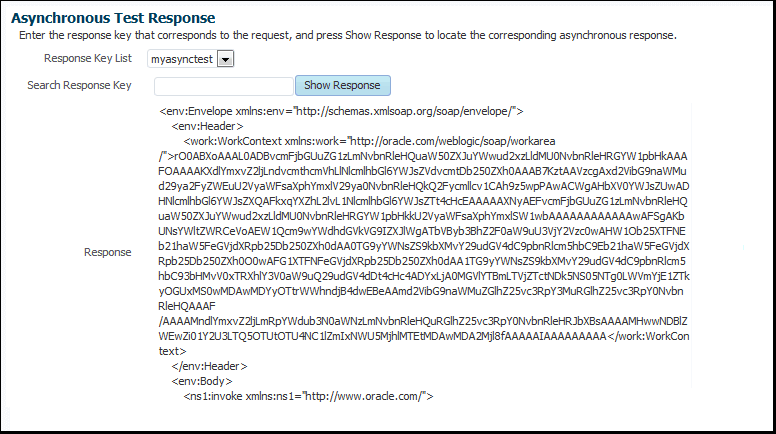
Click Show Response to display the test response, if a response exists, in the Response field in XML format, as shown in Figure 5–6.
Figure 5-6 Successful Test and Response for an Asynchronous Web Service
Description of "Figure 5-6 Successful Test and Response for an Asynchronous Web Service"
Note:
An asynchronous request can only have a response if the server has not been restarted.
If the response is not available, it can also be tracked later on the Asynchronous Test Response page by using the corresponding response key.
Accessing an asynchronous test response after testing
5.3.4 Introduction to Testing a RESTful Web Service
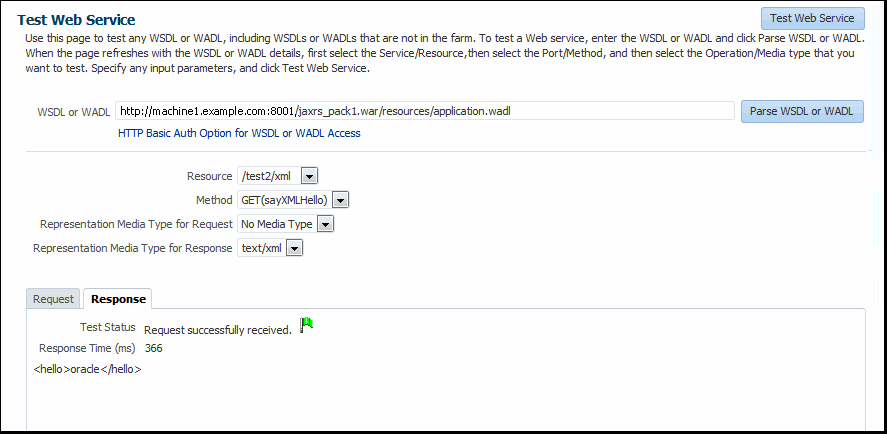
The Web Application Description Language (WADL) is an XML-based file format that describes a RESTful web services application. When the Test Web Services page refreshes with the WADL details for the RESTful web service, it is similar to the Test Web Services page for a WSDL, except that you can select the Resource, Method, and Media type that you want to test. You can also specify a variety of input parameters, though for this release they are more limited compared to a WSDL page.
5.3.4.2 The WebRestApp1 Web Service
You can view and manage token issuer trust configurations using a set of representational state transfer (REST) resources, as summarized below.
| Resource | Method | Resource Path |
|---|---|---|
|
persons |
GET |
rest/persons |
|
headerGetPerson |
GET |
rest/headerGetPerson |
|
person{id} |
GET |
rest/person/{id} |
|
personMatrixAdd |
POST |
rest/personMatrixAdd |
|
personXXXAdd |
POST |
rest/personXXXAdd |
|
personPathAdd |
POST |
rest/personPathAdd/{id} |
|
headerAddPerson |
POST |
rest/headerAddPerson |
|
personQueryAdd |
POST |
rest/personQueryAdd |
|
personAddForm |
POST |
rest/personAddForm |
|
personQueryDefaultAdd |
POST |
rest/personQueryDefaultAdd |
|
persondelete |
DELETE |
rest/persondelete |
|
personUpdate |
PUT |
rest/personUpdate |
|
verifyPart1 |
POST |
rest/verifyPart1 |
5.3.4.2.1 GET persons Method
Use the GET method to view all created persons.
REST Request
GET rest/persons
Input Parameters
None.
Response
| Media Type | Result |
|---|---|
|
application/xml |
first_name, last_name, ph_no and ID of all available persons created, in XML format |
|
application/json |
first_name, last_name, ph_no and ID of all available persons created, in Json format |
5.3.4.2.2 GET headerGetPerson Method
Use the GET method to view the header details for a person with specified firstname.
REST Request
GET rest/headerGetPerson
Input Parameters
Create a HTTP header with name/value as “fname/<firstname>".
Response
| Media Type | Result |
|---|---|
|
application/xml |
first_name, last_name, ph_no and ID of thefname entered in header, in XML format |
|
application/json |
first_name, last_name, ph_no and ID of thefname entered in header, in Json format |
5.3.4.2.3 GET person{id} Method
Use the GET method to view a person with specified ID.
REST Request
GET rest/person/{id}
Input Parameters
Enter the id of the person to be searched.
Response
| Media Type | Result |
|---|---|
|
application/xml |
all the details of ID entered in inputparameters, in XML format |
|
application/json |
all the details of ID entered in inputparameters, in Json format |
5.3.4.2.4 POST personMatrixAdd Method
Use the POST method to create a new person and details.
REST Request
POST rest/personMatrixAdd
Input Parameters
Enter string values for FirstName and LastName, Integer values for ID and Phone_no.
Response
| Media Type | Result |
|---|---|
|
application/xml |
first_name, last_name, ph_no and ID ofperson created, in XML format |
|
application/json |
first_name, last_name, ph_no and ID ofperson created, in Json format |
5.3.4.2.5 POST personXXXAdd Method
Use the POST method to create a person's details.
REST Request
POST rest/personXXXAdd
Input Parameters
Input parameters depend on the media type:
-
When selecting application/vnd.xxx+xml for request media type:
<person> <firstname>Firstname 12345/<firstname> <id>12345/id <lastname>Last 12345/lastname <phone_no>12345/phone_no/<person> -
When selecting application/vnd.xxx+json for request media type:
{"firstname":"cc","id":14,"lastname":"cc","phone_no":14} <person>
Response
Text message to confirm person has been added.
5.3.4.2.6 POST personPathAdd Method
Use the POST method to create a person with details.
REST Request
POST rest/personPathAdd/{id}/{fname}/{lname}/{phno}
Input Parameters
Enter string values for FirstName and LastName, Integer values for ID and Phone_no.
Response
Text message to confirm person has been added.
5.3.4.2.7 POST headerAddPerson Method
Use the POST method to create an HTTP header with person details.
REST Request
POST rest/headerAddPerson
Input Parameters
Create a HTTP header with name/value as:
“fname = <firstname>"
“lname = <lastname>"
“phone_no = <phone_no>"
“id = <id>"
Response
| Media Type | Result |
|---|---|
|
application/xml |
first_name, last_name, ph_no and ID ofperson created in XML format |
|
application/json |
first_name, last_name, ph_no and ID ofperson created in Json format |
Text message to confirm person has been added.
5.3.4.2.8 POST personQueryAdd Method
Use the POST method to create a person with details.
REST Request
POST rest/personQueryAdd
Input Parameters
Enter string values for FirstName and LastName, Integer values for ID and Phone_no.
Response
Text message to confirm person has been added.
5.3.4.2.9 POST personAddForm Method
Use the POST method to create a person with details.
REST Request
POST rest/personAddForm
Input Parameters
Enter string values for FirstName and LastName, Integer values for ID and Phone_no.
Response
Text message to confirm person has been added.
5.3.4.2.10 POST personQueryDefaultAdd Method
Use the POST method to create a new person and details.
REST Request
POST rest/personQueryDefaultAdd
Input Parameters
This method may be invoked with or without input parameters specified.
-
Enter string values for FirstName and LastName, Integer values for ID and Phone_no.
-
Keep all the values blank and invoke the test; default values are picked up and person is created
Response
| Media Type | Result |
|---|---|
|
application/xml |
first_name, last_name, ph_no and ID ofperson created, in XML format |
|
application/json |
first_name, last_name, ph_no and ID ofperson created, in Json format |
5.3.4.2.11 DELETE persondelete Method
Use the DELETE method to delete a specified person.
REST Request
DELETE rest/persondelete
Input Parameters
Enter the id of the person to be deleted.
Response
Text message to confirm person has been deleted.
5.3.4.2.12 PUT personUpdate Method
Use the PUT method to update details for a specified person.
REST Request
PUT rest/personUpdate
Input Parameters
Enter the id of the person to be updated and make changes to other input variables.
Response
Text message to confirm person has been deleted.
5.3.4.2.13 POST verifyPart1 Method
Use the POST method to send content as parts.
REST Request
POST rest/verifyPart1
Input Parameters
Create PARTs under Control, then Actions, as follows:
-
Enter part name as “part1" and part content as “part1_contents". Click OK.
-
Select File from Input mode. Enter part name as “part2" and browse for any file.
Click OK.
Response
Result contains the number of parts sent and details about each part.
5.3.4.3 The Mime_Multipart_rs Web Service
You can view and manage greeting string multipart configurations using a set of representational state transfer (REST) resources, as summarized below.
| Resource | Method | Resource Path |
|---|---|---|
|
greetingsMultipart |
POST |
/hello/greetingsMultipart |
|
greetings |
GET |
/hello/{greetings} |
|
greetingsImagePOST |
POST |
/hello/greetingsImagePOST |
|
greetings_matrix_to |
GET |
/hello/greetings_matrix_to |
|
greetings_query_to |
GET |
/hello/greetings_query_to |
|
greetingsMsg |
GET |
/hello/greetingsMsg |
|
greetingsImagePOST1 |
POST |
/hello/greetingsImagePOST1 |
|
greetingsMsgQP |
POST |
/hello/greetingsMsgQP |
|
hello |
GET |
/hello |
5.3.4.3.1 POST greetingsMultipart Method
Use the POST method to send content as parts.
REST Request
POST /hello/greetingsMultipart
Input Parameters
Create PARTs under Control, then Actions, as follows:
-
Enter part name as “part1" and part content as “part1_contents". Click OK.
-
Select File from Input mode. Enter part name as “part2" and browse for any file.
Click OK.
Response
Click the “Click the download response content" button. The text file shows the response.
5.3.4.3.2 GET greetings Method
Use the GET method to view a greeting string.
REST Request
GET /hello/{greetings}
Input Parameters
Enter a string value for greetings.
Response
Click the “Click the download response content" button. The text file shows the response with the contents of the input you entered.
5.3.4.3.3 POST greetingsImagePOST Method
Use the POST method to add an image file.
REST Request
POST /hello/greetingsImagePOST
Input Parameters
Browse and add a .png image file.
Response
Click the “Click the download response content" button. The text file shows the response with the image file contents.
5.3.4.3.4 GET greetings_matrix_to Method
Use the GET method to view a greeting string.
REST Request
GET /hello/greetings_matrix_to
Input Parameters
Enter a string value for greetings.
Response
Click the “Click the download response content" button. The text file shows the response with the contents of the input you entered.
5.3.4.3.5 GET greetings_query_to Method
Use the GET method to view a greeting string.
REST Request
GET /hello/greetings_query_to
Input Parameters
Enter a string value for greetings.
Response
Click the “Click the download response content" button. The text file shows the response with the contents of the input you entered.
5.3.4.3.6 GET greetingsMsg Method
Use the GET method to view a greeting string.
REST Request
GET /hello/greetingsMsg
Input Parameters
Enter a string value for greetings in the contents text area.
Response
The response shows the contents of the input you entered.
5.3.4.3.7 POST greetingsImagePOST1 Method
Use the POST method to add an image file.
REST Request
POST /hello/greetingsImagePOST1
Input Parameters
Browse folders and add an image file.
Response
Verify that the attached file size is returned.
5.3.5 Testing Security
You can use the Test Web Service Page to test web services security using OWSM security policies, HTTP basic authentication, or custom policies including copies of predefined policies. You can choose the type of test by selecting one of the options in the Security section of the page.
The security setting is not determined from a policy in the WSDL or WADL; you can specify the type of security you want to test. The default is None.
The following options are available. They are described in more detail in subsequent sections:
-
OWSM Security Policies– Uses the credentials and other security options required by the OWSM security policies for authentication and message protection.
The options available when you select OWSM Security Policies differ slightly, depending on whether you are testing a RESTful web service or a SOAP web service, as described later in this section.
-
HTTP Basic Auth – Inserts the username and password credentials in the HTTP transport header. Both the username and password are required.
If you do specify a username and password, they must exist and be valid.
-
Advanced – Uses a custom policy to authenticate the user. All user defined or non-default OWSM policies, and the copies of the default policies are termed as custom policies. You must specify the URI for the policy. You can also specify configuration overrides.
Note:
This option is not available for RESTful web services.
-
None – No credentials are included.
5.3.5.1 OWSM Security Policies
Only a subset of the OWSM predefined policies is available, and you can configure only the attributes presented for those policies. All of the other policy attributes use the policy defaults. For example, you cannot enable Secure Conversation, change the message security algorithm suite, and so forth.
Note:
For a list of client policies supported by the test function, see "Supported Client Security Policies for SOAP Services" on page 5‐36 and "Supported Client Security Policies for RESTful Services" on page 5‐37.)
Non-security policies and policies not supported by the test function are shown as read-only and cannot be selected. If a service has service policies whose corresponding client policies are not supported, including copies, those policies are shown as read only. This means that copies you made of the predefined policies are not directly listed and are available only through the Advanced option.
For example, assume that your web service has a copy of the oracle/wss11_message_protection_service_policy policy attached, and you have made a copy of the oracle/wss11_message_protection_client_policy. The test client displays both the oracle/wss11_message_protection_client_policy and oracle/wss11_message_protection_client_policy_copy policies, but the oracle/wss11_message_protection_client_policy_copy policy is unavailable and grayed out.
You can choose one of two approaches:
-
If for testing purposes the predefined oracle/wss11_message_protection_client_policy policy satisfies your requirements, select the oracle/wss11_message_protection_client_policy.
The JKS Keystore Location and JKS Keystore Password fields are required and presented on the page. Enter the location and password and click Load Keys.
-
If you want to use your own oracle/wss11_message_protection_client_policy_copy policy:
-
Select Advanced.
-
Enter the policy URI, in this case oracle/wss11_message_protection_client_policy_copy.
-
For message protection and SSL policies, the JKS Keystore Location and JKS Keystore Password properties are required.
Enter the JKS keystore location and password values using the full property names from "Client Policy Configuration Properties That Can Be Overridden at Design Time" in Securing Web Services and Managing Policies with Oracle Web Services Manager:
oracle.wsm.security.util.SecurityConstants.ClientConstants.WSS_KEYSTORE_LOCATION
oracle.wsm.security.util.SecurityConstants.ClientConstants.WSS_KEYSTORE_PASSWORD
-
5.3.5.2 SOAP and RESTful OWSM Security Policies
The options available when you select OWSM Security Policies differ slightly, depending on whether you are testing a SOAP web service or a RESTful web service.
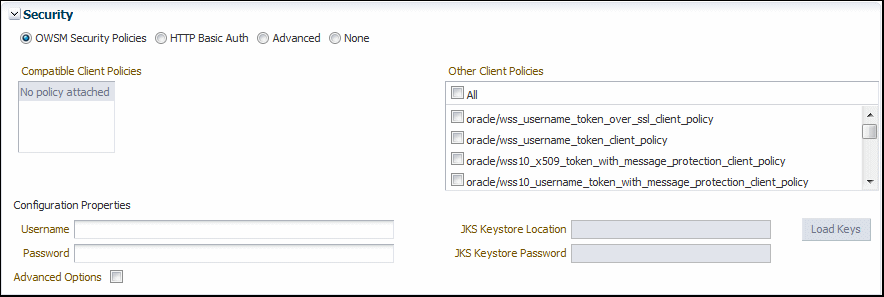
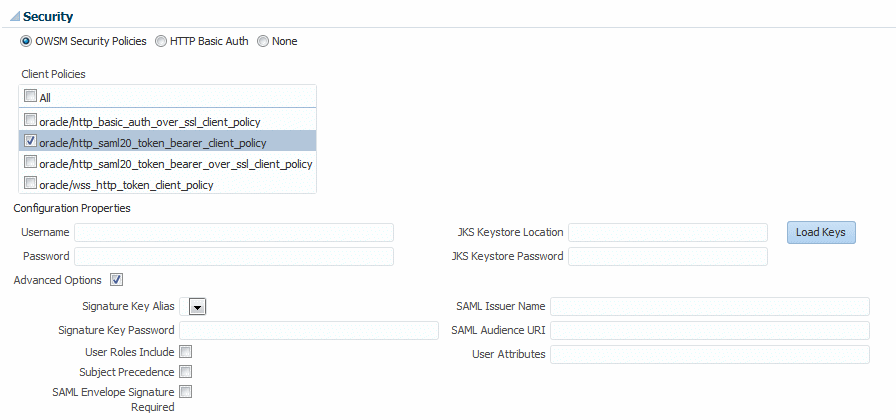
The options for a SOAP web service are shown in Figure 5–11. The options for a RESTful web service are shown in Figure 5–12, with the Advanced Options field selected to display all of the available fields.
Figure 5-11 OWSM Security Policies Test Options for SOAP Web Services
Description of "Figure 5-11 OWSM Security Policies Test Options for SOAP Web Services"
Figure 5-12 OWSM Security Policies Test Options for RESTful Web Services
Description of "Figure 5-12 OWSM Security Policies Test Options for RESTful Web Services"
To test the web service security using OWSM security policies:
-
Select the policies with which you want to test the service. The policies available differ, depending on whether you are testing a SOAP web service or a RESTful web service.
-
Selecting Policies for Testing a SOAP Web Service
From the Compatible Client Policies list, which displays the compatible client policies as specified in the WSDL, select the client policy to test.
Alternatively, to perform a negative test on the endpoint, you can select a non-compatible policy, or All from the Other Client Policies list.
-
Selecting Policies for Testing a RESTful Web Service
From the Client Policies list, select the client policy to test.
The Configuration Properties required by the selected policy are indicated with an asterisk (*). For example:
-
For username_token and http_token policies, the Username and Password fields are required; for SAML policies only the Username field is required.
-
For message protection and SSL policies, the JKS Keystore Location and JKS Keystore Password fields are required. (The KSS keystore is not supported.)
-
-
Provide values for the required fields as determined by the policy.
If the JKS Keystore Location and JKS Keystore Password fields are required by the policy, enter the location and password of a user-created keystore that is NFS accessible and click Load Keys. The associated keystore fields under Advanced Options are populated with the aliases specified in the keystore.
For more information about creating a keystore, see "Generating Private Keys and Creating the Java Keystore" in Securing Web Services and Managing Policies with Oracle Web Services Manager.
-
Click Advanced Options. Additional keystore alias and SAML properties fields are displayed. Properties required by the selected policies are indicated with an asterisk. Enter the required values, or provide override values in the applicable fields.
5.3.5.3 HTTP Basic Auth
This option requires Username and Password credentials that are inserted into the HTTP transport header. The username and password must exist and be valid for the WebLogic Server.
5.3.5.4 Advanced
Note:
The Advanced option is not available for RESTful web services.
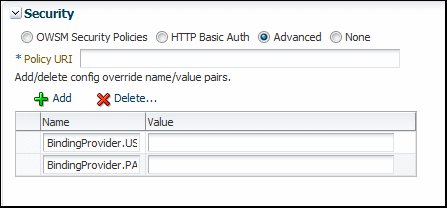
The options available when you select the Advanced option are shown in Figure 5–13.
The Advanced option allows you to use a custom policy, including a copy of a predefined policy, to test the web service security. To do so:
-
Specify the URI of the custom policy in the Policy URI field. For example, oracle/wss11_message_protection_client_policy_copy. This field is required.
-
Specify any configuration overrides for the policy in the Name and Value fields.
For username_token and http_token policies, Username and Password properties are required; for SAML policies only the username property is required.
For message protection and SSL policies, the JKS Keystore Location and JKS Keystore Password properties are required. (The KSS keystore is not supported.)
To add properties, click Add and provide the name/value pair for the configuration override. To delete a property, select it in the table and click Delete.
Note:
Properties must be specified using the full name of each property, for example
oracle.wsm.security.util.SecurityConstants.ClientConstants.WSS_KEYSTORE_LOCATION. For a complete list of property names for properties that can be overridden, see "Overriding Client Policy Configuration Properties at Design Time" in Securing Web Services and Managing Policies with Oracle Web Services Manager.All of the other policy attributes use the policy defaults. For example, if you enabled Secure Conversation or changed the message security algorithm suite, those policy values are used.
5.3.5.5 Supported Client Security Policies for SOAP Services
The following OWSM client security policies SOAP services are supported by the test function. Copies of these predefined policies are not directly listed and are available only through the Advanced option.
-
oracle/wss_http_token_client_policy -
oracle/wss_http_token_over_ssl_client_policy -
oracle/wss_saml_token_bearer_over_ssl_client_policy -
oracle/wss_saml_token_over_ssl_client_policy -
oracle/wss_saml20_token_bearer_over_ssl_client_policy -
oracle/wss_saml20_token_over_ssl_client_policy -
oracle/wss_username_token_client_policy -
oracle/wss_username_token_over_ssl_client_policy -
oracle/wss10_message_protection_client_policy -
oracle/wss10_saml_token_with_message_integrity_client_policy -
oracle/wss10_saml_token_with_message_protection_client_policy -
oracle/wss10_saml_token_with_message_protection_ski_basic256_client_policy -
oracle/wss10_saml20_token_with_message_protection_client_policy -
oracle/wss10_username_id_propagation_with_msg_protection_client_policy -
oracle/wss10_username_token_with_message_protection_client_policy -
oracle/wss10_username_token_with_message_protection_ski_basic256_client_policy -
oracle/wss10_x509_token_with_message_protection_client_policy -
oracle/wss11_message_protection_client_policy -
oracle/wss11_saml_token_identity_switch_with_message_protection_client_policy -
oracle/wss11_saml_token_with_message_protection_client_policy -
oracle/wss11_saml20_token_with_message_protection_client_policy -
oracle/wss11_username_token_with_message_protection_client_policy -
oracle/wss11_x509_token_with_message_protection_client_policy
5.3.5.6 Supported Client Security Policies for RESTful Services
The following OWSM client security policies for RESTful services are supported by the test function:
-
oracle/http_basic_auth_over_ssl_client_policy -
oracle/http_saml20_token_bearer_client_policy -
oracle/http_saml20_token_bearer_over_ssl_client_policy -
oracle/wss_http_token_client_policy -
oracle/http_jwt_token_client_policy -
oracle/http_jwt_token_over_ssl_client_policy
5.3.6 Enabling Quality of Service Testing
Note:
This section is not applicable when testing RESTful web services.
Three characteristics of Quality of Service (QoS) can be tested: Web services reliable messaging (WS-RM), WS-Addressing, and MTOM in the Quality of Service section of the Test Web Service Page (Figure 5–14). For each type of Quality of Service, there are three options:
-
WSDL Default – Execute the default behavior of the WSDL. For example, if WSDL Default is selected for MTOM, and the WSDL contains a reference to an MTOM policy, the policy is enforced. If the WSDL does not contain a reference to an MTOM policy, then no MTOM policy is enforced.
-
None – No policy for the specific QoS, even if it is included in the WSDL, is executed. For example, if None is selected for WS-RM, no reliable messaging policy is enforced. If the WSDL contains a reference to a reliable messaging policy, it is ignored.
-
Custom – Enforce a custom policy. For example, if a WS-Addressing policy is referenced in the WSDL, this policy will be ignored, and the policy specified in URI will be used instead.
-
URI – Specify the location of the policy to be enforced.
Figure 5-14 Quality of Service Parameters on the Test Web Service Page

Description of "Figure 5-14 Quality of Service Parameters on the Test Web Service Page"
5.3.7 Testing HTTP Headers
The HTTP Header section allows you to add, modify, or delete HTTP headers to pass request information to a SOAP or RESTful web service. After the service invocation, the HTTP headers should be displayed as part of the message response.
Figure 5-15 HTTP Header on the Test Web Service Page

Description of "Figure 5-15 HTTP Header on the Test Web Service Page"
5.3.8 Editing the Input Arguments as XML Source
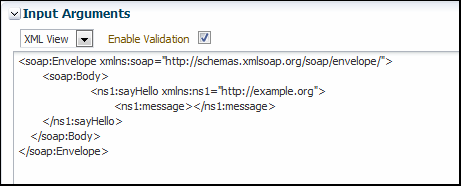
You can view the input arguments in a user-friendly form, or you can edit the XML source code directly. If you edit the XML source directly, you must enter valid XML.
Use the drop-down list in the Input Arguments section of the page to toggle between Tree View and XML View.
5.3.9 Stress Testing the Web Service Operation
Select the Enable Stress Test check box (Figure 5–18) to invoke a continuous series of invocations of the web service operation (Figure 5–18). The following options are available:
-
Concurrent Threads – The number of concurrent threads on which the invocations should be sent. The default is 5 threads.
-
Loops per Thread – The number of times to invoke the operation. The default is 10 times.
-
Delay in Milliseconds – The number of milliseconds to wait between operation invocations. The default is 1000 milliseconds (1 second).
Figure 5-18 Stress Testing Parameters on the Test Web Service Page
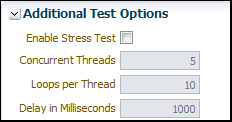
Description of "Figure 5-18 Stress Testing Parameters on the Test Web Service Page"
When you invoke the test, a progress box indicates the test status. When the stress test is complete, a confirmation page displays the results of the test.
The Response tab provides additional information about the stress test, including the number of tests with errors, and the average, minimum, and maximum response times. Details about each test are provided in tabular form. For each test, you can view the thread and loop numbers, the duration of the test, the start and end times for the test, and the invocation status. You can filter the fields displayed in the table using the View menu.
Figure 5-19 Stress Test Results on Test Web Service Page
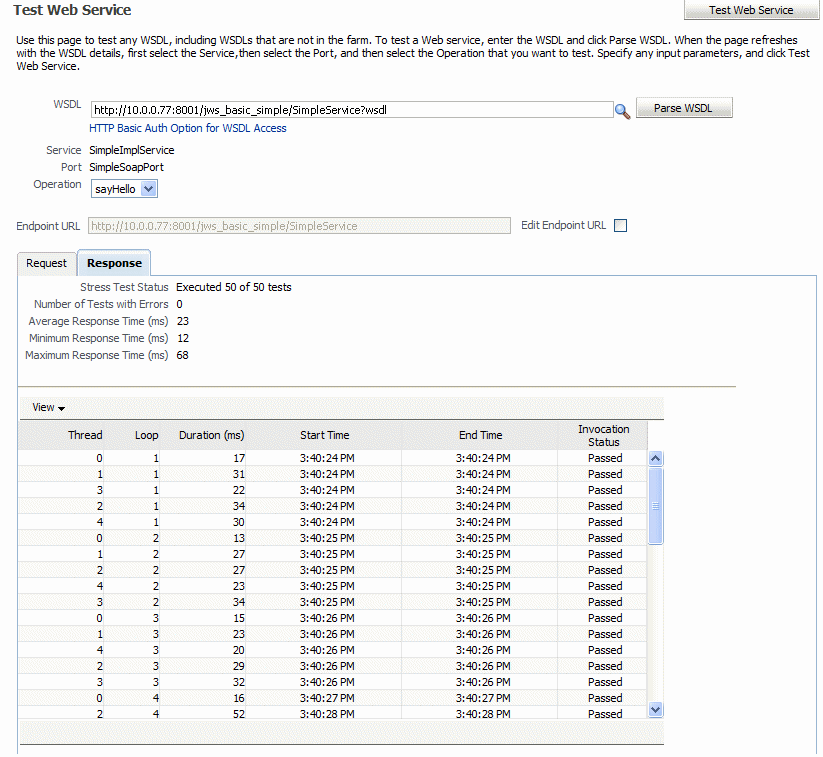
Description of "Figure 5-19 Stress Test Results on Test Web Service Page"
