B Building a Website
The following topics are covered:
B.1 Planning a Website
Administrators are responsible for planning the website. Subadministrators with WebLayout rights can create directory pages for groups and accounts if they have permissions for those groups and accounts.
This section covers these topics:
B.1.1 The Web Layout
From the Home page, the Library (Table of Contents) link displays the top level of your Web Layout. Although a Web Layout is not required and might not be necessary for all applications, it provides an effective means for grouping files and navigating. When a Web Layout is not created, the Search function provides the only access to files in the core Oracle WebCenter Content Server. However, other products, like Site Studio, and extras, like Folders and Categorization Folders, provide other means of navigation.
Active and Historical reports are other features introduced later in this section. Web viewable files always have lowercase names.
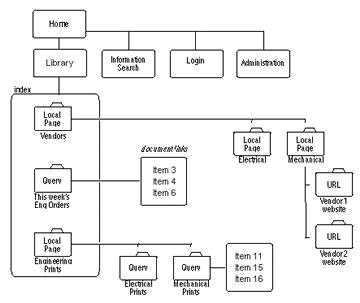
Figure B-1 shows an example of a Web Layout using Local Pages, URLs, and Queries as site-building features.
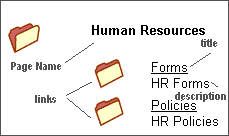
On the Library Web pages, these features are displayed as links with a title next to a file-folder icon. When you click a folder that represents a query, the result produces a set of links to files that match the query's criteria.
B.1.2 Defining the Site Structure and Displaying Criteria
Define the website structure in the Web Hierarchy pane of the Web Layout Editor. Then define criteria to display specific files when the user clicks a folder (or link). The criteria for each link is based on the metadata for each file. Besides executing a query, links can jump to another page of links, go to a URL, or display a report. The following examples demonstrate how links are setup to display files.
-
Example 1: To enable users to access engineering forms from a link named Forms, create a content type named Forms using the Configuration Manager. Then, create a query with Type equal to Forms using the Web Layout Editor.
For information about how to create a content type. For details, see "Defining Content Types" in Oracle Fusion Middleware Managing Oracle WebCenter Content.
-
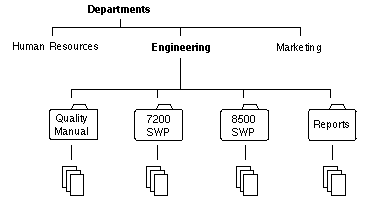
Example 2: To enable users to access specific Standard Work Procedures, create a content type called SWP, and create a query of Type equal to SWP and Content Name substring of 7200.
B.2 Working with Web Pages
After completing the initial plan, build the website and determine how it functions. Revise it if it does not perform properly or is not manageable. Continue this process until you have a design that is going to work for you and the users.
The links on a page jump to one of these:
-
Local page
-
URL
-
Query
-
Report
The links all look similar and can be combined on the same page as shown on the local page in Figure B-3:
A local page is one of two types: a directory or a report. A local page that is a directory can contain links that open another local page, open a URL, or run a query. Only administrators can create a local page that is a report. Administrators or subadministrators with appropriate rights can create a local page that is a directory.
An external URL is a link to a specified URL (Web address). You can link to any URL address or web page on the intranet or Internet.
A search query produces a page containing links to files that meet the criteria of a defined query. The page looks the same as a page resulting from a content search.
Note:
Queries can inherit the security group, the account or both that the page links are on. If the security group or account is inherited, it automatically restricts the query to files in that security group or account.
Reports are either Active or Historical. Active reports appear as a file folder link and perform a database query each time they are run, generating a display of current information. Like Active Reports, Historical Reports appear as a file folder link, but they contain information that was queried at the time they were initially run. They do not perform a database query each time they are opened, and the report is only changed if it is updated.
B.3 Managing Web Pages
Subadministrators do not have access to the Query Result Pages function in the Options menu nor to any applications for which they do not have rights. Additionally, subadministrators have viewing, editing, and deleting restricted rights as described in these sections:
B.3.5 Editing a Hierarchical Web Page Structure
To edit a hierarchical Web page structure, the objective is to insert a page, making it the new parent of the hierarchical page.
For example:
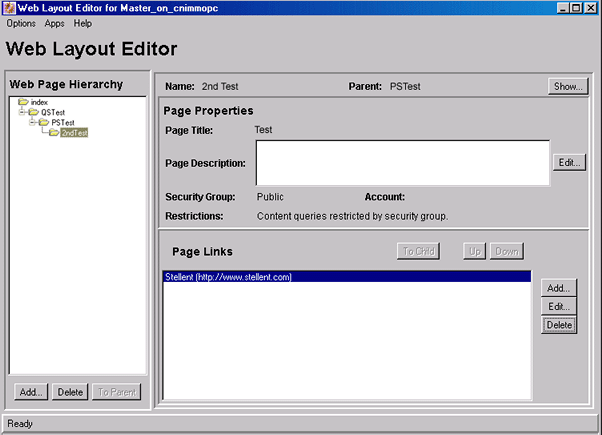
The NewEngPage has now been entered with PCTest as its child and the External URL in 2ndTest has been preserved.
The following image shows a hierarchical web page structure created by this example procedure.
B.4 Working with Reports
This section covers these topics:
B.4.1 About Reports
You can define two types of reports with the Web Layout Editor: Active Reports and Historical Reports.
- Active Reports appear as a file-folder link and perform a database query each time they are run, generating a display of current information. You can define active reports and edit their query expressions.
- Like Active Reports, Historical Reports appear as a file-folder link, but they contain information that was queried at the time they were initially run. They do not perform a database query each time they are opened, and the report is changed only if the database is updated. The procedure for creating a Historical Report is almost the same as creating an Active Report. The only difference is the Create Historical Report screen has an extra field (Rows Per Page) to specify the number of rows each page of the report can contain.
B.4.2 Defining an Active Report
To define an active report:
- In the Web Layout Editor, add a new Web page, and select Active Report as the Page Type.
- In the Active Report Specification pane of the Web Layout Editor, click Edit Report Query.
- Define the query by entering information on the Edit Active Report Query Screen.
- Click OK.
B.4.3 Defining a Historical Report
To prepare an Archive Historical Report:
- In the WebLayout Editor, add a new Web page and select Historical Report as the Page Type.
- In the Historical Report Specification pane of the Web Layout Editor, click Create Report Data.
- When you create the report data in the Create Historical Report Screen, specify Archive History for the data source.
- Write a query for the report that returns the data you want to retrieve. For example, specify the content ID.
- When done specifying information for the report, click OK.
B.5 Writing Queries
This section covers these topics:
B.5.1 Custom Query Expressions
You can write custom query expressions when you define query links. The method you use to write custom queries varies depending on the kind of query you write.
To write directory custom queries, use Idoc Script, a proprietary scripting language. To write report queries, you can use SQL script and Idoc Script. Idoc Script is described in detail in the Oracle Fusion Middleware Configuration Reference for Oracle WebCenter Content. Basic SQL script is briefly described below.
Note:
Your SQL syntax is dependent on your database. Different databases expect different syntax for items like wildcards, and so forth. See your database documentation for specific syntax information.
SQL script involves operators, which are words that show logical relationships between the words in your query. The following table contains some basic operators and their use.
| Operator | Use |
|---|---|
|
AND |
Returns files that contain the specified words. |
|
OR |
Returns files that contain at least one specified word. |
|
= |
Equal |
|
<> or ! |
Not equal |
|
< |
Less than |
|
> |
Greater than |
|
<+ |
Less than or equal to |
|
>+ |
Greater than or equal to |
|
IN |
Finds a position in a table. |
|
BETWEEN |
Finds a value in a range. |
|
NOT |
Excludes the files that contain the specified condition. |
The following are examples of SQL script:
-
Finds all files that have an internal revision ID less than 50000:
dID < '50000'
-
Finds all files that have a content ID between
10000and50000:dDocName BETWEEN '10000' AND '50000'
B.5.2 Creating a Query Link
To create a query link:
When adding Idoc Script variables and HTML tags to the Text 1 and Text 2 fields, keep in mind that any resulting HTML tags can affect the display of the search results page. For more information, see the Oracle Fusion Middleware Configuration Reference for Oracle WebCenter Content.
B.5.4 Adding a Query Results Page
Follow these instructions to add a query results page. This task is available for administrators, not for subadministrators with WebLayout rights:
B.5.5 Editing a Query Results Page
Follow these instructions to edit a query results page. This task is available for administrators, not for subadministrators with WebLayout rights:
B.5.6 Deleting a Query Results Page
Follow these instructions to delete a query results page. This task is available for administrators, not for subadministrators with WebLayout rights:
- From the Web Layout Editor menu, select Options, then Query Results Pages, then select the name of the page.
- Click Delete.
- When prompted, click OK to verify the deletion.


