2 Customizing Customer Data Services Pack
This chapter describes how EDQ-CDS can be customized to take advantage of some of the more advanced features of the product.
This chapter includes the following sections:
EDQ-CDS has been designed to perform well with minimal customization. Ready-to-use, the application can perform key generation and matching of individual, entity and address data in connected supported applications with little or no configuration changes required.
2.1 Using Stand-Alone Batch Matching
EDQ-CDS is designed to process customer data from any external system or stand-alone source. By default, pre-configured batch jobs are provided that work with a set of staging tables. Reconfiguring the product to process data from other sources, such as a text file, is straightforward.
In order to reuse the batch data matching services provided, it is necessary to create new input and output mappings for the s. The following sections use examples that demonstrate how to do this and how to run matching using a modified copy of an existing job configuration.
2.1.1 Using Stand-Alone Individual Batch Matching
You can create a new stand-alone individual batch matching job using the following example steps:
-
Ensure that no jobs are currently running.
-
In the EDQ-CDS project, create a new server-side data store named File In: Individuals that points to the structured text file containing the customer data to be processed. It is important that this is created as a server-side data store in order to be used within a job definition.
-
Create a new snapshot named Individuals using the File In: Individuals data store as a source.
-
Create the Input mappings as follows:
-
Right-click the Individual Candidates and select Mappings... to open the Mappings dialog.
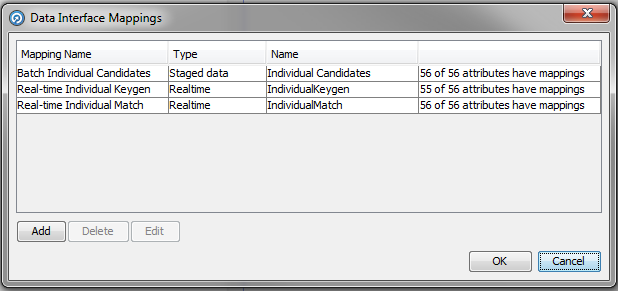
Description of the illustration ''data_intface_config2.png''
-
Click Add to open the New Mappings dialog.
-
Select the Individuals snapshot as the source and click Next. The Staged data default type is used.
-
Map the Customer Data Attributes on the left of the dialog to the Attributes on the right as follows:
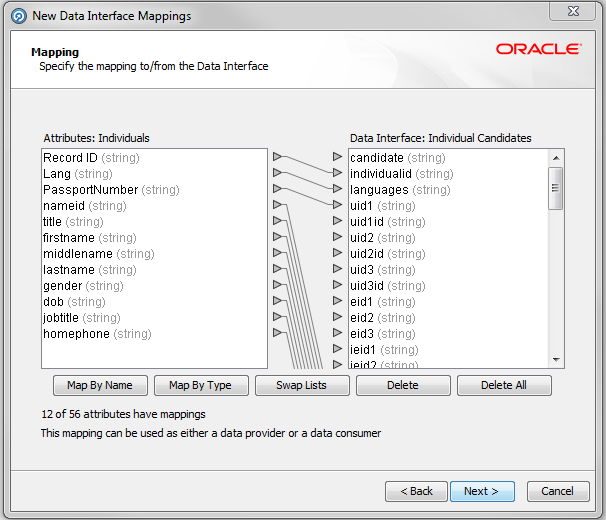
Description of the illustration ''new_data_intface_map.png''
Note :
In some instances, it may be necessary to construct a process that reads from the snapshot and reshapes the data to match the , see Section 2.1.2, "Converting Data to the Interface Format." -
Click Next.
-
Name the mapping Individual Candidates and click Finish to save.
-
Click OK.
-
-
Create a new Staged Data named Individual Matches with columns corresponding to the columns in the Matches .
-
Create the Output mappings as follows:
-
Right-click the Matches and select Mappings... to open the Mappings dialog.
-
Click Add to open the New Mappings dialog.
-
Select the Individual Matches staged data as the target and click Next.
-
Map the Matches attributes on the left to the Individual Matches attributes on the right as required.
-
Click Next.
-
Name the mapping Individual Matches and give it a description, then click Finish.
-
Click OK to close the dialog.
-
-
Create a new server-side delimited text data store called File Out: Individual Matches to use as a target for the match results. Alternatively, the data can be written to a database if required.
-
Create a new export called Matches to File Out: Individual Matches that uses the Matches as the source to export from, and the File Out: Individual Matches as the target for the export.
-
Create and configure a job to run matching as follows:
-
Create a copy of the Batch Individual Match job, rename it Batch Individual Match using Text File, and then open it.
-
Open the Individual Match job phase, change the source of the input data by double-clicking on the Individual Candidates and selecting the Individual Candidates mapping.
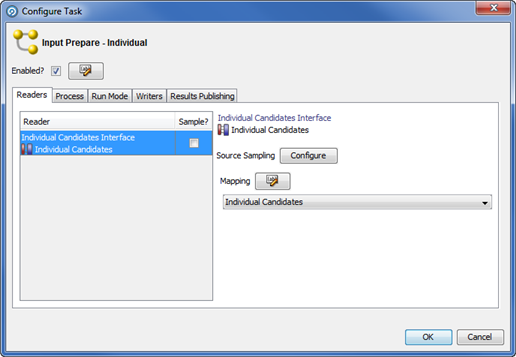
Description of the illustration ''data_intface_config1.png''
-
Click OK to apply the changes. The job configuration is modified accordingly and the old snapshot and staged data items are disconnected.
-
Delete the Individual Candidates snapshot task.
-
Drag the Individuals snapshot from the Snapshot in the Tool Palette into the open job phase and make sure it is connected to the Individual Candidates mapping.
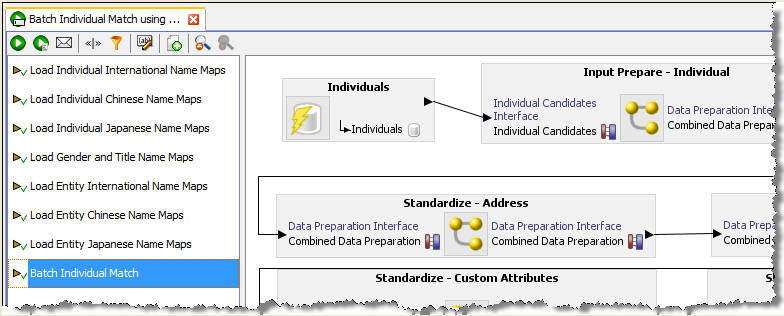
Description of the illustration ''indiv_match_job.jpg''
-
Drag the Matches to File Out: Individual Matches export task from the Export in the Tool Palette into the open job phase and connect it to Match Results - Output.
-
Delete the Batch Matches export task.
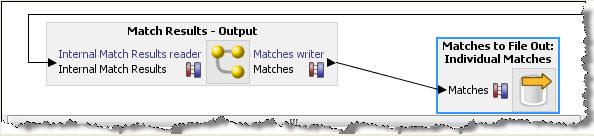
Description of the illustration ''indiv_1_match_job1.jpg''
-
-
Close the job and save the configuration changes.
2.1.2 Converting Data to the Interface Format
It may not always be possible to directly map the input source to the candidates interface if:
-
fields are of the wrong data type (for example, "Date of Birth" in a date field); or
-
fields need transforming to a compatible format/structure (for example, Individual names in a full name field).
If this is the case, then the input data should be run through a custom EDQ process to convert the data as appropriate as in the following example steps:
-
Ensure that no jobs are currently running.
-
Create a data store and snapshot for the input data as in steps 2 and 3 from Section 2.1, "Using Stand-Alone Batch Matching."
-
In the EDQ-CDS project, right-click the Processes node in the Project Browser and select New Process... to open the New Process wizard.
-
Select the snapshot created in step 2 as the data source.
-
Click Next.
-
On the last page of the wizard, rename the process Transform Individuals, then click Finish button to create the process.
-
On the Process canvas, add the necessary processors to transform the data to the interface format. For example, use a Convert Date to String processor to convert a date of birth in date format to the required format for the Candidates interface (for example, either yyyyMMdd, MM/dd/yyyy, yyyy-MM-dd or dd-MMM-yy).
-
Add a Writer processor to the process canvas and connect it to the process data stream:
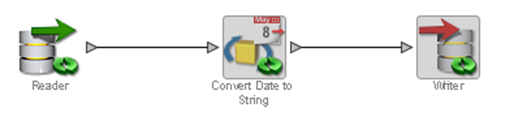
Description of the illustration ''convert_data_ex.png''
-
In the Writer Configuration dialog, select the Individual Candidates and map the attributes accordingly.
-
Create and configure a new job as follows:
-
Make a copy of Batch Individual Match job, renaming it Batch Transformed Individual Match.
-
Open the new job.
-
Double-click on the Individual Match job phase.
-
Use steps 9.d. - 10 of Section 2.1, "Using Stand-Alone Batch Matching" from step 9.d onwards, adding in the new Transform Individuals process between the Individuals snapshot and the process Input - Prepare - Individual. The resulting job should look like the following:

Description of the illustration ''startjob_phase_ex.png''
-
2.2 Using Cleaning Services
The cleaning processes provided with EDQ-CDS are provided as templates only, with the exception of the Address Cleaning process which is fully functional and uses EDQ-AV for address verification and standardization. The Individual and Entity cleaning processes are intended to be customized to meet the data standardization requirements of the implementation.
2.2.1 Customizing the Cleaning Services
The examples in the following sections demonstrate modifying the cleaning services provided with EDQ-CDS.
2.2.1.1 Standardizing Job Titles
Modify the Individual Cleaning service to standardize job titles as in the following example steps.
-
Ensure that no jobs are currently running.
-
In the EDQ-CDS project, create a new Reference Data set with the columns as follows:
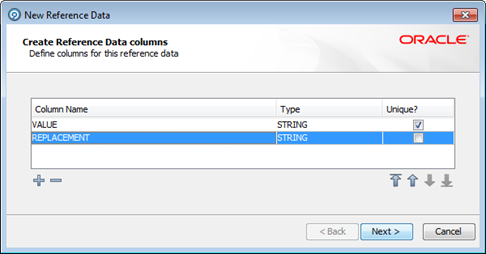
Description of the illustration ''new_ref_data.png''
-
Click Next through the New Reference Data wizard with the name Job Title Standardizations.
-
Click Finish to close the wizard. The Reference Data Editor dialog opens.
-
Add the required job title standardizations; for example:
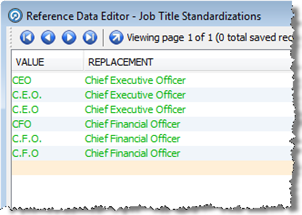
Description of the illustration ''ref_data_edit_job.png''
-
Open the Clean - Individual process.
-
Add a new Replace processor to the Process Canvas and connect it to the output of the Upper Case the Name Attributes processor.
-
In the Processor Configuration dialog, set the jobtitle attribute as the Input field, and on the Options tab select the Job Title Standardizations Reference Data in the Replacements field.
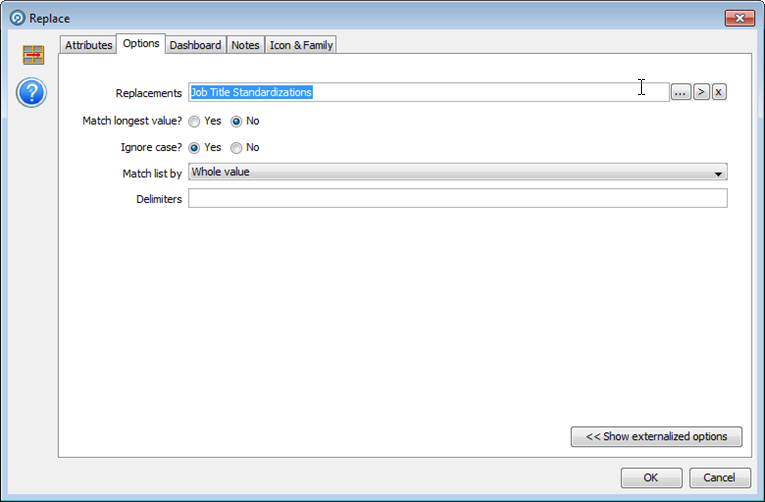
Description of the illustration ''replace_dialog.png''
-
Click OK to close the processor configuration dialog.
-
Connect the All output of the Replace processor to the Writer, then click OK without making any changes to the Writer configuration.
-
On the Process Canvas delete the direct link between the Upper Case processor and the Writer.
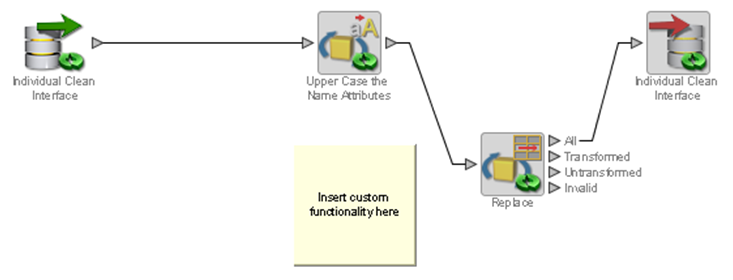
Description of the illustration ''job_title_ex.png''
-
Close the process and save the changes.
-
Test the modified cleaning service.
2.2.2 Changing Country-Specific Address Cleaning Settings
The default settings (Allowed Verification Results, Minimum Verification Level and Minimum Match Score) used in the Address Cleaning process that uses EDQ-AV can be overridden on a per-country basis by simply modifying reference data.
2.2.2.1 Reducing the Strictness of German Address Validation
Modify the EDQ-AV settings to reduce how strictly German addresses will be validated as in the following example steps.
-
Ensure that no jobs are currently running.
-
In the EDQ-CDS project edit the Address Clean - Country verification level and results Reference Data.
-
Add the following row:
-
Country Code: DE
-
Allowed Verification Results: VPA
-
Minimum Verification Level: 3
-
Minimum Match Score: 90
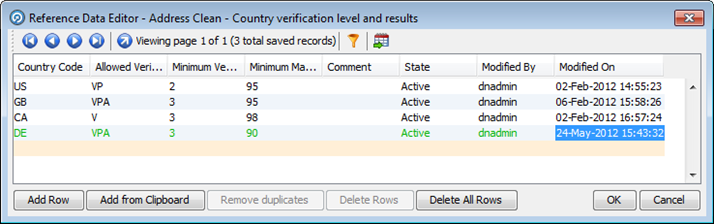
Description of the illustration ''ref_data_addr_clean.png''
-
-
Click OK to close the dialog.
2.3 Adjusting Matching
This section explains how you can change the EDQ matching settings.
2.3.1 Changing the Key Method To Use During Matching
Keys are used as the first stage of matching to pre-select similar records. This will happen inside EDQ for batch matching, or in the calling application during candidate selection for real-time matching.
By default, the key methods that are used during matching depends on the value of the keyprofile setting. The key profile specifies the enablement of key methods, allowing EDQ-CDS to offer a wider menu of key method algorithms.
The methods for controlling which Match key methods are used differs for Batch and Real-Time processing. The following sections contain examples to show you how to modify the key methods used.
2.3.2 Reviewing Matches in EDQ
The EDQ-CDS Matching services return only those records that matched with a score equal to or greater than the matchthreshold setting, and for those records it only returns the record ID, rule name and score. It is useful to be able to view the full record details during rule tuning in order to analyze matches. The Match Review application is a helpful tool in this process.
2.3.2.1 Enabling Match Review in Individual Batch Matching
You can enable match review for individual batch matching as in the following example steps.
-
Ensure that no jobs are currently running.
-
In the EDQ-CDS project, open the Match - Individual process.
-
Double-click on the Match Individuals processor to open the Match Configuration dialog.
-
Click Advanced Options.
-
From the Review System list, select Match Review, and then click OK. This makes the Assign Relationship Review option active.
-
Click Assign Relationship Review.
-
In the dialog displayed, select the appropriate user or user group in the Assigned To drop-down field.
-
Click OK to close the dialog.
-
Close the process and save the configuration changes.
-
Open the Batch Individual Match job.
-
Locate the Match phase, right-click on the Match Prepare task and select Configure. The Task Configuration dialog opens.
-
Select the Process tab, and check the Enable Sort/Filter in Match? option.
-
Click OK and close the job, saving changes when prompted.
-
Run the job from Director with the appropriate run profile and no run label to regenerate the data.
Note:
In order to generate Match Review data, you must run jobs without a run label.
Matches can be reviewed as follows:
-
On the Launchpad page, click Match Review icon.
Note :
If this application is not visible then you will need to publish it via the launchpad server configuration pages. -
Login as a user with the appropriate security permissions (for example, a user that is a member of the group selected in step 5).
-
Select Match - Individual in the Reviews list in the left-hand panel to view the Match Review statistics.
-
Click the Launch Review Application link to start reviewing matches for the selected Review.
2.4 Modifying Reference Data Used in Matching
This section explains how you can modify your data to improve matching and provides examples to aid you.
2.4.1 Stripping Words/Phrases from Name Fields
It is possible to customize the system to strip certain words and phrases from names that are deemed to be noise and/or add little information, and therefore may lead to potential missed matches.
2.4.1.1 Removing Noise from Individual Names
Name fields in customer data systems are often overfilled with additional (non-name) information, either because there are no other suitable fields available or due to errors made by Data Entry users. Common examples include "Fred SMITH (DO NOT CALL)" and "John DOE (DECEASED)". This extraneous information can be removed during name standardization when a "distilled" name is created for use in matching.
Use the following example steps to remove noise from individual names:
-
Ensure that no jobs are currently running.
-
In the EDQ-CDS - Initialize Reference Data project open the Strip List – Titles Latin Reference Data.
-
Add the following rows to the Reference Data set:
-
DO NOT CALL
-
DECEASED
-
-
Click OK to close the dialog.
-
Re-run the MAIN Initialize Reference Data job from the Server Console to re-prepare the Reference Data files that are used by the Matching services.
Note :
The Real-Time services will use the modified Reference Data sets the next time the full Real-time START ALL job (which re-snapshots the prepared Reference Data from files) is run.To remove words and phrases from individual names in non-Latin scripts use the reference data Strip List – Individual Script Strip List Reference Data . This Reference Data set is used as a replacement map and should have a blank value in the second column.
2.4.1.2 Removing Noise from Entity Names
Noise words and phrases or common business words (including suffixes) in Entity names that add little value in matching can be removed during name standardization when a "distilled" name is created. An example of such a noise word is "International", which is often found in organization name fields.
Due to the high frequency of occurrence of this term it is often omitted or shortened when entering the name, which may lead to potential matches being missed. Therefore it may be more appropriate to remove the term and all known variants for the purposes of matching.
Use the following example steps to remove noise from entity names:
-
Ensure that no jobs are currently running.
-
In the EDQ-CDS - Initialize Reference Data project open the Strip List – Entity Latin Reference Data.
-
Add the following rows to the Reference Data set:
-
INTERNTL
-
INTL
-
INT
-
-
Click OK to close the dialog.
-
Re-run the MAIN Initialize Reference Data job from the Server Console to prepare the data.
To remove words and phrases from entity names in non-Latin scripts use the Strip List – Entity Script Suffixes Reference Data.
2.4.2 Changing Name Standardization
EDQ-CDS uses a name standardization technique in order to match name variants. It is supplied with a large collection of common name variants for various language domains. It is possible to customize these lists.
Note :
If a name standardization is changed or added, the subsequent results may be eliminated during Conflict Resolution. For further details, see Section 2.4.3, "Resolving Conflicts".2.4.2.1 Adding Individual Name Standardizations
-
Ensure that no jobs are currently running.
-
In the EDQ-CDS - Initialize Reference Data project create a new Reference Data set with columns as in the following:
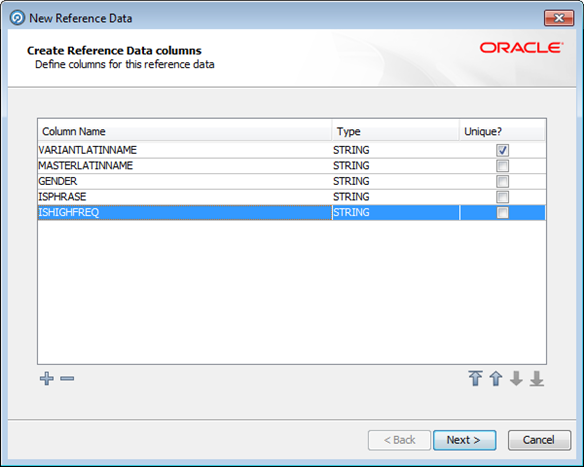
Description of the illustration ''new_ref_data_individ.png''
-
Click Next through the New Reference Data wizard and name it Custom Individual Name Standardizations.
-
Click Finish to close the dialog.
-
The Reference Data Editor dialog will open. Add the required name standardizations, where:
-
VARIANTLATINNAME is the name to be standardized.
-
MASTERLATINNAME is the standardized version of variant name.
-
GENDER takes the value M for male, F for Female, or U for unknown or ambiguous.
-
ISPHRASE takes the value N for single token names and Y for multi-token names containing whitespace.
-
ISHIGHFREQ is set to Y.
Note :
It is important to ensure that data is entered in upper case and that variant names only have a single master across all language domains.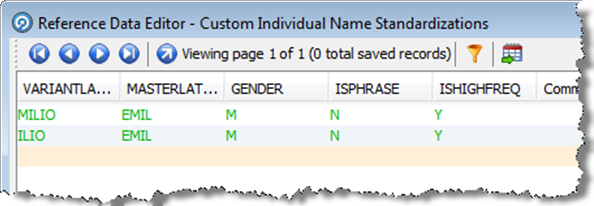
Description of the illustration ''ref_data_names.png''
-
-
Click OK to close the dialog.
-
Open the [D] Initialise Individual Latin to Latin Data process.
-
Add a Reader process to the Process Canvas and configure it to use the Custom Individual Name Standardizations Reference Data as the source, selecting all attributes for input to the process.
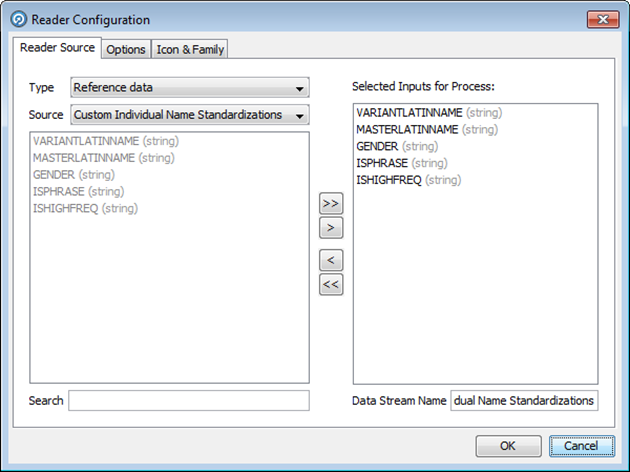
Description of the illustration ''reader_config.png''
-
Add a new Add String Attribute processor to the process canvas and connect the reader to the new processor. In the processor configuration dialog rename the new attribute DATASOURCE and set the attribute value to CUSTOM.
-
Connect the output of the Add String Attribute processor to the Merge Data Streams processor.
-
In the Custom Individual Name Standardizations tab of the Processor Configuration dialog associate the Available Attributes with the Output Attributes in the Merged Data Stream area:
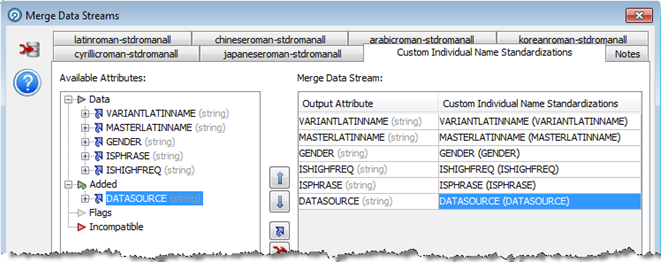
Description of the illustration ''merge_data_streams.png''
-
Click OK to close the dialog.
-
Close the process and save the configuration changes.
-
Re-run the MAIN Initialize Reference Data job from the Server Console to prepare the data.
2.4.3 Resolving Conflicts
Conflict resolution is performed to resolve issues arising when name standardization rules try to standardize names to more than one Master name. For example, if there is a rule that maps "Jon" to a Master of "John" and another that maps "Jon" to "John-Boy", there is a conflict. This conflict is resolved by assessing the importance of each Master name in the given standardization data. The best candidate is then selected as the primary Master, and other standardization maps conflicting with it are removed and quarantined.
As part of conflict resolution, each removed record is assigned one or more Reason Codes explaining why it is in conflict. These codes are displayed in the REASON column in the Server Console Results window:

Description of the illustration ''reason_code.png''
The Reason Codes are as follows:
-
PIV: The Primary record of a cluster of records (for example, the best Master identified for a set of equivalences) is also present as a variant to other Masters. All the instances where this Primary name is a variant are removed.
-
PVOM: The records that are variants of the current Primary are also variants of other Masters. All the records for these variants pointing to other Masters are removed.
-
PVIM: The records that are variants of the current Primary are also Masters to other variants. All the records where this variant is a Master are removed.
-
PIVCUTOFF: Whereas the other removals take place after identification of Primary clusters, there comes a time where it is not efficient to continue to identify the Primaries, and the remaining records where the Master name also exists as a variant have all the variant versions removed in a final cull of records that violate integrity.
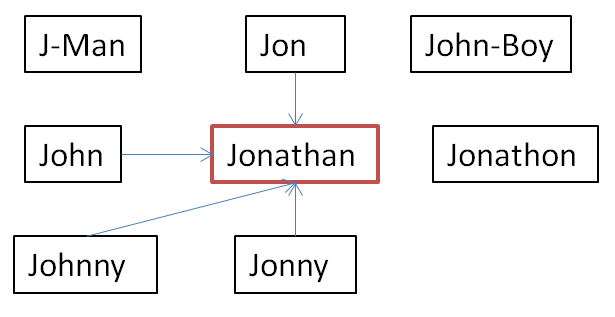
Expanding on the simple example given at the beginning of this section, let us assume that there are the following name standardization rules:
| Master | Primary |
|---|---|
| J-MAN | JON |
| JOHN | JONATHAN |
| JOHNNY | JONNY |
| JON | JOHN |
| JON | JONATHAN |
| JON | JOHN-BOY |
| JONNY | JONATHAN |
| JONATHAN | JONATHON |
| JOHNNY | JONATHAN |
These rules contain a number of inherent conflicts. This is illustrated in the following diagram in which JONATHAN is identified as the Primary:
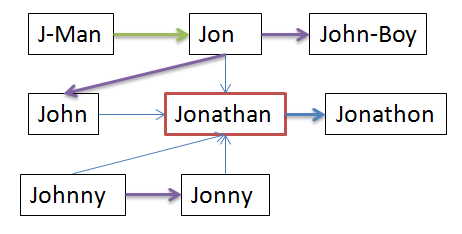
Description of the illustration ''conflict_res_ex2.png''
The arrows indicate the following:
| Arrow Type | Reason for Conflict |
|---|---|
| N/A (No conflict exists) | |
| PIV | |
| PVIM | |
| PVOM |
The conflict resolution rules will discard the mappings that cause conflicts, as follows:
Description of the illustration ''conflict_res_ex1.png''
Resulting in the following mappings being created:
| Name | Primary |
|---|---|
| JOHN | JONATHAN |
| JON | JONATHAN |
| JONNY | JONATHAN |
| JOHNNY | JONATHAN |