1 Installing Customer Data Services Pack
This chapter explains how to install the EDQ Customer Data Services Pack (EDQ-CDS).
This chapter includes the following sections:
1.1 Planning Your Installation
This section describes the prerequisites, integration, compatibility, and necessary installation components.
1.1.1 Prerequisites
EDQ-CDS 12c (12.2.1.2.0) requires the following:
-
If you are integrating EDQ-CDS with Siebel, you must install:
-
Siebel CRM or UCM version 8.1 or later.
-
Siebel Connector release 12.2.1.
-
The requirements for production systems are as follows:
-
64-bit Operating System.
-
64-bit Java Virtual Machine (JVM).
-
Minimum system memory of 8GB, with 4GB allocated to the JVM.
-
Recommended system memory of 16GB, with 8GB allocated to the JVM.
1.1.2 Integrating with Siebel
When integrating a Siebel instance with EDQ to use CDS services, Oracle recommends that the necessary components be installed and configured in the following order:
-
Install the EDQ-CDS pack on the EDQ server as detailed in this chapter.
-
The
siebelconnector.zipis automatically installed into the EDQ Oracle Home when the EDQ installer is run. Copy the zip to the Siebel server installation directory. -
Install the EDQ Siebel Connector on the Siebel server.
-
Integrate Siebel with EDQ-CDS, see Oracle Fusion Middleware Integrating and Managing Siebel Environments with Enterprise Data Quality.
1.1.3 Compatibility Matrix
The matrix below shows the compatibility of all released versions of EDQ-CDS with other EDQ components:
| EDQ-CDS | EDQ | EDQ Siebel Connector | EDQ-AV |
|---|---|---|---|
| 9.0.1 | 9.0.3 or later | 9.0.3-9.0.5 | Any |
| 9.0.2 | 9.0.4 or later | 9.0.4-9.0.5 | Any |
| 9.0.3 | 9.0.5 or later | 9.0.4-9.0.5 | Any |
| 9.0.4 | 9.0.7 or later | 9.0.6 | 12.4.0.0.0 or later |
| 9.0.5 | 9.0.7 or later | 9.0.6 | 12.4.0.0.0 or later |
| 11.1.1.7.3 | 11.1.1.7.3 or later | 11.1.1.7.3 | 12.4.0.0.0 or later |
| 12.2.1 | 12.2.1 or later | 12.2.1 | 15.2.0.0.0 |
1.1.4 Components
CDS is delivered with EDQ. To access the CDS .dxi files, right-click the server name in EDQ and select Open Server Package File > cds folder. The CDS folder contains the following components:
-
EDQ-CDS.dxi- the EDQ-CDS data quality services. -
EDQ-CDS - Published Processors.dxi- contains the Published Processors and Images. -
EDQ-CDS - Initialize Reference Data.dxi- the processes to prepare the EDQ-CDS Reference Data. -
EDQ-CDS - Data Quality Health Check.dxi- the processes for the Data Quality Health Check extension, see Chapter 4, "Installing and Using Data Quality Health Check." -
Staging_tables.sqlinOracle_Home/edq/oracle.edq/edq-cdscontains Siebel specific scripts for configuring the staging database and a default Structured Query Language (SQL) script for use in creating staging tables for use with generic batch jobs. -
siebelconnector.zipcontains thednd.propertiesfile, which is used when EDQ-CDS is integrated with a Siebel server. For more information, see sectionOracle Fusion Middleware Integrating and Configuring Siebel Environments with Enterprise Data Quality.
1.2 Installing EDQ-CDS
To install EDQ-CDS on the EDQ server:
-
Start the EDQ Director client, and log on as a user with the permission to create projects (Administrator or Project Owner).
-
Right-click on the server name and select Open Server Package File. Open the CDS folder and select the
EDQ-CDS - Initialize Reference Data.dxifile. -
Expand the
EDQ-CDS - Initialize Reference Data.dxifile and drag the whole EDQ-CDS - Initialize Reference Data project onto the Projects node. -
Repeat steps 2 and 3 for the
EDQ-CDS.dxiand the EDQ-CDS project it contains. -
Repeat steps 2 and 3 for the
EDQ-CDS - Published Processors.dxi. -
(Optional) Repeat steps 2 and 3 for the
EDQ-CDS - Data Quality Health Check.dxiand the EDQ-CDS - Data Quality Health Check project it contains. -
Once the projects have been imported, right-click on the
.dxifiles, and select Close Package File.
1.3 Configuring with Run Profiles
There are several configuration options for EDQ-CDS that are controlled by the properties in the EDQ-CDS Run Profiles that are installed with the product and used as follows:
| File Name | Use | Property Sets |
|---|---|---|
edq-cds.properties |
Default EDQ-CDS Run Profile. | Language
High Frequency Name Maps Key Generation (Real-time and Batch) Match Threshold Match Settings for disabling reference data input in real-time. Required for HA. Real-time Match Results Address Cleaning Staging Data for Batch Jobs Staged Data Visibility Match Settings Key Analysis Settings |
edq-cds-siebel.properties |
Sets properties specific to the Siebel EDQ-CDS integration. | Language
High Frequency Name Maps Key Generation (Real-time and Siebel Batch) Key Analysis Settings Match Settings Real-time Match Results Address Cleaning Siebel Staging Data for Batch Jobs Staged Data Visibility |
edq-cds-data-quality-health-check.properties |
Sets properties for Health Check functions. | EDQ Dashboard
Source Input File Encoding Export Check Results Address Verification Country Code Individual Results Book Functionality Entity Results Book Functionality Staged Data Visibility |
edq-cds-daas.properties |
Not used at this time. | |
edq-cds-fusion.properties |
Not used at this time. |
These files are in the oedq.home/runprofiles directory of your EDQ installation directory. You can copy properties from one file to another so that the Run Profile you want to use contains all of the properties necessary to your configuration.
To edit a Run Profile:
-
Copy the Run Profile to the
oedq.local.home/runprofilesdirectory of the EDQ installation and rename it. -
In the
oedq.local.home/runprofilesdirectory, open the Run Profile with a text editor. -
Edit the values of the properties as required.
-
Save the file.
When an update occurs, files in the oedq.home/runprofiles directory will be over-written. The files in the oedq.local.home/runprofiles directory will not be affected.
The properties in each Run Profile fall into several categories, as described in the following sections.
Note :
It is also possible to configure Address Cleaning on a per country basis, although this is not done using the Run Profile, see Section 1.3.4, "Address Cleaning Properties."1.3.1 Pre-Initialized Reference Data
The initialized Latin reference data and the cdslists-initialized-full.zip file (pre-installed in the Oracle_Home/edq/oracle.edq/edq-cds/landingarea/cdslists/cdslists-initialized-full.zip directory) together contain initialized reference data for all supported languages.
To use initialized reference data for all other supported languages, extract the cdslists-initialized-full.zip file over the cdslists directory, overwriting pre-existing data.
To use a different set of languages (for example, only Japanese) or to customize the reference data (for example, to add additional name standardizations), prepare and initialize it as required. This overwrites the pre-prepared files.
Note :
If this pre-initialized Reference Data is used, it is not necessary to use Section 1.3.2, "Initialize Reference Data Properties."1.3.2 Initialize Reference Data Properties
The section explains how to configure the properties of the Initialize Reference Data project using run profiles.
1.3.2.1 Language Domains
By default, name data for all non-Latin script languages is excluded when using the Run Profile. This is controlled by the following property:
phase.Initialize.process.*.Language\ Domains = LAT
Note:
-
This value is set to LAT by default, which means all Latin data is included. To exclude Latin data, delete this value.
-
Multiple language domains can be specified as a comma-separated list.
To include data in one or more script languages, add the associated property value, as documented in the comments of the Run Profile.
For example, to include Arabic script data, add the ARA value to the property:
phase.Initialize.process.*.Language\ Domains = LAT, ARA
If you edit this property, you must run the Initialize Reference Data job.
1.3.2.2 High Frequency Names Only
It is possible to exclude those non-Latin names that do not occur with a high frequency (for example, are not commonly used). By default, all names are included when records are processed.
This is controlled by the following property:
phase.Initialize.process.*.High\ Frequency\ Only = N
To exclude uncommon non-Latin names, change this property value to Y.
If you edit this property, you must run the Initialize Reference Data job.
1.3.3 Matching Properties
These values are used to control key profile and matching behavior.
1.3.3.1 Key Profile
The keyprofile parameter attribute is used to specify the key methods to use for Key Generation in both batch and real-time. It can be set as follows, either to a pre-defined profile (Loose, Strict or Typical)
phase.Individual\ Keygen.process.*.keyprofile = Typical
phase.Batch\ Individual\ Match.process.*.keyprofile = Typical
phase.Entity\ Keygen.process.*.keyprofile = Typical
phase.Batch\ Entity\ Match.process.*.keyprofile = Typical
phase.Address\ Keygen.process.*.keyprofile = Typical
phase.Batch\ Address\ Match.process.*.keyprofile = Typical
or a manually encoded profile such as
AD112FNL5GNL5^10|GNW1FNL0^11|AD17AD25CTL10^12|FNM4PNL8^13|PNR6^14
If Legacy cluster methods are required (the old "clustering" methods prior to version 12.2.1) the following settings should be set in the run profile:
phase.*.process.*.uselegacykeygen = Y
and the levels set using
phase.Individual\ Keygen.process.*.clusterlevel = 2
1.3.3.2 Cluster Comparison Limits
The match processors contain default cluster comparison limits that are applied. When set, the cluster comparison limit is a default upper limit on the maximum number of comparisons to be performed on a single cluster. You calculate this figure by assessing the number of comparisons that you want performed in a cluster before processing it. If the number of comparisons that would be performed on the cluster is greater than the limit, the cluster is skipped.
You can set the limits for a given cluster by adding the cluster limits properties to your edq-cds.properties file and editing the limit values. For example:
# Change the cluster limits to have a maximum of 15,000 comparisons per cluster group, and use the comparison limit in preference over the group limit.
phase.*.process.Match\ -\ Individual.*.individual_match_cluster_comparison_limit = 15000
phase.*.process.Match\ -\ Individual.*.match_cluster_group_limit = 0
phase.*.process.Match\ -\ Entity.*.match_cluster_comparison_limit = 15000
phase.*.process.Match\ -\ Entity.*.match_cluster_group_limit = 0
1.3.3.3 Batch Matching
This section describes properties for controlling batch matching:
1.3.3.3.1 Batch Match Threshold
By default, the match threshold in the project for Batch processing of all record types is set to 70 (on a percentage scale). Matches with a rule score below this value will not be returned.
The match threshold to be used for batch matching is specified using the following run profile parameters. To set a different level for one or more types of processing, edit the values of the following properties accordingly:
######### Match Threshold ###########
# Rule score below which matches will not be returned
# Default = 70 if this property is absent

# Batch Matching
phase.Individual\ Match.process.*.matchthreshold = 70
phase.Entity\ Match.process.*.matchthreshold     = 70
phase.Address\ Match.process.*.matchthreshold    = 70
Note :
While the match thresholds set in the Run Profile override the default project settings, values passed from the Web Service take priority over both.1.3.3.3.2 Batch Compound Comparison and Weighting
Whether each compound comparison should be enabled for matching, and if so, what weighting it should use, can be controlled using the following run profile parameters:
phase.Individual\ Match.process.*.overallscore.XXX.weighting = 7
phase.Individual\ Match.process.*.overallscore.XXX.enabled   = Y
...
...
phase.Entity\ Match.process.*.overallscore.XXX.weighting = 10
phase.Entity\ Match.process.*.overallscore.XXX.enabled   = N
...
...
where XXX is the name of the compound comparison. This also applies to the new custom attributes.
1.3.3.4 Real-time Options
When using the real-time Key Generation or Matching services, it is possible to override certain options on a per-message basis, by passing in the settings in the header of the message. For example, in the real-time matching service, it is possible to override the matchthreshold (see Batch Match Threshold) on a per-message basis, you must pass it in on the message header rather than on every record. For example:
<?xml version="1.0" encoding="UTF-8"?>
<env:Envelope xmlns:env="http://schemas.xmlsoap.org/soap/envelope/" xmlns:dn="http://www.datanomic.com/ws">
  <env:Header/>
  <env:Body>
    <dn:request matchthreshold="80">
      <dn:record>
...
For real-time key generation it also possible to set the keyprofile option to use on a per-message basis, for example:
<?xml version="1.0" encoding="UTF-8"?>
<env:Envelope xmlns:env="http://schemas.xmlsoap.org/soap/envelope/" xmlns:dn="http://www.datanomic.com/ws">
  <env:Header/>
  <env:Body>
<dn:request
  keyprofile="Strict"
>
Similarly, the other match-related run profile settings relating to compound comparison weighting and enablement can also be specified on a per-message basis, for example:
<?xml version="1.0" encoding="UTF-8"?>
<env:Envelope xmlns:env="http://schemas.xmlsoap.org/soap/envelope/" xmlns:dn="http://www.datanomic.com/ws">
  <env:Header/>
  <env:Body>
<dn:request
   overallscore.address.enabled="Y"
   overallscore.address.weighting="21"
>
      <dn:record>
...
Note:
When using the Web Service Tester tool there is a header input field provided, where any of these settings can be input in a simple key value pair input (for example, matchthreshold="80").For a full list of properties that can be specified in the header of a real-time request see the following tables: Table 5-1, Table 5-2, and Table 5-3.
1.3.3.5 Match Results Configuration for Real-time Jobs
Siebel 8.1 and later requires that real-time matching responses include both the driving record and all matching candidate records, with their match scores. For all other use cases it is not necessary to return the driving record in the response. The following option controls whether or not to include the driving record in responses to real-time matching services:
phase.*.process.*.Return\ Real-time\ Driving\ Record=
The default settings for this property are as follows:
-
edq-cds.properties-N -
edq-cds-siebel.properties-Y
If this option is set to Y the driving record (with only the ID populated) is returned as the first record in the response, where there was at least one match in the candidate set. Otherwise, the driving record is excluded.
1.3.4 Address Cleaning Properties
When using the Address Cleaning service with EDQ-AV, the properties described in this section can be configured as required. For more information about Address Cleaning, see Oracle Enterprise Data Quality Address Verification Installation Guide.
1.3.4.1 Default Country Code
phase.*.process.Clean\ -\ Address.Default\ Country\ Code = US
This property can be used to define a system-level default country code in installations where addresses will typically all be in the same country and will not be specified per request on the interface.
The default value is US. Any codes that are entered here are expected to comply with the ISO-3166-1-alpha-2 specification.
1.3.4.2 Whether Address Verification Should Enable Geocoding
phase.*.process.Clean\ -\ Address.Enable\ Geocoding = Y
This property controls whether the Address Verification processor should use Geocoding, and correspondingly return latitude and longitude information with the cleaned address.
1.3.4.3 Default Allowed Address Verification Result Codes
phase.*.process.Clean\ -\ Address.Default\ Allowed\ Verification\ Result\ Codes = PV
This property specifies which Verification codes are permitted, which by default are P(partially verified) and V(verified).
1.3.4.4 Default Minimum Address Verification Level
phase.*.process.Clean\ -\ Address.Default\ Minimum\ Verification\ Level = 2
This property specifies the minimum required (post-process) Verification Match level, on a scale of 1 to 5. The default value is 2.
1.3.4.5 Default Minimum Address Verification Match Score
phase.*.process.Clean\ -\ Address.Default\ Minimum\ Verification\ Match\ Score = 95
This property specifies the minimum Match score required, on a scale of 1-100. The default setting is 95.
Note :
The three properties above set system-level defaults that control whether the Address Verification processor should actually clean an address based on the strength of the verification it is able to perform. These properties can also be overridden on a per-request basis by specifying them on the Address Cleaning interface, or overridden on a per-country basis (see Section 1.3.7, "Address Cleaning Per Country.")1.3.4.6 Number of Lines Returned by the Address Clean Process
phase.*.process.Clean\ -\ Address.Number\ Of\ Address\ Lines =
Applications commonly support two, three or four address lines for the house number/street part of the address.
This property indicates the number of cleaned address lines that should be returned by the cleaning service.
The default settings in the Run Profiles are as follows:
-
edq-cds.properties-4 -
edq-cds-siebel.properties-2
1.3.4.7 Post-Processing
Post-processing is run after address cleaning, to apply certain changes to the results which have been returned from AV. This functionality is intended for Siebel integrations. Therefore, the default settings in the Run Profiles are:
-
edq-cds.properties-N -
edq-cds-siebel.properties-Y
Standardize a Verified Country Name to Specific Values
If this value is set to Y country names are standardized to those in the default Siebel pick list:
phase.*.process.Clean\ -\ Address\ Post\ Process.Standardize\ Verified\ Country\ to\ CRM\ Values =
Standardize a Verified adminarea to Specific Values
If this value is set to Y, only adminarea values in the default Siebel pick list are returned:
phase.*.process.Clean\ -\ Address\ Post\ Process.Standardize\ Verified\ Admin\ Area\ to\ CRM\ Values =
If this value is set to N, the adminarea value of the output address is passed back to Siebel.
Note :
The default Siebel pick list only includes US states. The reference data set that controls this in CDS is Address Clean - Admin Area to Standard CRM Admin Area. Entries added to this list are added to the Admin Areas that are considered 'valid' for pass-back to a CRM application such as Siebel that uses bound lists for the mapped field.Standardize Blank Verified Address Fields to be Returned as a Space
When the Siebel Data Quality interface receives back an empty string from a standardization service, it interprets this as meaning 'the current value should be retained'. In the case of Address Cleaning, it is sometimes desirable deliberately to remove the current value for an attribute; for example, an address standardization service may change an input address such that sub-building details are moved from the second line of the address to the end of the first line. In this case, in order not to duplicate the sub-building details in both address lines, a single space is returned in a return attribute to indicate to Siebel that the input value should be removed. Siebel does not in fact insert a space into the value; it interprets the space as meaning the value should be removed.
If this value is set to Y, any blank fields are populated with a single space character before being returned to Siebel:
phase.*.process.Clean\ -\ Address\ Post\ Process.Standardize\ Verified\ Blank\ Address\ Fields\ to\ Space =
1.3.5 Staging Data Configuration Parameters for Batch Jobs
By default, the Staging Data configuration for Batch jobs is derived from the candidate snapshots and the properties are set using the defined data source and the table names are set to the EDQ-CDS defaults. These properties can be edited as necessary if you want to point the (generic) batch matching jobs at different staging tables. The SERVERID and JOBID columns are used to enable processing of multiple batch jobs in parallel so they need to be edited in the run profile accordingly prior to each job submission; if they are not needed then default values can be used.
######### Staging Data Configuration Parameters For Batch Jobs ###########
# The JNDI data source name and table names may be different dependent on the installation

# Where clause for candidate snapshots, to obtain data for specific server and job
phase.*.snapshot.*.where   = serverid = 'SERVERID' AND jobid = 'JOBID'

# Export parameters for specific server and job
phase.*.process.*.serverid = SERVERID
phase.*.process.*.jobid    = JOBID

# JNDI data source name for staging schema in database
phase.*.snapshot.*.remotejndi = jdbc/edqcdsstaging
phase.*.export.*.remotejndi   = jdbc/edqcdsstaging

# Table names for candidate staging tables (snapshots)
phase.*.snapshot.Entity\ Candidates.table_name     = EDQCDS_CANDIDATES_ENT
phase.*.snapshot.Individual\ Candidates.table_name = EDQCDS_CANDIDATES_IND
phase.*.snapshot.Address\ Candidates.table_name    = EDQCDS_CANDIDATES_ADD

# Table names for result staging tables (exports)
phase.*.export.Batch\ Matches.table_name           = EDQCDS_MATCHES
phase.*.export.Batch\ Key\ Generation\ Results.table_name = EDQCDS_CLUSTER_KEYS
1.3.6 Staged Data Visibility Settings within Server Console
By default, most Staged Data sets are suppressed in the Results view of the Server Console. Only those Staged Data sets listed in this section of the Run Profile are visible in Server Console by default:
# Initialize Project
stageddata.\[QA\]\ Single\ chars.visible = yes
stageddata.\[QA\]\ Variant\ has\ Multiple\ Masters.visible = yes
stageddata.\[QA\]\ Variant\ is\ Master.visible = yes
stageddata.Conflict\ Res\ \-\ Removed\ Links\ ALL.visible = yes
To make other Staged Data sets visible, add a property in the format of those included in the Run Profile, as in the preceding example.
1.3.7 Address Cleaning Per Country
The extent to which EDQ-AV can verify addresses varies depending on the country. Additionally, address data from certain countries may be trusted more than data provided for others.
To allow for this, it is possible to set different parameters for address cleaning on a per-country basis.
To set the required parameters:
-
Open the Director client.
-
In the Project Browser, select EDQ-CDS > Reference Data.
-
Open the Address Clean - Country verification level and results Reference Data.
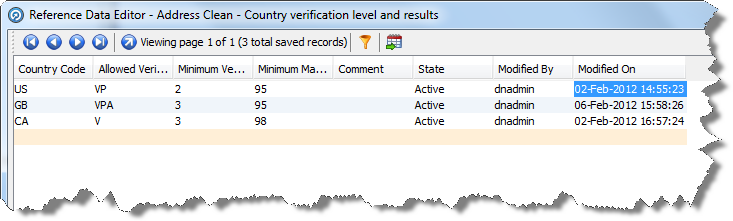
Description of the illustration ''addr_cln_cntry.png''
-
In the Reference Data Editor, change the default settings for US, GB and CA, and add additional rows and settings for other countries as required.
-
Click OK to save changes, or Cancel to abandon.
Note :
For further details of the Verification settings, see Chapter 5, "Using Business Services."1.4 Initializing Custom Reference Data
If the pre-initialized Reference Data shipped with EDQ-CDS is used, this procedure is not required. However, if any of the initialization options detailed in Section 1.3.2, "Initialize Reference Data Properties" have been changed from their default settings the Reference Data must be re-initialized by running the job in the Server Console.
To do this, use the following procedure:
-
Open the Server Console.
-
Expand the EDQ-CDS - Initialize Reference Data project.
-
Right-click the MAIN Initialize Reference Data job and select Run...
-
Select the EDQ-CDS run profile and specify a Run Label of cds.
Note:
-
This job must be re-run if the Reference Data is customized, or if the Run Profile is modified in order to select different languages to initialize.
-
Oracle recommends that
cdsis used as the Run Label for all CDS jobs.
1.5 Starting and Stopping Real-time Jobs and Processes
There are several jobs that must be running in order to use the Real-time processes. These jobs are controlled by two other jobs: Real-time START ALL and Real-time STOP ALL, which must be started in the Server Console.
Note :
By default, all CDS Real-time services are started by the Real-time START ALL and Real-time STOP ALL jobs.For optimum performance efficiency, do not run services that you are not using. For example, if you are not using the cleaning services you can remove the triggers that start them. In some cases, such as smaller servers, it may be required to remove the triggers that start the unused services from the Initiate Real-time Services phase of the Real-time START ALL job. To remove a trigger, right-click on the phase, select Configure, and remove the job that you do not need. Both Key Generation and Match Jobs must be running for a matching service.
To start the Real-time processes:
-
Open the Server Console.
-
Expand the EDQ-CDS project.
-
Run the Real-time START ALL job.
-
Select the required Run Profile from the drop-down field.
Note :
If running the job in order to provide services to Siebel (either CRM or UCM), the edq-cds-siebel Run Profile must be selected, so that the correct configuration settings for Siebel are used.If running the job to provide services to other applications, the edq-cds Run Profile is recommended. For more information, see Section 1.3, "Configuring with Run Profiles."
-
Enter cds as the Run Label.
-
Click OK.
Under certain circumstances it may be necessary to stop and restart the Real-time processes. For example, if new Reference Data has become available, it will be necessary to stop the Real-time processes, re-run the Initialize Reference Data job, and start the Real-time processes again.
To stop the Real-time processes:
-
Open the Server Console.
-
Expand the EDQ-CDS project.
-
Run the Real-time STOP ALL job.
1.5.1 Scheduling a Real-time START ALL Job at Start Up
If the server restarts, it will be necessary to also restart the Real-time jobs with the appropriate Run Profile and Run Label. To ensure this happens automatically, use the following procedure to configure the Real-time START ALL job to run at start up:
-
Open the Server Console
-
Expand the EDQ-CDS project.
-
Open the Real-time START ALL job
-
Right click and select the Schedule option.
-
Select the Startup radio option.
-
Select the required Run Profile from the drop-down field.
Note :
If running the job in order to provide services to Siebel (either CRM or UCM), the edq-cds-siebel Run Profile must be selected, so that the correct configuration settings for Siebel are used.If running the job to provide services to other applications, the
edq-cdsRun Profile is recommended. -
Specify a Run Label of cds.
-
Click OK to save the changes.