4 Creating the Master and Work Repository Schemas
ODI_REPO) schemas on a certified database for use with this release of Oracle Fusion Middleware.- Installing and Configuring a Certified Database
Before you create the database schemas, you must install and configure a certified database, and verify that the database is up and running. - Starting the Repository Creation Utility
Start the Repository Creation Utility (RCU) after you verify that a certified JDK is installed on your system. - Navigating the Repository Creation Utility Screens to Create Schemas
Enter required information in the RCU screens to create the database schemas.
4.1 Installing and Configuring a Certified Database
Before you create the database schemas, you must install and configure a certified database, and verify that the database is up and running.
For more information, see About Database Requirements for an Oracle Fusion Middleware Installation.
4.2 Starting the Repository Creation Utility
Start the Repository Creation Utility (RCU) after you verify that a certified JDK is installed on your system.
To start the RCU:
4.3 Navigating the Repository Creation Utility Screens to Create Schemas
Enter required information in the RCU screens to create the database schemas.
- Introducing the RCU
The Welcome screen is the first screen that appears when you start the RCU. - Selecting a Method of Schema Creation
Use the Create Repository screen to select a method to create and load component schemas into the database. - Providing Database Connection Details
On the Database Connection Details screen, provide the database connection details for the RCU to connect to your database. - Specifying a Custom Prefix and Selecting Schemas
On the Select Components screen, specify a custom prefix and select the product database schema. - Specifying Schema Passwords
On the Schema Passwords screen, specify how you want to set the schema passwords on your database, then enter and confirm your passwords. - Specifying Custom Variables
On the Custom Variables screen, specify the custom variables for the Master and Work Repository. - Completing Schema Creation
Navigate through the remaining RCU screens to complete schema creation.
4.3.1 Introducing the RCU
The Welcome screen is the first screen that appears when you start the RCU.
Click Next.
4.3.2 Selecting a Method of Schema Creation
Use the Create Repository screen to select a method to create and load component schemas into the database.
-
If you have the necessary permissions and privileges to perform DBA activities on your database, select System Load and Product Load. This procedure assumes that you have SYSDBA privileges.
-
If you do not have the necessary permissions or privileges to perform DBA activities in the database, you must select Prepare Scripts for System Load on this screen. This option generates a SQL script that you can give to your database administrator. For more information about system load and product load, see About System Load and Product Load in Oracle Fusion Middleware Creating Schemas with the Repository Creation Utility.
-
If the DBA has already run the SQL script for System Load, select Perform Product Load.
4.3.3 Providing Database Connection Details
On the Database Connection Details screen, provide the database connection details for the RCU to connect to your database.
Note:
If you are unsure of the service name for your database, you can obtain it from the SERVICE_NAMES parameter in the initialization parameter file of the database. If the initialization parameter file does not contain the SERVICE_NAMES parameter, then the service name is the same as the global database name, which is specified in the DB_NAME and DB_DOMAIN parameters.
For example:
- Database Type: Oracle Database
- Name: examplehost.exampledomain.com
- Port: 1521
- Service Name: Orcl.exampledomain.com
- User Name: sys
- Password: ******
- Role: SYSDBA
Click Next to proceed, then click OK in the dialog window that confirms a successful database connection.
4.3.4 Specifying a Custom Prefix and Selecting Schemas
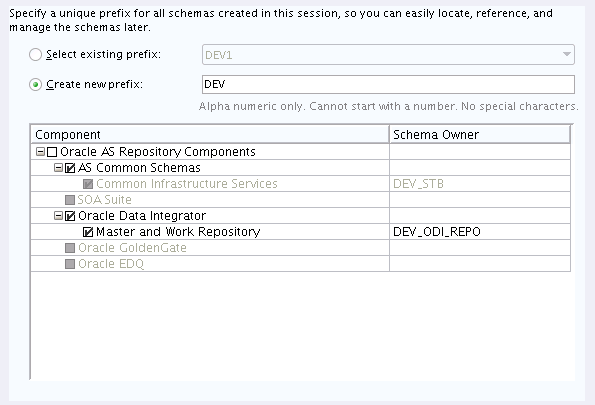
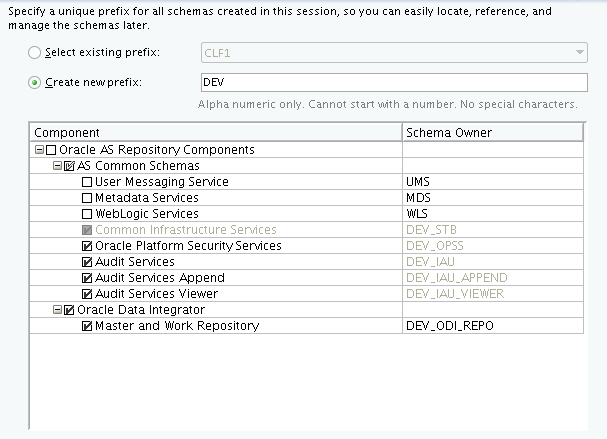
On the Select Components screen, specify a custom prefix and select the product database schema.
Select Create new prefix, specify a custom prefix, then select the Oracle Data Integrator schema.
Tip:
Make a note of the custom prefix you choose to enter here; you will need this later on during the domain creation process.
The custom prefix logically groups these schemas together for use in this domain only; you must create a unique set of schemas for each domain as schema sharing across domains is not supported.
See Also:
For more information, see the following topics in Oracle Fusion Middleware Creating Schemas with the Repository Creation Utility:
If you are running RCU from a Standalone installation, you will see the following:
If you are running RCU from an Enterprise installation, you will see the following:
Note:
If you have already created the ODI repository using ODI Studio, uncheck the ODI entry here and create only the dependent schema. In the Configuration Wizard, after retrieving the dependent schema connectivity from STB schema, manually fill in the ODI repository details.
Click Next to proceed, then click OK to confirm that prerequisite checking for schema creation was successful.
4.3.5 Specifying Schema Passwords
On the Schema Passwords screen, specify how you want to set the schema passwords on your database, then enter and confirm your passwords.
Tip:
You must make a note of the passwords you set on this screen; you will need them later on during the domain creation process.
4.3.6 Specifying Custom Variables
On the Custom Variables screen, specify the custom variables for the Master and Work Repository.
Tip:
For more information about the options on this screen, see Custom Variables in Oracle Fusion Middleware Creating Schemas with the Repository Creation Utility.
4.3.7 Completing Schema Creation
Navigate through the remaining RCU screens to complete schema creation.
On the Map Tablespaces screen, the Encrypt Tablespace check box appears only if you enabled Transparent Data Encryption (TDE) in the database (Oracle or Oracle EBR) when you start the RCU. Select the Encrypt Tablespace check box if you want to encrypt all new tablespaces that the RCU creates.
When you reach the Completion Summary screen, click Close to dismiss the RCU.


