10 Integrating Other Oracle Applications
Permissions:
To perform the tasks in this chapter, you must be granted the WebLogic Server Admin role through the Oracle WebLogic Server Administration Console and the Administrator role granted through WebCenter Portal Administration. Aside from these permissions for WebCenter Portal, you may also need additional permissions for the other Oracle applications being integrated.
For more information about roles and permissions, see Understanding Administrative Operations, Roles, and Tools.
10.1 About Integrating Other Oracle Applications
Oracle WebCenter Portal is an integrated suite of technology designed to deliver a unified, context-aware user experience. WebCenter Portal integrates structured and unstructured content, business intelligence, business processes, communication, and collaboration services, and removes the boundaries between enterprise applications. By integrating other applications available within the enterprise with WebCenter Portal, you can create context-centric, composite applications that leverage the capabilities of these applications, extending WebCenter Portal and changing the way people work.
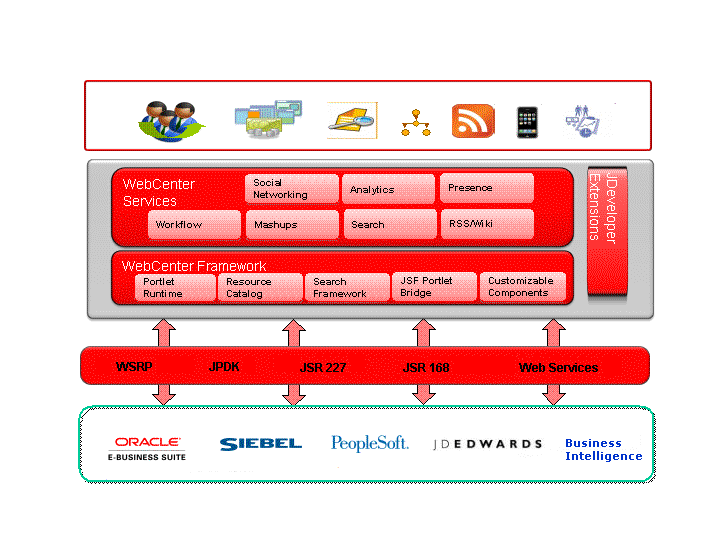
WebCenter Portal uses industry-standard technologies to integrate (primarily as WSRP portlets) other application components. Figure 10-1 shows the technologies involved in WebCenter Portal integration with other Oracle applications.
Although not all applications support the same integration mechanisms, the integration process is generally quite simple, consisting of exposing the application object to be integrated as a portlet, registering the portlet with WebCenter Portal, adding the portlet to a page, and then running and testing the results.
In Figure 10-1 we show the applications that can be integrated as Siebel, E-Business Suite, JD Edwards, PeopleSoft, and Oracle Business Intelligence. These Oracle applications are fully supported and documented within this chapter. However, you can integrate virtually any application that can expose objects as WSRP portlets. The process for integrating them is the same as for the Oracle applications documented here: expose the object as a portlet, register the portlet in WebCenter Portal, and add the portlet to a page. Refer to the documentation for one of the supported Oracle applications for a description of how to consume an exposed portlet in WebCenter Portal.
10.2 Integrating Siebel Applications
This section describes how to integrate a Siebel Web service in WebCenter Portal. Siebel and WebCenter can work together to include Siebel's CRM capabilities as portlets within WebCenter Portal.
10.2.1 How to Integrate Siebel Applications as Web Services
This section describes how to integrate Siebel applications as Web services in WebCenter Portal.
To be able to add a Siebel Web service data control or a task flow containing a data control to a portal page you must first have configured WS-Security for WebCenter Portal. For more information about configuring WS-Security, see Configuring Web Services Security login credentials in Oracle Fusion Middleware Administering Oracle WebCenter Portal. For more information about Web service data controls, see Creating Data Controls and Web Service Data Controls in Oracle Fusion Middleware Building Portals with Oracle WebCenter Portal.
This section contains the following subsections:
10.2.1.1 How to Prepare the Siebel Application
This section describes how to create an inbound Web service, set up operations for the inbound service, and generate a WSDL that you will later use to create a data control in WebCenter Portal.
This section contains the following subsections:
10.2.1.2 How to Consume a Siebel Web Service Data Control
This section describes how you can create a Web Service data control and add it to a portal page. The steps in this section assume that you have prepared the application and generated a WSDL as described in How to Prepare the Siebel Application.
Note:
Before you can add a data control or task flow containing a data control to a portal page you must first have configured WS-Security for WebCenter Portal. For more information about configuring WS-Security, see Configuring Web Services Security login credentials in Oracle Fusion Middleware Administering Oracle WebCenter Portal.
To create a Web service data control:
10.3 Integrating E-Business Suite Applications
This section describes how to integrate E-Business Suite applications in WebCenter Portal.
This section contains the following subsections:
10.3.1 About Integrating EBS Applications
This section describes the integration points and requirements integrating Oracle E-Business Suite portlets in WebCenter Portal.
This section includes the following subsections:
10.3.1.1 Understanding EBS Integration
Out of the box, Oracle E-Business Suite OA Framework-based portlets, such as Applications Navigator, and Favorites are WSRP and JSR 168-compliant. That means that you can access these Oracle E-Business Suite portlets from WSRP-compliant portal servers, such as WebCenter Portal, by simply adding the portlet onto a page. Follow the instructions in How to Add the EBS Portlet to a Portal Page to add them to a WebCenter Portal or portal page.
You can also create new E-Business Suite portlets that are WSRP and JSR 168-compliant that can similarly be added to WebCenter Portal. Creating and consuming WSRP and JSR 168 compliant portals in WebCenter Portal is described in How to Integrate EBS Applications.
10.3.1.2 Requirements for Integrating EBS Applications
The following requirements apply for integrating Oracle E-Business Suite portals in WebCenter Portal:
-
Regions to be exposed as portlets must be created using Oracle E-Business Suite OA Framework Release 12 as previous versions are not WSRP/JSR 168-compliant.
-
Oracle E-Business Suite can be configured to use Oracle Internet Directory (OID) and one of following single sign-on solutions:
Caution:
Both WebCenter Portal and Oracle E-Business Suite must share the same OID instance and user IDs.
-
Oracle Single Sign-On (OSSO)
-
Oracle Access Manager (OAM)
If you are using OSSO, follow the steps in My Oracle Support document 376811.1 to integrate E-Business Suite Release 12 with OID and OSSO.
If you are using OAM, follow the steps in My Oracle Support document 975182.1 to integrate E-Business Suite Release 12 with OAM.
E-Business Suite can also be configured to OID without OAM or OSSO. For more information, see How to Prepare OID for Use Without Single Sign-On.
Note:
Although Oracle E-Business Suite can be configured to use Oracle Internet Directory (OID) without single sign-on, this is not a recommended approach as users will be prompted for credentials each time they move to or from the integrated portal or data control.
-
-
You must have granted WebCenter Portal access to the E-Business Suite Portlet Producer and added and configured the appropriate users.
Note:
To complete some steps, you may need system administrator permissions.
10.3.2 Required Configurations for Integrating EBS
This section contains configurations that should be undertaken prior to attempting to integrate portal or data controls in WebCenter Portal.
This section contains the following subsections:
10.3.2.1 How to Prepare OID for Use Without Single Sign-On
This section describes the steps to configure OID as an optional standalone environment without using either OAM or OSSO. Note that this is not a recommended approach as users will be prompted for credentials each time they move to or from an integrated portal or data control. If you have installed an SSO solution, continue with How to Create a User in EBS and Assign a Responsibility.
Caution:
Both WebCenter Portal and Oracle E-Business Suite must share the same OID instance and the same user IDs.
-
Register the OID instance on the host server by following the steps below:
-
Run the following command:
$FND_TOP/bin/txkrun.pl -script=SetSSOReg -registerinstance=yes -
Supply the required information at the following prompts:
Enter the host name where the Oracle iAS Infrastructure database is installed ? <Enter the OID Host>
Enter the LDAP Port of the Oracle Internet Directory server ? <Enter the LDAP Port>
Enter SSL LDAP Port of the Oracle Internet Directory server ? <Enter the LDAP SSL Port>
Enter the Oracle Internet Directory Administrator (orcladmin) Bind password ? <Password>
Enter Oracle E-Business apps database user password ? <Password>
-
Restart all the services by navigating to
$ADMIN_SCRIPTS_HOMEand running:./adstpall.sh apps/<apps to stop>and then:
./adstrtal.sh apps/<apps to start>
-
-
Register OID by following the steps below:
-
Run the following command:
$FND_TOP/bin/txkrun.pl -script=SetSSOReg -registeroid=yes -
Supply the required information at the following prompts:
Enter LDAP Host name ? <Enter the OID Host>
Enter the LDAP Port on Oracle Internet Directory server ? <Enter the LDAP Port>
Enter the Oracle Internet Directory Administrator (orcladmin) Bind password ? <Password>
Enter the instance password that you would like to register this application instance with ? <Password>
Enter Oracle E-Business apps database user password ? <Password>
-
Restart all the services by navigating to
$ADMIN_SCRIPTS_HOMEand running:./adstpall.sh apps/<apps to stop>and then:
./adstrtal.sh apps/<apps to start>
-
10.3.2.2 How to Create a User in EBS and Assign a Responsibility
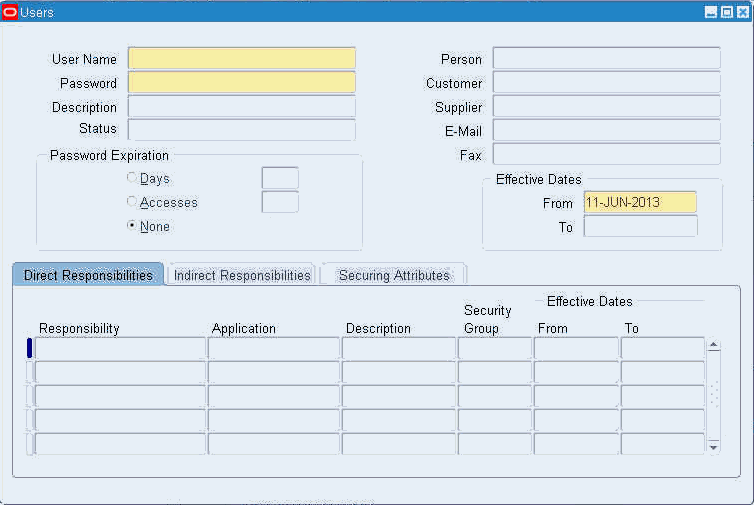
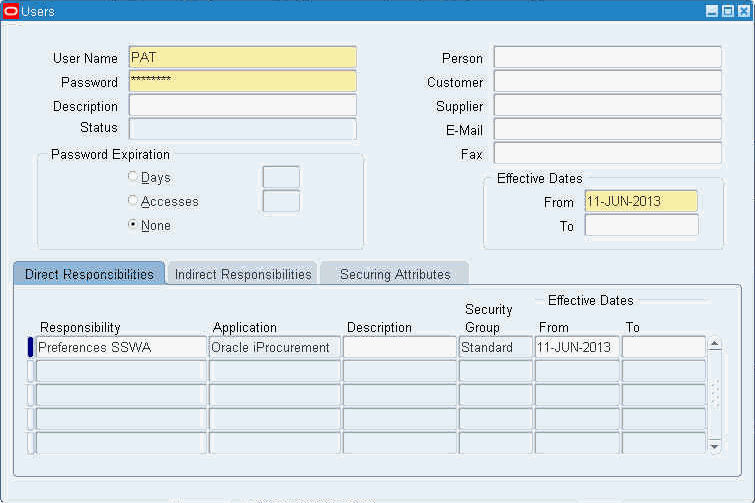
For integration with EBS to work, WebCenter Portal and EBS must have a common OID identity store. With a common OID, you can either create a new user in EBS, or use an existing user in OID, and then assign a responsibility to that user. This will ensure that the user has access to the portlets in WebCenter Portal.
To create a new user and assign a responsibility:
10.3.2.3 How to Configure the EBS Applications Profile Options
This section describes how to configure EBS Applications Profile Options and is a requirement for both SSO and non-SSO configurations.
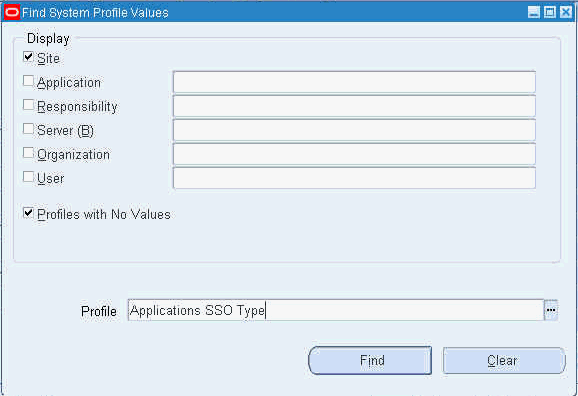
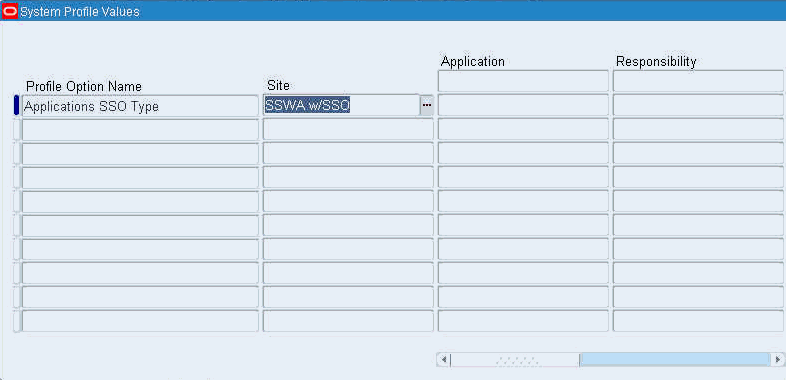
To configure the EBS profile options:
10.3.2.4 How to Add the WebCenter Host as a Trusted Portal Using AutoConfig
The EBS WSDL is protected and before you can access it you must first add an entry for the consuming WebCenter Portal instance's host using the EBS AutoConfig tool. Note that without this configuration step you will get a "403 Forbidden" error if you try to access the WSDL.
To add the WebCenter Portal host as a trusted portal:
10.3.3 How to Integrate EBS Applications as WSRP Portlets
This section describes how to integrate EBS regions as WSRP portlets in WebCenter Portal. To start, you'll need to generate the portlet for the region using the Portlet Generator, and then continue by registering the producer and integrating it in WebCenter Portal.
This section contains the following subsections:
10.3.3.1 How to Prepare the EBS Portlet for Remote Access
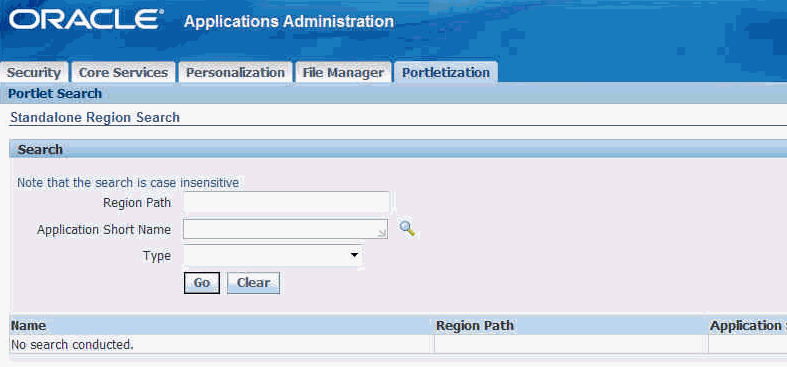
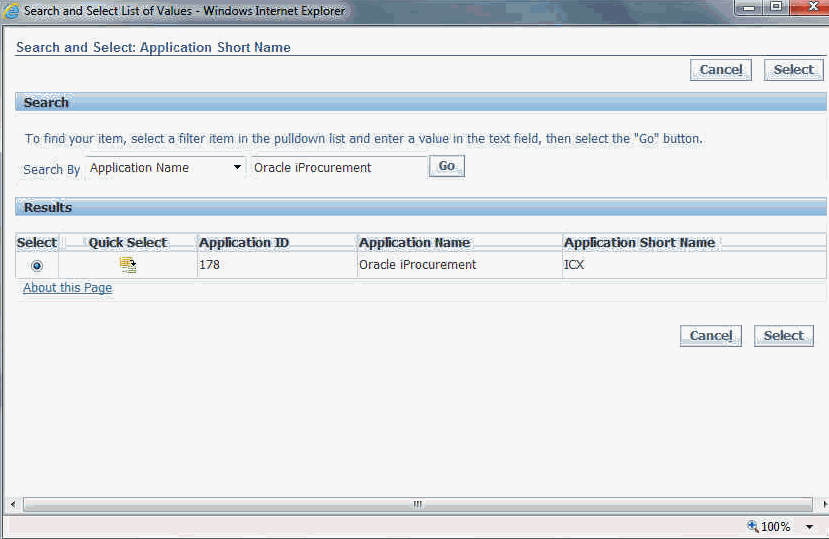
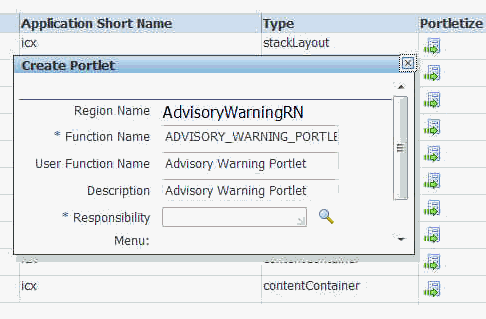
Oracle E-Business Suite provides a tool called Portlet Generator to convert existing standalone Oracle Application Framework regions into portlets. To be available for portletization, a region must have the following properties.
-
Regions must have an Application Module (AM) defined and must have its standalone property set to
true. -
Inline regions must have an AM defined and have its standalone property set to
true. -
Content regions must have an AM defined (content regions do not have a standalone property)
To expose EBS functionality as a portlet using Portlet Generator:
10.3.3.2 How to Integrate EBS Applications
This section contains the following subsections:
10.3.3.2.1 How to Prepare the EBS Portlet for Remote Access
Prepare the standalone regions to be portletized as described in the section on How to Prepare the EBS Portlet for Remote Access.
Before adding the portlets in WebCenter Portal, be sure to bounce the Apache listener as the menu and function definitions are cached.
10.3.3.2.2 How to Register the EBS WSRP Producer in WebCenter Portal
You can register the EBS WSRP producer directly in WebCenter Portal using Fusion Middleware Control.
To register the EBS WSRP producer using Fusion Middleware Control:
10.3.3.2.3 How to Add the EBS Portlet to a Portal Page
Follow the steps below to consume the EBS remote producer in a WebCenter Portal page:
10.3.3.2.4 How to Test the Portlet Connection
Follow these steps to test the portlet connection by modifying content and checking that the modification shows up in the EBS application.
- On the WebCenter Portal or portal page to which you added the EBS portlet, modify some information that you can verify the changes for in the EBS application.
- Save your changes and confirm that the changes also appear in the EBS application.
10.3.4 How to Integrate EBS Applications as Data Controls
This section describes how to add EBS applications as Web service data controls on a WebCenter Portal page.
This section contains the following topics:
10.3.4.2 How to Add a Web Service Data Control to a Portal Page
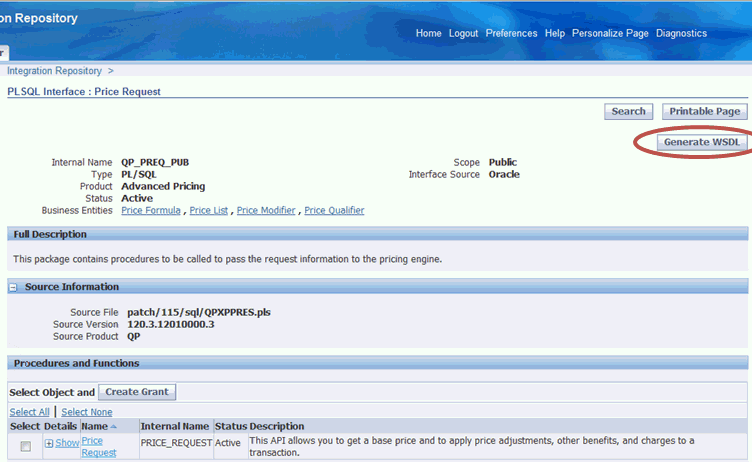
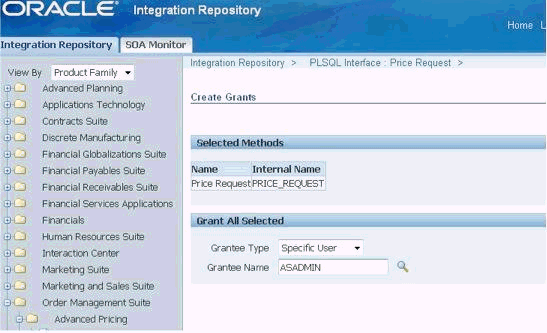
Once you have the WSDL, you can continue by using it to create a web service data control.
Note:
Before you can add a data control or task flow containing a data control to a portal page you must first have configured WS-security for WebCenter Portal. For more information about configuring WS-security, see Configuring Web Services Security.
For more information about creating a web service data control, see Creating a Web Service Data Control in Oracle Fusion Middleware Building Portals with Oracle WebCenter Portal. For information about web service data controls, see About Web Services Data Controls in Oracle Fusion Middleware Building Portals with Oracle WebCenter Portal.
To create a web service data control:
10.4 Integrating JD Edwards Applications
This section describes how to integrate JD Edwards applications into WebCenter Portal.
This section contains the following subsections:
10.4.1 How to Prepare the JD Edwards Application for Remote Access
Before you can add JD Edwards standalone regions to WebCenter Portal, you must first prepare them to be portletized within JD Edwards by making them available externally as portlets and locating the pre-configured WSDL in the webclient.war/wsdl directory. The WSDL URL is needed so that you can register the JD Edwards WSRP producer and consume it from a WebCenter Portal or portal page. To view the XML content of the JDE WSDL in the browser, open the Page source of the page in the browser. For more information, see Administering WSRP with Oracle WebCenter.
10.4.2 How to Register the Producer
You can register the JD Edwards WSRP producer directly in WebCenter Portal, as described in the Registering Portlet Producers in Oracle Fusion Middleware Administering Oracle WebCenter Portal. You can also register the JD Edwards WSRP producer using Fusion Middleware Control as described in the steps below.
To register the JD Edwards WSRP producer using Fusion Middleware Control:
10.4.3 How to Add the JD Edwards Portlet to a WebCenter Portal Page
Follow the steps below to consume the JD Edwards remote producer in WebCenter Portal:
10.4.4 How to Test the Portlet Connection
Follow these steps to test the portlet connection by modifying content and checking that the modification shows up in the JD Edwards application.
- On the WebCenter Portal or portal page that you added the JD Edwards portlet to, modify some information that you can verify the changes for in the JD Edwards application.
- Save your changes and confirm that the changes also appear in the JD Edwards application.
10.5 Integrating PeopleSoft Applications
This section describes how to integrate PeopleSoft applications in WebCenter Portal.
This section contains the following subsections:
10.5.1 About Integrating PeopleSoft Applications
This section describes the benefits and methods involved in integrating PeopleSoft applications in WebCenter Portal.
This section includes the following subsections:
10.5.1.1 Understanding PeopleSoft Integration
PeopleTools 8.51 and later lets you expose PeopleSoft applications as WSRP portlets in remote applications such as WebCenter Portal. This allows people who only need access to a small portion of PeopleSoft's functionality to access it through WebCenter Portal without needing to open or learn the entire PeopleSoft application.
10.5.1.2 Requirements for Integrating PeopleSoft Applications
This section the prerequisites for integrating PeopleSoft objects in WebCenter Portal.
-
PeopleSoft 9.0 or later.
-
PeopleTools 8.51 or later.
-
When using WS-Security for automatic sign on to PeopleSoft, in order for the SAML assertion to be valid, the date/time on the PeopleSoft and Oracle WebCenter Portal servers must be synchronized. If this is problematic, then the PeopleSoft web server's time may be set to be slightly ahead of the Oracle WebCenter Portal server.
-
For PeopleTools 8.51, you may need to create and configure a custom OWSM policy in order to fully support WS-Security. For more information, see How to Configure WS-Security for PeopleTools 8.51.
-
For PeopleTools 8.51, only upper case subject names are supported, requiring that only fully upper case user IDs can be used in WebCenter for the integration to work.
10.5.2 How to Integrate PeopleSoft Applications as WSRP Portlets
This section describes how to expose PeopleSoft applications as WSRP portlets in WebCenter Portal.
This section includes the following subsections:
10.5.2.1 How to Prepare the PeopleSoft Application for Remote Access
This section describes how to prepare the PeopleSoft application so that it can be consumed by WebCenter Portal.
To prepare the PeopleSoft application:
10.5.2.2 How to Configure WS-Security for PeopleTools 8.52 and Later
This section describes how to create a keystore for both WebCenter Portal and PeopleSoft, and exchange the private key between them. This step is required prior to adding WS-Security policies for WebCenter Portal.
-
First, we will create the WebCenter keystore as
webcenter.jkswithorakeyas the private key, and PeopleSoft's public keyrootCAand the certificate that PeopleSoft will use as the WS-Security recipient using the followingkeytoolcommands:./keytool -genkeypair -keyalg RSA -dname "cn=orakey,dc=us,dc=oracle,dc=com" -alias orakey -keypass password -keystore webcenter.jks -storepass password -validity 720 ./keytool -exportcert -v -alias orakey -keystore webcenter.jks -storepass password -rfc -file orakey.cer ./keytool -importcert -trustcacerts -alias orakey -file orakey.cer -keystore peoplesoft.jks -storepass password
-
Next, we will create PeopleSoft keystore as
peoplesoft.jkswithrootCAas the private key and WebCenter's public keyorakeyand the certificate that WebCenter will use as the WS-Security recipient../keytool -genkeypair -keyalg RSA -dname "cn=rootCA,dc=us,dc=oracle,dc=com" -alias rootCA -keypass password -keystore peoplesoft.jks -storepass password -validity 720 ./keytool -exportcert -v -alias rootCA -keystore peoplesoft.jks -storepass password -rfc -file rootca.cer ./keytool -importcert -trustcacerts -alias rootCA -file rootca.cer -keystore webcenter.jks -storepass password
-
After creating the key stores for WebCenter Portal and PeopleSoft, copy the
peoplesoft.jksto the PeopleSoft host andwebcenter.jksto the WebCenter host:-
Copy
peoplesoft.jksto<Domain_Home>/config/fmwconfig/ -
Copy
webcenter.jksto/home/psadm2/psft/pt/8.52/webserv/<Domain_Name>/applications/peoplesoft/pspc.war/WEB-INF/classes
-
-
Install the certificate in PeopleSoft as shown below:
-
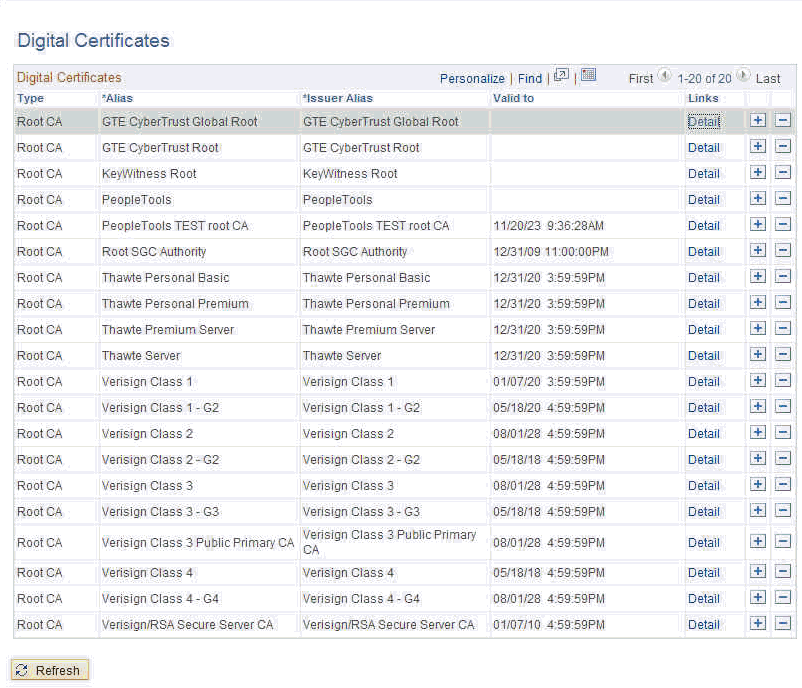
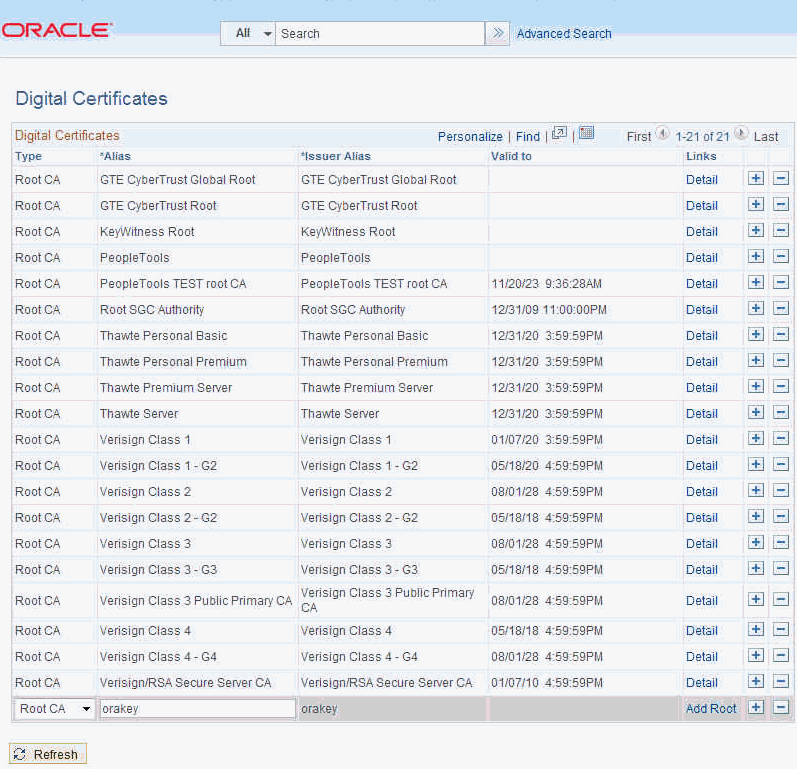
Log into PeopleSoft as an administrator and navigate to PeopleTools > Security > Security Objects > Digital Certificate.
The Digital Certificates page displays (see Figure 10-18).
-
Click +to add a new entry.
We need to add digital certificates for
RemoteandRootCAas shown in Figure 10-19. -
Enter the Type as
RootCA, Alias asorakey, Issuer Allias asorakey, and then click the Search icon (magnifying glass). -
Click Import and in the popup, enter the entire text of
orakey.cercreated earlier and click OK. -
Click +to add another new entry, and enter the Type as
Remote, Alias asorakey, Issuer Allias asorakeyand then click the Search icon. -
Click Import and in the popup, enter the entire text of
orakey.cercreated earlier and click OK.
-
-
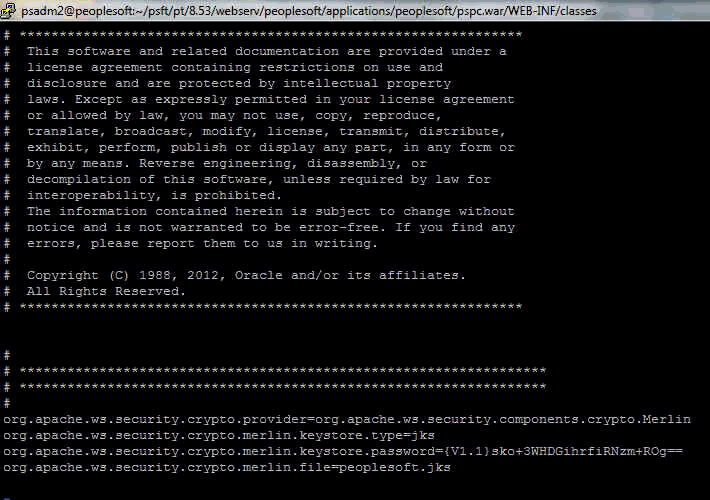
Update the
WSS.propertiesfile under/home/psadm2/psft/pt/8.52/webserv/<Domain_Name>/applications/peoplesoft/pspc.war/WEB-INF/classesto reference thepeoplesoft.jksfile. -
Use
PSCipher.shto create an Encrypted Password and update the KeyStore password as shown in Figure 10-20. -
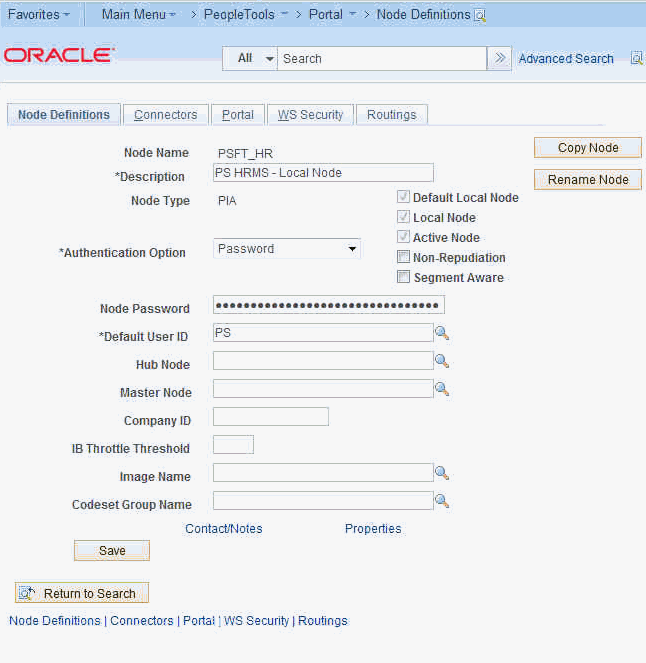
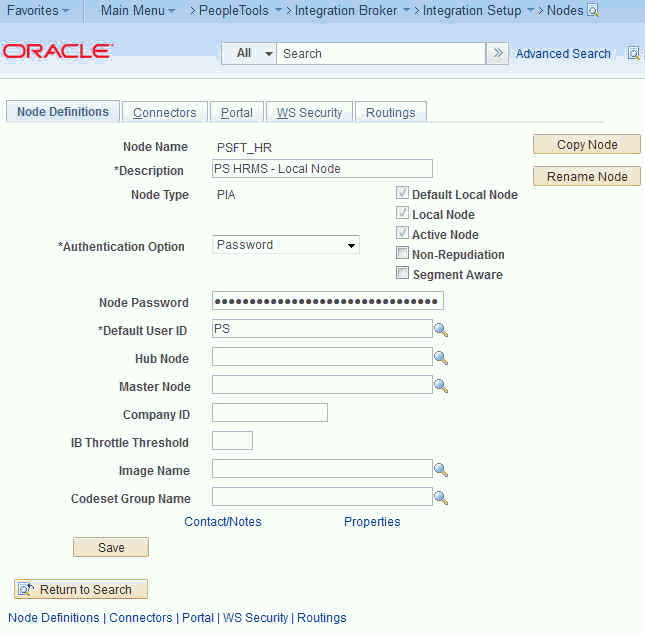
Check the local node definition in PeopleSoft:
-
Navigate to Peopletools > Portals > Node Definitions.
The Nodes page displays.
-
Click Search and click PSFT-HR.
-
Select
Passwordfrom the Authentication Option drop-down list and click Save.
-
-
Continue by adding a WS-Security policy to WebCenter Portal as described in How to Attach a WS-Security Policy to WebCenter Portal.
10.5.2.3 How to Attach a WS-Security Policy to WebCenter Portal
This section describes how to attach a WS-Security policy to WebCenter Portal.
Note:
Before continuing with the steps below you must have configured the WebCenter and PeopleSoft key stores as described in How to Configure WS-Security for PeopleTools 8.52 and Later.
10.5.2.3.1 How to Configure WSS 1.0 SAML Token with Message Integrity
Follow the steps below to configure the WSS1.0 SAML Token with Message Integrity policy for WebCenter Portal:
-
Navigate to the following directory on the PeopleSoft server:
/home/psadm2/psft/pt/8.53/webserv/peoplesoft/piabinand run the following command:
./redeployWSRP.sh 6This will update the PeopleSoft WSRP security options to use WSRPBaseService with SAMLToken Full Security.
-
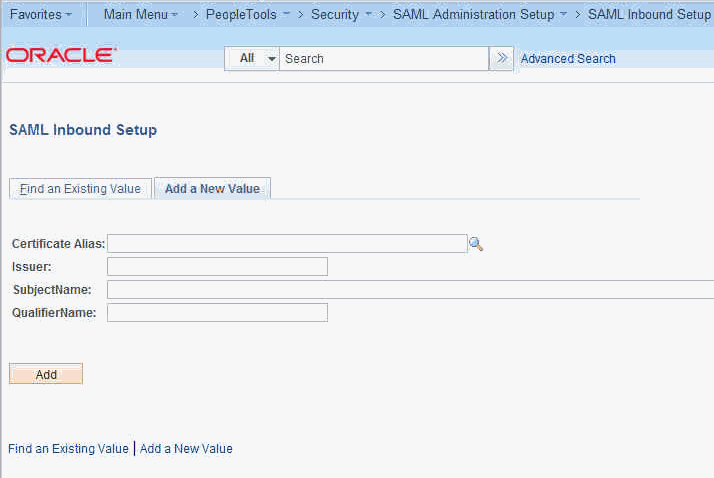
In PeopleSoft, navigate to PeopleTools > Security > SAML Administration Setup > SAML Inbound Setup.
The SAML Inbound Setup page displays (see Figure 10-22).
-
Open the Add a New Value tab and map the WebCenter Portal user with the PeopleSoft user if they use a different OID (example settings are shown below), and then click Save.
Example:
-
Certificate Alias - orakey
-
Issuer - WWW.ORACLE.COM
-
SubjectName - pat
-
QualifierName - WWW.ORACLE.COM
-
Mapping PeopleSoft UserID - PS
-
-
Continue by registering the WSRP producer and adding the portlet to a portal page as shown in How to Integrate PeopleSoft Applications in WebCenter Portal.
10.5.2.3.2 How to Configure WSS 1.0 Username Token Without Password
Follow the steps below to attach a WSS 1.0 Username Token without Password policy to WebCenter Portal.
-
Create a WebCenter user in PeopleSoft:
-
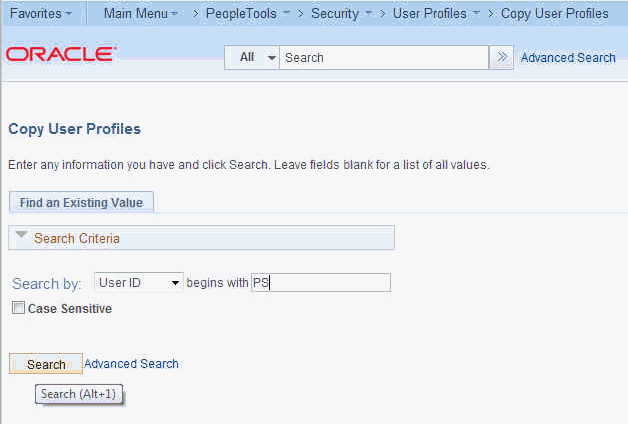
In PeopleSoft, navigate to PeopleTools > Security > User Profiles > Copy User Profiles.
The Copy User Profiles page displays (see Figure 10-23).
Figure 10-23 Copy User Profiles Page - Search Criteria
Description of "Figure 10-23 Copy User Profiles Page - Search Criteria" -
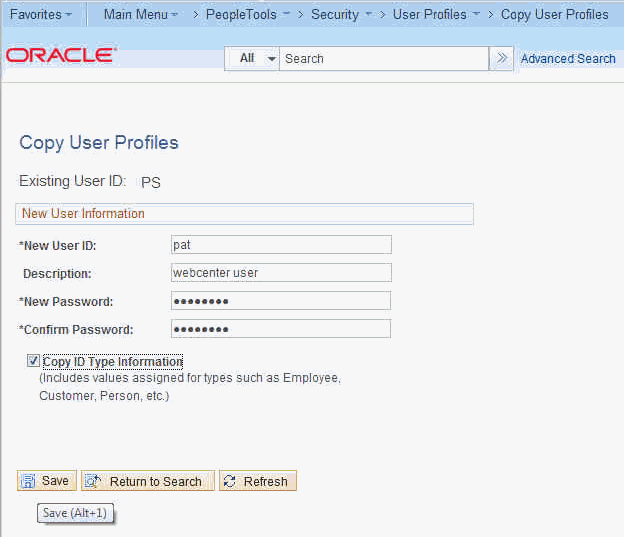
Search for the user to add (
PS, for example).The search results display (see Figure 10-24).
Figure 10-24 Copy User Profiles Page - Search Results
Description of "Figure 10-24 Copy User Profiles Page - Search Results" -
Enter the New User ID (for example,
Pat), a Description, the New Password, check the Copy ID Type Information option and click Save.
-
-
Log into Fusion Middleware Control, select the domain and navigate to Security > Security Provider Configuration.
The Security Provider Configuration page displays.
-
Open the Keystore section and click Configure.
The Keystore Configuration page displays.
-
Enter
./webcenter.jksfor the KeyStore Path,orakeyfor the Key Alias,orakeyfor the Crypt Alias. Enter the associated passwords and click OK.Note that you must restart the entire domain for the configuration changes to take effect.
-
Navigate to
/home/psadm2/psft/pt/8.53/webserv/peoplesoft/piabinand run the following command:./redeployWSRP.sh 8This will update the PeopleSoft WSRP security options to use WSRPBaseService with UsernameToken, No Password Full Security Option With WSS Response.
-
Continue by registering the WSRP producer and adding the portlet to a WebCenter Portal or portal page as shown in How to Integrate PeopleSoft Applications in WebCenter Portal.
10.5.2.3.3 How to Configure WSS 1.0 SAML Token with Message Protection
Follow the steps below to attach the WSS1.0 SAML Token with Message Protection policy to WebCenter Portal.
-
Navigate to
/home/psadm2/psft/pt/8.53/webserv/peoplesoft/piabinand run the following command:./redeployWSRP.sh 10This will update the PeopleSoft WSRP security options to use WSRPBaseService with SAMLToken Full Security Option With WSS Response.
-
Continue by registering the WSRP producer and adding the portlet to a portal page as shown in How to Integrate PeopleSoft Applications in WebCenter Portal.
10.5.2.3.4 How to Configure WSS 1.0 Username Token with Password
Follow the steps below to attach the WSS1.0 SAML Token with Message Protection policy to WebCenter Portal.
-
Navigate to
/home/psadm2/psft/pt/8.53/webserv/peoplesoft/piabinand run the following command:./redeployWSRP.sh 7This will update the PeopleSoft WSRP security options to use WSRPBaseService with UsernameToken Full Security Option With WSS Response.
-
Continue by registering the WSRP producer and adding the portlet to a WebCenter Portal or portal page as shown in How to Integrate PeopleSoft Applications in WebCenter Portal.
10.5.2.4 How to Integrate PeopleSoft Applications in WebCenter Portal
This section describes how to integrate a PeopleSoft application in WebCenter Portal.
This section contains the following subsections:
10.5.2.4.1 How to Register the PeopleSoft WSRP Producer for WebCenter Portal
You can register the PeopleSoft WSRP producer directly in WebCenter Portal, as described in Registering Portlet Producers in Oracle Fusion Middleware Administering Oracle WebCenter Portal. You can also register the PeopleSoft WSRP producer using Fusion Middleware Control as described in the steps below.
To register the PeopleSoft WSRP producer using Fusion Middleware Control:
-
Prepare the PeopleSoft page that you want to consume in WebCenter Portal for remote access as described in How to Prepare the PeopleSoft Application for Remote Access.
-
Log into Fusion Middleware Control for the WebCenter Portal domain (
WC_Domainby default). -
Expand
WebCenter Portalin the Navigation bar and from the WebCenter Portal menu, select Register Producer.The Add Portlet Producer page displays.
-
Set the Producer Type to
WSRP Producer, enter a Connection Name, and paste the WSDL endpoint URL that you copied in step 1 into the URL End Point field. -
If required, configure WS-Security in WebCenter Portal as described in How to Configure WS-Security for PeopleTools 8.51.
-
Click OK and verify that the producer connection was created successfully.
-
Continue by adding the portlet to a WebCenter Portal or portal page as described in How to Add the PeopleSoft Portlet to a WebCenter Portal Page.
10.5.2.4.2 How to Add the PeopleSoft Portlet to a WebCenter Portal Page
Follow the steps below to add the PeopleSoft portlet to a WebCenter Portal or portal page:
-
Log into WebCenter Portal.
If you configured WS-Security, be sure to use the user account that was used in the SAML Inbound Setup page in PeopleSoft (see How to Attach a WS-Security Policy to WebCenter Portal).
-
Go to the page, or create a new page, where you want to add the PeopleSoft portal.
-
Click Add Content and in the resource catalog, select UI Components and then Portlets.
Note that if you've created a custom catalog, Portlets may not appear. In this case, you will need to add it to the resource catalog. For information about managing resource catalogs, see Working with Resource Catalog Components on a Page in Oracle Fusion Middleware Building Portals with Oracle WebCenter Portal.
-
Click the portlet you added in Fusion Middleware Control.
-
Click Add for the PeopleSoft page you want to add to your portal page.
-
On the portal page, click the portlet’s View Actions menu, and select Display Options.
-
In the Display Options dialog, set Render Portlet in IFrame to
Trueand click OK. -
Continue by checking the portlet connection as described in How to Test the Portal Portlet Connection.
10.5.2.4.3 How to Test the Portal Portlet Connection
Follow these steps to test the portlet connection by modifying content and checking that the modification shows up in the PeopleSoft application.
-
On the WebCenter Portal or portal page that you added the PeopleSoft portlet to, modify some information that you can verify the changes for in the PeopleSoft application.
-
Save your changes and confirm that the changes also appear in the PeopleSoft application.
10.5.2.5 How to Configure WS-Security for PeopleTools 8.51
This section describes the supported OWSM policies for PeopleTools 8.51. It is important to note that PeopleTools release 8.51 does not support outgoing WS-Security headers in its messages. However, some out-of-the-box Oracle WebCenter Portal/OWSM policies require that both outgoing and incoming messages be secured. To bridge this gap you may need to create custom OWSM policies. The different integration scenarios that would require you to create custom WS-Security policies, and the steps required on the WebCenter Portal side to configure them are also described in this section.
For integration scenarios with PeopleTools 8.51, you can use WSS10 SAML Token with Message Integrity, WSS10 SAML Token with Message Protection, or WSS10 Username Token with Password as the OWSM policy.
This section includes the following subsections:
10.5.2.5.1 How to Configure WS-Security for WSS10 SAML Token with Message Integrity
(PeopleSoft policy: WSRPBaseService with SAMLToken Full Security Option (timestamp) )
This section describes how to configure WS-Security for the WSS10 SAML Token with Message Integrity (oracle/wss10_saml_token_with_message_integrity_client_policy) policy.
To configure WS-Security:
-
Configure the Oracle WebCenter Portal/OWSM keystore as described in Configuring Web Services Security.
-
Generate a certificate containing the public key of the Oracle WebCenter Portal domain and send it to the PeopleTools administrator so it can be imported in the PeopleTools configuration.
-
When you register the producer, choose
wss10_saml_token_with_message_integrity_client_policy. -
Continue by adding the WSRP portlet to WebCenter Portal.
10.5.2.5.2 How to Configure WS-Security for WSS10 SAML Token with Message Protection
(PeopleSoft policy: WSRPBaseService with SAMLToken Full Security Option (timestamp) With WSS Response)
The default WSS10 SAML Token with Message Protection (oracle/wss10_saml_token_with_message_protection_client_policy) policy that ships with OWSM requires that response also be signed and encrypted. However, PeopleTools release 8.51 and earlier cannot send WS-Security headers in response (only the initial cookie/get portlet handle call contains security headers; subsequent calls do not) and we therefore need to create and attach a custom policy based on the oracle/wss10_saml_token_with_message_protection_client_policy policy.
To create a custom policy:
-
Log into Fusion Middleware Control and navigate to the Oracle WebCenter Portal domain (
WC_Domainby default). -
From the WebLogic Domain menu, select Web Services > Policies.
-
Select the
wss10_saml_token_with_message_protection_client_policyand click Create Like. -
Give the policy a new name (for example,
oracle/wss10_saml_token_with_message_protection_plaintext_response_client_policy). -
Open the Response tab, uncheck the Include Entire Body check boxes under Message Signing Setting and Message Encrypt Setting, and save the policy.
-
Check that the public certificate of the PeopleSoft keystore is imported into the keystore used in the WebCenter Portal domain.
-
Use WLST to register the producer using the newly created policy as shown in the following example:
registerWSRPProducer('webcenter', 'wc-pt851-saml_msg-protection', 'http://xmlns.oracle.com/pspc/pswsdl/ps/EMPLOYEE', timeout=100, tokenType='oracle/wss10_saml_token_with_message_protection_plaintext_response_client_policy',
enforcePolicyURI='false', issuer='www.oracle.com', sigKeyAlias='webcenter',sigKeyPswd='welcome1', encKeyAlias='webcenter', encKeyPswd='welcome1', recptAlias='peopleTools_public')
Use the alias for the imported
peoplesftpublic key as the value for therecptAliasparameter.Note:
You must use WLST to register the producer. Fusion Middleware Control can only accept fixed policy names and therefore you must register the producer with this policy using WLST by passing in
enforcePolicyURI='false'.
10.5.2.5.3 How to Configure WS-Security for WSS10 Username Token with Password
(PeopleSoft policy: WSRPBaseService with UsernameToken Full Security Option With WSS Response)
The default WSS10 Username Token with Password (oracle/wss10_username_token_with_message_protection_client_policy) policy that ships with OWSM requires that response also be signed and encrypted. However, PeopleTools release 8.51 and earlier cannot send WS-Security headers in response (only the initial cookie/get portlet handle call contains security headers; subsequent calls do not) and we therefore need to create and attach a custom policy based on the oracle/wss10_username_token_with_message_protection_client_policy policy.
To create a custom policy:
-
Log into Fusion Middleware Control and navigate to the WebCenter Portal domain (
WC_Domainby default). -
From the WebLogic Domain menu, select Web Services > Policies.
-
Select the
wss10_username_token_with_message_protection_client_policyand click Create Like. -
Give the policy a new name (for example,
oracle/wss10_username_token_with_message_protection_plaintext_response_client_policy). -
Open the Response tab, uncheck the Include Entire Body check boxes under Message Signing Setting and Message Encrypt Setting, and save the policy.
-
Check that the public certificate of the PeopleSoft keystore is imported into the keystore used in the Oracle WebCenter Portal domain.
-
Use WLST to register the producer using the newly created policy as shown in the following example:
registerWSRPProducer('webcenter', '<Producer_Name>', '<URL>', timeout=100,
tokenType='oracle/wss10_username_token_with_message_protection_plaintext_response_client_policy', extApp='<Ext_App_Name>',
enforcePolicyURI='false', issuer='www.oracle.com',
sigKeyAlias='webcenter',sigKeyPswd='welcome1', encKeyAlias='webcenter',
encKeyPswd='welcome1', recptAlias='peopleTools_public')
Use the alias for the imported
peoplesftpublic key as the value for therecptAliasparameter.Note:
You must use WLST to register the producer. Fusion Middleware Control can only accept fixed policy names and therefore you must register the producer with this policy using WLST by passing in
enforcePolicyURI='false'.
10.5.3 How to Integrate PeopleSoft Applications as Data Controls in WebCenter Portal
This section describes how to add PeopleSoft applications as Web service data controls in WebCenter Portal.
This section includes the following subsections:
10.5.3.2 How to Create a Web Service Data Control
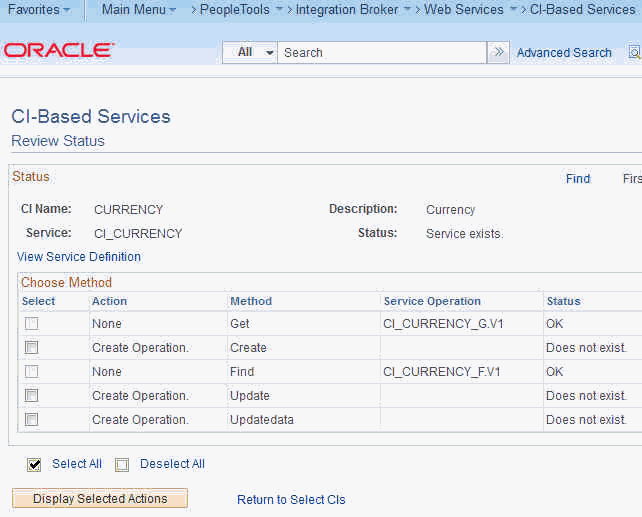
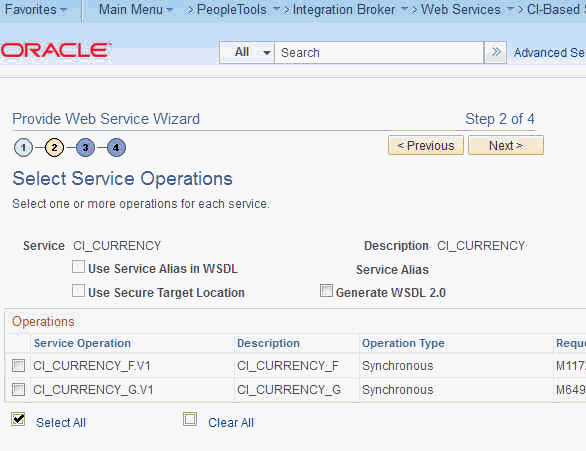
Once you have the WSDL, you can continue by using it to create a Web service data control. In this section we'll continue with the example we started in How to Prepare the WSDL.
Note:
Before you can add a data control or task flow containing a data control to a portal page you must first have configured WS-Security for WebCenter Portal. For more information about configuring WS-Security, see Configuring Web Services Security in Oracle Fusion Middleware Administering Oracle WebCenter Portal.
For more information about creating a Web service data control, see Creating a Web Service Data Control in Oracle Fusion Middleware Building Portals with Oracle WebCenter Portal. For information about Web service data controls, see also Web Service Data Controls in Oracle Fusion Middleware Building Portals with Oracle WebCenter Portal.
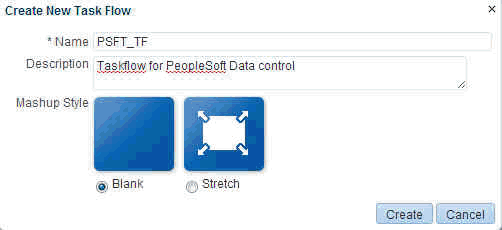
To create a Web service data control:
10.6 Integrating Oracle Business Intelligence Presentation Services
This section explains how to configure WebCenter Portal to integrate with the Oracle Business Intelligence Presentation Services catalog. At runtime, users can add business intelligence objects to their WebCenter Portal pages.
This section includes the following subsections:
10.6.1 About Integrating Oracle Business Intelligence Presentation Services
This section explains how to configure WebCenter Portal to integrate with the Oracle Business Intelligence Presentation Services catalog.
This section includes the following subsections:
10.6.1.1 Understanding Oracle Business Intelligence Presentation Services Integration
Oracle WebCenter Portal users can expand and browse the Presentation Services catalog's folders to view an analysis' views. The following view types display in the Presentation Services catalog: table, pivot table, chart, funnel chart, gauge, narrative, ticker and title. The following view types do not display in the Presentation Services catalog: view selector, column selector, logical SQL, and no-results view.
Users can also browse the dashboard folder for the pages associated with the dashboard; however, users cannot browse within the dashboard pages to see their components (for example, any analyses embedded in the dashboard).
10.6.1.2 Requirements for Integrating Oracle Business Intelligence Presentation Services
You must also set up a connection to the BI application as well as configuring security as described in Creating an Oracle BI EE Presentation Services Connection in Oracle Fusion Middleware Developer's Guide for Oracle Business Intelligence Enterprise Edition. You will also need to specify the credentials for the connection, as described in How to Configure Credentials for Connecting to the Oracle BI Presentation Catalog.
The following prerequisites apply:
Oracle WebCenter Portal
-
The
WC_Portalserver has been installed and configured, including the database connection, Content Server connection, and Fusion Middleware Control
OBIEE
-
Oracle Business Intelligence Applications
-
OBI Enterprise Edition version 12.2.1.1
-
OBIEE is already installed, configured, and up and running (Database –OBI Enterprise Edition)
-
OBI Applications is installed and set up and all content is available from the OBIEE environment (Optional)
Security
The OBIEE integration requires that the identity store user name population be the same across WebCenter and OBIEE. This can be done by either:
-
Having WebCenter and OBIEE share the same identity store (recommended)
-
Maintaining identical user names across separate WC and OBIEE identity stores
10.6.1.3 Advanced Integration Options
As well as the approaches to adding resources described in the subsections in Integrating Oracle Business Intelligence Presentation Services, such as adding business intelligence analyses, dashboards, and scorecard components that can be easily dropped onto a page, there are also options for using Web services and BI EE Logical SQL view objects to embed business intelligence data into an application. For more information about using Web services, see Introduction to Oracle Business Intelligence Web Services in Oracle Fusion Middleware Integrator's Guide for Oracle Business Intelligence Enterprise Edition. For more information about using the BI EE Logical SQL view object, see Using the Oracle BI EE Logical SQL View Object in Oracle Fusion Middleware Developer's Guide for Oracle Business Intelligence Enterprise Edition.
10.6.2 How to Configure Credentials for Connecting to the Oracle BI Presentation Catalog
At design time, you need to specify credentials to connect to the Oracle BI Presentation Catalog. These credentials are used to retrieve the list of business intelligence objects (for example, analyses, dashboards, and scorecard components) from the Oracle BI Presentation Catalog.
This process ensures that the login to the Presentation Server is the same as the current user of the application and any access checks are performed as the current user, and data is fetched as the current user. If the ADF page contains business intelligence objects to which the user does not have access, the ADF page returns a message stating that the user does not have the proper permissions to access these objects.
Note that the Perform impersonation parameter should be set to true when security is enabled.
This section contains the following subsections:
10.6.2.1 How to Check for the BIImpersonateUser
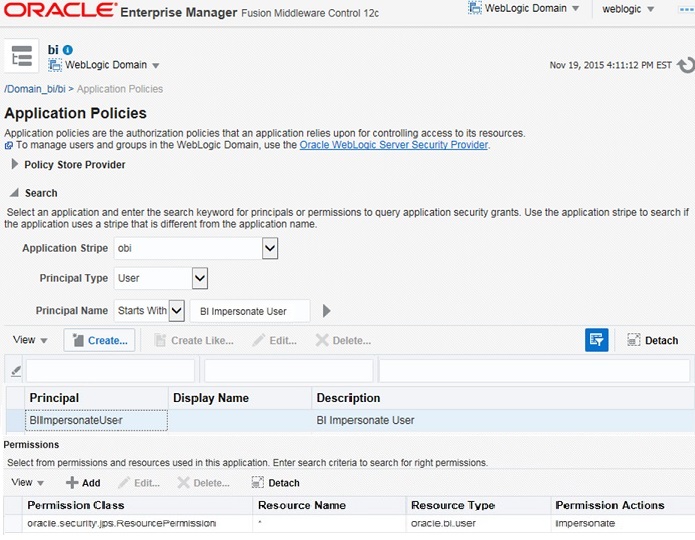
Use the following steps to check if a BIImpersonateUser user already exists, and that the roles assigned to it are correct:
10.6.2.2 How to Create the BIImpersonateUser
Use the following procedures to create a BIImpersonateUser user to secure an application that uses an Oracle BI EE Presentation Services connection and includes Oracle BI EE objects. ADF security must be enabled for your application before you can apply the impersonator user credentials to the Oracle BI EE Presentation Services connection.
The Impersonate User feature secures applications that contain Oracle BI EE objects when Oracle BI EE and ADF are not sharing an Oracle Internet Directory (OID). Before you begin the process of creating and using Impersonate User, you must confirm that this capability is configured in your environment.
Before you perform this procedure, make sure that either you or the Administrator have created users in the WebLogic Server's Oracle BI EE realm and assigned the BIConsumer group to each user in this realm. For more information, see How to Create and Use Impersonate User in Oracle Fusion Middleware Developer's Guide for Oracle Business Intelligence Enterprise Edition.
Follow the steps below to create the BIImpersonateUser user:
10.6.3 How to Integrate Oracle Business Intelligence Objects in WebCenter Portal
Use the following procedures to configure portal integration with the BI objects.
10.6.3.1 How to Add or Modify a Presentation Services Connection After Deployment
Before you can begin integrating BI objects in WebCenter Portal, you must first configure a connection from WebCenter Portal to the BI server. Oracle BI EE provides an ADF MBean that lets you add a new connection to a deployed portal or BI ADF application. You can also modify a deployed application's existing connection. MBeans are deployed with the application and can be accessed post-deployment using Fusion Middleware Control.
Prior to following the steps below, you should already have followed the steps in How to Configure Credentials for Connecting to the Oracle BI Presentation Catalogto specify credentials to connect to the Oracle BI Presentation Catalog.
Note:
If the portal and the Oracle Business Intelligence application do not share the same identity store, you must create the relevant users in both systems.
Follow the steps below to configure the connection after the application was deployed.
-
Log into the FMW Control Enterprise Manager of the instance where WebCenter Portal is installed and click on the WebLogic domain drop down menu.
-
From the list, select System MBean Browser.
The System MBean Browser pane displays.
-
In the System MBean Browser pane, navigate to the ADF Connections tree node by following the below path:
-
Select the Application Defined MBeans tree node.
-
Select the oracle.adf.share.connections tree node.
-
Select the Server: <my server name> tree node.
For example,
Server:DefaultServerorWC_Portal. -
Select the Application:<your application's name> tree node.
For example,
Application:Application2orwebcenter. -
Open the ADF Connections tree node.
-
Open the child ADF Connections tree node.
The corresponding MBean information displays in the Application Defined MBean pane.
-
-
In the Application Defined MBean pane, open the Operations tab and then click createConnection to create a Presentation Services connection.
The Operation:createConnection dialog displays.
-
Specify the required values for the connection.
In the Connection Type value field, enter
BISoapConnection, in the Connection Name value filed, enter for example,biserverand click Invoke to create the connection. -
In the System MBean Browser pane, click Refresh to refresh the tree so that the new connection displays.
-
Continue to expand the tree ADF Connections > BISoapConnection. You should see the biserver connection that was created
The connection's information displays in the Application Defined MBean pane.
-
Navigate to the Attributes tab.
-
Enter the
BISoapconnection information as shown below, and then click Apply to apply your changes.context = analytics host = The host name where the BI Server is running IsStaticResourcesLocationAutomatic = true Port = 9502(default Analytics port) protocol = http StaticResourcesLocation = http://machine.domain:port (This is the default URL for the Analytics port.) username =BIImpersonatorUser password = BIImpersonatorUser user password
-
Keep the defaults for the rest of the fields and click Apply .
-
Click on the ADFConnections folder in the Navigation pane, open the Operations tab, and then click Save to save the connection.
-
When you click Invoke, you should get the following message:
"
Confirmation Operation executed successfully."
10.6.3.2 How to Add Oracle BI Objects to a WebCenter Portal Resource Catalog
Before you can add Oracle BI content to a portal page, you must add objects stored in the Oracle BI Presentation Catalog to a WebCenter Portal resource catalog:
10.6.3.3 How to Add Oracle BI Content at Runtime
Use this procedure to create a portal page and add Oracle BI objects to it. Before you perform this procedure, you must have added Oracle BI objects to a WebCenter Portal resource catalog (see How to Add Oracle BI Objects to a WebCenter Portal Resource Catalog.
-
Log into WebCenter Portal and create a new portal or access an existing portal.
-
Make the resource catalog containing the Oracle BI objects the default resource catalog for portal pages. See Choosing Default Resource Catalogs
-
In the portal editor, create a new page.
-
In the page editor, click Add Content to open the resource catalog, and browse to the folder containing the Oracle BI objects.
-
Select an analysis or dashboard and click Add.
The object that you selected is added to the page.
10.6.3.4 How to Modify a Business Intelligence Object's Prompt Values
Use this procedure to test the portal page by changing an analysis or dashboard's filter or prompt values.
- Open the page that you created.
- In the running page, click Page Actions and then click the Edit link to enter edit mode.
- Add an analysis or dashboard that contains a filter or prompt. For more information about adding Oracle BI objects to the page, see How to Add Oracle BI Content at Runtime.
- Without exiting the edit mode of the page, save the portal page.
- In the portal page, modify the prompt values and click OK.
- Exit edit mode, save the page and confirm that the application correctly applied the prompt values.
10.7 Integrating with Oracle Content and Experience Cloud
This section describes how to integrate Oracle Content and Experience Cloud with WebCenter Portal.
It contains the following topics:
10.7.1 About Oracle Content and Experience Cloud Integration
The Oracle DOCS Content Manager task flow enables users to integrate Oracle WebCenter Portal with Oracle Content and Experience Cloud and quickly access documents in Oracle Content and Experience Cloud. You can add, view, manage, and share documents and collaborate in cloud server with robust security from WebCenter Portal.
The Oracle DOCS Content Manager task flow:
-
Provides easy and secure access to Oracle Content and Experience Cloud from WebCenter Portal
-
Allows easy collaboration with other people
10.7.2 Integrating Oracle Content and Experience Cloud with WebCenter Portal
To integrate Oracle Content and Experience Cloud with WebCenter Portal:
10.7.3 Creating a Default Oracle Content and Experience Cloud Connection Using WLST
Create a default Oracle Content and Experience Cloud URL Connection in Oracle WebCenter Portal using WLST, use WLST command adf_createHttpURLConnection.
The following is the syntax for the WLST command:
adf_createHttpURLConnection(appName=<application name>, name=<connection name>, url='http://<host>:<port>/documents')
where,
-
appNameis the application name, for examplewebcenter. -
nameis the default URL connection. Set the name asWCP-DCS. -
<host>:<port>is the host and the port of the of your Oracle Content and Experience Cloud.
Example:
adf_createHttpURLConnection(appName='webcenter', name='WCP-DCS', url='http://<host>:<port>/documents')
For more information on WLST, see Oracle WebLogic Scripting Tool (WLST).
You can list the created connection and also delete the connection using the following WLST commands
-
To list the connections created, use the following WLST command:
adf_listURLConnection(appName=<application name>)
For example:
adf_listURLConnection(appName='webcenter')
-
To delete the connection use
deleteConnection(appName=<application name>, name='connection name')
For example:
deleteConnection(appName='webcenter', name='WCP-DCS')
