1 Managing JSON File Properties

This chapter provides information about using the Property Management Tool and the Import/Export Utility to manage Oracle WebCenter Sitesproperties stored in JSON files.

Many of your configuration tasks for Oracle WebCenter Sites and its applications require you to set or modify values for properties that are specified in the WebCenter Sites and Satellite Server JSON files (wcs_properties.json).

To manage properties, WebCenter Sites provides the Property Management Tool and the Import/Export Utility. Most properties are located in the wcs_properties.json file for WebCenter Sites and Satellite Server, while other properties, such as zookeeper properties are stored in individual property files. This introduction describes the wcs_properties.json files, the Property Management Tool, and the Import/Export Utility.

This introduction contains the following sections:

1.1 About the WebCenter Sites JSON File

Most WebCenter Sites properties are located in the WebCenter Sites wcs_properties.json file. The WebCenter Sites JSON file is located in the <domain_home>/wcsites/wcsites/config directory of your WebCenter Sites installation.

WebCenter Sites provides two ways to manage the properties in the WebCenter Sites wcs_properties.json file:

The following topics provide overview information about the tools used to manage the WebCenter Sites wcs_properties.json file:

1.1.1 Overview of the Property Management Tool

When WebCenter Sites is running, use the Property Management Tool to set the values of properties in the WebCenter Sites wcs_properties.json file. It is recommended to always use the Property Management Tool to set values for the properties in this file.

The Property Management Tool ensures that property values are correctly formatted; specifically, the correct property separator characters are used. Furthermore, the Property Management Tool provides descriptive information about the properties, as well as default or possible values. In addition, since properties in the WebCenter Sites wcs_properties.json file are organized by category, the Property Management Tool enables users to search for properties by category and subcategory.

1.1.2 Overview of the Import/Export Utility

When WebCenter Sites is not running, use the Import/Export utility to make changes to the properties in the WebCenter Sites wcs_properties.json file.

The Import/Export Utility enables users to extract the properties from the WebCenter Sites wcs_properties.json file into a property file format (.ini or .properties) to their local system. Once you update the desired properties, you then run an import command to import the changes into the WebCenter Sites wcs_properties.json file. When the WebCenter Sites system is restarted, your property changes are updated on all WebCenter Sites instances.

1.2 Viewing Property Values in the WebCenter Sites JSON File

To view all the properties and their values configured on your system:

  1. Log in to WebCenter Sites, select a site name, and access the Admin interface.
  2. In the navigation pane, select the General Admin section, and then expand Admin.
  3. In the Admin tree, expand System Tools, then System Information, and then double-click Sites Info.
    The Sites Information form opens.
  4. In the Sites Properties Available list box, select wcs_properties.json file and then click Add.
  5. Click Show Results.
    The Sites Properties form opens and displays the name of the wcs_properties.json file.
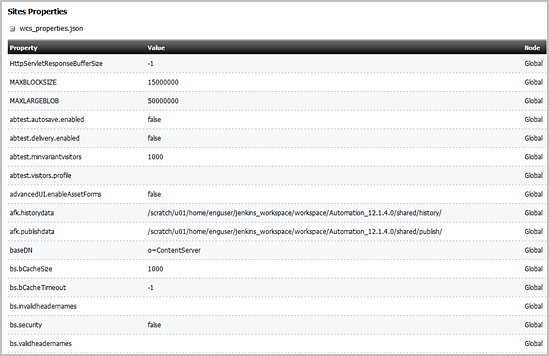
  6. Expand the wcs_properties.json node to view a list of all the properties and their current values (shown in Figure 1-1).

1.3 Using the Property Management Tool

The following topics provide instructions for working with the Property Management Tool:

1.3.1 Accessing the Property Management Tool

The Property Management Tool is located in the WebCenter Sites Admin interface.

  1. Log in to WebCenter Sites with administrator credentials, select the name of a site, and then select the Admin interface icon.
  2. In the Admin tree, expand the System Tools node.
  3. Under the System Tools node, double-click Property Management.

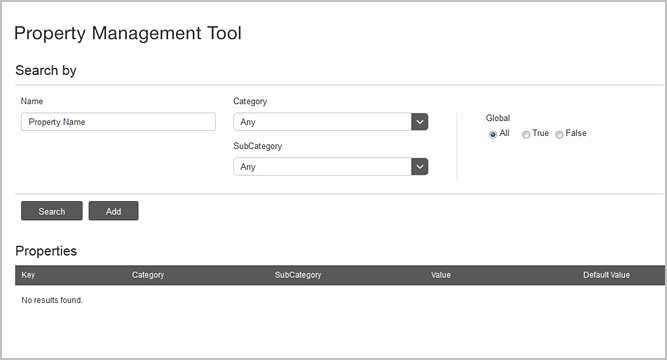
    The Property Management Tool opens, as shown in Figure 1-2:

    Figure 1-2 Property Management Tool

    Description of Figure 1-2 follows
    Description of "Figure 1-2 Property Management Tool"

1.3.2 Setting Properties

This section provides instructions about setting properties for WebCenter Sites and its applications.

  1. Open the Property Management Tool, as described in Accessing the Property Management Tool.
  2. Search for the property you want to configure. Enter values for the following fields:
    • Name: Enter the full or partial name of the property you want to view.

    • Category: (Optional) select the name of the category associated with the property.

    • SubCategory: (Optional) If a category is selected from the Category field, the subcategories associated with that category are shown in this drop-down menu. Select the name of the subcategory associated with the property.

    • Global: Select one of the following options:

      • All: All properties with the specified name and category are shown in the results.

      • True: Only properties where the Global flag is set to true are shown in the results.

      • False: Only properties where the Global flag is set to false are shown in the results.

  3. Click Search.

    The properties that match your search criteria are listed under the Properties section of the page.

  4. Click the name of the property whose value you want to modify.

    The property details are displayed as follows:

    • Category: shows the category under which this property is listed.

    • Valid Values: lists the possible values for the property.

    • SubCategory: shows the subcategory of the property.

    • Default Value: the recommended value of the property.

    • Description: provides information about the property.

    • Value: the actual value of the property.

    • Global: indicates that the value of this property is to be shared across all cluster nodes.

    • Restart Required: indicates whether the application server must be restarted so the new value can take effect.

  5. In the Value field, enter a value for this property.
  6. Click Save.
  7. Repeat steps 2 through 6 for each property you want to configure.
  8. If the property you saved has restart_required set as true, stop and restart the application server so the new values can take effect.

1.3.3 Adding Properties

Some configuration tasks require you to add new, custom properties for your system. For example, when you implement resultset caching, you can create up to three properties for any WebCenter Sites database table for which you want to set caching values. (For information about resultset caching, see Working with Resultset Caching and Queries in Oracle Fusion Middleware Developing with Oracle WebCenter Sites.) All custom properties are added to the wcs_properties.json file.

To add properties to your WebCenter Sites system, follow the steps below:

  1. Open the Property Management Tool, as described in Accessing the Property Management Tool.
  2. Click Add.

    The new property form opens under the Properties section of the Property Management Tool.

  3. Enter values for the new property in the following fields:
    • Key: enter the name of the property you need to add.

    • Valid Values: enter any possible values for the property.

    • Category: Custom. This value is shown in the property's Category parameter in the wcs_properties.json file.

    • Default Value: enter the recommended value for this property.

    • SubCategory: enter a sub category for this property (if any).

    • Value: set the value of the property.

    • Description: enter a description of this property.

    • Global: select this checkbox to indicate that the property and its value must be shared across all cluster nodes.

    • Restart Required: select this checkbox if the application server must be restarted for the new property and value to take effect.

  4. Click Save.
  5. If you set the restart_required flag to true, stop and restart the application server so the new property can take effect.

1.3.4 Deleting Properties

It is unlikely that you will ever have to delete a property. However, if you do have to delete a property, refer to the steps below.

Caution:

You can only delete custom properties. Never delete a required property.

  1. Open the Property Management Tool. (See Accessing the Property Management Tool.)
  2. Search for the property you want to configure (for search information, see step 2).

    The properties that match your search criteria are listed under the Properties section of the page.

  3. Click the name of the property you want to remove.
  4. Take note of the current value for this property just in case you need to restore it for any reason.
  5. Click Delete.
    A confirmation message is displayed.
  6. Click Yes.
  7. If the restart_required flag for the deleted property was set to true, stop and restart the application server so the changes can take effect.

1.4 Using the Import/Export Utility to Manage WebCenter Sites Properties

The Import/Export Utility is used to import and export the WebCenter Sites JSON file properties in a property file format (.ini or .properties) when WebCenter Sites is not running. The exported property file contains all the properties for WebCenter Sites in a key=value format. This exported property file can then be modified and the changed settings imported into WebCenter Sites.

Note:

The Import/Export utility enables you to update property values when WebCenter Sites is not running. For all other property changes, including modifying property values when WebCenter Sites is running and adding custom properties, use the Property Management Tool.

The commands for accessing the Import/Export utility are as follows:

  • For Windows systems, use the propertiesUtility.bat command file. For example:

    propertiesUtility.bat <sites_home> <config_folder> export <properties_file>

  • For Unix systems, use the propertiesUtility.sh command file and separate each command parameter with a forward slash (/). For example:

    propertiesUtility.sh /oracle/sites-home /oracle/config export /export/my_config.properties

The following instructions use the propertiesUtility.bat command file.

To run the Import/Export Utility:
  1. Open a command prompt window and cd to your sites-home/bin directory.
  2. Export the properties from the JSON file to a property file of your choice (.ini or .properties):
    >propertiesUtility.bat <sites_home> <config_folder> export <properties_file>
    

    For example, to export the JSON file properties to a my_config.properties file, enter the following export command:

    >propertiesUtility.bat c:/oracle/sites-home C:/oracle/config export 
       c:/export/my_config.properties
    

    The utility creates the property file in the directory you specified in your export command.

  3. Navigate to and open the property file in a text editor. The properties are listed in a key=value format. Modify the values of the desired properties and then save the property file.

    For keys that have cluster node specific values, the name of the node on which the changes should take place is appended as a suffix (---NodeName) to the key. For example, for the valid.urls key, there will be 2 entries in the property file:

    • valid.urls=some_value

    • valid.urls---nodeA=some_value_specific_to_nodeA

  4. Import the updated properties into the JSON file:
    • If WebCenter Sites is not running, use the following import command:

      >propertiesUtility.bat <sites_home> <config_folder> import <properties_file>
      

      Where <properties_file> is the path to properties file containing the updated properties and <config_folder> is the path to the config folder.

    • If WebCenter Sites is running, and you want to import your updates and dynamically update all WebCenter Sites instances with your changes, append the flush flag to the import command as follows:

      >propertiesUtility.bat <sites_home> <config_folder> import <properties_file> 
         [flush sites-url]
      

      For example:

      >propertiesUtility.bat c:/oracle/sites-home C:/oracle/config import c:/import/
          my_config.properties flush http://localhost:8080/sites
      

      The flush flag invalidates the cache in WebCenter Sites that stores the configuration settings. The flush flag requires you to specify the URL of your local WebCenter Sites instance (sites-url).

    The updated property values are imported into the JSON file. If you specified arguments to dynamically update WebCenter Sites, you see your changes immediately. If the system is not running, your changes will take-hold upon startup.