Obtaining the Standard WSDL

To obtain the standard WSDL for use with the RightNow adapter:

  1. Collect the following details from your Oracle RightNow Cx Account:
      • Host

      • Interface name

      • Username and password

  2. Open your web browser and enter the following URL to obtain the Standard WSDL, replacing the host name and interface details as appropriate.
    https://<host_name>/cgi-bin/<interface>.cfg/services/soap?wsdl=typed
    

    For example:

    https://integration-test.rightnowdemo.com/cgi-bin/integration_test.cfg/services/soap?wsdl=typed
    

    Note:

    Permissions for Public SOAP API must be enabled for the user account to enable use of the Oracle RightNow Connect Web Services for SOAP API.

    Permissions for Public SOAP API enable staff members with this profile to access the public SOAP API through account or session authentication.

    The Oracle RightNow adapter does not support the partner WSDL/generic WSDL. Therefore, the following URL is not supported:

    http://integration-test.rightnowdemo.com/cgi-bin/integration_test.cfg/services/soap?wsdl=generic
    

Importing the Oracle RightNow Application's Certificate into the Client/Server

To import the Oracle RightNow adapter certificate into the client/server:

  1. Open your web browser and type the following URL, replacing the host_name and interface details.
    https://<host_name>/cgi-bin/<interface>.cfg/services/soap?wsdl=typed
    

    An example is:

    http://integration-test.rightnowdemo.com/cgi-bin/integration_test.cfg/services/soap?wsdl=typed
    

    Where host_name is integration-test.rightnowdemo.com and interface is integration_test

  2. Click the lock icon, as shown in Figure 2-1.

    Figure 2-1 The Lock Icon in the Browser Window for Internet Explorer Browser


    Figure 2-2 shows the location of the lock icon in the Chrome Browser.

    Figure 2-2 Location of Lock Icon in Chrome Browser Indicated by Arrow


    Figure 2-3 shows the location of the lock icon in the Mozilla Firefox browser.

    Figure 2-3 Location of Lock Icon in Mozilla Firefox Browser Indicated by Arrow


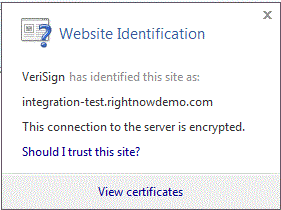
    A small window pops up. Click View certificates, at the bottom of the pop-up, as shown in Figure 2-4.

    Figure 2-4 View Certificates in Pop-up


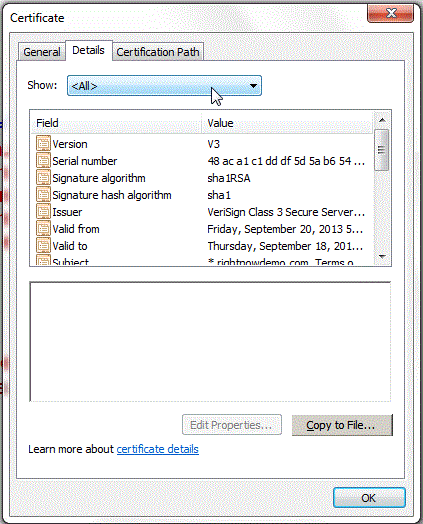
  3. After clicking View Certificates, another window is displayed, providing the details of the certificate. Open the Details tab and click Copy to File, as shown in Figure 2-5.

    Figure 2-5 Certificate Details Pop-up

    Description of Figure 2-5 follows
    Description of "Figure 2-5 Certificate Details Pop-up"
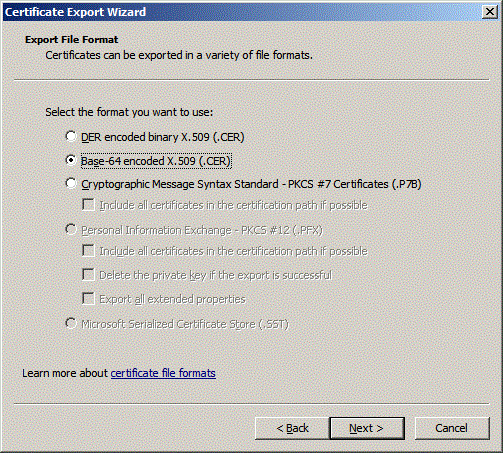
  4. The Windows Certificate export wizard opens. Click Next and select Base-64 encoded X.509 (.CER) option, See Figure 2-6.

    Figure 2-6 The Certificate Wizard, with Base-64 encoded X.509m(.CER) Selected

    Description of Figure 2-6 follows
    Description of "Figure 2-6 The Certificate Wizard, with Base-64 encoded X.509m(.CER) Selected"
  5. Click Next and browse to the location where you want to save the certificate. Provide an appropriate name to the certificate file and save it. For example, you can copy the certificate, say rightnowdemo.crt to the folder, FMW_HOME/wlserver/server/lib.
  6. Import the downloaded certificate into your application server, and configure your application server to request the client certificate. Re-import the certificate in case certification expiration has occurred.

Importing the Oracle RightNow Application's Public Certificate into WebLogic Server Using Keytool

You must import the Oracle RightNow application's public certificate into Oracle WebLogic Server using the keytool.

Before you follow the steps for importing, ensure that parameter Hostname Verification field (under the tab SSL in the console) is set to NONE on the server side.

To import the Oracle RightNow adapter's public certificate into the Oracle WebLogic Server keytool:

  1. Provide a suitable location on your system to save the certificate authority. Mark it as trusted. Save it on a suitable location on your system.
  2. To find the WebLogic server's trust keystore location, log in to the admin console http://url:port/console/
  3. On the home page, proceed to Servers under Environment subsection.
  4. Select the Admin server from the list of servers displayed.
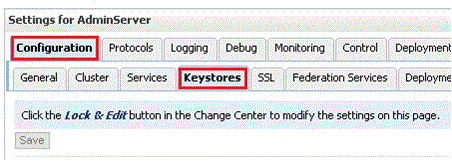
  5. Proceed to the Keystores tab, as shown in Figure 2-7.

    Figure 2-7 The Keystores Tab

    Description of Figure 2-7 follows
    Description of "Figure 2-7 The Keystores Tab"
  6. Under the Keystores tab, select the Demo Trust Keystore path. This is the path where the keystore resides.

    The path is similar to {Middleware_Home} \wlserver_10.3\server\lib.

  7. Import this certificate from the authority into WebLogic server's trust store. If you are using Windows, use the command prompt or if you're using Unix/Linux, use your command shell and navigate to the path mentioned above.
  8. Once at the path where the keystore resides, run the following keytool command:
    keytool -import -trustcacerts -alias OracleRightNowCA -file <Filename with location> -keystore DemoTrust.jks -storepass DemoTrustKeyStorePassPhrase 
    

    For example, assuming you keep the downloaded certificate at the location as mentioned in Step 7 and the name of the certificate is OracleServiceCloudCA.cer, the keytool command you use is similar to:

    keytool -import -trustcacerts -alias OracleRightNowCA -file OracleServiceCloudCA.cer -keystore DemoTrust.jks -storepass DemoTrustKeyStorePassPhrase
    
  9. A message that the certificate was added to keystore is displayed, which confirms your successful import of the certificate. When prompted if you can trust this certificate, enter Yes and select Enter.
  10. You can verify that the certificate was added to the keystore by listing all certificates using the following command:
    keytool -list -keystore DemoTrust.jks -storepass DemoTrustKeyStorePassPhrase 
    

    The newly imported certificate appears as part of existing certificates in the keystore.

  11. Restart the server to bring modifications made in the previous steps into effect.

Configuring Oracle RightNow Adapter Permissions

To configure permissions to enable you to make calls for CRUD operations and query operations:

  1. Install Oracle RightNow CX client.
  2. Log in to Oracle RightNow CX client, See the Oracle RightNow CX User Guide.
  3. Navigate to Staff Management, and then click Profiles
  4. Select the Profile, the user account that must be enabled.
  5. Click the Permissions tab.
  6. Check Select All for Public SOAP API.
  7. Check Account Authentication under Public SOAP API.
  8. Select object-specific permissions from object-specific tabs. See the next section.

Details for Object-specific Permissions

See Table 2-1 for information on these permissions. See the Oracle RightNow CX Cloud Service Server August 2014 User Guide for additional information.

Table 2-1 Finding Information on Objects

Information on... Can be found in this location in the Oracle RightNow Cx User Guide

Organization Permissions

Navigate to Core Features -->Staff Management-->Customizing Profiles --> Organization Permissions

Contact Permissions

Navigate to Core Features --.>Staff Management --.>Customizing Profiles --.>Contact Permissions

Service Permissions

Navigate to Core Features --.>Staff Management--.>Customizing Profiles ' Service Permissions

Opportunity Tracking Permissions

Navigate to Core Features--.>Staff Management --.> Customizing Profiles--.>Opportunity Tracking Permissions

Custom Object Permissions

Navigate to Core Features--.>Staff Management--.>Customizing Profiles --.>Custom Object Permissions

For related permissions information, specifically, information on RightNow CX IP Address Range and Restrictions, see the Oracle RightNow Cx Server May 2013 Release Notes.

Authenticating on the Oracle RightNow Cx Server with Account Passwords

The following section provides information on authenticating on the Oracle RightNow Cx Server with account passwords.

Oracle Cloud Connect Web Services for SOAP API Access Control

When the Oracle Cloud Connect Web Services for SOAP API receives a request, a series of access control measures are enforced:

  1. The site configuration is checked to ensure the API has been enabled at a site level.

  2. The user credentials supplied in the request are validated

  3. The profile for the supplied account is checked to ensure the correct profile bit is enabled. The profile is the mechanism for controlling access to administrative functions and for assigning staff members specific permissions, default workspaces, a default navigation set, and report access.

    Note:

    Server-side access control is enforced on all core API calls made by Oracle Cloud Connect Web Services for SOAP. The current permissions map to read, edit, delete, and move check boxes on the Profile Permissions editor in Oracle RightNow. Although server-side access is enabled by default on new May 2013 sites and later, it is disabled on upgraded sites before the May 2013 release. If you are an existing Oracle RightNow customer and plan to upgrade your site to a May 2013 or later build, contact customer care to have this security-enhancing functionality enabled.

    If you already have server-side access control enabled on your site, be careful of changes you make to Profile permissions. If an Oracle RightNow administrator changes the permissions on a profile for a specific Oracle Cloud Connect Web Services for SOAP integration, such changes might break that integration.