28 Securing MAF Applications
This chapter includes the following sections:
28.1 Introduction to MAF Security
MAF presents users with a login page when a secured application feature has been activated. For example, users are prompted with login pages when an application feature is about to be displayed within the web view or when the operating system returns an application to the foreground. MAF determines whether access to the application feature requires user authentication when an application feature is secured by an authentication server, or when it includes constraints based on user roles or user privileges. Only when the user successfully enters valid credentials does MAF render the intended web view, UI component, or application page.
While the presence of these conditions in any of the application features can prevent users from accessing a MAF application without a successful login, you can enable users to access a MAF application that contains both secured and non-secured application features by including a default application feature that is neither secured nor includes user access-related constraints. In this situation, users can access the MAF application without authentication. The default application feature provides the entrance point to the MAF application for these anonymous users, who can both view non-secured data and authenticate against the remote server when accessing a secured application feature. You can designate a non-secure default application feature by:
-
Allowing anonymous users access to public information through the default application feature, but only enabling authorized users to access secured information.
-
Allowing users to authenticate only when they require access to a secured application feature. Users can otherwise access the MAF application as anonymous users, or login to navigate to secured features.
-
Allowing users to log out of secured application features when secured access is not wanted, thereby explicitly prohibiting access to secured application features by unauthorized users.
Note:
MAF enables anonymous users because the application login process is detached from the application initialization flow; a user can start a MAF application and access unsecured application features as an anonymous user without having to provide authentication credentials. In such a case, MAF limits the user's actions by disabling privileged UI components.
For more information, see How to Enable Application Features to Require Authentication, and About User Constraints and Access Control.
A MAF application uses either the default page or a customized login page that is written in HTML.
Application features defined with user.roles or user.privileges constraints can be accessed only by users who have been granted the specific role and privileges. When users log into such an application feature, a web service known as the Access Control Service (ACS) returns the user objects that grant them access to this application feature. For more information about ACS, see What You May Need to Know About the Access Control Service.
The developer can elect to containerize the MAF application at the time of deployment. Containerization allows the application to utilize the Secure Networking and Network Tunneling capabilities of the enterprise networking platform configured with Oracle Mobile Security Suite (OMSS). Distribution of containerized applications is managed by OMSS administrators through the Oracle Mobile Security Access Server (MSAS) component App Catalog and Secure Workspace container features. Authentication of users is performed by MSAS configured for the desired authentication type. For more information about developing the MAF application and OMSS containerization, see Containerizing a MAF Application for Enterprise Distribution.
28.2 About the User Login Process
From the end-user perspective, the login process is as follows:
Note:
For more information about how containerizing the MAF application changes the login process, see Overview of the Authentication Process for Containerized MAF Applications.
-
MAF presents a web view of a login page, shown in Figure 28-1 whenever the user attempts to access an application feature that is secured. If the secured application feature is the default, then MAF prompts users with the default login page when they launch the application.
Figure 28-1 Default Login Page

Note:
As described in The Custom Login Page, MAF provides not only a default login page, but also supports the use of a custom login page.
-
The user enters a user name and password and then clicks Sign In.
Note:
MAF allows multiple users for the same application. Users may freely log in to an application after a previous user logs out.
-
If the user name and password are verified, MAF displays the intended web view, page, or user interface component.
-
MAF presents challenges to the user name and password until the user logs in successfully. When users cannot login, they can only navigate to another application feature.
Note:
Authentication times out when a predefined time period has passed since the last activation of an application feature. MAF only renews the timer for the idle time-out when one of the application features that use the connection to the authentication server has been activated.
28.3 Overview of the Authentication Process for MAF Applications
MAF applications may require that user credentials be verified against a remote login server (such as the Oracle Access Manager Identity Server used by Oracle ADF Fusion web applications) or a local credential store that resides on the user's device. To support local and remote connectivity modes, MAF supports these authentication protocols:
-
HTTP Basic
-
OAuth
-
Web SSO
Note:
At present, MAF applications that you deploy to the Universal Windows Platform support HTTP Basic only.
By default, authentication of the MAF application user is against the remote login server regardless of the authentication protocol chosen at design time. Developers may configure the application, in the case of Oracle Access Management Mobile and Social (OAMMS) and basic authentication to enable local authentication. However, initially, because the local credential store is not populated with credentials, login to access secured application features requires authentication against a remote login server. Successful remote authentication enables the subsequent use of the local credential store, which houses the user's login credentials from the authentication server on the device. Thus, after the user is authenticated against the server within the same application session (that is, within the lifecycle of the application execution), MAF stores this authentication context locally, allowing it to be used for subsequent authentication attempts. In this case, MAF does not contact the server if the local authentication context is sufficient to authenticate the user. Although a connection to the authentication server is required for the initial authentication, continual access to this server is not required for applications using local authentication.
Tip:
While authentication against a local credential store can be faster than authentication against a remote login server, Oracle recommends authentication using OAuth or Web SSO authentication protocols, which only support remote connectivity.
Table 28-1 summarizes the login configuration options of a MAF application. The connectivity mode depends on the chosen authentication protocol.
Table 28-1 MAF Connectivity Modes and Supported Authentication Protocols
| Connectivity Mode | Support Protocols | Mode Description |
|---|---|---|
|
local |
|
Requires the application to authenticate against a remote login server only when locally stored credentials are unavailable on the device. The initial login is always against the remote login server. After the initial successful login, MAF persists the credentials locally within a credential store in the device. These credentials will be used for subsequent access to the application feature. See also What You May Need to Know About Web Service Security. |
|
remote |
|
Requires the application to authenticate against a remote login server, such as Oracle Access Manager (OAM) Identity Server or a secured web application. Authentication against the remote server is required each time a user logs in. If the device cannot contact the server, then a user cannot access the secured MAF feature despite a previously successful authentication. |
|
hybrid |
|
Requires the application to authenticate against a remote login server when network connectivity is available, even when local credentials are available on the device. Only when a lack of network connectivity prevents access to the login server will local credentials on the device will be used. |
For information about how containerizing the MAF application changes the authentication process, see Overview of the Authentication Process for Containerized MAF Applications.
28.4 Overview of the Authentication Process for Containerized MAF Applications
When you develop the MAF application, you must define a login connection to develop and test secure features. During testing, the MAF login page will be used to authenticate before accessing the protected resources. At deployment time, you may choose to containerize the MAF application to utilize the Secure Networking and Network Tunneling capabilities of the enterprise networking platform configured with Oracle Mobile Security Suite (OMSS) and thus eliminates the need for mobile VPN.
Post deployment of the containerized MAF application, access to backend resources behind the corporate firewall will rely on the Mobile Security Access Server (MSAS), a component of OMSS, to provide a central access point for securing traffic from mobile devices to corporate resources. In this case, the MSAS instance is configured to enforce an authentication endpoint to use for the initial authentication of the user.
User authentication is handled by container Single Sign-On (SSO) integration provided by MSAS to the registered MAF application. To allow the MAF application to communicate with MSAS, the user installs and registers a Secure Workspace app for the type of authentication that has been configured for the MSAS instance. Then when the user attempts to access a protected resource, the MAF login page will be suppressed and MSAS will present its own login through the Secure Workspace app on the user’s mobile device.
Note:
To enable authentication by MSAS and to utilize the AppTunnel, the MSAS instance must be configured to proxy the login URL or authentication endpoint that the MAF application defines. For details about how MSAS is configured for a MAF login connection, see What You May Need to Know About Login Connections and Containerized MAF Applications.
Whether backend resource requests are proxied using the MSAS AppTunnel is determined by a MSAS-generated Proxy Auto-Configuration file used by the MAF application and Secure Workspace app. The AppTunnel is a mutually authenticated SSL tunnel from each Secure Workspace app that provides secure access to the containerized MAF application. The AppTunnel encrypts all data in transit and provides protection from rogue apps on a user's mobile device that device-level mobile VPNs are subject to.
For an overview of OMSS support for containerized MAF applications, see Containerizing a MAF Application for Enterprise Distribution.
28.5 Configuring MAF Connections
You must define at least one connection to the application login server for an application feature that participates in security. The absence of a defined connection to an application login server results in an invalid configuration. As a result, the application will not function properly.
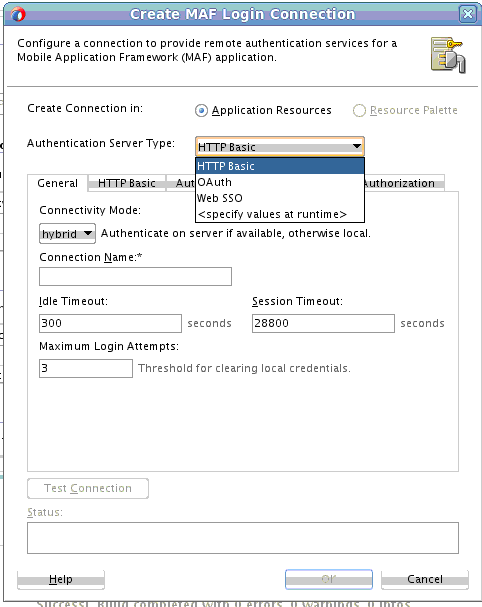
28.5.1 How to Create a MAF Login Connection
As Figure 28-2shows, you can use the Create MAF Connection dialog to select the connection type and, depending on the connection type, enable both local and remote authentication (hybrid). Depending on application requirements, you can configure a connection to servers that support the following authentication protocols:
-
HTTP Basic
-
OAuth
-
Web SSO
Note:
Oracle recommends that you configure a connection to the login server using the OAuth or Web SSO connection type. OAuth and Web SSO require authentication against a remote login server and do not allow users to authenticate on the device from a local credential store.
Figure 28-2 Configuring Authentication
To create a login server connection:
- Perform one of the following actions.
-
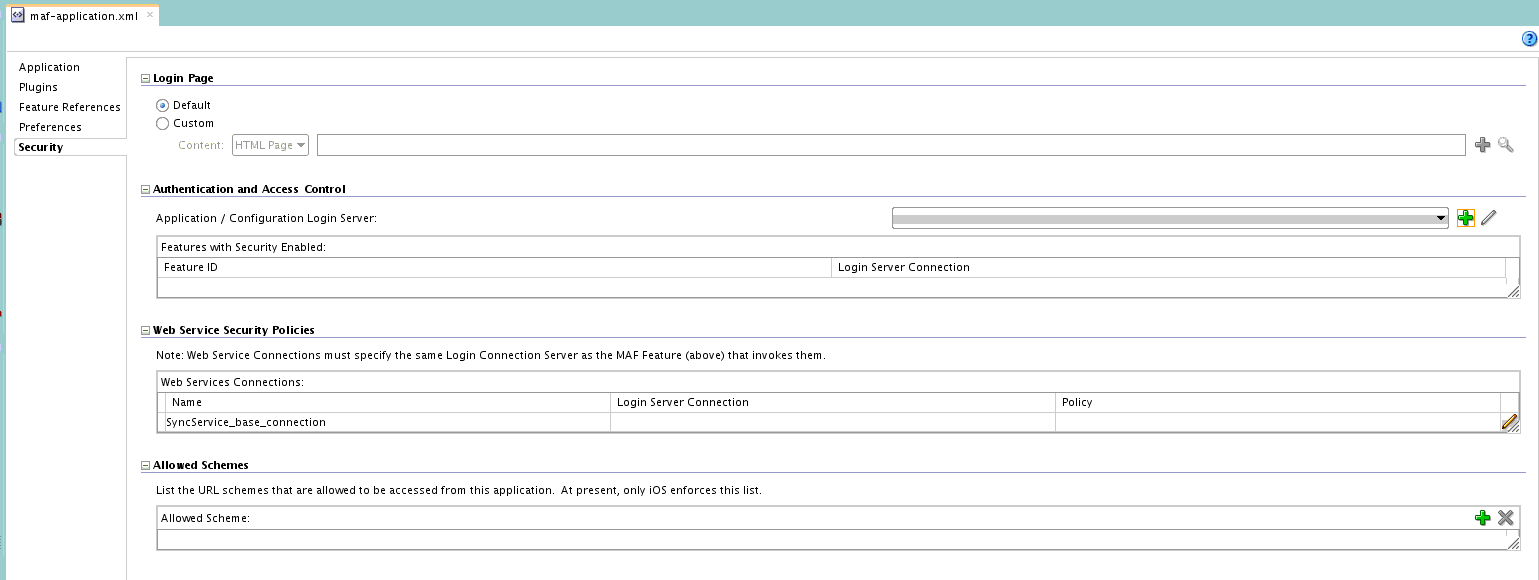
In the Navigator, expand the Descriptors node and then ADF META-INF, and double-click maf-application.xml. Then, in the overview editor for the
maf-application.xmlfile, expand the Security - Authentication and Access Control section and click Create, as shown in Figure 28-3.Figure 28-3 Adding a Server Connection

-
Alternatively, choose Connections in the New Gallery and then MAF Login Server Connection.
-
28.5.2 How to Create a Multi-Tenant Aware MAF Login Connection
Figure 28-4 Configuring a Multi-Tenant Aware Connection

As Figure 28-5 shows, the default login page displayed by the MAF application with a multi-tenant aware connection defined, will prompt the user to enter the domain ID to propagate the tenant value on the HTTP Request:
Figure 28-5 Default Login Page for Multi-Tenant Aware Connection

- Perform one of the following actions.
- In the Navigator, expand the Descriptors node and then ADF META-INF, and double-click maf-application.xml. Then, in the overview editor for the
maf-application.xmlfile, expand the Security - Authentication and Access Control section and click Create, as shown in Figure 28-6.Figure 28-6 Adding a Server Connection
- Alternatively, choose Connections in the New Gallery and then MAF Login Server Connection.
- In the Navigator, expand the Descriptors node and then ADF META-INF, and double-click maf-application.xml. Then, in the overview editor for the
28.5.3 How to Configure Basic Authentication
As Figure 28-7 shows, you can select the HTTP Basic authentication server type in the Create MAF Login Connection dialog to configure a connection for basic authentication.
Figure 28-7 Configuring Basic Authentication

To configure basic authentication:
- Click the HTTP Basic tab and configure the following, as shown in Figure 28-8.
-
Login URL—Enter the login URL for the login page.
The login URL should not be a login page on the remote server, but rather a page that is secured and presents the HTTP Basic user name/password challenge. The login URL must point to a web resource that does not result in file transfer when requested; it must not point to a file resource.
-
Logout URL—Enter the logout URL for the authentication server.
The logout URL may be the same as the login URL, but alternatively may be a URL to the remote server that performs additional actions on the session, such as invalidating it. The logout URL must point to a web resource that does not result in file transfer when requested; it must not point to a file resource.
Figure 28-8 Configuring Basic Authentication

-
28.5.4 How to Configure OAuth Authentication
As Figure 28-9 shows, you can use the Create MAF Login Connection dialog to configure how third-party applications (clients) gain limited access to protected data or services stored on a remote server. The Relying Party authentication provided by Oracle Mobile and Social server enables an application to authenticate against a third-party OAuth provider. Oracle Web Services Manager (OWSM) Lite Mobile ADF Application Agent injects the cookie into the security header of the web service call.
Figure 28-9 Configuring OAuth

Before you begin:
Configure the server to use the OM_PROP_OAUTH_OAUTH20_SERVER property key.
To configure authentication with an OAuth server:
- Click the OAuth tab and configure the following, as shown in Figure 28-10:
-
Choose the Grant Type to determine where the application obtains the login page. Select Authorization Code when you want the server login page to display. Select Resource Owner Credentials when you want the MAF application to display the default login page, or custom login page, when one is configured.
-
Enter enter the Client Identifier and, optionally, enter a connection password value in the Client Secret field.
-
Enter the authorization server's Redirect Endpoint and the URIs for the endpoints for the Authorization Server Endpoint itself and the Token Endpoint.
-
Enter the Logout URL to redirect to upon user logout. This field is mandatory and the URL parameters are determined by the specific authentication provider.
-
Select Enable Embedded Browser Mode when you want the login page to display within the embedded browser within the application. Deselect to display the login page in an external browser. Note that when single sign-on (SSO) is desired, you must deselect this option to force the application to use the external browser.
Figure 28-10 Configuring the Client ID and Endpoints

-
28.5.5 How to Configure Web SSO Authentication
As Figure 28-11 shows, you can use the Create MAF Login Connection dialog to configure a cross-domain single sign-on.
Figure 28-11 Configuring Federated SSO Authentication

To configure authentication with a Web SSO server:
- Click the Web SSO tab and configure the following URLs that enable successful and unsuccessful logins, as shown in Figure 28-12:
-
Login URL—Enter the URL that when visited, the user will be prompted to enter credentials. The login URL must point to a web resource that does not result in file transfer when requested; it must not point to a file resource.
-
Logout URL—Enter a server side URL that logs out the user by terminating the server session. The logout URL must point to a web resource that does not result in file transfer when requested; it must not point to a file resource.
-
Login Success URL—Enter a target URL to redirect the user to after the user successfully authenticates.
The login success URL can be the same as the login URL. For example, if the login URL and login success URL is
http://www.mysite.com, then when the user points the browser tohttp://www.mysite.com, the browser will redirect to the login page for the site before it redirects upon successful authentication back tohttp://www.mysite.com. Then, when MAF detects the page named by the login success URL, MAF completes the login process and activates the requested feature. Thus, the contents of the login success URL page will not be displayed to the user and user will have access to the MAF feature. -
Login Failure URL—Enter a URL to redirect the user to after unsuccessful authentication. Alternatively, when no failure URL exists, enter any URL.
As the browser loads the login failure URL, MAF first detects the error and returns control to the application. This is useful when the MAF application limits the user to attempt login a maximum number of times. In this case, MAF will redirect user to the login failure URL after the user fails to authenticate by the last allowed attempt.
In the case where no failure URL exists, it is permissible to enter any URL. In this case, authentication will be terminated either when the user clicks the Cancel button in the login page or when login times out due to no user action for a given period of time (the inactivity timeout is two minutes).
Figure 28-12 Configuring the Authentication URLs

-
28.5.6 How to Configure a Placeholder Connection for MAF Application Login
As Figure 28-13 shows, you can use the Create MAF Login Connection dialog to create a named connection during development and populate the login attributes to fully define the connection at runtime. This connection type is particularly useful when the connection attributes are not all known at design time.
Application developers must use AdfmfJavaUtilities.updateSecurityConfigWithURLParameters API to fully define the placeholder connection created at design time, as described in How to Update Connection Attributes of a Named Connection at Runtime.
Figure 28-13 Configuring a Placeholder Connection

To configure a placeholder connection for definition at runtime:
28.5.7 How to Update Connection Attributes of a Named Connection at Runtime
The AdfmfJavaUtilities class provides the overrideConnectionProperty and updateSecurityConfigWithURLParameters methods that application developers can use to to define or to redefine the connection attributes of a connection that already exists: either by placeholder (when you select Specify Values at Runtime in the Create MAF Login Connection dialog) or by a fully populated connection definition. Both methods must be invoked in conjunction with the clearSecurityConfigOverrides and updateApplicationInformation APIs that the AdfmfJavaUtilities class also provides.
The updateSecurityConfigWithURLParameters method updates parameters required for authentication only. Additional parameters that a connection in connections.xml may specify cannot be updated using the updateSecurityConfigWithURLParameters method. Use overrideConnectionProperty to update all the non-authentication parameters as well as all the parameters that can be updated with updateSecurityConfigWithURLParameters.
Note:
The typical timing is to call the AdfmfJavaUtilities.updateSecurityConfigWithURLParameters API in a start() method implementation within an application lifecycle listener. You must not call this method from within the feature lifecycle listener.
To update connection attributes associated with the configUrlParam parameter, call the updatedSecurityConfigWithURLParameters method in conjunction with the other methods shown in the following example:
AdfmfJavaUtilities.clearSecurityConfigOverrides(loginConnectionName);
AdfmfJavaUtilities.updateSecurityConfigWithURLParameters(configUrlParam, key, message, showConfirmation);
// Final step to apply the changes
AdfmfJavaUtilities.updateApplicationInformation(false);
The key parameter is set as a String object from the value defined for the adfCredentialStoreKey parameter in the connections.xml file. Use this key parameter in all references to the configuration, such as subsequent updates. The method may be invoked with the showConfirmation parameter set to true to allow MAF to display a confirmation prompt to the end user once MAF detects a connection configuration change to an existing attribute of the connection.
The string value that you pass to the configUrlParam parameter must be UTF-8 encoded and formatted as follows:
String parameterString = "http://settings?" +
  "&<Parameter Name1>::=<Parameter Value1>" +
  "&<Parameter Name2>::=<Parameter Value2>" +
  ...
  "&<Parameter NameN>::=<Parameter ValueN>";
For example, passing the following values to the configUrlParam parameter:
http://settings?AuthServerType::=HTTPBasicAuthentication
&ApplicationName::=Approvals
&LoginURL::=http://hostname.com:8008/OA_HTML/RF.jsp?function_id=mLogin
&LogoutURL::=http://hostname.com:8008/OA_HTML/RF.jsp?function_id=mLogout
&SessionTimeOutValue::=28800
&IdleTimeOutValue::=7200
&CryptoScheme::=PlainText
Requires you to create a URL as follows:
http://settings?AuthServerType::=HTTPBasicAuthentication&ApplicationName::=Approvals&LoginURL::=http%3A%2F%2Fhostname.com%3A8008%2FOA_HTML%2FRF.jsp%3Ffunction_
id%3DmLogin&LogoutURL::=http%3A%2F%2Fhostname.com%3A8008%2FOA_HTML%2FRF.jsp%3Ffunction_id%3DmLogout&SessionTimeOutValue::=28800&IdleTimeOutValue::=7200&CryptoS
cheme::=PlainText
Note the following additional points about the updateSecurityConfigWithURLParameters and overrideConnectionProperty methods:
-
The
updateSecurityConfigWithURLParametersmethod persists the new configuration immediately whileoverrideConnectionPropertydoes not persist the configuration change until the next time the MAF application uses the login connection. For example, an end user navigates to a feature that is protected by the login connection and MAF shows the login view. -
You can use
overrideConnectionPropertyto reconfigure any top-level properties in a connection reference and connection references not limited to login connections in theconnections.xmlfile. TheupdateSecurityConfigWithURLParametersmethod can be only used to update login connections. -
Calls to
overrideConnectionPropertycalls are cumulative while calls toupdateSecurityConfigWithURLParametersreconfigure previous calls toupdateSecurityConfigWithURLParametersand result in a new login URL each timeupdateSecurityConfigWithURLParametersis called. The following example demonstrates how a sequence ofoverrideConnectionPropertycalls overrides the values of thelogin,logout, andaccessControlproperties for a connection namedMyLoginConnection.AdfmfJavaUtilities.clearSecurityConfigOverrides("MyLoginConnection"); AdfmfJavaUtilities.overrideConnectionProperty("MyLoginConnection", "login", "url", newLoginUrl); AdfmfJavaUtilities.overrideConnectionProperty("MyLoginConnection", "logout", "url", newLogoutUrl); AdfmfJavaUtilities.overrideConnectionProperty("MyLoginConnection", "accessControl", "url", newAccessControlUrl); AdfmfJavaUtilities.updateApplicationInformation(false); -
The second parameter value in
overrideConnectionProperty (String node)is the parameter named used in theconnections.xmlfile. For example, to update the following connection:<Reference name="remotePage" className="oracle.adf.model.connection.url.HttpURLConnection" xmlns=""> <Factory className="oracle.adf.model.connection.url.URLConnectionFactory"/> <RefAddresses> <XmlRefAddr addrType="remotePage"> <Contents> <urlconnection name=" remotePage_urlconnectionName " url="http://www.google.com"/> </Contents> </XmlRefAddr> </RefAddresses> </Reference>You call
overrideConnectionPropertyto change the URL as follows:overrideConnectionProperty("remotePage", "urlconnection", "url", "http://www.oracle.com");This is not the same parameter name as in
updateSecurityConfigWithURLParameters. Follow the URL construction pattern described above when usingupdateSecurityConfigWithURLParameters. Knowledge of the contents of theconnections.xmlfile is not required.
For more information on the oracle.adfmf.framework.api.AdfmfJavaUtilities class and the usage of the configUrlParam parameter, see the Java API Reference for Oracle Mobile Application Framework.
For more information about how to override a connection property value using overrideConnectionProperty, see How to Configure Login Credentials Programmatically Prior to Authentication. The ConfigServiceHandler.java in the ConfigServiceDemo sample application demonstrates how to invoke the overrideConnectionProperty method to override a number of connection properties. For more information about the ConfigServiceDemo sample application, see MAF Sample Applications.
28.5.8 How to Store Login Credentials
When security is not critical, MAF supports storing user credentials, which can be replayed to the login server or used to authenticate users locally (depending on the mode defined for the login connection. Storing credentials enhances the user experience by enabling users to access the MAF application without having to login. The IDM Mobile SDKs enable MAF to support the following modes:
-
remember user name—MAF caches the user name and populates the login page's username field. After the user enters the password and confirms by tapping the login button, MAF replays these credentials to the authentication server.
-
remember credentials—MAF caches the user credentials and populates the login page's user name and password fields. After the user confirms these credentials by tapping the login button, MAF replays them to the authentication server.
-
auto login—MAF caches the user credentials and then replays them to the authentication server during subsequent authentications. In this mode, users can start an application without MAF prompting them to enter or confirm their credentials. MAF can, however, inform users that it has started a new application session.
Note:
Users can decide whether MAF stores their credentials.
As Figure 28-14 shows, you can use the AutoLogin page of the Create MAF Login Connection dialog to select credential storing options. Selecting credential options populates the login page with options to remember the user name and password and should not be selected when a device is shared by multiple end users.
Figure 28-14 Caching User Credentials

28.5.9 What Happens When You Create a Connection for a MAF Application
MAF aggregates all of the connection information in the connections.xml file (located in the Applications window's Application Resources panel under the Descriptors and ADF META-INF nodes). This file, shown in the following example, can be bundled with the application or can be hosted for the Configuration Service. In the latter case, MAF checks for the updated configuration information each time an application starts.
Note:
As a requirement for MAF application authentication, JDeveloper sets the adfCredentialStoreKey attribute to the same name as the login connection reference (for example, Connection_1). When editing the adfCredentialStoreKey attribute or the login connection name in the connections.xml file be sure to set the value to be identical for each. Failure to maintain identical values will result in a MAF runtime exception.
<?xml version = '1.0' encoding = 'UTF-8'?>
<References xmlns="http://xmlns.oracle.com/adf/jndi">
  <Reference name="Connection_1"
             className="oracle.adf.model.connection.adfmf.LoginConnection"
             adfCredentialStoreKey="Connection_1"
             partial="false"
             manageInOracleEnterpriseManager="true"
             deployable="true"
             xmlns="">
      <Factory className="oracle.adf.model.connection.adfmf.LoginConnectionFactory"/>
      <RefAddresses>
         <XmlRefAddr addrType="adfmfLogin">
            <Contents>
               <login url="http://10.0.0.0/SecuredWebServicelogin/login"/>
               <logout url="http://10.0.0.0/SecuredWebServicelogout/logout"/>
               <accessControl url="http://10.0.0.0/Identity/Authorize"/>
                      <isAcsCalledAutomatically value="false"/>
               <idleTimeout value="300"/>
               <sessionTimeout value="28800"/>
               <isMultiTenantAware value="true"/>
               <multiTenantHeaderName value="Oracle_Multi_Tenant"/>
                       <injectCookiesToRESTHttpHeader value="true"/>
               <userObjectFilter>
                  <role name="manager"/>
                  <privilege name="account manager"/>
                  <privilege name="supervisor"/>
                  <privilege name=""/>
               </userObjectFilter>
               <rememberCredentials>
                    <enableRememberUserName value="true"/>
                    <rememberUserNameDefault value="true"/>
                    <enableRememberPassword value="true"/>
                    <rememberPasswordDefault value="true"/>
                    <enableStayLoggedIn value="true"/>
                    <stayLoggedInDefault value="true"/>
               </rememberCredentials>
            </Contents>
         </XmlRefAddr>
      </RefAddresses>
   </Reference>
</References>
For more information, see the "Lookup Defined in the connections.xml File" section in Developing Fusion Web Applications with Oracle Application Development Framework.
28.5.10 What Happens When You Create a Multi-Tenant Aware Connection
After you complete the Create MAF Login Connection dialog with the Multi-Tenant Aware option enabled, MAF populates the connections.xml file with the <isMultiTenantAware> element set to true. In multi-tenant connection, the user name is the aggregation of tenant name and user name.
The login page uses a JavaScript utility to discern if a connection is multi-tenant aware. If the login page detects such a connection, it provides an additional field that requires the user to enter the tenant name configured in the Create MAF Login Connection, as shown in Figure 28-5. After a successful login (which includes entering the correct tenant ID), MAF stores the tenant ID in the local credential store.
28.5.11 What You May Need to Know About the Login Connection Configuration
When you define the login URL to grant access to secured MAF features, either in the connections.xml file or programmatically, the login URL must not point to a file resource, such as mydocument.txt. The login URL must point to a web resource that does not result in file transfer when requested. If a file resource is used instead, the MAF application may hang or login will fail, thus preventing the user from accessing the secured MAF feature.
28.5.12 What You May Need to Know About Login Connections and Containerized MAF Applications
In order to use the Oracle Mobile Security Suite (OMSS) AppTunnel feature to access corporate resources, the Mobile Security Access Server (MSAS) instance must be configured to proxy the URI or endpoint used by the MAF application to access the resources. For more information, see the "Managing Mobile Security Access Server Applications" and "Configuring a Mobile Security Access Server Instance" chapters in Administering Oracle Mobile Security Access Server.
Note that HTTP Basic authentication is supported by OMSS but the MAF login page will not be suppressed by the OMSS authentication process and therefore will require the user to authenticate two times.
For more information about authentication in containerized MAF applications, see Overview of the Authentication Process for Containerized Applications.
28.5.13 What You May Need to Know About Multiple Identities for Local and Hybrid Login Connections
Like a remote connection, local and hybrid login connection modes allow a user to log in and log out using any number of identities within an application lifecycle. When you define a login connection to use these connectivity modes, you enable users to log back into a secured application feature using the local credential store if they have previously logged into a secured application feature within the current session timeout duration. In this case, users who have logged out explicitly, or have been logged out because the idle timeout has expired, can log back into a secured application feature (or any other application feature secured by the login server that protects that application feature).
Note:
Local and hybrid connections are only available for basic authentication and authentication to Oracle Access Management Mobile and Social (OAMMS). Because OAuth and Federate SSO use remote authentication, application users cannot log back into an application unless they authenticate successfully.
28.5.14 What You May Need to Know About Migrating a MAF Application and Authentication Modes
When you migrate a MAF application, you must verify that the authentication mode defined in maf-feature.xml (such as <adfmf:feature id="feature1" name="feature1" credentials="remote">) is defined by the authenticationMode attribute in the connections.xml file. Use JDeveloper's audit rules, which detect the presence of the credentials attribute, to assist you in removing it from maf-feature.xml.
Because the authenticationMode attribute in the connections.xml file can only be defined as either remote or local, do not migrate the value of none (<adfmf:feature id="feature1" name="feature1" credentials="none">), as doing so causes the deployment to fail.
28.5.15 What You May Need to Know About Custom Headers
After you complete the Create MAF Login Connection dialog with custom headers defined, MAF populates the connections.xml file with the customAuthHeaders element and individual header subelements.
If the value of the custom headers is to be supplied at runtime, the MAF application can use the OverrideConnectionHandler API in the oracle.adfmf.framework.api.AdfmfJavaUtilities class to configure header values. The oracle.adfmf.framework.api.AdfmfAuthConnection class provides convenience methods to access the connection.xml XML elements and retrieve the most recent value when they have been overridden. For information about using the API to configure headers, see How to Configure Login Credentials Programmatically Prior to Authentication.
After a successful login (which includes entering the correct header values), MAF stores the header details in the local credential store, and allows secure calls, such as those made to REST services, to include custom headers on the HTTP Request.
28.5.16 What Happens at Runtime: When MAF Calls a REST Web Service
After a user is authenticated locally, MAF silently authenticates the user against the login server when the MAF application calls a REST web service. After the user's credentials are authenticated, MAF executes the application's request to the REST web service. If the REST web service returns a 401 status code (Unauthorized), MAF prompts the user to authenticate again. If the REST web service returns a 302 code (Found or temporarily moved), MAF checks the login server to confirm if the user is authenticated. If so, then the code is handled as a 302 redirect.
If the user has not been authenticated against the login server, then MAF prompts the user to authenticate again. In some cases, a login server may prompt users to authenticate using its own web page when it returns a 302 status code. MAF does not support redirection in these instances and instead prompts the user to login again using a MAF login page.
28.5.17 What You May Need to Know About Injecting Basic Authentication Headers
MAF enables application features to access secure resources by injecting a basic authentication header into the HTTP requests made by the web view in an application feature. This is useful in situations where a remote web resource is protected by basic authentication and cookies are not sufficient for authentication, or the server does not honor cookies at all. Specify a requesting realm in the Realm input field of the Create MAF Login Connection dialog's Authorization tab if known at the time of development. If not known at the time of development, the requesting realm can be modified using AdfmfJavaUtilities.overrideConnectionProperty at runtime.
The following example shows the entry that appears in the connections.xml file when you specify a value in the Realm input field (realm element).
<?xml version = '1.0' encoding = 'UTF-8'?>
<References xmlns="http://xmlns.oracle.com/adf/jndi">
   <Reference name="connection1"
              className="oracle.adf.model.connection.adfmf.LoginConnection"
              adfCredentialStoreKey="connection1"
              partial="false" manageInOracleEnterpriseManager="true"
              deployable="true" xmlns="">
      <Factory className=
                     "oracle.adf.model.connection.adfmf.LoginConnectionFactory"/>
      <RefAddresses>
         <XmlRefAddr addrType="adfmfLogin">
            <Contents>
               <login url="http://www.us.example.com/userInfo"/>
               <logout url="http://www.us.example.com/userInfo"/>
               <accessControl url="http://10.0.0.0/identity/authorize"/>
               <idleTimeout value="300"/>
               <sessionTimeout value="28800"/>
               <cookieNames/>
               <realm value="Secure Area"/>
               <userObjectFilter/>
            </Contents>
         </XmlRefAddr>
      </RefAddresses>
   </Reference>
</References>
28.5.18 What You May Need to Know About Web Service Security
There are no login pages for web services; user access is instead enabled by MAF injecting credentials into the header of the web service call. Web services gain access to application data using the locally stored credentials persisted by MAF after the user's first successful login to the authentication server.
The name of the local credential store is reflected by the adfCredentialStoreKey attribute of the login server connection (such as adfCredentialStoreKey="Connection_1" in What Happens When You Create a Connection for a MAF Application). To enable a web service to use this credential store, the name defined for the adfCredentialStoreKey attribute of a REST web service connection must match the name defined for the login server's adfCredentialStoreKey attribute. When editing the adfCredentialStoreKey attribute or the login connection name in the connections.xml file be sure to set the value to be identical for each. Failure to maintain identical values will result in a MAF runtime exception.
Note:
Because there is no overview editor for the connections.xml file, you can use the Properties window to update the <Reference> element's adfcredentialStoreKey attribute with the name configured for adfCredentialStoreKey attribute of the login server connection. Alternatively, you can add or update the attribute using the Source editor.
For more information, see What You May Need to Know About Credential Injection.
28.5.19 How to Configure Access Control
Access Control Service (ACS) is a RESTful web service with JSON that may be optionally deployed onto an external server that is separate from your MAF application. Typically, you provide the ACS service for your MAF application to consume when your application features contain secured components and you want to allow users to download their user roles and privileges through a single HTTP POST message. If you intend to provide this service with your application, then you must implement and host the ACS service; MAF does not provide this service. Figure 28-15 shows the Authorization page of the Create MAF Login Connection dialog that you would use to configure the MAF application to support access control.
Figure 28-15 Configuring Access Control

The access control granted by the application login server is based on the evaluation of the user.roles and user.privileges constraints configured for an application feature, as described in About User Constraints and Access Control. For example, to allow only a user with manager_role role to access an application feature, you must define the <adfmf:constraints> element in the maf-feature.xml file with the following:
<adfmf:constraint property="user.roles"
                  operator="contains"
                  value="manager_role"/>
</adfmf:constraints>
At the start of application, the RESTful web service known as the Access Control Service (ACS) is invoked for the application login server connection and the roles and privileges assigned to the user are then fetched. MAF then challenges the user to login against the application login server connection.
MAF evaluates the constraints configured for each application against the retrieved user roles and privileges and makes only the application features available to the user that satisfy all of the associated constraints.
To configure access control:
28.5.20 What You May Need to Know About the Access Control Service
The Access Control Service (ACS) is a RESTful web service with JSON that enables users to download their user roles and privileges through a single HTTP POST message. This is a request message, one which returns the roles or privileges (or both) for a given user. It can also return specific roles and privileges by providing lists of required roles and privileges. The request message is comprised of the following:
-
Request header fields:
If-Match,Accept-Language,User-Agent,Authorization,Content-Type,Content Length. -
A request message body (a request for user information).
-
The requested JSON object that contains:
-
userId—The user ID. -
filterMask—A combination of"role"and"privilege"elements are used to determine if either the filters for user roles, or for privileges, should be used. -
roleFilter—A list of roles used to filter the user information. -
privilegeFilter—A list of privileges used to filter the user information.
-
Note:
If all of the roles should be returned, then do not include the "role" element in the filterMask array.
If all of the privileges should be returned, then do not include the "privilege" element in the filterMask array.
The following example illustrates an HTTP POST message and identifies a JSON object as the payload, one that requests all of the filters and roles assigned to a user, John Smith.
Protocol: POST
Authoization: Basic xxxxxxxxxxxx
Content-Type: application/json

{
        "userId": "johnsmith",
        "filterMask": ["role", "privilege"],
        "roleFilter": [ "role1", "role2" ],
        "privilegeFilter": ["priv1", "priv2", "priv3"]
}
The response is comprised of the following:
-
A response header with the following fields:
Last-Modified,Content-Type, andContent-Length. -
A response message body that includes the user information details.
-
The returned JSON object, which includes the following:
-
userId—the ID of the user. -
roles—A list of user roles, which can be filtered by defining theroleFilterarray in the request. Otherwise, the response returns an entire list of roles assigned to the user. -
privileges—A list of the user's privileges, which can be filtered by defining theprivilegeFilterarray in the request. Otherwise, the response returns an entire list of privileges assigned to the user.
-
The following example illustrates the returned JSON object that contains the user name and the roles and privileges assigned to the user, John Smith.
Content-Type: application/json

{
        "userId": "johnsmith",
        "roles": [ "role1" ],
        "privileges": ["priv1", "priv3"]
}
Note:
There are no login pages for web services; user access is instead enabled by MAF, which automatically adds credentials to the header of the web service. For more information, see What You May Need to Know About Credential Injection.
Note:
You must implement and host the ACS service; MAF does not provide this service.
28.5.21 How to Alter the Application Loading Sequence
MAF invokes the Access Control Service (ACS) after a user successfully authenticates against a login connection that defines the ACS endpoint, such as http://10.0.0.0/Identity/Authorize in Figure 28-15. By changing this behavior to prevent the ACS from being called immediately after a successful login, you can insert a custom process between the login and the invocation of the ACS. This additional logic may be a security context called by MAF after a successful login that is based on the specifics of an application, or related to the user's responsibilities, organization, or security group.
You can change the sequence by updating the connections.xml file with <isAcsCalledAutomatically value = "false"/> and through the following method of the AdfmfJavaUtilities class, which enables MAF application features to call the ACS whenever it is required:
invokeACS(String key, String OptionalExtraPayLoad, boolean appLogin)
The invokeACS method enables you to inject extra payload into an ACS request. The key parameter is returned as a String object from the value defined for the adfCredentialStoreKey parameter in the connections.xml file, as illustrated in What You May Need to Know About Injecting Basic Authentication Headers. The appLogin parameter may be set to true to cause ACS to reevaluate the feature access. The OptionalExtraPayLoad parameter is reserved for future use and is not used.
Invoking ACS through either the invokeACS method or the isAcsCalledAutomatically parameter retrieves the role-based constraints for an application.
Note:
MAF automatically invokes the ACS after a successful login if <isAcsCalledAutomatically value = "false"/> is not included in the connections.xml file.
When a secured application feature calls the invokeACS method, MAF fetches the user constraints for all of the application features associated with the application login connection, including those configured for the secured application feature. When an unsecured application feature calls this method, MAF only retrieves the constraints associated with the login connection.
Note:
In addition to the invokeACS method, the AdfmfJavaUtilities class includes the following lifecycle methods:
-
applicationLogout—Logs out the application login connection. -
featureLogout(<feature_ID>)—Logs out the login connection associated with the application feature.
For more information, see the Java API Reference for Oracle Mobile Application Framework.
28.5.22 How to Configure Login Credentials Programmatically Prior to Authentication
Before the MAF application invokes the login connection to authenticate the user, it is possible to set connection values programmatically. This technique is often required, for example, when custom header names are defined in the Create MAF Login Connection dialog but the values are to be supplied at runtime. To programmatically configure the connection details, the MAF application can invoke the OverrideConnectionHandler API in the oracle.adfmf.framework.api.AdfmfJavaUtilities class. The API overrides the current connection property value with a new value and allows the application to initiate login with the overridden values.
To override the connection values programmatically, the general process entails:
-
Obtaining the names of the XML elements that define the properties to override from the
connections.xmlfile. -
Obtaining the override value prior to authentication. For example, the MAF application may define an AMX page to solicit the values from the end user for this purpose.
-
Invoking a managed bean that implements the override methods (one for each connection property override) and defines connection property getter and setter methods. For example, in the case of an AMX page, a command button that the end user clicks may submit their entered values on the managed bean.
To specify connection property overrides, examine the connections.xml file to obtain the following XML element definitions:
-
The connection reference name. For example,
ConnWithCustomHeader. -
The XML element name of the property that defines the attribute to override. For example
multiTenantSchemefor the scheme used to propagated a tenant domain name. -
The XML subelement name of the property’s attribute to override. In the case of unique connection properties, this is always the value element.
Note:
In the case of custom headers, do not use the XML elements header and value since all custom header definitions use the same element names to specify values. Instead, for custom headers use Contents and customAuthHeaders for the property and attribute to pass to the override method, respectively.
Obtain XML Element Names
For example, to override the value of custom headers, in the following connections.xml file you would pass the connection name ConnWithCustomHeader, the Contents element, and the customAuthHeaders subelement, which defines the header name / value pairs:
package mobile;

<References xmlns="http://xmlns.oracle.com/adf/jndi">
  <Reference name="ConnWithCustomHeader"
             className="oracle.adf.model.connection.adfmf.LoginConnection"
             adfCredentialStoreKey="ConnWithCustomHeader" partial="false"
             manageInOracleEnterpriseManager="true"
             deployable="true" xmlns="">
    <Factory className="oracle.adf.model.connection.adfmf.LoginConnectionFactory"/>
    <RefAddresses>
      <XmlRefAddr addrType="adfmfLogin">
        <Contents>
          ...
          <isMultiTenantAware value="true"/>
          <multiTenantScheme value="custom_header"/>
          <multiTenantHeaderName value="X-ID-TENANT-NAME"/>
          <customAuthHeaders>
            <header name="State" value="Georgia"/>
            <header name="City" value="Atlanta"/>
          </customAuthHeaders>
          ...
        </Contents>
      </XmlRefAddr>
    </RefAddresses>
  </Reference>
Obtain Override Values
To perform the connection value override at runtime, the MAF application may solicit the values with a default unsecured feature that invokes an AMX page with prompts for the values and a command button to submit the values. The following sample shows the command button defines an action listener that triggers the override method in a managed bean:
<?xml version="1.0" encoding="UTF-8" ?>
<amx:view xmlns:xsi="http://www.w3.org/2001/XMLSchema-instance"
          xmlns:amx="http://xmlns.oracle.com/adf/mf/amx"
          xmlns:dvtm="http://xmlns.oracle.com/adf/mf/amx/dvt">
  <amx:panelPage id="pp1">
    <amx:facet name="header">
      <amx:outputText value="Home" id="ot1"/>
    </amx:facet>
    <amx:facet name="primary">
      <amx:commandButton id="cb1"/>
    </amx:facet>
    <amx:facet name="secondary">
      <amx:commandButton id="cb2"/>
    </amx:facet>
    <amx:inputText label="Name1" id="it1" value="#{applicationScope.OverrideBean.headerName1}"/>
    <amx:inputText label="Value1" id="it2" value="#{applicationScope.OverrideBean.headerValue1}"/>
    <amx:inputText label="Name2" id="it3" value="#{applicationScope.OverrideBean.headerName2}"/>
    <amx:inputText label="Value1" id="it4" value="#{applicationScope.OverrideBean.headerValue2}"/>
    <amx:inputText label="TenantHeader" id="it5"
                                           value="#{applicationScope.TestBean.tenantHeaderName}"/>
    <amx:inputText label="Scheme" id="it6" value="#{applicationScope.OverrideBean.scheme}"/>
    <amx:commandButton text="Override headers" id="cb3"
                               actionListener="#{OverrideBean.overrideAndGotoOverrideFeature}"/>
  </amx:panelPage>
</amx:view>
Override the Connection Properties
To override the connection property values programmatically, the managed bean implements the override method for each connection property override. Note that in the following sample a headers HashMap is created to pass in the custom header values. The map is only necessary for custom headers that you want to override since the values of other properties (like MultiTenantHeaderName) are uniquely defined by the XML elements of the connections.xml definition.
package mobile;

import oracle.adfmf.amx.event.ActionEvent;
import oracle.adfmf.framework.api.AdfmfJavaUtilities;
import oracle.adfmf.java.beans.PropertyChangeListener;
import oracle.adfmf.java.beans.PropertyChangeSupport;

import java.util.HashMap;

public class OverrideBean {

    private String headerName1 = "", headerName2 = "", headerValue1 = "", headerValue2 = "";
    private String tenantHeaderName = "";
    private String scheme = "";

    // Bean setter and getter methods omitted for brevity
    ...

    // Command button action listener invokes override method implementation
    public void overrideAndGotoOverrideFeature(ActionEvent e) {
        overrideAndGotoOverrideFeature();
    }

    // Override method implementation configures custom headers and other connection properties
    public void overrideAndGotoOverrideFeature()
    {
      AdfmfJavaUtilities.clearSecurityConfigOverrides("ConnWithCustomHeader");
      HashMap<String, String> headers = new HashMap<String, String>();
      headers.put(headerName1, headerValue1);
      headers.put(headerName2, headerValue2);
      AdfmfJavaUtilities.overrideConnectionProperty("ConnWithCustomHeader", "Contents",
                                                      "customAuthHeaders", headers);
      AdfmfJavaUtilities.overrideConnectionProperty("ConnWithCustomHeader",
                                                      "multiTenantHeaderName", "value",
                                                      tenantHeaderName);
      AdfmfJavaUtilities.overrideConnectionProperty("ConnWithCustomHeader", "multiTenantScheme",
                                                      "value", scheme);
      AdfmfJavaUtilities.updateApplicationInformation(false);

    }

    public void addPropertyChangeListener(PropertyChangeListener l) {
        propertyChangeSupport.addPropertyChangeListener(l);
    }

    public void removePropertyChangeListener(PropertyChangeListener l) {
        propertyChangeSupport.removePropertyChangeListener(l);
    }
}
28.6 Configuring Security for MAF Applications
You configure security using the overview editors for the maf-feature.xml and maf-application.xml files, as well as the Create MAF Login Connection dialog. The overview editors enable you to designate the type of login page (default or custom) that MAF presents to users when they select application features that require authentication or to include user role- or user privilege-based constraints. They also enable you to select which embedded application features require security.
28.6.1 How to Enable Application Features to Require Authentication
You can define each application feature to participate in security. You perform the security configuration using the Security page of the maf-application.xml overview editor.
The maf-feature.xml overview editor, shown in Figure 28-16, enables you to designate which application features participate in security.
Figure 28-16 Designating User Credentials Options for an Application Feature

Before you begin:
When you enable security for a feature, the application requires access the network to authenticate the user. For more information about granting the application access to network sockets, see Enabling a Core Plugin in Your MAF Application.
To designate user access for an application feature:
28.6.2 How to Designate the Login Page
After you designate security for the application features, you use the Security page of the maf-application.xml overview editor, shown in Figure 28-17, to configure the login page as well as create a connection to the login server and assign it to each of the application features that participate in security. All of the application features listed in this page have been designated in the maf-feature.xml file as requiring security.
Typically, a group of application features are secured with the same login server connection, enabling users to open any of these applications without MAF prompting them to login again. In some cases, however, the credentials required for the application features can vary, with one set of application features secured by one login server and another set secured by a second login server. To accommodate such situations, you can define any number of connections to a login server for a MAF application. In terms of the maf-application.xml file, the authentication server connections associated with the feature references are designated using the loginConnRefId attribute as follows:
<adfmf:featureReference refId="feature1" loginConnRefId="BasicAuthentication"/>
<adfmf:featureReference refId="feature2" loginConnRefId="OAMMS"/>
MAF applications can be authenticated against any standard login server that supports basic authentication over HTTP or HTTPS. MAF also supports authentication against Oracle Identity Management. You can also opt for a custom login page for a specific application feature. For more information, see What You May Need to Know About Login Pages.
Note:
By default, all secured application features share the same connection, which, as shown in Figure 28-17, is denoted as <application login server>. The Properties window for a Feature Reference notes this default option in its Login Server Connection drop-down menu as <default> (application login server). You can select other connections that are defined for the MAF application using the Create MAF Login Connection dialog.
Figure 28-17 The Security Page of the maf-application.xml Overview Editor
Before you begin:
If the MAF application uses a custom login page, add the file to the public_html directory of the application controller project (JDeveloper\mywork\Application\ApplicationController\public_html) to make it available from the Web Content node in the Application Navigator, as shown in Figure 28-18. See also How to Create a Custom Login HTML Page and What You May Need to Know About Selecting External Resources .
Add constraints for user privileges and roles, as described in About User Constraints and Access Control.
Provision an Access Control Service (ACS) server. For more information, What You May Need to Know About the Access Control Service.
Figure 28-18 Adding a Custom Login Page

To designate the login page:
28.6.3 How to Create a Custom Login HTML Page
You can create the custom login page by modifying the default login page, adf.login.html, artifacts generated by the MAF deployment in the www directory.
Before you begin:
To access the login page within the www directory, deploy a MAF application and then traverse to the deploy directory. For iOS deployments, the pages are located at the following:
application workspace directory/deploy/deployment profile name/temporary_xcode_project/www/adf.login.html
For Android deployments, the page is located within the Android application package (.apk) file at the following:
application workspace directory/application name/deploy/deployment profile name/deployment profile name.apk/assets/www/adf.login.html
To create a custom login page:
- Copy the default login page to a location within the user interface project's
public_htmldirectory, such asJDeveloper\mywork\application name\ApplicationController\public_html. - Rename the login page.
- Update the page.
- In the Security page for the overview editor of the
maf-application.xmlfile, select Custom and then click Browse to retrieve the location of the login page.
28.6.4 What You May Need to Know About Login Pages
The entry point for the authentication process to an application feature is the activate lifecycle event, described at Using Lifecycle Listeners in MAF Applications . Every time an application feature is activated (that is, the activate event handler for the application feature is called), the application feature login process is executed. This process navigates to the login page (which is either the default or a custom login page) where it determines if user authentication is needed. Before the process navigates to the login page, however, the originally intended application feature must be registered with MAF. When authentication succeeds, the login page retrieves the originally intended destination from MAF and navigates to it.
28.6.4.1 The Default Login Page
The default login page provided by MAF is comprised of a login button, input text fields for the user name, password, and, optionally, multi-tenant name, and an error message section. This is a cross-platform page, one written in HTML. Figure 28-19 shows a default login page with the multi-tenant aware option enabled at design time to solicit the domain name of the tenant, in addition to the user name and password.
Figure 28-19 The Default Login Page with Multi-Tenant Domain Field
28.6.4.2 The Custom Login Page
When you add a custom login page for a selected application feature using the overview editor for the maf-application.xml file, JDeveloper adds the <adfmf:login> element and populates its child <adfmf:LocalHTML> element, as shown in the following example. As with all <adfmf:LocalHTML> elements, its url attribute references a location within the public_html directory. The user authentication mechanism and navigation control are identical to the default login page.
<adfmf:login defaultConnRefId="Connection_1">
    <adfmf:localHTML url="newlogin.html"/>
</adfmf:login>
Custom login pages are written in HTML. The fields for the login page must include specifically defined <input> and <label> elements.
Tip:
Use the default login pages that are generated when you deploy a MAF application as a guide for creating custom login pages. To access the login pages within the www directory, deploy a MAF application and then traverse to the deploy directory, as described in How to Create a Custom Login HTML Page.
The following example illustrates the required <input> and <label> elements for a default login page.
<input type="text"
       autocorrect="off"
       autocapitalize="none"
       name="oracle_access_user_id"
       id="oracle_access_user_id" value="">
   </input>

<input type="text"
       autocorrect="off"'
       autocapitalize="none"
       name="oracle_access_iddomain_id"
       id="oracle_access_iddomain_id" value="">
   </input>

<input type="password"
       name="oracle_access_pwd_id"
       id="oracle_access_pwd_id" value="">
   </input>

<input type="checkbox"
       class="message-text"
       name="oracle_access_auto_login_id"
       id="oracle_access_auto_login_id">
   </input>Keep me logged in

<input type="checkbox"
       class="message-text"
       name="oracle_access_remember_username_id"
       id="oracle_access_remember_username_id">
   </input>Remember my username

<input type="checkbox"
       class="message-text"
       name="oracle_access_remember_credentials_id"
       id="oracle_access_remember_credentials_id">
   </input>Remember my password

<label id="oracle_access_error_id"
       class="error-text">
   </label>

<input class="commandButton"
       type="button"
       onclick="oracle_access_sendParams(this.id)"
       value="Login" id="oracle_access_submit_id"/>
28.6.5 What You May Need to Know About Login Page Elements
Every HTML login page should include the user interface elements listed in Table 28-2.
Table 28-2 Login Page Fields and Their Associated IDs
| Page Element | ID |
|---|---|
|
username field |
|
|
password field |
|
|
login button |
|
|
cancel button |
|
|
identity domain/tenant name field |
|
|
error field |
|
|
auto login check box |
|
|
remember credentials check box |
|
|
remember username check box |
|
Table 28-3 lists the recommended JavaScript code used by the OnClick event.
Table 28-3 JavaScript Used by the OnClick Event
| Button | JavaScript |
|---|---|
|
login button |
|
|
cancel button |
|
28.6.6 What Happens in JDeveloper When You Configure Security for Application Features
After an application feature has been designated to participate in security, JDeveloper updates the Features With Security Enabled table with a corresponding feature reference, as shown in **INTERNAL XREF ERROR**. If each of the referenced application features authenticate against the same login server connection defined in the connections.xml file, JDeveloper updates the maf-application.xml file with a single <adfmf:login> element defined with a defaultConnRefId attribute (such as <adfmf:login defaultConnRefId="Connection_1">).
For application features configured to use different login server connections defined in the connections.xml file JDeveloper updates each referenced application feature with a loginConnReference attribute (<adfmf:featureReference refId="feature2" loginConnRefId="Connection2"/>). For more information, see How to Enable Application Features to Require Authentication. See also the Tag Reference for Oracle Mobile Application Framework.
28.7 Allowing Access to Device Capabilities
Access to device capabilities is defined by the Cordova plugins that are included in the MAF application. A set of core plugins are provided by MAF. Enabling one of these plugins enables any device access permissions that the application requires. Any additional Cordova plugins that you include in your MAF application will also enable the device access permissions required.
Because the vast majority of MAF applications require network access, permission to access the network is enabled by default (the only device capability that is enabled by default):
-
Network Information—Allows the application to open network sockets. You must leave the network access capability enabled when security is enabled for at least one device feature.
Because you can enable or restrict device capabilities, the various platform-specific configuration files and manifest files that are updated by the deployment framework list only the device capabilities in use (or rather, the plugins that the MAF application is registered to use). These files enable MAF to share information about the use of these capabilities with other applications. For example, a MAF application can report to the AppStore or to Google Play that it does not use location-based capabilities (even though MAF applications have this capability).
For more information about Cordova plugins in MAF applications, see Using Plugins in MAF Applications .
You can prevent selected application features within a MAF application from accessing the native container, and by extension, the device capabilities that the MAF application can access. For example, your MAF application includes an application feature that references remote content from a web application that you do not trust (Remote URL content application feature). In this scenario, you prevent this specific application feature from accessing the native container, as shown in the following example:
<adfmf:featureReference refId="remoteAppfeature1" id="fr1" allowNativeAccess="false"/>
The default value of the allowNativeAccess property is true.
28.8 Enabling Users to Log Out from Application Features
MAF does not terminate application features when a user logs out of one that contains secured content or is restricted through constraints; a user can remain within the application and access its unsecured content and features as an anonymous user. Because MAF enables constraints to be re-initialized, it allows a user to login to an application repeatedly using the same identity. It also enables multiple identities to share the access to the application by allowing the user to login using different identities.
The logoutFeature and logout methods of the AdfmfJavaUtilities class, described in the Java API Reference for Oracle Mobile Application Framework, enable users to explicitly login and logout from the authentication server after launching an application. In addition, they enable a user to login to the authentication server after the user invokes a secured application feature. Although a user can log out from individual application features, a user will be simultaneously logged out of application features secured by the same connection.
These methods enable users to perform the following the following:
-
out of an application feature but continuing to access its unsecured content (that is, MAF does not terminate the application).
-
Authenticate with the login server while in an application to enable its secured content and UI components.
-
Log out of a MAF application or application feature and then logging in again using a different identity.
-
Log out of a MAF application or application feature and then logging in again using the same identity but with updated roles and privileges.
To enable logging out of the current authentication server, call the logout method of the AdfmfJavaUtilities class as follows. For example:
import oracle.adfmf.framework.api.AdfmfJavaUtilities;
...
   AdfmfJavaUtilities.logout();
To enable logging from the authentication server associated with the key parameter, call the logoutFeature method as follows:
import oracle.adfmf.framework.api.AdfmfJavaUtilities;
...
   AdfmfJavaUtilities.logoutFeature(adfCrendentialStorykey);
The adfCredentialStorykey parameter is returned as a String object from the value defined for the adfCredentialStoreKey parameter in the connections.xml file. For more information on the AdfmfJavaUtilties class and the usage of the key parameter, see the Java API Reference for Oracle Mobile Application Framework.
28.9 Using MAF Authentication APIs
MAF provides a number of authentication classes that include APIs to assist you with authentication-related tasks in your MAF application.
These APIs reside in the authentication classes of the oracle.maf.api.authentication package. Examples include the AuthenticationHandler, AuthenticationPlatform, and AuthenticationUtility classes.
Tasks that you can perform by implementing these APIs include processing for a logged-in user before the user accesses a secured application. You can, for example, retrieve authorization header information and use the information to determine what content an end user navigates to upon a successful login. AuthenticationPlatform also provides an addLogoutCallback API that you can implement to perform some processing once an end user logs out from a secured application feature. Use of this callback API may be useful in scenarios where your end users share a device. For more information about these authentication classes, see the Java API Reference for Oracle Mobile Application Framework.
The following example shows snippets of code from an implementation class where an instance of AuthenticationPlatform gets the authorization header information using its getToken() API.
Example 28-1 Getting the Authorization Header from the Authentication Platform
import oracle.maf.api.authentication.AuthenticationPlatform;
import oracle.maf.api.authentication.AuthenticationUtility;
…
AuthenticationPlatform ap = AuthenticationUtility.getInstance().lookupByCredentialStoreKey("credentialStoreKey");
String authorization = ap.getToken("Authorization");
…
28.10 Creating Certificates to Access Servers That Use Self-Signed Certificates for SSL
MAF provides a cacerts certificate file, the Java mechanism for HTTPS handshakes between the client application and the server. JDeveloper creates this file within the Application Resources Security folder (located at JDeveloper\mywork\application name\resources\Security\cacerts ). The MAF cacerts file identifies a set of certificates from well-known and trusted sources to the JVM and enables deployment.
You need to add private certificates to the MAF cacerts file when your application has to access server resources where the server uses a self-signed certificate. You also need to add a private certificate if your application requires custom certificates, such as cases where RSA cryptography is not used. Add a private certificate before you deploy the application.
Before you begin:
It may be helpful to have an understanding of the contents of the cacerts file. For more information, see the "Migrating to New cacerts Files for SSL in MAF" section in Installing Oracle Mobile Application Framework.
You may also find it helpful to understand how JDeveloper creates the cacerts file. For more information, see About the Application Controller Project-Level Resources.
Refer to Java SE Technical Documentation (https://download.oracle.com/javase/index.html) for information on the cacerts file and how to use the keytool utility.
To add private certificates:
-
Create a private certificate. For example, create a certificate file called
new_cert. -
Add the private certificate to the application as follows:
-
Create a copy of the seeded
cacertsfile (cp cacerts cacerts.org). -
Use the Java SE keytool utility to add certificates to a
cacertsfile. The following example illustrates adding a single certificate to acacertsfile callednew_cert.keytool -importcert -keystore cacerts -file new_cert -storepass changeit -nopromptRepeat this procedure for each certificate. Table 28-4 lists the keytool options
Table 28-4 Options For Adding Certificates
Option Description -importcertImports a certificate.
-keystorecacerts fileIdentifies the file location of the imported certificate.
-filecertificate fileIdentifies the file containing the new certificate.
-storepass changeitProvides a password for the
cacertsfile. By default, the password is changeit.-
nopromptInstructs the keytool not to ask the user (through
stdin) whether to trust the certificate or not. -
Visually inspect the contents of the new
cacertsfile to ensure that all of the fields are correct. Use the following command:keytool -list -v -keystore cacerts | more
-
Verify that the certificate is for the given hostname.
Note:
The certificate's common name (CN) must match the hostname exactly.
-
Ensure that the customized certificate file is located within the
Securitydirectory (JDeveloper\mywork\application name\resources\Security) so that it can be read by the JVM.
-
-
Deploy the application.
Note:
During deployment, if a certificate file exists within the
Securitydirectory, MAF copies it into the Android or Xcode template project, replacing any default copies of thecacertsfile. -
Validate that you can access the protected resources over SSL.
28.11 Configuring a MAF Application to Enable Two-Way SSL for Authentication
MAF application end users can install digital certificates (client certificate) into their application’s keystore to enable authentication using a process known variously as two-way SSL, mutual authentication or two-way authentication.
Once the end user installs a client certificate into the application’s keystore, the MAF application can present it to a server so that a two-way SSL communication session is used to perform authentication between the client and the server.
To implement this functionality, you need to register the client certificate file extension in your application. Doing this enables the MAF application to open and install the certificate when the end user opens the client certificate file after downloading it to their device. If the MAF application is the only application on the device to register the client certificate file extension, it will be the application that the device’s operating system proposes to the end user to open the certificate. If other applications register the file extension, the device’s operating system presents a list of applications from which your end user must choose the MAF application.
Administrators can distribute client certificates to MAF application end users by email attachment or by hosting the certificate in a location from which the end user can download it using a URL.
The iOS platform does not permit third party applications to open files with the default extension for client certificates (.p12). To work around this restriction, you (the application developer) must register an alternative certificate extension (for example, .cert). Administrators who distribute the certificates can rename the client certificate files to use the alternative extension so that the MAF application end user can open the client certificate directly from the email attachment or URL used to distribute the client certificate.
How to Configure a MAF Application to Enable Two-Way SSL
You register the client certificate file extension in your application by entering the file extension in the Client SSL Certificate Extension field on the Application page of the maf-application.xml file’s overview editor.
To configure a MAF application to enable two-way SSL:
-
In the Applications window, expand the Application Resources panel.
-
In the Application Resources panel, expand Descriptors and then ADF META-INF.
-
Double-click the maf-application.xml file and in the overview editor that appears, click the Application navigation tab.
-
In the Application page, enter the file extension in the Client SSL Certificate Extension field.
What Happens When You Configure a MAF Application to Enable Two-Way SSL
JDeveloper writes the value that you enter in the Client SSL Certificate Extension field to the maf-application.xml file, as shown in Example 28-2.
At runtime, the end user downloads the client certificate to the device from the location where the administrator put the certificate or opens it automatically from an email attachment. The download behavior from a server location depends on the operating system of the end user’s device. For example, a MAF application end user with an Android device downloads the certificate to Android’s Download directory. Once downloaded, the end user extracts (opens) the certificate in order to install it to the MAF application’s keystore. To complete this step, the end user must enter a password provided by the administrator who distributed the client certificate. After the end user has installed the client certificate in their application’s keystore, the MAF application can present it to a server to establish a two-way SSL session.
Example 28-2 Client Certificate File Extension in maf-application.xml File
<adfmf:application xmlns:xsi="http://www.w3.org/2001/XMLSchema-instance" xmlns:adfmf="http://xmlns.oracle.com/adf/mf"
                   version="1.0" name="twowayssltest" id="com.company.twowayssltest"
                   appControllerFolder="ApplicationController" listener-class="application.LifeCycleListenerImpl"
                   client-ssl-certificate-extension="cert">
                  ….