55 Run and Deploy Applications on Oracle WebLogic Server
This chapter includes the following sections:
-
Introduction to Deploying Applications to Oracle WebLogic Server
-
Preparing to Deploy Oracle ADF Applications to an Instance of Standalone WebLogic Server
-
Deploying Your Oracle ADF Applications to an Administration Server Instance of WebLogic Server
-
Deploying Your SOA Projects to an Administration Server Instance of WebLogic Server
The scope of this chapter is limited to what is unique in the Oracle Fusion Applications environment. For general details about Oracle WebLogic Server, references are made to the generic Oracle Fusion Middleware guides.
55.1 Introduction to Deploying Applications to Oracle WebLogic Server
Deployment is the process of packaging application files as an archive file and installing it to a target application server. You can use JDeveloper to deploy your Oracle Applications Development Framework (Oracle ADF) applications or SOA applications directly to Oracle WebLogic Server or indirectly to an archive file as the deployment target, and then install this archive file to the target server. You also can run Oracle ADF applications (but not SOA applications) in JDeveloper using Integrated WebLogic Server.
JDeveloper contains Integrated WebLogic Server that allows the developer to run the application using the Run command. You do not need to manually create deployment descriptors or WebLogic Server domains, as you would if you were deploying the application to an instance of Standalone WebLogic Server. However, Standalone WebLogic Server allows more configuration options, such as support for SOA. For more information on using Integrated WebLogic Server, see Running Applications on Integrated WebLogic Server.
If you are deploying the application to a standalone WebLogic Server instance, you may need to perform security-related configuration to prepare the application for deployment. You may need to create or edit deployment descriptors and deployment profiles to prepare the application.
Whether you are using standalone or Integrated WebLogic servers to host the application, you will need to configure the WebLogic domains for Oracle Fusion Applications. You must run the Configure Fusion Domain Wizard from JDeveloper to configure the Integrated WebLogic Server or create a property file that is used to configure standalone WebLogic Server instances. For more information about the wizard, see Setting Up Your Development Environment.
Table 55-1 describes some common deployment techniques that you can use during the application development and deployment cycle.
Table 55-1 Deployment Techniques for Development Environments
After you have performed the tasks required for standalone deployment, you can use JDeveloper to deploy directly to a WebLogic Server instance or to create an Enterprise Archive (EAR) file and deploy the EAR file using WebLogic Server Administration Console, Enterprise Manager, or WebLogic Scripting Tool (WLST) commands.
For more information on how to deploy an application directly using JDeveloper, see Deploying Your Oracle ADF Applications to an Administration Server Instance of WebLogic Server.
For more information about deploying the application using WebLogic Server Administration Console, or WLST, see the Oracle Fusion Middleware Administering Oracle Fusion Middleware guide and the Oracle Fusion Middleware Administering Oracle ADF Applications guide.
Note:
This chapter discusses deploying applications. If you are deploying customizations or extensions, see the "Deploying Oracle ADF Customizations and Extensions" and the "Deploying SOA Composite Applications Customizations and Extensions" sections of the Extensibility Guide for Developers.
55.1.1 Prerequisites for Deployment
Before you deploy an application, you should perform the following tasks:
Example 55-1 Setting Environment Variable
# For csh shell
setenv JAVA_OPTIONS "$JAVA_OPTIONS -Djbo.debugoutput=console"

# For bash shell
export JAVA_OPTIONS="$JAVA_OPTIONS -Djbo.debugoutput=console"

For Windows
set JAVA_OPTIONS=%JAVA_OPTIONS% -Djbo.debugoutput=console
55.1.1.1 Setting Up JDBC Data Sources on Oracle WebLogic Server
To avoid passwords being present in plain text in deployed files, JDeveloper uses password indirection, which means that passwords for the data sources must be set on the server before the application will run correctly.
You do this using global data sources, which are set up in the Oracle WebLogic Server Administration Console using the Data Sources link under JDBC.
JDeveloper ensures that your web application web.xml, or EJB application ejb-jar.xml, contains the necessary <resource-ref> entry to identify an application resource name. The name is jdbc/connection-nameDS, where connection-name is the name of the application resources connection.
The application looks up this data source using the application-specific resource JNDI namespace of java:comp/env/jdbc/connection-nameDS, and it finds this resource because web.xml contains the <resource-ref> entry for jdbc/connection-nameDS.
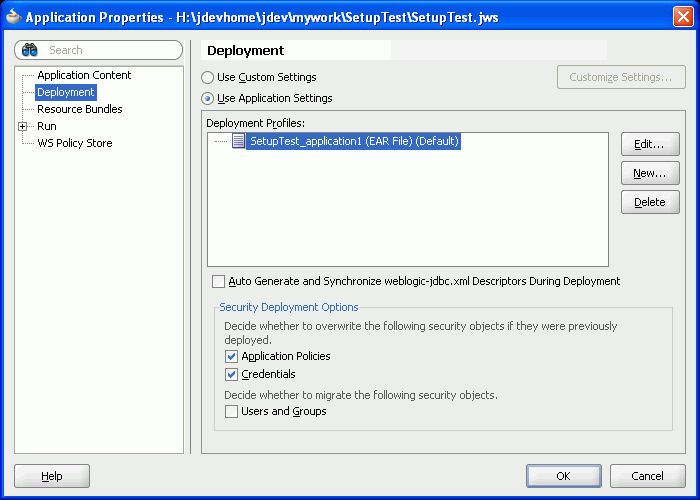
An important control for the files that are generated is the Auto Generate and Synchronize weblogic-jdbc.xml Descriptors During Deployment field on the WebLogic page of the Application Properties dialog.
When the Auto Generate field is selected, JDeveloper does the following:
-
Generates an application-name-jdbc.xml file for each connection in the application resources, and sets the indirect password attribute.
<jdbc-driver-params>
<use-password-indirection>true</use-password-indirection>
</jdbc-driver-params>
Upon deployment, JDeveloper determines the JDBC connection password from the username in application-name-jdbc.xml, and populates the JDBC connection password using an Mbean.
-
weblogic-application.xmlis updated to add each application-name-jdbc.xml as a module. -
web.xml(if it exists) has a resource reference to each JDBC JNDI name.
55.1.1.1.1 How to Create a Global Data Source on Oracle WebLogic Server
You create a global data source on Oracle WebLogic Server Administration Console.
To set up a global data source:
-
Login to the Oracle WebLogic Server Administration Console.
-
Click the Data Sources link under JDBC.
-
On the Summary of JDBC Data Sources page, click New.
-
In the Create a New JDBC Data Source page, enter details of the data source.
The name can be anything.
The JNDI name must be of the form
jdbc/connection-nameDS. For example, if the application has a connection nameconnection1, the JNDI name isjdbc/connection1DS. -
Ensure that the database type is Oracle and that the driver is
Oracle's Driver (Thin) for Service Connections;Version 9.0.1,9.2.0,10,11. -
Click Next twice to navigate to the Create a New JDBC Data Source page, where you enter the connection details.
The database name is the Oracle SID.
The host name is the name of the machine the database is on.
The default port is 1521.
-
Enter the user name and password, for example
hr/hr. -
Click Next and click Test Configuration.
-
Click Next to navigate to the Select Targets page, where you select a target for this data source. If you fail to select a target, the data source is created but not deployed.
-
Click Finish.
55.1.1.1.2 Deploy to an EAR File to Run on Oracle WebLogic Server
To deploy an application to an EAR file to run on Oracle WebLogic Server, you can:
-
Select the Auto Generate and Synchronize weblogic-jdbc.xml Descriptors During Deployment field, and set up passwords using application level credential mapping.
-
Alternatively, you can deselect the Auto Generate and Synchronize weblogic-jdbc.xml Descriptors During Deployment field and set up passwords by creating a global data source on Oracle WebLogic Server.
If you are deploying using ojdeploy:
-
You can use the
-nodatasourcesswitch, in which case you can set up passwords on Oracle WebLogic Server by either:-
Creating a global data source.
-
Manually creating application level data sources.
-
-
If you do not use the
-nodatasourcesswitch, you can only set up passwords using application level credential mapping.
55.1.2 Introduction to the Standalone Administration Server WebLogic Server Instance
A Weblogic Server instance is a configured instance to host applications, such as Web applications, Enterprise applications, and Web services, and resources, such as Java Message Service (JMS), and JDBC, Diagnostics.
There are two types of WebLogic Server instances: Administration Server and Managed Server.
The Administration Server instance is the central configuration controller for the entire domain. Its purpose is to:
-
Host the Administration Console.
-
Enable you to start and stop the servers from a central location.
-
Enable you to migrate servers and services within the domain.
-
Enable you to deploy applications within the domain.
Figure 55-2 Administration Server Configuration
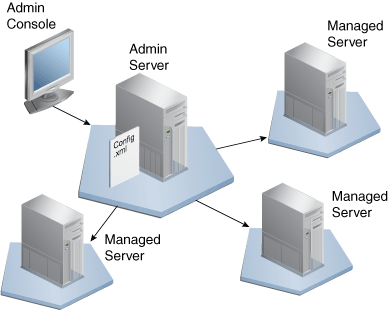
There is only one Administration Server instance of WebLogic Server in a domain, and an Administration Server instance of WebLogic Server controls only one domain.
A Managed Server WebLogic Server instance is a running instance that hosts the applications and the resources that are needed by those applications. Each Managed Server WebLogic Server instance is independent of all other Managed Server WebLogic Server instances in the domain, unless they are in a cluster. You can have as many Managed Server WebLogic Server instances as you need in a domain.
The Administration Server instance of WebLogic Server stores the master copy of the domain configuration, including the configuration for all Managed Server WebLogic Server instances in the domain. Each Managed Server WebLogic Server instance stores a local copy of its configuration. When a Managed Server WebLogic Server instance starts, it connects to the Administration Server instance of WebLogic Server to synchronize the configuration.
In most cases, a single server environment is used for development purposes. This is where a single server acts as the Administration Server instance of WebLogic Server and as the host for applications, as illustrated in Figure 55-3.
However, there are some teams that use a Managed Server for either Oracle Enterprise Scheduler (ESS) runtime or Service-Oriented Architecture (SOA). When you are setting up your standalone WebLogic server, you can choose one of the following options:
-
Administration Server - Oracle ADF (includes ESS libraries)
-
Administration Server - Oracle ADF + ESS Runtime
-
Administration Server - Oracle ADF and Managed Server - ESS Runtime
-
Administration Server - Oracle ADF and Managed Server - SOA
-
Administration Server and Managed Server - SOA
Figure 55-3 Single Server Environment
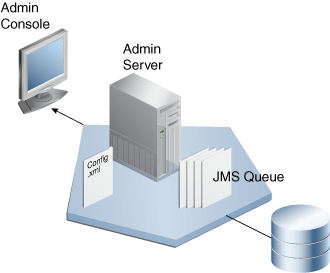
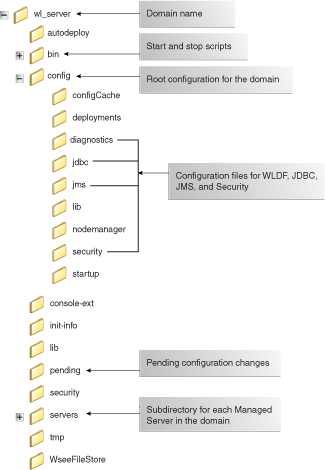
Figure 55-4 illustrates the structure of the domain directory:
Figure 55-4 Domain Directory Structure
You deploy applications to the Administration Server instance of WebLogic Server.
There are two configurations for Administration Servers:
-
Non-SOA
-
SOA
Not all components are available in both. For example, WebCenter libraries are not available in SOA and SOA libraries are not available in non-SOA. Oracle ADF applications containing UI must be deployed to the non-SOA WebLogic server, and SOA composites must be deployed to the SOA-configured WebLogic Server.
Some services have a Service Data Object (SDO) co-location requirement and need to be deployed to the SOA container. To deploy the service to the SOA-configured WebLogic Server, create a new EAR profile containing only that service or services from your application workspace.
For more information about SDO and SOA, see the Developing SOA Applications with Oracle SOA Suite guide.
For information about how to configure the SOA WebLogic Server, see How to Set Up the Personal Environment for Standalone WebLogic Server.
55.2 Running Applications on Integrated WebLogic Server
Integrated WebLogic Server is a single server that is included within JDeveloper. This server automates deploying your applications. Integrated WebLogic Server is sufficient to run your application to make sure it displays correctly in browsers, or for testing and debugging portions of the application.
Note:
You cannot use Integrated WebLogic Server to run SOA applications. You must deploy SOA applications to a standalone WebLogic Server instance. For more information, see Deploying Your SOA Projects to an Administration Server Instance of WebLogic Server.
Integrated WebLogic Server has already been configured with the Oracle Fusion Middleware Extensions for Applications domain extension templates. When the scripts are used to create the Integrated WebLogic Server and Standalone Weblogic Server domains, the Applications Core templates are configured. These templates are required for deploying and running applications using Applications Core functionality. So all of the Oracle Fusion applications will run on instances of both servers.
JDeveloper has a default connection to Integrated WebLogic Server and does not require you to manually create any deployment profiles or descriptors. Integrated WebLogic Server automates creating the same EAR that is used by Standalone WebLogic Server. You can see this when running the application. The run log shows the steps done by JDeveloper, including creating an EAR and deploying it.
When you run your application in JDeveloper using the run or debug commands, Integrated WebLogic Server automatically starts the server, packages the application to an EAR file, deploys the EAR, opens the browser, and accesses the URL for the deployed application.
When you use JDeveloper to run an application for the first time, it automatically creates the Integrated WebLogic Server instance. Make sure you have configured the domain, following the steps in How to Use the Oracle Fusion Domain Wizard.
You can also start the server directly from within JDeveloper. To do this, go to the main menu and select Run > Start Server Instance.
Tip:
The first time Integrated WebLogic Server starts, it tries to use the first available port in the 7101 - 7105 range. The following message appears as the first line in the Default server log in JDeveloper. You should use the alternate port for all access:
HTTP port conflict detected. The HTTP port will be reassigned to port 7102.
The server and the application are considered separate entities, so even if you stop the application, it does not stop the server. To terminate the application, select the application name from the terminate button dropdown menu in the Server Instance Log page, as shown in Figure 55-5.
Figure 55-5 Terminating the Application

To terminate the server, select the server name, as shown in Figure 55-6.
Figure 55-6 Terminating the Integrated WebLogic Server Instance

55.2.1 How to Deploy an Application with Metadata to Integrated WebLogic Server
When an application is running in Integrated WebLogic Server, the Metadata Archive (MAR) profile itself will not be deployed to a repository. Instead, a simulated Oracle Metadata Services (MDS) repository will be configured for the application that reflects the metadata information contained in the MAR. This metadata information is simulated and the application runs based on their location in source control.
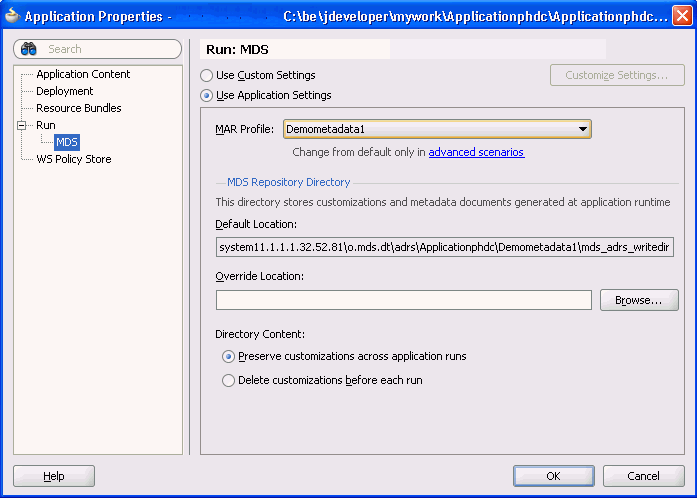
Any customizations or documents created by the application are written to this simulated MDS repository directory. You can keep the default location for this directory or you can set it to a different directory. You also have the option to preserve customizations across different application runs or to delete the customizations before each application run.
Before you begin, you must first create your MAR deployment profile. For information about how to create a MAR deployment profile, see How to Create Deployment Profiles for Standalone WebLogic Server Deployment.
To deploy a MAR deployment profile to Integrated WebLogic Server:
-
Go to the Application Navigator, right-click the application and select Application Properties.
-
In the Application Properties dialog, expand Run and choose MDS. See Figure 55-7.
Figure 55-7 Setting the Run MDS Options
-
In the Run MDS page:
-
Select the MAR profile from the MAR Profile dropdown list.
-
Enter a directory path in Override Location if you want to customize the location of the simulated repository.
-
Select the Directory Content option. You can choose to preserve the customizations across application runs or delete customizations before each run.
-
55.3 Prepare to Deploy Oracle ADF Applications to an Instance of Standalone WebLogic Server
You must prepare the application and the WebLogic Server instance before you deploy applications to an instance of Standalone WebLogic Server.
Before you begin:
Before you deploy the application to a Standalone WebLogic Server instance, you need to:
-
Create and configure the WebLogic Server domains using the Configure Fusion Domain wizard as described in Setting Up Your Development Environment.
-
If the application is using ADF Security, you may need to:
-
Configure for Oracle Single Sign-on using Oracle Access Manager (OAM). For more information, see the "Applications That Will Run Using Oracle Single Sign-On (SSO)" section in the Developing Fusion Web Applications with Oracle Application Development Framework.
-
Migrate application-level security information to the WebLogic Server instance. For more information, see the "Configuring Security for WebLogic Server" section in the Developing Fusion Web Applications with Oracle Application Development Framework.
-
Set up JDBC URL for WebLogic Server. For more information, see the "Applications with JDBC URL for WebLogic" section in the Developing Fusion Web Applications with Oracle Application Development Framework.
-
Set up JDBC datasource for WebLogic Server. For more information, see the "Applications with JDBC Data Source for WebLogic" section in the Developing Fusion Web Applications with Oracle Application Development Framework.
-
Understand LDAP-based stores. For more information, see What You May Need to Know About Testing.
-
55.3.1 How to Reference the Shared Libraries
Shared libraries are available in the integrated and standalone WebLogic Server container and your projects must be updated so that they can use a shared library.
When you create your WebLogic Server domain, all the required shared libraries should be automatically created for you. When you choose a new technology or library in JDeveloper, the weblogic.xml and weblogic-application.xml files are automatically updated to reference these shared libraries. If, for some reason, the required references are not created automatically, you must update the weblogic.xml and weblogic-application.xml files manually.
The process below shows how to reference a sample oracle.shared.library shared library in a project.
To reference a shared library into a project:
-
Go to Application Navigator, expand Application Resources > Descriptors > META-INF.
-
Add reference shared library to
weblogic-application.xml:-
Click the
weblogic-application.xmlfile. -
Create a copy of the
library-refelement.You can either accomplish this manually in the editor, or you can right-click the existing
library-refelement to use the copy and paste options. -
Change the
library-nameelement to oracle.shared.library. Leave the specification and implementation version values blank.Caution:
Make sure that there are no blank spaces between the tag <library-ref> and the actual entry as they will cause problems.
-
Repeat steps 2b and 2c to reference additional libraries.
-
-
Add reference shared library to
weblogic.xmlusing the same steps.
55.3.2 How to Create Deployment Profiles for Standalone WebLogic Server Deployment
The deployment profiles determine how the application is bundled and deployed to Standalone WebLogic Server. When running an application within JDeveloper using Integrated WebLogic Server, these deployment profiles are not used.
Tip:
When you run your application in JDeveloper Integrated WebLogic Server, these deployment profiles are not used. Instead, JDeveloper scans the entire workspace or the current working set, (if the Run Working Set option is enabled), to construct the class loader classpaths. If the data model project is eligible to be an EJB then the Libraries and Classpath entries from that project contribute to the application root class loader. The user interface project contributes to the web application class loader.
To deploy the application, you must create deployment profiles applicable to the project or projects. The deployment profiles you need depend on your application requirements. For example, an application may include Business Components Service Interface, Web Application Archive (WAR), and MAR profiles. When you have defined these, create an EAR deployment profile for the application.
You can only deploy the application as an EAR file at the application level. Creating EAR files from the project level are incomplete and this option is disabled. The project level deployment profiles should be included in the EAR deployment profile.
Depending on the type of projects in your application, you may need to create the following deployment profiles:
-
Business Components Service deployment profile. For instructions, see the "How to Deploy Web Services to Oracle WebLogic Server" section of the Developing Fusion Web Applications with Oracle Application Development Framework.
-
WAR deployment profile. For instructions, see the "Creating a WAR Deployment Profile" section of the Developing Fusion Web Applications with Oracle Application Development Framework
-
MAR deployment profile. For instructions, see the "Creating a MAR Deployment Profile" section of the Developing Fusion Web Applications with Oracle Application Development Framework
-
EAR deployment profile. For instructions, see the "Creating an Application-Level EAR Deployment Profile" section of the Developing Fusion Web Applications with Oracle Application Development Framework
55.4 Deploying Your Oracle ADF Applications to an Administration Server Instance of WebLogic Server
You can deploy your Oracle ADF applications to a standalone WebLogic Server instance using JDeveloper.
Any necessary MDS repositories must be registered with the WebLogic Server instance. If the MDS repository is a database, the repository maps to a WebLogic Server system data source with MDS-specific requirements. Before you deploy the application, make sure to target this data source to the Administration Server instance of WebLogic Server. For more information about registering MDS, see the Oracle Fusion Middleware Administering Oracle Fusion Middleware guide.
Note:
If you are using the WebLogic Server Administrative Console or WLST scripts to deploy an application packaged as an EAR file that requires MDS repository configuration in adf-config.xml, you must run the getMDSArchiveConfig WLST command that returns a handle to the MDSArchiveConfig object for the specified archive. The returned MDSArchiveConfig object's setAppMetadataRepository and setAppSharedMetadataRepository methods can be used to change application and shared repository configuration in an archive. MDS configuration is required if the EAR file contains a MAR file or if the application is enabled for Design Time at Runtime. For more information about WLST commands, see the Oracle Fusion Middleware WLST Command Reference for WebLogic Server guide.
55.4.1 How to Create an Application Server Connection Using JDeveloper
To deploy your application using JDeveloper, you create a connection to the application server and then deploy the application.
To create an application server connection:
-
Start WebLogic Server instance.
-
Open your application in JDeveloper.
-
Launch the Application Server Connection wizard.
You can:
-
In the Application Server Navigator, right-click Application Servers and choose New Application Server Connection.
-
In the New Gallery, expand General, select Connections and then Application Server Connection, and click OK.
-
In the Resource Palette, choose New > New Connections > Application Server.
-
-
Complete the wizard:
-
Enter the following information as you progress through the wizard:
-
Connection Name: Enter a name for the connection.
-
Username and Password: Enter a user name and password for the administrative user authorized to access the application server.
-
Weblogic Hostname Administration Server): Enter the name of the WebLogic Server instance containing the TCP/IP DNS where your application (
.jar,.war,.ear) will be deployed. -
Port: Enter a port number for the Oracle WebLogic Server instance on which your application (
.jar,.war,.ear) will be deployed. -
In the SSL Port field, enter an SSL port number for the Oracle WebLogic Server instance on which your application (
.jar,.war,.ear) will be deployed. -
Select Always Use SSL to connect to the Oracle WebLogic Server instance using the SSL port.
-
WebLogic Domain: Optionally enter a domain only if Oracle WebLogic Server is configured to distinguish nonadministrative server nodes by name.
-
Test the connection.
-
Click Finish to close the wizard and create your application server connection.
-
55.4.2 How to Deploy the Application Using JDeveloper
After you have created an application server connection and an EAR deployment profile, you can deploy the application to a standalone application server.
To deploy an application:
-
Deploy your project to the application server:
-
In the Application Navigator, right-click your application and choose Deploy > deployment profile.
-
In the Deploy wizard Deployment Action page, select Deploy to Application Server and click Next.
-
In the Select Server page, select the application server connection, and click Next.
-
The WebLogic Options page appears. Select a deploy option and click Next.
If the
adf-config.xmlfile in the EAR file requires MDS repository configuration, the Deployment Configuration dialog appears for you to choose the target metadata repository or shared metadata repositories, as shown in Figure 55-8.Figure 55-8 MDS Configuration and Customization For Deployment
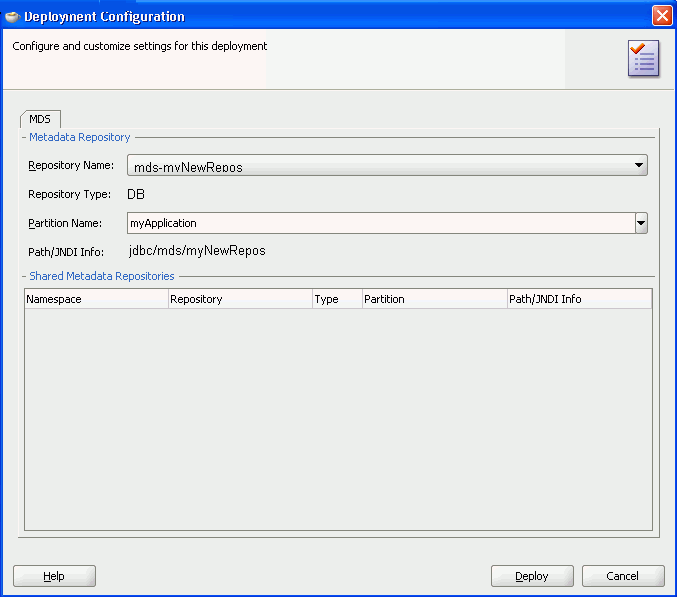
The Repository Name dropdown list allows you to choose a target metadata repository from a list of metadata repositories registered with the Administration Server instance of WebLogic Server. The Partition Name dropdown list allows you to choose the metadata repository partition to which the application's metadata will be imported during deployment. For more information about managing the MDS repository, see the Oracle Fusion Middleware Administering Oracle Fusion Middleware guide.
Note:
If you are deploying an Oracle ADF application, do not use the Deploy to all instances in the domain option.
-
Click Finish.
-
-
Verify the run-time application as:
http://httpHost:httpPORT/<CONTEXT>/faces/<landing jspx>
For example, http://server06.us.company.com:7001/UIPatternsDemo/faces/ServiceRequest
http://server12.company.com:7001/D7Build1-ViewController-context-root/faces/TreeHomePage.jspx
55.4.3 How to Create an EAR File for Deployment
You can also use the deployment profile to create an archive file (EAR file). You can then deploy the archive file using Enterprise Manager, WLST, or the Oracle WebLogic Server Administration Console.
Although an application is encapsulated in an EAR file (which usually includes WAR, MAR, and JAR components), it may have parts that are not deployed with the EAR. For instance, ADF Business Services can be deployed as a JAR.
To create an EAR archive file:
-
In the Application Navigator, right-click the application containing the deployment profile, and choose Deploy > deployment profile > to EAR file.
See How to Create Deployment Profiles for Standalone WebLogic Server Deployment.
55.5 Deploy Your SOA Projects to an Administration Server Instance of WebLogic Server
You can deploy your SOA projects using either JDeveloper or the other administration tools described in Table 55-1.
55.5.1 How to Deploy Your SOA Projects Using JDeveloper
This section discusses how to deploy your SOA projects into the Administration Server instance of WebLogic Server using JDeveloper.
The basic steps to deploying your SOA project from within JDeveloper are:
-
Define a connection. For instructions to create an application server connection, see "Creating an Application Server Connection" in the Developing SOA Applications with Oracle SOA Suite.
-
Deploy the Project. For instructions to deploy a SOA project, see "Deploying the Profile " in the Developing SOA Applications with Oracle SOA Suite
-
Check the deployed SOA Project.
For details about deploying a SOA project, see "Deploying SOA Composite Applications" in the Developing SOA Applications with Oracle SOA Suite.
55.5.1.1 Check the Deployed SOA Project
You can check and run your deployed SOA project from two locations:
From Enterprise Manager on port 7001 by opening the Weblogic Hostname (Administration Server) URL for which you created the Connection, such as:
http://xyzzy-on.example.com:7001/em
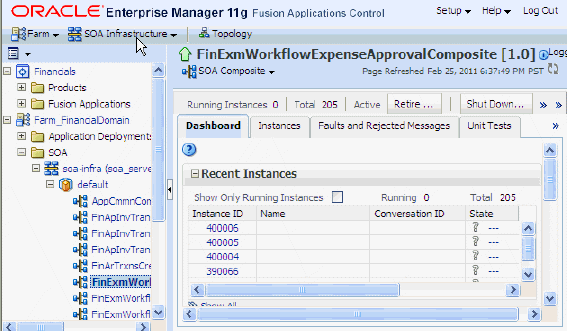
After you log in, a screen similar to Figure 55-9 displays (the SOA tree in the left pane has been expanded and the first deployment has been selected):
Figure 55-9 Checking SOA Deployment from the EM
