16 Implement Additional Functions in the UI Shell
This chapter includes the following sections:
For more information about the features, see:
16.1 Introducing the Navigate API
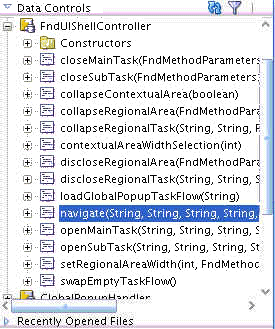
You can create a link in the task flow to open a different UI Shell page. Because navigation can occur across different web applications, a single consistent API performs browser redirect. See Table 16-1. This API is exposed as the FndUIShellController.navigate Data Control method.
Note:
When opening a new window, whenever possible, you should use the Navigate API instead of using the ADF Controller sub-flow calls. This is because the UI Shell has no information about sub flows. For instance, if you perform a search that returns clickable results and use sub flows to display the results, and if you then choose to save the page to your Favorites, the search page is saved; not the results page you want. If you use the Navigate API, however, the UI Shell knows about the opened results page and saving the page to your Favorites works as you expect.
16.1.1 How to Use the Navigate API Data Control Method
Drag and drop the Data Control method on page fragments to create links to start navigation.
Example 16-1 Navigating from One Work Space to Another
/**
* Navigate from one work space to another. If the current view id is the
* same as the viewId parameter, and if navTaskFlow is null, the current page
* will be refreshed. If the current view id is the same as the viewId
* parameter and if navTaskFlowId is not null, the current page will not
* be refreshed. The Navigate API will delegate to openMainTask API to open the
* task flow in the main area. This can be overriden by passing in
* forcePageRefresh=true in pageParametersList to force the page refresh so
* that openMainTask would not be used.
*
* @param viewId viewId of the target workspace
* @param webApp Deployed Module Name of the target workspace.
*        It only must be set when the target workspace is in a different
*        deployed module than the origin workspace. When this is null, it means
*        the target workspace is in the same deployed module of the origin
*        workspace. The webApp attribute is used to look up the host and port of
*        the associated Workarea or Dashboard from the ASK deployment
*        tables. These tables are populated at deployment time through
*        Oracle Fusion Functional Setup Manager tasks.
* @param pageParametersList Parameters list for the page. This is a semicolon
*                   delimited String of name value pairs. For example,
*                   "param1=value1;param2=value2"
*                   If the Expression Language expression evaluates to an Object,
*                   toString value of that Object will be passed as the value of
*                   the parameter.
*                   When forcePageRefresh=true is added to the pageParametersList,
*                   the current page will be refreshed even if navTaskFlowId
*                   is not null and current view id is the same as viewId
*                   parameter value.
* @param navTaskFlowId Id of the taskFlow to open in the target workspace
* @param navTaskKeyList Key list to pass in to the task flow to open in the
*                   target workspace. This is a semicolon delimited
*                   keys or key-value pairs. For example,
*                   "key1;key2=value2"
* @param navTaskParametersList Parameters list to pass in to the task flow to open
*                   in the target workspace. This is a semicolon delimited String
*                   of name value pairs. For example,
*                   "param1=value1;param2=value2."
*                   When loadDependentFlow=true is added to the
*                   navTaskParametersList, the task flow specified in
*                   navTaskFlowId will be loaded as dependent flow.
* @param navTaskLabel Label for the task flow to open in the target workspace.
* @param methodParameters Construct FndMethodParameters object for setting the
*                   width of the contextual area, and/or setting the disclosed
*                   state of the contextual area.
* @throws IOException
*/
public FndMethodParameters navigate(java.lang.String viewId,
                                    java.lang.String webApp,
                                    java.lang.String pageParametersList,
                                    java.lang.String navTaskFlowId,
                                    java.lang.String navTaskKeyList,
                                    java.lang.String navTaskParametersList,
                                    java.lang.String navTaskLabel,
                                    FndMethodParameters methodParameters)
                             throws java.io.IOException
Example 16-2 Setting contextualAreaWidth and contextualAreaCollapsed Parameters
FndMethodParameters methodParameters = new FndMethodParameters();
  methodParameters.setContextualAreaCollapsed(Boolean.FALSE);
  methodParameters.setContextualAreaWidth(200);
You can specify a task flow to load on the target page. Page level parameters also can be specified.
Table 16-1 Navigate API Parameters
| Navigate API Parameter | Attribute Name |
|---|---|
|
|
|
|
|
Attribute used to look up the host and port of the associated Workarea or Dashboard from the Oracle Fusion Applications Functional Core (ASK) deployment tables. These tables are populated at deployment time through Oracle Fusion Functional Setup Manager tasks. You need to pass the deployed module name to the |
|
|
Obsolete. Replaced by |
|
|
|
|
|
Equates to the This is the Id of the task flow to be loaded. The task flow Id is a concatenation of the file location for the task flow definition, and the task flow name. For example:
|
|
|
Equates to the Important:
The
In dynamic tabs mode, when looking for a match of an existing tab, these APIs will first look for any instances of the task flow that is already open, which has the same task flow Id as the one passed into them as the parameter. In addition, it will compare the It does not matter if the task flow parameters are the same or different. If the |
|
|
You can load the task flow specified in the |
|
|
Equates to the Note: When passing parameters, do not leave the |
Certain parameters, summarized in Table 16-2, can be passed using the Navigate API's argument list.
Table 16-2 Parameters Passed Using Navigate API Arguments
| Parameter Name | Passed Using | Description |
|---|---|---|
|
|
|
Default: The Navigate API is used to navigate from one work space to another. If the current view Id is the same as the Example:
Details:
|
|
|
|
Default: Example: FndMethodParameters methodParameters = new FndMethodParameters(); methodParameters.setContextualAreaCollapsed(Boolean.TRUE); methodParameters.setContextualAreaWidth(200); |
|
|
|
Default: 256 Example: FndMethodParameters methodParameters = new FndMethodParameters(); methodParameters.setContextualAreaCollapsed(Boolean.TRUE); methodParameters.setContextualAreaWidth(200); |
|
|
|
Default: Example:
Note that the value for Details:
|
|
|
|
This value should be passed only when the Example:
FndMethodParameters methodParameters = new FndMethodParameters();
methodParameters.setContextCode("CRM");
|
|
|
|
This value should be passed only when the Example:
FndMethodParameters methodParameters = new FndMethodParameters();
methodParameters.setContextCode("CRM");
methodParameters.setObjectType("Opportunity");
|
|
|
|
This value should be passed only when the navTaskFlowId input parameter has a value. Example:
FndMethodParameters methodParameters = new FndMethodParameters();
methodParameters.setContextCode("CRM");
methodParameters.setObjectType("Opportunity");
methodParameters.setObjectName("Opportunity 123");
|
Note:
When passing parameters, do not leave the label field null. This is the label that would appear in the tab header when in a tabs page. Even if you are in a no-tabs page (see Supporting No-Tab Work Areas ), do not leave it blank because this label will be used in other ways, such as Add to Favorites, or when the system tracks the Recent Items.
The signature and Javadoc of the method are shown in Example 16-1.
The main navigation is driven by two attributes: viewId and webApp.
-
webAppdetermines which web application to open. -
viewIddetermines the view activity within the target web application.
pageParametersList defines custom URL parameters that you can define.
The three parameters navTaskFlowId, navTaskParametersList, and navTaskLabel, provide support for loading a task flow on the target page, in addition to the default Main Tasks of the target page.
FndMethodParameters are placed as a future extension mechanism. The parameters that can be set through FndMethodParameters are: contextualAreaWidth and contextualAreaCollapsed. Example 16-2 shows how to set up these two parameters.
Note:
-
The task flow to be opened in the target Work Area does not need to be pre-registered as a
defaultMainordynamicMaintask for that page. The TaskFlow Id, parameters for it, and the label are all explicitly passed to the target page, and the target page does not perform any validation. -
The
webAppvalue that is passed into the Navigate API is used to look up the host and port of the associated WorkArea or Dashboard from the Oracle Fusion Applications Functional Core (ASK) deployment tables. These tables are populated at deployment time through Functional Setup Manager tasks. -
Because the Navigate API is based on URL redirect, only string representations of the parameter values can be passed to the target page. It is not possible to pass an object as a parameter value. For example, a Java map that is set as a
customObjectonFndMethodParameterscannot be passed as a parameter (this is only supported inopenMainTaskAPI). -
When navigating to the current page with the
forcePageRefresh=trueoption using this API, the ADF Controller state of the source page is not cleaned up.
16.1.2 How to Implement Navigation Across Web Applications
Navigating across web applications requires the webApp parameter in the menu meta data. For this parameter to work properly, the ApplicationDB and the AppMasterDB connections must be set. The webApp parameter must be specified for each parent node in the menu meta data. Child nodes inherit the value of this parameter from the parent node if not specified. The Navigate API is also modified to add the webApp parameter. Similarly, when using the openSubTask API, you must specify the webApp parameter correctly. There are no design or compile time checks that can catch an invalid value for the webApp parameter. It will throw null pointer exceptions at runtime only.
Note that you need to pass the DEPLOYED_MODULE_NAME in the ASK_DEPLOYED_MODULES table as the webApp parameter. The DEPLOYED_MODULE_NAME, by standard, should be the same as the context root of the application you are trying to open.
16.2 Warning of Pending Changes in the UI Shell
When there are pending changes in the UI Shell main area, and the user is leaving the page, or is refreshing the tab or task flow, or is closing the tab, the UI Shell will provide a modal confirmation dialog to the user. If confirmed, the operation will be allowed to proceed. Otherwise, the user will remain on the original page or tab.
Cases where pending changes are checked in the UI Shell main area include:
-
TaskList links in regional area relaunch a task flow in the main area (with
reuseInstance=trueand eitherforceRefresh=trueor with different parameters). -
Closing a tab by clicking the Close icon on the tab.
-
Closing the currently focused tab by using
closeMainTask. -
Relaunching a task flow by using
openMainTask(withreuseInstance=trueand eitherforceRefresh=trueor with different parameters). -
Relaunching a task flow using
navigate(navigating within the same web application andviewId). -
Opening a different work area or web application using
navigate.
Search Panel and Warning of Pending Changes
Search is treated as a special case and no warning for pending changes is shown when a user enters some data in a query panel provided by the Oracle Application Development Framework. But, from the search results page, drilling down to a sub flow and making the flow dirty marks the sub flow as a candidate for warn about changes.
16.2.1 How to Implement Warning of Pending Changes
To implement warning of pending changes, developers need to follow these steps.
-
All the main taskflows that render in MainArea should have the
data-control-scopeset toisolated.<data-control-scope id="dc"> <isolated/> </data-control-scope>
-
Make changes to the main area.
Note that inner taskflows and regions inside the main flow can have the
data-control-scopeset to shared.Other than tasklist, if developers are using Data Control APIs, such as
openMainTask,closeMainTaskornavigate, to relaunch or close a flow in the MainArea, they should add theclientListenerto post the changes. Adding theclientListeneron acommandButtonthat is bound tocloseMainTaskto post pending changes before the currently focused tab/flow is closed is shown in Example 16-3.When a command link/button invokes Data Control APIs programmatically, developers should add a client listener on the command link/button, as shown in Example 16-4.
In addition to adding the
clientListener, when Data Control APIs are executed from within the MainArea, developers must add themethodActionshown in Example 16-5 to their main page fragment's pageDef whose taskflow is attached to the tab in MainArea.The Data Control API shown in Example 16-5 lets you check for data dirty from within the child region and identify any pending changes in the child region.
After adding above API to the main page fragment's pageDef, developers should let the UI Shell know about that by sending the parameter
"fndCheckDataDirty=true"in theparametersListornavTaskParametersList.
Example 16-3 Adding the clientListener on a commandButton
<af:commandButton actionListener="#{bindings.closeMainTask.execute}"
             text="closeMainTask- with - CL"
             disabled="false"
             id="cb1">
      <af:clientListener method="queueActionEventOnMainArea" type="action"/>
</af:commandButton>
Example 16-4 Adding a client listener when a command link/button invokes Data Control APIs programmatically
<af:commandButton text="Calling datacontrol api programmatically"
         binding="#{backingBeanScope.backing_Navigateviaprogramatically.cb1}"
         id="cb1" action="go">
  <af:clientListener method="queueActionEventOnMainArea" type="action"/>
</af:commandButton>
Example 16-5 Adding the checkDataDirty methodAction
<methodAction id="checkDataDirty"
     InstanceName="FndUIShellController.dataProvider"
     DataControl="FndUIShellController" RequiresUpdateModel="true"
     Action="invokeMethod" MethodName="checkDataDirty"
     IsViewObjectMethod="false"
     ReturnName="FndUIShellController.methodResults.checkDataDirty_FndUIShellController_dataProvider_checkDataDirty_result"/>
16.2.2 How to Suppress Warning of Pending Changes
Developers can suppress warning of pending changes for a particular flow by sending the parameter "fndWarnChanges=false" to the parametersList or navTaskParametersList, as shown in Example 16-6.
Example 16-6 Suppressing warning of pending changes for a flow
<methodAction id="openMainTask" RequiresUpdateModel="true"
              Action="invokeMethod" MethodName="openMainTask"
              IsViewObjectMethod="false" DataControl="FndUIShellController"
              InstanceName="FndUIShellController.dataProvider"
              ReturnName="FndUIShellController.methodResults.openMainTask_FndUIShellController_dataProvider_openMainTask_result">
  <NamedData NDName="taskFlowId" NDValue="/WEB-INF/task-flow-definition.xml#task-flow-definition" NDType="java.lang.String"/>
  <NamedData NDName="keyList" NDType="java.lang.String"/>
  <NamedData NDName="parametersList" NDValue="fndWarnChanges=false" NDType="java.lang.String"/>
  <NamedData NDName="label" NDValue="Suppress Warn About Msg" NDType="java.lang.String"/>
  <NamedData NDName="reuseInstance" NDValue="true" NDType="java.lang.Boolean"/>
  <NamedData NDName="forceRefresh" NDValue="true" NDType="java.lang.Boolean"/>
  <NamedData NDName="loadDependentFlow" NDType="java.lang.Boolean"/>
  <NamedData NDName="methodParameters"
  NDType="oracle.apps.fnd.applcore.patterns.uishell.ui.bean.FndMethodParameters"/>
</methodAction>
16.3 Implementing the Oracle Fusion Home Page UI
The Oracle Fusion Home Page UI consists of a series of JSPX pages, each of which provides product- or role-specific content, that are visually tied together using a tabbed navigation interface.
Terms
Home page: any one of these JSPX pages.
Oracle Fusion Home: the overall Oracle Fusion Home Page UI.
16.3.1 Supported Behavior
The following key requirements are supported by the Oracle Fusion UI Shell:
-
To conform to Oracle Fusion Applications modularity requirements, the Oracle Fusion Home provides a common entry point across multiple Java EE web applications. A given home page can be hosted on any one of these distinct Java EE web applications. A tab click on a given home page therefore must issue a request for another home page that may be hosted on a different web application. When the new page is displayed, its tab must be visually selected.
-
Each home page should display content that includes navigation means to resources that may be hosted on a different web application. For example, a command navigation link on a home page may target a bounded task flow located on a different web application and designed to run on a Workarea or Dashboard page located on that web application.
-
A given home page may include content from a bounded task flow (presumably displayed within an ADF region or portlet) that has command navigation links within its view activities. These links or other navigation means must work correctly on the home page. For example, on click, navigate to the correct Workarea page and launch the intended task flow.
-
The Home icon in the Global Area will be disabled on all home pages.
-
By default, clicking the Home icon will open the Welcome tab and, if a different tab is selected, clicking the Home icon will go back to the last tab that was selected for that session. If, however, the user navigates to any Oracle Fusion page through a direct URL navigation, such as an email that contains a link to a Workarea, the Home icon will again return to the Welcome tab. By default, the Welcome tab will be the first itemNode defined.
-
A home page will display the same layout and content in the Global Area and for the page footer as other pages that extend the UI Shell page template. Unlike a Workarea page, however, the intervening content and its layout between the Global (top) and footer (bottom) sections of the page will be determined and provided by product teams.
16.3.2 How to Create a Home Page
To create a home page, follow these basic steps.
- Create a JSPX page that extends UIShell.jspx.
- From the JSPX page, select the
<af:pageTemplate>tag. On the property inspector, set theisHomePageattribute totrue. Note that whenisHomePageis set to true, the Regional, Local and Contextual Areas of the UI Shell will not be rendered. - Add content to the
HomePageContentfacet, following the ADF Layout Basics guideline for laying out the components. - Drop the JSPX to
adfc-config.xml. - Repeat Steps1 through 4 for all home page JSPX pages.
- Create the Home Page menu. See Working with the Global Menu Model.
- When running a home page JSPX, the page should look similar to Figure 16-3.
Figure 16-3 Home Page Example

See Global Area Standard Icons for a description of the icons.
16.3.3 Getting the URL
There are two APIs located in the UIShellContext class that you can use to return a URL without actually performing the navigation to the URL:
-
getURL : getURL is the same as a navigate call, but it returns the URL as a string instead of doing the navigation. See Example 16-7.
-
getURLForCurrentTask : getURLForCurrentTask, shown in Example 16-8, is good for getting the URL of the main area flow in focus so you could send it in an email to someone else. When clicked, it would open the correct workarea (.jspx page) and the correct flow with the correct parameters. If you did have other dynamic tabs open when you called getURLForCurrentTask, it would not open those when clicked.
Example 16-7 Example Use of getURL
public java.lang.String getURL(        java.lang.String    viewId,
   java.lang.String webApp,
   java.lang.String pageParametersList,
   java.lang.String navTaskFlowId,
   java.lang.String navTaskKeyList,
   java.lang.String navTaskParametersList,
   java.lang.String navTaskLabel,
FndMethodParameters methodParameters)
throws  java.io.IOException
Example 16-8 Example Use of getURLForCurrentTask
public java.lang.String getURLForCurrentTask( )
throws  java.io.IOException
16.4 Using the Single Object Context Workarea
The Single Object Context Workarea is a facet that defines an area between the Global Area and the Main and Regional areas into which developers can add what they want. If the facet is empty, the area does not appear. You also can create a view scope parameter so other flows on the page can get the context. See Figure 16-4.
Figure 16-4 Context Area Example
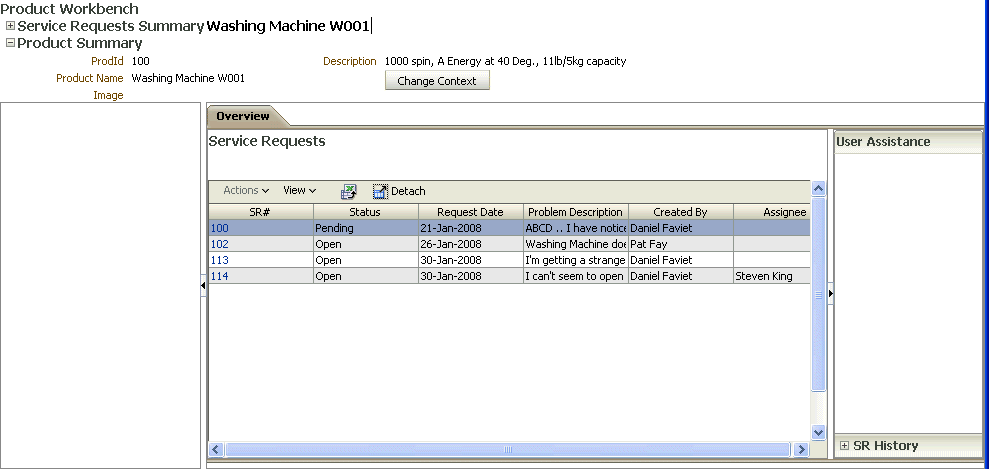
This area is useful for creating Single Object Workareas, which are particularly useful in tabbed page mode. A Single Object Workarea is a page that is devoted to one object so the information of that one object can be put above the Workarea.
Single Object Workareas provide a context for addressing the tasks and processes for the business process of a single complex object instance at a time. Usually, single object workareas will use multiple defaultMain flows. Each flow can be about a different aspect of the same object. For instance, you could have one tab showing recent activity, and another tab showing payments.
16.4.1 Implementation Notes
The SingleObjectContextArea facet has been added to the UI Shell template for Context Area task flow.
A managed bean entry, shown in Example 16-9, has been added to adfc-config.xml for viewScope Hashmap.
Support for URL parameters defined in the view activity for the page (JSPX) in adfc-config is to be set in the fndPageParams Hashmap defined in viewScope. This Hashmap is also passed onto the pageFlowScope of the task flows in the context area, regional area and main area.
This is accomplished by enabling the Bookmarkable property on the view activity for the page and specifying the URL parameter names with the value set to be added to the fndPageParams Hashmap defined in viewScope. See the "How to Create a Bookmarkable View Activity" section in the Developing Fusion Web Applications with Oracle Application Development Framework.
Product team task flows running in the Single Object Context Workarea must be designed to take in the appropriate context values as input parameters. The pageFlowScope values must be passed to the appropriate input parameters through the parametersList for the item node in the menu or the openMainTask API.
Product teams can cause URL navigation (using the navigate data control method provided by UI Shell by passing required parameters in the pageParametersList) for changing context or updating context information. This will cause the entire page to be refreshed based on new context parameter values.
Product teams can also check for the input parameter values (the context) within the context area task flow. If invalid, a modal dialog can be launched for the end user to choose a context (rendered as links based on the navigate data control method provided by UI Shell) before proceeding.
Example 16-9 Managed Bean viewScope Hashmap Entry in adfc-config.xml
<managed-bean>
    <managed-bean-name>fndPageParams</managed-bean-name>
    <managed-bean-class>java.util.HashMap</managed-bean-class>
    <managed-bean-scope>view</managed-bean-scope>
  </managed-bean>
16.4.1.1 Developer Implementation
Enable the Bookmarkable property on the view activity for the single object context page and specify the URL parameter names with the corresponding fndPageParams viewScope Hashmap key where the value should be stored. See the "How to Create a Bookmarkable View Activity" section in the Developing Fusion Web Applications with Oracle Application Development Framework.
Example 16-10 shows a sample entry in adfc-config.xml for such a view activity.
Product teams must create a bounded task flow for the Context Area that appears at the top of the page. This task flow must accept the context values as input parameters. This task flow is dropped as a static region onto the Context Area facet in the JSPX page based on the UI Shell template. In the task flow binding, set the input parameter values to the corresponding key in fndPageParms viewScope Hashmap.
Example 16-11 shows a sample entry in the page definition for the JSPX file for passing the viewScope values into the Context Area task flow as input parameter.
The UI Shell code passes this viewScope hashmap onto the pageFlowScope of the main area and regional area task flows. Product team task flows, which are initialized in the regional area and main area, can access this in pageFlowScope (of a main area or regional area container task flow owned by Applications Core) for the appropriate input parameters through the menu model and openMainTask API.
Example 16-12 shows a sample entry for a child item node for defaultMain task in the menu.xml file to pass the appropriate deptno in the single object context to a task flow that is initialized based on this input value.
Product teams can cause URL navigation (through the navigate data control method provided by UI Shell) for changing context or after updating context information. This will cause the entire page to be refreshed based on new context parameter values.
Product teams can also check for the input parameter values within the pageFlowScope of the context area task flow. If invalid, a modal dialog can be launched for the end user to choose a context (by providing links based on the navigate data control method provided by the UI Shell by passing required parameters in the pageParametersList) before proceeding. This can be achieved by defining an invoke action executable in the page def for the context area page fragment which checks for existence of the pageFlowScope value and programmatically shows a modal dialog for the user to choose the context. The other alternative is to use this approach to cause navigation to a completely different page where the user can select the context.
Also, it is important to note that all the bounded task flows that will be initialized in the Single Object Context Workarea need to check for input parameter values and show/query data only if the input parameter values are passed. Basically, if the input parameter values are empty, the task flows handle that, such as in a router activity, and avoid showing any transaction data to the end user.
Example 16-10 Sample Entry in adfc-config.xml for a View Activity
<view id="SingleDeptContextPage">
 <page>/oracle/apps/empdeptdemo/ui/page/SingleDeptContextPage.jspx</page>
 <bookmark>
  <url-parameter>
   <name>Deptno</name>
   <value>#{viewScope.fndPageParams.Deptno}</value>
  </url-parameter>
 </bookmark>
</view>
Example 16-11 Sample Page Definition for Passing viewScope Values into Context Area Task Flow
<taskFlow id="ContextDeptSummary1"
              taskFlowId="/WEB-INF/oracle/apps/empdeptdemo/ui/flow/ContextDeptSummary.xml#ContextDeptSummary"
              xmlns="http://xmlns.oracle.com/adf/controller/binding">
      <parameters>
        <parameter id="Deptno" value="#{viewScope.fndPageParams['Deptno']}"
                   xmlns="http://xmlns.oracle.com/adfm/uimodel"/>
      </parameters>
    </taskFlow>
Example 16-12 Sample Child Item Node for defaultMain Task
<itemNode id="SingleDeptContextPage_EmpListingDefaultTab"
              focusViewId="/SingleDeptContextPage"
              label="#{adfBundle['oracle.apps.empdeptdemo.ui.test_menuBundle'].EMPLOYEE_LISTING}"
              taskType="defaultMain" reuseInstance="false"
              taskFlowId="/WEB-INF/oracle/apps/empdeptdemo/ui/flow/ContainerTF.xml#ContainerTF"
              parametersList="Deptno=#{pageFlowScope.fndPageParams['Deptno']}"/>
16.5 Implementing the Third-Party Component Area
The Third-Party Component Area, shown in Figure 16-5, is a facet in the UI Shell template for showing content just above the Single Context Workarea in the global area. Although originally designed to contain a Call Telephony Interface (CTI) showing incoming calls in a call center operation, the facet can contain anything.
Figure 16-5 Third Party Component Area Facet Containing A CTI

16.5.1 How to Implement the ThirdPartyComponentArea Facet Developer
The ThirdPartyComponentArea facet should be added within a flexible layout component that will allow you to control the amount of screen real estate that the content added to the facet can consume.
-
A facet reference is under the global area content with its width set to 100 percent.
-
Add content to this facet.
-
You should create a bounded task flow with page fragment for the content and drop it into this facet as a static region. This supports personalization through web composer since the content is within a page template.
-
The height property of the
panelStretchLayoutin the UI Shell template defaults to 33 px. To view or enable the third party component area (see the dark blue area at the top of Figure 14-1), specify theglobalAreaHeightproperty as auto in thepageTemplateproperty Inspector.When the height of the top facet is specified as a CSS length or as auto, this facet will no longer be stretched and instead will consume the initial
offsetHeightgiven to its children by the browser. It is important to note that in an average page, a switch to a layout using automatic heights exhibited a 5- to 10-percent degradation in initial layout speed. Also, an automatic height will cause the facet child to not be stretched both vertically and horizontally. -
You can set the height of the root layout component within the facet to auto to ensure auto-resizing of contents within the facet. Consider a showDetailHeader that is the root element within the facet (in the default view activity for the bounded task flow dropped in as a region). If the height property for this showDetailHeader component is set to auto, collapsing the header would resize the contents and open more real estate in the screen for showing other components in the page.
16.6 Developing an Activity Guide Client Application with the UI Shell
The Oracle UI Shell can be used to develop an Activity Guide client application.
Before you begin:
Copy the file oracle.bpm.activityguide-ui_11.1.1.jar to a local directory from the following location in the bpm-jdev-extension.zip file:
jdev_install/jdeveloper/soa/modules/oracle.bpm.activityguide-ui_11.1.1.jar
16.6.1 How to Develop an Activity Guide Client Application Using Oracle UI Shell
To develop an activity guide client application using Oracle UI Shell, follow these steps:
-
Create a new application. In the Application Package Prefix field, enter
oracle.ag.Figure 16-6 Filling-in the Application Package Prefix Field
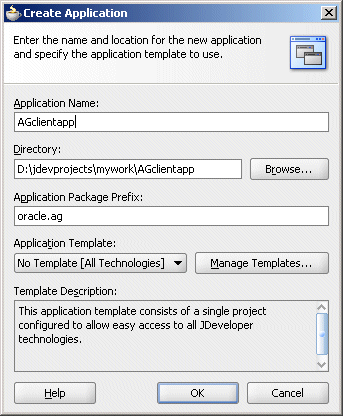
When prompted to create a new project, click Cancel.
-
In the new application, create a new project using the Web Project template by right-clicking the application and selecting New Project > Project > Web Project. Select Servlet 2.5/JSP 2.1 (Java EE 1.5). Click through the wizard, accepting all default values.
-
Add the ADF Faces and ADF Page Flow technologies to the client application project. Right-click the project and select Project Properties > Technology Scope. Shuttle ADF Faces and ADF Page Flow from the Available Technologies list to the Selected Technologies list.
Make sure the following technologies are also selected: HTML, Java, JSP and JSF and Servlets.
Figure 16-7 Adding the ADF Faces and ADF Page Flow Technologies to the Client Application
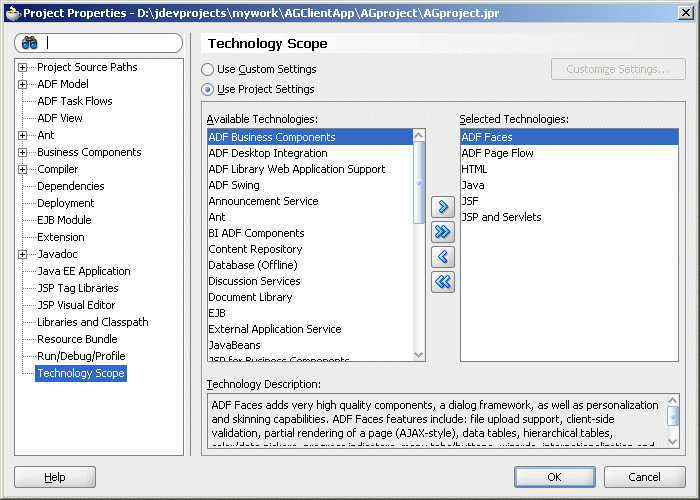
-
Right-click the client application and select Project Properties > JSP Tag Libraries. Select the Distributed Libraries folder and click Add. In the Choose Tag Libraries window, select the tag library Applications Core (ViewController) 11.1.1.0.0 and click OK.
Figure 16-8 Select the Tag Library Applications Core (ViewController) 11.1.1.00
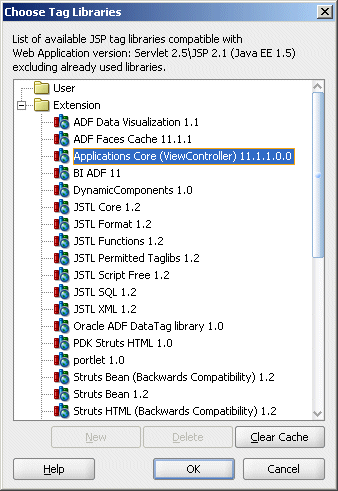
-
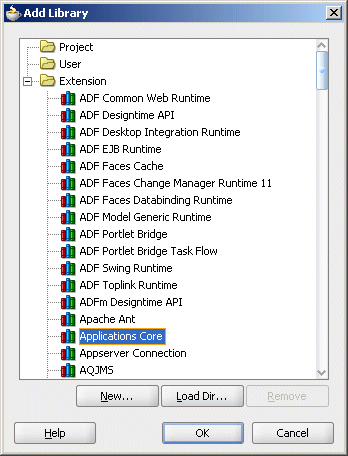
In the Project Properties window, select Libraries and Classpath and click the Add Library button. From the window that is displayed, select the Applications Core library and click OK.
Figure 16-9 Add the Applications Core Library to the Project
-
In the Project Properties window, click the Add JAR/Directory button and browse for the file
oracle.bpm.activityguide-ui_11.1.1.jar. The file is located under jdev_install/jdeveloper/soa/modules/oracle.bpm.activityguide-ui_11.1.1.jar.Click Select to add the JAR to the project classpath.
-
Add Activity Guide runtime libraries or JAR files to the classpath. Use either shared libraries or JAR files; do not use both.
-
Using shared libraries for Activity Guide runtime JAR files
Add the shared library references oracle.soa.bpel and oracle.soa.workflow.wc to the
weblogic-application.xmlfile.<library-ref> <library-name>oracle.soa.bpel</library-name> </library-ref> <library-ref> <library-name>oracle.soa.workflow.wc</library-name> </library-ref>
-
Using JAR files for Activity Guide runtime
Add the following JAR files to the classpath:
FMW_home/AS11gR1SOA/soa/modules/oracle.soa.workflow_11.1.1/bpm-services.jar
FMW_home/AS11gR1SOA/soa/modules/oracle.soa.bpel_11.1.1/orabpel-common.jar
FMW_home/AS11gR1SOA/soa/modules/oracle.soa.bpel_11.1.1/orabpel.jar
FMW_home/AS11gR1SOA/soa/modules/oracle.soa.fabric_11.1.1/bpm-infra.jar
FMW_home/AS11gR1SOA/soa/modules/oracle.soa.fabric_11.1.1/fabric-runtime.jar
FMW_home/oracle_common/modules/oracle.webservices_11.1.1/wsclient.jar
FMW_home/oracle_common/modules/oracle.xdk_11.1.1/xml.jar
-
-
Create a file called
Config.jarusing thewf_client_config.xmlfile and add it to the application classpath. Thewf_client_config.xmlfile should include the host name and port of the WLS instance running the Activity Guide instances. -
Create a JSF page. Right-click the application name and click New. In the New Gallery, select JSF > JSF Page and click OK. Use UIShell as a page template and select the checkbox Create as XML Document (*.jspx).
If a dialog box displays the message "Confirm Add Form Element," click No.
-
Create Application menu metadata. See Implementing Application Menu Security..
16.6.2 How to add a task flow to the Oracle UI Shell client application
Follow these steps to add a task flow to the Oracle UI Shell client application:
Example 16-13 An Activity Guide Properties File
#ActivityGuide Properties
ServerConnectionMode=SOAP
SelectionFilter=MY
ShowRefreshButton=true
#ShowAllAGTreeNodesProperties=true
## Sample value for AGDefinitionFilter: default/BPMAGPrj2!2.0*31fcd931-6263-4b58-97cf-6fb084addabc
#AGDefinitionFilter=
#AGInstanceID=110003
#AGInstanceOrdering=CIKEY:DESC
#CustomPredicate1=STATE,EQ,OPEN
#CustomPredicate2=STATUS,EQ,In Progress
## Example Value for  AGTasksPopupTaskflowID is /WEB-INF/ag-popup-task-flow.xml#ag-popup-task-flow
#AGTasksPopupTaskflowID=
#ShowCustomBlockedIcon=true
#HideAGTreeRootNode=false
##WorklistHttpURL is required only for digital signatures
#WorklistHttpURL=http://host:port/integration/worklistapp
Example 16-14 adfc-config.xml File with Reference to activityguide.properties File
<managed-bean>
<managed-bean-name>agProps</managed-bean-name>
<managed-bean-class>
   oracle.bpel.activityguide.ui.beans.model.AGProperties
</managed-bean-class>
<managed-bean-scope>request</managed-bean-scope>
<managed-property>
<property-name>absAgPropsFileName</property-name>
<property-class>java.lang.String</property-class>
<value> <!---absolute path on your machine should be given here-->/activityguide.properties</value>
   <!-- For example:
   Windows: C:\AG\activityguide.properties
   Linux: /scratch/<user>/AG/activityguide.properties
   -->
</managed-property>
</managed-bean>
Example 16-15 Workflow Services Client Configuration File
<?xml version="1.0" encoding="UTF-8" standalone="yes"?>
<workflowServicesClientConfiguration xmlns="http://xmlns.oracle.com/bpel/services/client">
  <server default="true" name="default">
      <localClient>
          <participateInClientTransaction>false</participateInClientTransaction>
      </localClient>
      <remoteClient>
          t3://host:port
          <initialContextFactory>weblogic.jndi.WLInitialContextFactory</initialContextFactory>
          <participateInClientTransaction>false</participateInClientTransaction>
      </remoteClient>
      <soapClient>
          http://host:port
          <identityPropagation mode="dynamic" type="saml">
              <policy-references>
                  <policy-reference enabled="true" category="security" uri="oracle/wss10_saml_token_client_policy"/>
              </policy-references>
          </identityPropagation>
     </soapClient>
  </server>
</workflowServicesClientConfiguration>
16.6.3 How to Secure the Activity Guide Oracle UI Shell Client Application
Securing the Activity Guide client application ensures that only users with proper credentials can complete the tasks outlined in the Activity Guide. Security features include authentication, authorization, realm verification and policy enforcement.
Follow the instructions for securing a Web application as described in the Enabling ADF Security in an Oracle Fusion Web Application section of the Oracle Fusion Middleware Developing Fusion Web Applications with Oracle Application Development Framework.
You can deploy an Activity Guide client application with Oracle UI Shell directly from JDeveloper or to the standalone Oracle WebLogic Server.
16.6.3.1 Deploy an Activity Guide Client Application with Oracle UI Shell to Integrated Oracle WebLogic Server
From the Application Navigator, right-click the JSF page created in How to Develop an Activity Guide Client Application Using Oracle UI Shell and select Run.
16.7 Implementing Touch Device Support in the UI Shell
The Global Area display on a tablet device is the same as the standard Global Area design except these menu options and display area are not available:
-
Administration menu options
-
Personalization > Customize this page menu option
The items that are not available on a tablet device take up too much space to be used comfortably on a small screen.
The page template will also collapse the left-side Regional area by default to save space.
Also see the Creating Web Applications for Touch Devices Using ADF Faces section in the Oracle Fusion Middleware Developing Web User Interfaces with Oracle ADF Face guide.
How to use flow mode on a touch screen device
Implementing flow mode follows the Best Practices When Using ADF Faces Components in a Mobile Browser section in the Oracle Fusion Middleware Developing Web User Interfaces with Oracle ADF Face guide.
To use flow mode on a touch screen device, but making sure that nothing is changed when displaying pages on a desktop system, add this context-param to the web.xml file of the J2EE application:
<context-param>
    <description>
      This parameter controls the default value for component geometry on the page.
      Supported values are:
        legacy - component attributes use the default values as specified for
the attributes
        auto - component attributes use the correct default value given the
value of their parent component. For example, with this setting, the
panelStretchLayout will use "auto" as the default value for its
"dimensionsFrom" attribute instead of "parent".
    </description>
    <param-name>oracle.adf.view.rich.geometry.DEFAULT_DIMENSIONS</param-name>
    <param-value>#{requestContext.agent.capabilities['touchScreen'] eq 'none' ? 'legacy' : 'auto'}</param-value>
</context-param>
In this case, the dimensionsFrom attribute is set to auto only when running on a touch screen device. But when running on a desktop system, the context-value is set to legacy and the dimensionsFrom attribute will use the old default value, which is parent.
The UI Shell sets the dimensionsFrom attribute to children on the root panel component on a page when running on a tablet device. Setting the dimensionsFrom attribute to auto, and placing the context-param in the web.xml file, will allow all other components to use the dimensionsFrom attribute.
16.8 Implementing the Translation Editor
The Translation Editor is a standard UI component that allows translated data to be edited in all languages, regardless of the session language. It is accessible in Table layout. It also:
-
Allows all translated data stored in multi-lingual (TL) tables to be edited on the same setup UI as untranslated data for the same object.
-
Automatically synchronizes any updates required by source_lang defaulting.
-
Does not require the user to change session language, even temporarily.
The Translation Editor is implemented as a popup window, launched at the row level.
The Edit Translations popup has a row for each language that is installed and implemented by the Translation Editor. When the user highlights an editable row and clicks the Translations Editor button and the popup displays, the user can enter, for instance, a description in German in the row marked German. This then places the German text in the correct field in a database.
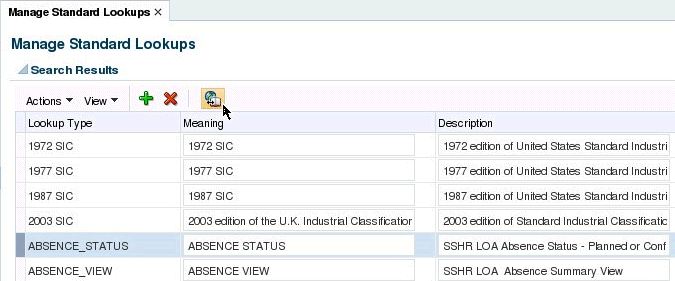
This example shows that the ABSENCE_STATUS row is selected:
Figure 16-10 Row Selected in Table
Click the Translation Editor button to display the Edit Translations dialog:
Figure 16-11 Translations Dialog
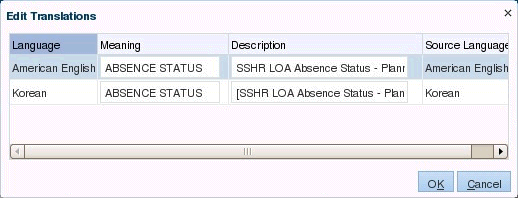
A user can enter other language descriptions in any other available language row without having to close the Edit Translations dialog and restarting it.
Assume the user's job is to enter data in multiple languages: Korean, German and English. When the Edit Translations dialog opens, the user would see Korean, German, and English rows.
When the system first starts, there may be no data. When data is added, it would be in a single language. That is the source language. So if a Korean user first adds the data, when any user views the data, it would be in Korean, even if the user were an English or German user. Then when the translation editor opens, it would have Korean data in all rows, and the Source Language in the right-hand column for each row would say Korean in all rows. If a German user then opens the translation editor and changes the German row, the Source Language for that row will change to German.
Note: If the source language value is updated, all values that show the same source language also will update.
Note: A user can enter a translation in the wrong field; such as entering a German translation in the French field.
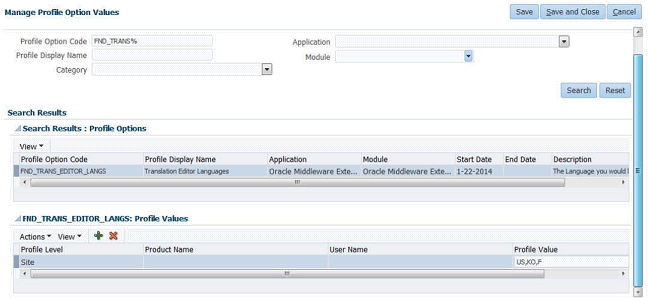
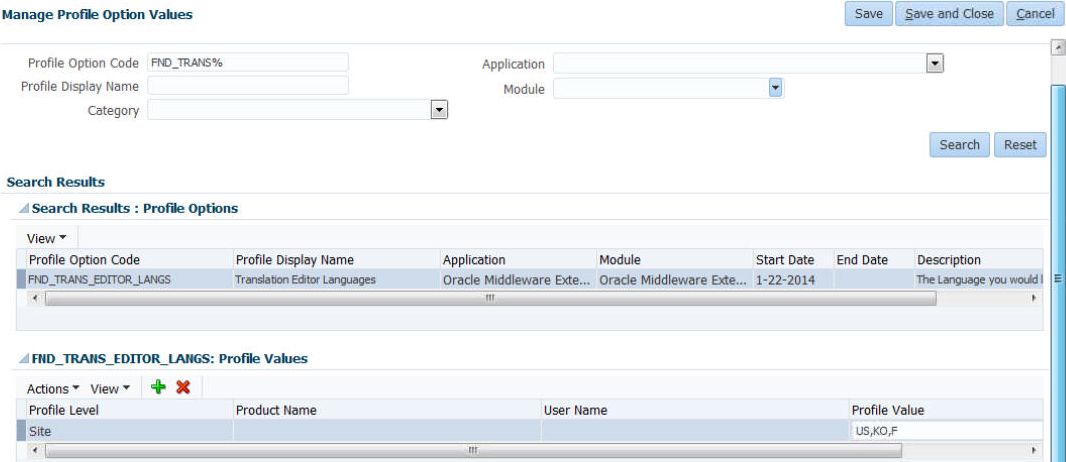
Limiting languages shown: This is to help someone that is translating many UIs for a certain language to limit the popup to only show the language on which he or she is currently working. This control is accomplished by setting the profile option FND_TRANS_EDITOR_LANGS to the languages that you want to see. This profile can be set at Site or User level.
To access the profile option, click Setup and Maintenance > Manage Administrator Profile Option Values > then search for FND_TRANS_EDITOR_LANGS.
Figure 16-12 Setting Which Languages to Display in the Edit Translations Dialog
16.8.1 How to Implement the Translation Editor
Important: This section assumes that developers will have completed all coding necessary to support the OA Base Class Translation Model. See OADEE58122 "Using Oracle Fusion Middleware Extensions for Oracle Applications Base Classes."
To implement the Translation Editor, follow these steps:
The TL model should now be complete. The next step is to add the Translation Editor to the UI.
16.8.2 How to Add the Translation Editor to Existing Application Tables During Design Time
This section describes how to add the Translation Editor to an Application Table on an existing JSFF page. If you are creating a new Application Table, skip to How to Add the Translation Editor to New Application Tables During Design Time.
You will use a design time wizard add the Translation Editor to a UI.
For example, if you drag a translatable table (TL) view object instance from the dataControl to an existing ApplicationTable > additionalToolbarButton > af:toolbar or ApplicationTable > f:facet-popup > panelGroupLayout, you can pick the Translation Editor under applications. You can drop the Translation Editor on either facet; the result will be the same.
Note that you can not drag and drop directly onto an ApplicationTable.
This shows an example drag-and-drop of a TL view object onto an ApplicationTable > additionToolbarButton-> af:toolbar.
Figure 16-20 Example Drag-and-Drop of A TL View Object

You also can drag and drop your TL view object onto ApplicationTable > f:facet-popup > panelGroupLayout.
After the drag-and-drop, the Create Translation Popup wizard will open. The wizard will include input for a list of all the columns in the TL view object and you can remove the ones you do not want. The list will show all the attributes in the TL view object, except for Who columns, LANGUAGE, SOURCE_LANG and the Primary Key. You can remove the translation attributes you do not want to display. You also can pick input text field or text region as the type. All other display properties (such as prompts) will be defaulted from control hints on the TL view object.
Figure 16-21 Create Translation Popup Wizard
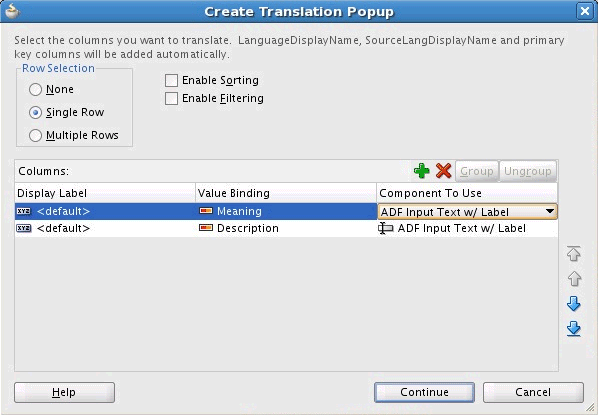
When you click Continue, designer will add the popup code into your JSFF file. You should not edit anything in the code that is added to your page.
16.8.3 How to Add the Translation Editor to New Application Tables During Design Time
The Application Table Configure Table Patterns wizard has an option for users to choose whether to have the translation editor ability. The View Instances that will be available to enable for the Translation Editor will be those view objects marked with the fnd:OA_TRANSLATION_TABLE custom property (see Model layer changes below). If there are no such view objects, the Translation Editor option will be disabled.
16.8.4 Handle Multi-Language Data Entry
The Translation Editor allows translated data to be edited in all languages, regardless of session language.
-
Allow all translated data stored in in multi-lingual (TL) tables to be edited on the same setup UI as untranslated data for the same object
-
Automatically synchronizes any updates required by source_lang defaulting
-
Does ot require the user to change session language, even temporarily
-
Accessible in either Form or Table layout
-
Is a standard component that require minimal hand-coding by consuming developers
-
Properly handles validation of translated values
Runtime Design
The Translation Editor is implemented as a popup window, launched at the row level by a button. The button and popup window will appear as shown in these two images:
Figure 16-22 Example of the Translation Editor in a Table
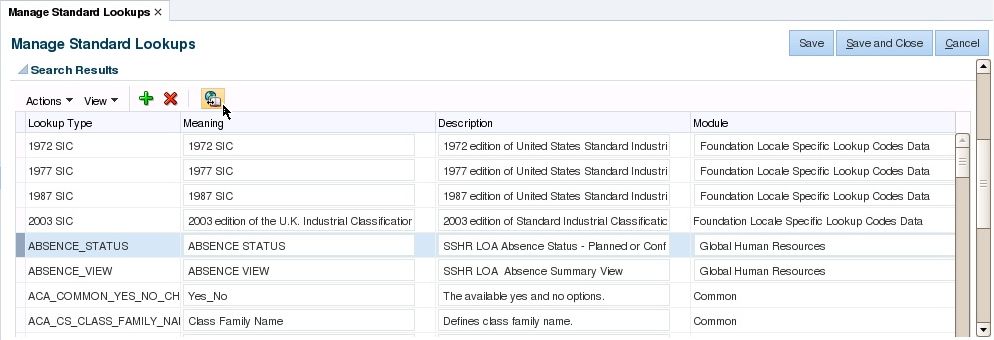
Figure 16-23 Example of the Edit Translations Display
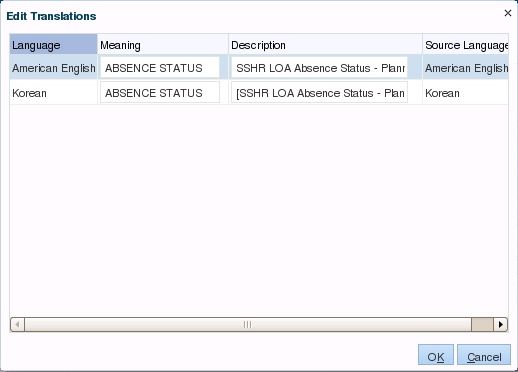
The translation button will be in the primary button region of Application Table.
If there is only 1 language active, the icon will not be visible.
The popup window will show a table of translated data for a single data row, with 1 row per active language (translated data for disabled languages will not be displayed, even if present). The columns of the table will include language and source language (both read-only), and 1 column for each translated attribute. Translated attributes may be editable or read-only. Column prompts and display properties (such as display size) should match the prompt and display properties of the base attribute. (NOTE: TBD how to do this.)
When a value is updated:
-
The row will be marked at "translated," meaning the language and source language will be set to the same value.
-
Any other languages with the same source language as the updated row will be re-defaulted.
If the window is closed:
-
If closed with OK, values will be written back to be committed (or not) with the main transaction. If any translated values for the session language have been updated, they will be updated in the main UI.
-
If closed with Cancel, all changes in the popup are discarded without affecting anything in the main transaction.
When the entire transaction is committed, any updates performed in the Translation Editor will be validated and committed at the same time. If any validation errors occur in translated data, they will be reported along with all other validation errors. The user will need to re-open the popup window to correct the error. If the error is associated with an attribute, that attribute will have a "red box" indicator in the popup, only on the language row in error.
Ability to limit languages shown: The languages that are shown can be limited. This is to help someone that is translating many UIs for a certain language to limit the popup to only show the language on which he or she is currently working. This control is accomplished by setting the profile option FND_TRANS_EDITOR_LANGS to the languages that will be shown. This profile can be set at SITE or USER level. If null, all active languages are shown. The values (US, KO, F) can be found in the Manage Languages setup UI.
Figure 16-24 Setting the FND_TRANS_EDITOR_LANGS Profile
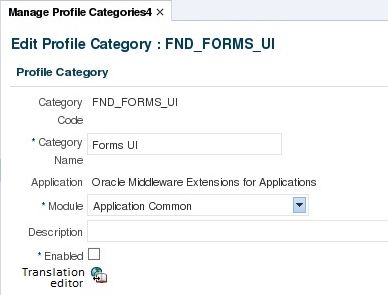
Launching the Translation Editor from a form is shown in this example.
Figure 16-25 Launching the Translation Editor from a Form

When you click the Translation Editor button, the same popup described for the Application Table case will show.
Figure 16-26 Edit Translations Popup
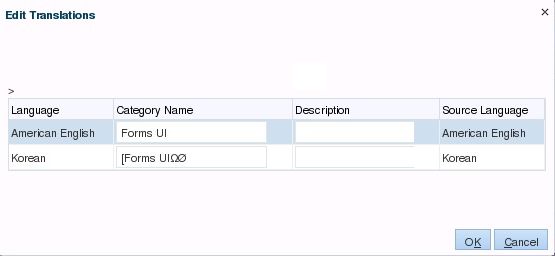
If your form has multiple regions that involve more than one TL ViewObject, then we recommended that you drag-and-drop the TL ViewObject onto the desired location in your form. For example, in the below case, the Translation Editor button is placed at the end of the form.
Figure 16-27 Edit Profile Category
16.8.4.1 Implement Multi-Language Data Entry
Prerequisite
Bbefore starting this, developers will have completed all coding necessary to support the OA Base Class Translation Model. See Understanding Multi-Language Support Features for setting up translation tables.
Prepare the TL EO and Entity Associations
-
Copy validators from VL EO to TL EO. In accordance with the MLS coding standard, only the VL EO will have any validation; the TL EO has no validation, it relies on validation in the VL EO before values are copied to the TL EO by the OA base classes. This will not be sufficient if translated values can be updated directly. Any validators on the VL EO that reference translated attributes must be copied to the TL EO.
-
Copy control hints from VL EO to TL EO. If you did not set the control hints to your TL EO, add control hints to the TL EO for prompt, display length, widget, and so on. These control hints will be used when rendering the Translation Editor. Generally, these will be the same control hints as the attributes on the VL EO, but under some circumstances might be different (for example display length may be shorter.)
-
Create Entity Associations for Language attributes. Create two EO associations from the TL EO to
LanguagePEO: one from your Language attribute to theLanguagePEO.LanguageCode, and one from theSourceLangattribute to theLanguagePEO.LanguageCode. Both associations are 0,1 .. *, everything else can be left as default. For example, the two EO associations created for this test case areLookupTypeTranslationVOLanguageToLanguagePEOandlookupTypeTranslationVOSourceLangToLanguagePEO.
Create the TL VO and View Link
-
Define a VO for the TL table. If the MLS coding standard has been followed, every TL table should have an EO, linked to an EO based on the VL view, but only the VL-based EO has a VO. To support the Translation Editor, a VO must be added for the TL EO as well. Define a new VO based on the TL EO. The VO should be the default, and include all attributes in the TL EO. No other changes are needed. The translated attributes in this new VO will inherit custom properties
fnd:OA_TRANSLATABLEfrom the TL EO that should have been set previously. -
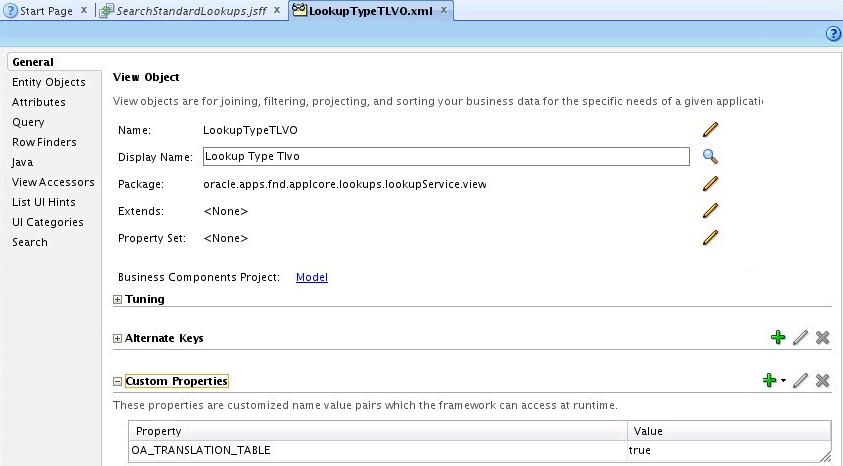
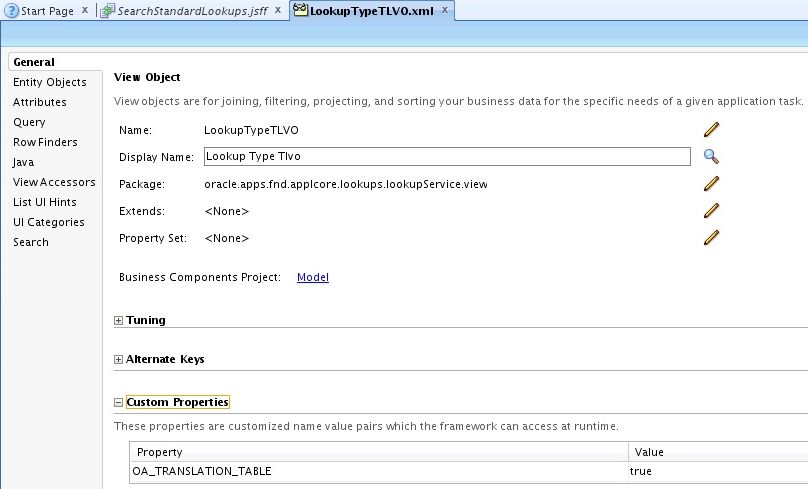
On the new TL VO, define the custom property at the VO level to
fnd:OA_TRANSLATION_TABLE = true. The translated attributes in this new VO will inherit custom propertiesfnd:OA_TRANSLATABLEfrom the TL EO that should have been set previously.Figure 16-28 Example Showing Custom Property
-
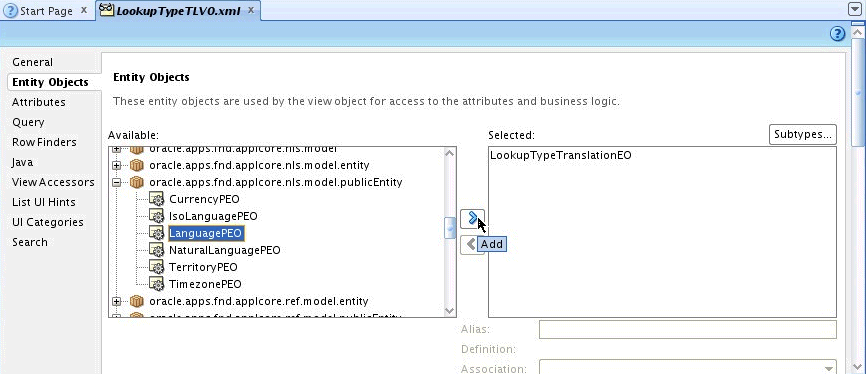
Add
LanguagePEOto the VO for Language andSourceLang. TheLanguagePEOmust be added to the model for the new TL VO for Language andSourceLang, using the 2 entity associations created above.-
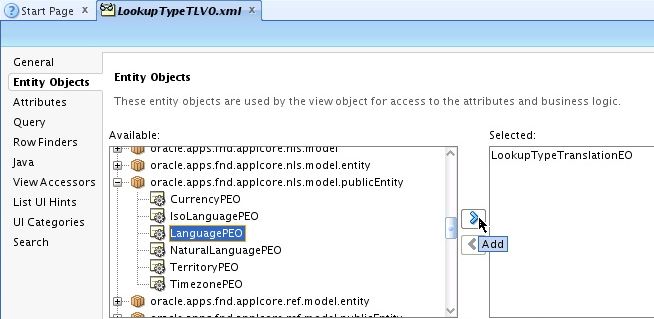
Add
LanguagePEOto the TL VO as an Entity Object, using the Entity Association created for the Language attribute.Figure 16-29 Adding LanguagePEO
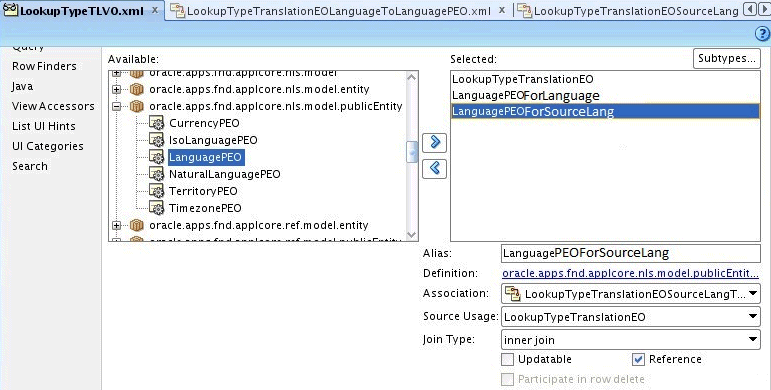
-
Add
LanguagePEOto the TL VO as an Entity Object again, using the Entity Association created for theSourceLangattribute.Figure 16-30 Adding LanguagePEO Again
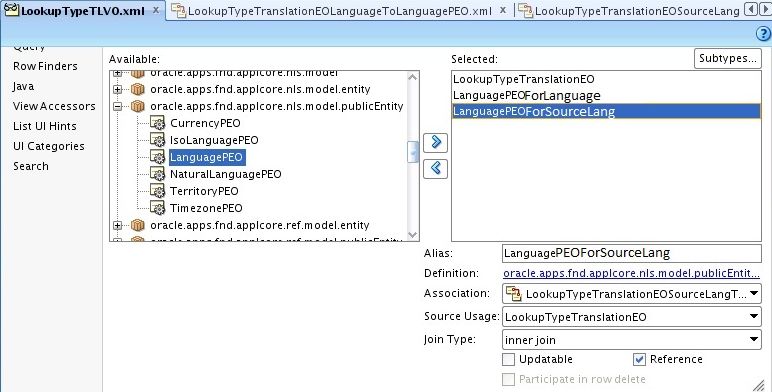
-
-
Add
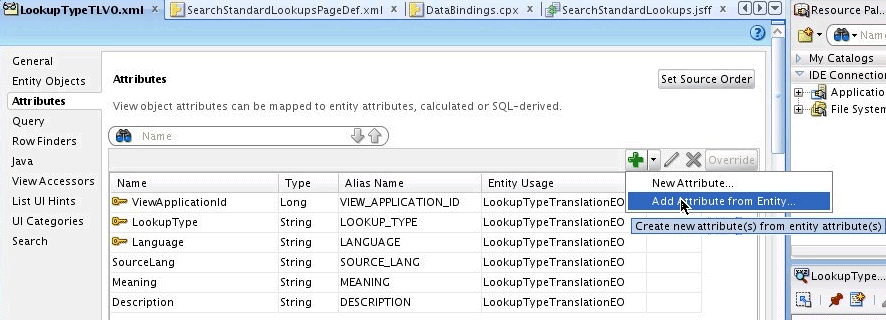
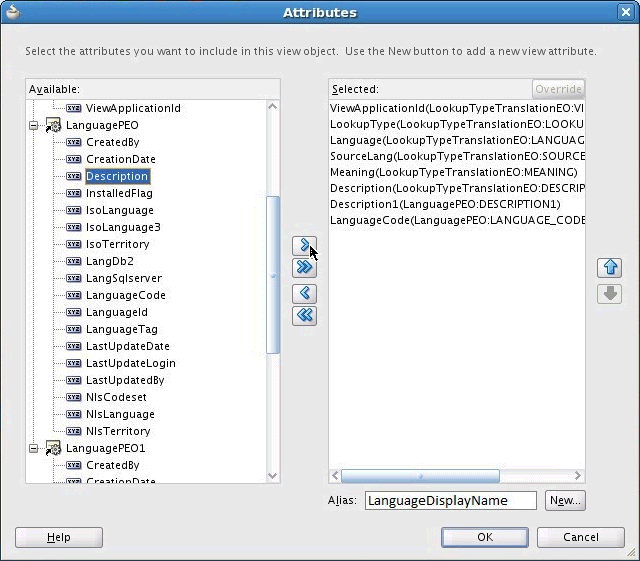
LanguageandSourceLangdisplay name attributes. Create 2 attributes in your VO for theLanguageandSourceLangdisplay name, using theDescriptionattribute from theLanguagePEOentity objects just added.Figure 16-31 Adding Display Names Attributes
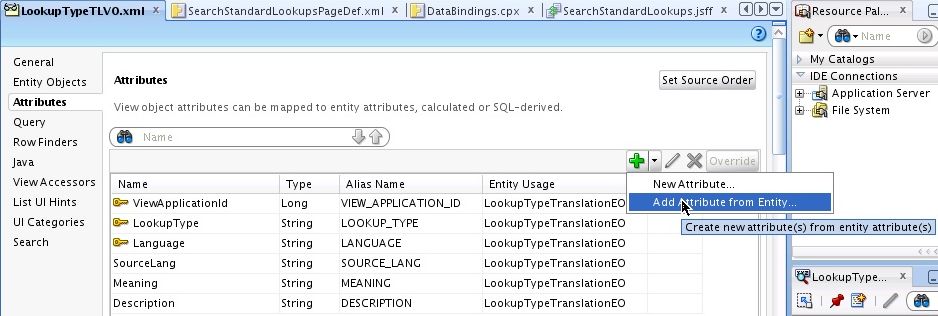
In the translation popup window, show the language description instead of the language code. For example, American instead of US.
Important:
When adding these attributes to the EO you must give them the alias
LanguageDisplayNameandSourceLangDisplayName, as shown below.Figure 16-32 Creating LanguageDisplayName Alias for Description Attribute
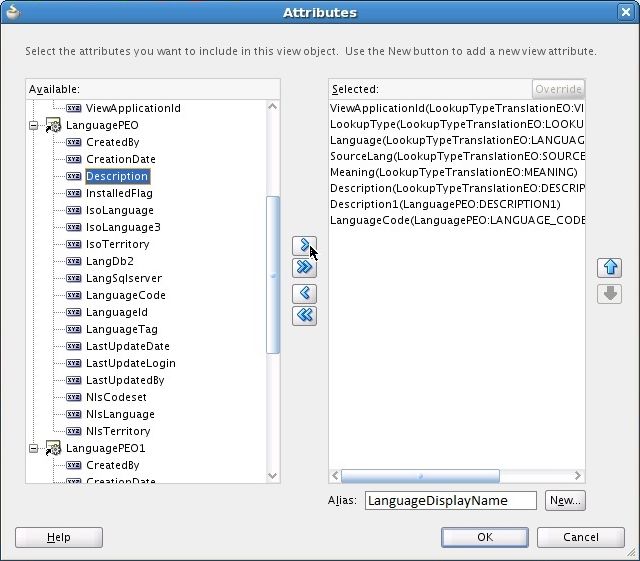
Figure 16-33 Creating SourceLanguageDisplayName Alias for Description1 Attribute
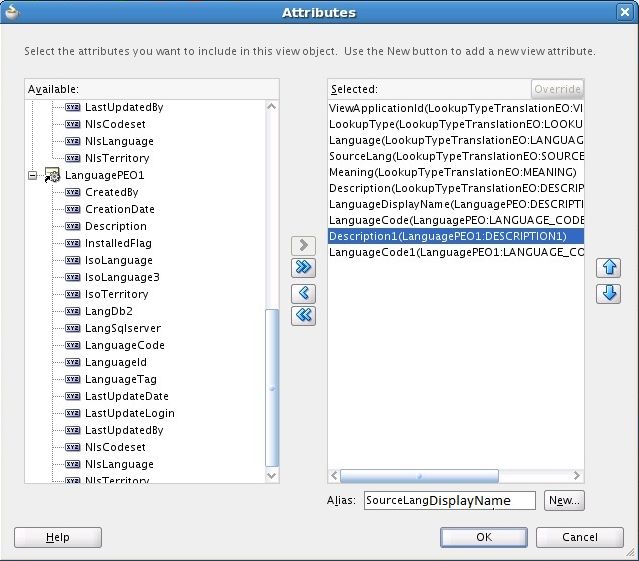
The
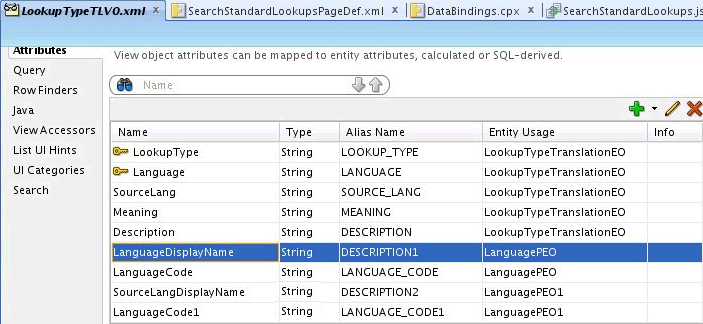
LanguageDisplayNameandSourceLangDisplayNameattributes should now be included in the TL VO.Figure 16-34 Example Showing LanguageDisplayName and SourceLangDisplayName Included in TL VO
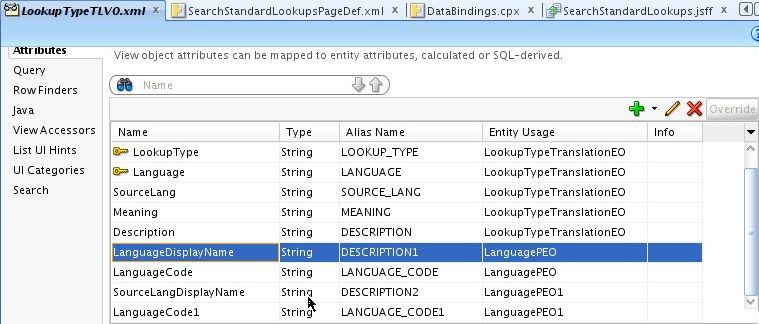
Important:
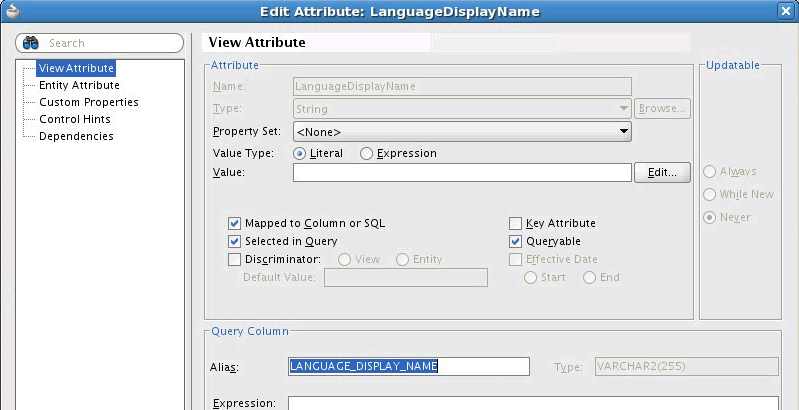
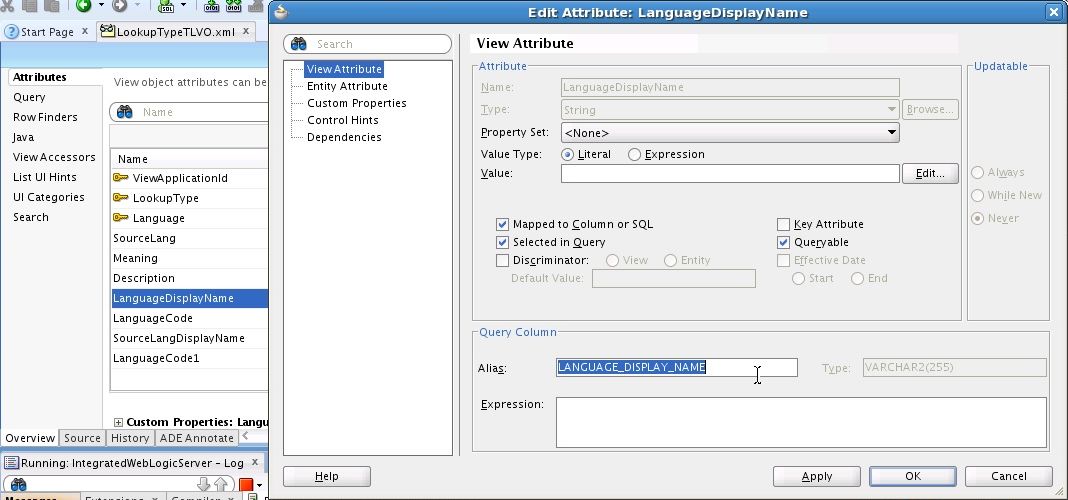
Set the Query Column Alias of the
LanguageDisplayNameattribute to "LANGUAGE_DISPLAY_NAME". The Translation Editor uses the Language Display Name to do the "order by" when displaying the translation data in the popup. You do not need to set the Query Column alias forSourceLangDisplayName, onlyLanguageDisplayName, as shown here.Figure 16-35 LanguageDisplayName Alias
Important:
Set the Control hint label text of your
LanguageDisplayNameto "Language". Set the Control hint label text of yourSourceLangDisplayNameto "Source Language." -
Add a View Link for the VO. This new TL VO must be a child of the base VL VO. A View Link must be defined between the VL VO and the new TL VO.
Add Translation VL to AM
-
Add Translation VO to the AM. Use this View Link to add the Translation VO to the AM, as a child of the VL VO.
-
Exclude this TLVO from loader VO list. If you are using the same model for both your UI and loader purpose, you will need to exclude this TLVO so that loader will skip this TLVO. For example, assume
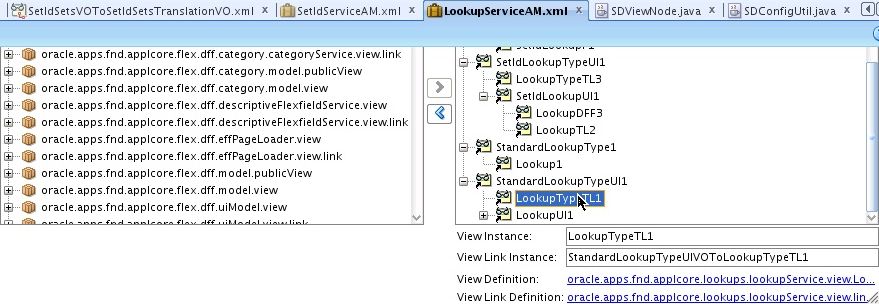
StandardLookupTypeUIVOis the loader VO and it now has a TLVO child. If you don't exclude this child, the TLVO will appear in the loader file. What you do is to addSD_EXCLUSION_LINKLISTinto your AM.xml file as shown here:<CustomProperties> <Property Name= "SD_EXCLUSION_LINKLIST_StandardLookupTypeUI1" Value = "StandardLookupTypeUIVOToLookupTypeTL1"/>Important:
Note that in the above example,
StandardLookupTypeUI1is the View Instance Name. And in the Value portion ofStandardLookupTypeUIVOToLookupTypeTL1is the View Link Instance Name. You can get the exact name in your AM > DataModel, as shown here.Figure 16-36 StandardLookupType UI1 in Data Model
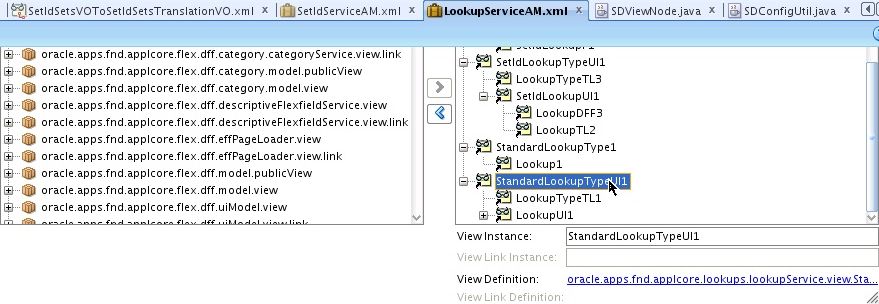
Figure 16-37 LookupTypeTL1 in Data Model
Your TL model should now be complete. Continue to the Design Time section to add the Translation Editor to your UI.
16.8.4.1.1 Design Time for Existing Application Tables
This section describes how to add a Translation Editor to an Application Table on an existing JSFF page. If you are creating a new Application Table, skip to the "Design Time for New Application Tables" section.
A design time wizard is used to add the Translation Editor to a setup UI.
For example, if you drag a TLVO Instance from the dataControl to your existing ApplicationTable > additionalToolbarButton > af:toolbar or ApplicationTable > f:facet-popup > panelGroupLayout then under Applications you can pick Translation Editor. You can drop the Translation Editor on either facet; the result will be exactly the same.
Note that you can not drag and drop directly onto ApplicationTable because it is not an ADF component that can be dropped.
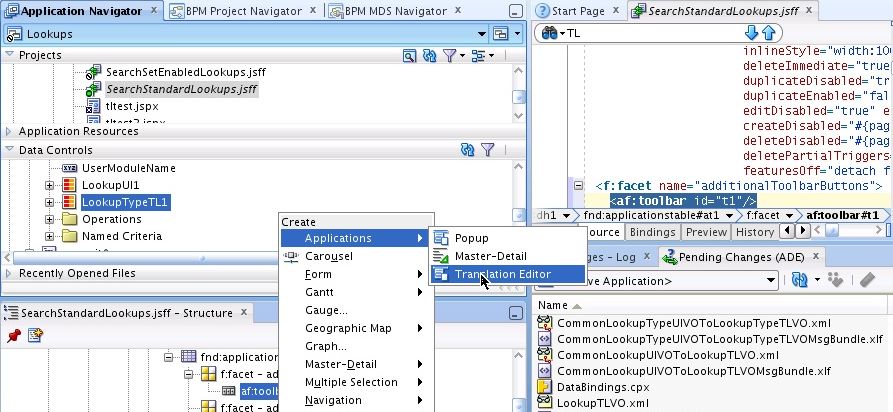
This is an example drag and drop of your TLVO onto ApplicationTable > additionToolbarButton > af:toolbar.
Figure 16-38 Example Drag and Drop to Existing Toolbar
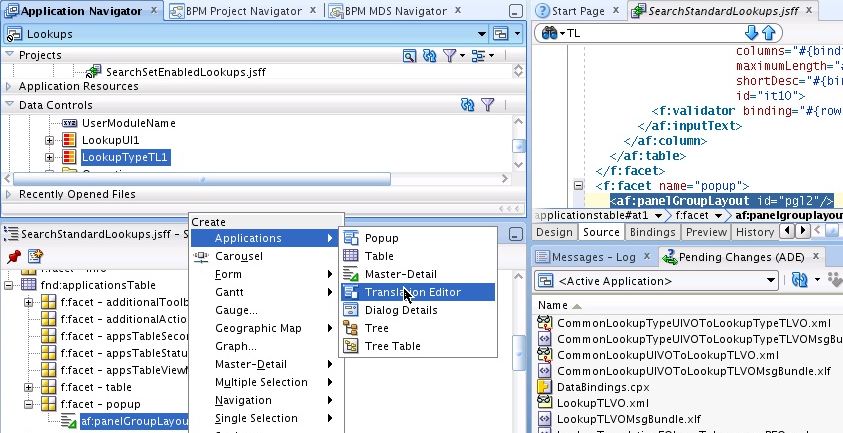
You also can drag and drop your TLVO onto ApplicationTable > f:facet-popup > panelGroupLayout.
Figure 16-39 Example Drag and Drop to existing panelGroupLayout
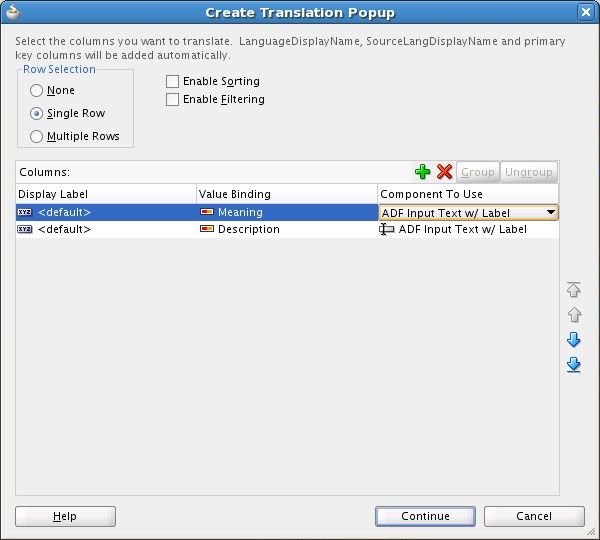
After the drag and drop, the wizard will show. The wizard will include input for a list of all the columns in the TL VO and you can remove the ones you do not want. The list will show all the attributes in the TL VO, except for WHO columns, LANGUAGE, SOURCE_LANG and the Primary Key. You can remove the translation attributes you do not want to display. You also can pick input text field or text region as the type. All other display properties (such as prompt) will be defaulted from control hints on the TL VO.
Figure 16-40 Create Translation Popup
When you click Continue, designer will add the popup code into your JSFF file. You should not edit anything in the code added to your page.
Turn On Auto Submit
Turn on the autoSubmit property for all your translation attributes so that any changes you make in your base table are immediately seen inside your Translation Editor popup table.
All updates you make inside the Translation Editor popup table will automatically be brought back to your base table.
Adjust your code accordingly if it is sensitive with autoSubmit turned on.
16.8.4.1.2 Design Time for Creating a New Application Table
The Application Table wizard lets the user choose whether or not to have the Translation Editor ability. The View Instances that will be available to enable for the Translation Editor will be those VOs marked with the fnd:OA_TRANSLATION_TABLE custom property. If there are no such VOs, the Translation Editor option will be disabled.
Figure 16-41 Configure Table Patterns
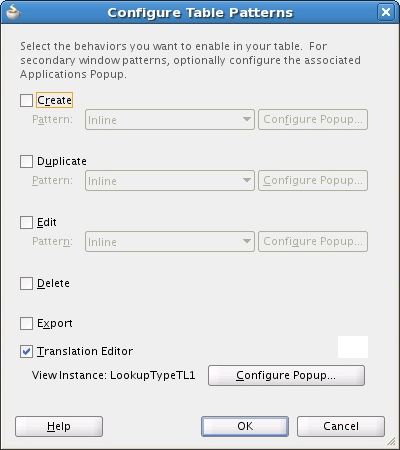
LookupTypeTL1 is shown automatically because it has defined the custom property OA_TRANSLATION_TABLE = yes.
Further steps are identical to the procedures in Design Time for Existing Application Tables.
Information Written to the JSFF File
Whether you add the Translation Editor feature for an existing application table or enable it when creating a new application table, Translation Editor writes two pieces of information into the JSFF page whether you create it within the Application Table wizard or you create it by dragging and dropping the TLVO into an existing application table.
This example shows information that will be written inside the JSFF file.
<fnd:applicationsTable tableId="ATt1" id="AT1"
 ..................................>
    <af:table .............
<!-- Design time add the TL dialog id into your af:table partialTriggers !-->
        partialTriggers=............":::TlAfd1"

<!-- TL button is placed inside ApplicationTable additionToolbarButtons -->
<f:facet name="additionalToolbarButtons">
   <af:toolbar id="t1">
     <af:commandToolbarButton shortDesc="#{applcoreBundle.TRANSLATION_EDITOR}"
             icon="/images/applcore/patterns/language_qualifier_ena.png"
             hoverIcon="/images/applcore/patterns/language_qualifier_ovr.png"
             depressedIcon="/images/applcore/patterns/language_qualifier_dwn.png"
             disabledIcon="/images/applcore/patterns/language_qualifier_dis.png"
             disabled="#{backingBeanScope.TranslationEditorBean.checkNewRow.tlt2}">
             id="ctb1">
       <af:showPopupBehavior popupId="::TlAfp1"  <<<<--- Translation Editor popup id
            triggerType="action"/>
     </af:commandToolbarButton>
   </af:toolbar>
 </f:facet>
 .......................................
 ........................................
                </af:table>
 </f:facet>
<!-- Design Time place the the TL popup dialog code at the end of your table -->
 <f:facet name="popup">
   <af:panelGroupLayout id="pgl2">
     <af:popup contentDelivery="lazyUncached"
               popupFetchListener="#{backingBeanScope.TranslationEditorBean.handlePopupFetch}"
               popupCanceledListener="#{backingBeanScope.TranslationEditorBean.handlePopupCanceled}"
               id="TlAfp1">
       <af:dialog title="#{applcoreBundle.EDIT_TRANSLATIONS}"
                  cancelTextAndAccessKey="#{applcoreBundle.CANCEL}"
                  type="okCancel"
                  affirmativeTextAndAccessKey="#{applcoreBundle.OK}"
                  modal="true"
                  dialogListener="#{backingBeanScope.TranslationEditorBean.updateBaseParent}"
                  id="TlAfd1">
         <af:panelStretchLayout id="psl1" dimensionsFrom="children">
           <f:facet name="center">
             <af:table value="#{bindings.LookupTypeTL1.collectionModel}"
                       var="row"
                       rows="#{bindings.LookupTypeTL1.rangeSize}"
                       emptyText="#{bindings.LookupTypeTL1.viewable ? applcoreBundle.TABLE_EMPTY_TEXT_NO_ROWS_YET :
                                    applcoreBundle.TABLE_EMPTY_TEXT_ACCESS_DENIED}"
                       fetchSize="#{bindings.LookupTypeTL1.rangeSize}"
                       rowBandingInterval="0" inlineStyle="width:840px; height:200px;"
                       selectedRowKeys="#{bindings.LookupTypeTL1.collectionModel.selectedRow}"
                       selectionListener="#{bindings.LookupTypeTL1.collectionModel.makeCurrent}"
                       rowSelection="single" id="tlt2">
               <af:column sortProperty="#{bindings.LookupTypeTL1.hints.LanguageDisplayName.name}"
                          headerText="#{bindings.LookupTypeTL1.hints.LanguageDisplayName.label}"
                          sortable="false" id="c19">
                 <af:outputText value="#{row.LanguageDisplayName}"
                                id="ot1"/>
               </af:column>
               <af:column sortProperty="#{bindings.LookupTypeTL1.hints.Meaning.name}"
                          sortable="false"
                          headerText="#{bindings.LookupTypeTL1.hints.Meaning.label}"
                          id="c21">
                 <af:inputText value="#{row.bindings.Meaning.inputValue}"
                               label="#{bindings.LookupTypeTL1.hints.Meaning.label}"
                               required="#{bindings.LookupTypeTL1.hints.Meaning.mandatory}"
                               columns="#{bindings.LookupTypeTL1.hints.Meaning.displayWidth}"
                               maximumLength="#{bindings.LookupTypeTL1.hints.Meaning.precision}"
                               shortDesc="#{bindings.LookupTypeTL1.hints.Meaning.tooltip}"
                               autoSubmit="true"
                               valueChangeListener="#{backingBeanScope.TranslationEditorBean.TLValueChangeListener}"
                               id="it3">
                   <f:validator binding="#{row.bindings.Meaning.validator}"/>
                 </af:inputText>
               </af:column>
               <af:column sortProperty="#{bindings.LookupTypeTL1.hints.Description.name}"
                          sortable="false"
                          headerText="#{bindings.LookupTypeTL1.hints.Description.label}"
                          id="c22">
                 <af:inputText value="#{row.bindings.Description.inputValue}"
                               label="#{bindings.LookupTypeTL1.hints.Description.label}"
                               required="#{bindings.LookupTypeTL1.hints.Description.mandatory}"
                               columns="#{bindings.LookupTypeTL1.hints.Description.displayWidth}"
                               maximumLength="#{bindings.LookupTypeTL1.hints.Description.precision}"
                               shortDesc="#{bindings.LookupTypeTL1.hints.Description.tooltip}"
                               autoSubmit="true"
                               valueChangeListener="#{backingBeanScope.TranslationEditorBean.TLValueChangeListener}"
                               id="it12">
                   <f:validator binding="#{row.bindings.Description.validator}"/>
                 </af:inputText>
               </af:column>
               <af:column sortProperty="#{bindings.LookupTypeTL1.hints.SourceLangDisplayName.name}"
                          headerText="#{bindings.LookupTypeTL1.hints.SourceLangDisplayName.label}"
                          sortable="false" id="c20">
                 <af:outputText value="#{row.SourceLangDisplayName}"
                                id="ot2"/>
               </af:column>
             </af:table>
           </f:facet>
         </af:panelStretchLayout>
       </af:dialog>
     </af:popup>
   </af:panelGroupLayout>
 </f:facet>
</fnd:applicationsTable>
<af:column> and <af:inputText> Properties Copied from Base Attribute
If you have any properties set on the translatable attribute in the base table, design time will copy the same properties into the attribute inside the translation popup table.
These are the properties Designer will copy:
-
<af:column>
-
allign, headerNoWrap, headerText, helpTopicId, minimumWidth, noWrap, rendered, shortDesc, showRequired, sortProperty, sortable, visible,
-
<af:inputText>
-
disabled, editable, helpTopicId, label, labelAndAccessKey, maximumLength, readOnly, rendered, required, requiredMessageDetail, rows, shortDesc, showRequired, validator, visible, wrap
16.8.4.1.3 Design Time for Adding Translation Editor into ADF Form
This is the start of your topic.
The Translation Editor feature is designed outside of the native ADF. Therefore, you must create your ADF form first and then drag and drop the Translation Editor view object onto the desire location in the ADF form.
If you have a simple form, you should drag and drop onto the applicationsPanel > actionButtonBar facet.
-
Locate the Data Control created for the new Translation VO.
-
Open the JSFF page. Drag-drop this data control onto the fnd:applicationsPanel > f:facet - actionButtonBar in the Structure window.
-
In the Create menu, choose Applications > Translation Editor.
Figure 16-42 Drag and Drop onto actionButtonBar Facet
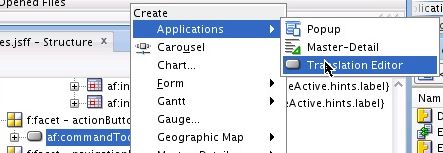
After the drag and drop, the Translation Editor wizard already described for the application table will open.
You also can choose to drag and drop the Translation Editor button inside your ADF form. For example:
Figure 16-43 Drag and Drop into ADF Form
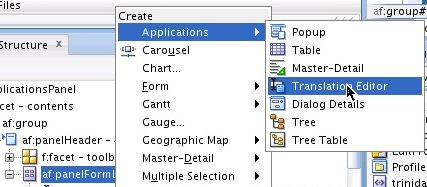
Note:
Turn On Auto Submit.
Turn on theautoSubmit property for all of your translation attributes so that any changes you make in your base form will be seen immediately inside your Translation Editor popup table.
All updates you make inside the Translation Editor popup table will automatically be brought back to your base form.
Adjust your code accordingly if it is sensitive to having autoSubmit turned on.
This is the code written into your JSFF file:
<?xml version='1.0' encoding='UTF-8'?>
<jsp:root xmlns:jsp="http://java.sun.com/JSP/Page" version="2.1"
          xmlns:af="http://xmlns.oracle.com/adf/faces/rich"
          xmlns:f="http://java.sun.com/jsf/core"
          xmlns:c="http://java.sun.com/jsp/jstl/core"
          xmlns:fnd="http://xmlns.oracle.com/apps/fnd/applcore"
          xmlns:h="http://java.sun.com/jsf/html">
  <c:set var="profileuiBundle"
         value="#{adfBundle['oracle.apps.fnd.applcore.profiles.ui.CreateEditCategoryBundle']}"/>
  <c:set var="profileuiMainBundle"
         value="#{adfBundle['oracle.apps.fnd.applcore.profiles.ui.ProfilesMainBundle']}"/>
  <af:pageTemplate viewId="/oracle/apps/fnd/applcore/templates/UIShellMainArea.jspx"
                   id="pt1">
    <f:facet name="localArea">
      <fnd:applicationsPanel id="AP1"
            title="#{bindings.Name.inputValue == 'a' ? profileuiBundle.CREATE_PROFILE_CATEGORY : af:formatNamed(profileuiBundle.EDIT_PROFILE_CATEGORY, 'PROFILE_CATEGORY_NAME',  bindings.Name.inputValue)}"
            scrollable="true" contentsFacet="scroll"
            navigationType="none" cancelVisible="true"
            cancelRendered="true" saveVisible="true"
            saveRendered="true" saveAndCloseVisible="true"
            saveAndCloseRendered="true"
            saveDisabled="#{bindings.CreatedBy.inputValue == 'SEED_DATA_FROM_APPLICATION' and securityContext.userName != 'SEED_DATA_FROM_APPLICATION'}"
            saveAndCloseDisabled="#{bindings.CreatedBy.inputValue == 'SEED_DATA_FROM_APPLICATION' and securityContext.userName != 'SEED_DATA_FROM_APPLICATION'}"
            saveOptionsStyle="button">
        <f:facet name="contents">
          <h:panelGroup id="pg1">
          <af:panelGroupLayout id="pgl1">
            <af:panelHeader text="#{profileuiBundle.PROFILE_CATEGORY}" id="ph1">

<!-- Design time will write a partial trigger inside your form to point to the TL dialog !-->
              <af:panelFormLayout maxColumns="1" rows="1" id="pfl2" partialTriggers="TlAfd1">
                <!-- Your existing af:form content -->
..........................................
..........................................
<!-- could also put the TL button at the end of your form  -->
              </af:panelFormLayout>
            </af:panelHeader>
          </af:panelGroupLayout>
<!-- The TL popup dialog code starts here -->
           <af:popup id="TlAfp3" contentDelivery="lazyUncached"
   popupFetchListener="#{backingBeanScope.TranslationEditorBean.handlePopupFetch}"
   popupCanceledListener="#{backingBeanScope.TranslationEditorBean.handlePopupCanceled}">
              <af:dialog id="TlAfd1"
                        title="#{applcoreBundle.EDIT_TRANSLATIONS}"
                        cancelTextAndAccessKey="#{applcoreBundle.CANCEL}"
                        type="okCancel"
                        affirmativeTextAndAccessKey="#{applcoreBundle.OK}"
                        modal="true"
                        dialogListener="#{backingBeanScope.TranslationEditorBean.updateBaseParent}">
                  <af:panelStretchLayout dimensionsFrom="children"
                                    id="psl3">
                      <f:facet name="center">
                          <af:table value="#{bindings.ProfileCategoryTLUI1.collectionModel}
            <!-- The TL table content is the same as the above example -->

        </h:panelGroup>
        </f:facet>
        <f:facet name="navigationBar"/>
        <f:facet name="actionButtonBar">
<!-- The TL button is placed inside Application Panel actionButtonBar -->

          <h:panelGroup id="pg2">
            <af:commandToolbarButton shortDesc="#{applcoreBundle.TRANSLATION_EDITOR}"
                                    icon="/images/applcore/patterns/ipaddress_ena.png"
                                    hoverIcon="/images/applcore/patterns/ipaddress_ovr.png"
                                    depressedIcon="/images/applcore/patterns/ipaddress_dwn.png"
                                    disabledIcon="/images/applcore/patterns/ipaddress_dis.png"
                                    id="ctb1"
                                    disabled="#{backingBeanScope.TranslationEditorBean.checkNewRow.tlt29}">
                <af:showPopupBehavior popupId="TlAfp1"
                                    triggerType="action"/>
            </af:commandToolbarButton>
          </h:panelGroup>
        </f:facet>
        <f:facet name="saveButtonMenu"/>
        <f:facet name="submitButtonMenu"/>
        <f:facet name="popup"/>
        <f:facet name="customSaveDropButton"/>
        <f:facet name="collaborationToolbar"/>
        <f:facet name="scalingInfo"/>
        <f:facet name="taskStamp"/>
        <f:facet name="localContext"/>
        <f:facet name="appsPanelLegend">
          <af:message id="msg1"
                      messageType="warning"
                      message="#{profileuiMainBundle.CANNOT_EDIT_PROTECTED_DATA}"
                      rendered="#{bindings.CreatedBy.inputValue == 'SEED_DATA_FROM_APPLICATION' and securityContext.userName != 'SEED_DATA_FROM_APPLICATION'}"/>
        </f:facet>
      </fnd:applicationsPanel>
    </f:facet>
    <f:facet name="contextualArea"/>
    <f:facet name="localAreaScroll"/>
  </af:pageTemplate>
</jsp:root>
If you have a more complicated form that involves multiple regions (multiple TL ViewObject), you should drag and drop to the location that makes the most sense to you.
For example, if you have five fields on your form, A, B, C, D, E and if you drag and drop the TL ViewObject onto attribute C, the Translation Editor button will appear after attribute C.
16.8.4.1.4 Removing the Translation Editor
The two pieces of information written to your page file are the Translation Editor button and the dialog. You can search for "TlAfp" to find the button and dialog locations in your page so that you can remove them manually.
If you add a new translation attribute into your TLVO and you would like to include this new attribute, you can remove them. Then you can drag and drop the TLVO again so that the new attribute will be included.
16.9 About the Create Page Wizard
If the implementing code is in place, Create Page lets a user create, text, and export a new application page without having to use JDeveloper. This is useful, for instance, in creating a new homepage, testing it, and finally moving it from one system to another, such as from a test environment to a production environment.
The basic steps to create a page are:
-
Create and then enter a sandbox. Using a sandbox is described in the Oracle Sales Cloud Customizing Sales guide.
-
In the Navigator menu, select New Page.
-
Complete the Create Page wizard.
-
Edit and test the page.
-
Publish the page.
16.9.1 How to Complete the Create Page Wizard
When you click New Page on the Navigator menu, the Create Page wizard displays.
Figure 16-44 Create Page Wizard
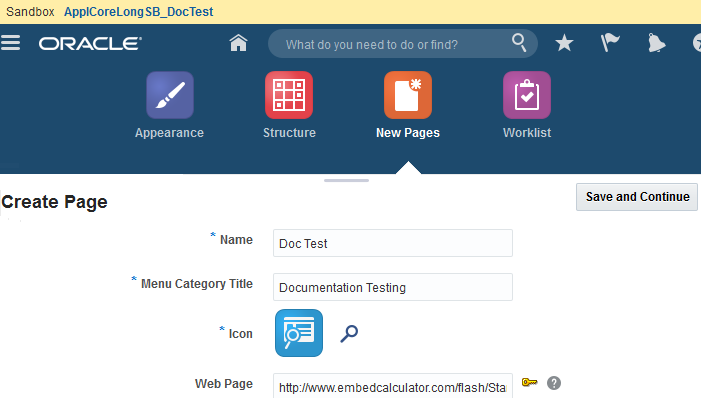
Name: Enter a name for the page.
Menu Category Title: Enter a menu category title. The page name will be displayed under this title.
Icon: Click the Search icon to select an icon to represent this page. This step is mandatory and the icon must be selected from the choices presented; a user-supplied icon cannot be used.
Web Page: [Optional] Enter the URL of the application that you wish to host in this page in an iFrame. For example, if you want to run a calculator in your page, you can enter this URL:
http://www.embedcalculator.com/flash/StandardCalculator.swf
This usually is used to create a page where content is coming from another application. This can be a link to a related application, or to a public web site, as shown in the calculator example.
Secure Token: If you need to add a secure token to the URL, click the key icon.
This option is used when you link a menu item to a secure token URL of an application outside Fusion Applications.
An HTTPS protocol is required to access the application.
The secure token expires if the user session is inactive. Refresh the page to regenerate the tokens.
This additional dialog displays:
[image]
Web Application: This is a dropdown menu that shows third-party applications that have been registered in the topology tables. To register an application, use the Register Enterprise Applications task in Setup and Maintenance. Registered content usually includes the protocol (such as http or https), the host, port and context root. This means that the beginning section of the URL can be built from this information.
Destination for Web Application: The destination is anything else to be appended on the URL.
Secure Token Name: [Optional] This can be any name you choose.
For example:
Web Application = "BlueApp"
Destination for Web Application = "/faces/showItem.asp" - The beginning "/" is optional, the design time will insert it if it is not included.
Secure Token Name = "userToken"
When saved, the design time will create a menu node with just a destination field with the following:
destination="#{EndPointProvider.externalEndpointByModuleShortName['BlueApp']}/faces/showItem.asp?userToken=#{applCoreSecuredToken.trustToken}"
At runtime, this could evaluate to:
https://BlueAppsHost:9001/BlueApp/faces/showItem.asp?userToken=9439439432JHU8I53KL88E3
Click Save and Close.
Click Save and Continue.
16.10 Troubleshooting UI Shell Issues
This section presents the more-common problems, with their solutions, that may be experienced by Oracle Fusion applications developers. Also see "Troubleshooting Customizations" in the Extensibility Guide for Developers.
16.10.1 ApplSession Is Not Created
Problem
When ApplSession is not created, these problems occur:
-
User Language settings are not set.
-
Data security policies are not applied.
-
Webservice requests are run as anonymous users instead of named users.
Solution
To resolve this problem:
-
Check that the JpsFilter section is correct in web.xml: Applcore Session code depends on the JPS subject. The entry must appear exactly as shown in Example 16-16.
-
Check that the ApplSessionFilter section is correct in web.xml: ApplSession must be configured immediately after JpsFilter. The entry must appear exactly as shown in Example 16-16.
-
If the issue is with the ApplSession not being created over a web service request using SOA, check how the ApplSession context interceptor is configured.
ApplSession information is preserved over SOA/Web Service requests with context interceptors that fire when requests are sent and received. The ApplSessionContext interceptor, in particular, will handle propagating all session attributes from the caller to the web service, and will even attempt to reuse the same session Id if running against the same database. To enable the context interceptor, the weblogic-application.xml on both the caller and the called should include the oracle.applcore.config shared library:
<library-ref>
    <library-name>
      oracle.applcore.config
    </library-name>
  </library-ref>
If the context interceptor has not been enabled, the prepareSession() of the root application module call should still be able to create the session as the right user, so long as the Subject has been established correctly in the Oracle Web Services Manager layer. But in that case, no other session attributes will be propagated, and the session cannot be reused.
-
Obtain the session Id from the cookie. The cookie is located in the browser's cookies folder.
The session cookie is obtained so that subsequent queries can be run to verify the session's existence and obtain additional info about the session. Note that it is the session cookie that is stored in the browser cookie location, not the session Id. They represent the same session, but the actual session Id is internal.
Cookie name: ORA_FND_SESSION_<db_instance_name>
The session cookie value will appear similar to:
DEFAULT_PILLAR:wvlu8CUiH4FYjySCPQtwaEphBOyiUTZwexYd1fYXh5VwV9i9koUL8L3Qhm0bNrZ8:1282160020177To retrieve the actual session id, run this SQL statement:
select session_id from fnd_sessions where session_cookie=value_obtained_from_cookie_value.Note: The
value_obtained_from_cookie_valueis the alpha-numeric string between the two colons. In the example, it iswvlu8CUiH4FYjySCPQtwaEphBOyiUTZwexYd1fYXh5VwV9i9koUL8L3Qhm0bNrZ8. This value will always be different.
Example 16-16 ApplSessionFilter and JpsFilter Configuration in web.xml
<filter-mapping>
    <filter-name>JpsFilter</filter-name>
    <url-pattern>/*</url-pattern>
    <dispatcher>FORWARD</dispatcher>
    <dispatcher>REQUEST</dispatcher>
    <dispatcher>INCLUDE</dispatcher>
</filter-mapping>
<filter-mapping>
    <filter-name>ApplSessionFilter</filter-name>
    <servlet-name>Faces Servlet</servlet-name>
    <dispatcher>FORWARD</dispatcher>
    <dispatcher>REQUEST</dispatcher>
</filter-mapping>
16.10.2 Navigator Shows a Little White Box
Problem
Clicking the Navigator in the global area shows a little white box.
This is an issue that developers would see.
Solution when in a production environment
-
Make sure that you are signed in as a user that has access to some pages in the Navigator menu. You can type the full URL of the page directly into the browser and see if the user can access it.
-
Make sure there is a valid connection to the LDAP server. This is needed to check the policies of each entry in the Navigator menu.
-
Use Enterprise Manager to make sure the Applications are registered in the topology tables.
-
Make sure the Applications Core Setup application is deployed. (From JDeveloper, run .../atgpf/applcore/applications/FndSetup/FndSetup.jws.) This contains the Navigator menu file and usually is deployed to the Oracle Fusion Applications Global domain.
-
Check that the menus are in MDS. Check for entries with the path oracle/apps/menu.
Solution when in a development environment
-
You usually should run without menu security. The first thing to check is if you have started your web server with this parameter to turn off security checking:
-DAPPLCORE_TEST_SECURED_MENU=N -
Then check steps 3 through 5 in the solution for a production environment.
16.10.3 Navigator Shows Unfiltered Entries
Problem
The Navigator menu is showing all entries, rather than being filtered by what the user has access to, and the Welcome page has all tabs exposed.
Solution
This is caused by menu security being turned off. This should happen only in development environments.
Because menu security is on by default, check that the web server was not started with -DAPPLCORE_TEST_SECURED_MENU=N.
