3 Using Oracle JDeveloper for Customizations
This chapter includes the following sections:
3.1 About Using JDeveloper for Customization
You use JDeveloper when you need to customize or create objects or security outside of CRM applications, or when you need to make more sophisticated changes, like changes to SOA composite applications, Oracle Enterprise Scheduler jobs, Oracle Business Process Management project templates, or embedded help. While you use JDeveloper to both customize existing standard objects and to create new custom objects, the procedures you use for each are different.
New custom objects created in JDeveloper are not saved into the MDS Repository, and are therefore created in a standard application workspace using the Oracle Fusion Applications Developer role. However, when you customize standard objects, those customizations are saved into the MDS Repository, and therefore must be implemented using the Oracle Fusion Applications Administrator Customization role. Implementing the customizations using this customization role ensures that your changes are saved to the upgrade-safe MDS Repository, and not written directly to the standard object. In the future, when you patch or upgrade Oracle Fusion Applications, your customizations held in these metadata files are not affected, so you do not have to redo them. For more information about customizations and MDS Repository, see Customizing and Extending .
When customizing Oracle Application Development Framework (Oracle ADF) artifacts, you create a special customization application workspace, using the developer role. This application workspace includes a connection to a deployed Oracle Fusion Applications environment (typically a test environment), which allows you to import the artifacts you want to customize into your application workspace. This customization application workspace is automatically configured to work within Oracle Fusion Applications, so that when you test and deploy your customizations, they behave as though they were native Oracle Fusion Applications. When customizing SOA composite applications, you create a SOA Composite application workspace in the developer role.
After the application workspace is created, you switch roles to the customization role and import the Oracle ADF artifact or the SOA archive you want to customize. You then make your customizations to the imported artifact. After completion, you package and deploy the artifacts in the application workspace to the Oracle Fusion Applications environment.
Often, you must perform both customizations (customizing an existing standard object) and extensions (creating a new object). For example, say you want to create a new entity object and expose that new object in an existing application module. First, because you are creating a new custom entity object, you would create a standard application workspace and then create your entity object. After completion, you would package the application workspace as an ADF Library, and place it into the exploded enterprise archive (EAR) directory for your test environment. Next, you would create a customization application workspace, and import both the new entity object library and the library that contains the application module to which you must add the entity object. After both are imported, you log in using the customization role and make the customizations to the application module. After customizations are complete, you would deploy the customizations to the test environment.
Before you use JDeveloper to customize, be familiar with the Oracle Fusion application architecture that enables customization, as described in Customizing and Extending . Also understand the typical workflows for working with customizations, as described in Understanding the Customization Development Life Cycle.
Do the following before using JDeveloper to customize:
-
Deploy the application you are customizing to a test environment. You must have access to the test environment and to the exploded EAR directory for that application.
-
Install JDeveloper and set up your development environment. Before you can implement customizations using JDeveloper, you must create a customization application workspace that imports the necessary parts of the application you want to customize. For more information, see About Installing Customization Tools.
Note:
Before you can use JDeveloper to customize your application, JDeveloper must have access to the customization layers for the application. To enable JDeveloper to see the customization classes that define the customization layers, use the
-Dide.extension.extra.search.pathVM option, as described in the "Adding Customization Extension Bundles to the jdev.conf File" section of the Developer's Guide.For information about locating the Java archive (JAR) files containing the product-specific customization classes, see the product-specific documentation from Oracle Enterprise Repository for Oracle Fusion Applications. You can also use the steps in the "Adding Customization Extension Bundles to the jdev.conf File" section of the Developer's Guide to locate the JAR files.
3.1.1 About Customizing Oracle ADF Artifacts
Oracle Fusion applications are built using Oracle Application Development Framework (Oracle ADF) artifacts on Oracle Fusion Middleware, including the following:
-
Application modules: An application module is the transactional component that UI clients use to work with application data. It defines an updatable data model along with top-level procedures and functions (called service methods) related to a logical unit of work related to an end-user task.
-
Entity objects: An entity object represents a row in a database table and simplifies modifying its data by handling all data manipulation language (DML) operations for you. It can encapsulate business logic to ensure that your business rules are consistently enforced. You associate an entity object with other entity objects to reflect relationships in the underlying database schema to create a layer of business domain objects to reuse in multiple applications.
-
View objects: A view object represents a SQL query and simplifies working with its results. You use the SQL language to join, filter, sort, and aggregate data into whatever form is required by the end-user task being represented in the user interface. This includes the ability to link a view object with other view objects to create master-detail hierarchies of any complexity. When end users modify data in the user interface, your view objects collaborate with entity objects to consistently validate and save the changes.
-
Task flows: A task flow defines the flow of control throughout an application. It can also be included in a page as a region, where users can navigate through a series of page fragments, without leaving the original page.
-
JSPX pages and page fragments: The view layer of Oracle Fusion Applications consists of a small number of pages per application. These pages then contain task flows, which in turn contain several page fragments.
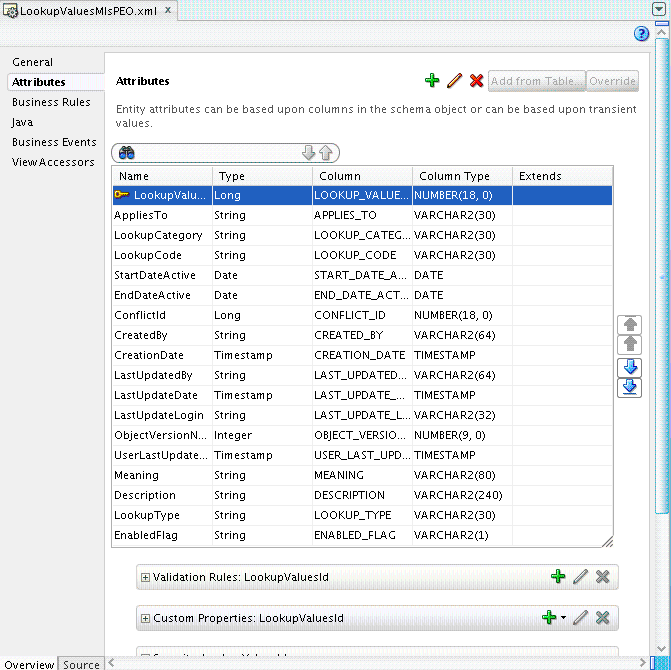
When you customize Oracle ADF artifacts, you usually work in an overview editor that allows you to make your customizations declaratively. For example, the following figure shows the editor for an entity object. Among other things, you can set validation or change how the UI displays the data.
Figure 3-1 Overview Editor for Entity Object
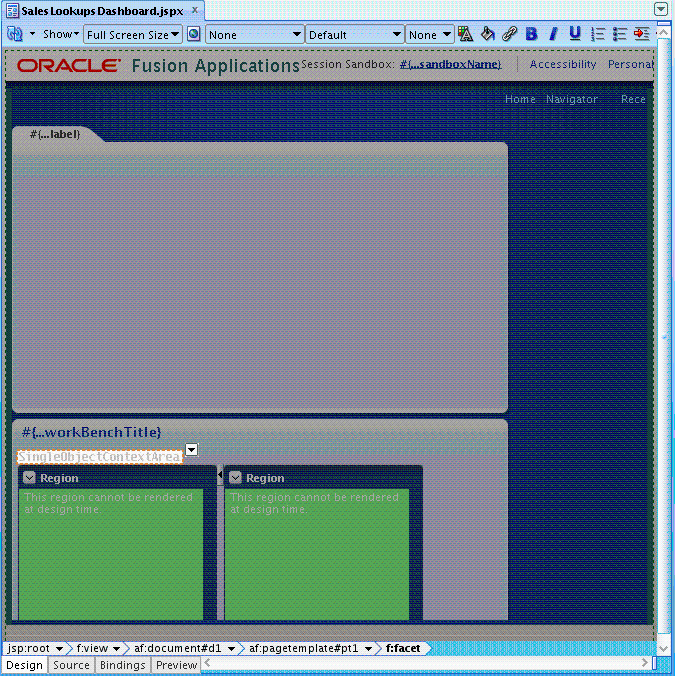
For JSP pages, you work in a WYSIWYG environment using the Design tab in the editor window, as shown in the following figure.
Figure 3-2 Design Editor for JSP Pages
3.1.2 About Using JDeveloper to Customize SOA Composite Applications
Oracle Fusion applications are built using SOA composite artifacts on Oracle Fusion Middleware, which include the following:
-
Service components: A service component implements the business logic or processing rules of a SOA composite application. Available service components include the following:
-
Business Process Execution Language (BPEL) processes: A BPEL process enables you to integrate a series of business activities and services into an end-to-end business process flow.
-
Business rules: A business rule enables you to create business decisions in your business process flow based on rules.
-
Human tasks: A human task enables you to create human workflows that describe the tasks for users or groups to act upon as part of an end-to-end business process flow. You use Oracle Business Process Management Worklist (Oracle BPM Worklist) to act upon the tasks during runtime.
-
Oracle Mediator: An Oracle Mediator enables you to define services that perform message and event routing, filtering, and transformations within the SOA composite application.
-
-
Binding components: A binding component establishes the connection between a SOA composite application and the external world. There are two types of binding components:
-
Services provide the outside world with an entry point to the SOA composite application. The Web Services Description Language (WSDL) file of the service advertises its capabilities to external applications. These capabilities are used for contacting the SOA composite application components. The binding connectivity of the service describes the protocols that can communicate with the service (for example, Simple Object Access Protocol (SOAP)/Hypertext Transfer Protocol (HTTP) or Java EE connector architecture (JCA) adapter).
-
References enable messages to be sent from the SOA composite application to external services in the outside world.
-
-
Wires: A wire connects services, service components, and references into a complete SOA composite application.
3.2 Customizing Oracle ADF Artifacts with JDeveloper
To customize Oracle ADF artifacts, you first create a customization application workspace, using the Oracle Fusion Applications Developer role in JDeveloper. After the application workspace is created, you exit JDeveloper and then reenter, using the Oracle Fusion Applications Administrator Customization role and import and customize your artifacts.
3.2.1 Creating the Customization Application Workspace
You must set up a customization application workspace in JDeveloper to create the application that holds your customizations.
Note:
Before you start the FA Customization Application wizard to create a customization application workspace, make sure that the entire topology for the application you want to customize is up and running. The conn.xml file in Oracle Fusion applications contains EL expressions pointing to common server endpoints, such as the BI server, that cannot be resolved unless the entire topology for the application is running.
To create the customization application workspace:
After you complete the wizard, an application with a project is created for you. This application is configured to be the same as a deployed Oracle Fusion application. For example, it is connected to the same database, same metadata repository, and has similar web.xml and weblogic.xml settings. This configuration allows it to work correctly when deployed into your Oracle Fusion Applications environment, and also ensures that when you test your customizations locally in JDeveloper Integrated WebLogic Server, the customizations behave as they will in the full test environment.
JDeveloper also creates a connection to the exploded EAR directory named Customizable Archive, which is accessible from the Application Resources panel of the Application Navigator. The following figure shows a connection to the exploded EAR directory for an application.
Figure 3-4 Application Resources Connection to Exploded EAR Contents

3.2.2 Configure the Application
[[this section is no longer needed, but until the IDE is done, will keep, just in case]]
Configure the customization application workspace by copying the configuration files from the exploded JAR file to the newly created application workspace. This ensures that your new workspace is configured the same as the application you are customizing.
-
Copy the following from the exploded EAR file's
/adf/META-INFdirectory to the/.adf/META-INFdirectory of the new workspace:-
adf-config.xml -
connections.xml
For example:
cp <ExploadedEarLoc>/adf/META-INF/adf-config.xml <NewJwsDir>/.adf/META-INF
-
-
Copy the
weblogic-application.xmlfile from the exploded EAR file's/adf/META-INF/directory to the/src/META-INF/directory of the new workspace. -
Copy the following from the exploded EAR files
/WEB-INFdirectory to the new UI project's/public_html/WEB-INFdirectory:-
web.xml
-
trinidad-config.xml
-
portlet.xml
-
weblogic.xml
-
oracle-portlet.xml
-
-
In JDeveloper, open the newly copied
adf-config.xmlfile and change the metadata store to use theFileMetadataStoreclass, as shown in Example 3-1. This setting will allow you to test your customizations using the integrated WebLogic server (WLS). -
If the application you are customizing launches Enterprise Scheduler (ESS) jobs, you will need to remove those references from your application if you plan on testing your customizations in integrated WLS. If you will only be testing in a deployed environment, you can proceed to the next step.
To remove the references:
-
In the UI project, open the newly copied-over
web.xmlfile. -
Search for the following entries and delete them:
<ejb-local-ref>
  <ejb-ref-name>ess/metadata</ejb-ref-name>
  <ejb-ref-type>Session</ejb-ref-type>
    <local>oracle.as.scheduler.MetadataServiceLocal</local>
    <ejb-link>MetadataServiceBean</ejb-link>
   </ejb-local-ref>
   <ejb-local-ref>
     <ejb-ref-name>ess/runtime</ejb-ref-name>
     <ejb-ref-type>Session</ejb-ref-type>
     <local>oracle.as.scheduler.RuntimeServiceLocal</local>
     <ejb-link>RuntimeServiceBean</ejb-link>
   </ejb-local-ref>
-
-
If you're are customizing ADF Task Flows that are used for SOA human tasks, extract the
hwtaskflow.xmlfile from the UI jar that you are customizing and, once extracted, copy that file into theadfmsrcdirectory in you UI project.If you are customizing more than one ADF Task Flow for a human task, and they reside in different UI jars, you will need to either create separate projects for each UI jar which contains an ADF Task Flow for Human Task which you plan to customize, or merge the
hwtaskflow.xmlfrom each UI jar, as shown in Example 3-2.
Example 3-1 Change the Metadata Store to use the FileMetadataStore Class
<adf-config xmlns="http://xmlns.oracle.com/adf/config">
  ......
  <mdsC:adf-mds-config version="11.1.1.000">
    <mds-config xmlns="http://xmlns.oracle.com/mds/config">
        <metadata-store-usages>
          <metadata-store-usage id="WebCenterFileMetadataStore"
                                default-cust-store="true">
            <metadata-store class-name=
                   "oracle.mds.persistence.stores.file.FileMetadataStore">
              <property name="metadata-path" value="."/>
            </metadata-store>
          </metadata-store-usage>
        </metadata-store-usages>
      </persistence-config>
    </mds-config>
</adf-config>
Example 3-2 Merged hwtaskflow.xml Files
<?xml version = '1.0' encoding = 'UTF-8'?>
<hwTaskFlows xmlns="http://xmlns.oracle.com/bpel/workflow/hwTaskFlowProperties">
   <ApplicationName>worklist</ApplicationName>
  <LookupType>LOCAL</LookupType>
   <TaskFlowDeploy>false</TaskFlowDeploy>
   <SoaServer>
      <ejbProviderUrl/>
      <aliasKeyName/>
      <keyName/>
      <connectionName/>
   </SoaServer>
   <TaskFlowServer>
      <hostName/>
      <httpPort/>
      <httpsPort/>
   </TaskFlowServer>
   <hwTaskFlow>
      <WorkflowName>FinFunTransactionApproval</WorkflowName>
      <TaskDefinitionNamespace>
          http://xmlns.oracle.com/apps/financials/c
mponents/ledgerSoa/fun/intercompanyTransactions/approvalComposite
FinFunIntercoTransactionsApprovalComposite/FinFunTransactionApproal
      </TaskDefinitionNamespace>
      <TaskFlowId>FinFunTransactionApproval_TaskFlow</TaskFlowId>
      <TaskFlowFileName>
        WEB-
NF/oracle/apps/financials/commonModules/intercompanyTransactions/
i/approvalTask/flow/FinFunTransactionApprovalTaskFlow.xml
      </TaskFlowFileName>
   </hwTaskFlow>
   <hwTaskFlow>
      <WorkflowName>
        FinFunEnterDistRequestForAction
      </WorkflowName>
      <TaskDefinitionNamespace>
        http://xmlns.oracle.com/apps/financials/c
mponents/ledgerSoa/fun/intercompanyTransactions/approvalComposite
FinFunIntercoTransactionsApprovalComposite/FinFunEnterDistRequest
orAction
      </TaskDefinitionNamespace>

<TaskFlowId>
  FinFunEnterDistRequestForActionTaskFlow
</TaskFlowId>
<TaskFlowFileName>
  WEB-
NF/oracle/apps/financials/commonModules/intercompanyTransactions/
i/enterDistTask/flow/FinFunEnterDistRequestForActionTaskFlow.xml
</TaskFlowFileName>
</hwTaskFlow>
<hwTaskFlow>
  <WorkflowName>FinGlJournalApproval</WorkflowName>
  <TaskDefinitionNamespace>
    http://xmlns.oracle.com/apps/financials/c
mponents/ledgerSoa/gl/journals/journalEntries/approvalComposite/F
nGlJrnlEntriesApprovalComposite/FinGlJournalApproval
  </TaskDefinitionNamespace>
    <TaskFlowId>FinGlJournalApprovalTaskFlow</TaskFlowId>
      <TaskFlowFileName>
        WEB-
NF/oracle/apps/financials/generalLedger/journals/journalEntries/u
/journalApprovalTask/flow/FinGlJournalApprovalTaskFlow.xml
      </TaskFowFileName>
   </hwTaskFlow>
</hwTaskFlows>
3.2.3 Import Artifacts to be Customized
Instead of importing the actual artifacts, you create an ADF Library from the JAR file that contains the artifact you want to customize. You then import that library into your project.
To create the library, add a dependency from the project to the JAR file to be customized. For example, if you want to customize a page, you would create a dependency from your view project to the JAR file that contains the page you want to customize.
-
In the Resource Palette, click the new icon and choose New > New Connection > File System.
-
Create a connection to the exploded EAR directory.
-
In the Application Navigator, select the project to which you want to import the artifact to be customized.
-
The Resource Palette shows all the JARs in the exploded ear directory as ADF libraries that can be imported into your application. In the Resource Palette, expand the library directory that contains the ADF Library for the JAR file you want to customize. Model libraries are in the
/APP-INF/libdirectory, and UI jars are in the/WEB-INF/libdirectory. -
Right-click the JAR file and choose Add to Project.
3.2.4 Configure the View Project
If you've just imported a library into a view project, you need to do some additional configurations.
-
Add the ApplCore tag library to the web project.
-
Double click the view project to open the Properties dialog.
-
Select JSP Tag Libraries.
-
Add the Applications Core (ViewController) library.
-
-
Add servlets expected by the
web.xmlfile from the ADF library to the project.-
In JDeveloper, from the view project, open the
web.xmlfile. -
Search for servlets whose class name begins
oracle.apps(ignore any that begin withoracle.apps.fnd. -
Go to the exploded war directory and grep for the class name(s) found in the
web.xmlfile. -
Import the associated library to the project, as you did in Step 1.
-
3.2.5 Import Pre-Seeded Customizations
Fusion applications often contain JAR files that contain extensions of base classes. You need to include these extensions in your application.
-
Import any customization classes in the EAR file.
-
In the Resource Palette, in the
APP-INF /libdirectory of the EAR, search for libraries whose names begin withAdfExt.[[Reviewers: Ning thought that the jar names would begin with "Ext," but I only see AdfExt. Are these the correct jars?]]
-
Copy those jar files to the <JDev_HOME>/jdev/extensions directory. For example:
cp <ExploadedEarLoc>/APP-INF/lib/AdfExtCust.jar <JDev_HOME>/jdev/extensions
-
In the Application Navigator, select the corresponding project.
[[Reviewers: which project do these get imported into?]]
-
In the Resource Palette, right-click the JAR file to be imported and choose Add to Project.
-
3.2.6 Test the New Application
You should now be able to run the new projects with the imported artifacts. If you cannot, that generally means that you are missing dependencies.
-
In Application Navigator, click the Navigator Display Option icon, and choose Show Libraries. All libraries in your project will now display in the Application Navigator.
-
In the project to be tested, expand the ADF Library node.
-
For a model project:
-
Find and expand the packages, until you find a service package, for example, competitorsService.
-
In that service package, expand the applicationModule package.
-
Right-click the application module (for example, CompetitorAM.xml) and choose Run with [[reviewers: should they run with PerfTrace or PUTF]] to run the application module.
-
-
For a view project:
-
Expand the
META-INFdirectory. -
Right-click the adfc-config.xml file and choose Run.
-
If you get any class not found errors, or no def found errors, then most likely a dependent JAR file is missing.
Use the search field in the Resource Palette to find the missing JAR, and then import that corresponding library into the project, as you did for the pre-seeded cusotmizations.(for more information, see Import Pre-Seeded Customizations).
Once all errors are fixed, you can begin to customize the artifacts.
3.2.7 Determining Which Oracle ADF Artifacts You Need to Customize
Most often, the customizations you want to make are surfaced on an existing page. For example, say you want to add a field to a page. So, you first must identify the page to customize, which may actually be a page fragment within a task flow. You then must identify which business objects you'll need to customize to add the field.
The easiest way to identify which artifacts you need to customize is to follow this path:
When you have identified the artifacts you want to customize, take note of the top-level page that contains the artifacts. You will need to know the name of the page to run when testing your customizations. For more information, see About Running Customizations Locally.
3.2.8 Customizing the Artifacts
You must switch to the Customization Developer role before you can begin customizing.
-
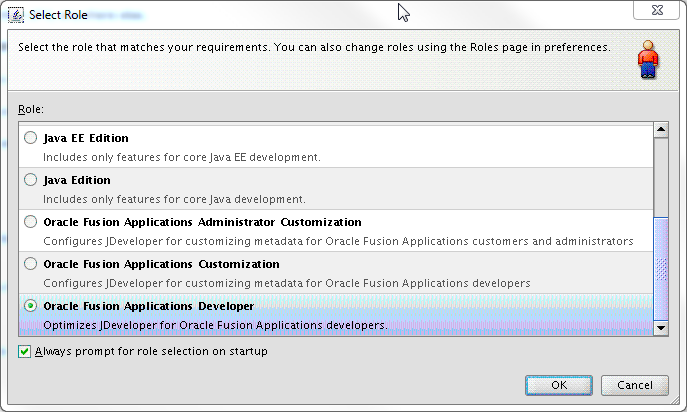
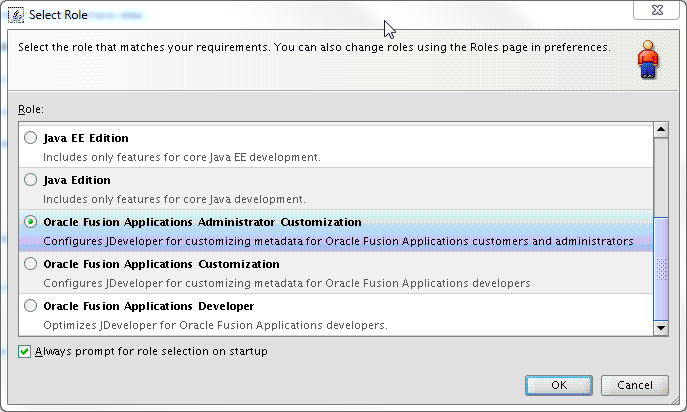
Restart JDeveloper and select the Oracle Fusion Applications Administrator Customization role, as shown in the following figure.
Figure 3-5 Oracle Fusion Applications Administrator Customization Role
-
In the Application Resources panel, expand Connections, and then Customizable Archive.
-
To locate the artifact you want to customize, right-click Base Application Archive and choose Filter.
For help in determining which artifacts you need to customize, see Determining Which Artifacts You Need to Customize.
-
In the Filter Customizable Archive dialog, enter the file name of the artifact you want to customize, and click the Go icon.
When the file is located, it is displayed in the Application Resources panel.
Note that sometimes when customizing an ADF Business Components object, you will find two results entries for a given object. For example, when searching for
LookupValuesVO.xml, you might find both of the following results:jdev.rc:%40scratch%40jdeveloper%40mywork%40FASalesApp%40FASalesAp p.jws/Base+Application+Archive+-+FASalesApp/APP-INF/lib/AdfBaseSa lesCommonPublicModelSalesLookups.jar/oracle/apps/sales/baseSales/ common/publicModel/salesLookups/view/LookupValuesVO.xml jdev.rc:%40scratch%40jdeveloper%40mywork%40FASalesApp%40FASalesAp p.jws/Base+Application+Archive+-+FASalesApp/APP-INF/lib/AdfBaseSa lesCommonModelSalesLookups.jar/oracle/apps/sales/baseSales/common /salesLookups/salesLookupService/view/LookupValuesVO.xml
When you encounter this situation, use the non-service object for customization. That is, customize the object that does not have a service named package in its path. In this example, you would customize the first object because the second object has
salesLookupServicein its path. -
Right-click the artifact, choose Customize, and choose to add the associated library to the project.
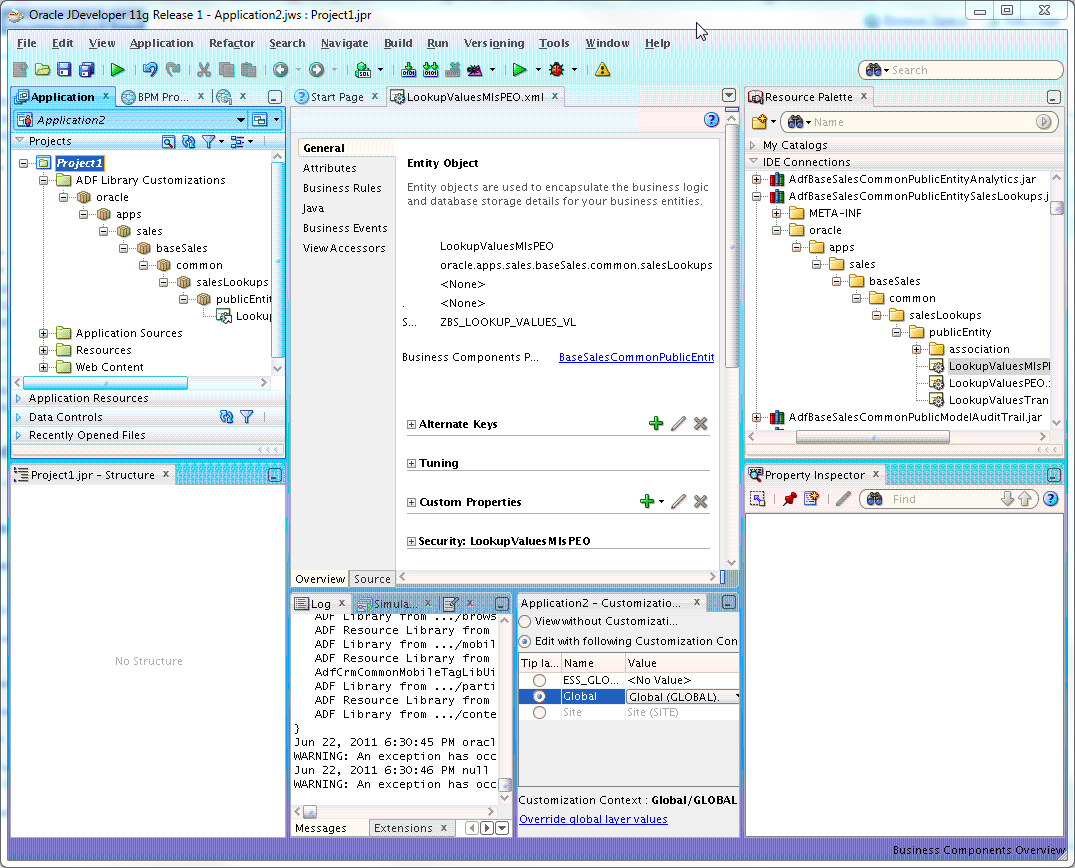
The artifacts from the imported library now display in the Application Navigator, under the ADF Library Customizations node, and the artifact you selected to customize opens in the editor window, as shown in the following figure.
Figure 3-6 JSPX Page Open in Editor and Ready to Customize
Note:
If imported data controls are not displayed in the Data Controls panel, do the following:
-
From the JDeveloper main menu, choose Tools > Preferences to open the Preferences dialog.
-
Expand the Business Components node.
-
Select General.
-
Select Display Imported ADF Libraries in Data Control Palette.
-
-
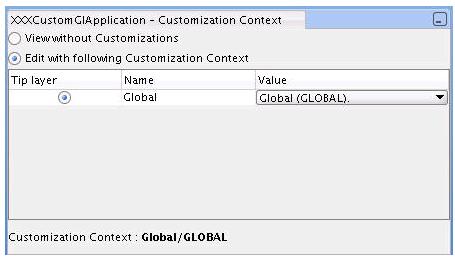
In the Customization Context window (by default, displayed at the bottom of JDeveloper), select the layer to which you want the customizations written.
All customizations for Oracle ADF business components must be done in the global layer. View layer customizations can be made in any other layer except User. For more information about customization layers, see About Customization Layers.
You are now ready to begin customizing your artifact. For more information about customizing specific artifacts, see the following chapters:
3.2.9 Guidelines for Avoiding Conflicts Among Multiple Customization Developers
When working in teams of multiple developers implementing multiple customizations in an application, observe the following guidelines to avoid conflicts of customized metadata:
-
Create small, focused customization application workspaces for the application, logically divided among functional areas.
-
Ensure that any given artifact is customized in only one customization application workspace.
-
Share the customization application workspaces among customization developers, ensuring that only one developer at a time implements customizations in the workspace.
-
Make sure that all custom JAR files have different names that begin with the prefix
Xx, for exampleXxMyJar.jar.
By following these guidelines, you can avoid situations where developers inadvertently overwrite each others customizations, and make sure that customizations don't interfere with product upgrades.
3.2.10 About Running Customizations Locally
You can use JDeveloper to run applications in Integrated WebLogic Server. To accomplish this, you need to identify a runnable target that contains the customized object.
When identifying which artifact to customize, you typically start by opening the page that exposes that artifact, and then drill down to identify the specific object to customize. The top-level page you start at (typically a .jspx file) is the page you will run to test customizations, so it is important to take note of the name of that file when you begin customization. Page fragments (.jsff files) are not runnable objects.
You will also need to make sure that your local test environment has the necessary security configuration to run the application. For more information, see Customizing Security for Application Artifacts . In particular, you will need to consult a security administrator to export all predefined function security policies of the application that you are customizing into a jazn-data.xml file. For details about how the security administrator exports the application policy store, see the "Securing Oracle Fusion Applications" chapter in the Administrator's Guide.
For more information about running locally, see the "Running a Fusion Web Application in Integrated WebLogic Server" section in Developing Fusion Web Applications with Oracle Application Development Framework. For more information about identifying an artifact to customize see Determining Which Artifacts You Need to Customize.
3.2.11 About Importing Customizations into Your Application Workspace
There may be occasions when you need to import other customizations into your application workspace. For example, someone else may have made customizations to an application module to which you need to make changes as well. Before you make your customization, you must import that application module into your customization application workspace.
If you need to import customizations made to a single page or page fragment, you can use the Manage Customizations dialog to download the file, as described in the "Customizing Pages" chapter in the . Save the customization files to a zip or JAR file.
If you need to import multiple customizations available in the metadata repository for an application, you use the exportMetadata Oracle WebLogic Scripting Tool (WLST) command. For more information, see the "Application Metadata Management Commands" section of WLST Command Reference for WebLogic Server. This command saves the customization files in a JAR file that you can import into your application workspace. For procedures, see the "Viewing ADF Library Runtime Customizations from Exported JARs" section of the Developing Fusion Web Applications with Oracle Application Development Framework.
Tip:
You can also use Oracle Enterprise Manager Fusion Applications Control to import and export customization files. For more information, see the "Transferring Metadata Using Fusion Middleware Control" section of the Administering Oracle Fusion Middleware. The referenced procedure describes using Fusion Middleware Control, but also applies to Fusion Applications Control.
If you want to use extensions (for example, if you want to add a custom entity object to an existing application module), the extensions must be deployed into the environment to which you have a connection. For more information, see About Deploying Customizations and Extensions.
3.2.12 About Resynchronizing Your Customization Application Workspace Configuration Files
During the process of customization, it is possible that the base application that you are customizing is updated with a patch. If this happens, you might need to resynchronize the configuration files in your local customization application workspace from the exploded EAR of the application you are customizing.
When you create a customization application workspace in your local development environment, workspace configuration files (such as, adf-config.xml, connections.xml, and web.xml) are copied to the local development environment. In some cases, the file is modified to allow you to implement and test customizations locally. When a patch is applied to the base application, these configuration files might change, and would therefore need to be synchronized to your local development environment so that you can continue to implement and test customizations.
JDeveloper allows you to check for and process updates to the workspace configuration files after a patch has occurred on the base application. When you run the check, there are three potential results for each file:
-
The file in the local development environment does not need to be updated.
-
The file in the local development environment must be updated, and can be updated safely because the local version has not been modified.
-
The file in the local development environment must be updated, but cannot be updated safely because the local version has been modified.
After the check, JDeveloper lets you decide how to handle the update. If you choose to proceed with the updates, backups of the local files are created. You can use the backup files to manually merge changes into the updated files if necessary.
3.2.12.1 Resynchronizing Your Customization Application Workspace Configuration Files
-
Start JDeveloper in the Oracle Fusion Applications Administrator Customization role, and open your customization application workspace.
-
From the main menu, choose Application > Synchronize Patch Changes.
The check is run, and the Synchronize Patch Changes dialog displays the results.
-
If no files in the development environment need updating, the Synchronize Patch Changes dialog gives you the option to review the list of possible updates. Click Yes to view possible updates, or No to close the dialog.
-
If one or more files need to be updated, the Synchronize Patch Changes dialog displays the files that might be out of date. Files that have been modified locally are indicated with a green icon. Click Yes to update the files, or No to skip the updates and close the dialog.
Note:
If you choose to proceed with the updates, backups of the local files are created. You can use the backup files to manually merge changes into the updated files if necessary.
3.3 About Customizing SOA Composite Applications with JDeveloper
Before you begin customizing, you must perform the following tasks:
-
Identify the SOA archive (SAR) file to customize. The SAR file is a special JAR file that requires a prefix of sca_. (for example, sca_OrderBookingComposite_rev1.0.jar). The SAR file packages binding components and service components into a SOA composite application.
-
Retrieve the configuration plan from the default SOA composite application in MDS Repository. Configuration plans enable you to modify environment-specific values, such as JDBC connection strings, host names of various servers, and so on using a single text (XML) file as you move projects from one environment to another (for example, from testing to production). During process deployment, the configuration plan searches the SOA project for values that must be replaced to adapt the project to the next target environment.
-
Set up the application workspace and SOA composite application project for MDS Repository customization in JDeveloper using the Oracle Fusion Middleware Developer role
After the application workspace is created, you must exit and reenter JDeveloper using the Oracle Fusion Applications Administrator Customization role.
3.3.1 Before You Start Using JDeveloper to Customize SOA Composite Applications
Perform the following tasks before you start customizing SOA composite applications with JDeveloper:
-
Identify the SAR file to customize, and locate it in the
APPLICATIONS_BASE/fusionapps/applications/product_family/deploydirectory. This directory includes the following files:-
Composite SAR (
sca_*.jar) -
Business process management (BPM) template (
bta_*.jar) -
List of resource bundle classes (
jar_*.jar)
-
-
Ensure that the SAR file is marked as customizable by Oracle Fusion Applications. Otherwise, customizations do not survive patching or are not properly patched and merged. For information about which SOA composite applications are customizable, see the product-specific documentation from Oracle Enterprise Repository for Oracle Fusion Applications.
If you encounter the following message when importing the SAR file for customization, it means that Oracle Fusion Applications did not mark the SOA composite application for customizations in JDeveloper and your changes cannot survive patching.
The composite from the archive was not created for
customization. If you import the composite for
customization, you can customize it but you will have
problems to merge your customizations to any new
versions of that composite.
Do you want to continue?
Otherwise, uncheck "Import for Customization" box, and
click "Finish" option.
-
Get the configuration plan from the default SOA composite application in MDS Repository using the following WLST commands:
-
Identify the default revision of the SOA composite application with
sca_getDefaultCompositeRevision. For example:wls:/mydomain/ServerConfig> sca_getDefaultCompositeRevision("myhost", "7001", "weblogic", "weblogic", "FinGlCurrencyUserPreferredCurrencyComposite") -
Export the full SOA composite application corresponding to the default revision with
sca_exportComposite. For example:wls:/offline/mydomain/ServerConfig> sca_ exportComposite('http://myhost:8001', 'none', '/tmp/sca_ FinGlCurrencyUserPreferredCurrencyComposite.0.jar', 'FinGlCurrencyUserPreferredCurrencyComposite', '1.0') -
Extract the configuration plan used originally with the export action with
sca_extractPlan. For example:wls:/mydomain/ServerConfig> sca_extractPlan("/tmp/sca_ FinGlCurrencyUserPreferredCurrencyComposite_ rev1.0.jar", "/tmp/FinGlCurrencyUserPreferredCurrencyComposite_ configPlan.xml")
-
For information about using these commands, see the "Oracle SOA Suite Custom WLST Commands" section of WLST Command Reference for WebLogic Server.
3.3.2 Setting Up the SOA Shared Repository in JDeveloper
The Oracle Fusion Applications Oracle SOA Suite composite that you customize will have references, via the oramds URI, to artifacts in the SOA shared repository. This repository contains artifacts such as .xsd's and .wsdl's that are shared across Oracle Fusion Applications.
To access these artifacts during design time, use the following procedure to define a file-based MDS repository containing the SOA shared repository. Then, configure your customized SOA workspace in JDeveloper to reference the file-based repository.
Note:
In previous releases, all SOA shared repository artifacts were stored in the SOA MDS schema and a database-based MDS was used to access the repository at design time. In the current release, the repository artifacts are stored in different locations depending on the artifact type and whether it is customizable. As a result, the database-based MDS that points to the SOA MDS schema can no longer be used.
-
Go to
http://soa_server:port/soa-infra/exportmds.jsp.Going to this URL will start the export of the SOA shared repository artifacts. When the export is done, you will see "Welcome !" rendered on the page. The log messages for the export are captured in the SOA server log file.
The repository artifacts are exported to the
/tmp/mds_export0directory on the server whereexportmds.jspwas run. The export will not overwrite an existing directory. Therefore, if/tmp/mds_export0exists, then the exported files will be written to/tmp/mds_export1.If you do not have access to this directory, please ask your administrator to create a ZIP file containing these files to make them available to you. For example, if the export is in
/tmp/mds_export0, the following commands would be used to change the file permissions to read, write, and execute for all files, and zip the contents into/tmp/mds_export0/mds_export.zip:cd /tmp/mds_export0 chmod a+rwx -R . zip -r mds_export . ls -l mds_export.zip
-
Choose a directory on your local machine where you will be customizing the Oracle Fusion Applications composite. For example:
~fusionapps/soa_shared/soa-infra. Unzip the contents of themds_export.zipfile to that directory. (The code below assumes it is in~directory.)mkdir -p ~/fusionapps/soa_shared/soa-infra cd ~/fusionapps/soa_shared/soa-infra unzip ~/mds_export.zip
-
Validate your work by creating a file-based SOA MDS connection in JDeveloper: , click "Test Connection" button and click the "OK" button.
-
Start JDeveloper using the Oracle Fusion Applications Developer role.
-
Go to View > Resource Palette, and then to New Connection > SOA-MDS … in the Resource Palette window
-
Enter the following information:
– Connection Name: Enter any name, for example,
TestFileBasedSoaSharedRepository– Connection Type: File Based MDS
– MDS Root Folder: Use the browse button to identify the directory that contains the
/appsdirectory. For example,~/fusionapps/soa_shared/soa-infra. -
Click Test Connection, and then click the OK.
-
-
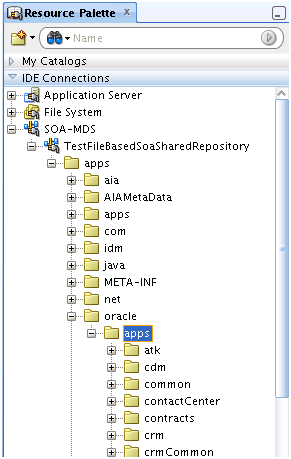
Expand the contents of the SOA MDS connection that you just created. You should be able to see artifacts in the
/apps/oracle/appsfolder. For anyoramds:/appsreference in the composite that you will be customizing, you should be able to locate that artifact in the Resource Palette.Figure 3-8 Artifact in Resource Palette
3.3.3 Configuring the SOA Application Workspace in JDeveloper
Do the following to configure the workspace:
-
Start JDeveloper using the Oracle Fusion Applications Developer role.
-
From the File main menu, choose New, then Applications, then SOA Application, and then OK to create a SOA application with an
XXprefix in the application name.The
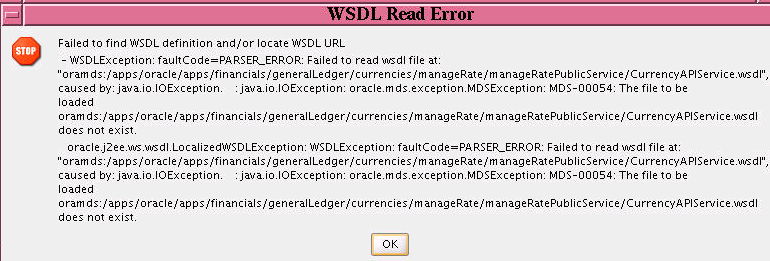
XXprefix identifies a SOA artifact or object created by the customer and distinguishes it from Oracle Fusion Applications artifacts. You can delete the SOA project named Project1 that was created by default.The Oracle Fusion Applications SOA composite application references shared SOA artifacts through the SOA-shared repository stored in MDS Repository instead of replicating the shared SOA artifact throughout the Oracle Fusion Applications code source. If the references to the SOA shared repository are not resolved, you receive the error message shown in the following figure.
-
To resolve references to the SOA-shared repository (
oramds:/apps), define an MDS Repository entry in theadf-config.xmlfile.-
Go to the file in the Application Navigator window in the Application Resources section, and expand Descriptors > ADF META-INF > adf-config.xml.
-
Add a
<namespace>element withpath="/apps"to<metadata-namespaces>, as shown in the code below. Note that by defaultmstore-usage_1is created for another mapping the/soa/sharedpath in theadf-config.xmlfile.<namespace path="/apps" metadata-store-usage="mstore-usage_2"/>
-
-
Add a
<metadata-store-usage>attribute to<metadata-store-usages>for a file-based MDS Repository. Replace the value attribute of the property element with the metadata-path name attribute. The following example below assumes that the files in the repository are in$HOME/fusionapps/soa_shared/soa-infra.<metadata-store-usage id="mstore-usage_2"> <metadata-store class-name="oracle.mds.persistence.stores.file. FileMetadataStore"> <property name="metadata-path" value="${HOME}/fusionapps/soa_shared"/> <property name="partition-name" value="soa-infra"/> </metadata-store> </metadata-store-usage>The following is an example of an
adf-config.xmlfile. Themstore-usage_2entry resolves references tooramds:/appsin the SOA shared repository:<?xml version="1.0" encoding="UTF-8" ?> <adf-config xmlns="http://xmlns.oracle.com/adf/config" xmlns:config="http://xmlns.oracle.com/bc4j/configuration" xmlns:adf="http://xmlns.oracle.com/adf/config/properties" xmlns:sec="http://xmlns.oracle.com/adf/security/config"> <adf-adfm-config xmlns="http://xmlns.oracle.com/adfm/config"> <defaults useBindVarsForViewCriteriaLiterals="true" useBindValuesInFindByKey="true" executeEmptyOnException="true"/> <startup> <amconfig-overrides> <config:Database jbo.locking.mode="optimistic"/> </amconfig-overrides> </startup> </adf-adfm-config> <adf:adf-properties-child xmlns="http://xmlns.oracle.com/adf/config/properties"> <adf-property name="adfAppUID" value="XXExtensibilityGuideWorkspace.oracle.apps.xx"/> </adf:adf-properties-child> <sec:adf-security-child xmlns="http://xmlns.oracle.com/adf/security/config"> <CredentialStoreContext credentialStoreClass="oracle.adf.share.security.providers.jps.CSFCredentialStore" credentialStoreLocation="../../src/META-INF/jps-config.xml"/> </sec:adf-security-child> <adf-mds-config xmlns="http://xmlns.oracle.com/adf/mds/config"> <mds-config xmlns="http://xmlns.oracle.com/mds/config"> <persistence-config> <metadata-namespaces> <namespace path="/soa/shared" metadata-store-usage="mstore-usage_1"/> <namespace path="/apps" metadata-store-usage="mstore-usage_2"/> </metadata-namespaces> <metadata-store-usages> <metadata-store-usage id="mstore-usage_1"> <metadata-store class-name="oracle.mds.persistence.stores.file.FileMetadataStore"> <property name="metadata-path" value="${oracle.home}/integration"/> <property name="partition-name" value="seed"/> </metadata-store> </metadata-store-usage> <metadata-store-usage id="mstore-usage_2"> <metadata-store class-name="oracle.mds.persistence.stores.file.FileMetadataStore"> <property name="metadata-path" value="${HOME}/fusionapps/soa_shared"/> <property name="partition-name" value="soa-infra"/> </metadata-store> </metadata-store-usage> </metadata-store-usages> </persistence-config> </mds-config> </adf-mds-config> </adf-config> -
From the File main menu, choose Import, then SOA Archive Into SOA Project to import the SAR file, and then click OK.
-
In the Project Name field, enter the name of the new SOA project with an
XXprefix and select a name to identify the base SOA composite application that you are extending. For example, specifyXXFinGlCurrencyUserPreferredCurrencyCompositeif you are customizingFinGlCurrencyUserPreferredCurrencyComposite. -
Click Next.
-
In the Composite Archive field, perform the following steps:
-
Click Browse to select the SAR file to customize that you identified in Before You Start Using to Customize SOA Composite Applications.
-
Accept the default setting for the SOA composite application name.
-
Select the Import for Customization checkbox.
-
Click Finish.
Accept the default SOA composite application name to ensure that patching and Oracle SOA Suite can identify whether runtime customizations, JDeveloper customizations, or both types have been applied to the SOA composite application. If the SOA composite application is renamed, patching and SOA have no knowledge of the renamed SOA composite application.
You may see an error icon on a partner link in Design view of the
composite.xmlfile that reports the following error:Couldn't resolve classpath:/META-INF/wsdl/ServiceException.wsdl
This error is addressed in Configuring the Composite Project in .
-
3.3.4 Configuring the Composite Project in JDeveloper
After configuring the application workspace, you must configure the composite project:
3.3.6 About Customizing SOA Resource Bundles
The following table includes information about customizing SOA resource bundles.
Table 3-1 Customizing SOA Resource Bundles
| To Modify or Add Translatable Strings for... | Description |
|---|---|
|
An existing human task, activity guide, or BPEL process |
This feature is not supported in the first version of Oracle Fusion Applications (for example, modifying the human task title). Runtime modifications do not support this functionality and the |
|
Human task mapped attributes |
This feature is not supported in the first version of Oracle Fusion Applications. Translations for human task mapped attribute labels are defined in the following resource bundle: oracle.bpel.services.workflow.resource.WorkflowLabels For this version, the |
|
Server name in Federated Worklist on the Oracle Fusion Applications home page |
The server names that appear in the Federated Worklist on the Oracle Fusion Applications home page are defined in the following file: oracle/apps/common/acr/resource/ResourcesAttrBundle.xliff See About Customizing or Adding Resource Bundles for instructions about overriding strings in XML localization interchange file format (XLIFF) resource bundles. |
Note:
Oracle Fusion Applications automatically seed human task-protected mapped attributes and labels, but do not seed public mapped attributes. If you require human task mapped attributes, it is recommended that you use the public mapped attributes. However, if protected mapped attributes are required, then add the XX prefix to your label names to prevent problems with Oracle Fusion Applications seeded labels.
