Release 8.0.4 for Windows NT and Windows 95
A55976-01
Library |
Product |
Contents |
Index |
| Oracle Pro*C/C++ Getting Started Release 8.0.4 for Windows NT and Windows 95 A55976-01 |
|
![]()
![]()
This chapter explains how to create and precompile a project. It also describes the Pro*C/C++ graphical user interface, from which you execute commands with Windows menus and icons or with keyboard equivalents, and using Pro*C/C++ at the command line.
Specific topics discussed are:
Installing Oracle software creates a directory structure on your hard drive for your Oracle products. A main directory-the Oracle home directory-contains the Oracle subdirectories and files that are necessary to run Pro*C/C++.
The subdirectories in ORACLE_HOME contain the Pro*C/C++ executable files and library files.
In the following table, the letters nn represent the version of the product installed. For example, if you previously installed Pro*C/C++ version 2.2, you have a \PRO22 subdirectory under ORACLE_HOME. If you now install Pro*C/C++ version 8.0, Oracle Installer adds a \PRO80 subdirectory.
Based on the supported products that you install, Oracle Installer also creates the appropriate product subdirectory. When you install Pro*C/C++ version 8.0, Oracle Installer creates the \PRO80 subdirectory, which contains the following subdirectories:
The Pro*C/C++ installation procedure copies a set of 32-bit sample programs and their corresponding make files to the ORACLE_HOME\PRO80\C\SAMPLES directory. Samples can be found in their corresponding subdirectories. Oracle recommends that you build and run these sample programs to verify that Pro*C/C++ has been installed successfully and operates correctly.
Before you follow the instructions for creating and precompiling a Pro*C/C++ project, you may want to familiarize yourself with the basic commands, dialog boxes, menus, and buttons of the Pro*C/C++ graphical user interface.
To start the graphical user interface, do one of the following:
procui80.exe at the MS-DOS command prompt.
The Pro*C/C++ precompile environment contains five elements:
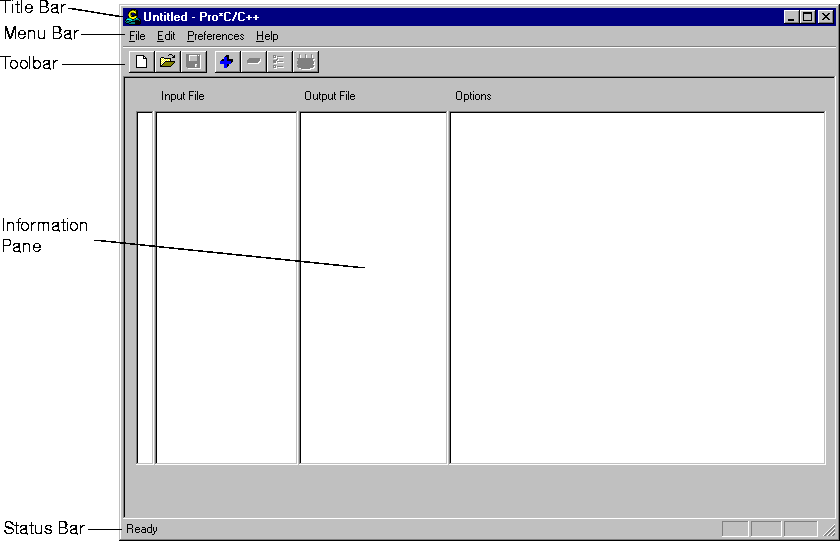
Displays the name of the Pro*C/C++ project. If you have not assigned a name to the current project, the word "Untitled" appears instead.
Contains the following menus:
Enables you to execute commands by clicking a button:

Consists of four elements:
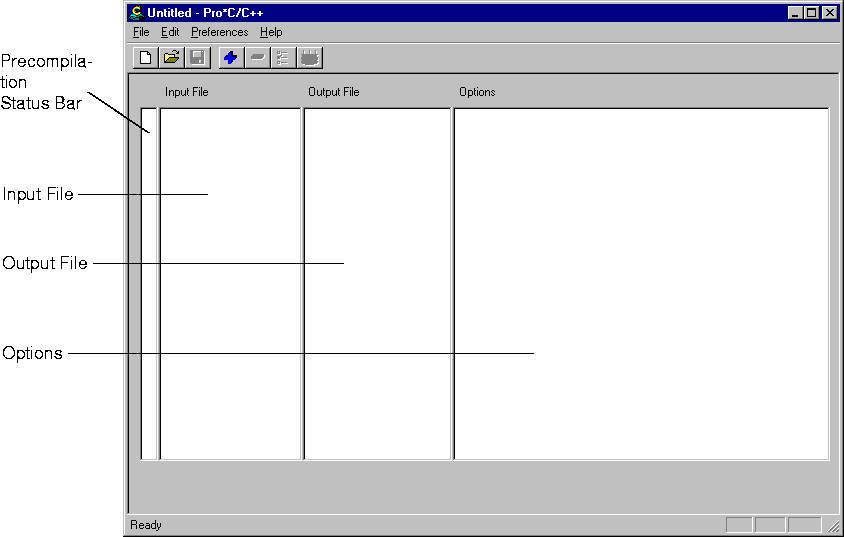
Look for one of the three status icons in the precompilation status bar once the precompile process is complete.
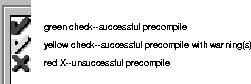
Double clicking a status icon opens the Precompilation Status dialog box. This dialog box provides detailed information on the reason for a warning or failure.
Displays information about the progress of a precompilation. The status bar also identifies the purpose of a toolbar button or menu command when you place the mouse pointer over the toolbar button or menu command.
This section describes the steps involved in creating and precompiling a Pro*C/C++ project.
First, start the Pro*C/C++ application by doing one of the following:
procui80.exe at the MS-DOS command prompt.
Then, perform the following steps:
The remainder of this section describes each of these steps in detail.
Pro*C/C++ opens only one project at a time. A project consists of one or more precompilable files. Project files have an extension of .PRE.
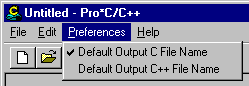
Use the Preferences menu to choose the manner in which a name is assigned to the output files.
This setting only affects input files that you add later. An existing output file name will not change. However, you can change an existing output file name by double-clicking the output file and entering a new name.
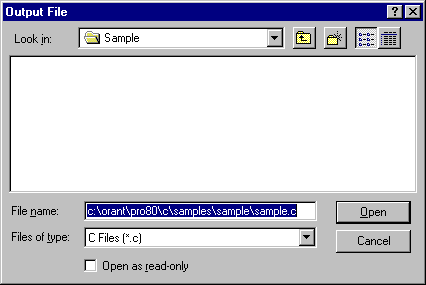
Enter an output file name for the file selected. Once you select or enter a file name, it appears in the Output File area of the information pane.
To change the name of an existing input or output file:
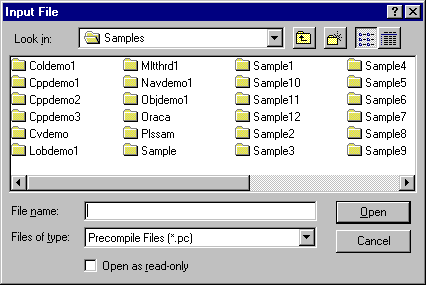
The Input File or Output File dialog box appears.
A Pro*C/C++ project consists of one or more precompilable files.
To add files to the project:
If you need to, you can easily delete one or more files from the project.
To delete files from the project:
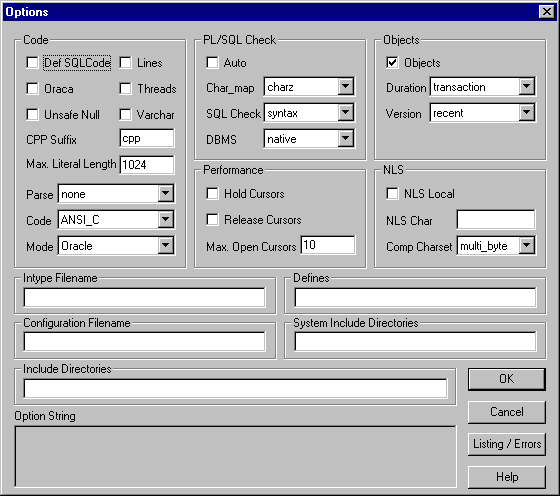
Many useful options are available. They enable you to control how resources are used, how errors are reported, how input and output are formatted, and how cursors are managed.
To set the precompile options:
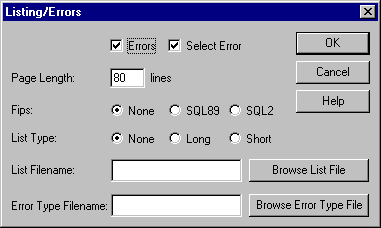
The Listing/Errors dialog box appears.
|
Additional Information: See Chapter 9 in the Pro*C/C++ Precompiler Programmer's Guide for a description of the precompiler options. In addition, click the Help button in the Options dialog box for a condensed version of the information in Chapter 9. See "Using the Precompiler Options", later in this chapter, for issues that are related to Pro*C/C++ for Windows NT/95. |
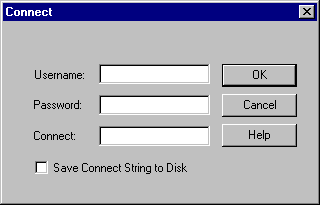
If you selected semantics or full for the SQL Check option in the Options dialog box, you may need to specify database connection information to the Oracle database. You do not need to connect to the Oracle database if every table referenced in a data manipulation statement or PL/SQL block is defined in a DECLARE TABLE statement.
To specify database connection information:
You can precompile any number of files in the Input File list.
To precompile:
When precompiling is completed, the message in the dialog box indicates "Precompiling Finished!", and the Cancel button changes to OK.
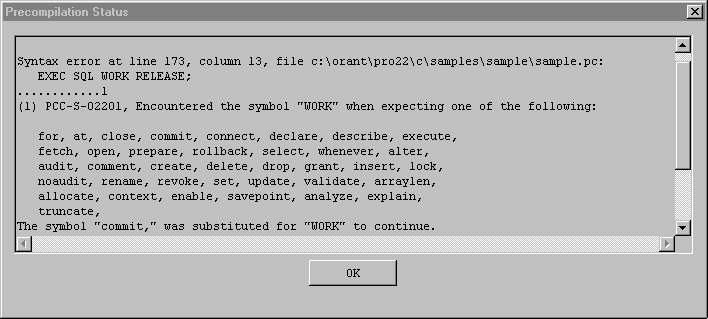
Precompiling can result in success, success with warning(s), or failure. When precompiling is finished, check the Precompilation Status Bar.
Double-click the yellow check or red X to display the Precompilation Status dialog box, which lists warning messages or reasons why the precompilation failed.
Switch to your development environment to fix the problem(s). After you correct the errors, precompile again.
To exit Pro*C/C++, choose Exit from the File menu. If your project changed in any way, you are prompted to save it.
|
Suggestion: If you want to keep an original file, as well as a version of the file with your changes, choose the Save As command. The Save command overwrites the previous version. |
If you perform most of your programming tasks at the command line, it is recommended that you run Pro*C/C++ at the command line.
To precompile an application with Pro*C/C++, enter the following command:
C:\>PROC INAME=filename.pc
where filename.pc is the name of the source file.
Pro*C/C++ generates filename.c, which can be compiled by your C compiler.
If the source file is not within your current working directory, include the file's full path after the INAME argument.
The ORACLE_HOME\PRO80\C\INCLUDE directory contains the Pro*C/C++ header files.
|
Additional Information: See the Pro*C/C++ Precompiler Programmer's Guide for more information about ORACA.H, SQLCA.H, and SQLDA.H. |
Consists of an extended set of diagnostic tools for runtime errors and status changes. ORACA handles Oracle communications. Note that using the ORACA adds to runtime overhead.
Consists of SQLLIB functions that enable the Oracle Call Interface (OCI) environment handle and OCI service context to be obtained in a Pro*C/C++ application.
Consists of ANSI prototypes for externalized functions that can be used in conjunction with OCI.
Consists of the host language data structure. Oracle updates the SQLCA after every executable SQL statement (values are undefined after a declarative statement). By checking Oracle return codes stored in the SQLCA, your application can determine the outcome of a SQL statement.
Provides platform-specific ANSI prototypes for SQLLIB functions that are generated by Pro*C/C++. By default, Pro*C/C++ does not support full-function prototyping of SQL programming calls. If you need this feature, include SQLCPR.H before any EXEC SQL statements in your application source file.
Consists of the host program data structure that contains descriptions of select-list items or input host variables. SQLDA files differ among host languages and operating systems.
Consists of K&R prototypes for externalized functions that can be used in conjunction with OCI.
Chapter 9 of the Pro*C/C++ Precompiler Programmer's Guide describes the Pro*C/C++ options. This section highlights issues that are related to Pro*C/C++ for Windows NT/95.
The CODE option has a default setting of ANSI_C. Pro*C/C++ for other operating systems may have a default setting of KR_C.
DBMS=V6_CHAR is not supported when using CHAR_MAP=VARCHAR2. Instead, use DBMS=V7.
Use the Include Directories field of the Options dialog box to enter INCLUDE path directories. If you want to enter more than one path, separate each path with a semicolon, but do not insert a space after the semicolon. This causes a separate "includes=" string to appear in front of each directory.
For sample programs that precompile with PARSE=PARTIAL or PARSE=FULL, an include path of C:\PROGRAM FILES\DEVSTUDIO\VC\INCLUDE has been added. If Microsoft Visual C++ has been installed at a different location or if Borland C++ is used, modify the Include Directories field accordingly for the sample programs to precompile correctly.
The PARSE option has a default setting of NONE. Pro*C/C++ for other operating systems may have a default setting of FULL.
The VER option is a Windows-specific option.
It takes the first and second most significant digits of the version number of Pro*C/C++ you want to use. This option is an alternative to changing the PROC_DFLT value in the registry.
For a previously installed Pro*C/C++ 2.2 to precompile SAMPLE1.PC, for example, type the following:
PROC.EXE VER=22 SAMPLE1.PC
|
Note:
This option can only be used to execute previously installed Pro*C/C++ release 2.2.2.0.1 or later. Simply running |
When Pro*C/C++ is installed, PROC_DFLT is set to PROC80 by default in the registry. If multiple versions of Pro*C/C++ are installed, simply resetting the value to a valid Pro*C/C++ version number will allow a different version to be the default when proc.exe is executed at the MS-DOS command prompt. For example, setting PROC_DFLT to PROC22 will make Pro*C/C++ 2.2 the default. This feature applies only to command line Pro*C/C++.