Release 8.1.6
A73028-01
Library |
Product |
Contents |
Index |
| Oracle AppWizard for Microsoft Visual C++ User's Guide Release 8.1.6 A73028-01 |
|
This chapter describes how to create a starter application with Oracle AppWizard for Microsoft Visual C++.
Specific topics discussed are:
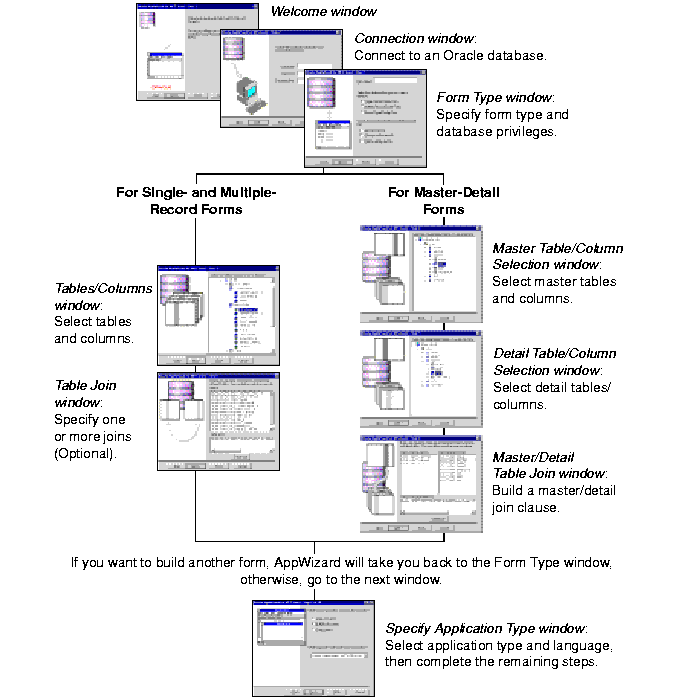
After starting Oracle AppWizard for Microsoft Visual C++, you complete a series of steps in which you specify which of three application types you want to create:
The first three steps are the same whether you create a single-record, multiple-record, or a master-detail display.
When you finish the last step, Oracle AppWizard for Microsoft Visual C++ generates the application. Application files include the following:
You then build and run the executable, using Microsoft Visual C++.
To start Oracle AppWizard for Microsoft Visual C++:
The New dialog box appears.
Oracle AppWizard for Microsoft Visual C++ starts.
This section describes how to create a single- or multiple-record display application.
The Welcome window appears when you start Oracle AppWizard for Microsoft Visual C++.
Click Next to continue.

In the Connection window, you connect to an Oracle database.

To connect to the Oracle database:
For more information about database aliases, refer to the Net8 Administrator's Guide.
Use the Form Type window to name your form, generate a specific type of database form, and to specify the database privileges for users.

To complete the Form Type window:
a1b3eux
| If You Want to Create a... | Then Select... |
|---|---|
|
Single-record display form that displays one record at a time on a form |
Single-Record Display Form |
|
Multiple-record display form that displays multiple records on a form |
Multiple Record Display Form |
|
Master-detail display form that displays infromation in master-detail format |
Master Detail Display Form and see section "Creating a Master-Detail Display Application" |
| If You Want Users to Be Able to... | Then Select the... |
|---|---|
|
Add records |
Add new records checkbox |
|
Change records |
Change existing records checkbox |
|
Delete records |
Delete existing records checkbox |
If you select any or all permitted database operations for your users, Oracle AppWizard generates code for this purpose. This enables methods that allow the users of your application to update data. If you do not select any permitted database operations, Oracle AppWizard does not generate code for this purpose and the form will be read-only.
In the Tables/Columns Selection window, you select columns from the tables you want the form to reference. The tables available to you appear in the list.
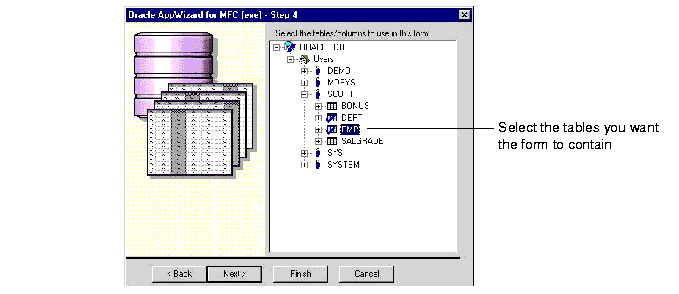
To complete the Tables/Columns Selection window:
The Add, Change, and Delete options, specified in the Form Type window, work only with a single table. If you select multiple tables and have checked these options, the following error message appears:
Add, Change, and Delete are supported in applications using a single table.
You have selected multiple tables.
Database Functionality defaults to Read Only.
If necessary, expand the table you selected and select additional columns that should be displayed in the application.
Oracle AppWizard for Microsoft Visual C++ automatically creates a simple join (also called an equi-join) between two tables, or views, based on a Primary Key and a Foreign Key.
Joins are used in the WHERE clause of a SELECT statement to avoid a Cartesian product, which would combine every row in one table with every row in another table. For example, a 90-row table combined with a 100-row table would produce a 9000-row result.
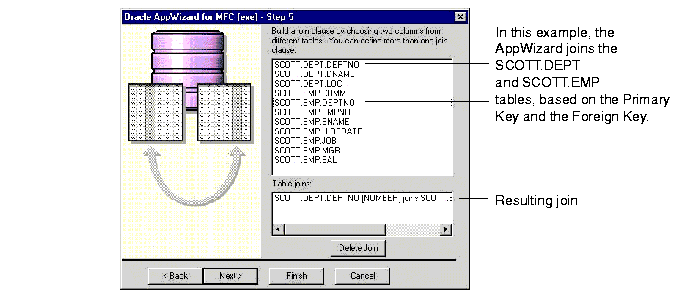
The Oracle AppWizard Table Join window displays a join in the following format for single or multiple tables:
SCHEMA.TABLE_NAME.COLUMN_NAME [DATA_TYPE] joins
          SCHEMA.TABLE_NAME.COLUMN_NAME [DATA_TYPE]
If you do not want to use the suggested join created by Oracle AppWizard for Microsoft Visual C++ (shown in the previous illustration), you can delete it and create a new join. You can also do this by modifying the WHERE clause of a query statement in the source file generated by Oracle AppWizard for Microsoft Visual C++.
To accept the default join:
To delete the default join:
Oracle AppWizard for Microsoft Visual C++ deletes the join.
To create a new a join:
The join appears in the Table joins list with the following syntax:
SCHEMA.TABLE.COLUMN [DATA_TYPE] joins SCHEMA.TABLE.COLUMN [DATA_TYPE]
When you are finished building forms and click Next, you can specify the application type and user language.
|
Note: If you are using Microsoft VC++ 6.0, there is an additional option for Document/View architecture support. See "Microsoft Visual C++ 6.0 Limitations". |
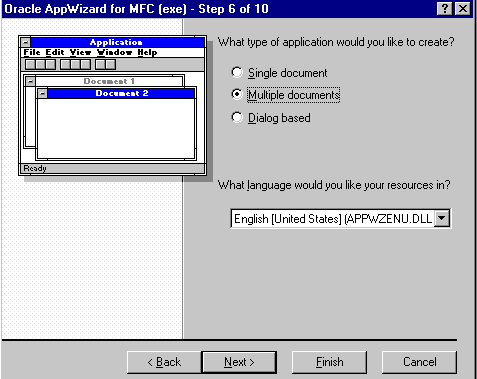
To complete the Application Type window:
Complete the remaining standard MFC windows as appropriate until you reach the window illustrated below. For more information about MFC windows, refer to your MSVC++ documentation.
In the Class Information window, Oracle AppWizard for Microsoft Visual C++ displays the classes it creates for your application, including their names, header files, base classes, and the implementation file:

To complete the Class Information window:
The New Project Information window displays the specifications for the new skeleton application you are creating.
Oracle AppWizard generates the files for your single-record or multiple-record application.
This section describes how to create an application that can display records from two or more tables that have a master-detail relationship.
The first three windows are completed in the same way as those described in "Creating a Single- or Multiple-Record Display Application", except that, for a master-detail display, you will complete the Application Type window as follows:
In the Form Type window, type the name you want to give the form, select the type of form, and the database privileges that your application requires.

In the Master Table/Column Selection window, the available master tables appear in a list:
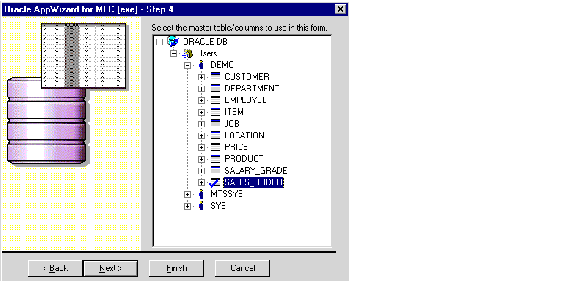
To complete the Master Table/Column Selection window:
In the Detail Table/Column Selection window, the available detail tables appear in a list. Select the detail tables and the columns you want displayed in the application.
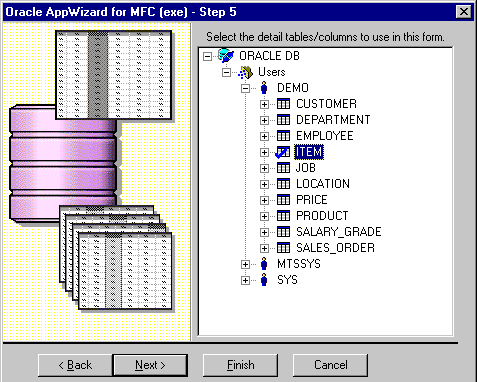
To complete the Detail Table/Column Selection window:
After you select the tables between which to set up a master-detail relationship, use the Master/Detail Table Join window to specify how to join the columns from each of the tables selected in the last two windows.
Oracle AppWizard for Microsoft Visual C++ automatically creates a simple join (also called an equi-join) between two tables, or views, based on a Primary Key and a Foreign Key.
Such joins are used in the WHERE clause of a SELECT statement to avoid a Cartesian product, which combines every row in one table with every row in an other table. For example, a 90-row table combined with a 100-row table would produce a 9000-row result.
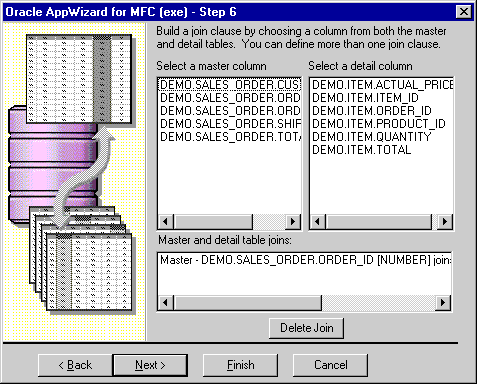
If you do not want to use the default join created by Oracle AppWizard for Microsoft Visual C++ (shown in the previous illustration), you can delete it and create a new join. Alternatively, you can also do this by modifying the WHERE clause of a query statement in the source file generated by Oracle AppWizard.
If you want to create more than one join, choose one column from the master table and one column from the detail table to create each additional join clause.
To accept the default join in the Master/Detail Table Join window:
To delete the default join:
Oracle AppWizard for Microsoft Visual C++ deletes the join.
To create a new join:
The join appears in the Master and Detail Table Joins list with the following syntax:
Master - SCHEMA.TABLE_NAME.COLUMN_NAME [DATA_TYPE] joins Detail -
SCHEMA.TABLE_NAME.COLUMN_NAME [DATA_TYPE]
When you are finished building forms and click Next, you are ready to specify the application type and the user language.
|
Note: If you are using Microsoft VC++ 6.0, there is an additional option for Document/View architecture support. See "Microsoft Visual C++ 6.0 Limitations". |
To complete the Application Type window:
Complete the remaining standard MFC windows as appropriate until you reach the window illustrated below. For more information about MFC windows, refer to your MSVC++ documentation.
In the Class Information window, Oracle AppWizard for Microsoft Visual C++ displays the classes it will create for your application, including their names, header files, base classes, and the implementation file.

To complete the Class Information window:
The New Project Information window appears.
The New Project Information window displays the specifications for the new skeleton application you are creating.
Oracle AppWizard for Microsoft Visual C++ creates the files for your master-detail application.
After Oracle AppWizard generates the application, you can build an executable.
To build the executable:
You are now ready to execute your application.
To run the executable:
The Connect to Oracle dialog box appears.
After your application connects to the database successfully, the form you generated appears showing data retrieved from the database. The following illustration is a sample of what your form can look like, although the appearance of your actual form and data varies based on the database information you select.
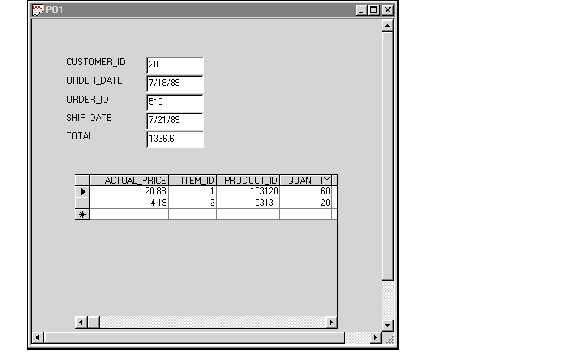
By design, no toolbar for inserting, updating, and deleting records is available. This is because the master table is read-only. If you have a single detail table, you can edit the fields by making a change and clicking on a different row to commit the change.
|
|
 Copyright © 2000 Oracle Corporation. All Rights Reserved. |
|