Release 8.1.6
A76932-01
Library |
Product |
Contents |
Index |
| Oracle Advanced Security Administrator's Guide Release 8.1.6 A76932-01 |
|
![]()
![]()
This chapter contains information on how to configure Oracle for use with Identix biometric authentication. It covers the following topics:
The Biometric Authentication Service uses Identix Biometric Authentication to provide tamper-proof biometric authentication of users using secret-key MD5 hashing, centralized management of biometrically identified users, and centralized management of those database servers that authenticate biometrically identified users.
This section describes how the Biometric Authentication Service works in a client-server environment.
Figure 8-1 shows the components and the configuration of the Biometric Authentication Service.
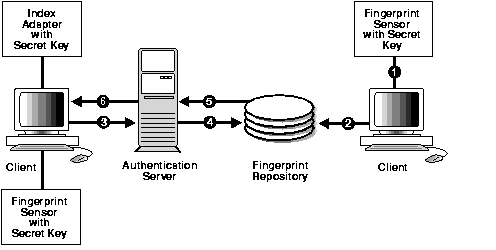
The Fingerprint Repository has one administrator who is responsible for enrolling multiple users' fingerprint templates and defining the DEFAULT policy that is in force for all databases that subscribe to the fingerprint server for authentication.
The Fingerprint Security Service Administrator uses a desktop fingerprint scanner to read user fingerprints, convert them into fingerprint templates, and send them with measured accuracies to the Biometric Authentication Service. The Biometric Authentication Service stores the fingerprint templates in the Fingerprint Repository, an Oracle database. The measured accuracy of a fingerprint is an estimate of how reliable a comparison can be made between the stored fingerprint template and the user's fingerprint that is scanned later for authentication. The enrollment quality is expressed as a percent score between 0 and 100. For example, a user may have an enrollment quality of 72 percent.
The Biometric Authentication Service consists of the following modules:
Both the manager and the client-side adapter interface with Identix products: TouchSafe II Software Libraries, TouchSafe II Hardware Interface, TouchSafe II Desktop Sensor, TouchSafe III software libraries, and TouchSafe III desktop sensor.
|
More Information:
For a list of Identix documentation that describes these Identix products, see "Related Publications" in the Preface. |
The Fingerprint Security Server Administrators use the manager to scan user fingerprints, measure the accuracy of the fingerprints, and establish security policies for database servers. The manager sends this information to the authentication server, which stores the data in the repository.
The administrator, or someone who can be trusted, uses the Identix TouchSafe II or TouchSafe III software to store the secret key on the TouchSafeII or TouchSafe III device. This key must match the key stored in the DEFAULT security policy before authentication can occur.
Each user who wants to use the system must place a fingerprint on a TouchSafe II or TouchSafe II Desktop Sensor. The client-side adapter sends an authentication request to the server-side adapter which uses the previously enrolled fingerprint stored in the authentication server for comparison. For each authentication request from a client, the authentication server retrieves and sends the user's fingerprint and the database server's security policy back to the client-side adapter via the server-side adapter.
The user's authentication request causes the client-side Oracle Advanced Security Identix authentication adapter to send the request to the server side biometric authentication adapter, which looks up the user's fingerprint in the authentication server, which returns the stored fingerprint and the associated security policy.
Using threshold level values from the associated security policy, the client side adapter uses the TouchSafe II Software Libraries to set threshold values on the TouchSafe II Desktop Sensor. It then prompts for the placing of the user's finger on the TouchSafe II Desktop Sensor. The adapters on the client and the database server work together to compare the user's fingerprint, the secret key, and the threshold levels against the administrator-entered security policy stored in the authentication server repository. If this data matches, the user is authenticated.
The Biometric Manager installation process automatically installs the necessary TouchSafe II software and automatically configures the device if requested.
If during the installation of the Biometrics Manager, you chose not to allow the installer to set up your Identix TouchSafe II Device Driver, you can configure it manually as follows.
ORACLE_HOME\identix.
etsiint.ini to the current TouchSafe II Encrypt I/O port setting. For example:
IoPortAddress = REG_DWORD 0x00000360 for I/O port 0x360
etsiint.bat with the Windows NT directory. For example:
copy etsiint.sys c:\winnt\system32\drivers
 -> copy etsiint.sys path\drivers
etsiint.bat.
Perform the following steps on the manager PC:
See "Installing the TouchSafe II Encrypt Device Driver for Windows NT"in this chapter and the platform-specific installation documentation.
More Information:
Follow the instructions in the Identix manual to verify that the module works with the Identix demonstration program. The demonstration program must work on the PC before any other Oracle products can be loaded onto the PC. See the Identix Readme file for additional information.
Perform the following steps on each client PC:
See "Installing the TouchSafe II Encrypt Device Driver for Windows NT" in this chapter and the platform-specific installation documentation.
More Information:
The biometric authentication adapter must be installed on each database that uses biometric services for its authentication. Install the biometric authentication adapter following the instructions in the platform-specific documentation.
The Biometric Authentication Service is the database that stores both the user and fingerprint information. The database can be any Oracle 8.0.3 or later production database. It should be on a secure, trusted system with strict security and access controls. The Identix adapter should not be installed on this database.
To configure the Biometric Authentication Service, perform the following tasks.
Task 1: Configure the Database Server that is to become the Authentication Server
Task 2: Configure Identix Authentication
Task 3: Establish a Net Service Name for the Fingerprint Repository Server
Task 4: Verify that the Address of the Database Server is Accessible to the Client
Perform the following steps to configure the database server:
ofm_admin/ofm_admin
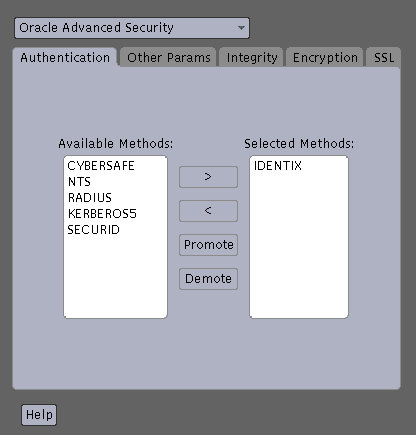
Perform the following tasks to configure Identix authentication:
Unless otherwise indicated, you can configure Identix authentication either by using the Net8 Assistant, or by modifying the sqlnet.ora file with any text editor.
The Oracle Advanced Security tabbed pages appear.
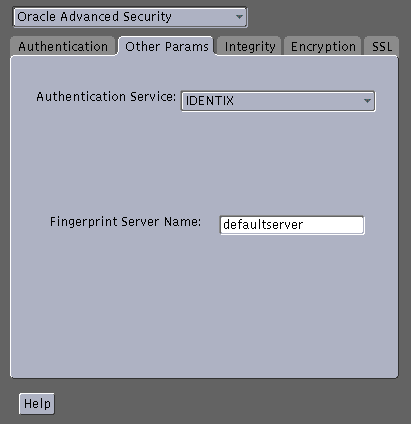
The sqlnet.ora file updates with the following entries:
SQLNET.AUTHENTICATION_SERVICES=(IDENTIX)
SQLNET.IDENTIX_FINGERPRINT_DATABASE=SERVICE_NAME
Use a text editor to set the following parameters in the sqlnet.ora file,
sqlnet.identix_fingerprint_database_user=ofm_client

sqlnet.identix_fingerprint_database_password=password

sqlnet.identix_fingerprint_method=oracle
where username is the well-known user name ofm_client, and password is the well-known password ofm_client.
Add the following parameters to the initialization parameters file:
REMOTE_OS_AUTHENT = false
OS_AUTHENT_PREFIX = ""
Set the USERNAME parameter in the Oracle section of the oracle.ini file. This parameter sets the name of the database user with which the client connects to the database.
Establish a net service name for the fingerprint repository server.
Verify that the address of the database server is accessible to the client.
Configure the manager PC with a net service name to connect to the authentication server.
Perform the following tasks to administer the Biometric Authentication Service using the Biometric Manager.
Use the Identix Setkey utility to configure a hexadecimal hashkey on each of the clients, such as FF30EE. The key must be the same for each client and must match the DEFAULT Policy hashkey. This key can range from one to thirty-two hexadecimal digits.
The user name must match the name used in the next step.
Enter the following to create an account:
SQL> CONNECT system/manager
SQL> CREATE USER os_authent_prefix username IDENTIFIED EXTERNALLY;
SQL> GRANT CREATE SESSION TO username;
;
For example, if you create the user king, and set OS_AUTHENT_PREFIX to a null value (""), use SQL*Plus to create an Oracle user account using the following syntax:
SQL> CREATE USER king IDENTIFIED EXTERNALLY;
At the minimum, grant the user the CREATE SESSION privilege as follows:
SQL> GRANT CREATE SESSION TO king;
Use the Biometric Manager to enroll the user in the Biometric Authentication Service.
The user king can now be biometrically authenticated to Oracle.
|
More Information:
For information on creating users identified externally, see Oracle8i Administrator's Guide and Oracle8i Distributed Database Systems. For information on the Biometric Authentication Service and on storing the secret key in the client, see the Identix documentation. |
Before you authenticate a user, ensure that the Biometric Authentication Service has been installed and configured and the steps in "Administering the Biometric Authentication Service" in this chapter have been executed.
Perform the following steps to authenticate users with a Biometric Authentication Service:
ETSII_IOPORT = 0X280
|
Note: The TouchSafe III device does not use the ETSII_IOPORT environment variable. Instead, it uses the tn3com.ini file to set the port and baud rate. |
sqlplus
SQL>connect /@net_service_name
where net_service_name is Net8 net service name.
See "Authenticating Users with a Biometric Authentication Service" in this chapter.
More Information:
Check the following if you encounter any problems installing or using Identix biometric authentication.
TNSNAMES.ORA
biometrics.world = (DESCRIPTION =
                    (ADDRESS_LIST =
                     (ADDRESS =
                       ...
SQLNET.ORA
sqlnet.identix_fingerprint_database=biometrics.world
tnsnames.ora) on the server and on each PC client.
(connect_data =
    (service_name = service_name)
    (security = (Authentication_service = NONE))
|
|
 Copyright © 1999 Oracle Corporation. All Rights Reserved. |
|