Release 9.0.1
Part Number A88717-01
Home |
Book List |
Contents |
Index | Master Index | Feedback |
| Oracle Enterprise Manager Getting Started with Oracle Change Management Pack Release 9.0.1 Part Number A88717-01 |
|
![]()
![]()
The Plan Editor application allows you to modify and/or reproduce database object definitions at one or more databases.
With Plan Editor, you create or modify a single change plan and populate it with change requests. To deploy the plan, you specify one or more destination databases, generate a script to apply the plan's change requests at each database, then execute the scripts.
You can also create change plans with DB Alter, DB Quick Change, DB Propagate, and the Synchronization Wizard. However, these change applications differ from Plan Editor because each of them is designed to create a change plan with specific types of change requests that make specific types of changes.
Plan Editor is a more flexible change plan tool. You can use Plan Editor to create and modify a change plan that includes any type of change request and to make a wider variety of changes. Plan Editor can edit plans that were created earlier using the other change applications and can generate and execute scripts for those plans.
The other change applications have page-oriented interfaces that guide you step-by-step through the process of specifying the changes the tool is designed to make and making those changes. Because you can make different types of changes using Plan Editor, its interface is not page-oriented and it does not guide you step-by-step. You must learn the process of using Plan Editor to create and modify change plans that make different types of changes.
This section describes how to start the Plan Editor application and use it to create a change plan, which is used to modify and create object definitions.
Figure 3-1 shows the steps for creating a change plan. The steps in the figure are described in detail in the remainder of this chapter.
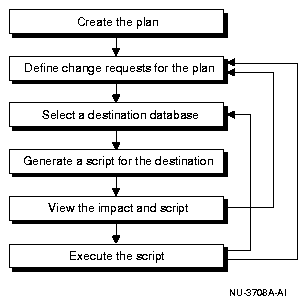
To create a new plan using Plan Editor, follow these steps:
After Plan Editor creates the empty plan, you need to define one or more change requests to add to the plan. Depending on what you want the plan to accomplish, you will define directives, scoped directives, exemplars, modified exemplars, or some combination of these types of change requests for the plan.
The rest of this section provides conceptual information about directives, scoped directives, exemplars, and modified exemplars.
A directive is a set of changes you specify for an existing, named object definition. A directive can be thought of as a "Super Alter" statement.
A directive for an object definition tells an Oracle Change Management Pack application, "Make these specific changes to the object definition." Suppose, for example, that you are defining a directive for a table named Table_1. Some of the change requests that you could specify in a directive for table Table_1 include:
You create a directive for an object definition by selecting an object definition to be modified, then specifying the changes to the object definition's attributes on property sheets similar to those used in the Oracle Enterprise Manager Console.
A directive has the scope of a single object definition. That is, the changes specified in the directive are applied to a single object definition when the change plan script executes at a destination database.
You can also extend the scope of a directive so that the changes specified in the directive are applied to multiple object definitions that you specify. A directive with an extended scope is called a scoped directive. The changes specified in a scoped directive are applied to multiple object definitions when the change plan script executes at a destination database.
An exemplar is a complete object definition to be reproduced, either by creating a new object definition or by modifying an existing object definition of the same name and object type. An exemplar can be thought of as the example of what you want to reproduce.
An exemplar tells an Oracle Change Management Pack application, "Reproduce this object definition. If an object definition of the same name and type already exists at the destination database, make whatever changes are necessary to that object definition so that it matches this object definition. If the object definition does not exist at the destination database, create an object definition that matches this object definition." When you define an exemplar, you can also include grants information for the exemplar.
You can also edit the attributes of an exemplar definition before propagating it. For example, you can modify the storage parameters for exemplar definitions before propagating the definitions from a production database to a test database. After the propagation operation completes, the propagated definitions will already have the desired storage parameters for the new destination. An exemplar with attributes that have been changed since the exemplar was created is referred to as a modified exemplar. See "Creating a Modified Exemplar with Plan Editor" for more information on using Plan Editor to create a modified exemplar.
Table 3-1 summarizes the types of change requests that can be created with Oracle Change Management Pack applications.
| Application | Type of Change Requests Created |
|---|---|
|
Synchronization Wizard |
exemplars |
|
DB Propagate |
exemplars, modified exemplars,Foot 1 or both |
|
DB Quick Change |
directives |
|
DB Alter |
directives, scoped directives, or both |
|
Plan Editor |
directives, scoped directives, exemplars, and modified exemplars, or any combination of these |
|
1
Modified exemplars can be created with either DB Propagate or Plan Editor, but Plan Editor offers more options for applying modified exemplars in change plan scripts at destination databases. See "Generating a Script with Plan Editor" for more information. |
Some Oracle Change Management Pack applications (such as DB Alter and DB Propagate) make it evident when you are creating change requests because these applications prompt you to add directives or exemplars to the change plan. Other applications (such as the Synchronization Wizard and DB Quick Change) prompt you to select object definitions to copy or modify, but do not make it evident that the selected definitions are directives or exemplars that are being added to the change plan.
You have created an empty plan using Plan Editor. Now you need to define one or more change requests to add to the plan. Depending on what you want the plan to accomplish, you will define directives, scoped directives, exemplars, modified exemplars, or some combination of these types of change requests for the plan.
The rest of this section provides detailed information about how to create directives, scoped directives, exemplars, and modified exemplars using Plan Editor.
To specify the modifications to be made to an existing object definition at the destination database, follow these steps to define a directive for that object definition in the source database:

By default, a directive contains the changes to be applied to a single object definition. However, it is possible to extend the scope of a directive so that the changes specified in the directive are applied to multiple object definitions that you specify. A directive with an extended scope is called a scoped directive.
Scoped directives can be very powerful. For example, suppose that you want to move several tables to a new tablespace without creating a separate directive for each table you want to move. Instead, you can create a directive for one of the tables, and in that directive specify the name of the new tablespace for the table. Then you can edit the scope specification for that directive, making sure that the search criteria identifies the other tables that you want to move to the new tablespace. When the script is generated, the scoped directive's instructions are applied to each object that matches the search criteria. When the script executes, it carries out the scoped directive's instructions on each matched object. In this example, all the tables that match the scope directive's search criteria are moved to the new tablespace that is specified in the scoped directive.
To create a scoped directive, follow these steps:
The Edit Directive Scope dialog box contains the following fields:
Displays the object type of the directive object. This field is non-editable.
If the directive object is a non-schema object, you cannot modify this field.
If the directive object is a schema object, you can modify this field. To include any schema name in the search criteria, click Any Schema. To include any schema name except the SYS and SYSTEM schemas, click Exclude SYS, SYSTEM after clicking Any Schema.
To include specific schemas or wild card patterns in the search criteria, click Add. The Select Schemas dialog box is displayed. Use the Select Schemas dialog box to add specific schemas or wild card patterns to the search criteria. If you specify wild card patterns, any schema name that matches the pattern will be included in the search criteria.
To remove specific schemas or wild card patterns from the search criteria, select the item in the Schemas list, then click Remove.
To include any object name in the search criteria, click Any Object Name.
To include specific object names or wild card patterns in the search criteria, click Specified Object Names and then click Add. The Select Names dialog box is displayed. Use the Select Names dialog box to add specific object names or wild card patterns to the search criteria. If you specify wild card patterns, any object name that matches the pattern will be included in the search criteria.
To remove specific schema names or wild card patterns from the search criteria, select the item in the Search For list, then click Remove.
See the online help for more information about specifying wild card patterns.
Scoped directives are marked with both the scoped directive icon and an object type icon. The scoped directive icon appears first, followed by the object type icon, then the name of the object. The scoped directive icon is shown in Figure 3-3.

A change plan can have only one change request for an object in a destination database. For example, a plan cannot contain both a directive and a scoped directive for the same object in a destination database. If a change plan contains multiple change requests for the same object, this problem will be identified in the impact report.
Refer to the online help for more information on scoped directives.
To reproduce an existing object definition at a destination database, you create an exemplar for that object definition in the source database. Later, when the script generated from the change plan is executed against the destination database, one of the following three actions is performed for each exemplar in the change plan:
To reproduce an existing object definition at a destination database, follow these steps to create an exemplar for that object definition in the source database:

Select one or more of an exemplar's grants and click the Exclude button to exclude those grants from the plan. If you decide later that you want to include one or more excluded grants for an exemplar in the plan, select those grants, then click the Include button to include them in the plan.
After you include a specific grant for an exemplar in a plan, it is possible for the same grant to be modified in the database. In this case, the Refresh button becomes available when you select that grant on the Grants page. If you want to update the grant in the plan to match the grant in the database, select the grant, then click the Refresh button.
If no grants are associated with the exemplar, the Grants page does not display any grants.
The Dependencies page displays the objects that the exemplar depends on. Each dependency object definition on the Dependencies page should be added to the plan, except for those object definitions that already exist at the destination database. For example, suppose you add an exemplar for a trigger to a plan, and the trigger refers to a table that is not in the plan and which does not exist at the destination database. In this case, you should manually add an exemplar for the referenced table to the plan, otherwise the trigger will not be created at the destination database. To manually add a dependency object to the plan, select the object definition and click Add to Plan. Objects that are already in the plan are unavailable.
The Dependents page displays the objects that depend on the exemplar. You can use this page to locate other object definitions that are related to the exemplar, and, if you wish, manually add them to the plan. To manually add a dependent object definition to the plan, select the object definition and click Add to Plan. Objects that are already in the plan are unavailable.
By default, objects on the Dependencies and Dependents pages are displayed in a tree. If you click Show List, the objects on the selected page will be displayed in a list instead of a tree. Click Show Tree to display the objects in a tree again.
Click Generate Report to generate a report about the dependency and dependent objects. The report can be generated in HTML or comma-separated values format.
If your plan contains table exemplars, you can reproduce both the table definitions for the exemplars and the data associated with the table definitions at a destination database. To do so, select the Copy Table Data option. If you want to reproduce only the definitions for the table exemplars, do not select the Copy Table Data option.
See the online help for a complete list of the propagation options and a description of how their values affect the application of a change plan's exemplars at a destination database.
You may want to edit the attributes of an exemplar definition before propagating it (instead of creating an exemplar definition to propagate, then manually editing the definition's attributes after it has been reproduced at a destination database). For example, you can modify the storage parameters for exemplar definitions before propagating the definitions from a production database to a test database. After the propagation operation completes, the propagated definitions will already have the desired storage parameters for the new destination. An exemplar with attributes that have been changed since the exemplar was created is referred to as a modified exemplar.
To modify an exemplar, thereby creating a modified exemplar:
Both DB Propagate and Plan Editor allow you to create modified exemplars. However, Plan Editor offers more options for applying modified exemplars in change plan scripts at a destination database. See "Generating a Script with Plan Editor" for more information.
To select the destination database where you want the plan to be executed:
After a destination database has been selected, a script can be generated from the change plan. The script generated from the change plan (not the plan itself) will be run against the destination database. During the initial stage of script generation, the Oracle Change Management Pack application examines the structure and definitions in the destination database so that it can generate a script designed exclusively for execution against the destination database.
When you use a single plan to generate scripts for several databases that have different structures and definitions, a different script is generated for each database. This is because Plan Editor and the other change applications take each destination database's structure and definitions into account when generating the script.
For example, suppose your plan contains an exemplar for table Table_2, and you generate two scripts, one to run against destination database DB_1 and the other to run against destination database DB_2. If table Table_2 does not exist in database DB_1, the script generated for DB_1 will include statements that define table Table_2. If a different version of table Table_2 already exists in database DB_2, the script generated for DB_2 will include statements to make the definition of table Table_2 in database DB_2 match the exemplar for table Table_2.
After Plan Editor generates a script for a destination database, you can view and, optionally, edit the script. An impact report is also created when the script is generated. You should view the impact report to determine the impact of executing the script at the destination database. The impact report provides a summary of the number and types of objects that will be modified when the script executes at the destination database. The impact report also shows warnings and errors, including a description of the requested operations that cannot be performed at the destination database, for example, a request to drop a column that no longer exists at the destination database. The other change applications also generate scripts that can be viewed and edited.
If you modify a plan's change requests after you have generated one or more scripts for the plan, the scripts that have been generated are considered to be obsolete scripts. When you try to execute an obsolete script, the Change Management Pack application you are using displays a message that advises you that the plan was modified after the script was generated and confirms whether you want to execute the script anyway. It is prudent to generate a new script from the modified plan instead of executing an obsolete script.
To generate a script for the destination database:
The Options page and its features are also available from other change applications besides Plan Editor.
If you choose to apply only the changes specified for the modified exemplars, there are several suboptions that allow you to select which changes to apply. See the online help for the Advanced Options page for more information about the options and suboptions for applying changes specified for modified exemplars.
Modified exemplars can be created using Plan Editor or DB Propagate. However, the Advanced Options page is not available when you use DB Propagate to generate a script. Therefore, scripts generated by DB Propagate for plans with modified exemplars use the default method of applying modified exemplars (the script applies both the original exemplars and the specified changes at the destination database).
If you use DB Propagate to create a plan with modified exemplars and then generate a script for it, you might decide that you do not want the default option for applying modified exemplars. If so, edit the plan originally created in DB Propagate with Plan Editor, click the Script subobject, select the other option and the desired suboption on the Advanced Options page, then generate the script again and execute it using Plan Editor.
Figure 3-5 shows a fully expanded change plan in Plan Editor with the Script subobject selected and the Impact Report page displayed.
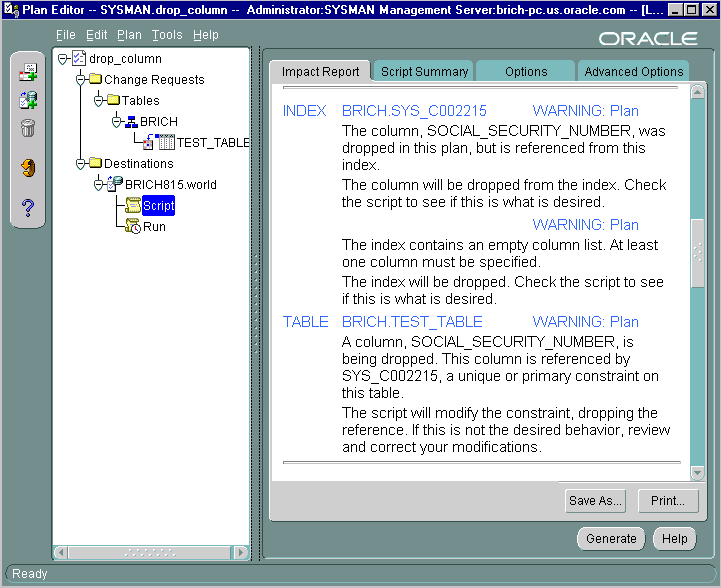
Oracle Change Management Pack change applications create an impact report and a script summary when they generate a script.
View the impact report to determine the impact of executing the generated script at the destination database. The impact report provides a summary of the number and types of objects that will be modified when the script executes at the destination database. The impact report also shows warnings and errors, including a description of the requested operations that cannot be performed at the destination database, for example, a request to drop a column that no longer exists at the destination database.
Script errors must be fixed. Evaluate the errors, take corrective action, then regenerate the script.
Script warnings should be read and the appropriate action taken before you attempt to execute the script. Some warnings are informational, for example, a message that dropping a column will cause an index to be dropped, as shown in Figure 3-5. To save the impact report to a file, click Save As. To print the impact report, click Print.
View the script summary on the Script Summary page. The script summary contains the SQL statements and non-SQL operations that will be executed at the destination database to implement the plan's change requests. The actual script includes both the SQL statements from the script and OraTCL statements. To save the script summary to a file, click Save As. To print the script summary, click Print.
To edit the actual script (not the script summary), click the Edit script button on the Script Summary page. This displays the script in the Edit Oracle Tcl Script dialog box. Note that the actual script can be very difficult to understand, and editing it may result in undesired changes that you cannot undo after the script is executed. To save the script to a file, click the Save As button in the Edit Oracle Tcl Script dialog box.
A script that has been edited can be executed even if it has script generation errors.
|
Note: Scripts produced by Oracle Change Management Pack applications can only be run using Oracle Change Management Pack applications, the Oracle Change Management Pack command line interface, or the Oracle Enterprise Manager job system. See "execute command" for more information about executing a script using the command line interface. See the online help for more information about executing a script using the job system. |
If the impact report or the script summary is unacceptable, you can take one or more of the following actions:
To ensure that you can undo the execution of a script, Oracle Change Management Pack change applications make a copy of the old data when it is needed for recovery purposes. The recovery data is stored in temporary tables that look like the original tables but have different names.
Oracle Change Management Pack change applications give you the option of keeping or undoing the changes made when a script is executed.
If you keep the changes, the temporary tables used by the recovery script are deleted, making the changes permanent.
If you undo the changes, the recovery script uses the recovery data to return the user tables and data to their original state.
To execute the script against the destination database:
If you want to execute the plan's change requests against a different destination database, select a new destination database, then generate, view, and execute a new script against the database.
You can also execute a script using:
All the change applications allow you to execute scripts generated by that application. Plan Editor can execute scripts generated by any change application.
Two common causes of script execution errors are:
When the Oracle Change Management Pack translator generates a script for a destination database, it takes the current structure of the database into account. If objects at the destination database are deleted or modified after the script is generated, the script is considered to be a stale script. Errors can occur during the execution of a stale script or recovery script. For example, if a particular user is removed from a destination database before you run a script, the execution log may display an error message such as this after the statement that generated the error message:
ORA-01918: user `GEORGE' does not exist
If you suspect that a script execution error is caused by a problem with the Oracle Change Management Pack translator, please contact Oracle Worldwide Customer Support.
To have Oracle Change Management Pack predict script execution failures (which is the default behavior), the OCM_FAILURE_PREDICTION property in the ORACLE_HOME/sysman/config/omsconfig.properties file must be enabled (where ORACLE_HOME is the directory in which Oracle Enterprise Manager is installed). The property is enabled when its value is set to "true" (case insensitive) or when the property does not exist in the omsconfig.properties file. When failure prediction is enabled, Oracle Change Management Pack change applications perform resource checking (for example, they check for sufficient space and quota to make copies of tables or to move items from one tablespace to another) during script generation. Resource warnings are reported in the impact report. Script generation takes longer when failure prediction is enabled.
If the OCM_FAILURE_PREDICTION property is present in the omsconfig.properties file and has a value other than "true," then resource checking and script failure prediction does not occur.
When error messages occur during script execution, the best ways to fix the problem are:
When error messages occur during recovery script execution, the best ways to fix the problem (in order of preference) are:
|
|
 Copyright © 1996-2001, Oracle Corporation. All Rights Reserved. |
|