Oracle Enterprise Manager Administrator's Guide
Release 9.0.1

Part Number A88767-02
Go To Documentation Library
Home
Go To Product List
Book List
Go To Table Of Contents
Contents
Go To Index
Index

Master Index

Feedback

Go to previous page Go to next page

7
Enterprise Manager Reporting

Enterprise Manager Reporting provides administrators with a powerful tool for quickly viewing and analyzing information about managed applications and systems.

This chapter covers the following topics:

Enterprise Manager Reporting

The Enterprise Manager reporting system provides flexible reporting functionality to administrators, permitting quick and easy access to information about the status, configuration, and performance of all monitored systems in their enterprise. Administrators can create, schedule, and publish a wide variety of enterprise system reports. When published to a website, these reports can be accessed by a wider audience, enabling anyone from administrators to managers to executives to quickly access information regarding their monitored environment. The reporting functionality is fully integrated with the Enterprise Manager Job scheduling system, allowing reports to be generated automatically at specific times or at regular intervals. Reports can also be generated on-demand, such as when an administrator requests to view a specific report by clicking on a link within the reporting website.


Important:

The reporting system is only available for Enterprise Manager Consoles connected to a Management Server. Consoles running standalone only have access to the minimal reporting functionality that is available through the standard database management tools.  


Key Concepts

The Enterprise Manager reporting system consists of two parts: The services that reside at the Management Server, and the reporting website where reports can be published. See the Enterprise Manager Configuration Guide for more information on reporting setup and configuration.

Before using the reporting system to create reports, there are two fundamental concepts you must be familiar with: report definitions and report elements.

What is a Report Definition?

A key concept to understand is that all reports are generated from report definitions. An administrator creates a report definition that generates the desired report. A report definition defines what type of report is generated, its content and appearance, or whether it is published on the reporting website. It also includes various attributes such as an optional schedule. A report is uniquely identified by its definition name. Specifically, a report definition allows you to define the following attributes:

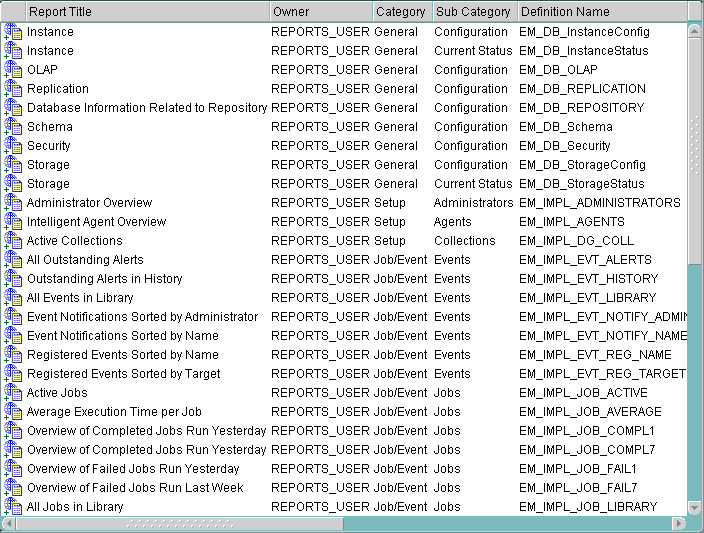
Enterprise Manager supplies a wide array of predefined report definitions, allowing you to generate reports without having to create new report definitions. Select the Report Definition object in the Console Navigator to display a list of all report definitions in the detail view. See Figure 7-1, "Report Definitions in the Console Detail View".

If none of the predefined definitions meets your reporting requirements, you can modify definition parameters from an existing report definition and save it as a new report definition.

Figure 7-1 Report Definitions in the Console Detail View

Text description of report_m.gif follows.
Text description of the illustration report_m.gif

If your reporting needs go beyond the scope of the predefined report definitions, you can create completely new report definitions. The next section covers the different ways you can create a report.

As shown in Figure 7-1, "Report Definitions in the Console Detail View", existing report definitions are displayed in a multi-column list that provides information and current status for all report definitions. The columns shown are:

What is a Report Element?

Report elements are the building blocks of any report definition, and by extension, the generated report itself. By selecting and ordering report elements, you construct the format and content of your report. Enterprise Manager provides three general categories of report elements:

The categories actually displayed depend on the chosen report type. See "Report Elements Page" on page 7-15 for an explanation of specific report elements for each of these categories.

Ways to Select Targets for Report Generation

Once your Enterprise Manager reporting environment has been configured, you can generate reports immediately by using the predefined report definitions. Regardless of whether you use a predefined report definition or a custom definition, there are two distinctions that must be made regarding report generation:

Creating Individual Reports for All Targets of a Selected Type

Reports generated using this method do not require that you choose specific targets before publishing or saving the report. In this situation, the administrator who views the report chooses the target(s). For example, a super administrator wants to publish a report listing the number of active jobs submitted against a target. They would like this report to be used by other administrators as a helpful utility to allow them to determine the job loads for targets they are managing. Since there are over 560 targets in their managed environment, it is not practical to generate a report for all 560 targets. Instead, the super administrator specifies in the report definition that an individual report be created for all targets of a selected type and then publishes the report to the Enterprise Manager reporting website. A regular administrator goes to the reporting website to find out how many jobs are active for the five targets they are managing. They click on the hyperlink to generate a report. They are then prompted by the system to specify the exact targets they wish to run the report against. They choose the targets and the report is generated for those targets only.

Creating a Single Report for Preselected Targets

As the heading suggests, specific targets must be selected from the report definition before generating the report. Hence, the administrator who clicks on that report's hyperlink in the reporting website will see a report for all targets chosen by the owner of the report definition.

Configuring Enterprise Manager Reporting

You set up your reporting environment using the web server supplied with your Oracle installation. Upon installing Enterprise Manager components, all internal configuration of the Enterprise Manager Reporting web site is taken care of automatically.

Configuration requires a two-way exchange of information between the Reporting web server and the Oracle Management Server.

For more information on Reporting setup and configuration, see the Oracle Enterprise Manager Configuration Guide.

The Enterprise Manager Reporting Website

The primary advantage of the reporting system lies in its ability to publish reports to a website for other administrators and other users to access information on their environment. The reporting website (along with an Apache web server) is installed from the Server CD with Enterprise Manager.

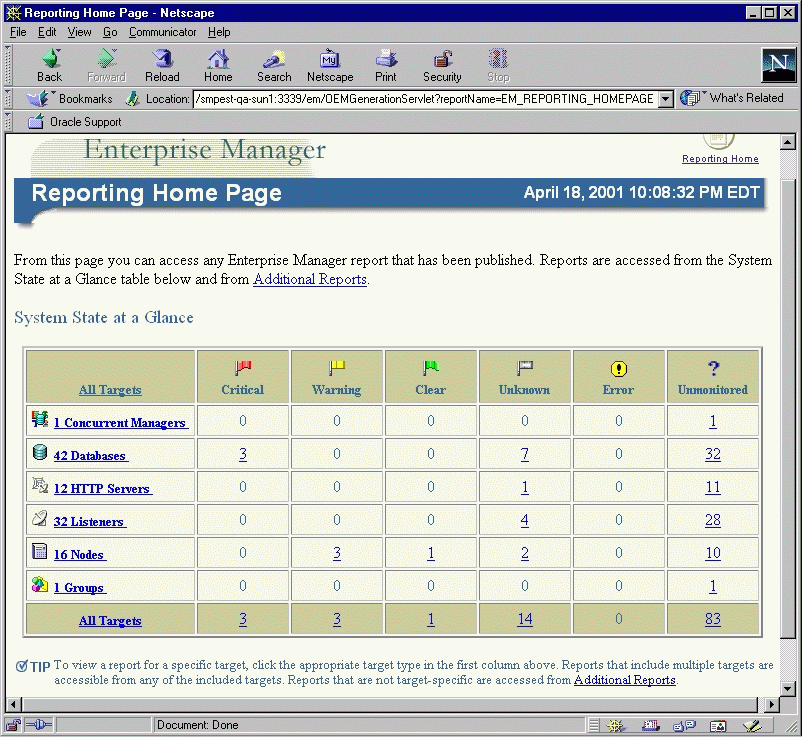
As with any website, there is a home page. See "The Enterprise Manager Reporting Website" on page 7-6. The Enterprise Manager reporting website home page provides both a summary of all managed target types and their status. Clicking on any target link displays all reports related to that target. From this page, an administrator, or anyone with intranet access can navigate to any published report for your managed environment.

Clicking on any target type link (i.e. Databases or Nodes) displays

Figure 7-2 Reporting Website Home Page

Text description of report_h.gif follows.
Text description of the illustration report_h.gif

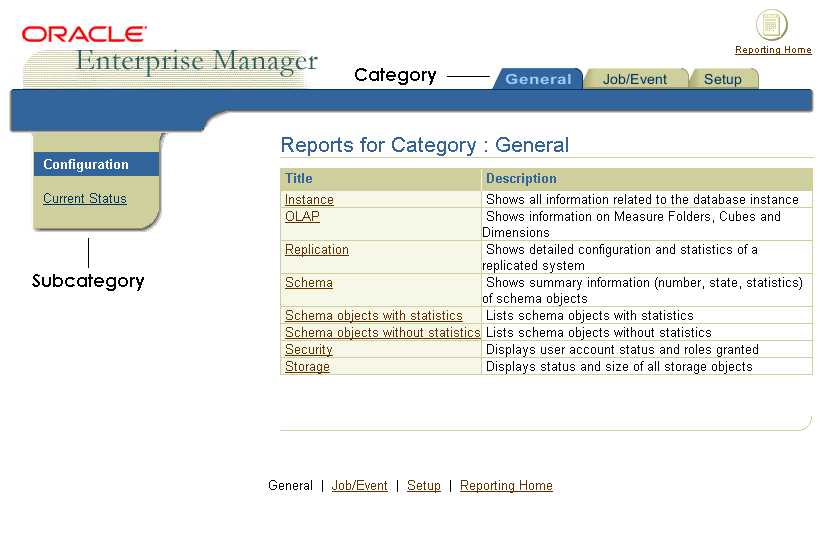
When creating a report definition, two pieces of information that you must specify are the Category and Subcategory. These parameters refer to the published report's location on the reporting website. See Figure 7-3, "Reporting Website Categories and Subcategories" to see how these parameters graphically correspond to website navigation. This figure shows the Additional Reports page.

Figure 7-3 Reporting Website Categories and Subcategories

Text description of report_c.gif follows.
Text description of the illustration report_c.gif

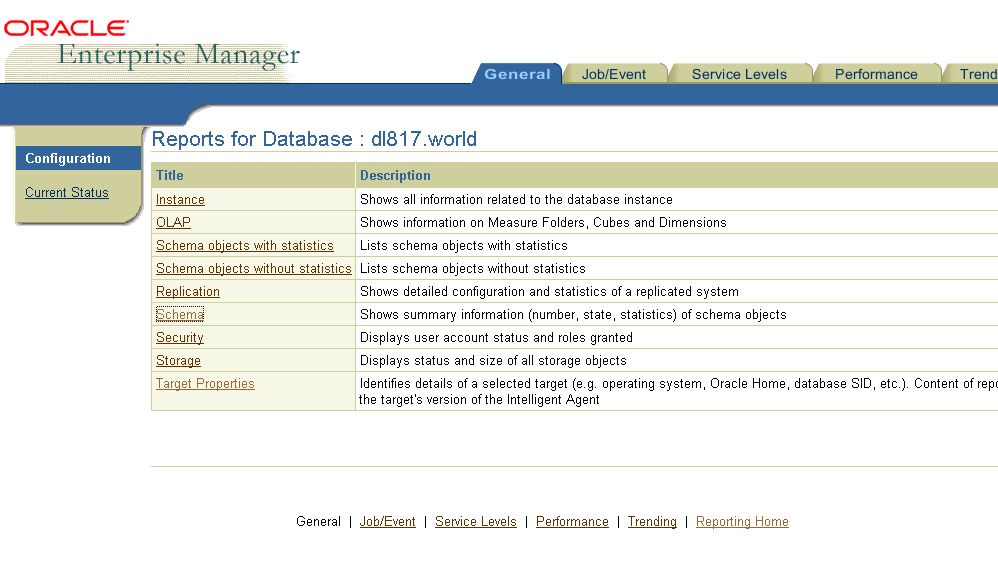
If you are accessing reports from the Console, typically you will see specific reporting web pages related to managed objects selected within the Navigator. The ability to display reports in context from the Console is particularly useful when managing large numbers of targets. For example, if you right-click on a database and choose View Published Reports from the context-sensitive menu, a list of reports pertaining to that database are displayed in your browser. Figure 7-4, "In-context Reports" shows the results of choosing the View Published Reports menu item for a database (dl817).

For a complete site map of the reporting website, see "Navigating the Enterprise Manager Reporting Website" on page 7-25.

Figure 7-4 In-context Reports

Text description of report_d.gif follows.
Text description of the illustration report_d.gif

Creating a Report from an Existing Report Definition

The following report creation scenario assumes you are the owner of the report definition. In cases where you are not the owner (i.e. you are using one of the predefined reports supplied with Enterprise Manager), you must either click Save As to save the report definition under another definition name, or alternatively right-click on the report definition in the detail view and choose Create Like from the context-sensitive menu.

To create a report using an existing report definition:

  1. Select Report Definitions from the Console Navigator. A full list of existing report definitions displays in the detail view.

  2. Double-click on the desired report definition. The Edit Report property sheet displays

  3. On the Parameters page, click on each of the report elements in the Selected Elements list and enter the requisite parameters, if necessary.

    Note: If necessary, you can add or remove report elements on the Elements page.

  4. On the Publish page, choose whether you want to generate the report only when viewed from the reporting website or only at a scheduled time.

  5. Click View Report to preview the generated report. If necessary, you can further modify the report definition and perform this step again. When you view a report, the your own preferred credentials are used. When publishing a report, the preferred credentials of the report definition owner.

  6. After you are satisfied with the results, click OK.

Editing a Report Definition

You edit a report definition by double-clicking on a definition entry in the detail view to display the Edit Report property sheet for that report definition. Alternatively, you can right-click on the definition in the detail view and choose Edit from the context-sensitive menu. Simply change the parameters in the property sheet pages as required. However, you must be the owner of the report definition or have Super Administrator privileges in order to modify it. If you are not the report definition owner (REPORT_USER for predefined definitions supplied with Enterprise Manager), clicking OK to save the report definition will result in your being prompted to save the report definition under another name via the Save As dialog.

Generating a Report from Enterprise Manager Applications

The Enterprise Manager reporting system is integrated with many applications that are part of the Enterprise Manager framework. As such, certain applications can access the reporting system directly to publish data to the web for use by others. For example, Performance Manager (part of the Enterprise Manager Diagnostics Pack), utilizes the reporting system to publish charts and saved analyses to the Performance and Trending pages of the reporting website.


Note:

Performance and Trending pages only appear on the reporting website if you have the Enterprise Manager Diagnostics Pack installed. You must first select an individual target. These pages do not appear under "Additional Reports." 


Features that are integrated into the Console Navigator, such as database management functionality, access the reporting system via the predefined report definitions supplied with Enterprise Manager. For example, right-click on a database in the Console Navigator to access the context-sensitive menu. Choose View Published Reports (this menu option also appears in the Console Object menu). The reporting website page appears with a list of published reports that can be run against the selected database. Selecting a specific Navigator object, such as Schema, and choosing View Published Reports from the Console's Object menu, displays the Target report, which allows you to view information such as:

The ability to create reports in-context provides a powerful way to monitor the status of managed targets from the Console.

Creating a User-defined Report Definition

In general, the standard predefined report definitions, or their user-customized variants, should provide sufficient reporting capability. However, there may be cases where you may want to create your own report definitions to meet specific monitoring needs. The reporting system provides you with a high degree of flexibility in extracting data and generating a properly formatted report.

Once you have created a custom report definition, it is added to the list of predefined report definitions, at which point you can view a report just as you would with any predefined report definition.

To create a new report definition:

  1. Right-click on the Report Definitions object in the Console Navigator to display the context-sensitive menu.

  2. Choose Create Report. The Create Report property sheet displays.

  3. Enter the requisite information on the various property pages. For a detailed discussion on how to fill out the property sheet, see "The Report Property Sheet" on page 7-12.

  4. Click OK to save the report definition.

The Report Property Sheet

The Report property sheet is the primary user interface to the Enterprise Manager reporting system. It is through this property sheet that you define and control the operation of the reporting system in addition to determining the security of the system. Changes made to the report definitions are automatically reflected on the reporting website if the Publish to Enterprise Manager reporting website option is checked on the Report General page.

Report General Page

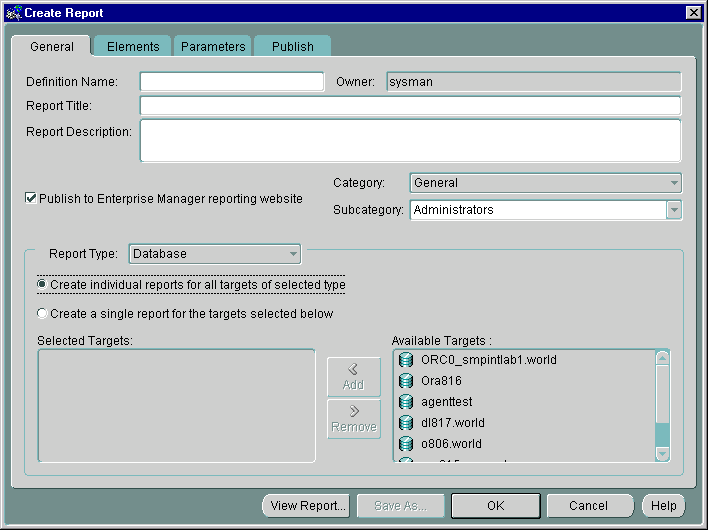
The Report General page allows you to define the primary report identification and report type parameters. See Figure 7-5, "Report General Page".

Figure 7-5 Report General Page

Text description of report_g.gif follows.
Text description of the illustration report_g.gif

Table 7-1 Report General Page Parameters
Parameter  Description/Usage 

Definition Name 

Name of the report definition. This name must be unique. This name is used internally (appears only in the Console and not an a generated report). 

Owner 

Name of the report definition creator. This is the fully qualified username of the administrator logged into the Enterprise Manager Console. 

Report Title 

Title appearing in the header of the generated report and on the reporting website. The title also appears in the report definition multi-column list when Report definitions is selected in the Console Navigator. 

Report Description 

Brief description for the report definition. The description appears on the reporting website. 

Category 

Specifies the report category in which the report will appear on the reporting website. The primary categories (e.g., General, Custom, Job/Event, Service Levels, Setup) appear as main tab pages on the reporting website. See Figure 7-3, "Reporting Website Categories and Subcategories"

Subcategory 

Specifies the subcategory in which the report will appear on the report website. See Figure 7-3, "Reporting Website Categories and Subcategories"

Publish to Enterprise Manager Reporting website 

Selected by default (when the webserver is configured), specifies that the report generated from the report definition be published to the Enterprise Manager reporting website. This option must be selected in order to select options on the Report Publish page. Publishing the report allows you to view the report on the reporting website.  

Report Type 

Specifies the target types to be used for the report. 

Create individual reports for all targets of selected type 

Allows you to create a report definition that, when it is viewed, interactively prompts an administrator for the information sources. 

Create a single report for the targets selected below 

Allows you to create a report definition using information sources chosen from the Available Targets list. 

Available Targets 

List of all available targets from which a report can be generated. Entries in this list vary according to the report type selected 

Selected Targets 

List of information targets from which the report is to be generated. To add entries to this list, select an entry in Available Targets list and click Add. You can remove entries from the Selected Targets list by selecting the desired entry and clicking remove 

View Report 

Executes the report definition and displays the generated report in a web browser. 

Save As 

Saves the current report definition under a different report definition name. This button is disabled when creating a new report definition. 

OK 

Saves the current report definition to the repository. 

Cancel 

Close the Report Definition property sheet without implementing any changes. 

Report Elements Page

The Elements page allows you to select one or more report elements to be included in the report definition. Report elements correspond to specific types of content to be included in a report. Essentially, you create a report by assembling and ordering elements. Figure 7-6, "Report Elements Page" shows the elements page and Table 7-2, "Report Elements Page Parameters" describes the user interfaces. See Table 7-3, "Report Element Descriptions" for a detailed description of all report definition elements and associated parameters.

Figure 7-6 Report Elements Page

Text description of report_e.gif follows.
Text description of the illustration report_e.gif

For the predefined report definitions supplied with Enterprise Manager, these elements have already been selected. You need only specify the element parameters.

Table 7-2 Report Elements Page Parameters
Parameter  Description/Usage 

Available Elements 

Tree list displaying a hierarchy of available report elements. Report elements in this tree list vary according to the Report Type chosen on the General Page. Major report element categories are:

  • HTML: Customize the HTML for a generated report and call SQL and Javascript functions for additional row-level processing.

  • Queries: Specify SQL queries to generate charts or tables.

  • Service Levels: Specify time-based statistics for monitored services.


Report Elements 

Elements selected to be included in the generated report. 

Add/Remove Buttons 

Adds selected report elements from the Available Elements tree list to the Report Elements list or Removes report elements from the Report Elements list.

Note: You can also add/remove elements by double-clicking on the specific element. 

Up/Down Arrows 

Positions a selected element within the Report Elements list. The up/down arrows allow you to determine the order in which the information corresponding to a specific element should appear in the generated report 

Table 7-3 Report Element Descriptions
Category  Report Element  Description/Usage 

HTML 

For each row... 

The For each row report element provides you with the highest level of flexibility for your reporting needs; It allows you to generate custom report output without having to develop a new report element. By associating a Javascript procedure with each row of information returned by a SQL SELECT statement, you can perform a multitude of actions to create custom formatting or additional data processing.

Parameters:

Javascript function to call: Name of the Javascript used to process each row of data returned by the SQL SELECT statement. Javascript functions can be added to a report definition using the HTML report element.

Select Statement: SQL SELECT statement needed to return data to be used as input parameters by the Javascript function. 


HTML 

The HTML report element allows you to insert any sequence of alphanumeric characters directly into a generated report. This is a flexible report element in that you can use it to perform a variety of functions. For example, you can:

  • Insert boilerplate HTML into your report

  • Insert HTML to override default formatting

  • Insert Javascript procedures for use by the For each row report element

Parameters:

Specify HTML: HTML or Javascript coding to be inserted into the report. 


Include GIF 

The Include GIF report element allows you to insert a GIF image into a generated report.

Parameters:

Specify Name of GIF file: Name of GIF file. The specified GIF file will be copied from its original location to the appropriate report subdirectory.

Browse: Displays the Choose File dialog box.

File Tag: File is copied from the location of origin to the subdirectory of the generated report's index.html file. Specifying a File Tag renames the gif file when it is copied into its respective report directory. Flat directory references from within generated report. Not being used as a true alias. When referencing the "tag" from the HTML report element, you must specify the complete filename with extension.

You can also imbed an image within a report using the HTML tag (<IMG SOURCE=my_pic.gif>) 


Table of Contents 

The Table of Contents report element allows you to insert a hyperlinked table of content at any point within a generated report. This report element uses headers defined in the report to generate an HTML hyperlinked list, each entry taking you directly to the report section associated with its respective header.

Parameters:

None 

Queries 

Chart from SELECT statement 

This report element allows you to create one or more bar, line, and pie charts for a generated report using information obtained from a SQL SELECT statement. The data returned by the SELECT statement must conform to the input parameter requirements for each chart type.

Parameters

SQL: SQL SELECT statement used to return data required to generate the desired chart type. See below for input data requirements.

Chart Type:

    Bar: This selection generates a typical bar chart and requires the data source to consist of one key column (used for labeling) and one or more numeric data columns. The key column must be the first column in the table.

    Line: This selection generates a line chart that plots the tabular data against the X-Y axis. As with the bar chart, the data source must consist of a single key column and one or more numeric data columns.

    Pie: This selection generates a pie chart from a single row of data. If more than one row is returned by the SELECT statement, a new pie chart is generated for each row.

Note: For all charts, only the key column can be non-numeric. Non-numeric data appearing anywhere except the first column generates a diagnostic message.

Orientation: (Applicable to Bar charts only)

Horizontal (Default Setting): Produces bar charts with bars originating from the Y-axis.

Vertical: Produces bar charts with bars originating from the X-axis.

Advanced: Displays the Advanced Options dialog which allows you to change chart dimensions and levels of label cascading (number of label levels along an axis). 


Table from SELECT statement 

This report element allows you to create one or more tables in a generated report using information obtained from a SQL SELECT statement.

Parameters

SQL: SQL SELECT statement used to return one or more rows of tabular data.

Orientation:

    Horizontal (Default Setting): Produces a typical row/column format for all tabular data. There is a maximum limit of 100 rows.

    Vertical: Produces a layout in which a single row table is generated for each column of data found in the information source. The column label appears on the first (leftmost) column with a single row of data in the second column. For each row returned by the SELECT statement, a new table is generated. The order in which the table columns are displayed is determined by the SELECT statement.


Version SQL for Table 

Versions of SQL used by older versions of the Oracle Server may not support certain SELECT statement options used to extract information for inclusion into a report. Parameters on this property page allow you to manually define specific SELECT statements to be used with different versions of the database. Defining alternate database version compatible SELECT statements allows you to choose information targets that may contain multiple versions of the database.

Parameters:

Database Version (>=): Lists available SQL (database) versions. A version number selected from this list corresponds to the user-defined SQL statement that is compatible with database versions that are greater than or equal to the specified database version number.

Add: Displays the Database Version dialog box and allows you to add a new database version number.

Remove: Deletes the database version number that is selected in the Database Version (>=) list.

SQL: SQL statement used for the query.

Database Option Name: Specific options (Replication, OLAP, Generic) used for the query. If Generic is selected, an option check will not be performed for this report element. More options may appear depending on the options installed with the database.


Service Levels 

Availability by service 

Shows availability information for selected services. 


Low Level Capture of Availability State Changes 

Shows sequential service level availability state changes for selected services. This includes messages from the agent regarding outages and restored availability. 


Overall Availability 

Displays combined availability of the services as well as the availability of each individual service 


Downtime Details 

Shows downtime details for selected services including percentage downtime, number of times down, total downtime in minutes, and comments/annotations pertaining to downtime 


Simple Availability Element 

Shows the percentages of uptime, downtime and unknown time as well as the number of downtimes and total downtime for selected services.  


Note: All Service Level elements use the same time period parameters.

From the Parameters page, you can set the time period for this report definition element. The default period is the current month.

It is not necessary to set the time period for each report element (if you have multiple elements). The time period settings chosen for the first report element in a report will automatically apply to all elements in the report.

The options are:

  • Current - This option is for the current period, either Day, Week, Month, or Year.*

  • Previous - This option is for the previous period, either Day, Week, Month, or Year.*

  • Time Span - This option lets you define the length of time for this report: Week, Month, or Year. You can then define the date at which the report is to start by editing the information in the Start Date field.

  • Date Range - This options lets you define a range of dates this report should encompass. In the Start Date field, enter the date that reflects the data you want to study. In the End Date field, enter the date that reflects the data you want to study.

Note: All times are in the time zone of the Intelligent Agent.

If the current month is November and you select Previous Month as a reporting period, your report will contain data for the month of October. If the current year is 2000 and you select Previous Year as a reporting period, your report will contain data for the year 1999. 

Report Parameters Page

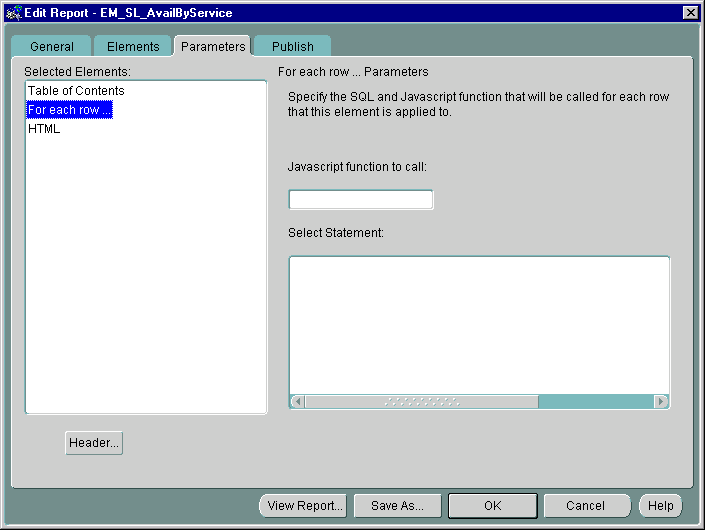
The Parameters page allows you to define the information presented by a specific report element. Figure 7-7, "Report Parameters Page" shows the parameters for the For each row element, which allows you to define specialized data processing functions for each row of information returned by a SQL SELECT statement.

Figure 7-7 Report Parameters Page

Text description of report_p.gif follows.
Text description of the illustration report_p.gif

Table 7-4 Report Parameters Page Parameters
Parameter  Description/Usage 

Selected Elements 

Lists all report elements chosen on the Elements page. 

Element Parameters 

Displays all modifiable parameters (if any) for the selected report element. See Table 7-3, "Report Element Descriptions" for specific element parameters. 

Header 

Allows you to edit the default header associated with the selected report element. This option allows you to modify the text of the header, its hierarchical level (1 being the highest), or whether a header should be displayed at all in the generated report. Headers are used by the Table of Contents report element to generate an HTML hyperlinked list. 

Report Publish Page

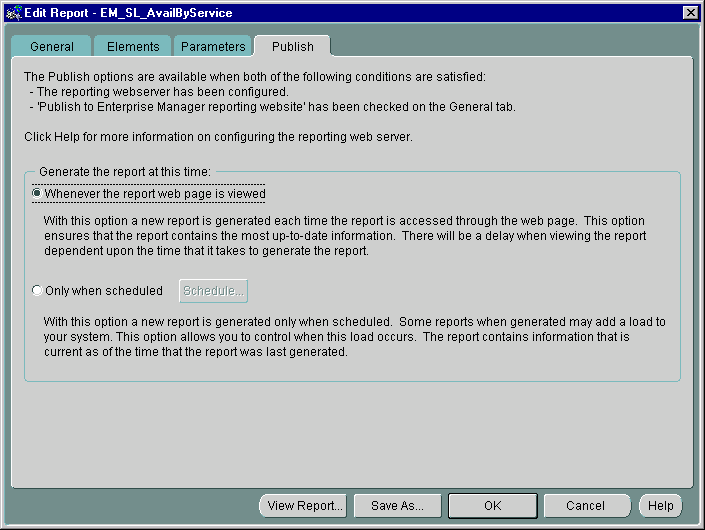
The Publish page allows you to publish generated reports to the Enterprise Manager Reporting website. Options on this page are only available when Publish to Enterprise Manager reporting website is selected on the General page. See Figure 7-8, "Report Publish Page".

Figure 7-8 Report Publish Page

Text description of report_a.gif follows.
Text description of the illustration report_a.gif

This page allows you to select when the report should be generated: on-demand or according to a set schedule. Two options are available:

Whenever the report web page is viewed: New reports are generated whenever the report link on the reporting website is accessed from a web browser. Hence, the report always current in that it presents real-time information.

Only when scheduled: Reports are generated based on a set schedule. Hence, report content does not present real-time information. To specify the schedule click the Schedule button to launch the Create Jobs property sheet. You can schedule report generation just as you would a normal Enterprise Manager job, however, the job task used to schedule a report cannot be accessed outside the reporting system.


Note:

You must choose a targets running a 9i version of the Intelligent Agent in order to schedule jobs. See "Job Schedule Page" on page 4-17 for more information about scheduling jobs. 


Navigating the Enterprise Manager Reporting Website

The following tables provide a complete listings of all predefined reports available on the Enterprise Manager reporting website and in the Console Report Definition detail view. Availability of reports may vary depending on the options installed in your enterprise environment.

You can view the reporting website using one of the following methods:

From a browser:

  1. Start a browser.

  2. Enter the following URL: http://<ReportingWebserverName>:port# /em/OEMNavigationServlet. The default port number used is 3339.

From the Enterprise Manager Console:

  1. Start the Enterprise Manager Console.

  2. Choose View Published reports from the Console's Object menu.

Both methods assume that you have already configured your reporting environment. See "Configuring Enterprise Manager Reporting" on page 7-5 for specific instructions on setting up the reporting environment, or see the Enterprise Manager Configuration Guide for information regarding non-standard website configuration.

Table 7-5 Database Reports
Category  Subcategory  Report Title  Description 

General 

Configuration 

Instance 

Shows all information related to the database instance. 


OLAP 

Shows information on Measure Folders, Cubes and Dimensions 


Schema objects with statistics 

Lists schema objects with statistics 


Schema objects without statistics 

Lists schema objects without statistics 


Replication 

Shows detailed configuration and statistics of a replicated system 


Schema 

Shows summary information (number, and state) of schema objects 


Security 

Displays user account status and roles granted  


Storage 

Displays status and size of all storage objects  


Target Properties 

Identifies details of a selected target (e.g. operating system, Oracle Home, database SID, etc.) Content of the report depends on the target's version of the Intelligent Agent.


Current Status 

Database Object Space Usage 

Shows space usage reports for:

  • Objects unable to extend

  • List of Objects which are nearing Max Extents

  • Overextended segments (non SYS and SYSTEM)


Database Top 10 

For a selected database, shows the top 10:

  • SQL statements that have been executed.

  • Accessed tables.

  • Procedures that have been executed.


Disk Space Used by Tables 

Displays the disk space used by tables (for SYS and non-SYS). 


Instance 

Displays instance statistics and process state 


Storage 

Shows extent, segment and I/O information  

Job/Event 

Events 

Outstanding Alerts 

Shows information on outstanding alerts (with status of critical, warning, unknown, or error). 


Alert History 

Shows information on alerts for a target that has moved to the event history. 


Registered Events 

Lists all registered events for a target. 


Jobs 

Active Jobs 

Displays details for jobs scheduled on a target. 


Failed Jobs from the last 24 hours. 

Lists jobs for a target that failed in the last 24 hours.  


Failed Jobs from the Last 7 Days 

Lists jobs for a target that failed in the last 7 days. 


Completed Jobs from the Last 24 Hours 

Lists jobs for a target that completed in the last 24 hours. 


Completed Jobs from the Last 7 Days 

Lists jobs for a target that completed in the last 7 days. 


Average Execution Time per Job 

Shows information on execution times for jobs completed against a target. 

Service Levels 

Summary 

Overall Availability 

Displays combined availability of the services as well as the availability of each individual service. 


Availability by Service 

Shows availability information for selected services. 


Details 

Downtime Details 

Shows downtime details for selected services including percentage downtime, number of times down, total downtime in minutes, and comments/annotations pertaining to downtime. 


Service Level Availability Timeline 

Displays sequential service availability state changes. 


Diagnostics 

Availability Diagnostics 

Shows captured low-level service availability data. 

Table 7-6 Additional Reports
Category  Subcategory  Report Title  Description 

Job/Event 

Events 

Outstanding Alerts Sorted by Target 

Displays details, sorted by target name, on all outstanding alerts with status of critical, warning, unknown, or error.

Note: If there are no alerts, the Report Title "No Outstanding Alerts" is displayed.  


Outstanding Alerts Sorted by Event 

Displays details, sorted by event name, on all outstanding alerts with status of critical, warning, unknown, or error. 


Alert History Sorted by Target 

Shows information, sorted by target name, on alerts that have been moved to the event history. 


Outstanding Alerts in History Sorted by Event 

Shows information, sorted by event name, on alerts that have been moved to the event history. 


Registered Events Sorted by Target 

Provides information, sorted by target for all registered events 


Registered Events Sorted by Event 

Provides information, sorted by event name, for all registered events. 


Events in Library 

Displays details on all events saved to the event library. 


Notifications for Events Sorted by Administrator 

Lists all paging and email notifications, sorted by administrator name, that were sent due to event status changes. 


Notifications Sorted by Event 

Lists all paging and email notifications, sorted by event name, that were sent due to event status. 


Jobs 

Active Jobs Sorted by Target 

Provides information, sorted by target name, for all scheduled jobs. 


Active Jobs Sorted by Job 

Provides information, sorted by job name, for all jobs scheduled. 


Failed Jobs from the Last 24 Hours 

Lists all jobs that failed in the last 24 hours. 


Failed Jobs from the Last 7 Days 

Lists all jobs that failed in the last 7 days 


Completed Jobs from the Last 24 Hours 

Lists all jobs that completed in the last 24 hours. 


Completed Jobs from the Last 7 Days 

Lists all jobs that completed in the last 7 days. 


Jobs in Library 

Displays details on all jobs saved to the job library. 


Notifications for Jobs Sorted by Administrator 

Lists paging and email notifications, sorted by administrator name, that were sent due to job status changes. 


Notifications Sorted by Job 

Lists paging and email notifications, sorted by job name, that were sent due to job status changes. 


Active Jobs 

Shows information on execution times for all completed jobs. 

Setup 

Administrators 

Administrator Overview 

Provides information on all Enterprise Manager administrator accounts. 


Agents 

Intelligent Agent Overview 

Displays status and other details on discovered Intelligent Agents. 


Collections 

Active Collections 

Shows all active, operational collections defined in Oracle Capacity Planner. 


Targets 

All Targets 

Lists all targets that have been manually or automatically discovered. 


Go to previous page Go to next page
Oracle
Copyright © 1996-2001, Oracle Corporation.

All Rights Reserved.
Go To Documentation Library
Home
Go To Product List
Book List
Go To Table Of Contents
Contents
Go To Index
Index

Master Index

Feedback