Release 9.0.1
Part Number A90150-01
Home |
Book List |
Contents |
Index | Master Index | Feedback |
| Oracle Advanced Security Administrator's Guide Release 9.0.1 Part Number A90150-01 |
|
![]()
![]()
Enterprise User Security lets you create and administer large numbers of users in a secure, LDAP-compliant directory service. This chapter describes the configuration and setup of Enterprise User Security.
This chapter contains the following topics:
This part introduces Oracle Enterprise User Security, and describes its fundamental concepts.
Part I contains the following sections:
This section describes fundamental concepts related to Enterprise User Security:
Administrators must manage complex user information for the entire enterprise, keeping it both current and secure. This task becomes increasingly difficult as the use of technology expands and the user turnover rate increases throughout an enterprise. In a typical enterprise, every user can have multiple accounts on different databases, requiring users to remember passwords for each of these accounts. This can produce too many passwords for users to remember, and too many accounts for administrators to effectively manage.
With perhaps thousands of users accessing thousands of database accounts, administrators must devote substantial resources to user administration. Common information used by multiple applications--such as usernames, user office locations and telephone numbers, and system roles and privileges--is typically fragmented across the enterprise, contributing to data that is redundant, inconsistent, and difficult to manage.
There are security problems as well. For example, any time a user leaves a company or changes jobs, that user's privileges should be changed the same day in order to guard against their misuse. However, in a large enterprise, with user accounts and passwords distributed over multiple databases, an administrator may be unable to make such timely changes. In addition, users may elect to write down their passwords (making them easy for others to copy), or make them easy to remember (making them easy for others to guess), or simply choose the same password for multiple applications--all of which compromise the security of the enterprise.
Enterprise User Security addresses these user, administrative, and security challenges by centralizing storage and management of user-related information in an LDAP-compliant directory service. When an employee changes jobs in such an environment, the administrator need only modify information in one location--the directory--to make effective changes in multiple databases and systems. This centralization can substantially lower administrative costs while materially improving enterprise security.
Enterprise users benefit from Enterprise User Security as well, through single sign-on or single password authentication, depending on the configuration chosen by the administrator.
Single sign-on lets users authenticate once, with subsequent authentications taking place transparently. It address the multiple password problem, and provides stronger, PKI-based authentication, combined with an improved user experience.
Single password authentication lets enterprise users authenticate to multiple databases with a single, global password--although each database requires a separate authentication. The password is securely stored in the centrally located, LDAP-compliant directory, and protected with security mechanisms including encryption and an Access Control List (ACL). This approach reduces the number of passwords to remember, and eliminates the overhead of setting up SSL--both of which improve usability.
Enterprise User Security supports the following LDAP-compliant directory services:
Oracle Advanced Security also provides a tool, Oracle Enterprise Security Manager, to create user entries in the directory and manage authorizations for those users.
Enterprise User Security lets administrators manage two types of users in a single LDAP-compliant directory:
Password-authenticated enterprise users use single password authentication.
SSL-authenticated users enjoy single sign-on and strong authentication, using industry-standard, interoperable X.509 v3 certificates--over Secure Sockets Layer (SSL) v3.
Each authentication method has its own set of selection criteria, as summarized by Table 15-1:
| Selection Criteria, Applicable to: | |
|---|---|
| Password Authentication | SSL-Authentication |
|
Supports password-based logins. |
Provides stronger, systemwide security. |
|
Does not support PKI, or PKI certificate-based client authentication. |
Supports PKI, certificate-based authentication. |
|
Does not employ SSL, wallets, or X.509 certificates. |
Supports PKI, SSL, and industry-standard X.509 certificates. |
|
Supports single, global user passwords, with separate authentications required for each database and application (single password authentication). |
Supports single sign-on using SSL. |
|
Provides faster processing, because there is no SSL processing required between clients and servers (supports Oracle Advanced Security native encryption). Note: if your organization requires SSL, you cannot use password authentication across the enterprise. |
Somewhat slower connection processing, but with higher network security. Note: if your organization requires SSL across the enterprise, you must use SSL-authentication. |
|
From the user/client point of view, password authentication may be viewed as easier-to-use, particularly for notebooks and home workstations. |
SSL is more difficult to configure initially, but it provides stronger security. |
|
Password authentication is compatible with either a two-tier or three-tier environment. |
SSL-authentication is compatible with either a two-tier or three-tier environment. |
|
Password authentication supports Oracle Release 7.3 or 8.0 clients, with an Oracle9i database. |
SSL-authentication supports Oracle8i or Oracle9i clients with an Oracle9i database. |
|
Note:
|
Prior releases of Oracle Advanced Security use SSL processing to establish secure channels between (i) the client and the server, and (ii) the database server and the LDAP-compliant directory. The client authentication mechanism uses SSL and X.509 v3 certificates, requiring installed Oracle wallets on both the client and the server.
This release complements certificate-based authentication with password-based authentication for enterprise users, including the following principal features:
The following directory entries relate to Enterprise User Security:
An enterprise user is one that is defined and managed in a directory. Each enterprise user has a unique identity across an enterprise. Enterprise user entries can reside at any location within the directory.
The entries described below can only reside within an Oracle Context.
Enterprise users can be assigned enterprise roles, which determine their access privileges on databases. These enterprise roles are also stored and managed in a directory.
An enterprise role consists of one or more global roles, each one of which is defined in a specific database. A global role includes privileges contained in a database, but the global role is managed in a directory. An enterprise role is thus a container of global roles. For example, the enterprise role USER could contain the global role HRCLERK with its privileges on the Human Resources database, and the ANALYST role with its privileges on the Payroll database.
An enterprise role can be assigned to one or more enterprise users. For example, you could assign the enterprise role USER to a number of enterprise users who hold the same job. This information is protected in the directory, and only the administrator can manage users and assign their roles. A user can be granted local roles and privileges in a database in addition to enterprise roles.
An enterprise domain subtree includes enterprise role entries, each of which contains information about associated global roles on each server and authorized enterprise users. These are created and managed by the Domain Administrator by using Oracle Enterprise Security Manager.
An enterprise domain is a group of databases and enterprise roles. An example of a domain could be the engineering division in an enterprise or a small enterprise itself. It is here, at the enterprise domain level, that the Domain Administrator, using Oracle Enterprise Security Manager, assigns enterprise roles to users and manages enterprise security. An enterprise domain subtree in a directory is composed of three types of entries: enterprise role entries (discussed by Enterprise Roles), User-Schema Mappings, and the Domain Administrator's group for that domain.
A user-schema mapping entry contains mapping information between a full or partial DN and an Oracle database user name. The users referenced in the mapping are connected to the specified schema when they connect to the database. User schema mapping entries can appear under database server entries, where they apply only to that database. They can also appear under domain entries, where they apply to all databases in that domain.
Mapping entries are created by the Domain Administrator for a particular domain, and are created by the Database Administrator for a particular database.
A database server entry (represented as cn=sales in Figure 15-1) contains information about a database server. It is created by the Oracle Database Configuration Assistant during the database registration. A database server entry is the parent of database level mapping entries that contain mapping information between full or partial DNs and Oracle shared schema names. Database-level mapping entries are created by the Database Administrator by using Oracle Enterprise Security Manager. A Database Administrator's group, containing administrators for that database, is located under the server entry.
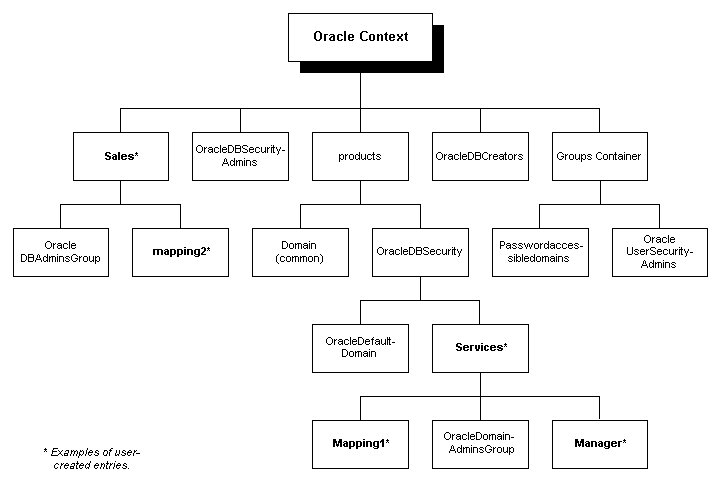
The Oracle Context contains Enterprise User Security-related administrative groups, each with its associated Access Control List (ACL). The user who creates the Oracle Context with NetCA automatically becomes the first member of each of these groups. The relevant administrative groups in an Oracle Context are described in Table 15-2:
You can also have a Domain Administrator responsible for managing a single domain. This administrator has lesser privileges than the Database Security Administrator. Similarly, you can have a Database Administrator responsible for a single database directory entry. These admin groups reside directly under the relevant database or domain entry.
In all secure password-based authentication methods, a server authenticates a client with a password verifier, typically a hashed version of the password--that must be rigorously protected. Password-based authentication to an Oracle database is no different; there is an Oracle proprietary password verifier, and it must be protected as well. This is true if the verifier is stored locally in the database or centrally in the directory.
In the current release an enterprise user's centrally-stored database password can be stored in a central directory service for access by multiple databases, and is viewable and shared by all trusted databases to which the user has access. Although the password verifier stored in the directory is not the cleartext password, it is still necessary to protect it from casual or unauthorized access. It is therefore extremely important to define password-related ACLs in the directory that are as restrictive as possible, while still enabling necessary access and usability.
Oracle tools help set up ACLs in the directory to protect these password verifiers. The Oracle recommended approach is intended to balance both security and usability considerations. If you require maximum security and can set up wallets for all users, you should require SSL connections (only) from users to databases. This SSL-only approach circumvents the entire directory password protection issue.
In the current release, there is a new Password-accessible Domains group in each Oracle Context. This group is created automatically when the context is created, and can be managed using Oracle Enterprise Security Manager. Enterprise domains with member databases that must view users' database password verifiers in the directory are placed into this group. Enterprise Security Manager can be used to place an appropriate ACL on user subtrees, so that databases in this group can read the password verifier for users in that subtree.
There are two steps involved in this (Oracle-supported) approach:
This step places a restrictive ACL on the selected user search base entry in the directory. That ACL specifies permitted access to the attribute that holds the Oracle database password verifier as follows:
usersecurityadmins groups from both contexts appear in the ACL.
These ACLs restrict access to the Oracle database password verifier value only (the orcldbpassword attribute). No other attributes in the user entries are affected.
|
See Also:
Oracle Directory Service Integration and Deployment Guide for more information about the LDAP schema for Enterprise User Security |
Figure 15-2 displays the Enterprise User Security elements--with SSL-authentication employed:
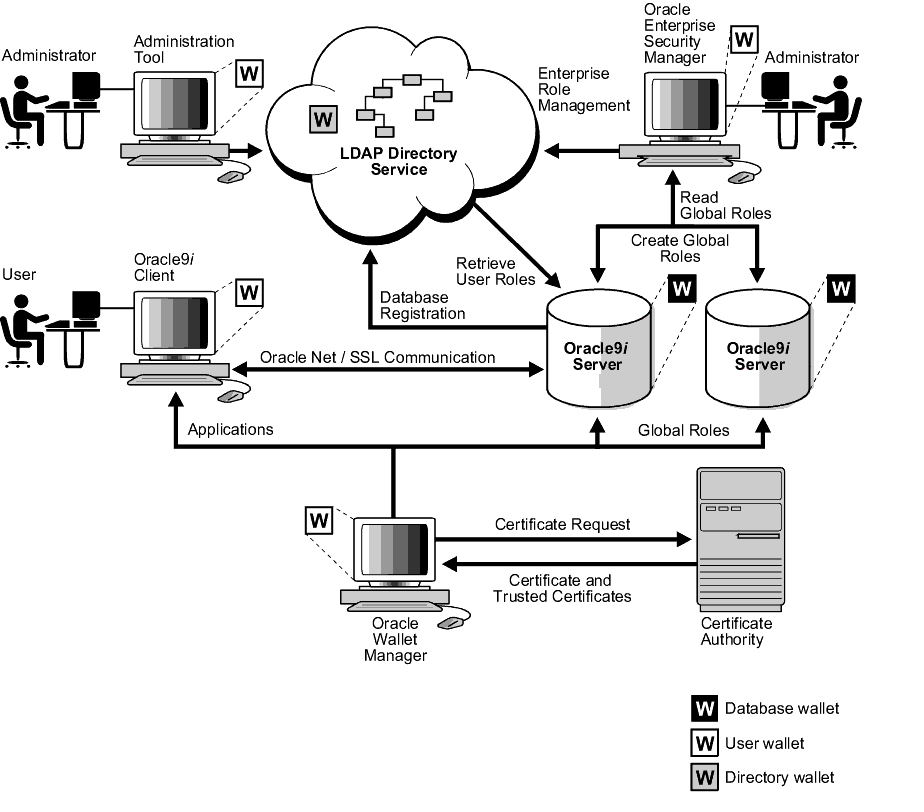
Figure 15-3 displays the Enterprise User Security elements--with password-authentication employed:
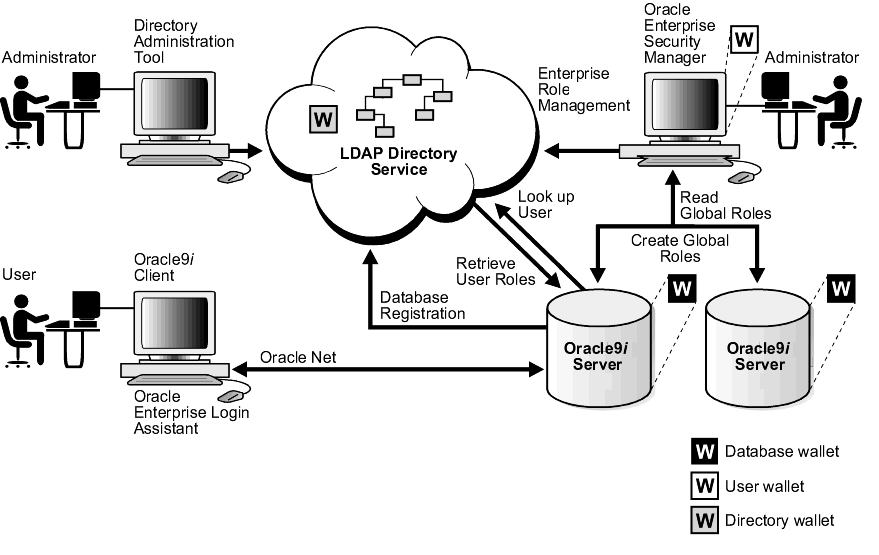
Figure 15-4 shows the operation of the Enterprise User Security process. For an SSL processing environment, the following assumptions apply:
In a three-tier environment, enterprise users can authenticate to the database through any middle tier using proxy authentication.
Note:
This section describes the operation of the Enterprise User Security process, with password-based authentication (See: Figure 15-4):
In a three-tier environment, enterprise users can authenticate to the database through any middle tier using proxy authentication.
Note:
The following sections describe shared schemas, and how to set them up:
Users do not necessarily require individual accounts or schemas set up in each database. Alternatively, they can be granted access to common, shared schemas associated with target applications. For example, suppose that users Tom, Dick, and Harriet require access to the Payroll application on the Finance database. They do not need to create unique objects in the database, and therefore do not need their own schemas--they do need access to the Payroll schema.
Oracle9i Release 9.0.1 supports mapping multiple users stored in an enterprise directory to shared schema on an individual database. This separation of users from schemas reduces administration costs by reducing the number of user accounts on databases. It means that you do not need to create an account for each user--a user schema--in multiple databases, in addition to creating the user in the directory. Instead, you can create a user in one location, the enterprise directory, and map the user to a shared schema that other enterprise users can also be mapped to. For example, if Tom, Dick and Harriet all access both the Sales and the Finance databases, you do not need to create an account for each user on each of these databases. Instead, you can create a single shared schema on each database, such as SALES_APPLICATION and FINANCE_APPLICATION, respectively, that all three users can access. A typical environment might have some 5,000 enterprise users mapped to just one of three or four shared schemas. Alternatively, you can map multiple users to a single shared schema (a guest schema), and assign enterprise roles to each user.
Summary:
To configure shared schemas, the local Database Administrator must create at least one database schema in a database. Enterprise users can be mapped to this schema.
In the following example, the administrator creates a shared schema and maps users to it:
EMPLOYEE and the global role HRMANAGER on the HR database.
MANAGER. The administrator then assigns the global role HRMANAGER to the enterprise role MANAGER.
MANAGER to Harriet.
When Harriet connects to the database, she is automatically connected to the EMPLOYEE schema and is given the global role HRMANAGER. Multiple enterprise users can be mapped to the same shared schema. For example, the enterprise security administrator can create another enterprise user Scott and map Scott to the EMPLOYEE schema. From that point on, both Harriet and Scott automatically use the EMPLOYEE schema when connecting to the HR database, but each can have different roles--and can be individually audited.
Shared schema functionality relies on SSL or user passwords for authentication to the database. For a discussion of password-based authentication, See: Enterprise Users and Password Authentication.
A discussion of the SSL authentication process follows:
This method associates the DN of a single directory user with a particular schema on a database. It results in one mapping entry for each user.
When using full DN mapping, each enterprise user can be mapped either to a unique schema, or to a shared schema.
This method lets multiple enterprise users share part of their DN to access the same shared schema. This method is useful if multiple enterprise users are already grouped under some common root in the directory tree. The subtree that these users share can be mapped to a shared schema on a database. For example, you can map all enterprise users in the subtree for the engineering division to one shared schema, BUG_APPLICATION, on the bug database. Note that the root of the subtree is not mapped to the specified schema.
If the database does find either the DN locally or the appropriate DN mapping object in the directory, the database lets the user log on.
For example, suppose that Harriet is trying to connect to the HR database, but the database does not find Harriet's DN (in the database). In this case, the HR database looks up the Harriet's DN in the directory. The directory has a mapping of Harriet to the shared schema EMPLOYEE and returns this schema. The database logs Harriet in and connects her to the EMPLOYEE schema.
The database also retrieves from its own tables any local roles and privileges associated with the database schema to which the user is mapped.
The database uses both the global and the local roles to determine the information that the user can access.
|
See Also:
|
Continuing this example, assume that the enterprise role MANAGER contains the global roles ANALYST on the HR database, and USER on the Payroll database. When Harriet, who has the enterprise role MANAGER, connects to the HR database, she uses the schema EMPLOYEE on that database.
The syntax for creating a shared schema is:
CREATE USER [shared schema name] IDENTIFIED GLOBALLY AS ''
For example, the administrator for the HR database creates a shared schema for the user SALES_APPLICATION as follows:
CREATE USER sales_application IDENTIFIED GLOBALLY AS ''
You can use Oracle Enterprise Security Manager to create enterprise user entries one at a time. To load large numbers of entries, use other LDAP processes such as the Oracle Internet Directory bulk load tool.
The mapping between enterprise users and a schema can be done in either the database or the directory.
The mapping is done in the directory by means of one or more mapping objects. A mapping object is used to map the distinguished name (DN) of a user to a database schema that the user will access. You create a mapping object by using Oracle Enterprise Security Manager. This mapping can be one of the following:
When determining the appropriate schema to which it is to connect the user, the database uses the following precedence rules:
You can grant privileges to a specified group of users by granting roles and privileges to a database schema. Every user sharing such a schema gets these local roles and privileges in addition to personal enterprise roles. However, you should exercise caution when doing this, because every user who is mapped to this shared schema can exercise the privileges assigned to it. Accordingly, Oracle does not recommend assigning roles and privileges to a shared schema.
Oracle9i supports current user database links for both SSL-authenticated and password-authenticated enterprise users, which let you make a procedural connection to a second database as another user and with that user's privileges--though it does not require that the second user's credentials be stored in the database link definition. Such access is limited to the scope of the database link procedure.
For example, a current user database link lets Harriet, a user of the Finance database, procedurally access the Accounts Payable database by connecting as Scott, and using Scott's credentials.
For Harriet to access a current user database link to connect to the schema Scott, Scott must be a schema created as IDENTIFIED GLOBALLY in both databases. Harriet, however, can be a user identified in one of three ways:
To create Scott as a global user in both the Accounts Payable and Finance databases, you must enter the following command in each database:
CREATE USER Scott IDENTIFIED GLOBALLY as 'CN=Scott,O=nmt'
Note that the syntax for creating this kind of schema is slightly different from the syntax for creating a shared schema described in Creating a Shared Schema. In this case, the schema is Scott's alone. In order for the current user database link to work, the schema created for Scott cannot be shared with other users.
Current user database links operate only between trusted databases within a single enterprise domain--databases within the domain trust each other to authenticate users. You specify a domain as trusted by using Oracle Enterprise Security Manager. By default, if current user database links are enabled for a domain by using Enterprise Security Manager, they will work for all databases within that domain. To specify a database as untrusted that is part of a trusted enterprise domain, use the PL/SQL package DBMS_DISTRIBUTED_TRUST_ADMIN. To obtain a list of trusted servers, use the TRUSTED_SERVERS view.
|
See Also:
|
Enterprise User Security functionality uses the following administration tools:
Oracle Enterprise Security Manager is an administration tool that provides a graphical user interface to help you manage enterprise users, enterprise domains, databases, and enterprise roles that are stored in a directory service. Use Oracle Enterprise Security Manager to:
Use Oracle Enterprise Login Assistant to enable and disable Autologin, to upload wallets to, or download wallets from a directory, and to change a user wallet password. This tool lets enterprise users use SSL to connect to multiple services with a single sign-on. Oracle Enterprise Login Assistant masks the complexity of SSL, wallets, enterprise users, and the process of authenticating to multiple databases.
Oracle Enterprise Login Assistant also supports password authentication, letting users securely access multiple databases and applications using a single password, entered once for each session.
You can use ELA to change any of the following passwords:
The directory password is the password used to bind to Oracle Internet Directory. The database password, on the other hand, is the single, global password that enterprise users enter into an application (such as SQL*Plus), in order to authenticate to multiple databases.
The user wallet password is used to access user wallets, stored locally (on the client) or in the directory. User wallets are required for SSL-based authentication, but they are not required for password-based authentication.
Oracle Wallet Manager is a standalone Java application that wallet owners and security administrators use to manage and edit the security credentials in their Oracle wallets. Wallet Manager tasks include:
Chapter 16, Using Oracle Wallet Manager, for detailed information about using this application
See Also:
Consider the following before deploying Oracle Enterprise Security Manager:
Beyond the general benefits that flow from the centralization of enterprise users and their associated credentials, there are a number of security-related benefits and risks that should be reviewed.
One security benefit is that centralizing management makes it easier and faster to administer users, credentials, and roles, and to quickly revoke a user's privileges on all applications and databases across the enterprise. With centralized management, the administrator can delete a user in one place to revoke all global privileges, minimizing the risk of retaining unintended privileges.
Another security benefit is that it can be more secure to centrally control security information, because you can centralize the organization's security expertise. Specialized, security-aware administrators can manage all aspects of enterprise user security, including directory security, user roles and privileges, and database access. This is a substantial improvement over the traditional model, where Database Administrators are typically responsible for everything on the databases they manage, including security.
The downside is that, while Oracle Internet Directory is a secure repository, there is a security challenge--and inherent risk--in centralizing credentials in any publicly accessible repository. Although centralized credentials can be protected at least as securely as distributed credentials, the very nature of centralization increases the consequences of inadvertent credential exposure to unauthorized parties. It is therefore imperative to limit the privileges of administrators, to set restrictive Access Control Lists (ACLs) in the directory, and to implement good security practices in the protection of security credentials when they are temporarily outside of the directory.
Consider the following criteria when defining the database membership of a domain:
This part describes the initial Enterprise User Security configuration tasks--for both SSL and password authentication.
This part contains the following tasks:
Oracle Wallet Manager requires you to have a certificate authority (CA) in your environment. You can use a CA vendor's certificates, or you can use your own CA that can process PKCS#10 certificate requests in Base 64 format and return X509v3 certificates--also in Base 64 format.
|
See Also:
Chapter 16, Using Oracle Wallet Manager, for a description of certificate authorities and Oracle Wallet Manager |
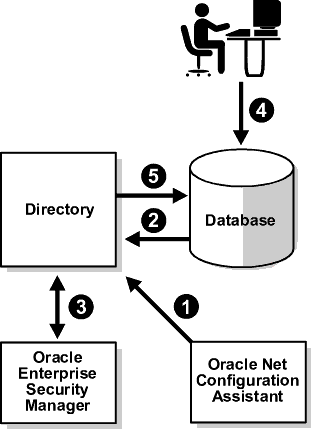
Conceptually, there are four major prerequisites for an Oracle RDBMS to communicate with the directory:
ldap.ora) that tells the database how to connect to the directory, including host, port, and directory type-- and the location in the directory of the Oracle Context.
NetCA performs the first three steps (called directory service access configuration), and the Oracle Database Configuration Assistant (DBCA) performs the fourth. Note that you must create the Oracle Context at least once for each directory, but you must create an ldap.ora file for each ORACLE_HOME used to access the directory. If there is no context, NetCA prompts you to create one; if one already exists, it prompts you to choose one to use. If there is no Oracle schema installed in the directory (which is done automatically for Oracle Internet Directory), or it is not current, NetCA prompts you to install or update it.
If you run the recommended custom database install, NetCA and DBCA automatically complete the directory-related configuration.
If you install the Oracle9i database using a typical install, NetCA and DBCA do not complete the directory-related configuration. In this case, you must run both NetCA and DBCA in standalone mode.
To install and configure a directory service:
Oracle9i Release 9.0.1 supports the following internet directories:
Setting up the directory for two-way SSL authentication requires the creation of an Oracle wallet for the directory. If you are using Oracle Internet Directory, use Oracle Wallet Manager and Oracle Internet Directory to create a wallet for the directory and to configure SSL. If you are using Microsoft Active Directory, see that product's documentation for instructions about enabling two-way SSL authentication.
Ensure that the directory has an Oracle9i schema and an appropriate Oracle Context installed.
The Oracle Schema is pre-installed in Oracle Internet Directory. If you are using an older version of Oracle Internet Directory, you can upgrade the schema using NetCA. The Oracle9i version is backward compatible.
Oracle Internet Directory is shipped with a pre-installed Oracle Context at the directory root. You can use NetCA to create an Oracle Context.
You must upgrade an Oracle8i Oracle Context before registering an Oracle9i database with that context in the directory. You can use this upgraded Oracle Context to register any Oracle8i databases that are created in the future. If you have a combination of Oracle8i and Oracle9i databases deployed, set the VERSIONCOMPATIBILITY parameter to 8i and 9i, using Oracle Enterprise Security Manager. Oracle recommends that you set this to 9i if you deploy only Oracle9i databases. This parameter determines if some of the database security attributes must be represented in the directory in two places to support both Oracle8i and Oracle9i databases. If you are deploying only Oracle8i databases, there is no requirement to upgrade the Oracle Context--and no requirement to set this parameter.
If they do not already exist, create enterprise users in the directory who are authorized to perform the following functions:
To install and configure one or more databases:
Use the Oracle Universal Installer to install Oracle9i databases. Before installation, obtain the following from the directory administrator:
cn=OracleDBCreators). The user who created the Oracle Context is automatically a member of this group.
During installation, select Oracle9i Enterprise Edition and the Custom installation type with Oracle Advanced Security.
NetCA runs automatically at the end of the Oracle9i installation process; see Step 2 for related instructions (if you did not choose the custom install, NetCA must be started manually).
To configure directory service access configuration, use NetCA:
Directory Usage Configuration; choose Next.
Select an already configured directory server to use; choose Next.
Finish to exit NetCA.
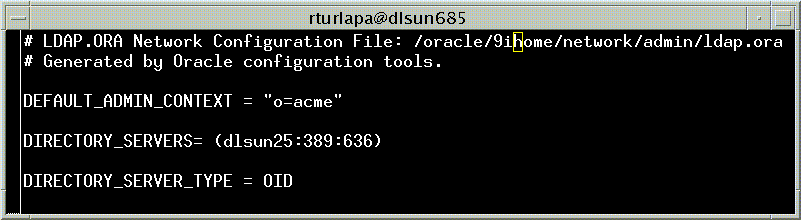
ldap.ora file is located in the following directory path:
UNIX and Windows NT: <ORACLE_HOME>/network/admin
To register your database in the directory (using DBCA), you must provide directory credentials for (i) a user in the Database Installation Administrator's group, or (ii) a user in the Context Administrator's group, or (iii) the directory superuser. If you choose the first or second approach, you may need to add appropriate users to that group before running DBCA. Use Oracle Enterprise Security Manager to put the appropriate directory users into the Database Installation Admin group--so they can register the database in the directory.
To authorize users for administrative functions:
Yes.
Configure database options in a database and choose Next.
Next (this process typically takes about a minute to complete); the final Oracle Database Configuration Assistant window appears (Figure 15-6):
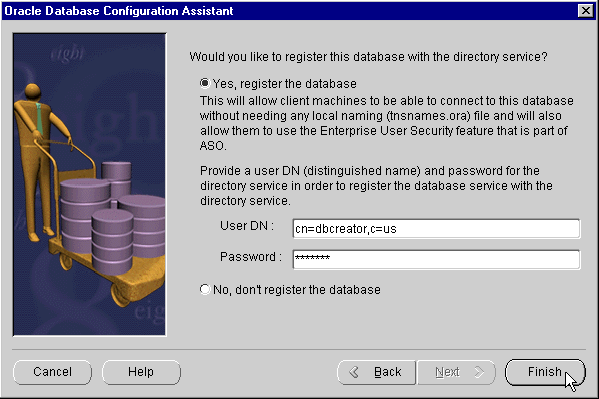
Yes, Register the Database, and enter the directory credentials for a user in the Database Installation Administrators group.
Finish; the Locate Initialization File window appears. DBCA Locate Initialization File Window
RDBMS_SERVER_DN initialization parameter to the init.ora file for the database. This parameter represents the distinguished name (DN) of the database as registered in the directory.
To configure the database for SSL:
Oracle Net must be configured for SSL on both the listener and the database. The listener must have a listening endpoint that is configured for the TCP/IP with SSL protocol, and the location of the database wallet must be specified. Use Oracle Net Manager to do this (See: Enabling SSL):
To configure the SSL service name:
Next.
TCP/IP with SSL; choose Next.
Next.
Finish.
File-->Save the network configuration; your TNSNAMES.ORA file is updated, and can be reviewed later.
To configure the listener:
Listeners and select the appropriate Listener (in the expandable tree menu on the left side of the window).
Listening Locations from the drop-down menu at the top right side of the window.
Add Address button at the bottom right side of the window.
File-->Save Network Configuration; your listener.ora file is updated. Exit Oracle Net Manager.
tnsnames.ora for the client; edit $ORACLE_HOME/network/admin/tnsnames.ora by adding the following to your SSL service name:
SECURITY = (AUTHENTICATION_SERVICE = TCPS)
To facilitate review of your .ora files, some Windows NT examples follow:
NAMES.DEFAULT_DOMAIN = WORLDWALLET_LOCATION =(SOURCE =(METHOD = FILE)(METHOD_DATA =(DIRECTORY = C:\WINNT\Profiles\DATABASES\oe)))SQLNET_AUTHENTICATION_SERVICES = (TCPS,NTS)SSL_CLIENT_AUTHENTICATION = TRUESSL_VERSION = 0SQLNET.CRYPTO_SEED = 4fhfquweotcadsfdsafjkdsfqp5f201p45mxskdlfdasf
OESSL.WORLD =(DESCRIPTION =(ADDRESS_LIST =(ADDRESS = (PROTOCOL = TCPS) (HOST = host1) (PORT = 5000))(CONNECT_DATA =(SERVICE_NAME = finance))(SECURITY = (AUTHENTICATION_SERVICE = TCPS)(SSL_SERVER_CERT_DN="cn=finance,cn=OracleContext,o=Oracle,c=us")))OE.WORLD =(DESCRIPTION =(ADDRESS_LIST =(ADDRESS = (PROTOCOL = TCP) (HOST = host1) (PORT = 1521))(CONNECT_DATA =(SERVICE_NAME = oe.world)))
WALLET_LOCATION =(SOURCE =(METHOD = FILE)(METHOD_DATA =(DIRECTORY = C:\WINNT\Profiles\DATABASES\oe)))
LISTENER =(DESCRIPTION_LIST =(DESCRIPTION =(ADDRESS = (PROTOCOL = TCP) (host = HOST1) (port = 1521))(DESCRIPTION =(ADDRESS = (PROTOCOL = TCPS) (HOST = host1) (PORT = 5000))))SID_LIST_LISTENER =(SID_LIST =(SID_DESC =(GLOBAL_DBNAME = oe.world)(ORACLE_HOME = D:\Oracle\Ora81)(SID_NAME = oe)))
SSL_CLIENT_AUTHENTICATION = FALSE
To create and configure the database wallet:
To create a database wallet:
New from the wallet menu. Do not create a new default directory when asked--this is for user wallets. During certificate request creation, type the distinguished name (DN) of the database exactly:
cn=database_name,cn=OracleContext,<location of Oraclecontext>
It is found in the initialization parameter file, in the parameter
RDBMS_SERVER_DN.
For example:
If the global database name chosen during installation is sales.us.nmt.com, and the location selected within NetCA for the Oracle Context is o=nmt, the complete DN of the database that you enter into Oracle Wallet Manager is:
cn=sales,cn=OracleContext,o=nmt
For users to access the database using SSL two-way mutual authentication with an LDAP compliant directory server, Autologin must be enabled for the database wallet, and the listener must be running. To enable database Autologin and run the listener:
To stop the listener, enter the following at the command line:
lsnrctl stop
lsnrctl stop
You can alternatively stop Oracle Listener Services in the Services Control Panel. See: Notes.
Note for NT:
To change the Oracle Services login:
OracleService <database name>; choose the Stop button; choose Yes to confirm.
Startup button.
Log On As region of the Service Window (Figure 15-7):
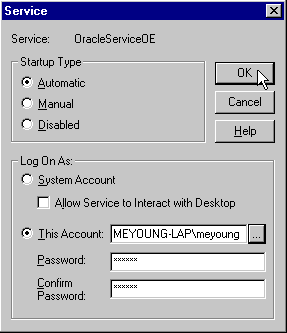
Choose This Account and enter <domain>\< NT user login> for the user who enabled Autologin for the database wallet; alternatively, you can choose the browse button (...) to select from a list; enter your password in the Password and Confirm Password fields; choose OK.
To start the listener, enter the following at the command line:
lsnrctl start
lsnrctl start
The database wallet is now open, and the database is able to participate in authenticated communications using SSL; on Windows NT, the OracleTNSListener service is also started.
|
See Also:
Chapter 16, Using Oracle Wallet Manager, for detailed instructions about creating a wallet |
To logout from the database:
To verify that the database has been successfully configured:
cwallet.sso file located in the database wallet directory. If not, Autologin was not successfully enabled. If this happens, go back to the Oracle Wallet Manager, open the wallet, select the Autologin check box, and save the wallet.
ldap.ora file located in
$ORACLE_HOME/network/admin
If there is no ldap.ora file, NetCA failed to configure directory access. Verify that the ORACLE_HOME is set and rerun NetCA.
ldap.ora file exists and is correct. Then register the database again, using DBCA.
Although this task can be completed using Oracle Enterprise Manager, the following examples use SQL*Plus directly.
To create global schemas and roles:
Using SQL*Plus, create a shared schema (called Guest, for example) for enterprise users by entering:
CREATE USER guest IDENTIFIED GLOBALLY AS ''
Note the two single quotation marks with no space between them at the end of the line. If you enter a specific distinguished name (DN) between the quotation marks, only that user is able to connect to that schema, and it is not shared.
Users connecting to this schema require a CREATE SESSION privilege. You can grant the CREATE SESSION privilege either to the global schema, or to a global role which you grant to specific users though an enterprise role.
Create global roles for the database to hold relevant privileges. These roles are associated with enterprise roles to be created later. Enterprise roles are allocated to users.
For example:
CREATE ROLE emprole IDENTIFIED GLOBALLY;CREATE ROLE custrole IDENTIFIED GLOBALLY;
Associate privileges with the new global roles.
For example:
GRANT select ON products TO custrole, emprole;
|
Note: Oracle Advanced Security can be configured to authenticate enterprise users using either SSL or password authentication.
|
This section describes the final steps to complete the installation and configuration of Enterprise User Security for SSL authentication. The required tasks (numbered in sequence from Part II) follow:
|
Note: The configuration tasks for Enterprise User Security are numbered consecutively, and continue in sequence from Part II. This part includes Task 8 through Task 11.
|
Once you have installed Oracle9i clients, configure Oracle Net on the clients by using Oracle Net Manager. You may complete this step during or after installation of Oracle9i Release 9.0.1.
Because you will be using an LDAP directory service for enterprise security, you may also want to use Oracle Net directory naming. Oracle Net directory naming lets the client connect to the database using the database entry registered with the directory by Oracle Database Configuration Assistant. Alternatively, you can use one of the other Oracle Net naming methods, such as local naming (tnsnames.ora file), to configure a net service name for the database.
To configure database clients:
sqlnet.ora file can be shared by enterprise users, providing easier administration and deployment. Each user whose wallet is in a non-default wallet location must have a separate sqlnet.ora file that contains that user's wallet location.
Default Wallet Directories for the User Wallets:
c:\winnt\profiles\<user>\ORACLE\WALLETS
/etc/ORACLE/WALLETS/<OS username>
|
Note: Wallets for specific users are set up when you create enterprise users. See Chapter 18, Using Oracle Enterprise Security Manager, for instructions about creating enterprise users. |
|
See Also:
|
Oracle Enterprise Security Manager is installed automatically as part of the Oracle9i installation, and is used to configure an enterprise domain. Note that the Oracle default domain is created by default when the Oracle Context is created in the directory, and databases are automatically added as members of that domain when they are registered by DBCA. Table 15-3 lists the steps required to set up an enterprise domain, and cross-references related instructions. If you are using the Oracle default domain, you can skip steps 1 and 6.
| Step | Related Instructions |
|---|---|
|
1. Create an enterprise domain. |
|
|
2. (Optional) Add domain administrators for the domain. |
|
|
3. Enable or disable enterprise user current user database links between member databases. |
|
|
4. Select authentication type for the domain. Must be (i) SSL only, or (ii) both password and SSL. |
|
|
5. Configure user-schema mappings for the domain; alternatively, you can configure database-specific user-schema mappings. |
|
|
6. Create enterprise roles in the domain. |
|
|
7. Enroll the database as a member of the desired enterprise domain. |
Defining Database Membership of an Enterprise Domain
|
|
8. Create global roles on the databases. The SQL*Plus command is:
|
|
|
9. Assign global roles to each enterprise role. |
To create a new enterprise user:
Any directory user can be an enterprise user. You can add users to the directory by using one of the following tools:
If you elect to populate the directory with users before using Oracle Enterprise Security Manager, note that user entries in the directory must have the orcluser objectclass.
If Oracle Enterprise Security Manager is used to prepare existing user entries for Oracle use (provision), the orcluser objectclass is added to the existing entry.
|
See Also:
|
To create a user wallet, See: Chapter 16, Using Oracle Wallet Manager.
You can do either or both of the following:
Use Oracle Enterprise Manager or SQL*Plus to grant local roles and privileges to the database user or schema; this step is optional.
|
Note: If the schemas are shared schemas, all roles granted to the shared schema are enabled for all users connecting to that schema. Accordingly, you should avoid granting any local roles or privileges to a shared schema. |
Use Oracle Enterprise Security Manager to grant enterprise roles to the enterprise user in the directory.
If you are using a shared schema, use Oracle Enterprise Security Manager to map the user to a schema. You can choose either of the following mapping options:
For example:
If you are creating a domain mapping from three users to a shared schema called guest, and you have more than one database in the domain, each database must have a shared schema (called guest) that all three users can access. These three users cannot connect to any database in the domain that does not have a shared schema called guest.
Alternatively, you can create a mapping under a particular database. If you do it this way, the mapping applies only to that database, and not to all databases in the domain. If you have mappings in both places, the database mapping takes precedence.
|
See Also:
|
To log in as an Enterprise User:
To download a user wallet:
The enterprise user must enable Autologin for the user wallet (created in Task 10) in order to log in to the database. Enabling Autologin generates a single sign-on file and enables authentication to the SSL adapter.
To enable Autologin, use Oracle Enterprise Login Assistant to select the Autologin box.
ORACLE_HOME.
If the ORACLE_HOME is set to a server ORACLE_HOME, you must set the TNS_ADMIN environment variable to address the directory where you placed the sqlnet.ora file--that you created in Task 8: Configure Database Clients.
If you have a separate client ORACLE_HOME, you do not need to set the TNS_ADMIN environment variable.
sqlplus/@connect_identifier
where connect_identifier is the net service name you set up in Task 8: Configure Database Clients.
If you are successful, the system responds Connected to:...; this is the principal confirmation of a successful connection and setup. If an error message is displayed, see: Part IV: Final Configuration for Password Authentication.
If you do connect successfully, check that the appropriate global roles were retrieved from the directory by entering:
select * from session_roles
In the Oracle Enterprise Login Assistant, select Autologin > Logout to disable authentication with the SSL adapter.
|
See Also:
Chapter 17, Using Oracle Enterprise Login Assistant, for instructions about using Oracle Enterprise Login Assistant |
This section describes how to set up password authentication for enterprise users. The required tasks (numbered in sequence from Part III) follow:
|
Note: The configuration tasks for Enterprise User Security are numbered consecutively, and continue in sequence from Part III. This part includes Task 12 through Task 16.
|
In this task you complete the initial Enterprise User Security setup steps, including the following:
Configure the enterprise domain for password authentication.
Oracle Enterprise Security Manager launches from the Oracle Enterprise Manager console. Oracle Advanced Security uses it for managing enterprise domains, users, roles, and databases. It can be used to configure an enterprise domain. Note that the Oracle default domain is created by default when the Oracle Context is created in the directory, and databases are automatically added as members of that domain when they are registered by DBCA (Figure 15-8).
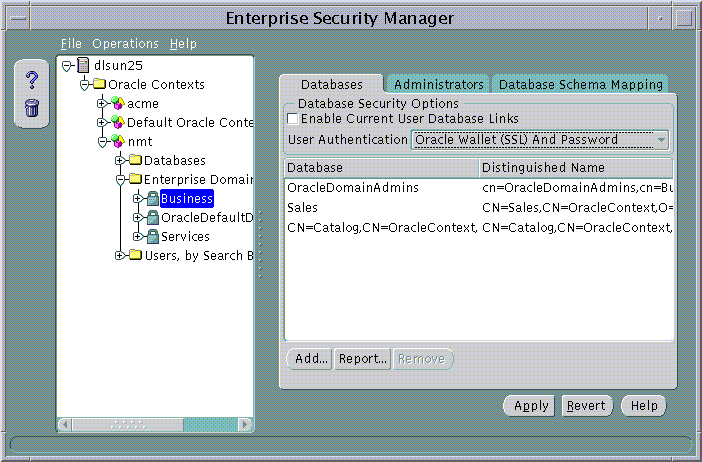
Table 15-4 lists the steps required to set up an enterprise domain, and cross-references related instructions. If you are using the Oracle default domain, you can skip step 1 and step 4.
| Step | Related Instructions |
|---|---|
|
1. Create an enterprise domain. |
|
|
2. (Optional) Add domain administrators for the domain. |
|
|
3. Enable or disable current user database links between member databases. |
|
|
4. Configure user schema mappings for the domain or database. |
|
|
5. Create enterprise roles in the domain. |
|
|
6. Use Oracle Enterprise Security Manager to make the database a member of the desired enterprise domain. |
|
|
7. Create global roles on the databases. The SQL*Plus command is:
|
|
|
8. Assign global role(s) to each enterprise role. |
|
|
9. Choose the Enterprise Domain Administration tab; select Oracle Wallet (SSL) And Password, or Password Only from the Enterprise User Authentication drop-down menu. |
See: Figure 15-8. |
|
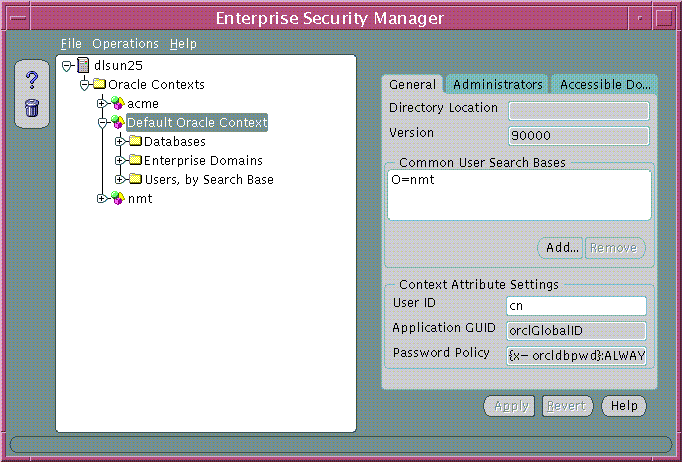
Note: The reference to Default Oracle Context in Figure 15-9 should read Root Oracle Context; all references to Default Oracle Context will be changed to Root Oracle Context in the production release of Oracle Advanced Security. |
Choose the General tab of the Oracle Context Properties Window (Figure 15-9). In the Common User Search Bases region, enter the user search bases under which the databases are to search for user entries. A user search base is the root of a subtree under which you have stored your enterprise user entries in the directory.
Choose the General tab (Figure 15-9). In the Context Attribute Settings region, enter the name of the user entry attribute that holds the UserID--that uniquely identifies each enterprise user. The default UserID attribute is the common name (cn)attribute defined in the LDAP directory, but can be changed by the Security Administrator.
Choose the Administrators tab (Figure 15-9). Set up all necessary administrators for this Oracle Context, if you haven't already done so.
In order to accept password-authenticated connections, a database must belong to a domain in the Password Accessible Domains group--and the database access permissions on the user search base must be enabled. This enables the database to read the user's login credentials in the directory.
In a selected Oracle9i Oracle Context, add the domain to the Password-Accessible Domains group. Choose Add and select one of the current enterprise domains from the resulting dialog. To remove an enterprise domain from the group, select it in the Accessible Domains window and choose Remove.
Any directory user can be an enterprise user. You can add users to the directory by using one of the following tools:
If you elect to populate the directory with users before using Oracle Enterprise Security Manager, note that user entries must have the orcluser objectclass.
|
See Also:
|
You can do any of the following:
Use Oracle Enterprise Manager or SQL*Plus to grant local roles and privileges to the database user or schema; this step is optional.
Use Oracle Enterprise Security Manager to grant enterprise roles to the enterprise user in the directory. User authorizations are the aggregate of both local database roles and enterprise roles.
If you are using a shared schema, use Oracle Enterprise Security Manager to map the user to a schema. You can choose either of the following mapping options:
If you are creating a domain mapping from three users to a shared schema called guest, and you have more than one database in the domain, each database must have a shared schema (called guest) that all three users can access. These three users cannot connect to any database in the domain that does not have a shared schema called guest.
Alternatively, you can create a mapping under a particular database. If you do it this way, the mapping applies only to that database, and not to all databases in the domain. If you have mappings in both places, the database mapping takes precedence.
|
See Also:
|
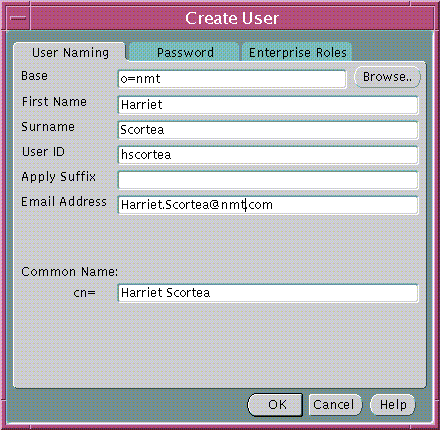
For each user, define a UserID that is unique across the enterprise (Figure 15-10). The default UserID is the value in the common name (cn) attribute defined in the LDAP directory.
Choose a UserID that conforms to the following:
cn to be the UserID attribute, and Scott's cn attribute value is Scott.us, there can be no other cn=Scott.us defined in any of the users specified in the user search base field.
For example, in Figure 15-10 the UserID is hscortea.
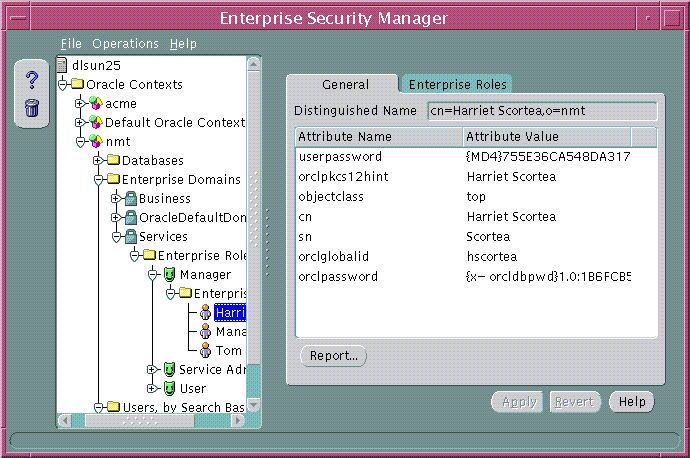
Choose the Password tab of the Create User Window (Figure 15-10) to create a password for each enterprise user. Oracle Enterprise Security Manager automatically creates the associated password verifiers and stores them in the orclPassword attribute of the user entry (Figure 15-11).
The user entry must reside in a directory subtree of users that has been enabled for Oracle database access. You can set Oracle Database Access permissions for a selected subtree--to let databases within a domain in the Password-Accessible Domains group read the user's login credentials.
To enable database access:
On a selected subtree of directory users, set Oracle Database Access permissions to permit databases in the Password-Accessible Domains group to access the user's database login credentials:
For an enterprise user whose UserID is hscortea (Figure 15-11) and whose password is welcome, enter the following to connect using sqlplus:
SQL>connect hscortea/welcome@<TNS Service Name>
The database authenticates the enterprise user (hscortea) by verifying the username/password combination against the directory entry associated with this user. If successful, the connection to the database is established.
This section describes potential problems and associated corrective actions.
The following tips help you verify that the user has been allocated the correct global roles upon database login and, if necessary, help determine the cause of failure:
SELECT * FROM session_roles;
Do an LDAP search to display the appropriate roles by entering the following:
ldapsearch -h <directory hostname> P <SSL directory port number> -U 3-W "file:<walletpath>" -P <database wallet password>-b "cn=oracleDBSecurity, cn=Products, cn=OracleContext, <admin context>""objectclass=orclDBenterpriseRole"
If you do not see the roles, the database is not in the correct domain--or there is an incorrect distinguished name (DN) in the database wallet certificate. If the database appears to be receiving information from the wrong domain, try restarting the database to update its internal domain membership information.
This error may indicate that you attempted to configure a domestic cipher suite. Run Oracle Net Manager again, and be sure that you choose the Show Domestic Cipher Suites button.
This error indicates that the connection was not over SSL. Look at the tnsnames.ora file to verify the protocol value of the net service name that you are using. The value must be TCPS and not TCP.
The distinguished name that the wallet uses to connect does not match the DN in the CREATE USER statement for any schema in the database, and it does not match the DN in any relevant mapping.
ldapbind -h <directory hostname> -p <directory SSL port number> -U 3 -W
"file:[database wallet path]" -P [database wallet password]
Bind successful should be displayed. If the bind fails, try restarting the SSL instance of your directory.
Then try the bind again.
If it still doesn't work, carefully check the wallet location in the configuration set via Oracle Directory Manager. Make sure that it is set to the proper path name.
guest (for example) to be a non-shared schema.
In sqlplus as system/manager@database_name, enter:
alter user guest identified globally as <user DN>;
and then try the connect /@connect_identifier again. If this succeeds, the problem is associated with the mapping of the user to the schema; use Oracle Enterprise Security Manager to check that mapping in the directory.
If this still fails, the user wallet DN does not match the DN you specified in the alter user statement. Check the user wallet.
Alter this user back to a shared schema by entering:
alter user guest identified globally as '';
This error usually means that something is wrong with the wallet. Look in the sqlnet.log file in the current operating system directory for more information. Also, on Windows NT, this can mean that the Oracle service has stopped; check the Services control panel.
Applies to Window NT only.
This error occurs when you attempt to open a wallet that you are not permitted to open.
For Example:
user-x, but you do not have a local sqlnet.ora file that identifies c:\winnt\profiles\user-x\oracle\wallets as your wallet location.
sqlnet.ora file in the default location to find the wallet location, and then tries to open the database wallet to get your login credentials.
user-x does not have permission to open the database wallet.
This is a catch-all Oracle9i error that indicates something unanticipated went wrong with the RDBMS to directory LDAP query. It is possible that SSL has failed on the directory--the database and directory wallets may not share a trusted certificate. Try to bind to the directory over SSL using the database wallet.
You can use tracing to help debug. This is appropriate if the ldapbind (See: ORA-1017: Invalid username/password) fails, indicating that the directory's SSL instance is not working properly.
If you are using Oracle Internet Directory as your ldap directory, use the following tracing procedure:
$ORACLE_HOME\ldap\log. Look at the file with your SSL directory instance number and an s in its filename. The log files without the s are for the monitor process (oidmon) and the dispatcher. Look at the end of the log file immediately after you have tried your connect /@connect_identifier. One thing to look for is the string Distinguished Name to ensure that it matches the DN of your user.
|
|
 Copyright © 1996-2001, Oracle Corporation. All Rights Reserved. |
|