Release 1 (9.0.1)
Part Number A89869-02
Home |
Book List |
Contents |
Index | Master Index | Feedback |
| Oracle9i Real Application Clusters Administration Release 1 (9.0.1) Part Number A89869-02 |
|
This chapter describes how Oracle Enterprise Manager manages multiple instances. The Server Management (SRVM) component of Real Application Clusters can perform a variety of cluster database management tasks. Many of these tasks can be initiated from the Oracle Enterprise Manager console.
This section is meant to only describe Oracle Enterprise Manager administration for Real Application Clusters. Use this section as a supplement to information contained in the Oracle Enterprise Manager Administrator's Guide and other Oracle Enterprise Manager documentation.
The topics in this chapter are:
The Oracle Enterprise Manager Console provides a central point of control for the Oracle environment through an intuitive graphical user interface (GUI). The Oracle Enterprise Manager Console can initiate a variety of cluster database management tasks at the managed cluster nodes with the Server Management (SRVM) component.
After nodes have been discovered, you can use the Oracle Enterprise Manager Console to start, stop, and monitor services as well as to schedule jobs or register events. You also perform these tasks simultaneously on multiple nodes. You can also use the Console to manage schemas, security, and the storage features of cluster databases.
|
See Also: Oracle9i Real Application Clusters Installation and Configuration for configuration information. The Oracle Enterprise Manager online Help system may also answer many frequently asked questions. |
To use the Oracle Enterprise Manager Console, start the following components:
Oracle9i Real Application Clusters Installation and Configuration for Real Application Clusters-specific information on installing Oracle Enterprise Manager
See Also:
From the Navigator pane, you can view and manage both single- and multiple-instance databases. After nodes are discovered, the Navigator displays cluster databases, their instances, and other related services, such as a listener. The information available for cluster databases is essentially the same as for single-instance databases. Just as in single instance databases, cluster databases and all of their related elements can be administered using master/detail views and Navigator menus.
The Navigator displays all the network objects and their relationships to other objects including a direct view of objects such as user-defined groups, nodes, listeners, servers, databases, and database objects.
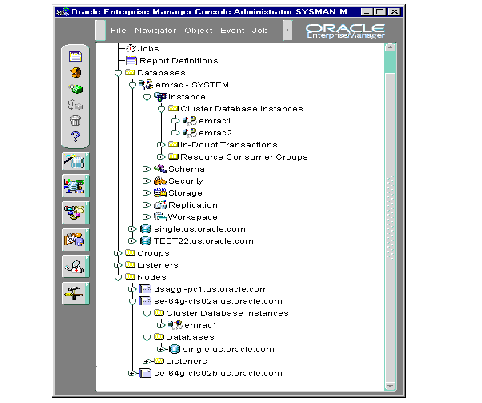
In the Navigator tree, cluster databases are listed under the Databases folder as siblings to single-instance databases. Just as in single instance databases, each cluster database folder contains the instances and sub-folders for Instance, Schema, Security, and Storage, as shown in Figure 5-1.
|
Note: If you attempt to expand a cluster database and you have not yet set preferred credentials for the database as described in Oracle9i Real Application Clusters Installation and Configuration, the Database Connect Information dialog prompts you to enter database connect information. |
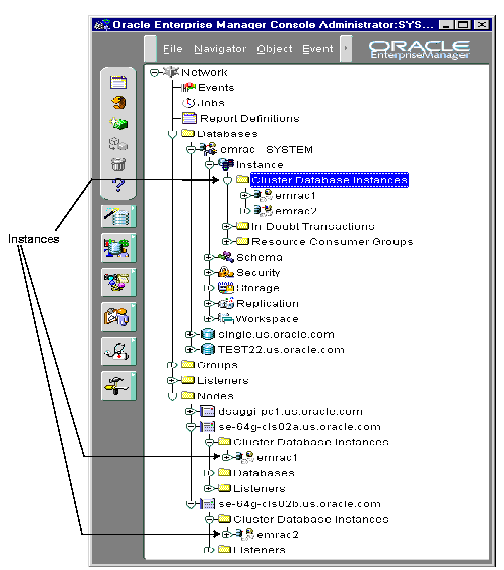
By selecting objects within a Cluster Database subfolder, you can access property sheets to inspect and modify properties of these objects. (Just as you can for single-instance databases.) For example, by expanding the Storage folder and then right-clicking Redo Log Groups subfolder, and then choosing Create, you can add a new redo log group. All discovered instances will be displayed, under the Cluster Database Instances folder.
When accessing cluster databases, only the Instance folder has subfolder contents that differ from those seen in single instance databases. Within the Instance folder, the instance database subfolders are split into two functional parts:
All of the database-specific functionality is seen directly under the Instance subfolder for the cluster database. The available database-specific functionality includes:
All instance-specific functionality appears beneath the individual instance icons within the Cluster Database Instances subfolder. The instance-specific functionality includes:
Here you can view instance states, view and edit initialization parameters, toggle the archive mode, and view performance statistics of active resource plans.
Here you can create, edit, and store multiple startup configurations for instances. This eliminates the need to track initsid.ora parameter files.
Here you can list the status of connected users, view the latest SQL for sessions, and terminate sessions.
Here you can view list details for currently held User type and System type locks.
Here you can define and modify the resource plans for the cluster database. You can also activate a specific resource plan for an individual instance.
Here you can schedule activation of a resource plan.
The contents of a typical database folder are shown in Figure 5-1.
You can expand the Cluster Database Instances folder to display the instances belonging to each discovered database or node, as shown in Figure 5-2.
Right-clicking on a cluster database displays the specialized cluster database right-mouse menu as shown in Figure 5-3.
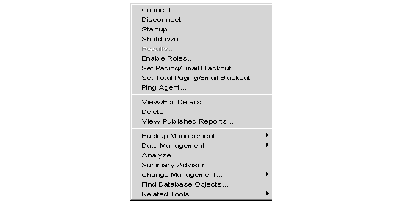
The menu contains entries for the specialized functions listed in Table 5-1. (All others are identical to single instance Oracle Enterprise Manager.) When selected, you will see dialogs that differ from single instance databases. Note that in addition to the tools listed in Table 5-1 you will also see the single instance tools, which also work with Real Application Clusters.
Table 5-1 Cluster Database Right-Mouse Menu Functions Specific to Real Application Clusters
| Option | Description |
|---|---|
|
Startup |
See Also: "Starting a Cluster Database" |
|
Shutdown |
See Also: "Shutting Down a Cluster Database" |
|
Results |
|
|
View Edit Details |
Enables inspection of the state of the cluster database, including which instances are active. See Also: "Viewing Cluster Database Status" |
|
Related Tools |
Contains access to other tools which have been enabled for a cluster database. |
The Console enables you to start an entire cluster database or selected instances within the cluster database.
To start up a cluster database or its instances:
A menu appears with options for the database.
The Cluster Database Startup dialog box appears.
The Select Instances to Start dialog box appears.
The Cluster Database Startup Results dialog box displays the progress of the startup operation, as described in "Viewing the Cluster Database Operation Results".
If the instances were started successfully, the Cluster Database Started message box appears with a successful message.
Click OK in the Cluster Database Started message to acknowledge the message, then click Close in the Cluster Database Startup Results.
If the startup fails, the Cluster Database Started message box appears with a failure message. Click View Details to view more information in the Cluster Database Startup Results dialog box about why the startup failed, then click Close.
The Console enables you to shut down an entire cluster database or selected instances within a cluster database. Once all instances are shut down, the database is also considered shut down.
To shut down a cluster database or its instances:
A menu appears with options for the database.
The Cluster Database Shutdown dialog box appears.
To shut down only selected instances, follow these additional steps:
The Select Instances to Stop dialog box appears.
The Cluster Database Shutdown Progress dialog box displays the progress of the shutdown operation.
If the instances were shut down successfully, the Cluster Database Stopped message box appears with a successful message.
Click OK in the Cluster Database Stopped message to acknowledge the message, then click Close in the Cluster Database Shutdown Results.
If the shutdown fails, the Cluster Database Stopped message box appears with a failure message. Click View Details to view more information in the Cluster Database Shutdown Progress dialog box about why the shutdown failed, then click Close.
The Cluster Database Startup/Shutdown Results dialog displays information about the progress of the instance startup or shutdown operation you selected:
The operation results are presented in two views:
The Cluster Database Startup/Shutdown Results dialog box automatically displays during a startup or shutdown operation. You can also initiate it with the following steps:
A menu appears with options for the database.
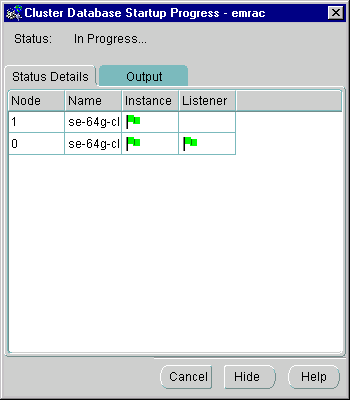
While a startup or shutdown operation is running against a cluster, the Status Details tab progress display is shown and updated dynamically as the operation progresses.
A successful startup operation for a three-node cluster looks like the following in the Status Details tab, as shown in Figure 5-4.
A successful shutdown operation for a three-node cluster looks like the Status Details tab shown in Figure 5-5.
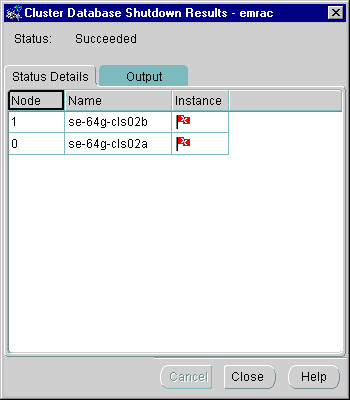
Table 5-5 shows the possible states that each component might experience.
Table 5-4 Possible Component States
The Output tab displays the commands executed by the node and any associated error messages in textual format.
A successful shutdown looks like the following in the Output tab, as shown in Figure 5-6.
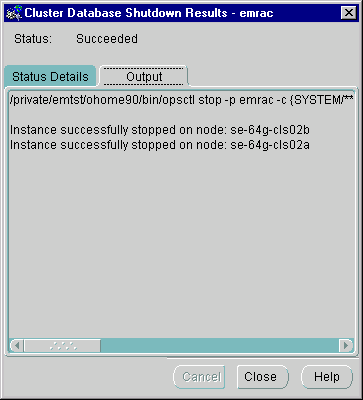
Oracle Enterprise Manager displays a Results tab that is similar to the Shutdown tab in Figure 5-6.
The Edit Cluster Database dialog box displays status information about the database, such as instances available in the cluster and the status of cluster components.
To view status information about a database:
A menu appears with options for the database.
The Edit Cluster Database dialog box appears.
The operation results are presented in two views:
The General tab displays information about the currently running instances by querying V$ACTIVE_INSTANCES table, as shown in Figure 5-7. Oracle Enterprise Manager makes a connection to the cluster database. Therefore, this tab will not appear if the database is down.
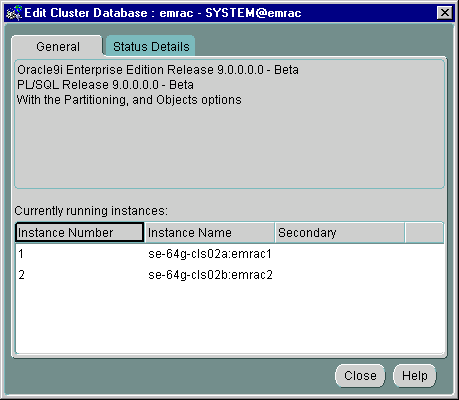
Table 5-5 describes the fields in the Output Tab Form.
Table 5-5 Fields in Output Tab Form
| Column Name | Description |
|---|---|
|
Instance Number |
Identifies the instance number |
|
Instance Name |
The name specified for the instance and the node it is running on. This name has the following format: node:instance_name. |
|
Secondary |
Indicates if the node is an secondary instance in a primary/secondary instance configuration |
The Status Details Tab displays an overall view of the state of the cluster and related components, as shown in Figure 5-8. This tab displays the status of the various components, such as listeners and instances, for all nodes.
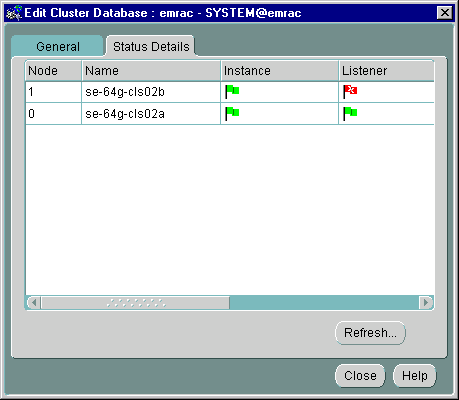
Table 5-6 shows the possible states that each component might experience.
Table 5-6 Component States
The job scheduling system provides a highly reliable and flexible mechanism for you to schedule and automate repetitive jobs on both the cluster database and instances.
The Console contains a full-featured scheduling tool that enables you to develop a customized schedule. This provides you with actual "lights out" management capability so that you can focus on other tasks. A rich selection of jobs is provided for cluster databases.
You can create a job with a cluster database or instance as the destination. To create a new job, follow these steps:
From the Create Job property sheet, you can specify the details of a new job. The Create Job property sheet contains the tabs listed in Table 5-7.
Table 5-7 Tabs Contained in the Create Job Property Sheet
The following tabs contain options specific to cluster databases:
As shown in Figure 5-9, from the General tab you can specify:
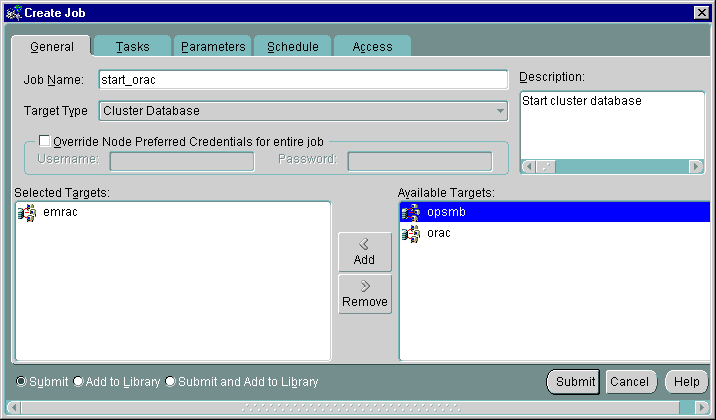
The General tab contains the options in Table 5-8.
Table 5-8 General Tab Options
From the Tasks tab, choose the task(s) for the job to perform. The list of tasks that appear is different depending on whether you select a cluster database or instance as your Destination Type from the General tab.
Move the tasks between the Available Tasks and Selected Tasks lists with the Add and Remove buttons.
If your Destination Type is a cluster database, you can select from these tasks that are specific to Real Application Clusters:
From the Parameters tab, you can specify parameter settings for the job tasks you selected on the Tasks tab. The parameters that display vary according to the job task. Parameters specific to cluster database startup and shutdown tasks are described below.
When you select the Startup Cluster Database task on the Tasks tab, the following display appears.
Complete the parameters on the tab and click Submit to run the cluster database startup task.
The Parameters tab for Startup contains the options listed in Table 5-9.
Table 5-9 Parameters Tab for Startup
| Parameters | Description |
|---|---|
|
Startup |
Select the startup modes for the job from the drop-down list box. |
|
Connect As |
Only Normal is allowed for Oracle7. For Oracle8i and subsequent releases, SYSOPER and SYSDBA roles allow you the maximum database administration privileges. You require SYSDBA or SYSOPER privileges to run job tasks such as shutdown or startup on the database. See Also: Oracle9i Database Administrator's Guide for more information about SYSOPER and SYSDBA roles If you attempt to connect as SYSDBA and do not have SYSDBA privileges, an error message states that an invalid user name or password was entered. |
|
Override Preferred Credentials |
You can use the preferred credentials that have been set up for the database, or you can enter another database user name and password. |
When you select Shutdown Cluster Database on the Tasks tab, the following display in Figure 5-10 appears.
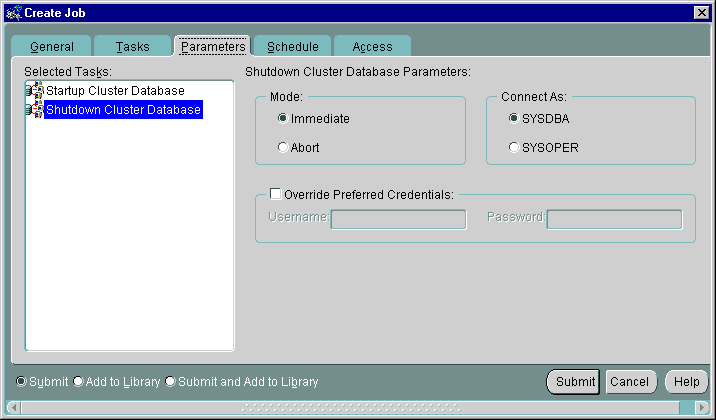
Complete the parameter entries on the tab and click Submit to run the cluster database shutdown task.
The Parameters tab for Shutdown contains the options listed in Table 5-10.
Table 5-10 Parameters Tab for Shutdown
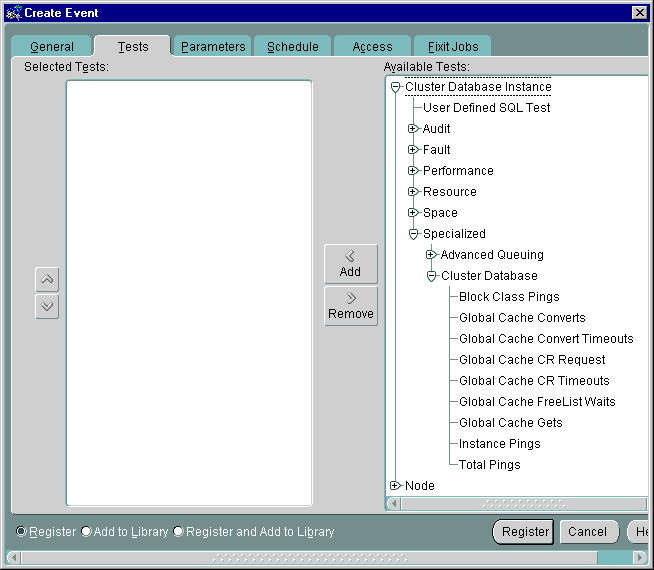
Oracle Enterprise Manager includes an Event Management feature. This feature enables you to monitor tests on cluster database instances. All of the tests that are available for single instance databases can also be run on cluster databases. In addition to these standard event tests, there are specialized event tests available only for cluster database instances. These tests include: global cache converts, pings, timeouts, consistent read requests, freelist waits, and so forth. Data from the Oracle Data Gatherer is used to create these Event Management reports.
To access the Event Management feature, from the Event menu, select Create Event. The Create Event window opens. There, you can select targets, set parameters, and set notification preferences, using the following sub-pages:
Typically, you will set parameters and notifications so that the system will inform you when a given parameter limit has been reached. The Event Management Tests submenu is shown in Figure 5-11.
|
|
 Copyright © 1996-2001, Oracle Corporation. All Rights Reserved. |
|