Release 1 (9.0.1)
Part Number A89869-02
Home |
Book List |
Contents |
Index | Master Index | Feedback |
| Oracle9i Real Application Clusters Administration Release 1 (9.0.1) Part Number A89869-02 |
|
![]()
![]()
This chapter explains how to configure Recovery Manager (RMAN) for Real Application Clusters environments. The topics in this chapter include:
Before using Recovery Manager in Real Application Clusters, review the following documentation.
The RMAN online documentation roadmap and the Quick Start and Configuration chapters in the Oracle9i Recovery Manager User's Guide
See Also:
After installing the Oracle Enterprise Edition with the Oracle9i Real Application Clusters license, you can configure RMAN for use after following the configuration procedures in this chapter. Before configuring RMAN, however, decide whether to use a recovery catalog as described in the RMAN documentation. You also can use RMAN without a catalog and add one later. If you use a catalog, be sure to register your Real Application Clusters database in the RMAN recovery catalog.
The first configuration step is to specify the default location of the snapshot control file. RMAN creates a snapshot control file as described in this chapter to obtain a consistent picture of the target control file before making a backup, and RMAN must create the snapshot control file on the node that makes the backup. Also, you can enable the control file autobackup feature, which causes RMAN to automatically make backups of the control file after BACKUP and COPY commands.
The aspect of RMAN use that requires the careful planning is the configuration of the archived logs. When Oracle generates an archived log, it records the filename of the log both in the control file of the target database and in the recovery catalog. RMAN accesses the archived log files by this filename regardless of which node runs the backup. Configure the RMAN environment by sharing the archived log directories in Real Application Clusters environments as explained in this chapter.
The CONFIGURE command creates persistent settings that are in effect across RMAN sessions. Thus, after running these commands, you do not need to run them again unless you want to change the default configuration.
This section contains these topics:
In Real Application Clusters, configure the location for your snapshot control files before performing backups using RMAN. The snapshot control file must exist on the node from which you perform backups. Therefore, on all nodes used for backups, ensure that the same destination directory for a snapshot control file exists.
For example, on UNIX specify that the snapshot control file should be written to the file /oracle/db_files/snapshot/snap_prod.cf as follows:
CONFIGURE SNAPSHOT CONTROLFILE NAME TO '/oracle/db_files/snapshot/snap_prod.cf';
This RMAN configuration is globally set across all nodes in the cluster. Therefore, ensure that the directory /oracle/db_files/snapshot exists on all nodes that make backups.
You can also specify a raw device destination for a snapshot control file. This raw device destination is shared across all nodes in the cluster just like other data files in Real Application Clusters.
|
See Also:
Oracle9i Recovery Manager User's Guide for more information on configuring the RMAN environment |
If you set CONFIGURE CONTROLFILE AUTOBACKUP to ON, then RMAN makes an automatic control file backup after you execute the BACKUP or COPY commands. RMAN gives this backup a default name. However, you can change this name with the CONFIGURE CONTROLFILE AUTOBACKUP FORMAT command. RMAN can restore this control file and even autobackup after the loss of both the recovery catalog and the current control file.
RMAN performs the control file autobackup on the first allocated channel. Thus, when you allocate multiple channels with different parameters, especially when you allocate a channel with the CONNECT command, you must determine which channel will perform the CONTROLFILE AUTOBACKUP. Always allocate the channel for this node first.
|
See Also:
Oracle9i Recovery Manager User's Guide for more information on configuring the RMAN environment |
The rest of this chapter describes various archived log configuration schemes for implementing RMAN in Real Application Clusters databases. This chapter also explains each schemes' advantages and disadvantages and provides configuration details.
Carefully select the archived log configuration scheme that best meets your requirements. The archivelog scheme you use is critical for RMAN. With RMAN, you can distribute backup operations among all the nodes in the cluster, but only one node performs recovery operations. The node performing recovery must have access to all of the logs created by all nodes.
The source for archived log information is the target database control file. If you use a recovery catalog, then the log information in the control file is imported by RMAN into the catalog. Depending on your configuration, RMAN selects the logs to backup or recover by referring to the control file or the RMAN catalog to determine the log filenames generated by the nodes.
Each node in the configuration reads the common control file to obtain log filenames, but each node also looks for log filenames on its own file system. Therefore, the node performing the backup or recovery must be able to read the filename for each log listed in the repository to use the log. If every node in the configuration must be able to perform backup and recovery, then every node must be able to read all log filenames.
A problem can occur if you configure each node to write to a local directory that has the same path name as the local archiving directory on the other nodes in your Real Application Clusters database. For example, assume that each node archives to its local directory called /arc_dest. If you use identical directory names, the locations of the RMAN logs appear in the control file as in the following example:
/arc_dest/log_1_62
/arc_dest/log_2_100
/arc_dest/log_2_101
/arc_dest/log_3_70
/arc_dest/log_1_63
If node 1 attempts to access these logs for backup or recovery, then node 1 searches its local arc_dest directory for the required logs as they were recorded in the control file. Using this information, node 1 only finds the logs that it archived in its local directory. In this example, node 1 can find log 62 and 63, but it cannot locate the remaining logs. The various configuration schemes described in this chapter solve this problem so that RMAN can access the logs that it needs for backup and recovery.
The most common archive logging schemes belong one of the following six categories:
The following sections describe each of these schemes in ascending order of reliability from least reliable to most reliable. The sample schemes assume that you have a three-node Real Application Clusters database.
In the non-shared scheme, each node writes to a local archived log file as shown in Figure 6-1.
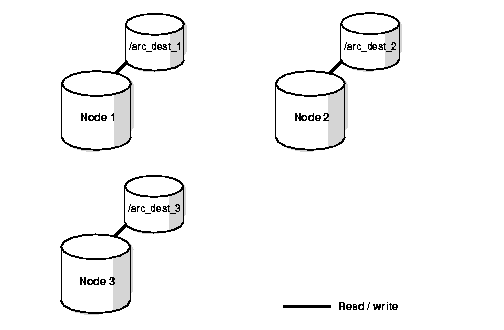
Each archive destination requires a unique name so that RMAN can distinguish the archived logs for backups and restores. This configuration is useful if every node has a local tape device. Otherwise, although the reading is local on every node, writing to tape must go through the network.
If one node fails, transactions that were logged after the last full backup are lost. Therefore, the node that fails becomes a single point of failure. For this reason, Oracle Corporation does not recommend that you implement non-shared local configurations for RMAN in Real Application Clusters.
In the scenario shown in Figure 6-1, the archived log records may look something like the following:
/arc_dest_1/log_1_62
/arc_dest_2/log_2_100
/arc_dest_2/log_2_101
/arc_dest_3/log_3_70
/arc_dest_1/log_1_63
Because each node archives to a different directory, the path names of the logs in the repository are different. Thus, if you run RMAN on node 1 and you do not use network file system (NFS) to map local directories to directories on the other nodes, then the archivelog backup step in the following script fails because RMAN cannot access the archived redo logs from node 2:
% RMAN TARGET  / CATALOG RMANUSER/RMANPASS@RMANCAT

  RUN
  {
  ALLOCATE CHANNEL db1tape1 DEVICE TYPE sbt;
  BACKUP DATABASE;
  BACKUP ARCHIVELOG ALL:
  }
The configuration scheme in this section prevents this type of failure. To configure this scheme, perform the following one-time configuration so that one channel is configured for each node in the cluster. Do this at the RMAN prompt by entering:
CONFIGURE DEVICE TYPE sbt PARALLELISM 3;
CONFIGURE DEFAULT DEVICE TYPE TO sbt;
CONFIGURE CHANNEL 1 DEVICE TYPE sbt CONNECT 'user1/password1@node1';
CONFIGURE CHANNEL 2 DEVICE TYPE sbt CONNECT 'user2/password2@node2';
CONFIGURE CHANNEL 3 DEVICE TYPE sbt CONNECT 'user3/password3@node3';
Similarly, you can set up this configuration for a device type of DISK.
To configure initialization parameters for non-shared archiving destinations, create the local archiving destination on each node. You do not need to use NFS or shared drives for backups. However, during recovery, the node performing recovery must be able to read all the archived logs from all nodes in the cluster. In this case, you may still need use NFS or shared drives for recovery.
In UNIX, for example, make the following initialization parameter settings so that each node is archiving to a path that is distinct from the other archiving paths:
db1.LOG_ARCHIVE_DEST_1="LOCATION=?/admin/db_name/arc_dest1"
db2.LOG_ARCHIVE_DEST_1="LOCATION=?/admin/db_name/arc_dest2"
db3.LOG_ARCHIVE_DEST_1="LOCATION=?/admin/db_name/arc_dest3"
|
Note:
If Oracle reconstructs the names of archived redo log files, the format that |
You should develop a production backup script for whole database backups that you can run from any node. In the script, make sure that the channel allocated on each node only backs up the logs that are located on the node. The following example uses automatic channels to make a database and archived log backup:
BACKUP DATABASE
  (ARCHIVELOG LIKE '%arc_dest_1%' CHANNEL ORA_SBT_TAPE_1)
  (ARCHIVELOG LIKE '/arc_dest_2/' CHANNEL ORA_SBT_TAPE_2)
  (ARCHIVELOG LIKE '/arc_dest_3/' CHANNEL ORA_SBT_TAPE_3)
The following script uses automatic channels to back up only archived logs:
BACKUP
  (ARCHIVELOG LIKE '/arc_dest_1/' CHANNEL ORA_SBT_TAPE_1)
  (ARCHIVELOG LIKE '/arc_dest_2/' CHANNEL ORA_SBT_TAPE_2)
  (ARCHIVELOG LIKE '/arc_dest_3/' CHANNEL ORA_SBT_TAPE_3)
To restore and recover the whole database, make all the archived logs that were not backed up accessible by the node from which you are performing the restore and recovery. Do this by using one of the following strategies:
For example, if node 3 is performing the recovery, then you can use the following script, where directory is a directory on node 3 into which you will restore the archived logs generated by node 1 and node 2. This example assumes that the channels are set up as in the previous example, where one channel will be allocated each node:
RUN
{
SET AUTOLOCATE ON;
RESTORE DATABASE;
# set the archiving destination to the directory
# where RMAN will restore the logs it needs for recovery. Note that this
# directory must be read-write accessible by all nodes in the cluster.
SET ARCHIVELOG DESTINATION TO directory;
RECOVER DATABASE;
}
To only restore the archived logs (not the database) in this archiving scheme, you can use the following script:
RUN
{
SET AUTOLOCATE ON;
# set the archiving destination to the directory containing all needed logs
SET ARCHIVELOG DESTINATION TO directory;
RESTORE ARCHIVELOG ALL;
}
In the shared read local archiving scheme, each node writes to a local archived log file and can read the archived log files of the other nodes as shown in Figure 6-2. Read access is commonly achieved using NFS on UNIX or shared drives on Windows platforms.
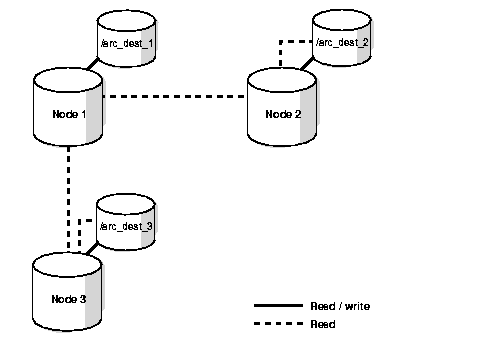
This configuration is useful only if a few nodes have tape devices and if you perform the backups from those nodes.
Consider a UNIX example in which you are using the following configuration for the scheme in Figure 6-2:
Node 1 has the following archived log configuration:
/arc_dest_2is a symbolic link to/arc_dest_2on node 2/arc_dest_3is a symbolic link to/arc_dest_3on node 3
Node 2 has the following archived log configuration:
/arc_dest_1 is a symbolic link to /arc_dest_1 on node 1
/arc_dest_3 is a symbolic link to /arc_dest_3 on node 3
Node 3 has the following symbolic links:
/arc_dest_1 is a symbolic link to /arc_dest_1 on node 1
/arc_dest_2 is a symbolic link to /arc_dest_2 on node 2
For this scheme, the control file has the following entries:
/arc_dest_1/log_1_62
/arc_dest_2/log_2_100
/arc_dest_2/log_2_101
/arc_dest_3/log_3_70
/arc_dest_1/log_1_63
In this case, any node performing the recovery can read the control file and access the logs on the other nodes by means of the symbolic links. For example, if node 2 is performing recovery and needs to access /arc_dest_1/log_1_62, then it is going to look for it in the /arc_dest_1 directory on its local file system. Because /arc_dest_1 on node 2 is a symbolic link pointing to /arc_dest_1 on node 1, it can access the log remotely.
For this scheme and the remaining schemes that use sharing, to enable RMAN to back up and recover a Real Application Clusters database in one step, all archived logs must have uniquely identifiable names throughout the Real Application Clusters database. In addition, you must configure every node so that it can identify and access all the archived logs throughout your cluster using these same unique names.
Although this scheme offers simplified manageability over non-shared local configurations, shared read local archiving configurations also have single points of failure. If one node fails after the last complete backup, the archived logs located on that node are unavailable to the surviving nodes for recovery.
The production script for whole database backups from any node is:
BACKUP DATABASE PLUS ARCHIVELOG;
To back up just the archived logs and to delete them after the backup, use the following script:
BACKUP ARCHIVELOG ALL DELETE INPUT;
To restore and recover the whole database from any node, use the script:
RESTORE DATABASE;
RECOVER DATABASE;
To only restore the archived logs if the remote destinations are writable, use the script:
RESTORE ARCHIVELOG ALL;
If the remote archived log destinations are not writable, then enter the following, where directory is the directory into which you want to restore the archived logs:
RUN
{
SET ARCHIVELOG DESTINATION TO directory;
RESTORE ARCHIVELOG ALL;
}
Figure 6-3 shows a one remote archive logging scheme in which each node writes to both a local archived log destination and to a remote archived log destination on one of the other nodes.
In this example, the following occurs:
The one remote archive logging scheme is more reliable than the previous two schemes. This is because each node writes to both a local archived log file as well as to remote log files. As with shared read local archiving, each archived log within the Real Application Clusters environment must have a unique path name.
For the remote destination disk, Oracle Corporation recommends that you logically arrange your nodes in a circular sequence. Do this to allow the first node to write to second node, the second node to write to the third node, and so on. The last node must write to the first node. This way, each node writes to a local archived log file as well as to a remote archived log.
Recovery does not have a single point of failure in this scheme unless you are backing up to tape and only one node can access the tape device. Multiple archived log destinations also avoid single-points-of-failure by making the archived logs for a failed node available to other nodes for recovery processing.
If you use NFS to link the remote logs to each node, then you may experience some performance degradation. This occurs because each node must write to its remote archived log files by way of the network. Moreover, if you make the NFS directory mandatory and the network fails, your database also stops. Avoid this by making the NFS directory optional. However, in this case you risk losing synchronization among the archived logs.
You must also decide whether to use remote reading so that each node can read a directory on every other node. This scheme is known as cross-mounting, and is illustrated in the following example:
You can achieve cross-mounting using either NFS on UNIX or shared drives on Windows platforms.
To configure parameters for one remote archive logging, create a local and a remote archived log directory. For example on UNIX, on node 1 create the following directory structure:
$ORACLE_HOME/admin/db1/arc_dest1
$ORACLE_HOME/admin/db1/arc_dest2 # remote NFS destination on node 2
Create the following directory structure on node 2:
$ORACLE_HOME/admin/db2/arc_dest2
$ORACLE_HOME/admin/db2/arc_dest3 # remote NFS destination on node 3
Create the following directory structure on node 3:
$ORACLE_HOME/admin/db3/arc_dest3
$ORACLE_HOME/admin/db3/arc_dest1 # remote NFS destination on node 1
Continue by creating a similar directory structure for every node. Then use the following initialization parameter file settings:
db1.LOG_ARCHIVE_DEST_1="LOCATION=?/admin/db_name//arc_dest1"
db1.LOG_ARCHIVE_DEST_2="LOCATION=?/admin/db_name//arc_dest2"
db2.LOG_ARCHIVE_DEST_1="LOCATION=?/admin/db_name//arc_dest2"
db2.LOG_ARCHIVE_DEST_2="LOCATION=?/admin/db_name//arc_dest3"
db3.LOG_ARCHIVE_DEST_1="LOCATION=?/admin/db_name//arc_dest3"
db3.LOG_ARCHIVE_DEST_2="LOCATION=?/admin/db_name//arc_dest1"
On Windows using shared drives, create the following shared drives on node 1:
J:\
K:\ # maps to K: drive on node 2
Create the following shared drives on Node 2:
K:\
L:\ # maps to L: drive on node 3
Create the following shared drives on Node 3:
L:\
J:\ # maps to J: drive on node 1
Then use the following initialization parameter file settings:
db1.LOG_ARCHIVE_DEST_1="LOCATION=J:\archivelogs"
db1.LOG_ARCHIVE_DEST_2="LOCATION=K:\archivelogs"
db2.LOG_ARCHIVE_DEST_1="LOCATION=K:\archivelogs"
db2.LOG_ARCHIVE_DEST_2="LOCATION=L:\archivelogs"
db3.LOG_ARCHIVE_DEST_1="LOCATION=L:\archivelogs"
db3.LOG_ARCHIVE_DEST_2="LOCATION=J:\archivelogs"
Using cross-mounting simplifies your backup scripts for one remote archive logging. However your system may incur network processing overhead. If you are backing up to tape, cross-mounting is preferable if only a few of the nodes have local tape devices.
If you do not use cross-mounting, your scripts must be more complex. Not using cross-mounting is only beneficial if all of the nodes have local tape devices.
Regardless of whether you use cross-mounting, you can optimize your backup scripts so that each node locally reads two archived log destinations. To do this, use customized scripts on each node; in this case you cannot use one generalized script for all the nodes.
To configure the no cross-mounting scheme, perform the following one-time configuration. To do this, at the RMAN prompt enter:
CONFIGURE CHANNEL 1 DEVICE TYPE sbt CONNECT 'user1/password1@node1';
CONFIGURE CHANNEL 2 DEVICE TYPE sbt CONNECT 'user2/password2@node2';
CONFIGURE CHANNEL 3 DEVICE TYPE sbt CONNECT 'user3/password3@node3';
If you use this configuration, then your production backup script for whole database backups is:
BACKUP DATABASE
  (ARCHIVELOG LIKE '/arc_dest1' CHANNEL ORA_SBT_1)
  (ARCHIVELOG LIKE '/arc_dest2' CHANNEL ORA_SBT_2)
  (ARCHIVELOG LIKE '/arc_dest3' CHANNEL ORA_SBT_3);
You can run this script from any node. To only backup the archived logs, use this script:
BACKUP
  (ARCHIVELOG LIKE '/arc_dest1' CHANNEL ORA_SBT_1)
  (ARCHIVELOG LIKE '/arc_dest2' CHANNEL ORA_SBT_2)
  (ARCHIVELOG LIKE '/arc_dest3' CHANNEL ORA_SBT_3);
Otherwise, if you do not want to perform the one-time configuration, then your production backup script for a whole database backup is:
RUN
{
  ALLOCATE CHANNEL c1 DEVICE TYPE sbt CONNECT 'node1';
  ALLOCATE CHANNEL c2 DEVICE TYPE sbt CONNECT 'node2';
  ALLOCATE CHANNEL c3 DEVICE TYPE sbt CONNECT 'node3';
BACKUP DATABASE
  (ARCHIVELOG LIKE '/arc_dest1' CHANNEL ORA_SBT_1)
  (ARCHIVELOG LIKE '/arc_dest2' CHANNEL ORA_SBT_2)
  (ARCHIVELOG LIKE '/arc_dest3' CHANNEL ORA_SBT_3);
}
To restore and recover the whole database, make all the archived logs that were not backed up accessible by the node from which you are performing the restore and recovery operation. Even though you did not use cross-mounting for the backups, you could use it for the restore and recover operations. In this case, you must use writable cross-mounting. Or you can copy the archived logs onto a disk accessible by the node you are using. To copy the logs, use the following script:
  RUN
  {
  SET AUTOLOCATE ON;
  RESTORE DATABASE;
  SET ARCHIVELOG DESTINATION TO directory;
  RECOVER DATABASE;
  }
Where directory is the directory into which you copied the archived logs. To restore only the archived logs in this scheme, use the following script:
  RUN
  {
  SET AUTOLOCATE ON;
  SET ARCHIVELOG DESTINATION TO directory;
  RESTORE ARCHIVELOG ALL;
  }
You do not have to use a particular configuration to use a cross-mounting scheme. However, for more information see the RMAN documentation.
To configure initialization parameters for cross-mounting for writing, create the same directory structure for the archived logs on every instance. For a three-node cluster, one of the entries is the local archived log destination, and the other two entries are for the remote archived logs.
For example, on UNIX, create the following directory structure on each node.
$ORACLE_HOME/admin/db_name//arc_dest1
$ORACLE_HOME/admin/db_name//arc_dest2
$ORACLE_HOME/admin/db_name//arc_dest3
Then use the following initialization parameter settings:
db1.LOG_ARCHIVE_DEST_1="LOCATION=?/admin/db_name//arc_dest1"
db1.LOG_ARCHIVE_DEST_2="LOCATION=?/admin/db_name//arc_dest2"
db1.LOG_ARCHIVE_DEST_3="LOCATION=?/admin/db_name//arc_dest3"
db2.LOG_ARCHIVE_DEST_1="LOCATION=?/admin/db_name//arc_dest2"
db2.LOG_ARCHIVE_DEST_2="LOCATION=?/admin/db_name//arc_dest1"
db2.LOG_ARCHIVE_DEST_3="LOCATION=?/admin/db_name//arc_dest3"
db3.LOG_ARCHIVE_DEST_1="LOCATION=?/admin/db_name//arc_dest3"
db3.LOG_ARCHIVE_DEST_2="LOCATION=?/admin/db_name//arc_dest2"
db3.LOG_ARCHIVE_DEST_3="LOCATION=?/admin/db_name//arc_dest1"
On Windows using shared drives, create the following shared drives on each node:
J:\
K:\
L:\
Use the following initialization parameter settings:
db1.LOG_ARCHIVE_DEST_1="LOCATION=J:\archivelogs"
db1.LOG_ARCHIVE_DEST_2="LOCATION=K:\archivelogs"
db1.LOG_ARCHIVE_DEST_3="LOCATION=L:\archivelogs"
db2.LOG_ARCHIVE_DEST_1="LOCATION=K:\archivelogs"
db2.LOG_ARCHIVE_DEST_2="LOCATION=L:\archivelogs"
db2.LOG_ARCHIVE_DEST_3="LOCATION=J:\archivelogs"
db3.LOG_ARCHIVE_DEST_1="LOCATION=L:\archivelogs"
db3.LOG_ARCHIVE_DEST_2="LOCATION=J:\archivelogs"
db3.LOG_ARCHIVE_DEST_3="LOCATION=K:\archivelogs"
Each instance writes archived logs to its local archive directory and to the remote directories.
/arc_dest1 is the local archived log destination for the instance. The other entries for /arc_dest2 and /arc_dest3 are the mount points for the archived logs for the instances on the second and third nodes.
/arc_dest1 is a mount point for the remote archived log on the first node, the second entry for /arc_dest2 is the local archived log directory, and the third entry for /arc_dest3 is a mount point for the remote archived log on the third node.
/arc_dest1 is a mount point for the remote archived log on the first node, the second entry for /arc_dest2 is a mount point for the remote archived log on the second node, and the third entry for /arc_dest3 is a mount point for the local archived log directory.
The production script for whole database backups from any node is:
BACKUP DATABASE PLUS ARCHIVELOG;
To only backup the archived logs and to delete them after the backup, use the following script:
BACKUP ARCHIVELOG ALL DELETE INPUT;
To restore and recover the whole database from any node, use the following script:
RESTORE DATABASE;
RECOVER DATABASE;
To only restore the archived logs if the remote archived log destinations are writable, enter:
RESTORE ARCHIVELOG ALL;
If the remote archived log destinations are not writable, then enter:
RUN
{
SET ARCHIVELOG DESTINATION TO directory;
RESTORE ARCHIVELOG ALL;
}
Where directory is the directory into which you copied the archived logs.
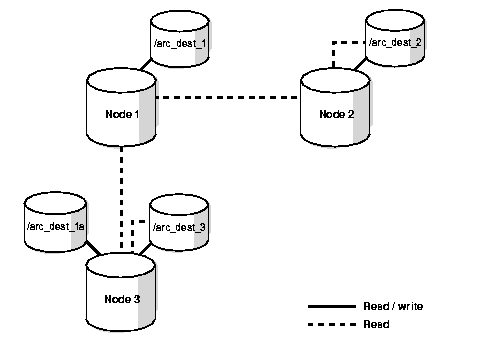
To configure RMAN to read two local archived log destinations, manually partition the archived logs. For example, if you do not use cross-mounting and you are backing up from Node 3, use a script similar to the following:
BACKUP
  (ARCHIVELOG LIKE '%/arc_dest3%')
  (ARCHIVELOG LIKE '%/arc_dest1a%')
  (ARCHIVELOG LIKE '%/arc_dest2%' CHANNEL Node 2);
In this case, the archived log destinations /arc_dest3 and /arc_dest1a are local to Node 3. Archivelog /arc_dest2 is backed up locally to Node 2. Change this script if you perform the backup from Node 2 to:
BACKUP
  (ARCHIVELOG LIKE '%/arc_dest2%')
  (ARCHIVELOG LIKE '%/arc_dest3a%')
  (ARCHIVELOG LIKE '%/arc_dest1%' CHANNEL Node 1);
Use the following script if you use cross-mounting:
BACKUP
  (ARCHIVELOG LIKE '%/arc_dest2%')
  (ARCHIVELOG LIKE '%/arc_dest3%')
  (ARCHIVELOG LIKE '%/arc_dest1%');
The cross shared cross writing with one local and n remote archiving scheme provides even greater reliability than the previous scheme. This is because each node writes to a local archived log file as well as to multiple remote log files as shown in Figure 6-4

Text description of the illustration racad005.gif
For the example in Figure 6-4, the archiving destinations are as shown in Table 6-1:
In this configuration, none of the nodes are single points of failure. As long as at least one node survives, complete recovery is possible. However, this scheme is limited for use on Real Application Clusters databases with no more than five nodes.
The configuration, backup, and restore scripts for this example are similar to the one remote archive logging scheme with cross-mounting, with added reliability.
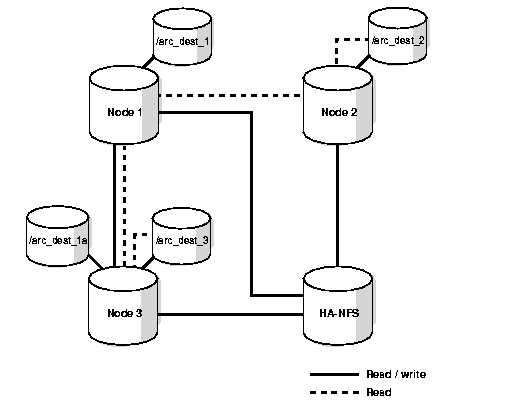
Configuring a central high availability NFS (HA-NFS) directory requires that each node mount the same destination device for archive logging as shown in Figure 6-5.
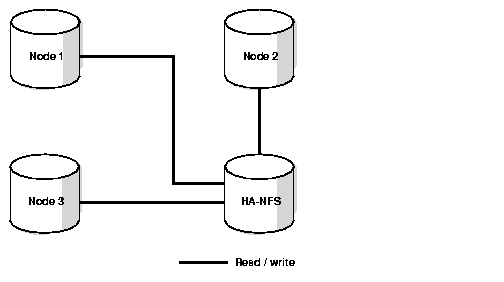
In this example, the archiving destinations are as shown in Table 6-2:
The only point of failure in this configuration is the HA-NFS node. If one or all of the other nodes fail, you can perform a complete recovery using the HA-NFS node.
The configuration, backup, and restore scripts for this example are similar to the one remote archive logging with cross-mounting scheme. You can distribute the archived log backup processing among the nodes, or perform it from one node.
For the greatest reliability, use a hybrid scheme that combines the advantages of the previous schemes. This enables you to reduce the number of or completely eliminate single points of failure. For example, you could implement HA-NFS and one remote logging with cross-mounting as shown in Figure 6-6.
Your configuration, backup, and restore scripts will vary according to your implementation.
To support cross-mounting reading and cross-mounting writing, you must rely on your operating system's capabilities. These capabilities vary as described in the following topics:
To use NFS, create one non-raw partition for each node and assign it to one node. Then create NFS mounts for all the the nodes so they can access all of the archived logs.
Exercise caution, however, when using NFS in Real Application Clusters environments. Hard NFS, which is the default, can block the entire cluster if the remote directories become inaccessible. This might occur as a result of a hardware failure. For this reason, Oracle Corporation strongly recommends that you use NFS implemented for high availability or soft-mounted NFS directories.
Soft mounting means that a process attempting to access the mounted directory is not blocked until the directory becomes available after a failure. Consult your vendor documentation because the commands to configure this are operating system-dependent.
On Solaris, for example, create a soft mounted directory using the following commands:
mount -F NFS -o soft,rw,retry=10,timeo=30 node1:
/ORACLE_HOME/admin/db_name//arc_dest1
/ORACLE_HOME/admin/db_name//arc_dest1
As mentioned, the optimal solution is to use NFS implemented for high availability. This solution uses the exported NFS directory stored on the shared disks of a cluster. One node is the primary node that is used to provide access to the archived log files. If this node fails, a failover process changes the access path to a backup node that also has access to the shared disks. If your hardware supports NFS for high availability, consult your vendor documentation to configure this feature.
To access remote archived log directories from your database, configure the OracleServicesid to start with a Windows NT and Windows 2000 account that has permission to write to this directory. Otherwise, attempts to write to the directory produce this message:
ORA-9291: sksachk: invalid device specified for archive destination.
Then use the following procedures to configure shared archived logs on Windows NT and Windows 2000:
db1, db2, and db3, and if drive letters J, K, and L are unused, assign these letters to the nodes as shown in Table 6-3:
Table 6-3 Example Letter-to-Node Assignment on Windows
| Node Name | Drive Letter |
|---|---|
|
|
|
|
|
|
|
|
|
Each partition is a local archived log destination for the instance running on that node. To configure this, assign the drive letter owned by that node to the partition. Continuing with the example in Step 1 on db1, create a partition named "J:", on db2, create a new partition named "K:", and so on. When you create each partition, also create a directory hierarchy called \archivedlogs as shown in Table 6-4:
| Node Name | Command |
|---|---|
|
|
|
|
|
|
|
|
|
net share db_name_logs=drive_letter:\
Using the variables db_name and drive_letter in the example commands for each node as shown in Table 6-5 where the database name is db:
| Node Name | Command |
|---|---|
|
|
|
|
|
|
|
|
|
net use \\node_name\db_name_logs drive_letter:
For this example, use the variables node_name, db_name, and drive_letter as in the following entries:
On db1, that has local drive J:, enter
net use \\db2\DB_logs K:
net use \\db3\DB_logs L:
On db2, that has local drive K:, enter:
net use \\db1\DB_logs J:
net use \\db3\DB_logs L:
On db3, that has local drive L:, enter:
net use \\db1\DB_logs J:
net use \\db2\DB_logs K:
|
|
 Copyright © 1996-2001, Oracle Corporation. All Rights Reserved. |
|