Release 1 (9.0.1)
Part Number A88807-01
Home |
Book List |
Contents |
Index | Master Index | Feedback |
| Oracle9i Data Guard Broker Release 1 (9.0.1) Part Number A88807-01 |
|
![]()
![]()
This chapter shows how to use Oracle9i Data Guard Manager to create, manage, and monitor a Data Guard configuration.
This chapter contains the following sections:
Start Data Guard Manager through the Oracle Enterprise Manager Console by taking the following steps.
Start the Oracle Management Server from the command-line prompt by entering the oemctl start oms command.
Launch Oracle Enterprise Manager at the command-line prompt by entering the oemapp console command. When the Enterprise Manager Console login dialog displays, you must select Login to the Oracle Management Server. Do not select Launch standalone, because Data Guard Manager will not be available from the Enterprise Manager Console if you select this option.
The Intelligent Agent must be running for Data Guard Manager to execute jobs and monitor events. Follow the directions in the Oracle Intelligent Agent User's Guide to configure and use the Intelligent Agent on the primary and standby nodes.
Run the Enterprise Manager Discovery wizard, also referred to as Discovery wizard to discover the primary and standby nodes and gain access to the databases that you want to configure and administer with Data Guard Manager. To invoke the Discovery wizard from the Enterprise Manager Console menu bar, select: Navigator > Discover Nodes
Follow the directions in the Discovery wizard. When finished, all discovered nodes and databases are displayed in the Enterprise Manager navigator tree:
You must set Preferred Credentials on both the primary and standby nodes to ensure Data Guard Manager can run Enterprise Manager jobs to create the configuration. To set Preferred Credentials from the Enterprise Manager Console menu bar, select: Configuration > Preferences > Preferred Credentials
Although setting Preferred Credentials for the databases is not required, you might want to set Preferred Credentials for the primary database and for the standby database if you are adding an existing standby database resource.
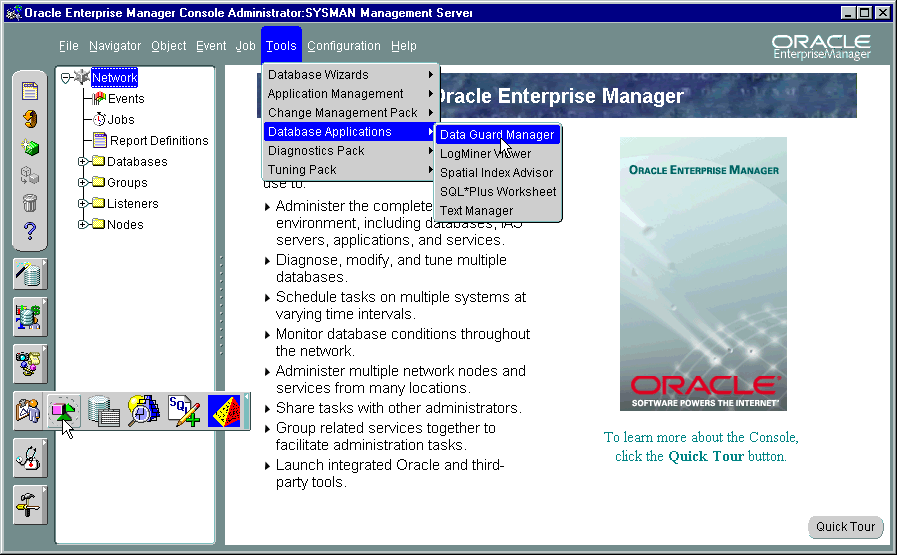
You can start Data Guard Manager from the Enterprise Manager Console or at the command-line prompt:
Figure 4-1 shows both methods of starting Data Guard Manager from the Enterprise Manager Console.
When launched, Data Guard Manager displays the informational page shown in Figure 4-2.
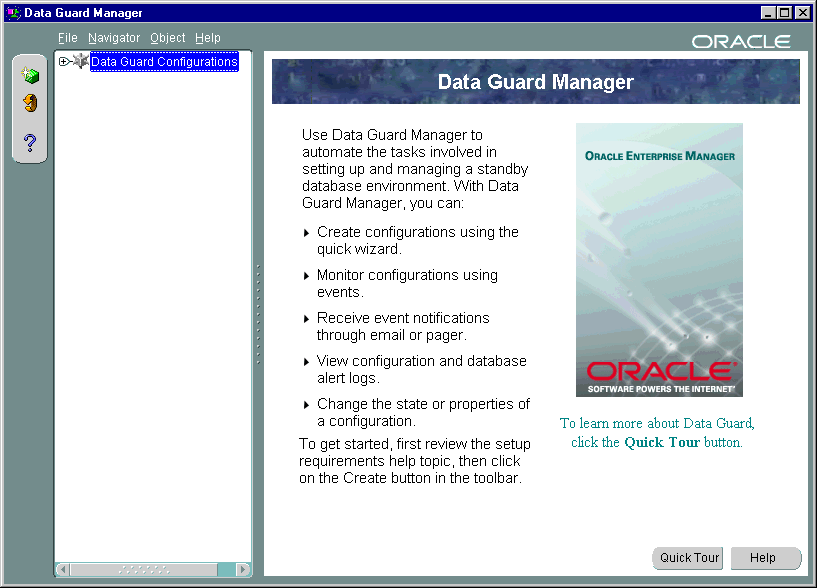
On this page, you can:
Creating a configuration is the first thing you must do before you can manage and monitor sites and resources. Data Guard Manager provides the Create Configuration wizard to create a configuration that includes a primary database and one standby database. To start the Create Configuration wizard, right-click Data Guard Configurations in the tree view and choose Create Configuration Wizard.
The wizard takes you through the following steps.
The following steps create a configuration in which a new standby database is created. It shows how to have the wizard use Oracle Recovery Manager (RMAN) to copy datafiles from the primary database to create the standby database.
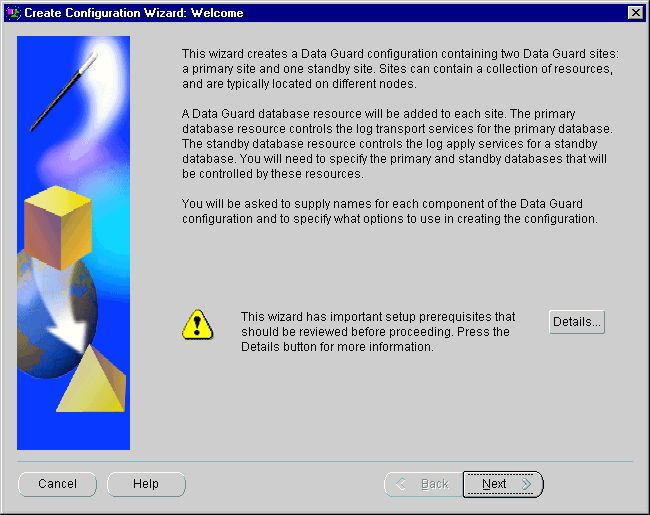
Before the Create Configuration wizard steps you through the process of creating a Data Guard configuration, you must ensure some basic configuration requirements have been met on the primary and standby nodes.
When you click Details on the wizard welcome page shown in Figure 4-3, Data Guard Manager provides a handy checklist of setup requirements and information to help you ensure the environment is properly prepared.
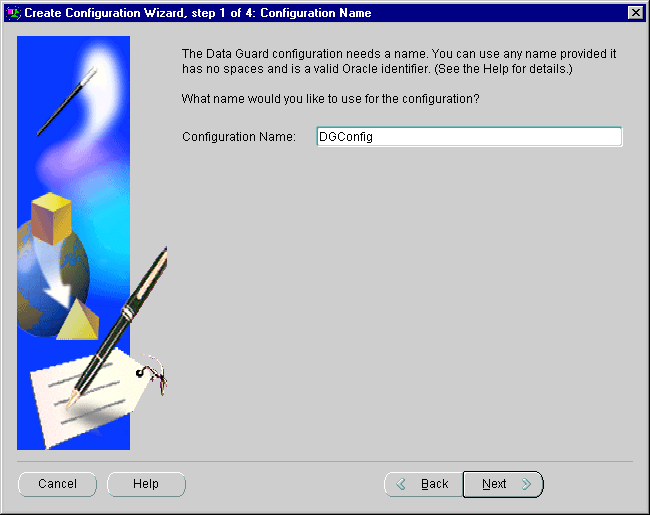
The next dialog asks you to provide the name of the new Data Guard configuration. Each configuration name must be an Oracle identifier that is unique among the configurations that you have created with Data Guard Manager.
Figure 4-4 shows the Configuration Name dialog in which a new configuration, DGConfig, is named.
The list of discovered database instances listed on this page contains all of the instances that have been discovered through the Enterprise Manager Console Discovery wizard. (These were discovered during the setup work performed in Section 4.1 in the step titled, "Discover the primary and standby nodes.")
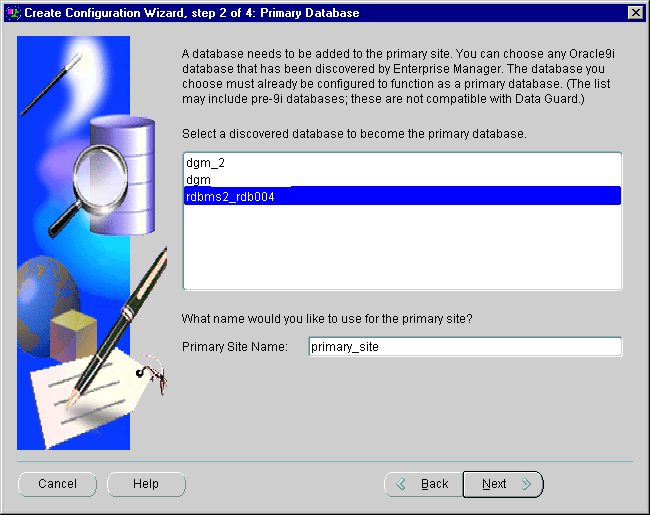
To select a primary database, select the Oracle9i database instance that you want to serve in the role of a primary database for this Data Guard configuration. The database instance that you choose must be release 9.0.1 or greater, and it must be a primary database, such that the CONTROL_FILE_TYPE in the V$DATABASE view must be equal to CURRENT.
The wizard allows you to create a new standby database or add an existing standby database.
This scenario will create a new standby database, as shown in Figure 4-6.
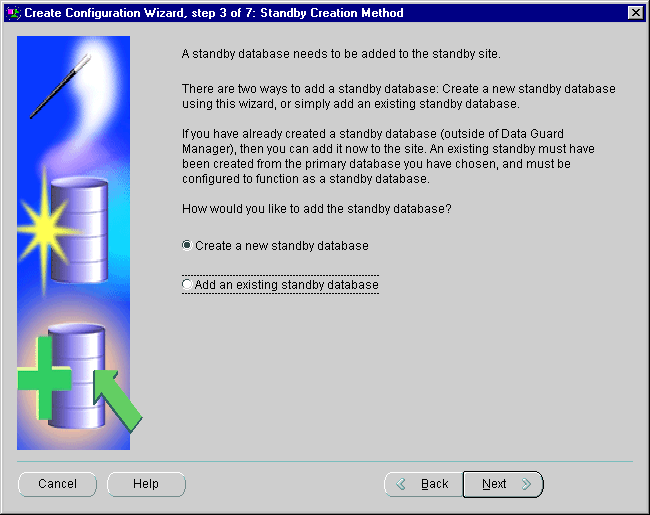
If you choose to add an existing standby database, the wizard displays a list of discovered database instances from which you select a standby database to import into the Data Guard configuration. The wizard prompts you to name the standby database and connects to that database.
If you choose to create a new standby database, the wizard takes you through the following additional steps:
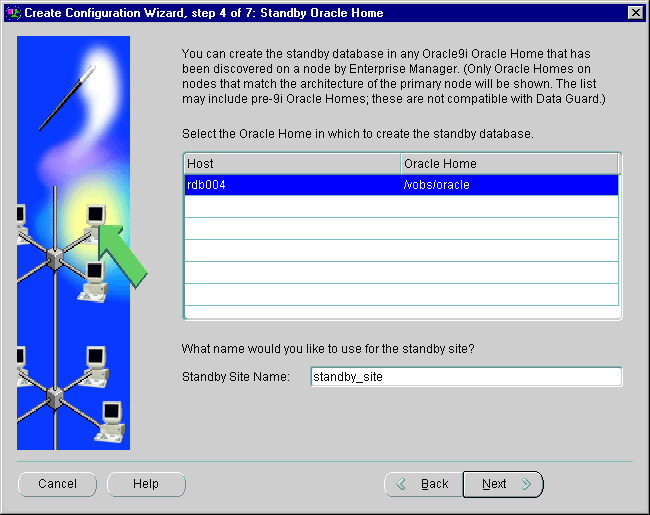
The wizard displays a dialog that lists all of the Oracle homes that have been discovered through the Enterprise Manager Discovery wizard. You must select a discovered Oracle home and provide a unique name for the standby site.
Figure 4-7 shows this step of the configuration process.
Part of the creation process involves copying the datafiles for the primary database to the standby node. The Data Guard Manager offers two different ways to do this: using the Oracle Recovery Manager (RMAN) or using the operating system (OS) method.
Figure 4-8 shows this step of the configuration process.
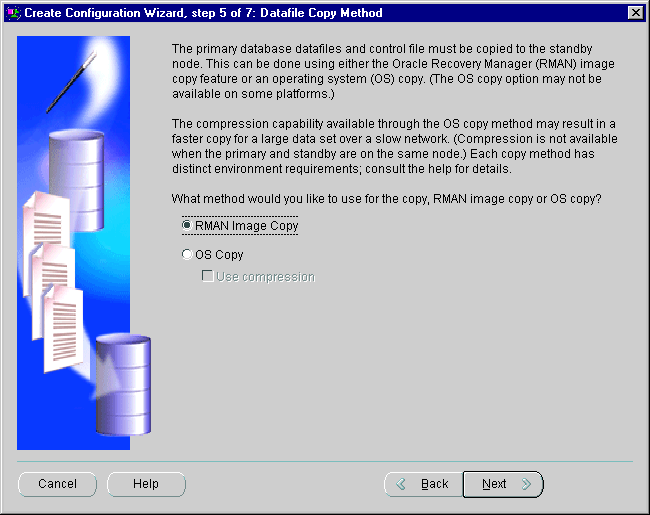
This scenario chooses the RMAN method because it is the default and it has the advantage of being available on all supported Oracle platforms. The operating system (OS) method is not available on all platforms and will be dimmed if it is not available.
When using the RMAN copy method, you must specify path name information for the network directory on the primary host, the destination directory on standby host, and the standby archived log file directory fields. (As you type the destination directory, the wizard assumes your directory structure will be the same on the primary and standby hosts and mirrors your input to the Standby archived log file directory field at the bottom of the page.)
Figure 4-9 shows this step of the configuration process.
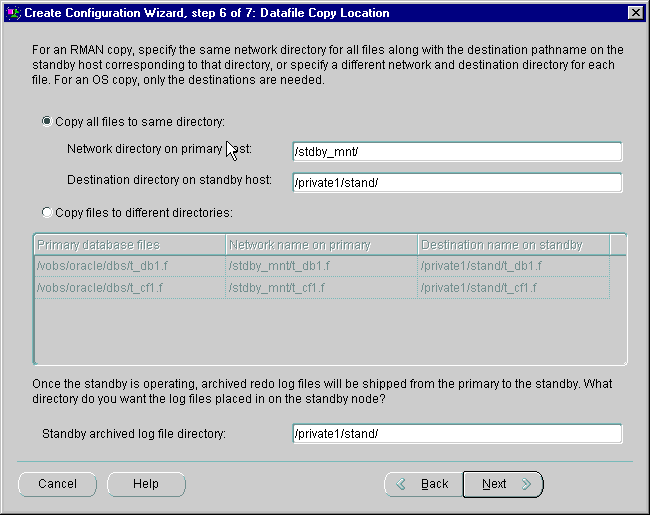
Figure 4-10 shows the Options dialog on which all values are set automatically.
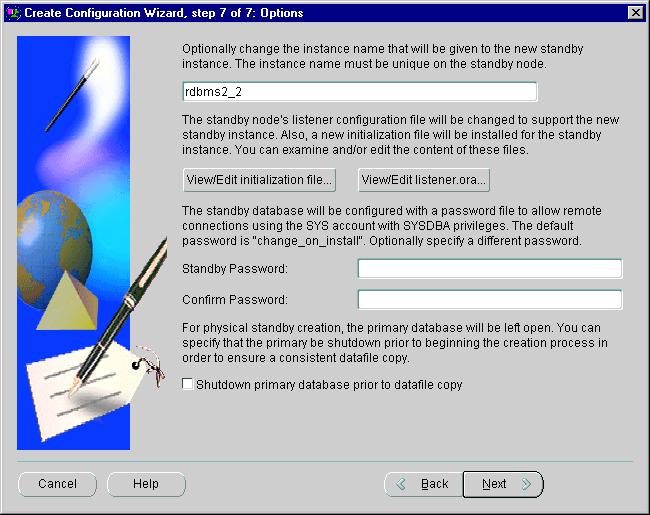
Although you do not have to provide any input, you can optionally make changes to any of its fields. Table 4-1 describes the default values for each field and includes comments about how the information is used.
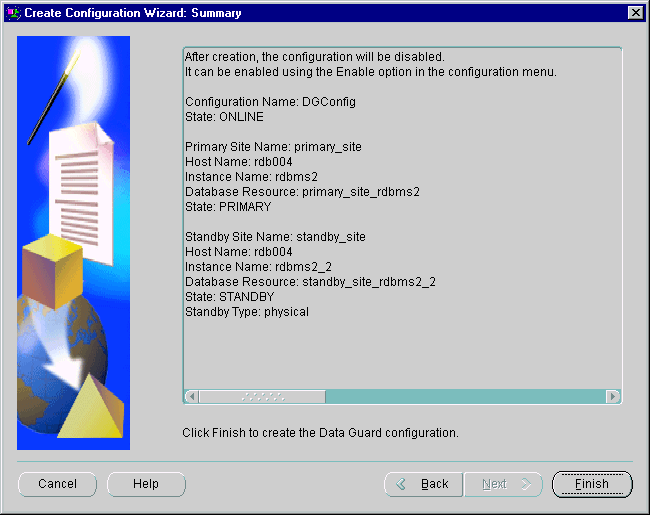
Next, the wizard provides a summary page on which you can verify the information that you provided as input. If you find an error or decide to rename something, click Back to move backward through the screens in the wizard. Otherwise, click Finish to begin creating the Data Guard configuration.
Figure 4-11 shows the summary page.
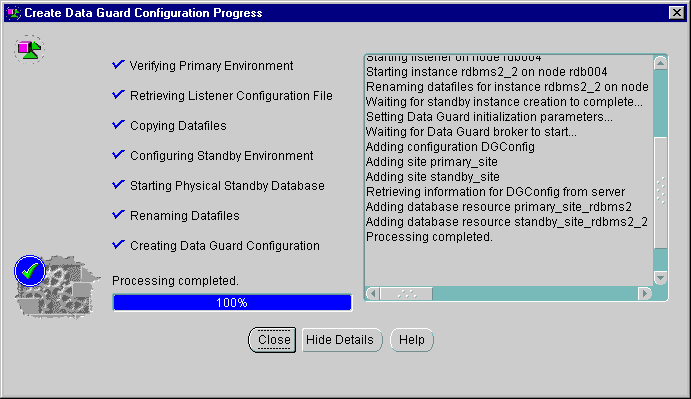
Data Guard Manager opens a dialog box (shown in Figure 4-12) to display the progress of the create operation after you finish providing input to the wizard. The progress information that is displayed varies depending on whether you are importing an existing standby database or creating a new standby database.
You can click Show Details to display detailed information as the operation proceeds. When you select this option, the progress dialog window expands and displays all of the output from the Data Guard log file. Click Hide Details to hide the right-hand pane.
Click Close when the create operation is done to close the progress dialog window and return control to the Data Guard Manager main window.
Figure 4-12 shows the progress dialog after the successful creation of the DGConfig configuration.
When the Create Configuration Wizard completes, a To Do list is displayed that describes some tasks that you must complete.
You access the new DGConfig configuration (created in Section 4.2) through the Data Guard Configuration Connect Information dialog box. You can connect through either the primary or the standby database.
To connect, double-click the configuration name in the tree view; this launches the Data Guard Connect Information dialog box shown in Figure 4-13.
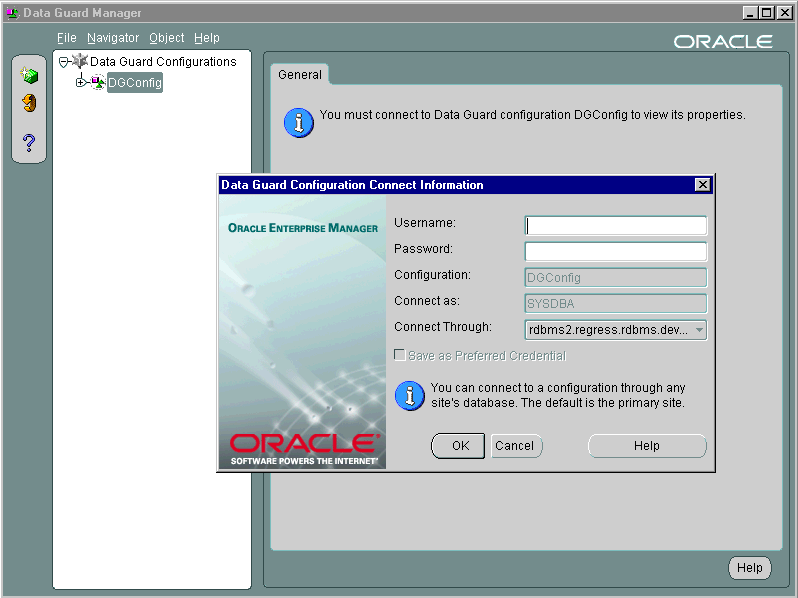
The connection must be made using an Administrator account that has SYSDBA privileges. You supply the following information in this dialog box:
When the configuration is first created, the configuration, site, and resource objects are disabled, which means that you cannot manage or monitor the objects because they are not under the control of Data Guard Manager.
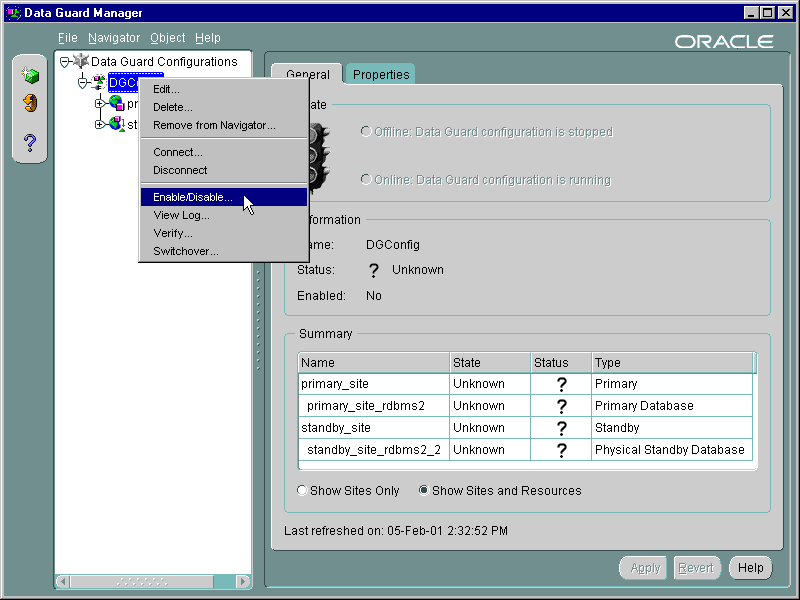
When you finish configuring the sites and resources and connect to a broker configuration, you must enable the configuration to allow the Data Guard monitor to manage the configuration, and to bring the primary and standby database systems online.
After the configuration is enabled the first time, you can subsequently enable or disable:
To enable the entire configuration, right-click the configuration and select Enable/Disable, as shown in Figure 4-14.
Data Guard Manager displays a progress dialog box as it enables the configuration. When processing completes, click Close in the progress dialog box to dismiss the progress dialog box and allow the enable operation to complete.
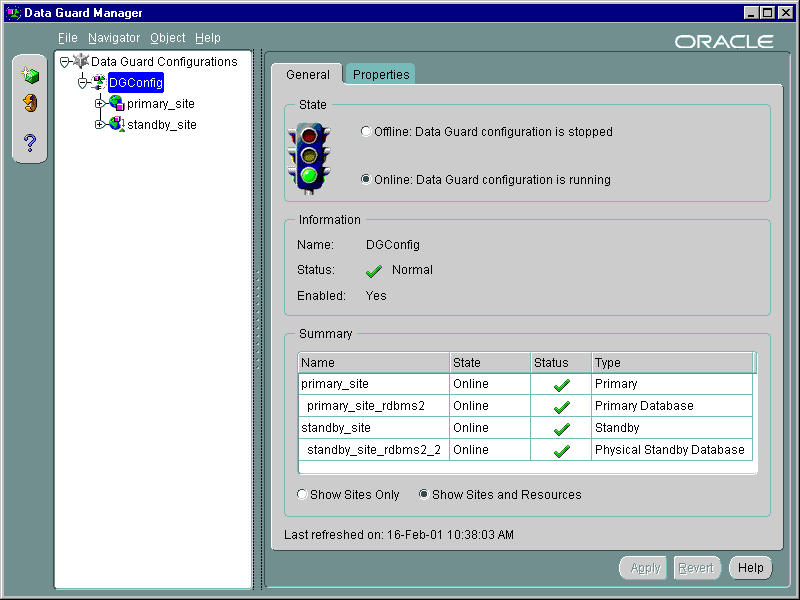
When processing completes, you should verify the configuration state and status information on the general property page.
For example, the state and status information in Figure 4-15 shows that the DGConfig configuration was successfully enabled. The operating state of the configuration, including its sites and database resources, has changed from unknown to online, and its normal status (checkmarks) verifies that the configuration is operating without errors or warnings.
Data Guard Manager can help simplify some of the routine maintenance tasks you must perform in the configuration. The following sections provide two examples: one shows how to take a site offline to replace a faulty disk drive and the other example dynamically changes an attribute of the LOG_ARCHIVE_DEST_n parameter.
This section describes how to take the standby database resource offline for the purpose of replacing a faulty disk drive.
To change the state of the standby database to be offline, follow these steps:
(If you were changing the state of the primary database to offline, you would also need to click Yes in the pop-up dialog box that displays to confirm that you want to change its state.)
When you change the state of the standby database to offline, the standby database instance will be put into a started, nomount state and log apply services will be stopped. This temporarily pauses the application of the archived redo logs to the standby database while you replace the faulty disk drive. (Note that log transport services continue to archive redo logs to the standby site.) After completing your maintenance tasks, you can follow the same sequence of steps to bring the database online again.
Figure 4-16 shows the General property page after you change the state of the standby database to offline.
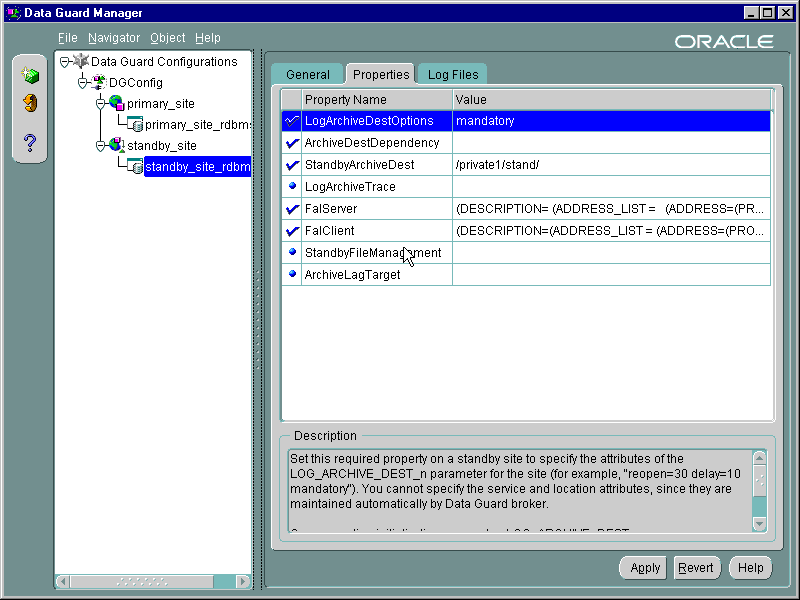
This section describes how to modify the LogArchiveDestOptions property.
Data Guard Manager automatically sets the critical properties for the standby database resource to a null value. Thus, when you created the DGConfig configuration with Data Guard Manager, the LogArchiveDestOptions critical property on the standby database was set automatically to a null value (LogArchiveDestOptions = ' ').
However, you can edit critical (and noncritical) properties at any time to tune your current environment. For example, suppose you want to edit the LogArchiveDestOptions property to specify the MANDATORY attribute. (The MANDATORY attribute of the LOG_ARCHIVE_DEST_n parameter requires a successful archival to the destination before an online redo log is available for reuse.) All you have to do is specify the attribute on the Properties page for the standby database resource. The new value overrides the current (null) value of the LOG_ARCHIVE_DEST_n parameter and also propagates the change to the primary site.
You can edit database resource properties if the configuration and its sites and databases are enabled, disabled, online, or offline. To edit the LogArchiveDestOptions property with Data Guard Manager, follow these steps:
LogArchiveDestOptions property.
MANDATORY.
When you edit a property, the new property value dynamically overrides the value of the parameter specified in the initialization parameter file, but it does not modify the contents of the file.
Figure 4-17 shows the Properties page for the standby database resource.
There may be occasions when you need to perform some operations outside of Data Guard Manager. For example, you might want to temporarily exit from Data Guard Manager so that you can use SQL statements to perform a switchover operation between the primary database and standby databases.
This section provides the steps you must do to exit the GUI, perform a switchover operation, and then return to managing the configuration with Data Guard Manager.
When you delete a configuration from Data Guard Manager, you remove all objects in the configuration from management and monitoring through the GUI. It does not affect the underlying operations of the primary and standby databases, log transport services, or log apply services. Operations such as log shipping and log applying continue to function. However, these services are no longer manageable through Data Guard Manager.
To delete the configuration, from the Data Guard Manager menu:
Data Guard Manager displays a warning and asks you to confirm the delete operation.
To exit from Data Guard Manager, choose File > Exit.
On both the primary and standby sites, stop the Data Guard monitor by setting the DRS_START=FALSE parameter using the SQL ALTER SYSTEM statement.
SQL> ALTER SYSTEM SET DRS_START=FALSE;
System altered.

SQL> SHOW PARAMETER DRS_START
NAME         TYPE      VALUE
------------------------------------
drs_start    boolean   FALSE
Follow the instructions in Oracle9i Data Guard Concepts and Administration for complete information using the SQL ALTER DATABASE COMMIT TO SWITCHOVER statement on both the primary and standby sites to perform a switchover operation.
|
Note: After performing this step, you should stop and restart the Intelligent Agent on both nodes to rediscover the nodes and databases. See Oracle Intelligent Agent User's Guide for additional information. |
Use the Create Configuration wizard and choose the Create Existing Standby option to create and enable the configuration based on the new primary and standby roles. (Follow the steps in Section 4.2 through Section 4.4.) Because the standby site is already created, you can use the Create Existing Standby method to create the standby database. This method takes only a few minutes to re-create the standby database.
Data Guard Manager provides the ability to monitor the status of a configuration as well as the redo log activity of the primary and standby databases.
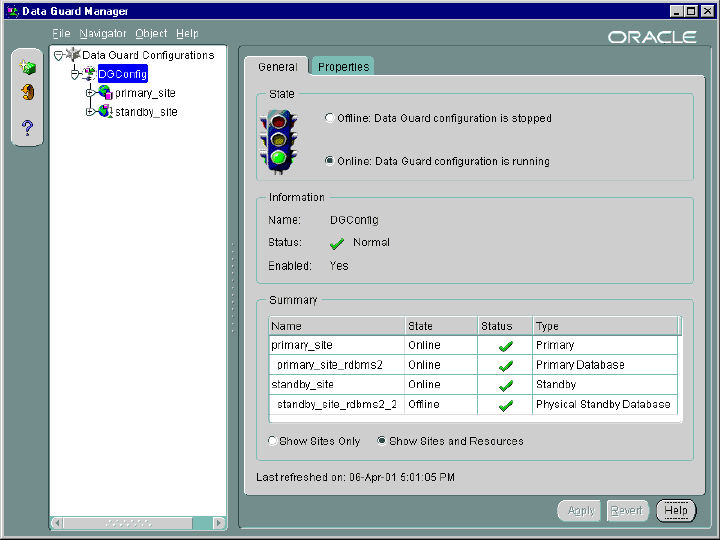
For example, Figure 4-18 shows general information for all of the objects in the DGConfig configuration.
The General tab for the Data Guard configuration not only displays information about the configuration, but it includes summary information about its sites and database resources. In Figure 4-18, for example, the summary information on the property page shows that the standby database is offline, while all other objects in the configuration are online and running with normal status. If you want to find out more information about why the standby database is offline, select the standby database resource in the tree view and view the database resource's property pages.
To ensure you are seeing the most current information, you should refresh the display often. To do this, either click the refresh icon on the toolbar or select Navigator > Refresh from the menu bar.
In addition to monitoring the status and log activity using Data Guard Manager, you can register event tests with Oracle Enterprise Manager to monitor the redo log activity on the primary and standby databases or monitor the status of the configuration as a whole.
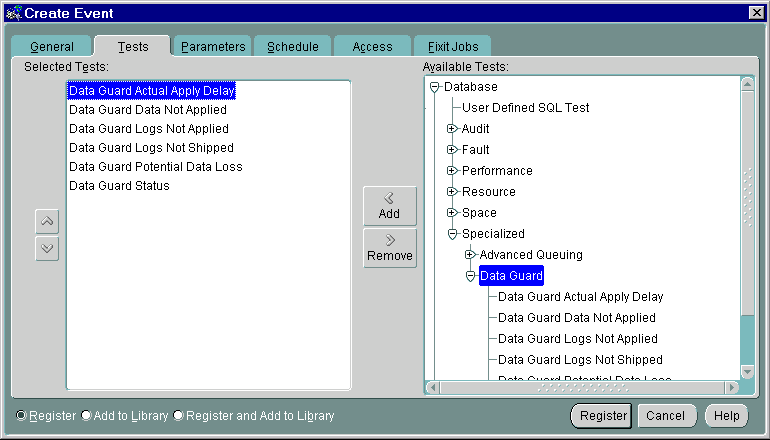
You can create events using predefined event tests that are installed with Data Guard. Table 4-2 describes the six Data Guard event tests.
Using the Enterprise Manager Event System, you can register one or more Data Guard event tests against both the primary and standby databases. You can also set up the Paging /Email Services to notify you through your pager or e-mail if any of the event tests are triggered.
In addition to registering the Data Guard event tests, consider registering the Node UpDown event test against each node where the Oracle Intelligent Agent is running. This event test monitors the node and the Intelligent Agent. Because the UpDown event test is triggered if any problems occur with the node or agent, it can be very beneficial in detecting problems that may prevent other event tests, including Data Guard event tests, from running.
The example in this section describes how to create and register Data Guard event tests and set up for notification through e-mail when an event occurs.
To prepare the Enterprise Manager environment for events, it is essential that you have performed the following prerequisite tasks:
If you want to receive event notification by pager or e-mail, invoke the Paging/Email Services to set up the SMTP mail gateway and mail address of the person who will receive the event notification. From the menu bar on the Enterprise Manager Console, invoke the Paging/Email Services by selecting: Configuration > Configure Paging/Email
From the menu bar on the Enterprise Manager Console, select:
Event > Create Event
Complete or modify the fields in the following Create Event system property pages:
Database > Specialized > Data Guard
For each event test that you want to create, select the test from the Available Tests view and click Add to move it to the Selected Tests list. In Figure 4-19, all of the Data Guard event tests have been selected.
When you have completed all of the Create Event property sheets, select Register and Add to Library option on the bottom left side and then click Register and Add to send the event to the selected destinations. This adds the event to the Library and saves the event definitions.
When the event is submitted, the primary and standby database destinations are validated and the Intelligent Agent for each destination processes the event.
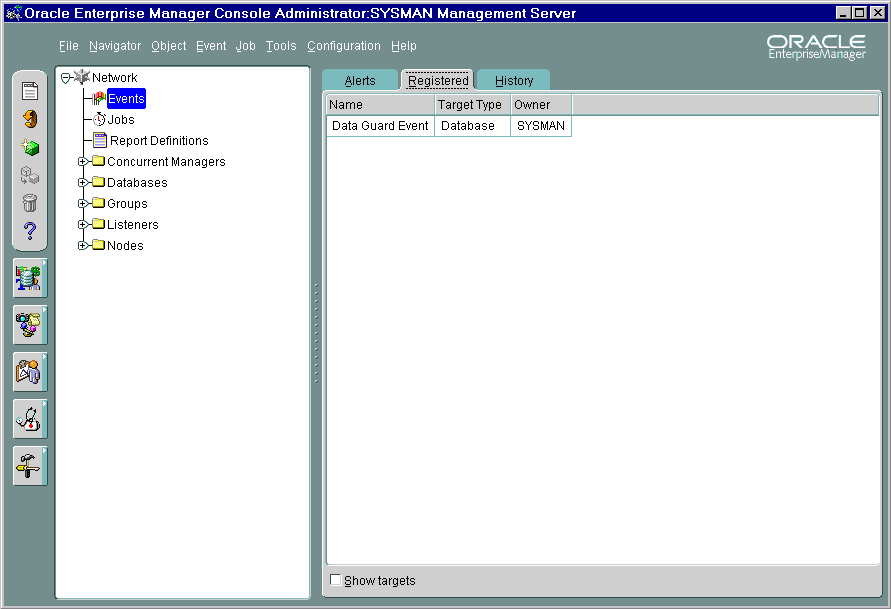
If the registration is successful, the event displays in the Registered page of the Events pane. For example, Figure 4-20 shows that the event named Data Guard Event was registered successfully.
If an event condition is triggered or a threshold value is exceeded, a notification is sent to the General page of the Events pane in the Enterprise Manager Console.
Figure 4-21 shows some Data Guard events that were triggered after log transport and apply stopped between the primary and standby databases.
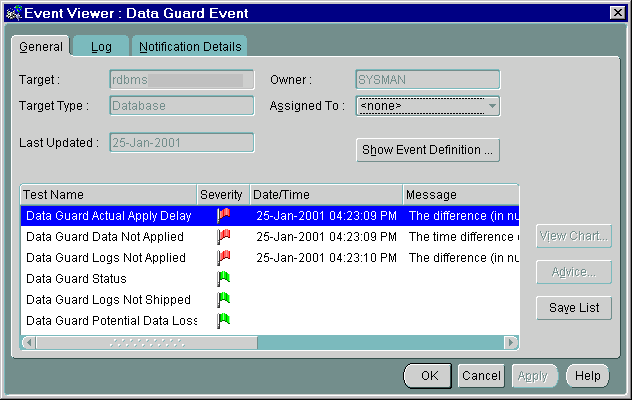
In Figure 4-21, notice how the events return a different flag symbol and message, depending on the severity of the event. The severity levels are determined by the parameters you set for the event tests when you created them. See the Oracle Enterprise Manager online help system for more information about the different symbols.
When running the Data Guard event tests, an error might occur for the following reasons:
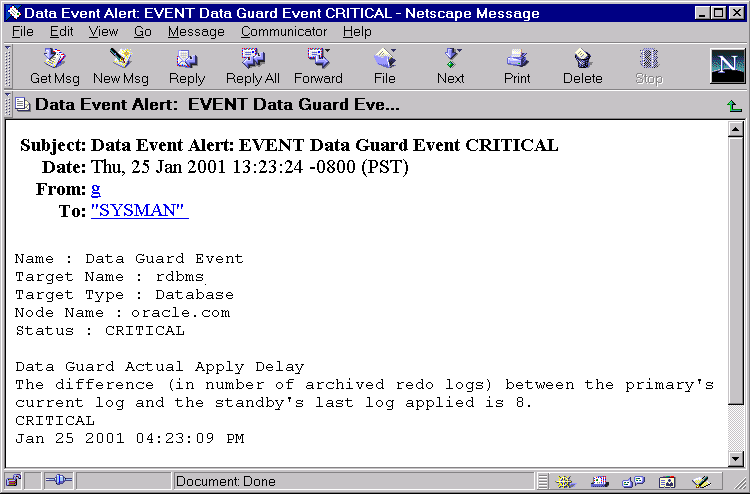
Because the Paging/Email Services was set up, DBAs are also notified by an e-mail message similar to the one shown in Figure 4-22.
After an event condition is fixed, the event is cleared automatically. You can also clear an event by acknowledging it and moving it to the Events History page.
|
|
 Copyright © 1996-2001, Oracle Corporation. All Rights Reserved. |
|