Release 1 (9.0.1) for Windows
Part Number A90164-01
Home |
Book List |
Contents |
Index | Master Index | Feedback |
| Oracle9i Database Administrator's Guide Release 1 (9.0.1) for Windows Part Number A90164-01 |
|
![]()
![]()
This appendix describes how to configure your system to store datafiles for tablespaces on raw partitions.
This appendix contains these topics:
Oracle Real Application Clusters require additional configuration tools. See Oracle9i Real Application Clusters Installation and Configuration for information on creating logical partitions and assigning symbolic links. Do not use this appendix to create partitions for Oracle Real Application Clusters.
Note:
In addition to storing datafiles for tablespaces on a file system, datafiles can also be stored on raw partitions.
A raw partition is a portion of a physical disk that is accessed at the lowest possible level. Input/output (I/O) to a raw partition offers approximately a 5% to 10% performance improvement over I/O to a partition with a file system on it.
A raw partition is created after generation of an extended partition and a logical partition. The Windows NT Disk Administrator application enables you to create an extended partition on a physical drive.
An extended partition points to raw space on the disk that can be assigned multiple logical partitions for the database files. An extended partition also avoids the four-partition limit by letting you define large numbers of logical partitions to accommodate applications using the Oracle database server. Logical partitions can then be given symbolic link names to free up drive letters.
Windows NT defines each disk drive found at startup with the following naming convention:
\Device\Harddiskm\Partitionn
where Harddiskm is the number of the physical drive, and Partitionn is a logical partition number. Harddiskm starts at 0, and Partitionn starts at 1.
Partition0 has a special meaning in that it has access to the whole disk. For example, the first logical partition (E:) on the second physical drive in the above figure has the following entry:
\Device\Harddisk1\Partition1
The first logical partition on a system (normally the C: drive) has the following entry:
\Device\Harddisk0\Partition1
Raw partitions are of two types:
A physical disk represents the entire disk and points to the following:
\Device\Harddiskx\Partition0
Windows NT automatically creates a symbolic link name of \\.\PhysicalDrivex, where x is the number corresponding to your hard disk drive number in the Disk Administrator. The x matches the x in \Device\Harddiskx\Partition0.
\\.\PhysicalDrivex is automatically defined by Windows NT for every hard disk in the computer. For example, a computer with three hard disks:
\\.\PhysicalDrive0
\\.\PhysicalDrive1
\\.\PhysicalDrive2
Internally, these names expand to the following:
\\.\PhysicalDrive0 = \Device\Harddisk0\Partition0
\\.\PhysicalDrive1 =\Device\Harddisk1\Partition0
\\.\PhysicalDrive2 =\Device\Harddisk2\Partition0
Partition0 is special, because it represents the entire physical disk regardless of any partitioning scheme on that disk. On all disks recognized by Windows NT, the Disk Administrator writes a signature on the first block of all disks. To avoid overwriting that block, Oracle skips the first block of a physical raw partition that is used for an Oracle datafile.
A logical partition is a partition created by the Disk Administrator that points to a drive other than \Device\Harddiskx\Partition0.
Logical partitions are initially assigned names with drive letters (\\.\drive_letter:) and typically re-assigned symbolic link names (\\.\symbolic link name). For example, \\.\D: may be assigned a symbolic link name of \\.\ACCOUNTING_1. Regardless of whether a drive letter or symbolic link name is used, logical partitions are defined to represent a specific partition in a disk rather than the entire disk. Internally, these names can expand to:
\\.\D:= \Device\Harddisk2\Partition1
\\.\ACCOUNTING_1= \Device\Harddisk3\Partition2
Drive letters can be assigned to specific partitions, using the Disk Administrator. Symbolic link names can, on the other hand, be assigned using a utility such as DOSDEV.EXE, which is available with the Windows NT Resource Kit.
Consider the following when deciding which raw partition to use:
Partition0.
Partition0), use the pre-defined physical raw names that Windows NT provides.
Question: What is the impact if I have created logical partitions, but defined physical disk convention names for them. For example:
\\.\PhysicalDriveACCOUNTING_1 = \Device\Harddisk2\Partition1
\\.\PhysicalDriveACCOUNTING_2 = \Device\Harddisk3\Partition1
Answer: The Oracle database handles the datafile using the physical disk convention even though it really is a logical partition. This will not cause any data corruption or loss as long as you continue to use the physical disk naming conventions. Oracle Corporation recommends that you convert to the logical partition at your earliest convenience. See "Compatibility Issues".
Question: What is the impact if I have created logical names representing Partition0? For example:
\\.\ACCOUNTING_1 = \Device\Harddisk1\Partition0
Answer: This poses severe problems, because the Disk Administrator typically writes a signature into the first block of every disk, and consequently may overwrite a portion of the datafile header.
This can also cause data loss. Never use Partition0 with the logical partition convention. See "Compatibility Issues" for information on rebuilding your Oracle database with the proper conventions.
Question: How do I transfer the contents of any raw partition to a standard file system for backup purposes?
Answer: Use the Oracle-provided OCOPY utility to copy data to/from a raw partition for both physical and logical raw conventions. See "Compatibility Issues" for further information.
The physical and logical partition conventions are not compatible with one another because of the extra block that is skipped for physical raw conventions. This also means you cannot simply use the OCOPY utility to copy from a physical disk to a logical partition, because the contents of these partitions are incompatible.
To convert from a physical convention to a logical convention, you must:
If your database installation uses physical disk conventions with logical partitions, Oracle Corporation recommends converting to the logical partition conventions at your earliest convenience, using the preceding steps.
Only one extended partition can be created for each disk. You can use the free space in the extended partition to create multiple logical partitions or use all or part of it when creating volume sets or other kinds of volumes for fault-tolerance purposes.
To create an extended partition:
The Disk Administrator window appears.
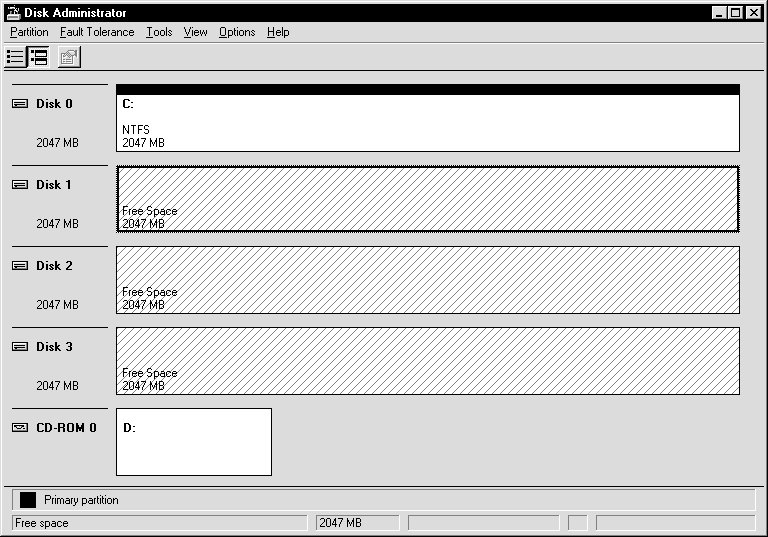
Note that the lines display diagonally from top right to bottom left, indicating unpartitioned devices.
Oracle Corporation recommends that you use the entire disk.
Disk Administrator displays the minimum and maximum sizes for the extended partition:
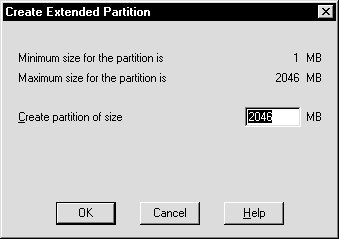
The extended partition is created.
Note that the lines now display diagonally from top left to bottom right, indicating the partition is an extended partition.
After an extended drive is created, you must assign logical partitions to it. Logical partitions are assigned letters of the alphabet.
To create logical partitions in an extended partition:
|
Note: Oracle Corporation recommends you do not create more than 120 logical partitions in an extended partition. |
The Disk Administrator window displays the minimum and maximum sizes for the logical partition.
The size depends on how large you want your datafiles to be. Add 2 MB to this size for overhead.
A confirmation dialog appears, informing you that changes have been made to the disk.
A dialog box appears, informing you that the disks have been updated successfully.
| Hard Disk Number | Partition Number Range |
|---|---|
|
Hard Diskx |
Partitions x-x |
|
Hard Diskx |
Partitions x-x |
Disk Administrator exits.
To create a tablespace using a datafile located in a raw partition:
C:\> sqlplus
Enter user-name: SYSTEM/password
where password is MANAGER for the SYSTEM user account by default. If you have changed this password, substitute MANAGER with the correct password.
SQL> CREATE TABLESPACE tablespace DATAFILE '\\.\datafile' SIZE xm;
where:
For example, to create a tablespace named accounting_1 that was assigned a symbolic link name of accounting_1, enter the following:
SQL> CREATE TABLESPACE accounting_1 DATAFILE '\\.\accounting_1 SIZE 502M;
|
|
 Copyright © 1996-2001, Oracle Corporation. All Rights Reserved. |
|