Release 1.0.2 for Sun SPARC Solaris
Part Number A86059-01
Library |
Contents |
Index |
| Oracle9i Application Server Oracle HTTP Server powered by Apache Performance Guide Release 1.0.2 for Sun SPARC Solaris Part Number A86059-01 |
|
![]()
![]()
This chapter describes utilities and processes you can use to gather information from your system. This information helps you to determine the best use of your resources.
Contents
To determine process utilization, you should gather CPU statistics. You should also monitor system scalability by adding users and increasing the system workload. Use utilities such as sar (System Activity Reporter) and mpstat to monitor process use.
You can use sar to sample cumulative activity counters in the operating system at specified intervals.
To determine process use, use the following sar command:
$ sar -u 5 5
This command samples CPU usage five times, in five second intervals, as shown below:
$ sar -u 5 5
SunOS dummy-sun 5.5.1 Generic_103640-03 sun4u    03/02/99

15:30:25    %usr     %sys     %wio      %idle
15:30:30      49       36        0         14
15:30:35      52       41        0          7
15:30:40      46       45        0          8
15:30:45      46       44        0         10
15:30:50      50       41        0          9

Average       46       41        0          9
The statistics above show that the CPU was only 9% idle for the given time interval. If your performance criteria specify that CPU usage must be below a certain percentage, you can use sar to sample usage at a chosen interval during peak load times.
The sar command (-u option) provides the following statistics:
The mpstat utility is similar to sar in that its first argument is the polling interval time in seconds. The second argument to mpstat is the number of iterations.
The mpstat command:
$ mpstat 1 3
reports three processor statistics in one second intervals. For example:
$ mpstat 1 3
CPU minf mjf xcal  intr ithr  csw icsw migr smtx  srw syscl  usr sys  wt idl
  0    1   0    0   268   64  148   11    0    0    0    33    3   5   0  92
  0    5   0    0   250   49  157   13    0    1    0   357    2   0   0  98
  0    0   0    0   247   47  134    8    0    0    0   326    0   0   0 100
The mpstat utility reports the statistics per processor, as shown in Table 2-2.
You can use network monitoring tools, such as snoop on Solaris or Network Monotor on Windows NT, to verify the status of a request as it is being transmitted across the network.
Following are examples of how you can use the snoop utility to examine network packets. Using snoop in conjunction with netstat provides a good picture of network activity.
You can use different command options to view packets captured in a file. For example, the command below displays the contents of the Gods file with timestamps relative to the first packet displayed.
prompt>snoop -i Gods -t r | more
Below is an example of using snoop to diagnose a suspected problem related to the FIN_WAIT_2 state:
prompt>snoop -i Gods | grep FIN
The first column of the output contains the packet numbers; you can get detailed information about a packet by typing:
prompt>snoop -i Gods -v -p<packet number>
A good reference source for the snoop utility is Solaris Performance Administration: Performance Measurement, Fine Tuning, and Capacity Planning for Releases 2.5.1 and 2.6 by H. Frank Cervone.
Monitoring is essential to performance tuning. The Oracle HTTP Server provides server side status information, including current server statistics, via the mod_status module. To obtain these server status reports, you must configure the web server as described below.
To enable monitoring, edit the httpd.conf file to replace your_domain.com with the hostname of the server you want to monitor.
<Location /server-status>your_domain.com
SetHandler server-status
Order deny, allow
Deny from all
Allow from
</Location>
Ensure that the ExtendedStatus directive is set to On, so that the maximum amount of information is displayed.
When you allow access from all domains, instead of just your_domain.com, you can monitor the server from machines outside of your domain, but be aware of the security implications of this: your server status is accessible from any site. It is probably best to specify the domain(s) from which you want to monitor your system.
With monitoring enabled, you can view current statistics from http://hostname:port/server-status. These statistics help you to gain insight on how busy your system is.
The display includes:
Figure 2-1 is a screen capture of a server status page with ExtendedStatus turned on.
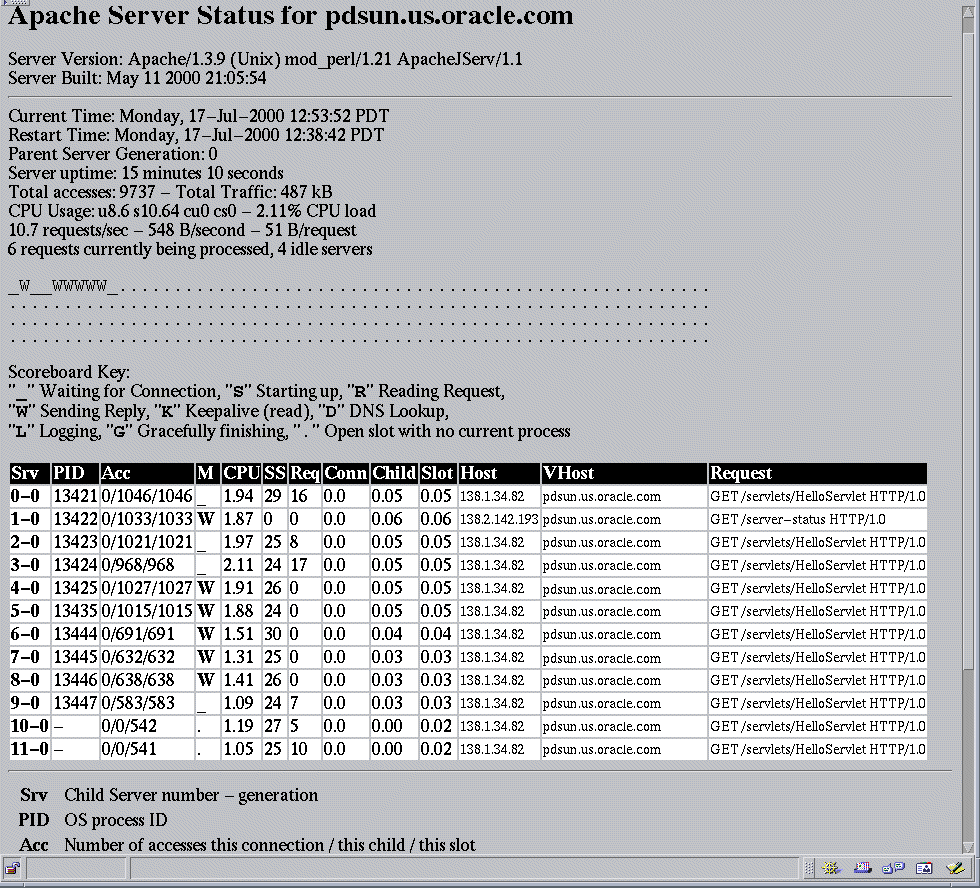
The display (with ExtendedStatus enabled) shows that 6 requests are being processed and four servers are idle. You can determine what stage of processing each server is in from the value in the M (Mode column). In Figure 2-1, 6 servers are sending replies and 4 servers are waiting for connections.
If your system has poor response times, or you suspect that httpd processes have stopped responding, look at the Req (request) column. It shows the number of milliseconds required to process the most recent request. Check to see if this number is greater than the time expected to service the request. If, after a request has been completed, there is a W in the M (mode) column for the process, the process is probably not responding.
Another situation that is important to monitor is that of the system being CPU bound, where CPU utilization is around 90%. The server status page displays CPU usage and the number of processes spawned. If the system is approaching the httpd process limit (the MaxClients directive's setting in httpd.conf), performance is poor, and the processes are all always busy, you may need to change your MaxClients setting. See "MaxClients".
Figure 2-1 is a snapshot of a server for a moment in time. You can get updated server statistics at any interval you choose by including the refresh parameter in the server-status URL:
http://servername:port/server-status?refresh=x
where x is an integer representing the number of seconds after which the data is refreshed. For example, specify refresh=3 to update statistics every 3 seconds.
You may also find it useful to have the statistics displayed in a machine-readable format, for processing in a data analysis or spreadsheet program. To do this, add auto to the end of the URL, as shown below:
http://servername:port/server-status?auto

The Apache Group provides a Perl script, logstatus.pl, to automate server monitoring. It is included in the $ORACLE_HOME/Apache/Apache/bin/ directory.
The script is designed to be run by cron (or an equivalent daemon that executes commands at intervals). To use the script, you must modify the following configuration variables:
Enabling server status is very useful if an httpd process is not responding, and you need to identify that process. Operating system utilities such as ps, top, or pmap do not identify which process is not responding.
For more information on mod_status, see:
http://www.oreillynet.com/pub/a/apache/2000/04/21/wrangler.html
http://www.apache.org/docs/mod/mod_status.html
After you start the Oracle9i Application Server, you can check to ensure that all JServ processes have started normally.
<Location /jserv/>
     SetHandler jserv-status
     order deny, allow
     deny from all
     allow from oracle.com
</Location>
http://hostname:port/jserv/
The port must be the port on which the web server listens (found in the httpd.conf file). Always include the trailing slash (/) in this URL. A "not found" error occurs if you omit the trailing slash.
A Configured Hosts column displays links to hosts.
The JServ status information for the host displays as shown in Figure 2-3.
|
Note: The JServ status monitor shows all of the JServ processes that are configured in the jserv.conf file, but not all of these may have been started. For example, Figure 2-3 shows four processes, but only two have a Status of Up (indicating that the process is able to service requests). |
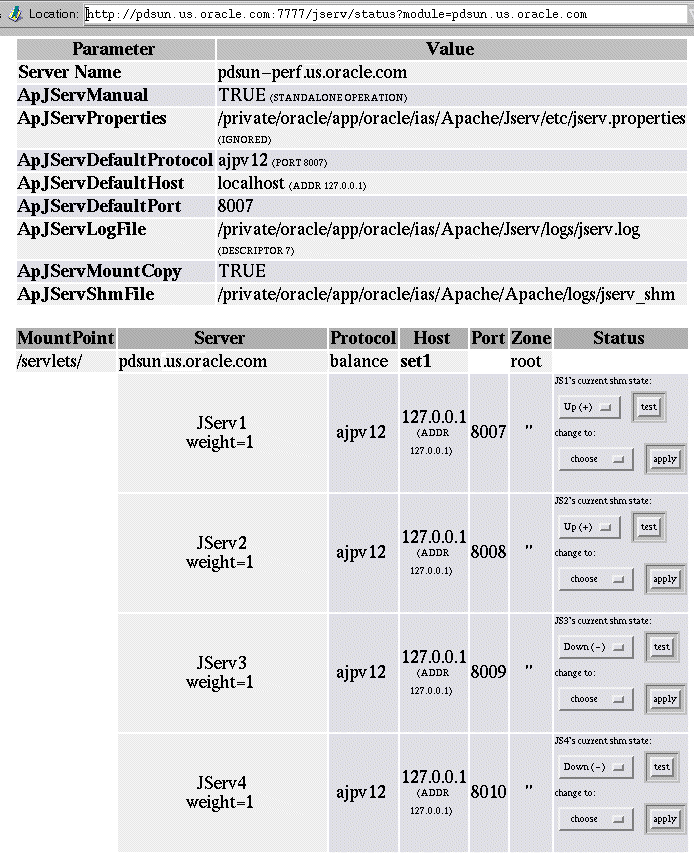
The Status column shows the current shared memory (shm) state of each process.
|
Note: The Status column is populated only for processes that are started in manual mode. It is not populated for a single process started in automatic mode. |
The symbols that appear in parentheses after the word Up or Down have the following meanings:
|
|
 Copyright © 2000 Oracle Corporation. All Rights Reserved. |
|