Release 8.1.6 for Windows NT
Part Number A82868-01
Library |
Contents |
Index |
| Oracle Transparent Gateway Microsoft SQL Server Administrator's Guide Release 8.1.6 for Windows NT Part Number A82868-01 |
|
![]()
![]()
This chapter explains how to install the gateway software from the distribution CD-ROM. This chapter includes the following sections:
Confirm that you have met all of the hardware and software requirements described in Chapter 1. You should also determine the configuration of the gateway components on the system, identify the machines on which the Oracle database server, the gateway, and the Microsoft SQL Server database reside, and verify the administration roles. Refer to the following sections:
Figure 3-1, "Gateway Component Configuration", is a system diagram that gives an example of one possible system configuration. To sketch your own system, first draw a box. This represents a single system. Next, for each component you wish to install on the system, draw a box inside the box representing your system. Label these boxes with their respective component names. Follow the same procedure to represent a second system.
Draw a line with an arrow on both ends between the two systems to represent communication between them. Draw a box or boxes to represent client applications, and draw a line between them and the Oracle database server to represent communications between the client applications and the Oracle database server. Label the machines on which the Oracle database server, the gateway, and the non-Oracle database reside.
Identify the machines on which Microsoft SQL Server and the Oracle database server reside and where the gateway will be installed. Write this information on the Installation Worksheet. After you determine the configuration and identify the machines, verify that the machines and the software meet the hardware and software requirements described in Chapter 1. The supported versions of Windows NT, Microsoft SQL Server database and communication software, and the Oracle database server must all be installed.
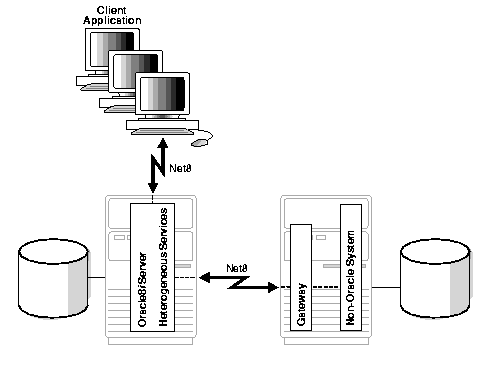
Figure 3-1, "Gateway Component Configuration", is a system diagram that gives an example of one possible system configuration. In this diagram, the Oracle8i database server, which includes Heterogeneous Services and the database files, resides on a single machine. Client applications access the server over Net8. The gateway and its respective non-Oracle system and database reside on a second machine. The two systems communicate over Net8 so that the Oracle database server accesses the non-Oracle system through the gateway.
Fill in the values on the following Installation Worksheet, so you can refer to it during the configuration process.
Install the Gateway software from the CD-ROM as follows:
Create the ORACLE_HOME directory where the gateway will be installed and write the value on the Installation Worksheet. The gateway installation should be under a new ORACLE_HOME. Do not install under an existing ORACLE_HOME that already has either the Oracle database server or one or more other Oracle products installed.
When you create the directory, use the version number as part of the path name to allow different versions of the gateway to be installed under one Oracle directory tree. For example:
c:\> mkdir oracle
c:\> mkdir oracle\gateway
c:\> mkdir oracle\gateway\8.1.6
Insert the CD-ROM into the CD-ROM drive, change directories to this drive, and start the Oracle Universal Installer. Assuming that the CD-ROM drive is D:, enter the following commands:
c:\> d:
c:\> setup.exe
The Oracle Universal Installer screens and the sequence in which they appear depend on the platform. Default values are selected for you and should be used unless you have reason to change them. Refer to Table 3-2, " Installation Prompts and Responses", as a guide to the installation. Follow the instructions in the Response column for each entry in the Screen column.
You can verify that the installation was successful after the Oracle Universal Installer confirms that the installation has been completed. Check the contents of the installation log file located in the following file, where orainventory_location is the directory in which OraInventory is located:
orainventory_location\logs\installActions.log
De-install the gateway as follows:
Only the files that were copied into the ORACLE_HOME directory during the gateway installation are removed when the gateway is de-installed. You must manually remove all other related files.
|
|
 Copyright © 2001 Oracle Corporation. All Rights Reserved. |
|