Oracle9i Application Server Installation Guide
Release 1.0.2.1 for Windows NT/2000

Part Number A88726-01

Library

Contents

Index

Go to previous page Go to next page

A
Configuration Tools

This appendix guides you through the steps required to run component-specific configuration assistants to configure Oracle9i Application Server. It contains instructions on manually launching, and running the following configuration assistants to configure the components you chose not to configure during installation:

Net8 Configuration Assistant

For information on running the Net8 Configuration Assistant, refer to the Net8 Administration Guide in your database documentation library.

Oracle9iAS Database Cache Configuration Assistant

Before you can run the Oracle9iAS Database Cache Configuration Assistant, you need to configure the ora_icache_origin service manually.

The tnsnames.ora in the ORACLE_HOME\network\admin directory has the following entry after installation:

ora_icache_origin =

(DESCRIPTION =
(ADDRESS_LIST =
(ADDRESS = 
   (PROTPCOL = TCP) 
   (HOST = ORIGINHostName) 
   (PORT = originPortNumber>))
     )
(CONNECT_DATA =
(SERVICE_NAME = originServiceName)
)
)

Fill in the origin host name, port and service name in tnsnames.ora file as per the above example before running the following command to launch the Oracle9iAS Database Cache Configuration Assistant:

prompt> ORACLE_HOME\bin\wtacca -create -typical

The following steps guide you through the Oracle9iAS Database Cache Configuration Assistant:
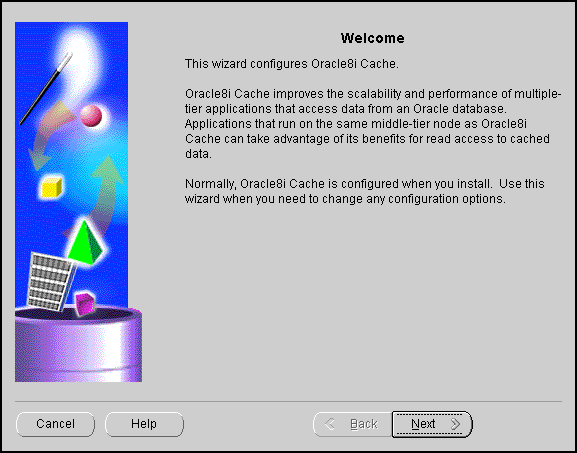
  1. Review the Oracle9iAS Database Cache Configuration Assistant welcome screen and click Next.

    Figure A-1 Welcome Screen


    Text description of n_cach1.gif follows.
    Text description of the illustration n_cach1.gif

    The Welcome screen introduces you to the Oracle9iAS Database Cache Wizard.
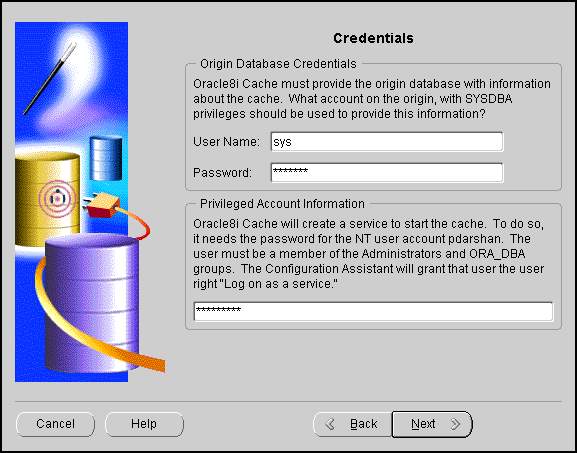
  2. Enter the privileged account information and click Next.

    Figure A-2 Origin Database Credentials Screen


    Text description of n_cach2.gif follows.
    Text description of the illustration n_cach2.gif

    The Origin Database Credentials screen specifies the database that is the original and primary storage for the data that you cache on the middle-tier node.
    • User Name: The name of a user on the origin database who has the SYSDBA role. This field defaults to the information you entered in the Origin Database User Information screen during installation.

    • Password: The password of the specified user. This field defaults to the information you entered in the Origin Database User Information screen during installation.

    • Privileged Account Information: The password for the Windows NT user who invoked the Configuration Assistant. If you enter a user name that is not valid or that does not have SYSDBA privileges, or if you enter an invalid password, the Configuration Assistant returns an error and allows you to enter another value.

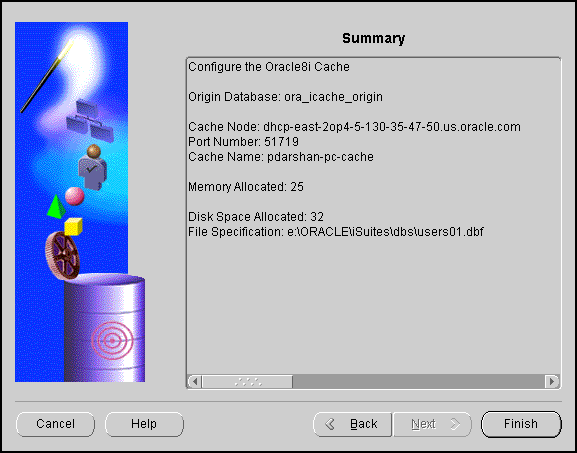
  3. Review the summary screen and click Finish to configure the cache.

    Figure A-3 Summary Screen


    Text description of n_cach3.gif follows.
    Text description of the illustration n_cach3.gif

    The Summary screen provides information about the origin database, cache node, port number, cache name, memory, disk space allocated and file specification.
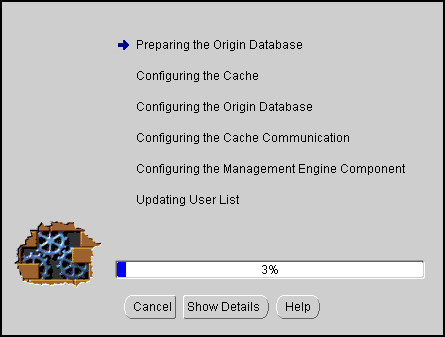
  4. Monitor the Configuration Assistant as it configures your cache.

    Figure A-4 Cache Configuration Assistant Progress Screen


    Text description of n_cach4.gif follows.
    Text description of the illustration n_cach4.gif

    The Cache Configuration Assistant Progress screen informs you of the results of the configuration.

    • Show Details: To display detailed result of the configuration.

Oracle9iAS Portal Configuration Assistant

The following command launches the Oracle9iAS Portal Configuration Assistant:

prompt> ORACLE_HOME\assistants\opca\launch.bat

The following steps guide you through the Oracle9iAS Portal Configuration Assistant:
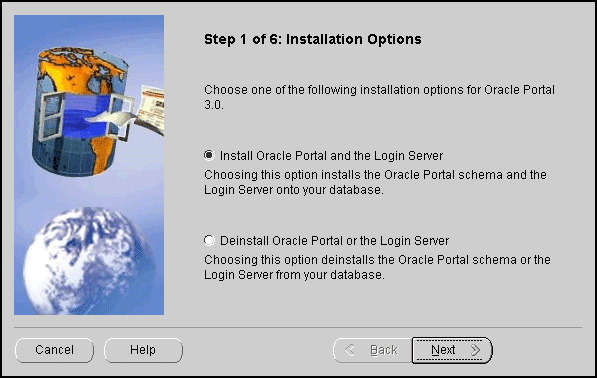
  1. Choose the first installation option to install Oracle9iAS Portal and the Login Server and click Next.

    Figure A-5 Installation Options Screen


    Text description of n_port1.gif follows.
    Text description of the illustration n_port1.gif

    The Installation Options screen allows you to install and deinstall Oracle9iAS Portal. Selecting "Install Oracle9iAS Portal and the Login Server" installs the Oracle9iAS Portal schema and the Login Server onto your database.
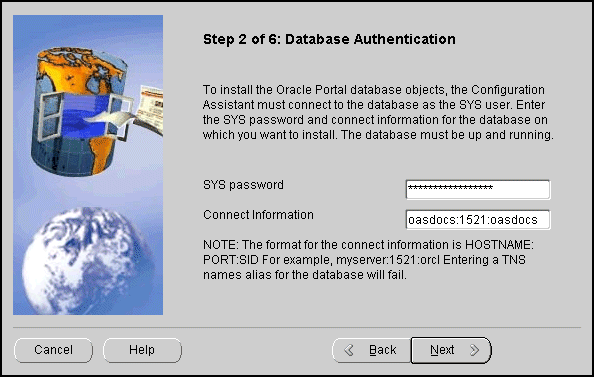
  2. Enter the database connection information and click Next.

    Figure A-6 Database Authentication Screen


    Text description of n_port2.gif follows.
    Text description of the illustration n_port2.gif

    The Database Authentication screen allows you to specify the database connection information granting the Configuration Assistant database access to install the Oracle9iAS Portal database objects.


    Note:

    Be sure to connect, and store objects in the origin database or any Oracle8i database that you have access to. Otherwise you will get an error stating that the sys user is locked. 


    • SYS Password: Enter the SYS password for the database on which you want to install Oracle9iAS Portal database objects. When an Oracle database is created, the user SYS, identified by the password CHANGE_ON_INSTALL, is automatically created and granted the DBA role.

    • Connection Information: Enter the connect information in the following format: HOSTNAME:PORT:SID

      Example: oasdocs:1521:oasdocs

      where hostname is the domain name and machine where you want to install Oracle9iAS Portal, port is the port number on which the Oracle8i database is running, and SID is the database name which uniquely identifies a node's instance.
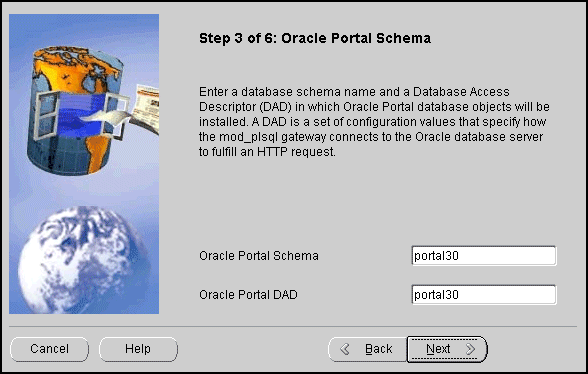
  3. Enter the Oracle9iAS Portal Schema and Oracle9iAS Portal DAD names, and click Next.

    Figure A-7 Oracle9iAS Portal Schema Screen


    Text description of n_port3.gif follows.
    Text description of the illustration n_port3.gif

    Oracle9iAS Portal Schema screen allows you to enter the Schema and DAD name. These must match the Oracle9iAS Portal Schema and DAD name you entered during the installation process on the Apache Listener Configuration for Oracle9iAS Portal (DAD and Schema name) screen. The default is portal30.
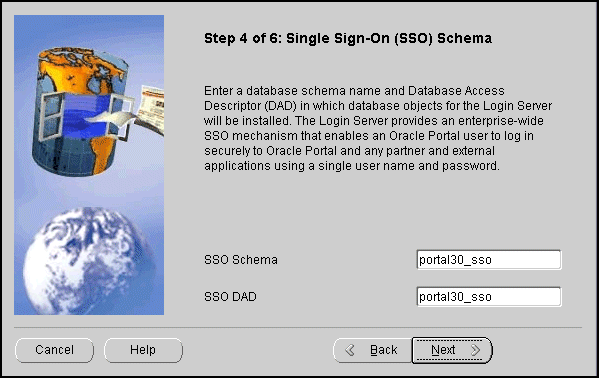
  4. Enter the SSO Schema and SSO DAD names for the Login Server, and click Next.

    Figure A-8 Single SIgn-On Schema Screen


    Text description of n_port4.gif follows.
    Text description of the illustration n_port4.gif

    Single Sign-On Schema screen allows you to enter the SSO Schema and DAD name. These must match the SSO Schema and DAD name you entered during the installation process on the Apache Listener Configuration for Oracle9iAS Portal (Login Server) screen. The default is portal30_sso.
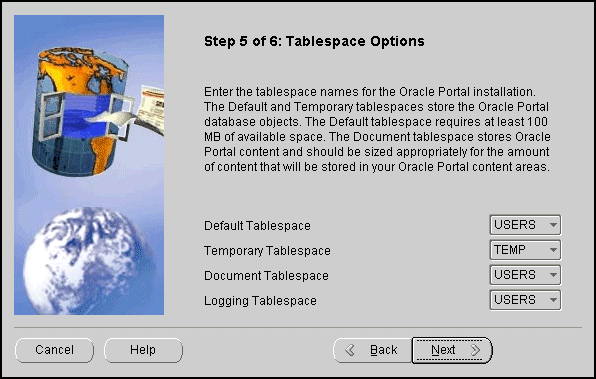
  5. Enter the tablespace names for Oracle9iAS Portal installation. Click Next.

    Figure A-9 Tablespace Options Screen


    Text description of n_port5.gif follows.
    Text description of the illustration n_port5.gif

    Tablespace Options screen allows you to enter the tablespace names for Oracle9iAS Portal. Choose from the list of tablespaces. For more information, refer to Table A-1.
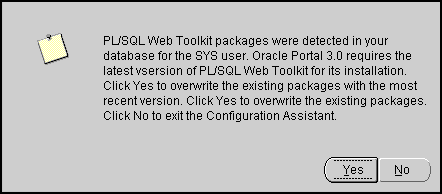
    Table A-1 Tablespace Options
    Field  Description 

    Default Tablespace 

    Used to store any database objects or components created by the Oracle9iAS Portal user.
    Required minimum: 100 MB 

    Temporary Tablespace 

    Improves the concurrence of multiple sort operations, reduce their overhead, or avoid Oracle space management operations altogether. Used for the creation of temporary table segments for operations performed by the Oracle9iAS Portal user such as sorting table rows. 

    Document Tablespaces 

    Used to store any items uploaded onto an Oracle9iAS Portal content area. These item types can include files, images, folders, and stored procedures.

    Note: The Document Tablespace will gradually fill as users add items to Oracle9iAS Portal content area. You should choose a tablespace large enough to accommodate these additions or a tablespace that automatically extends itself. Size the document tablespaces according to the planned size of your content areas. 

    Logging Tablespace 

    Name of the tablespace where the logs are stored. These contain logging information such as end user requests for components and information about the time of the request, the end user who made the request, the machine and browser that was used, and when an Oracle9iAS Portal developer created or last edited the component. Additional logging information includes database storage allocated to users, objects, and tablespaces, memory allocation, object creation dates, objects created during a given time span, rollback segment attributes, session locks, redo logs, and DBMS jobs. 

  6. Determine if you want to overwrite or keep the existing PL/SQL Web Toolkit packages. Click Yes or No accordingly.

    Figure A-10 PL/SQL Web Toolkit Screen


    Text description of n_port6.gif follows.
    Text description of the illustration n_port6.gif

    PL/SQL Web Toolkit screen appears only if the configuration assistant detects that PL/SQL Web Toolkit packages already exist on your machine. Click Yes to overwrite the existing packages, or click No to keep the existing PL/SQL Web Toolkit packages.

    Note:

    Oracle9iAS Portal requires the latest version of PL/SQL Web Toolkit packages. If you are unsure if your existing packages are compatible with PL/SQL Gateway, click Yes to install the correct version. 


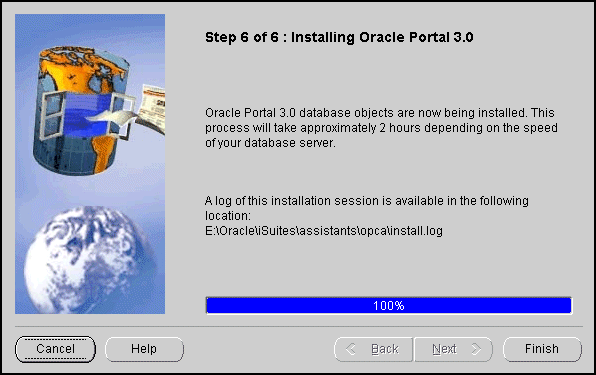
  7. Monitor the progress of the configuration assistant as the database objects are installed.

    Figure A-11 Installing Oracle9iAS Portal Screen


    Text description of n_port7.gif follows.
    Text description of the illustration n_port7.gif

    Installing Oracle9iAS Portal screen displays a database objects installation progress bar. Please be patient and refrain from using your machine while this is underway. This process may a take long time to complete.
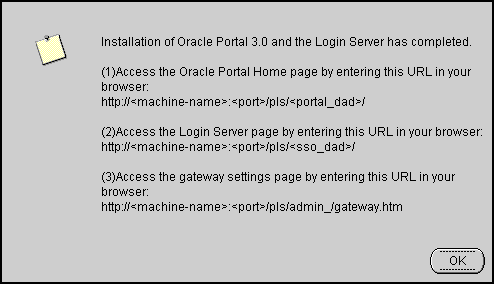
  8. Make note of the information, and click OK.

    Figure A-12 Summary Screen


    Text description of n_port8.gif follows.
    Text description of the illustration n_port8.gif

    Summary screen appears at the end of installation. It reveals information about accessing the Oracle9iAS Portal Home page, Login Server page and the gateway settings page. For your convenience, make note of this information before clicking OK.

  9. An installation session log that describes the actions performed and the components installed is created. You can check the log file for ORA and PLS errors that may have occurred during installation. The log file is located in the following locations:

    ORACLE_HOME\assistants\opca\install.log


Oracle Database Configuration Assistant

The following command launches the Oracle Database Configuration Assistant:

prompt> ORACLE_HOME\bin\DBAssist.bat

The Oracle Database Configuration Assistant creates a database that is used as a container for Oracle Enterprise Java Engine. The following screen appears as the configuration assistant creates the database:
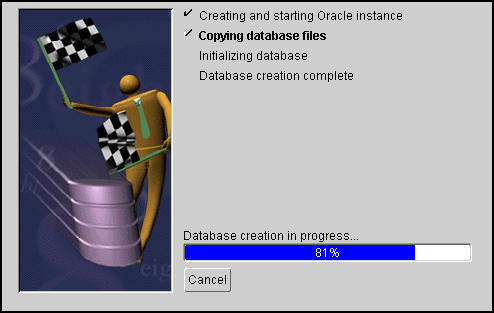
Figure A-13 Oracle Database Configuration Assistant Screen


Text description of n_dbca.gif follows.
Text description of the illustration n_dbca.gif

Oracle Database Configuration Assistant does not require any user input. Once the database creation process ends, the following screen appears.
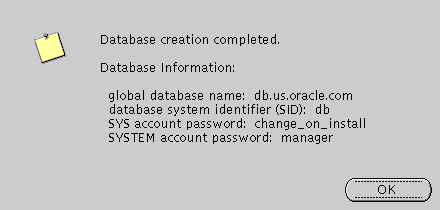
Figure A-14 Database Information Screen


Text description of dbconf.gif follows.
Text description of the illustration dbconf.gif

The Database Information screen displays database information such as global database name, database SID, SYS account password, and SYSTEM account password. Make a note of this information and click OK. You have completed the database creation process.

Oracle Internet File System Configuration Assistant

The following command launches the Oracle Internet File System Configuration Assistant:
prompt> ORACLE_HOME\ifs1.1\bin\ifsconfig.bat


Note:

Be sure that the origin database is running to store the Oracle Internet File System schema. You must have a TNS name that maps to that database instance.  


The following steps guide you through the Oracle Internet File System Configuration Assistant:

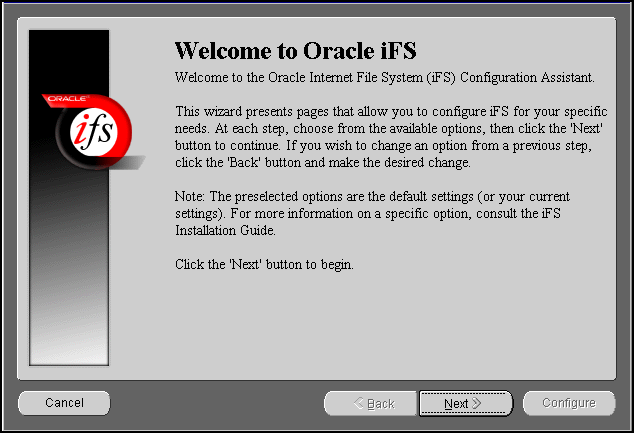
  1. Review the Welcome screen and click Next.

    Figure A-15 Welcome Screen


    Text description of n_ifs1.gif follows.
    Text description of the illustration n_ifs1.gif

    The Welcome screen introduces you to the Oracle Internet File System Configuration Assistant and allows you to review the licensing agreement before you can proceed to configure Oracle Internet File System.
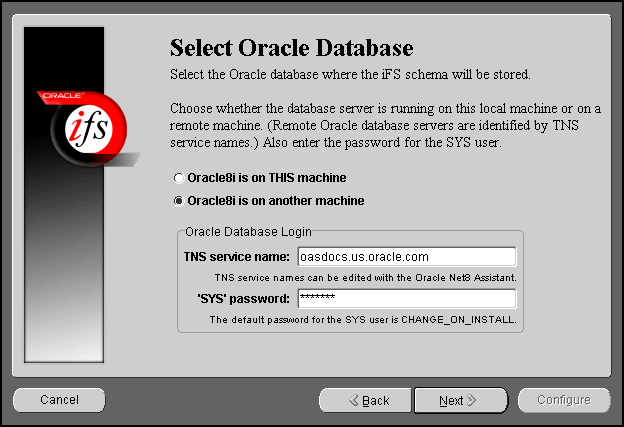
  2. Select the database to store Oracle Internet File System, and click Next.

    Figure A-16 Select Oracle Database Screen


    Text description of n_ifs2.gif follows.
    Text description of the illustration n_ifs2.gif

    Select Oracle Database screen allows you to choose where the Oracle Internet File System schema will be stored. Select whether the origin database is on the local machine or on the remote machine other than the Oracle Internet File System server machine currently being configured.


    Note:

    Be sure to connect, and store objects in the origin database or any Oracle8i database that you have access to. Otherwise you will get an error stating that the sys user is locked. 


    If you select Oracle8i on THIS machine, then you will have to fill in the SYS password field.

    If you select Oracle8i on another machine, then you will have to enter the TNS service name and the SYS password in their respective fields.

    If an error occurs, you will be required to correct the database connection information before continuing.
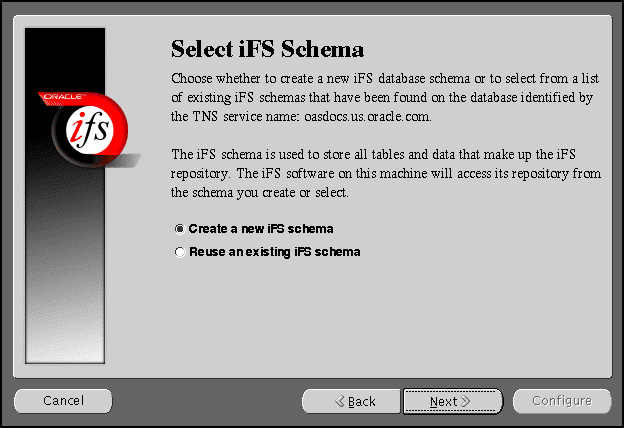
  3. Choose to create a schema or reuse an existing one, and click Next.

    Figure A-17 Select IFS Schema Screen


    Text description of ifsn1.gif follows.
    Text description of the illustration ifsn1.gif

    The Select iFS Schema screen allows you to either create a new iFS schema or select from a list of existing iFS schemas that have been found on the database identified by the TNS service name you specified.


    Note:

    If you are migrating from Oracle9i Application Server, Release 1.0.2.0, then you should re-use the existing schema. 


    If you select "Create a new iFS schema", then click Next to proceed with the instructions provided.

    If you select "Reuse an existing iFS schema", then click Next. The following screens will appear:

    1. Select Existing iFS Schema screen: This screen informs you of all the existing iFS schemas found on the database identified by the TNS service name you specified. Select an existing schema from the menu and enter its password, and click Next.

    2. Set iFS Options screen: This screen allows set various iFS options. Set the necessary options, and click Next.

    3. Configure iFS Email screen: This screen provides you with options to configure your iFS email. Select the necessary options, and click Next.

    4. Configuring iFS screen: This screen displays the various configuration tasks. Click Cancel to stop the configuration.

    5. iFS Configuration Completed screen: This screen appears when the configuration completes. It prompts you to run the ifssetup script as an admin user. The script is located in the ORACLE_HOME\ifs1.1\bin directory. This script will configure your system for Oracle Internet File System email, if this option was selected.

    6. Perform the following steps to configure Oracle HTTP Server:

      Stop Oracle HTTP Server from Services in the Control Panel.

      Run the following script:

      prompt> ORACLE_HOME\ifs1.1\bin\ifsapachesetup


      Be sure to run this script as the user who owns the Oracle software.

      Restart Oracle HTTP Server from Services in the Control Panel.

    7. Restart the Oracle Internet File System using the ifsstart script.

    You have completed configuring Oracle Internet File System.
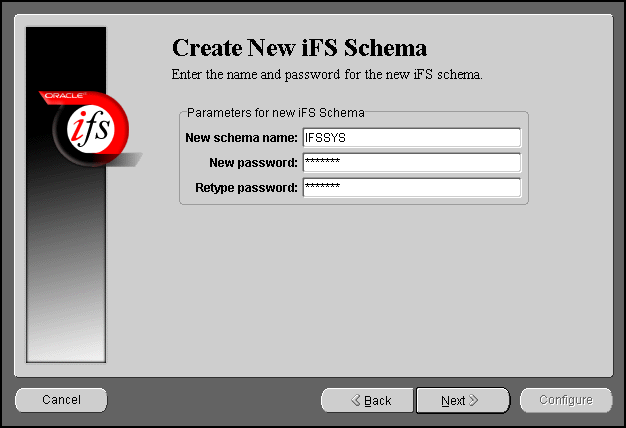
  4. Enter an Oracle database username and password for a new schema, and click Next.

    Figure A-18 Create New iFS Schema Screen


    Text description of n_ifs4.gif follows.
    Text description of the illustration n_ifs4.gif

    Create New iFS Schema screen allows you to specify an Oracle database username and password for the new schema.

    • New Schema Name: Enter the Oracle database username for the new schema. The default username is ifssys.

    • New Password: Enter the password for the Oracle database user for the new schema.

    • Retype Password: Re-enter the new schema user password for confirmation.

    If you choose to create a new schema with the same name as an existing schema, a warning message appears. Creating a new schema with the same name as an existing schema will drop the existing schema.
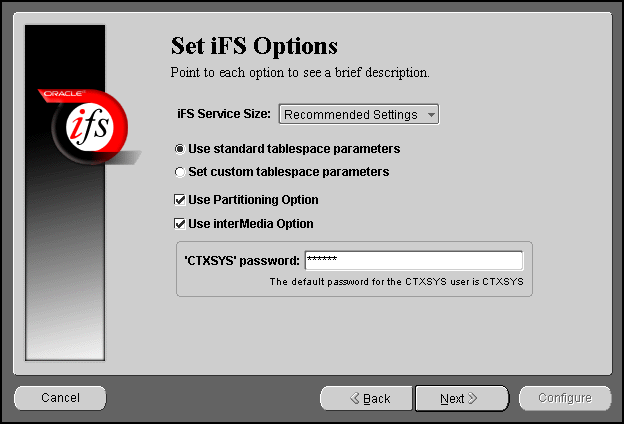
  5. Set the necessary Oracle Internet File System options, and click Next.

    Figure A-19 Set iFS Options Screen


    Text description of n_ifs5.gif follows.
    Text description of the illustration n_ifs5.gif

    Set iFS Options screen allows you to set certain schema options and to select a service size for your Oracle Internet File System server. There are two choices for the Oracle Internet File System server size:

    • Minimum requirements

    • Recommended settings

    If you are creating a new Oracle Internet File System schema, then you can choose whether to use standard tablespace parameters, or to specify custom tablespace parameters.

    • Standard Tablespaces: By default, the Oracle Internet File System configuration creates six tablespaces used to store the data in the Oracle Internet File System schema. The database files for these tablespaces are placed in the same location (on the database machine) as the SYSTEM tablespace, which is usually found under ORACLE_HOME\oradata\global_dbname. Oracle recommends storing each of these tablespaces on separate disks for best performance.

      - Primary: Stores metadata for documents. information about users and groups, and other Oracle Internet File System data.

      - Non-Indexed Medias: Stores the LOB data for documents that are not indexed by interMedia, such as image, audio, and video files.

      - Indexed Media: Stores the LOB data documents that are indexed by interMedia, such as text and word processing files.

      - interMedia Index: Stores the Oracle indexed on interMedia data.

      - interMedia Keymap: Stores the mapping between interMedia Text information and Oracle Internet File System information.

      - interMedia Data: Stores the interMedia data about Oracle Internet File System documents.

    • Custom Tablespaces: Choosing the custom tablespaces option displays six additional pages where the custom tablespace information can be entered. These pages allow experienced database administrators to create customized tablespaces for Oracle Internet File System or to select existing tablespaces.

      - Partioning Option: Improves performance. Available only with Oracle8i Enterprise Edition.

      - interMedia Option: If you have installed interMedia Text, then select this option to use interMedia Text for searching document contents.

      - CTXSYS: If you choose the interMedia Text option, then enter the password for the interMedia CTXSYS account. The default password is CTXSYS.

    If you have chosen to use interMedia Text, the Configuration Assistant will verify the interMedia configuration when you click the Next button. If an error occurs. then you will not be able to choose the interMedia Text option unless you rectify the error.
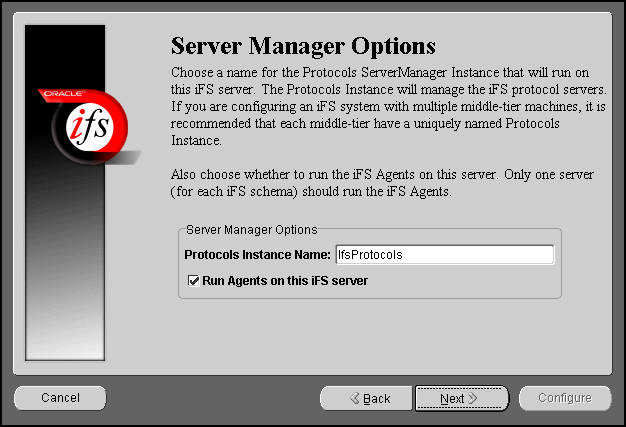
  6. Enter the Protocol Instance Name, and click Next.

    Figure A-20 Server Manager Options Screen


    Text description of n_ifs6.gif follows.
    Text description of the illustration n_ifs6.gif

    Server Manager Options screen allows you to enter a name for the Protocols Server Manager Instance that will run on this Oracle Internet File System server.
    • Protocol Instance Name: Enter the Protocols Server Manager Instance name that will run on this Oracle Internet File System server. The Protocols Instance will manage the Oracle Internet File System protocol servers. If you are configuring an Oracle Internet File System system with multiple middle-tier machines, then it is recommended that each middle-tier have a uniquely named Protocols Instance.

    • Run Agents on This iFS Server: Choose whether to run the Oracle Internet File System Agents on this server. Only one server for each Oracle Internet File System schema should run the Oracle Internet File System Agents.

  7. Select the default character set and indexing language, and click Next.

    Figure A-21 Language Options Screen


    Text description of n_ifs7.gif follows.
    Text description of the illustration n_ifs7.gif

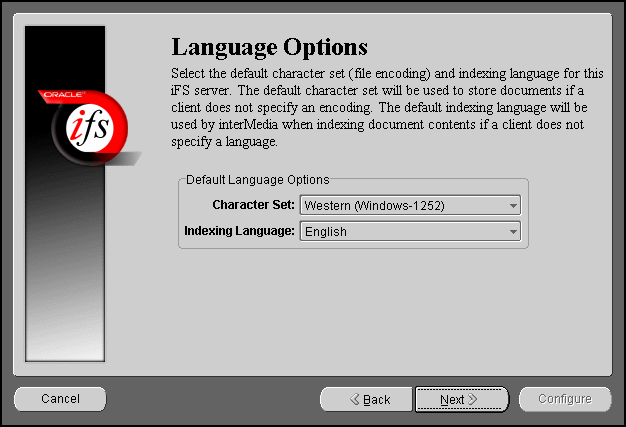
    Language Options screen allows you to select the Character set and indexing language for this Oracle Internet File System server.
    • Character Set: Select the default character set (file encoding). The default character set will be used to store documents if a client does not specify an encoding.

    • Indexing Language: Select the default indexing language. The default indexing language will be used by interMedia when indexing document comment contents if a client does not specify a language.

  8. Select the required Oracle Internet File System protocol serves, and click Next.

    Figure A-22 Select iFS Protocol Servers Screen


    Text description of n_ifs8.gif follows.
    Text description of the illustration n_ifs8.gif

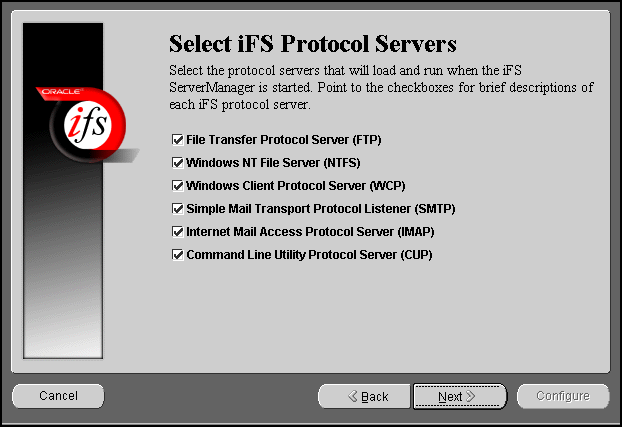
    Select iFS Protocol Servers screen allows you to select the protocol servers to configure for this Oracle Internet File System server. The following protocol servers are available:
  9. Select the port numbers for the Oracle Internet File System protocol servers, and click Next.

    Figure A-23 Set iFS Protocol Server Ports Screen


    Text description of n_ifs9.gif follows.
    Text description of the illustration n_ifs9.gif

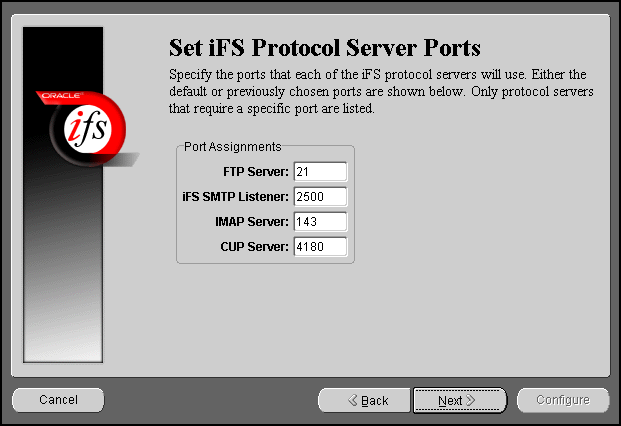
    Set iFS Protocol Server Ports screen allows you to set port numbers for the protocol servers you selected in the previous screen. The following is a list of protocol servers and their default port numbers:

    • FTP Server: Port 21

    • SMB Server: Port 139 (not configurable)

    • iFS SMTP Listener: Port 2500

    • IMAP Server: Port: 143

    • CUP Server: Port 4180

    When you click the Next button, the port availability on your computer is tested. If a port is already in use, a warning screen appears. A common port conflict can arise because the standard Solaris installation includes a FTP server on port 21, which conflicts with the Oracle Internet File System FTP server. You must resolve such conflicts before starting the Oracle Internet File System protocol servers.
  10. Enter your Oracle Internet File System Email Domain, and click Next.

    Figure A-24 Configure iFS Email Screen


    Text description of n_ifs11.gif follows.
    Text description of the illustration n_ifs11.gif

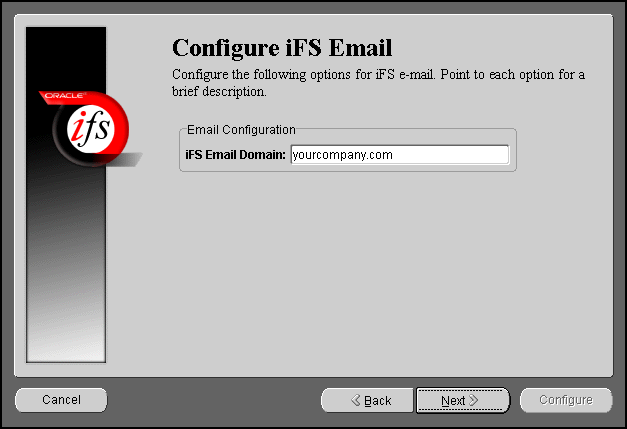
    Configure iFS Email screen allows you to enter the iFS Email domain.
    • Use NIS for iFS Email: Click on the check box to use NIS (Network Information System) for your Oracle Internet File System email package.

    • iFS Email Domain: Enter the default email domain for the users you will create on your Oracle Internet File System server. This option is available only if you are creating a new Oracle Internet File System schema.

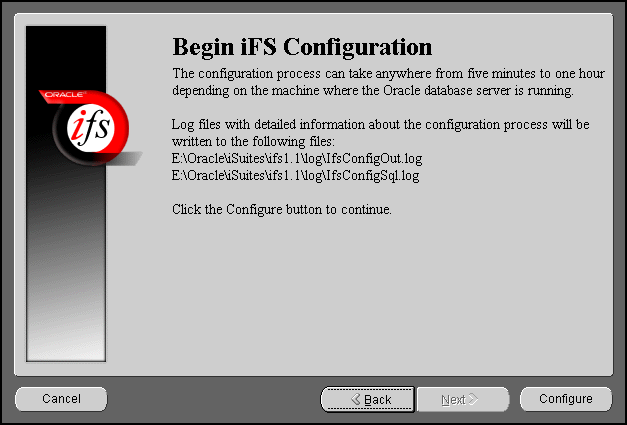
  11. Review the screen and click Configure to begin the Oracle Internet File System configuration process.

    Figure A-25 Begin iFS Configuration Screen


    Text description of n_ifs12.gif follows.
    Text description of the illustration n_ifs12.gif

    Begin iFS Configuration screen informs the users of the configuration process, and displays the location for the log files.

    Once you have started the configuration process, a progress window appears. indicating the progress of the Oracle Internet File System configuration. If an error occurs, check the log files that are displayed on the Begin iFS Configuration screen.

  12. A dialog box appears noting that the configuration was successfully completed. Run the ifssetup script as an admin user.

    The script is located in the ORACLE_HOME\ifs1.1\bin directory. This script will configure your system for Oracle Internet File System email, if this option was selected.

  13. Perform the following steps to configure Oracle HTTP Server:

    1. Stop Oracle HTTP Server from Services in the Control Panel.

    2. Run the following script:

      prompt> ORACLE_HOME\ifs1.1\bin\ifsapachesetup


      Be sure to run this script as the user who owns the Oracle software.

    3. Restart Oracle HTTP Server from Services in the Control Panel.

    4. Restart the Oracle Internet File System using the ifsstart script.

    You have completed configuring Oracle Internet File System.

Oracle Management Server Configuration Assistant

The following command launches the Oracle Enterprise Manager Configuration Assistant:

prompt> ORACLE_HOME\bin\emca.bat

The following steps guide you through the Oracle Enterprise Manager Configuration Assistant:
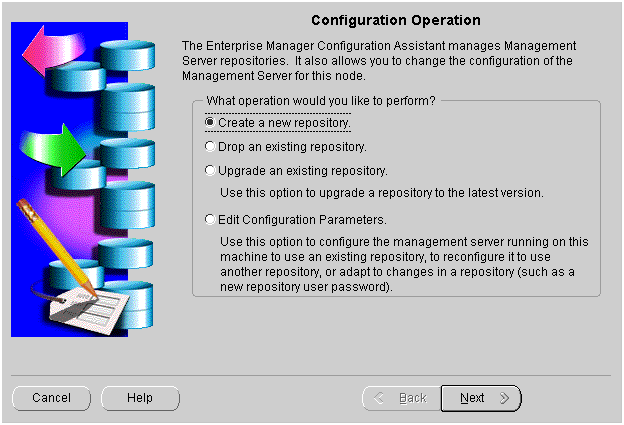
  1. Select "Create a new repository" and click Next.

    Figure A-26 Configuration Operation


    Text description of n_emca1.gif follows.
    Text description of the illustration n_emca1.gif

    Configuration Operation Screen allows you to create, drop, or upgrade a repository. It also enables you to edit your configuration parameters.
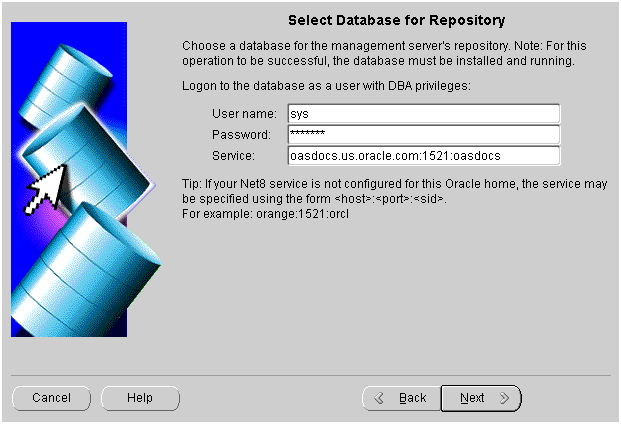
  2. Enter the host name, password, and service information, and click Next.

    Figure A-27 Select Database for Repository Screen


    Text description of n_emca2.gif follows.
    Text description of the illustration n_emca2.gif

    Select Database for Repository screen allows you to enter database information for the management server's repository. Be sure to log in as a user with DBA privileges.
    • User name: Enter a user name, with DBA privileges.

    • Password: Enter the password for the username.

    • Service: Enter the host:port:SID for the database.

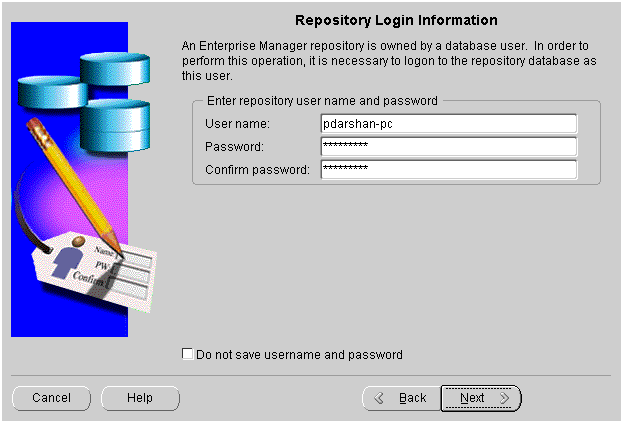
  3. Enter the repository login information, and click Next.

    Figure A-28 Repository Login Information Screen


    Text description of n_emca3.gif follows.
    Text description of the illustration n_emca3.gif

    Repository Login Information screen allows you to enter the login username and password for the database user.

    • Username: Enter the database user name who will own the repository.

    • Password: Enter the password for the username.

    • Confirm Password: Re-enter the user password for verification.

  4. Select to either create a new OEM_REPOSITORY tablespace, or use an existing tablespace, and click Next.
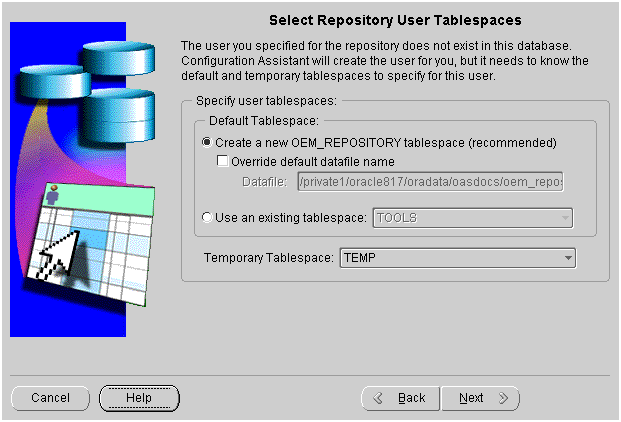
    Figure A-29 Select Repository User Tablespaces Screen


    Text description of n_emca4.gif follows.
    Text description of the illustration n_emca4.gif

    Select Repository User Tablespaces screen allows you to choose between creating a new OEM_REPOSITORY tablespace, or using an existing one.
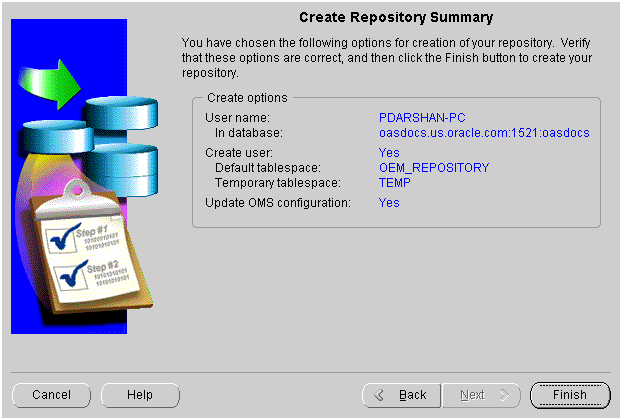
  5. Review the repository summary, and click Finish.

    Figure A-30 Create Repository Summary


    Text description of n_emca5.gif follows.
    Text description of the illustration n_emca5.gif

    Create Repository Summary screen displays all your repository settings. Be sure to verify them for accuracy.
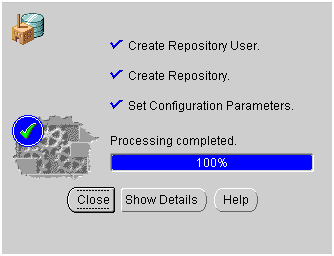
  6. Monitor the repository creation process, and click Close when it finishes.

    Figure A-31 Configuration Screen


    Text description of n_emca6.gif follows.
    Text description of the illustration n_emca6.gif

    Configuration screen indicates the progress the configuration assistant has made as it creates the repository. Click on Show Details if you get an error.


Go to previous page Go to next page
Oracle
Copyright © 2001 Oracle Corporation.

All Rights Reserved.

Library

Contents

Index