Version 9.0.2
Part Number A90879-02
Home | Solution Area | Contents |
Index |
| Oracle9iAS Discoverer Plus User's Guide Version 9.0.2 Part Number A90879-02 |
|
This chapter explains how to use Discoverer conditions to answer typical business questions. For example, which product items sell more than 10,000 each week? This section contains the following topics:
Conditions are worksheet items that enable you to choose what data to display on worksheets. Conditions filter out data that you are not interested in, enabling you to concentrate on data that you want to analyze. For example, in the figure below, a condition is being used that only displays data for the year 2001.
You create conditions by specifying condition statements against which to match worksheet data. Discoverer uses conditions as follows:
Conditions are categorized as follows:
Multiple conditions comprise more than one condition statement in a single condition item. For example, you might want to only display data for the year 2000 where the profits are greater than $900,000.
Note: You might also create two single conditions here to achieve the same result. For more information, see "About applying more than one condition".
Nested conditions comprise condition statements contained within the definition of other condition statements. Nested conditions work as follows:
For example, you might want to find data for the year 2000, where either the Region equals Eastern and Profits are greater than $900,000, or where the Region equals Northern and Profits are greater than $500,000.
Worksheets can contain conditions defined by you, by the Discoverer manager, or by other Discoverer users. Conditions work as follows:
Applying more than one single condition at the same time can have the same effect as creating a multiple condition. This can keep your condition statements short and make them easier to understand by other Discoverer users. Single condition statements also enable you to selectively apply individual condition statements.
For example, you apply the following two single conditions:
This has the same effect as one multiple condition containing two condition statements:
Note: When filtering certain types of data, using a multiple condition produces different results from using more than one single condition. For example, when using analytic functions (see "About analytic functions and sequencing").
You turn conditions on when you want to filter worksheet data according to the condition statement. For example, to turn on the condition Year = 2001 to display only data for the year 2001.
To turn a condition on:
Text description of the illustration cond10.gif
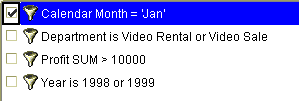
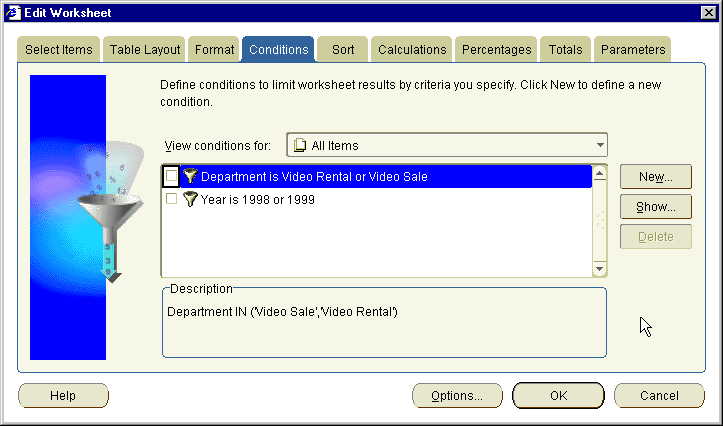
The Conditions tab lists conditions available to the worksheet. The check box beside each item indicates whether the condition is turned on.
You can turn on more than one condition at a time.
Discoverer displays the data that meets the condition(s) that you have turned on.
You turn conditions off when you no longer want to filter the worksheet with a condition. If you need to filter the data later using the condition, you can always turn the condition back on. For example, you might turn off the condition Year = 2001 to display data for all years available.
Note: Do not click the Delete button to turn off a condition. The Delete button permanently removes the condition from your workbook (see "How to delete conditions").
To turn a condition off:
Text description of the illustration cond10.gif
The Conditions tab lists conditions available to the worksheet. The check box beside each item indicates whether it is turned on.
Discoverer displays data that meets any conditions that are still turned on.
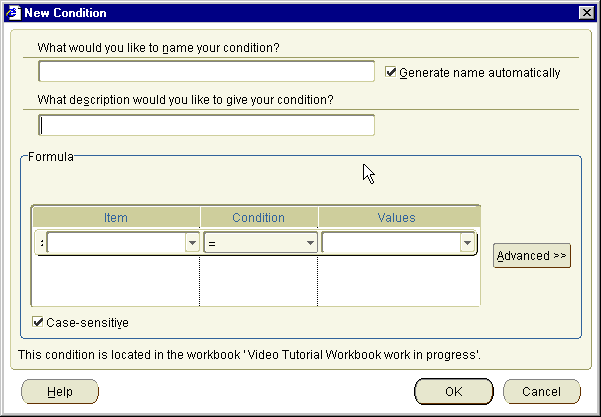
You create single conditions when you want to filter worksheet data in a new way using a single condition statement. For example, to display data for the year 2001, you might create the condition 'Calendar year = 2001'.
To create a single condition:
Hint: If you want Discoverer to create a condition name for you from the conditions statements that you enter, select the Generate name automatically check box.
For example, you might choose Year to display data for a particular year.
Hint: The Item drop down list shows the items available to the worksheet that you can use in the condition. You can use items that are not currently displayed on the worksheet to filter the worksheet data.
For example, you might select '>' here to filter data where the item value is greater than a certain number.
For example, you might enter 2001 here to look only at data for the year 2001.
If a list of values is defined for the item, you can also select from items and values in the drop down list, which might contain items and values made available to you by the Discoverer manager. For more information, see "Using lists of values (LOVs)".
The new condition appears in the Conditions dialog and is turned on.
Discoverer filters the worksheet to display only data that matches the condition. Data that does not match the condition is not displayed.
For more information about what values you can enter in the Values field, see "Using lists of values (LOVs)".
You use a multiple condition to display only data that matches multiple condition statements that you cannot display using a single condition. For example, to display data for the year 2000 that also relates to the Eastern region.
To create a multiple condition:
Discoverer adds Insert buttons for New Item, And and Or. You use these buttons to create the advanced condition.

By default, the new item is grouped with a logical AND, which means that data must match all condition statements contained within the AND group.
Hint: To change the way that condition statements are grouped, click the buttons in the Group column to display a drop down list of options (e.g. AND, OR, NOT AND, or NOT OR).
The new condition appears in the Conditions dialog and is turned on.
Discoverer filters the worksheet to display only data that matches the condition. Data that does not match the condition is not displayed.
Notes:
You use nested conditions to display only data that matches a specific set of condition statements that you cannot apply in a single or multiple condition.
To create a nested condition:
Discoverer adds Insert buttons for New Item, And and Or. You use these buttons to create the nested conditions.

The new condition appears in the Conditions dialog and is turned on.
Discoverer filters the worksheet to display only data that matches the condition. Data that does not match the condition is not displayed.
You edit conditions when you want to change the way that they filter data. For example, you might have a condition that displays sales people who generate more than $100,000 worth of sales. You might want to change this to more than $150,000 worth of sales.
To edit a condition:
If the condition is active, Discoverer filters the worksheet to display only data that matches the condition (for more information, see "How to turn conditions on").
You delete a condition when you no longer want to use it, and you want to remove it permanently from a workbook. For example, you might have created a temporary condition to produce an ad hoc report and now want to remove the condition from the workbook.
Note: If you want to disable the condition without deleting the condition permanently, you can turn the condition off (see "How to turn conditions off").
To delete a condition:
If the deleted condition was previously active, Discoverer removes the condition and displays data that was previously not displayed.
When a worksheet has page items, Discoverer applies conditions to underlying sub-totals. Discoverer does not apply conditions to roll-ups.
The following example illustrates how this affects Discoverer worksheets.
In this example, a worksheet contains sales totals for regions (see figure below).
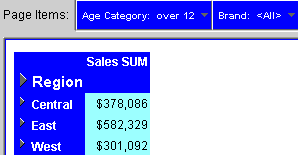
Notice that the Brand item is displayed in the Page Items area. The Sales SUM values are roll-ups of underlying Brand sub-totals for each region (see figure below).
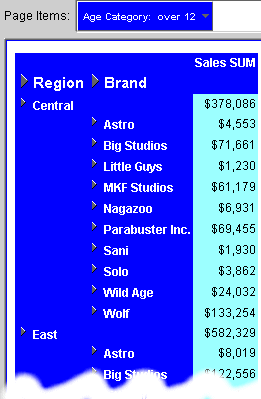
For example, Astro is $4,553, and Big Studios is $71,661. The largest sub-total is Wolf ($133,154).
Now imagine that you apply the condition Sales SUM > 400,000 to the worksheet.
The result is that Discoverer returns no rows, because none of the underlying Brand sub-totals are greater than $400,000.
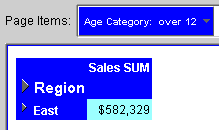
If you want to apply the condition Sales SUM > 400,000 to the roll-ups displayed on the worksheet, you must remove the Brand item from the worksheet. Discoverer will then return the East region row (see figure below).
Example 1: In this example, you want to display only data for the month of January.
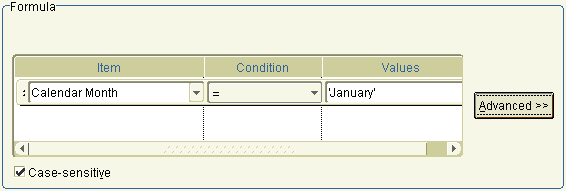
In the figure above, a single condition statement is defined (Calendar Month = January).
Example 2: In this example, you want to display only data for the month of January and the East region.
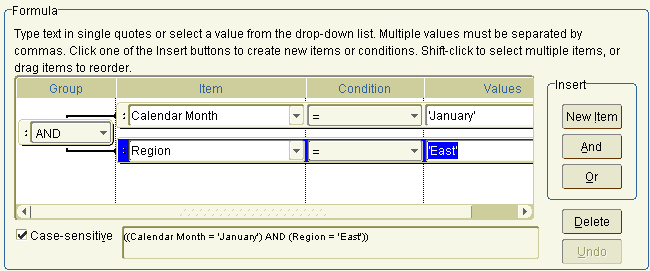
In the figure above, a multiple condition statement is defined (Calendar Month = January AND Region = East).
Example 3: In this example, you want to display only data for the month of January, and data for the East region or data for the North region.
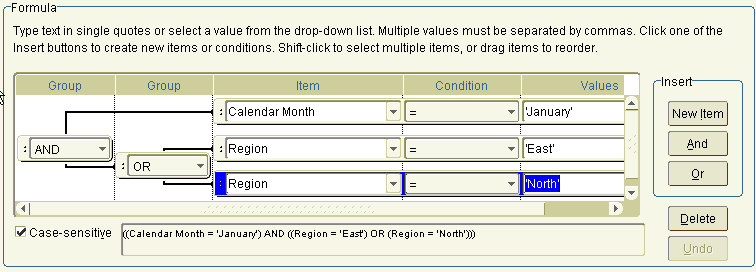
In the figure above, a nested condition is created (Calendar Year = 2001 AND Region = East OR Region = North).
When the Case sensitive check box is not selected, the worksheet query might take longer to run.
|
|
 Copyright © 2002 Oracle Corporation. All Rights Reserved. |
|