3
Running Oracle9iAS Discoverer
3.1 Running Oracle9iAS Discoverer
This chapter explains how to run Oracle9iAS Discoverer after you have completed an Oracle9iAS installation, and contains the following topics:
For more information about installing Oracle9i Application Server, see the Oracle9i Application Server Installation Guide.
Note: Unless you are using the Oracle9iAS demo database, before users can use Discoverer to analyze data, the database must contain a Discoverer EUL Version 5. You must create or update the EUL with Oracle9i Discoverer Administrator Version 9.0.2 or later (shipped with Oracle9i Developer Suite).
3.2 About the Oracle9iAS demo database
When you install Oracle9iAS, a demo database is installed that contains everything you need to run reports using a sample set of intelligence data.
You can use the demo database and workbooks to quickly test the Oracle9iAS Discoverer install without having to use Oracle9i Discoverer Administrator to create an End User Layer. In other words an EUL for the demo database is already created for you.
Discoverer Viewer and Discoverer Plus first time users can also use the demo database and workbooks to quickly become familiar with Discoverer workbooks and reports.
Notes:
- To provide access to the Oracle9iAS demo database, create a public Discoverer connection with the following details:
- username - scott
- password - tiger
- database - discodemo
- End User Layer - SCOTT
- When you run Discoverer using this connection, open the sample workbooks. For more information about how to create a public Discoverer connection, see Section 2.5, "How to create a public connection".
- When you install Oracle9iAS, a TNS entry for the demo database is automatically added to the tnsnames.ora file (for more information about configuration files, see Section A.2, "List of Discoverer file locations")
3.3 About running Discoverer Plus for the first time on a client machine
When you run Discoverer Plus for the first time on a client machine, you perform a one-time setup process to install Oracle JInitiator (if required) and initialize the Discoverer Plus software. This procedure is typically done when:
- you have installed Oracle9iAS and want to test that Discoverer is working
- a Discoverer end user wants to run Discoverer Plus for the first time on a client machine
Once the Discoverer Plus software is initialized, you do not have to perform any further setup when you run Discoverer Plus.
If you upgrade Discoverer, you might have to repeat the setup process. For example, you might install a new version of Discoverer Plus that requires a new version of Oracle JInitiator, or a new version of the applet.
Notes:
- The Discoverer Plus initialization procedure is different for Microsoft Internet Explorer and Netscape Navigator. Refer to the appropriate task:
- To run Discoverer Plus in Microsoft Internet Explorer, you must have the Security level set no higher than 'Medium' or custom equivalent (i.e. using the Security dialog in Microsoft Internet Explorer).
- If a Security Warning dialog is displayed when you run Discoverer, click Yes to install and run Oracle JInitiator. If you have previously configured the machine to always trust content from Oracle Corporation, this dialog is not displayed.
Figure 3-1 Security Warning dialog

Text description of the illustration jinit1.gif
3.4 How to run Discoverer Plus in Microsoft Internet Explorer for the first time on a client machine
To run Discoverer Plus in Microsoft Internet Explorer for the first time on a client machine:
- Start a Web browser and enter the Discoverer Plus URL containing the fully qualified host name (including port number if necessary) used by your own installation.
For example:
http://machinename.myorganization.com:7777/discoverer/plus
Where:
- machinename.myorganization is the hostname and domain on which the Oracle HTTP Server is installed
- 7777 (optional) is the port number on which the Oracle HTTP Server is installed if the default port number (i.e. port 80) has been changed
- /discoverer/plus is the URL command that starts Discoverer Plus
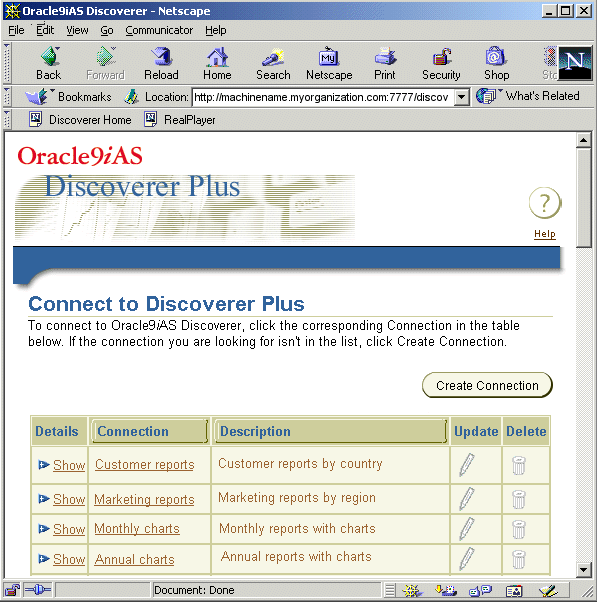
The Connect to Discoverer Plus page is displayed.
Figure 3-2 Connect to Discoverer Plus page
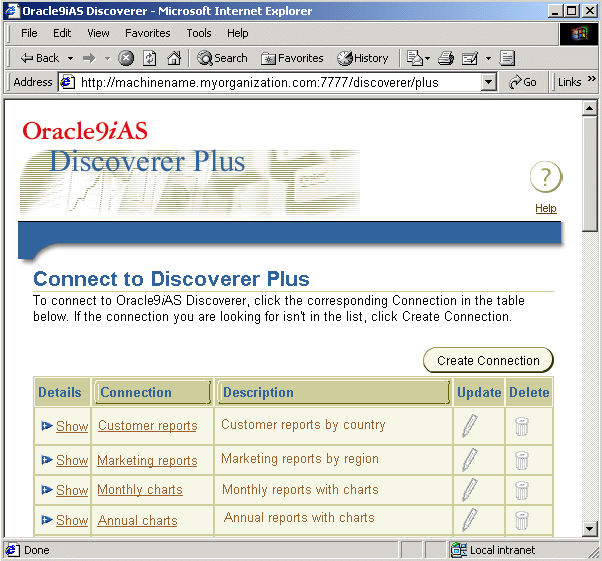
Text description of the illustration connect.gif
- Select a connection in the Connection column.
Hint: If no connections are displayed in the Connection column, you will have to create a new connection before continuing. For more information about creating private connections, see Oracle9iAS Discoverer Plus User's Guide. You can also use public connections that have been created by the Discoverer Administrator (for more information, see Section 2.5, "How to create a public connection" and Oracle9i Discoverer Administrator Administration Guide).
Depending on the software already installed on the client machine, you might have to download and install Oracle JInitiator. If you are not prompted to download and install Oracle JInitiator, skip to step 5.
If you have to download and install Oracle JInitiator, the Oracle JInitiator Choose Destination Location dialog page is displayed.
Figure 3-3 Choose Destination Location dialog
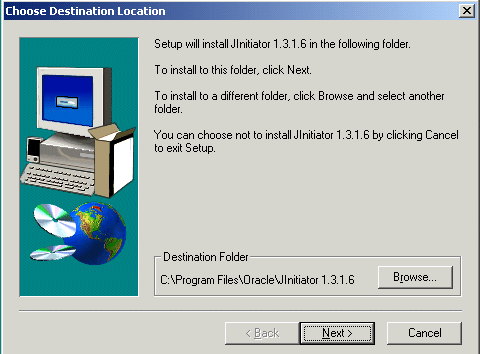
Text description of the illustration jinit3.gif
- Click Next to accept the default Destination Folder (or change the default Destination Folder and click Next).
The installer program installs Oracle JInitiator in the specified location. When the Oracle JInitiator installation is complete, the Installation Complete dialog is displayed.
Figure 3-4 Installation Complete dialog
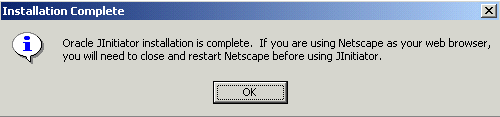
Text description of the illustration jinit4.gif
- Click OK to close the Installation Complete dialog.
Oracle JInitiator is now installed on the client machine.
- Wait for the Discoverer Plus applet to initialize.
While the Discoverer Plus applet initializes, the Starting product: Discoverer Plus page is displayed.
Figure 3-5 Starting product: Discoverer Plus page
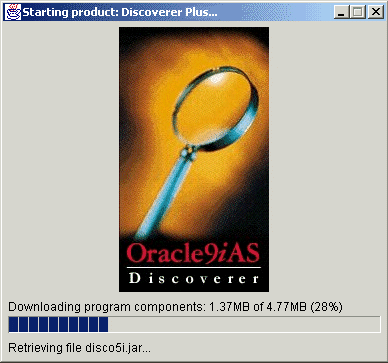
Text description of the illustration download.gif
The Discoverer Plus applet is initialized and cached, then the Workbook Wizard dialog is displayed.
Figure 3-6 Discoverer Plus Workbook Wizard: Create/Open Workbook dialog
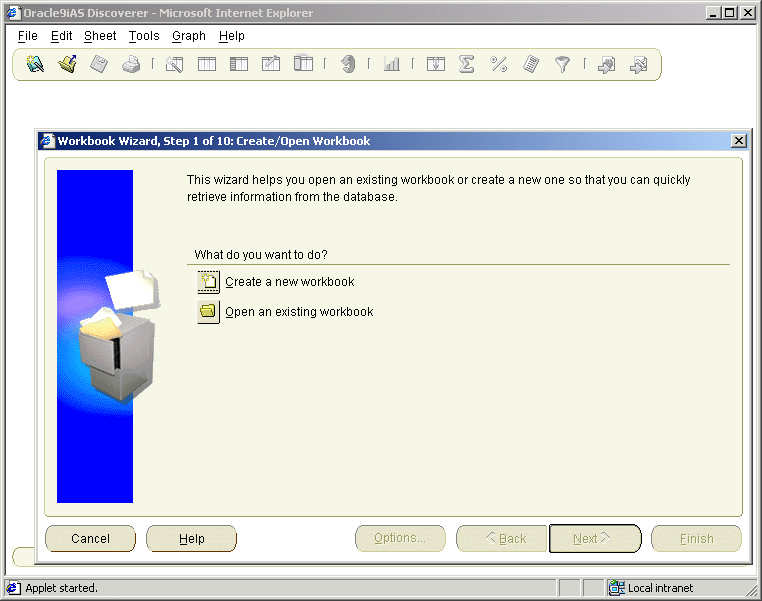
Text description of the illustration wbkwiz2.gif
You are now running Discoverer Plus.
3.5 How to run Discoverer Plus in Netscape Navigator for the first time on a client machine
To run Discoverer Plus in Netscape Navigator for the first time on a client machine:
- Start a Web browser and enter the Discoverer Plus URL containing the fully qualified host name (including port number if necessary) used by your own installation.
For example:
http://machinename.myorganization.com:7777/discoverer/plus
Where:
- machinename.myorganization is the hostname and domain on which the Oracle HTTP Server is installed
- 7777 (optional) is the port number on which the Oracle HTTP Server is installed if the default port number (i.e. port 80) has been changed
- /discoverer/plus is the URL command that starts Discoverer Plus
The Connect to Discoverer Plus page is displayed.
Figure 3-7 Connect to Discoverer Plus page
Text description of the illustration connectn.gif
- Select a connection in the Connection column.
Hint: If no connections are displayed in the Connection column, you will have to create a new connection before continuing. For more information about creating private connections, see Oracle9iAS Discoverer Plus User's Guide. You can also use public connections that have been created by the Discoverer Administrator (for more information, see Section 2.5, "How to create a public connection" and Oracle9i Discoverer Administrator Administration Guide).
Depending on the software already installed on the client machine, you might have to download and install Oracle JInitiator. If you are not prompted to download and install Oracle JInitiator, skip to step 10.
When you are using Netscape Navigator, if you have to download and install Oracle JInitiator, the Oracle9iAS Discoverer - Netscape page is displayed.
Figure 3-8 Oracle9iAS Discoverer - Netscape page

Text description of the illustration jinit5.gif
- Click anywhere on the Oracle9iAS Discoverer - Netscape page to display the Plug-In Not Loaded dialog.
Figure 3-9 Plug-In Not Loaded dialog
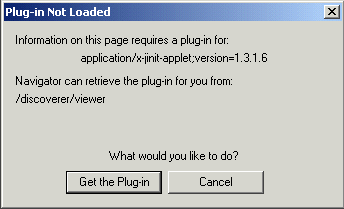
Text description of the illustration jinit6.gif
- Click Get the Plug-in to display the Setting Up Oracle9iAS Discoverer Plus page.
Figure 3-10 Setting Up Oracle9iAS Discoverer Plus page
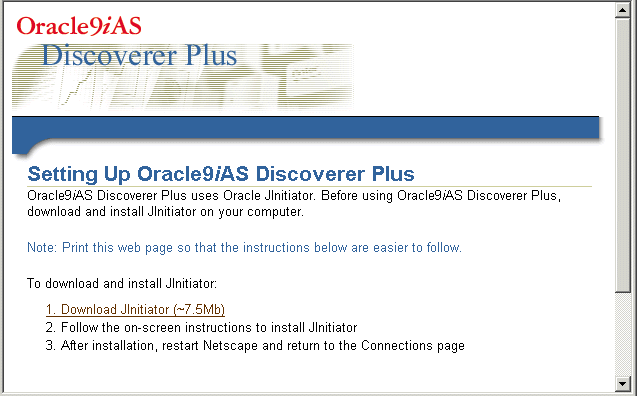
Text description of the illustration jinit7.gif
- Select the Download JInitiator (~<size> Mb) link to display the Save as... dialog.
Figure 3-11 Save As... dialog for Oracle JInitiator
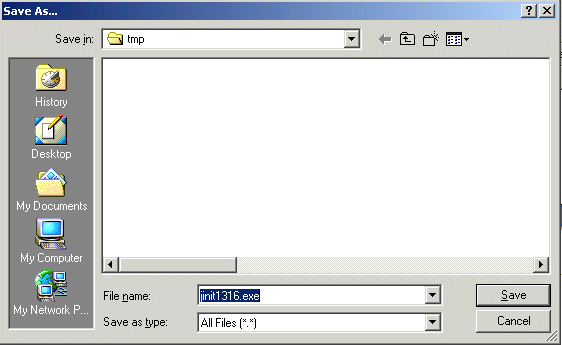
Text description of the illustration jinit8.gif
- Click Save to save the Oracle JInitiator install file to the default save location (or change the default save location and click Save).
While the Oracle JInitiator install file is being saved, the Saving Location dialog is displayed.
Figure 3-12 Saving Location dialog
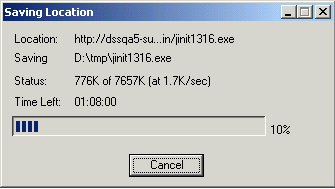
Text description of the illustration jinit9.gif
- When the Oracle JInitiator install file has been saved, open the file, as follows:
- Open a file browser and navigate to where the Oracle JInitiator install file was saved in the previous step.
- Double-click the Oracle JInitiator install file to display the Choose Destination Location dialog.
- Click Next to accept the default Destination Folder (or change the default Destination Folder and click Next).
The installer program installs Oracle JInitiator in the specified location. When the Oracle JInitiator installation is complete, the Installation Complete dialog is displayed.
- Click OK to close the Installation Complete dialog.
Oracle JInitiator is now installed on the client machine.
- Shut down the machine, then restart the machine.
- Start Netscape and enter the Discoverer Plus URL containing the fully qualified host name.
- Select a connection in the Connection column.
- Wait for the Discoverer Plus applet to initialize.
While the Discoverer Plus applet initializes, the Starting product: Discoverer 5i Plus page is displayed.
Figure 3-13 Starting product: Discoverer 5i Plus page
Text description of the illustration download.gif
The Discoverer Plus applet is initialized and cached, then the Workbook Wizard dialog is displayed.
Figure 3-14 Discoverer Plus Workbook Wizard: Create/Open Workbook dialog
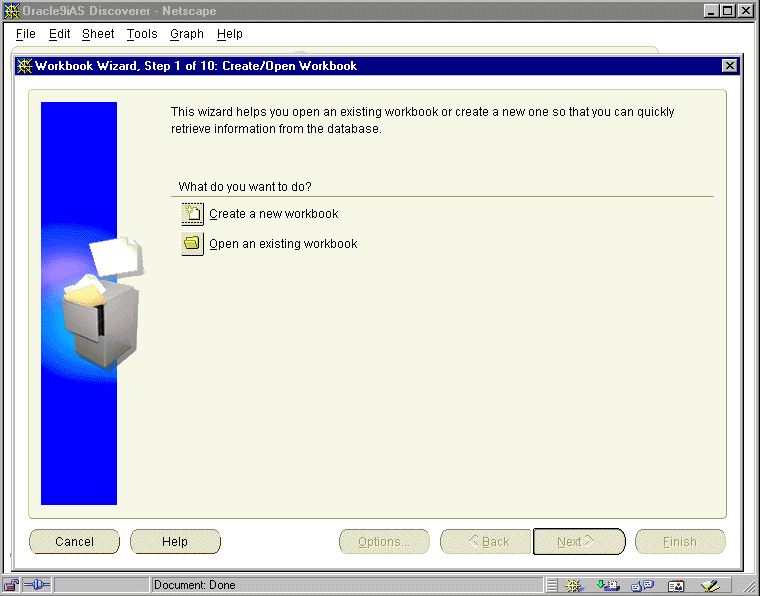
Text description of the illustration wbkwiz1.gif
You are now running Discoverer Plus.
3.6 How to run Discoverer Viewer
To run Discoverer Viewer:
- Start a Web browser and enter the Discoverer Viewer URL containing the fully qualified host name (including port number if necessary) used by your own installation.
For example:
http://machinename.myorganization.com:7777/discoverer/viewer
Where:
- machinename.myorganization is the hostname and domain on which the Oracle HTTP Server is installed
- 7777 (optional) is the port number on which the Oracle HTTP Server is installed if the default port number (i.e. port 80) has been changed
- /discoverer/viewer is the URL command that starts Discoverer Viewer
The Connect to Discoverer Viewer page is displayed.
Figure 3-15 Connect to Discoverer Viewer page
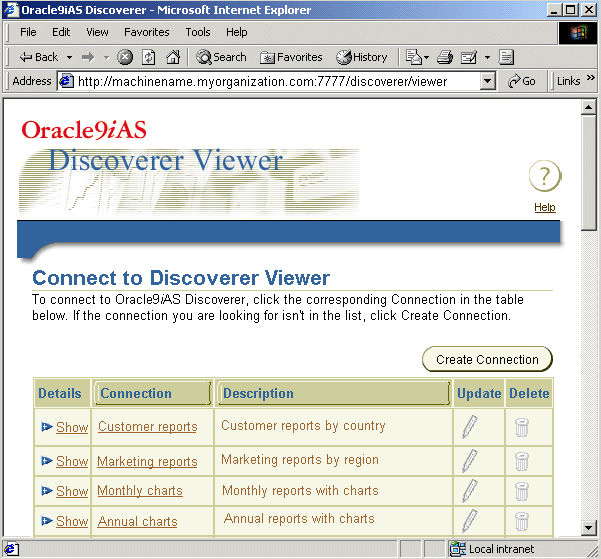
Text description of the illustration vlogin.gif
- Select a connection in the Connection column.
Hint: If no connections are displayed in the Connection column, you will have to create a new connection before continuing. For more information about creating private connections, see Oracle9iAS Discoverer Plus User's Guide. You can also use public connections that have been created by the Discoverer Administrator (for more information, see Oracle9i Discoverer Administrator Administration Guide).
The List of Workbooks page is displayed.
Figure 3-16 List of Workbooks page
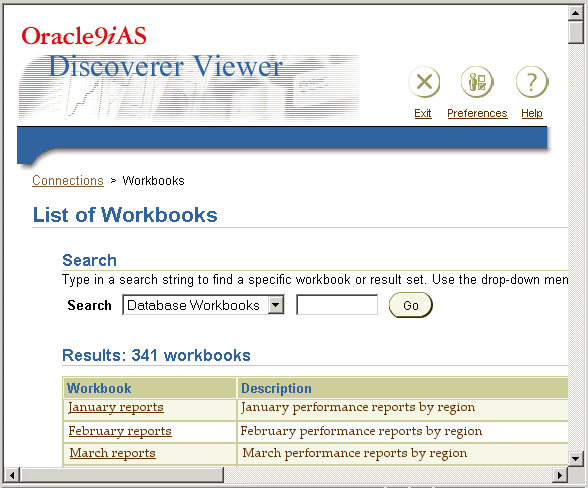
Text description of the illustration lowbs.gif
You are now running Discoverer Viewer. Select a workbook from the Workbook list to display the workbook in Discoverer Viewer.
Figure 3-17 A workbook opened in Discoverer Viewer
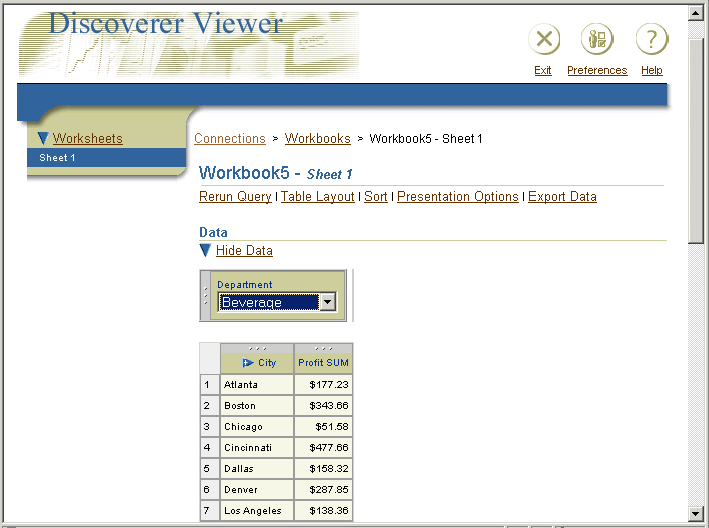
Text description of the illustration viewer.gif
Notes:
- If you install Oracle9iAS in a UNIX environment, an XWindow display must be available to the Discoverer Viewer servlet to support Discoverer Viewer's graphing and charting functionality. For more information about setting the DISPLAY environment variable to refer to the X Server, see the Oracle9iAS Installation Guide.
