Release 9.0.2
Part Number A95410-01
Home |
Solution Area |
Contents |
Index |
| Oracle Enterprise Manager Configuration Guide Release 9.0.2 Part Number A95410-01 |
|
Beginning with Release 9.0 when you launch the Enterprise Manager Console or various other Enterprise Manager applications, you are prompted to choose between launching the product standalone (i.e. not connecting to the middle tier Management Server) or logging into a Management Server. While launching the Console standalone allows a single administrator to perform direct database administration, launching the Console by connecting to a middle tier Management Server provides more comprehensive management capabilities, such as sharing of administrative data among multiple administrators, being proactively notified of potential problems, and automating repetitive administrative tasks. This chapter will describe how to configure the Enterprise Manager Console when it is connected to a middle tier Management Server.
The following topics will be discussed:
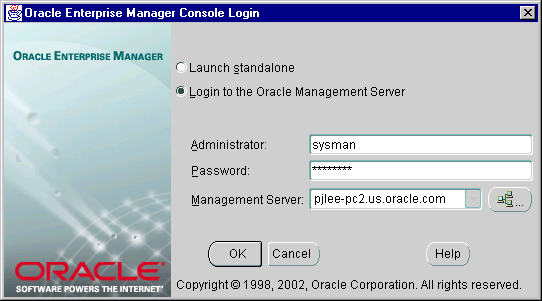
When you launch the Enterprise Manager Console, you are prompted to choose between launching the product standalone or logging into a Management Server.
|
Note: Previous to launching the Console by logging into a Management Server you must first install and configure a Management Server. For installation instructions, refer to the Installation Guide. For configuration details, refer to Chapter 3, "Configuring and Controlling the Management Server". |
Choose to launch the Console by logging into a Management Server when you want access to functionality such as:
On Windows-based platforms, you start the Console from the Windows Start Menu.
On any supported platform, you can launch the Console from the command line by using the command:
oemapp console
On UNIX platforms, the oemapp part of the command line is case-sensitive and must be entered with lowercase characters.
All of the above options prompt you with the Enterprise Manager login dialog. If you want to bypass the login dialog, you can enter the following command at the command line to automatically login to the Console by connecting to a Management Server:
oemapp console oem.loginmode=

oms oem.credential=<username>/<password>@<management server>
When the dialog appears, choose "Login to the Management Server" and if this is the first time you have logged in to the Management Server, enter the default credentials (e.g. Enterprise Manager administrator name and password) and the Management Server machine name. The default Enterprise Manager administrator name is sysman and its password is oem_temp. The Management Server on the node you select or enter must be one which is already configured with the repository you want to access.
|
Note: The repository you use with a Management Server should not be confused with the standalone repository used with certain standalone, integrated applications. |
If the name of the node where the Management Server is running does not appear in the pull-down list, you can either enter the machine name in the edit field or follow these instructions:
If you add a Management Server using the Management Server dialog it becomes the current choice when you return to the logon dialog.
After the initial login with sysman/oem_temp, a security dialog appears where you can change the default sysman password. The password you specify is not case sensitive. Other than spaces at the beginning or at the end of the password, you can specify any character in an Enterprise Manager Administrator's password.
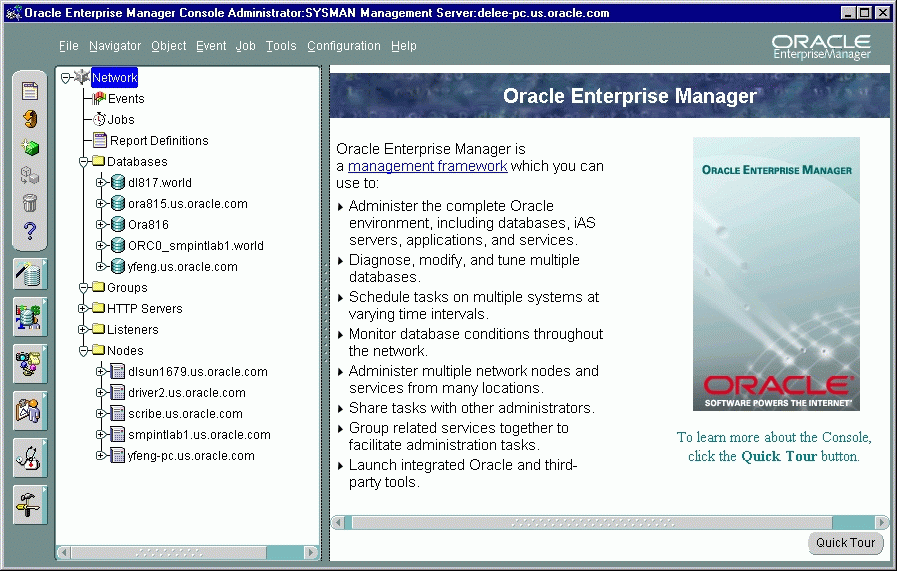
Oracle Enterprise Manager provides a Discovery Wizard for identifying network nodes and machines and populating the Console Navigator tree with these discovered nodes and targets. The discovered targets, such as databases and listeners, can then be administered with Enterprise Manager.
The Console is the central location for management and therefore the window from which you would see all the targets you are managing.
During start up of the Console, any manageable targets on the machine where the Management Server is running are automatically discovered if the Intelligent Agent is installed and running on that Management Server machine. The Console Navigator then displays all those discovered targets.
To discover additional nodes and targets which reside on nodes within your environment:
If nodes have failed automatic discovery, you can press the Next button on the Progress page. On the Errors page, you will have the option to retry, skip, or perform a manual discovery on the failed nodes.
If no Intelligent Agent is running for some nodes which failed to be discovered, you can still add the node to the navigator, and add databases to that node using manual discovery.
During manual discovery, you will be prompted for the following information:
When a node is manually added, you cannot register events or submit jobs against the node.
|
Note: Manually discovered nodes must be dropped from the Navigator tree before they can be automatically discovered. |
If a node cannot be discovered, check if the node is down or if the node does not have an Intelligent Agent running. You can also check if you are using the TCP/IP network protocol. Refer to the Oracle Enterprise Manager Administrator's Guide for more information on discovering nodes.
Enterprise Manager is a multi-administrator system: every person who is administering systems using Enterprise Manager has his or her own administrator account which he or she uses to log into the Console by connecting to a Management Server.
The installation of Enterprise Manager creates a Reports user and a Super Administrator named sysman. The Super Administrator sysman can create administrators using the Manage Administrators item in the Configuration menu. In addition to an administrator name and password, each account can be tagged as a "Super Administrator" account or an account to which the administrator has access to only jobs and/or events.
Differences between the two types of accounts are as follows:
Most Super Administrators also have a separate account for daily operations but use their Super Administrator account for special operations only available to Super Administrators, such as creating new Enterprise Manager Administrators, configuring paging or e-mail servers, defining management regions, or granting other administrators access to targets. Using the sysman account for daily administration work is not recommended. The Super Administrator account is similar to root on UNIX or Administrator on Windows NT and is a user which cannot be deleted or renamed. It is a user that can perform any task and therefore should be used only for setting up the environment.
Typically, all administrators share a single Enterprise Manager repository, which allows administrators to share information. The Enterprise Manager repository is one in which Management Servers share; it is not a standalone repository. Although you can set up multiple repositories, administrators using different repositories will not have access to each other's information; there is no sharing of data between repositories. Administrative data stored in the repository is filtered based on administrator permissions.
Preferred Credentials must be set up for each administrator account. When an administrator connects to managed targets through the Management Server, the preferred credentials used are those defined explicitly for that administrator.
Refer to the Oracle Enterprise Manager Administrator's Guide for information on how Enterprise Manager administrators are created, edited, and deleted with the Manage Administrators option of the Console Configuration menu.
Beginning with Oracle 8.0.6 databases and higher, the OEM_MONITOR role is created by the Oracle database creation scripts. This role permits access to database functionality within Enterprise Manager, such as registering events against a database or browsing through the objects in a database via the Console Navigator tree. These types of functionality require database credentials on which to perform these operations. Rather than granting the powerful DBA role to the database credentials, many administrators prefer to provide only the necessary privileges required to do these operations. Granting the OEM_MONITOR role to the database credentials, ensures that the user has the minimum sufficient privileges required for these operations.
You must perform the following steps:
drop role OEM_MONITOR;
create role OEM_MONITOR:
grant connect to OEM_MONITOR;
grant analyze any to OEM_MONITOR;
grant create table to OEM_MONITOR;
grant select_catalog_role to OEM_MONITOR;
You are now ready to grant the OEM_MONITOR role to the database user that will be used as "database preferred credentials" in Enterprise Manager. In addition to granting the OEM_MONITOR role to a user, you must also ensure that the QUOTA for the user account is set to UNLIMITED.
The "Continued Row" event test needs to analyze results into a table so it needs both the "analyze any" and "create table" privileges.
In order for Enterprise Manager administrators to be able to successfully submit jobs, certain configuration steps must be performed:
ORACLE_HOME\NETWORK directory as well as read, write, update, and delete permissions to the TEMP directory or the ORACLE_HOME directory.
|
Note: If you do not set up the "logon as batch job" privilege, you will receive the "Failed to authenticate user" message when you try to run jobs on the node. |
You must create a Windows platform user account for every managed Windows platform node which will have jobs submitted against it. Follow one of the three procedures listed below.
In addition, because the output of some jobs may be quite large, you have the option in Oracle Enterprise Manager to specify the maximum size for any job output. For details, refer to the Oracle Enterprise Manager Administrator's Guide.
To create a new Windows NT user account on the Windows NT machine where the Intelligent Agent is installed and grant the "log in as batch jobs" privilege to this user, perform the procedure below.
Alternately, to assign privileges to an existing local user account, perform the following steps.
Alternately, to configure a domain user as your Intelligent Agent user, perform the following steps.
To enable administrators to receive e-mail notifications, super administrators must first configure the e-mail server from the Console:
After completing the SMTP mail configuration, notification and schedule preferences should be specified for all administrators who want to receive e-mail notifications. Refer to the Oracle Enterprise Manager Administrator's Guide for details.
Enterprise Manager bundles its own Paging Server which enables administrators to receive notifications on events and jobs on their pagers. Both numeric and alphanumeric pagers are supported; however, alphanumeric pagers must utilize one of the following paging service protocols:
Most paging service providers support the sending of e-mail messages to pagers. If your provider offers the option of sending e-mail; then, you can choose not to install and configure the Enterprise Manager Paging Server. If you do choose not to install our Paging Server, you would specify the e-mail address of your pager as the Receiver's E-mail address when you configure your e-mail notification preferences. Refer to the Oracle Enterprise Manager Administrator's Guide for more details on e-mail notifications.
However, using an e-mail to page address to receive page notifications will be based on your e-mail notification's schedule and filters, not your pager notification's schedule and filters. If you use the Enterprise Manager Paging Server, you could distinguish the e-mail notification's schedule and filters from the pager notification's schedule and filter which offers more flexibility and completeness.
The Enterprise Manager Paging Server is automatically installed with the Oracle Management Server on Windows NT, Windows 2000, or Windows XP. The Paging Server can also be installed by itself via a Custom installation on Windows NT, Windows 2000, or Windows XP. However, the Paging Server is not installable for any UNIX platform.
|
Note: The Enterprise Manager Paging Server requires a modem. Ensure that the machine on which you install the Paging Server has a modem. |
While you can install the Paging Server only on certain Windows platforms, you can configure the Paging Server from the Enterprise Manager Console on any Windows or UNIX operating system. Furthermore, only one Paging Server is necessary for an Enterprise Manager deployment.
For further details on installing the Enterprise Manager Paging Server, refer to the Installation Guide provided with the software release.
The two most common options for deploying the Paging Server are listed below:
or
The installation of the Enterprise Manager Paging Server does not automatically start the Paging Server service nor configure it. After installation, you must specify the modem settings, start the Paging Server service manually, and configure the Paging Server from the Enterprise Manager Console.
To specify the modem settings:
To start the Paging Server:
You can also start the paging server by typing the following at a command prompt
oemctl start paging
To enable administrators to receive paging notifications via the Enterprise Manager Paging Server, super administrators must first configure the Paging Server from the Console.
To add a paging server to the Enterprise Manager Console, perform the following operations:
If the Console is unable to find the paging server with the given hostname, an error appears.
If the paging server is found, a new paging server object is added under the "Paging Configuration" object in the tree list. The new paging server will have no paging carrier. You must add at least one paging carrier in order for paging to function.

Paging carrier name. Field accepts alphanumeric characters and underscores.
Type of paging carrier. Enterprise Manager supports alphanumeric or numeric.
TAP, FLEX-TD, or GSM. Protocol selection is only available if the carrier type is Alphanumeric.
After completing paging server configuration, notification and schedule preferences should be specified for all administrators who want to receive page notifications. Refer to the Oracle Enterprise Manager Administrator's Guide for details.
The Enterprise Manager reporting system provides flexible reporting functionality to administrators, permitting quick and easy access to information about the status of all monitored systems in their enterprise. Administrators can create, schedule, and publish a wide variety of enterprise system reports. When published to a web site, these reports can be accessed by a wider audience, enabling anyone from administrators to managers to executives to quickly access information regarding their monitored enterprise.
In order to access published reports, ensure that the Enterprise Manager Web Site component has been installed. By default, it is installed with the Management Server under the Oracle_Home/oem_webstage directory. In addition, the Enterprise Manager Web Site automatically installs a preconfigured Oracle HTTP Server to act as the reporting web server. This is the same HTTP Server that is used by default for the browser-based Enterprise Manager.
In order to view published reports, follow the steps documented in the sections below.
You must change the default password (oem_temp) for the REPORTS_USER administrator. The REPORTS_USER administrator owns predefined reports.
To change the password:
The oemctl configure rws script is a command-line utility that must be run on the machine where the Management Server and reporting web server are installed.
To run the configuration utility:
You must change the oem_temp password prior to running this script; otherwise the oemctl configure rws script will generate an error message when you run it if the REPORTS_USER password is left as the default.
Shutdown and startup the Oracle HTTP Server after running the oemctl configure rws.
Note: Choosing "View Published Reports" from any Console menu or even accessing the Reporting web site itself directly before running oemctl configure rws will generate an error message indicating that you need to first configure the Reporting web site.
If you have installed the Oracle HTTP Server that is packaged with Enterprise Manager by default, start it by performing the following steps:
On Windows NT:
To start the Oracle HTTP Server:
On UNIX:
You can start the Oracle HTTP Server from the command line using the command:
$Oracle_Home/Apache/Apache/bin/apachectl start
To stop the Oracle HTTP Server, perform the following steps:
On Windows NT:
To stop the Oracle HTTP Server on Windows NT, perform the following steps:
On UNIX:
You can stop the Oracle HTTP Server from the command line using the command:
$Oracle_Home/Apache/Apache/bin/apachectl stop
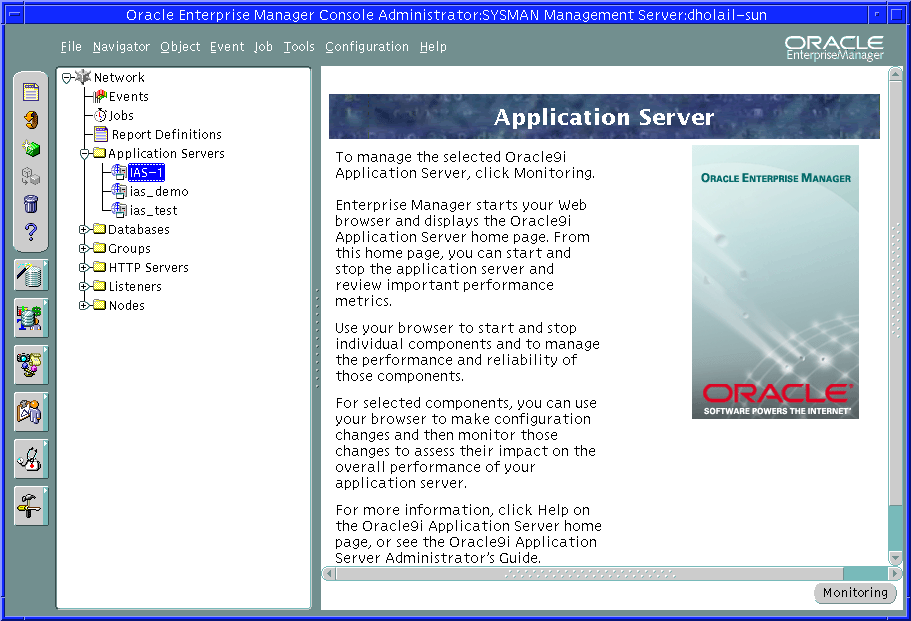
If the Console discovers a host computer where Oracle9i Application Server has been installed, instances of Oracle9i Application Server on that host appear in the Console navigator pane.
To manage the selected Oracle9iAS instance in your Web browser:
The Console displays an information panel describing the Oracle9iAS management tools.
Text description of the illustration iasconso.gif
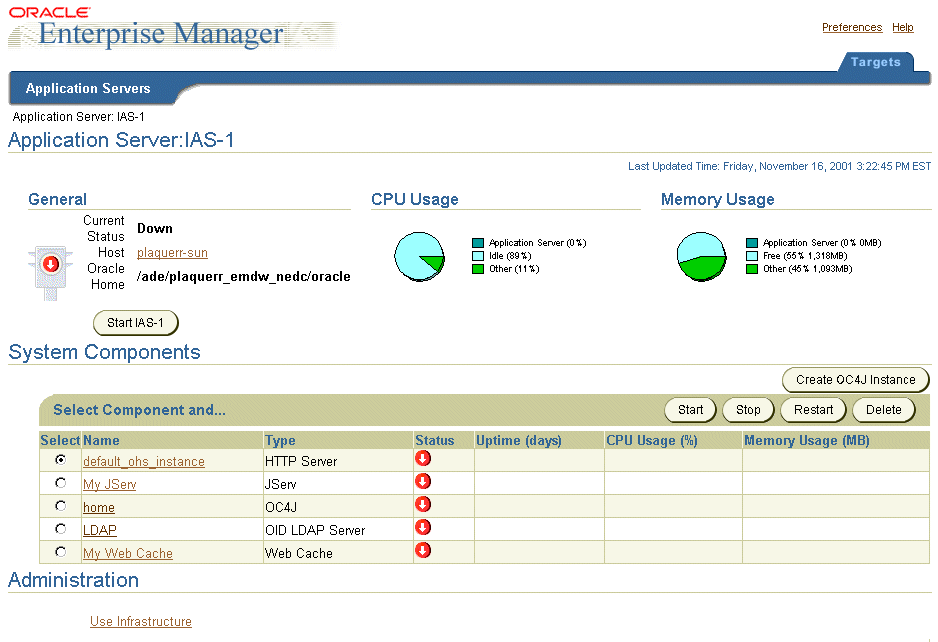
Oracle Enterprise Manager displays the appropriate Oracle Enterprise Manager Home Page for the selected Oracle9iAS instance.
The Enterprise Manager Home Page provides buttons for starting and restarting the server and it contains some high-level statistics about the server and a table that lists all the components of the server.
Text description of the illustration ias_home.gif
For instructions on using the Enterprise Manager Home Page to start or stop Oracle9iAS and its components, refer to Chapter 6, "Using the Oracle Enterprise Manager Web Site". For detailed instructions on administering the Oracle9i Application Server, refer to the Oracle9i Application Server Administrator's Guide.
You must have the correct TCP/IP configuration; incorrect TCP/IP configurations result in timeouts and lost connections.
|
Note: Dynamic IP addresses attributed by DHCP are not supported on nodes running the Management Server or an Intelligent Agent. DHCP is supported only on Enterprise Manager clients. |
When the Console connects over a dialup line, the Console machine obtains a dynamic IP address. This dynamic IP address needs to be sent by the operating system (Windows 2000, Windows NT, Windows 98) to the Enterprise Manager application.
In order for the operating system to return the correct IP address, the network communication protocol (TCP-IP) needs to be configured to obtain the IP address using the Dynamic Host Configuration Protocol (DHCP). This setting is specified as follows:
You must make note of your previous settings in order to return to those settings when you connect the same machine to the network via ethernet. Copy the Settings specified in IP Address, Subnet Mask and Default Gateway to a file.
|
Note: If you are not running from a web browser, you may need to restart your system after making the changes. |
You can set the preferred color by adding this line to the $ORACLE_HOME/sysman/config/ClientConfig.properties file:
user.color.scheme=System
The value can be any valid color scheme. Currently available color schemes are blue, khaki, olive, purple, red, teal, titanium, or System. The values are not case sensitive.
Blue, khaki, olive, purple, red, teal, titanium, and System are the currently known values for this property. Setting the user.color.scheme property will change the color scheme in the Console with the basic color as the named color in the property. System is the only one that takes the system default properties.
If the color scheme you are trying to use does not seem to take effect, turn on client tracing using the oemapp trace console command. Use level two tracing. In the trace output, search for "Color Scheme." The information is at the top of the trace output. If an incorrect value is entered, the following will appear in the trace file:
Unrecognized Color Scheme: <>
Color Schemes: ...
|
|
 Copyright © 2002 Oracle Corporation. All Rights Reserved. |
|