Release 2 (9.0.2)
Part Number A95878-01
Home |
Solution Area |
Contents |
Index |
| Oracle9iAS Containers for J2EE Servlet Developer’s Guide Release 2 (9.0.2) Part Number A95878-01 |
|
This chapter provides basic information for developing servlets for OC4J and the Oracle9i Application Server, covering the following topics:
Most HTTP servlets follow a standard form. They are written as public classes that extend the HttpServlet class. A servlet overrides the init() and destroy() methods when code is required to perform initialization work at the time the servlet is loaded by the container, or when finalization code is required when the container shuts the servlet down. Most servlets override either the doGet() method or the doPost() method of HttpServlet, to handle HTTP GET or POST requests. These two methods take request and response parameters.
This chapter provides sample servlets that are more advanced than the HelloWorldServlet in "A First Servlet Example". You can test each of these servlets using the OC4J default Web application. To do this, save the Java source files in the following directory:
j2ee/home/default-web-app/WEB-INF/classes
To test some of the servlets, you might have to make changes to the web.xml file in the j2ee/home/default-web-app/WEB-INF directory, as directed. When you change and save the web.xml file, OC4J restarts and picks up the changes to the default Web application.
This chapter emphasizes the servlet code itself, so deployment is done to the default Web application for simplicity. Chapter 3, "Deployment and Configuration", describes Web application development, deployment, and testing under the J2EE paradigm that you would use for production applications.
Here is a code template for servlet development:
public class myServlet extends HttpServlet {

  public void init(ServletConfig config) {
  }

  public void destroy() {
  }

  public void doGet(HttpServletRequest request, HttpServletResponse)
                    throws ServletException, IOException {
  }

  public void doPost(HttpServletRequest request, HttpServletResponse)
                    throws ServletException, IOException {
  }

  public String getServletInfo() {
    return "Some information about the servlet.";
  }
Overriding the init(), destroy(), and getServletInfo() methods is optional. The simplest servlet just overrides either doGet() or doPost().
Servlets have a predictable and manageable lifecycle:
<load-on-startup> element is declared for the servlet in the application web.xml file.
web.xml. These can include initialization parameters.
service() method of the generic servlet, which then delegates the request to doGet() or doPost() (or another overridden request-handling method), depending upon the information in the request headers.
java.io.PrintWriter or javax.servlet.ServletOutputStream object.
destroy() method before the servlet is unloaded.
A servlet typically receives information from one or more sources, including the following:
HttpSession object
ServletContext object
The servlet adds information to the response object, and the container sends the response back to the client.
Because a servlet can be invoked from more than one thread, you must ensure that servlet code is thread-safe. Critical sections of code must be synchronized, although you must do this selectively and carefully, because it can affect performance. The servlet specification provides that a servlet can implement the SingleThreadModel to guarantee synchronized access to the whole servlet, but this practice is not recommended for OC4J applications.
The servlet specification provides a convenient way to enable stateful servlet sessions, using cookies and the javax.servlet.http.HttpSession object. See "Cookies" for more information.
There is a single servlet context for each Web application.
The javax.servlet.ServletContext object is contained within the javax.servlet.ServletConfig object, which the Web server provides to the servlet and which is used by the servlet container to pass information to the servlet during initialization.
A servlet or JSP page is invoked by the container when a request for the servlet arrives from a client. The client request might come from a Web browser or a Java client application, or from another servlet in the application using the request forwarding mechanism, or from a remote object on a server.
A servlet is requested through its URL mapping. The URL mapping for a servlet consists of two parts: the context path and the servlet path. The context path is that part of the URL from the first forward slash after the host name or port number, and before the servlet path. The servlet path continues from the slash at the end of the context path (if there is a context path) to the end of the URL string, or until a '?' or ';' that delimits the servlet path from the additional material, such as query strings or rewritten parts of the URI. In a typical deployment scenario, the context path and servlet path are determined through settings in a standard web.xml file.
The remainder of this section covers the following topics, including some special OC4J features for invoking a servlet in a development or testing environment:
When the servlet container receives a request for a servlet, it does the following:
You can determine all the available information passed in the request object by looking at the Javadoc for the HttpServletRequest interface, at the following location:
http://java.sun.com/products/servlet/2.3/javadoc/index.html
service() method. Note that for HTTP servlets, the generic service method is usually overridden in the HttpServlet class. The service method dispatches requests to the servlet doGet() or doPost() methods, depending on the HTTP header in the request (GET or POST).
If there is a filter or a chain of filters to be invoked before the servlet, these are called by the container with the request and response objects as parameters. The filters pass these objects, perhaps modified, or alternatively create and pass new objects, to the next object in the chain using the doChain() method. See Chapter 4, "Servlet Filters", for more information about this topic.
In a development or testing environment in OC4J, there is a mechanism for invoking a servlet by class name. This may simplify the URL for invocation.
Setting the servlet-webdir attribute in the <orion-web-app> element of the global-web-application.xml file or orion-web.xml file defines a special URL component. Anything following this URL component is assumed to be a servlet class name, including applicable package information, within the appropriate servlet context. By default in OC4J, this setting is "/servlet".
The following URL shows how to invoke a servlet called SessionServlet, with explanations following. In this example, assume SessionServlet is in package foo.bar, and executes in the OC4J default Web application.
http://<hostname><:port>/j2ee/servlet/foo.bar.SessionServlet
This mechanism applies to any servlet context, however, and not just for the default Web application. If the context path is foo, for example, the URL to invoke by class name would be as follows:
http://<hostname><:port>/foo/servlet/foo.bar.SessionServlet
|
Note: See the Oracle9iAS Containers for J2EE User's Guide for information about defined ports and what listeners they are mapped to, and for information about how to alter these settings. Depending on the port you specify, you can access OC4J directly through its own listener (useful in development environments), or through the Oracle HTTP Server (highly recommended for deployment environments). |
In a deployment environment, using the servlet-webdir attribute in global-web-application.xml or orion-web.xml is inadvisable for security reasons. Instead, you should use standard servlet settings and mappings in the application web.xml file to specify the context path and servlet path.
In web.xml, the <servlet-name> subelement of the <servlet> element defines a name for the servlet and relates it to a servlet class. The <servlet-mapping> subelement relates servlet names to path mappings. The servlet name as well as the mapping names are arbitrary--it is not necessary for the class that is invoked to have the same base name, or even a similar base name, to either the <servlet-name> or any of the <servlet-mapping> settings.
Note that because of the default OC4J mount point, each context path must start with "/j2ee/" for the servlet to be routed to OC4J through the Oracle HTTP Server. If you want to use something other than "/j2ee/", create a new Oc4jMount directive in the mod_oc4j.conf file. Copy the default mount directive and replace "j2ee" as desired. Here is the default directive:
Oc4jMount /j2ee/*
See the Oracle9iAS Containers for J2EE User's Guide for more information.
There is also a relevant element in the default-web-site.xml file (or other Web site XML file). The <frontend> subelement of the <web-site> element specifies a perceived front-end host and port of the Web site as seen by HTTP clients. When the site is behind something like a load balancer or firewall, the <frontend> specification is necessary to provide appropriate information to the Web application for functionality such as URL rewriting. Attributes are host, for the hostname of the front-end server, such as "www.acme.com", and port, for the port number of the front-end server, such as "80". Using this front-end information, the back-end server that is actually running the application knows to refer to www.acme.com instead of to itself in any URL rewriting. This way, subsequent requests properly come in through the front-end again, instead of trying to access the back-end directly.
The container instantiates and loads a servlet class when it is first requested, unless you specify that the class should be loaded and initialized when the OC4J server starts up. In the application web.xml file, you can specify a <load-on-startup> subelement in the <servlet> element to have the server load and initialize the servlet on start-up. For example, the following element names the servlet represented by the PrimeSearcher.class file as PSearcher, and specifies that it should be loaded when the server starts:
  <servlet>
    <servlet-name>PSearcher</servlet-name>
    <servlet-class>PrimeSearcher</servlet-class>
    <load-on-startup/>
  </servlet>
When the servlet is loaded, either at server start-up time or when requested, the container indirectly calls the servlet init() method. A servlet can override the HttpServlet init() method to perform actions that are required only once in the servlet lifetime, such as the following examples:
log() method of the ServletContext object
See "Database Query Servlet" for an example that shows a servlet that uses the init() method to get a data source object at start-up.
This section discusses servlet sessions, covering the following topics:
The HTTP protocol is stateless by design. This is fine for stateless servlets that simply take a request, do a few computations, output some results, and then in effect go away. But many, if not most, server-side applications must keep some state information and maintain a dialogue with the client. The most common example of this is a shopping cart application. A client accesses the server several times from the same browser, and visits several Web pages. They decide to buy some of the items offered for sale at the Web site, and clicks on the BUY ITEM boxes. If each transaction were being served by a stateless server-side object, and the client provided no identification on each request, it would be impossible to maintain a filled shopping cart over several HTTP requests from the client. In this case, there would be no way to relate a client to a server session, so even writing stateless transaction data to persistent storage would not be a solution.
A number of approaches have attempted to add a measure of statefulness to the HTTP protocol. The most widely accepted at the current time is the use of cookies, to let the client transmit an identifier to the server, together with stateful servlets that can maintain session objects. Session objects are simply dictionaries that store a value (a Java object) together with a key (a Java string).
When a client first connects to a stateful servlet, the server (container) sends a cookie that contains a session identifier back to the client, often along with a small amount of other useful information (all less than 4 KB). Then on each subsequent request from the same Web client session, the client sends the cookie back to the server. Cookies are sent and updated by the container in the response header--the servlet code does not need to do anything to send a cookie. Similarly, cookies are sent back to the server by the Web browser. A browser user only has to enable cookies on the browser to get cookie functionality.
The container uses the cookie for session maintenance. A servlet can retrieve cookies using the getCookies() method of the HttpServletRequest object, and can examine cookie attributes using the accessor methods of the javax.servlet.http.Cookie objects.
Most Web users have learned to keep cookies enabled on their browsers, although some still do not. An alternative to using cookies is URL rewriting, through the encodeURL() method of the response object. See "Session Servlet Example" for an example of URL rewriting.
Other techniques have been used in the past to relate client and server sessions. These include server hidden form fields and user authentication mechanisms to store additional information. Oracle does not recommend that you use these techniques in OC4J applications, because they have many drawbacks, including performance penalties and loss of confidentiality.
HttpSession objects persist for the duration of the server-side session. A session is either terminated explicitly by the servlet, or it "times out" after a certain period and is cancelled by the container.
The default session timeout for the OC4J server is 20 minutes. You can change this for a specific application by setting the <session-timeout> subelement in the <session-config> element of web.xml. For example, to reduce the session timeout to five minutes, add the following lines to the application web.xml:
<session-config>
  <session-timeout>5</session-timeout>
</session-config>
A servlet explicitly cancels a session by invoking the invalidate() method on the session object. You must obtain a new session object by invoking the getSession() method of the HttpServletRequest object.
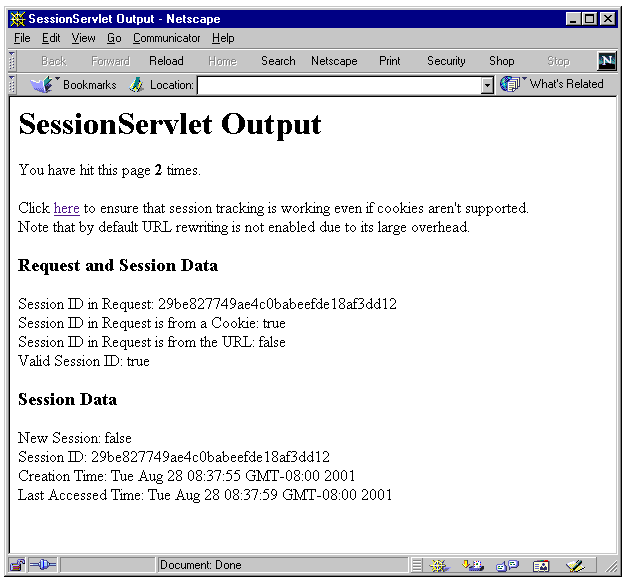
The SessionServlet code below implements a servlet that establishes an HttpSession object and prints some interesting data held by the request and session objects.
import java.io.*;
import javax.servlet.*;
import javax.servlet.http.*;
import java.util.Date;

public class SessionServlet extends HttpServlet {

  public void doGet (HttpServletRequest req, HttpServletResponse res)
        throws ServletException, IOException {

    // Get the session object. Create a new one if it doesn't exist.
    HttpSession session = req.getSession(true);

    res.setContentType("text/html");
    PrintWriter out = res.getWriter();

    out.println("<head><title> " + "SessionServlet Output " +
                "</title></head><body>");
    out.println("<h1> SessionServlet Output </h1>");

    // Set up a session hit counter. "sessionservlet.counter" is just the
    // conventional way to create a key for the value to be stored in the
    // session object "dictionary".
    Integer ival =
      (Integer) session.getAttribute("sessionservlet.counter");
    if (ival == null) {
      ival = new Integer(1);
    }
    else {
      ival = new Integer(ival.intValue() + 1);
    }

    // Save the counter value.
    session.setAttribute("sessionservlet.counter", ival);

    // Report the counter value.
    out.println(" You have hit this page <b>" +
                ival + "</b> times.<p>");

    // This statement provides a target that the user can click on
    // to activate URL rewriting. It is not done by default.
    out.println("Click <a href=" +
                res.encodeURL(HttpUtils.getRequestURL(req).toString()) +
                ">here</a>");
    out.println(" to ensure that session tracking is working even " +
                "if cookies aren't supported.<br>");
    out.println("Note that by default URL rewriting is not enabled" +
                " due to its large overhead.");

    // Report data from request.
    out.println("<h3>Request and Session Data</h3>");
    out.println("Session ID in Request: " +
                req.getRequestedSessionId());
    out.println("<br>Session ID in Request is from a Cookie: " +
                req.isRequestedSessionIdFromCookie());
    out.println("<br>Session ID in Request is from the URL: " +
                req.isRequestedSessionIdFromURL());
    out.println("<br>Valid Session ID: " +
                req.isRequestedSessionIdValid());

    // Report data from the session object.
    out.println("<h3>Session Data</h3>");
    out.println("New Session: " + session.isNew());
    out.println("<br> Session ID: " + session.getId());
    out.println("<br> Creation Time: " + new Date(session.getCreationTime()));
    out.println("<br>Last Accessed Time: " +
                new Date(session.getLastAccessedTime()));

    out.println("</body>");
    out.close();
  }

  public String getServletInfo() {
    return "A simple session servlet";
  }
}
Enter the preceding code into a text editor, and save it in the file j2ee/home/default-web-app/WEB-INF/classes/SessionServlet.java. If you set the attribute development="true" in the <orion-web-app> element of the global-web-application.xml file, the servlet can be recompiled and redeployed automatically the next time it is invoked. You may also have to set the source-directory attribute appropriately. See "Element Descriptions for global-web-application.xml and orion-web.xml" for more information about these attributes.
Figure 2-1 shows the output of this servlet when it is invoked the second time in a session by a Web browser that has cookies enabled. Experiment with different Web browser settings--for example, by disabling cookies--then click on the HREF that causes URL rewriting.
The session object of a stateful servlet can be replicated to other OC4J servers in a load-balanced cluster island. If the server handling a request to a servlet should fail, the request can "failover" to another JVM on another server in the cluster island. The session state will still be available. The Web application must be marked as distributable in the web.xml file, by use of the standard <distributable> element.
Objects that are stored by a servlet in the HttpSession object are replicated, and must be serializable or remoteable for replication to work properly.
Note that a slight but noticeable delay occurs when an application is replicated to other servers in a load-balanced cluster island. It is, therefore, possible that the servlet could have been replicated by the time a failure occurred in the original server, but that the session information had not yet been replicated.
A servlet can access a database using a JDBC driver. The recommended way to use JDBC is by using an OC4J data source to get the database connection. See Oracle9iAS Containers for J2EE Services Guide for information about OC4J data sources.
For more information about JDBC, see the Oracle9i JDBC Developer's Guide and Reference.
Part of the power of servlets comes from their ability to retrieve data from a database. A servlet can generate dynamic HTML by getting information from a database and sending it back to the client. A servlet can also update a database, based on information passed to it in the HTTP request.
The example in this section shows a servlet that gets some information from the user through an HTML form and passes the information to a servlet. The servlet completes and executes a SQL statement, querying the sample HR schema to get information based on the request data.
A servlet can get information from the client in many ways. This example reads a query string from the HTTP request.
The Web browser accesses a form in a page that is served through the Web listener. First, enter the following text into a file, naming the file EmpInfo.html.
<HTML>
<HEAD>
<TITLE>Get Employee Information</TITLE>
</HEAD>

<BODY>
<FORM METHOD=GET ACTION="/servlet/GetEmpInfo">
The query is<br>
SELECT LAST_NAME, EMPLOYEE_ID FROM EMPLOYEES WHERE LAST NAME LIKE ?.<p>

Enter the WHERE clause ? parameter (use % for wildcards).<br>
Example: 'S%':<br>
<INPUT TYPE=TEXT NAME="queryVal">
<P>
<INPUT TYPE=SUBMIT VALUE="Send Info">
</FORM>

</BODY>
</HTML>
Then save this file in the j2ee/home/default-web-apps directory.
The servlet that the preceding HTML page calls takes the input from a query string. The input is the completion of the WHERE clause in the SELECT statement. The servlet then appends this input to complete the database query. Most of the code in this servlet is taken up with the JDBC statements required to connect to the data server and retrieve the query rows.
This servlet makes use of the init() method to do a one-time lookup of a data source, using JNDI. The data source lookup assumes a data source such as the following has been defined in the j2ee/home/config/data-sources.xml file:
<data-source
   class="com.evermind.sql.DriverManagerDataSource"
   name="OracleDS"
   location="jdbc/OracleCoreDS"
   xa-location="jdbc/xa/OracleXADS"
   ejb-location="jdbc/OracleDS"
   connection-driver="oracle.jdbc.driver.OracleDriver"
   username="scott"
   password="tiger"
   url="jdbc:oracle:thin:@localhost:5521:oracle"
   inactivity-timeout="30"
/>
In Oracle9iAS 9.0.2, it is advisable to use only the ejb-location JNDI name in the JNDI lookup for a data source. See the Oracle9iAS Containers for J2EE Services Guide for more information about data sources.
Here is the servlet code:
import java.io.*;
import java.sql.*;
import javax.servlet.*;
import javax.servlet.http.*;
// These packages are needed for the JNDI lookup.
import javax.naming.*;
// These packages support SQL operations and Oracle JDBC drivers.
import javax.sql.*;
import oracle.jdbc.*;


public class GetEmpInfo extends HttpServlet {

  DataSource ds = null;

  public void init() throws ServletException {
    try {
      InitialContext ic = new InitialContext();
      ds = (DataSource) ic.lookup("java:comp/env/jdbc/OracleDS");
    }
    catch (NamingException ne) {
      throw new ServletException(ne);
    }
  }


  public void doGet (HttpServletRequest req, HttpServletResponse resp)
                  throws ServletException, IOException {

    String queryVal = req.getParameter("queryVal");
    String query =
      "select last_name, employee_id from employees " +
      "where last_name like " + queryVal;

    resp.setContentType("text/html");

    PrintWriter out = resp.getWriter();
    out.println("<html>");
    out.println("<head><title>GetEmpInfo</title></head>");
    out.println("<body>");

    try {
      Connection conn = ds.getConnection();
      Statement stmt = conn.createStatement();
      ResultSet rs = stmt.executeQuery(query);

      out.println("<table border=1 width=50%>");
      out.println("<tr><th width=75%>Last Name</th>" +
                  "<th width=25%>Employee ID</th></tr>");

      for (int count = 0; ; count++ ) {
        if (rs.next()) {
          out.println("<tr><td>" + rs.getString(1) + "</td><td>" +
             rs.getInt(2) + "</td></tr>");
        }
        else {
          out.println("</table><h3>" + count + " rows retrieved</h3>");
          break;
        }
      }
      conn.close();
      rs.close();
      stmt.close();
    }
    catch (SQLException se) {
      se.printStackTrace(out);
    }

    out.println("</body></html>");
  }

  public void destroy() {
  }
}
To deploy this example, save the HTML file in the j2ee/home/default-web-app/ directory (the effective document root for the default application), and save the Java servlet in the j2ee/home/default-web-app/WEB-INF/classes/ directory. The GetEmpInfo.java file is automatically compiled when the servlet is invoked by the form.
To test the example, invoke the EmpInfo.html page from a Web browser, as follows:
http://<hostname><:port>/j2ee/EmpInfo.html
This assumes /j2ee is the root context of the OC4J default Web application.
Complete the form and click Submit Query.
|
Note: For the port setting, 7777 by default will access OC4J through the Oracle HTTP Server, powered by Apache, with the Oracle9iAS Web Cache enabled. Other port settings are possible to use the OC4J Web listener directly, which may be useful in development situations. See the Oracle9iAS Containers for J2EE User's Guide for information about OC4J port settings and default settings. For production applications, Oracle recommends that you use the Oracle HTTP Server, which is part of the Oracle9iAS distribution. See the Oracle HTTP Server Administration Guide. |
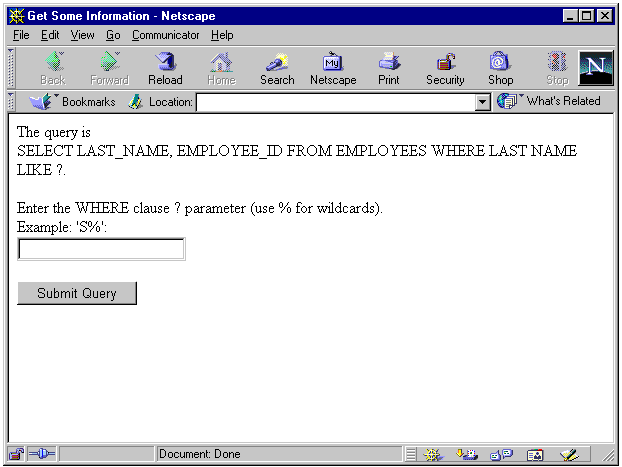
When you invoke EmpInfo.html, you will see a browser window that looks something like Figure 2-2.
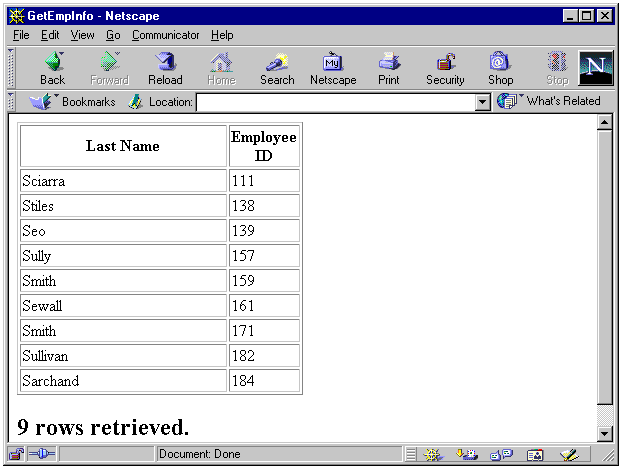
Entering 'S%' in the form and pressing Submit Query calls the GetEmpInfo servlet, and the results look something like Figure 2-3.
A servlet or a JSP page can call an EJB to perform additional processing. A typical application design often uses servlets as a front-end to do the initial processing of client requests, with EJBs being called to perform the business logic that accesses or updates a database. Container-managed-persistence (CMP) entity beans, in particular, are well-suited for such tasks.
There are three main scenarios for servlet-EJB interactions:
<ejb-ref> element in the web.xml file. See "Local EJB Lookup Within the Same Application" below, which includes a detailed example.
For additional servlet-EJB examples, see the demo programs that come with the OC4J distribution.
See the Oracle9iAS Containers for J2EE Enterprise JavaBeans Developer's Guide and Reference for more information about EJB development in OC4J.
This section presents an example of a single servlet, HelloServlet, that calls a single EJB, HelloBean, within the same application using a local lookup.
Here are the key steps of the servlet code:
helloWorld() method on the remote object, which returns a String object.
package myServlet;

// Step 1: Import the EJB package.
import myEjb.*;
import java.io.*;
import javax.servlet.*;
import javax.servlet.http.*;
import javax.naming.*;                                // for JNDI

public class HelloServlet extends HttpServlet {

  public void doGet (HttpServletRequest request, HttpServletResponse response)
    throws ServletException, IOException {

    response.setContentType("text/html");
    PrintWriter out = response.getWriter();

    out.println("<html><head><title>Hello from Servlet</title></head>");
    // Step 2: Print a message from the servlet.
    out.println("<body><h1>Hello from hello servlet!</h1></body>");

    // Step 3: Create an output string, with an error default.
    String s = "If you see this message, the ejb was not invoked properly!!";
    // Step 4: Use JNDI to look up the EJB home interface.
    try {
      HelloHome hh = (HelloHome)
                  (new InitialContext()).lookup("java:comp/env/ejb/HelloBean");

      // Step 5: Create the EJB remote IF.
      HelloRemote hr = hh.create();
      // Step 6: Invoke the helloWorld() method on the remote object.
      s = hr.helloWorld();
    } catch (Exception e) {
      e.printStackTrace(out);
    }
    // Step 7: Print the message from the EJB.
    out.println("<br>" + s);
    out.println("</html>");
  }
}
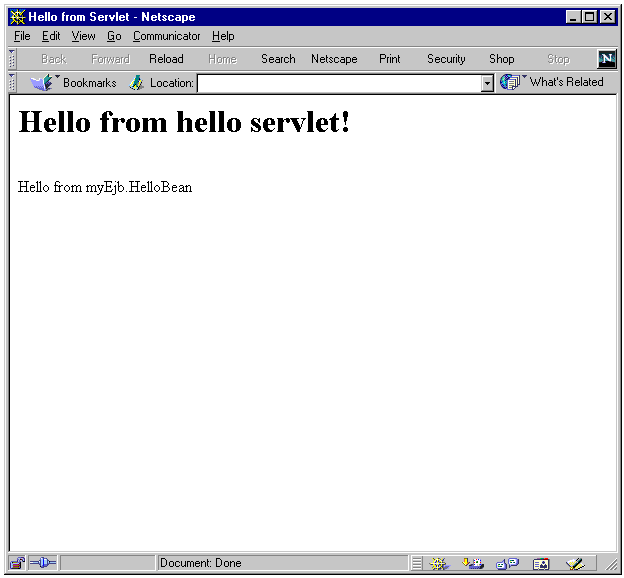
Figure 2-4 shows the output to a Web browser when you invoke the servlet:
http://<hostname><:port>/j2ee/myapp/doubleHello
The output from the servlet is printed in H1 format at the top, then the output from the EJB is printed in text format below that.
The EJB, as shown here, is simple. It implements a single method--helloWorld()--that returns a greeting to the caller. The home and remote EJB interface code is also shown below.
package myEjb;

import java.rmi.RemoteException;
import javax.ejb.*;

public class HelloBean implements SessionBean
{
  public String helloWorld () throws RemoteException {
    return "Hello from myEjb.HelloBean";
  }

  public void ejbCreate () throws RemoteException, CreateException {}
  public void ejbRemove () {}
  public void setSessionContext (SessionContext ctx) {}
  public void ejbActivate () {}
  public void ejbPassivate () {}
}
Here is the code for the home interface:
package myEjb;

import java.rmi.RemoteException;
import javax.ejb.EJBHome;
import javax.ejb.CreateException;

public interface HelloHome extends EJBHome
{
  public HelloRemote create () throws RemoteException, CreateException;
}
Here is the code for the remote interface:
package myEjb;

import java.rmi.RemoteException;
import javax.ejb.EJBObject;

public interface HelloRemote extends EJBObject
{
  public String helloWorld () throws RemoteException;
}
This section discusses the deployment steps for the Servlet-EJB sample application, including the Web archive, EJB archive, application-level descriptor, and deployment commands.
See Chapter 3, "Deployment and Configuration", for general information about deployment to OC4J.
To deploy this application, an EJB deployment descriptor (ejb-jar.xml) and a Web deployment descriptor (web.xml) are required. The contents of web.xml for this example are as follows:
<?xml version="1.0"?>
<!DOCTYPE WEB-APP PUBLIC "-//Sun Microsystems, Inc.//DTD Web Application
2.2//EN" "http://java.sun.com/j2ee/dtds/web-app_2_2.dtd">

<web-app>

  <display-name>HelloServlet</display-name>
  <description> HelloServlet </description>
  <servlet>
    <servlet-name> ServletCallingEjb </servlet-name>
    <servlet-class> myServlet.HelloServlet </servlet-class>
  </servlet>
  <servlet-mapping>
    <servlet-name> ServletCallingEjb </servlet-name>
    <url-pattern> /doubleHello </url-pattern>
  </servlet-mapping>
  <welcome-file-list>
    <welcome-file> index.html </welcome-file>
  </welcome-file-list>
  <ejb-ref>
    <ejb-ref-name>ejb/HelloBean</ejb-ref-name>
    <ejb-ref-type>Session</ejb-ref-type>
    <home>myEjb.HelloHome</home>
    <remote>myEjb.HelloRemote</remote>
  </ejb-ref>
</web-app>
Next, create the directory structure that is required for Web application deployment, and move the Web deployment descriptor (web.xml) and the compiled servlet class file into the structure. The web.xml file must be in a WEB-INF directory, and the servlet class files (in their respective packages, as applicable) under the WEB-INF/classes/ directory. Once you create the directory structure and populate the directories, create a WAR file to contain the files. From the Web root directory, create the WAR file as follows:
% jar cvf myapp-web.war *
When created, the WAR file should look like this:
% jar -tf myapp-web.war
META-INF/
META-INF/MANIFEST.MF
WEB-INF/
WEB-INF/classes/
WEB-INF/classes/myServlet/
WEB-INF/classes/myServlet/HelloServlet.class
WEB-INF/web.xml
The contents of ejb-jar.xml are as follows. Note that the <ejb-name> value here corresponds to the <ejb-ref-name> value in the web.xml file above.
<?xml version="1.0"?>
<!DOCTYPE ejb-jar PUBLIC "-//Sun Microsystems, Inc.//DTD Enterprise JavaBeans
1.12//EN" "http://java.sun.com/j2ee/dtds/ejb-jar_1_1.dtd">
<ejb-jar>
  <enterprise-beans>
    <session>
      <description>Hello Bean</description>
      <ejb-name>ejb/HelloBean</ejb-name>
      <home>myEjb.HelloHome</home>
      <remote>myEjb.HelloRemote</remote>
      <ejb-class>myEjb.HelloBean</ejb-class>
      <session-type>Stateful</session-type>
      <transaction-type>Container</transaction-type>
    </session>
  </enterprise-beans>
  <assembly-descriptor>
  </assembly-descriptor>
</ejb-jar>
Create a JAR file to hold the EJB components. The JAR file should look like this:
% jar tf myapp-ejb.jar
META-INF/
META-INF/MANIFEST.MF
myEjb/
META-INF/ejb-jar.xml
myEjb/HelloBean.class
myEjb/HelloHome.class
myEjb/HelloRemote.class
To deploy the application, create an application deployment descriptor--application.xml. This file describes the modules in the application:
<?xml version="1.0"?>
<!DOCTYPE application PUBLIC "-//Sun Microsystems, Inc.//DTD J2EE Application
1.2//EN" "http://java.sun.com/j2ee/dtds/application_1_2.dtd">

<application>
  <display-name>Servlet_calling_ejb_example</display-name>
  <module>
    <web>
      <web-uri>myapp-web.war</web-uri>
      <context-root>/foo</context-root>
    </web>
  </module>
  <module>
    <ejb>myapp-ejb.jar</ejb>
  </module>
</application>
Note the following regarding the <context-root> setting:
/foo in this example) to route properly to OC4J through Oracle HTTP Server, there must be an appropriate Oc4jMount command in the mod_oc4j.conf file. (See the Oracle9iAS Containers for J2EE User's Guide for additional information.) If you use OEM to deploy the application, this is handled automatically. This discussion assumes the Web application is bound to a Web site that uses AJP protocol, according to settings in default-web-site.xml or the relevant Web site XML file.
<context-root> element is ignored. You must specify the context root by adding appropriate entries to default-web-site.xml or the relevant Web site XML file, and to mod_oc4j.conf.
Finally, create an EAR file to hold the application components. The EAR file should look like this:
% jar tf myapp.ear
META-INF/
META-INF/MANIFEST.MF
myapp-ejb.jar
myapp-web.war
META-INF/application.xml
To perform the application deployment for testing purposes, you can use the OC4J admin.jar tool to issue two commands. The first command is as follows. (Specify the appropriate machine name.)
% java -jar $J2EE_HOME/admin.jar ormi://<machine_name> admin welcome  \
       -deploy -file ./lib/myapp.ear   \
       -deploymentName myapp
This command adds the following entry to j2ee/home/config/server.xml:
   <application
      name="myapp"
      path="<your_path_to>/lib/myapp.ear"
      auto-start="true"
   />
Here is the second command:
% java -jar $J2EE_HOME/admin.jar ormi://<machine_name> admin welcome
       -bindWebApp myapp myapp-web default-web-site /myapp
This command binds the Web module to a Web site. It adds the following entry to j2ee/home/config/default-web-site.xml:
   <web-app
      application="myapp"
      name="myapp-web"
      root="/myapp"
   />
To perform a remote EJB lookup in OC4J, you must enable the EJB remote flag. This is an attribute in the <ejb-module> subelement of an <orion-application> element in the orion-application.xml file for the application to which the calling servlet belongs. (The default setting is remote="false".) Here is an example of enabling this flag:
<orion-application ... >
   <ejb-module remote="true" ... />

   ...

</orion-application>
No changes are necessary to the servlet code. Recall the local EJB lookup from "Servlet Code: HelloServlet":
HelloHome hh = (HelloHome)
               (new InitialContext()).lookup("java:comp/env/ejb/HelloBean");
Given a remote="true" setting, this code would result in a remote lookup of ejb/HelloBean. Where the lookup is performed is according to how EJB clustering is configured in the application rmi.xml file.
Configure remote servers in rmi.xml through <server> elements, using the host, port, user, and password attributes as appropriate. If multiple servers are configured, OC4J will search all of them, as necessary, for the intended EJB.
See the Oracle9iAS Containers for J2EE Services Guide for information about rmi.xml.
To look up an EJB from outside the application, use ormi://... syntax in the lookup() call. The remote flag discussed in "Remote EJB Lookup Within the Same Application" above is not relevant--the lookup is according to the ormi URL. If the host and port are the same as for the calling servlet, then the lookup is local; otherwise, the lookup is remote. Here is an example, where appname is the name of the application to which the EJB belongs:
HelloHome hh = (HelloHome)
  (new InitialContext()).lookup("ormi://host:port/appname/env/ejb/HELLOEJB");
This assumes that the name ejb/HELLOEJB is defined in an <ejb-name> element in the ejb-jar.xml file of the remote application. The web.xml file of the application to which the calling servlet belongs is not relevant.
See the Oracle9iAS Containers for J2EE Enterprise JavaBeans Developer's Guide and Reference for information about ejb-jar.xml.
|
|
 Copyright © 2002 Oracle Corporation. All Rights Reserved. |
|