Release 2 (9.0.2)
Part Number A95880-01
Home |
Solution Area |
Contents |
Index |
| Oracle9iAS Containers for J2EE User's Guide Release 2 (9.0.2) Part Number A95880-01 |
|
Chapter 2, "Configuration and Deployment", discusses basic configuration, development, and deployment of a J2EE application. This chapter discusses both global J2EE service configuration and advanced J2EE application configuration.
In the original OC4J product, all configuration was stored in XML files. With this release, OC4J is integrated with Enterprise Manager. This causes the entire configuration to be split into two segments:
application.xml file must still be constructed by hand within XML files.
This chapter discusses the following topics:
You can configure J2EE services, J2EE applications, and Oracle9iAS clusters with Enterprise Manager. Some aspects are configured at the OC4J instance level; thus, they provide a global configuration for all deployed applications in the instance. Other aspects are configured at the application level; thus, this type of configuration is local and applicable only to the application.
The following sections provide you with an overview of advanced configuration within Enterprise Manager for OC4J:
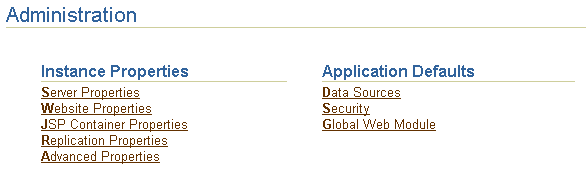
There exists one OC4J Home Page for each OC4J instance configured. Generally, on the OC4J Home Page, you configure global services and deploy applications to this instance.
Specifically, from the OC4J Home Page, you can do the following:
You can deploy, redeploy, or undeploy a J2EE application that exists in an EAR or WAR file archival format. To deploy an application, click the Deploy EAR File or Deploy WAR File buttons to deploy in the Deployed Applications section on the OC4J Home Page.
This starts the deployment wizard that is covered in "Deploying Applications". If you deploy an EAR file, it must contain an application.xml that describes the application modules; if you deploy a WAR file, the application.xml file is created for you automatically.
To undeploy, click the Select radio button for the application and then click the Undeploy button.
To redeploy, click the Select radio button for the application and then click the Redeploy button.
|
Note: You can also deploy, undeploy, or redeploy simple applications with the DCM command. See Appendix A, "DCM Command-Line Utility (dcmctl)" for directions. |
To configure OC4J properties, scroll down to the Administration section of the OC4J Home Page. Select Server Properties in the Instance Properties column. The General section of this page contains the following fields:
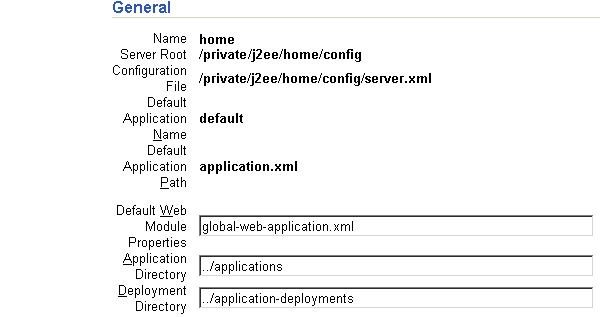
In this section, you can modify OC4J server defaults. These are listed below:
application.xml, which is separate from the application.xml included with each EAR file. This application.xml file is known as the global application.xml file. It defines properties that are used across all deployed applications within this OC4J instance. Some of the properties exist in the rest of this page. If you want to change the name and the content of this global application.xml file, modify this field to contain the new XML filename. However, this file must conform to the DTD that Oracle specifies. The directory is relative to j2ee/home/config.
global-web-application.xml. If you want it to refer to another XML file, you can change the pointer to this file here. However, this file must conform to the DTD that Oracle specifies. The directory is relative to j2ee/home/config.
If you want to actually modify elements contained within this file, update entries in either the Web Site Properties or Advanced Properties section. These are discussed more in "Configure Web Site" and "Manipulating XML Files".
/applications directory. The default directory is where OC4J places modified module deployment descriptors with added defaults. Currently, this location is in the /application-deployments directory. You can change the locations of the default directories in these fields. The directory is relative to j2ee/home/config. See "What Happens When You Deploy?" for more information on the usage of these directories.
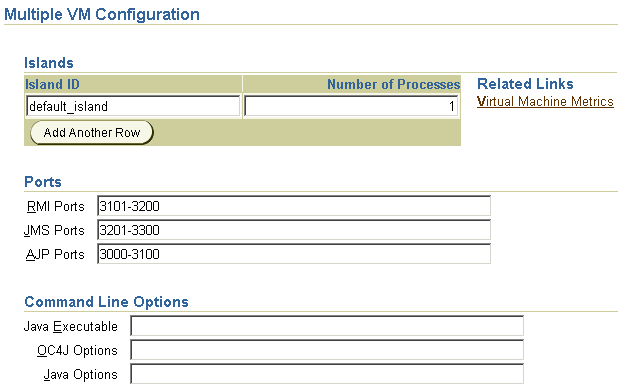
The next section, Multiple VM Configuration, is dedicated as part of the cluster configuration. The following details what each field means; however, the context of how to configure clusters using this section is discussed fully in Chapter 9, "Oracle9iAS Clustering".
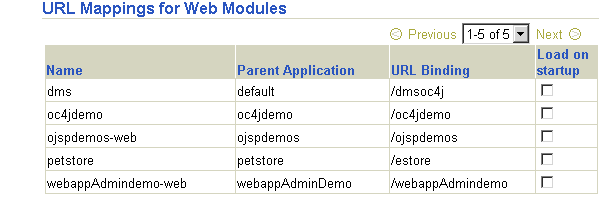
To configure your Web site, scroll down to the Administration section of the OC4J Home Page. Select Website Properties in the Instance Properties column.
The Web site page has two sections. In the first section, you can see what is the default Web application and its parent. In the second section--URL Mappings for Web Modules--you can specify whether each Web application is to be loaded upon startup. These parameters are discussed in more detail in the Oracle9iAS Containers for J2EE Servlet Developer's Guide and are stored in the default-web-site.xml file.
You can configure global JSP Container parameters. These apply to all JSPs deployed in this OC4J instance. To configure JSP Container parameters, scroll down to the Administration section of the OC4J Home Page. Select JSP Container Properties in the Instance Properties column. This brings you to the following page:
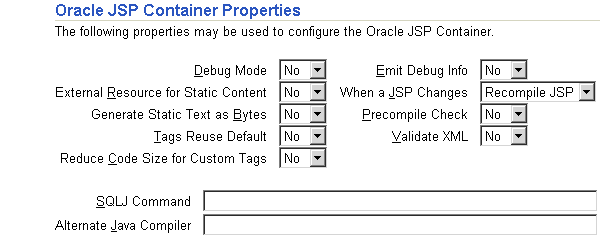
Most of the properties indicated here are described in Chapter 3 of the Oracle9iAS Containers for J2EE Support for JavaServer Pages Reference. These properties can be included within the global-web-application.xml file within the <servlet> element.
To configure Web parameters that apply to all deployed Web applications, scroll down to the Administration section of the OC4J Home Page. Select Global Web Module in the Application Defaults column. This brings you to the following page:
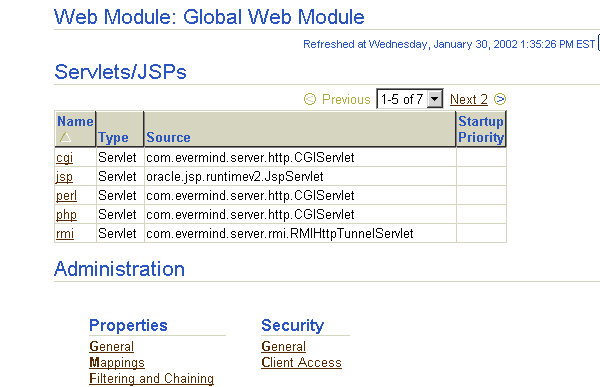
The type of parameters that you can define for Web modules concern mappings, filtering, chaining, environment, security, and client access. Drill down into each of the provided links under the Properties and Security columns to modify these parameters. Each of these parameters are discussed in detail in the Oracle9iAS Containers for J2EE Servlet Developer's Guide. These parameters are stored in the global-web-application.xml and orion-web.xml files. This guide discusses the elements in these files.
RMI and JMS can only be defined within an XML definition. To edit the XML files for either of these services, scroll down to the Advanced Properties section under the Instance Properties column on the OC4J Home Page. In this section, you can choose rmi.xml or jms.xml to modify the straight XML files for these services. See the Oracle9iAS Containers for J2EE Services Guide on how to modify these XML files.
You can configure global or local data sources. A global data source is available to all deployed applications in this OC4J instance. A local data source is configured within the deployed application and can only be used by that application.
See Oracle9iAS Containers for J2EE Services Guide for a full explanation of how to configure a data source and the elements within the data-sources.xml file.
To configure global data sources, select one of the following off of the OC4J Home Page:
data-sources.xml on this page. This allows you to add data sources using the XML definitions. This is useful if you have been provided the XML. You can just copy in the already configured data sources.
To configure local data sources, you perform the same selection off of the application page. You must drill down to the particular application that this data source will be local to. On the application page, choose Data Source under the Resources column. It displays the same data source field page that is discussed in "Data Source Field Page".
When you choose Data Source under the Application Defaults column, you see the Data Sources that are currently configured.
To configure a new Data Source, click Add Data Source. This brings you to a page where you can enter all configuration details about the data source. This page is divided up into four sections.
Figure 3-1 shows the General section.
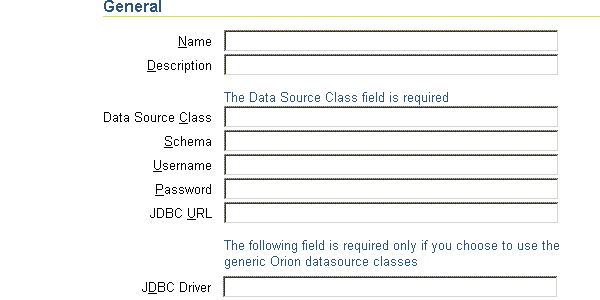
The General section enables you to define the following aspects about a data source:
com.evermind.sql.ConnectionDataSource, that the data source is instantiated as.
jdbc:oracle:thin:@my-lap:1521:SID.
oracle.jdbc.driver.OracleDriver.
Figure 3-2 shows the JNDI Locations section.
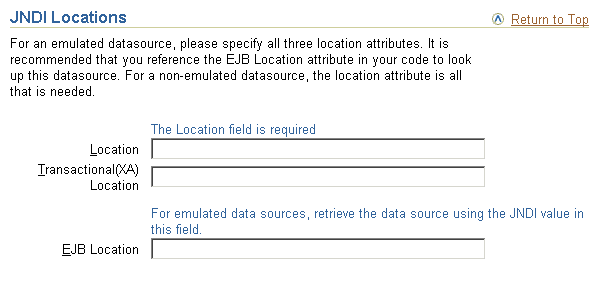
The JNDI Locations section enables you to define the JNDI location string that the data source is bound with. The JNDI location is used within JNDI lookup for retrieving this data source.
Figure 3-3 shows the Connection Attributes section.
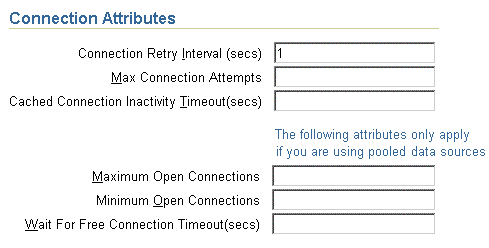
This section enables you to modify connection tuning parameters, including the retry interval, pooling parameters, timeout parameters, and maximum attempt parameter.
Figure 3-4 shows the Properties section for the data source.
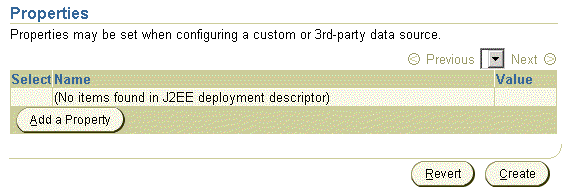
If your data source is a third party data source, you may need to set certain properties. These properties would be defined in the third-party documentation. In addition, properties must be set for JTA transactions for the two-phase commit coordinator.
The type of security you use is designated by the User Manager configured. The default User Manager for all applications is the JAZN User Manager. Within the User Manager type, you configure groups, users, and roles.
Each application can be assigned its own User Manager if you do not want to use the default JAZN User Manager. You chose the User Manager that you will use for the application on the deployment wizard. See Chapter 8, "Security" for more information on User Managers.
To configure groups, users, or roles in the default JAZN User Manager, do the following:
Choosing Security allows you to manage groups, users, and roles for the default JAZN User Manager, as shown in Figure 3-6. These groups, users, and roles can be used in all applications deployed in this OC4J instance.
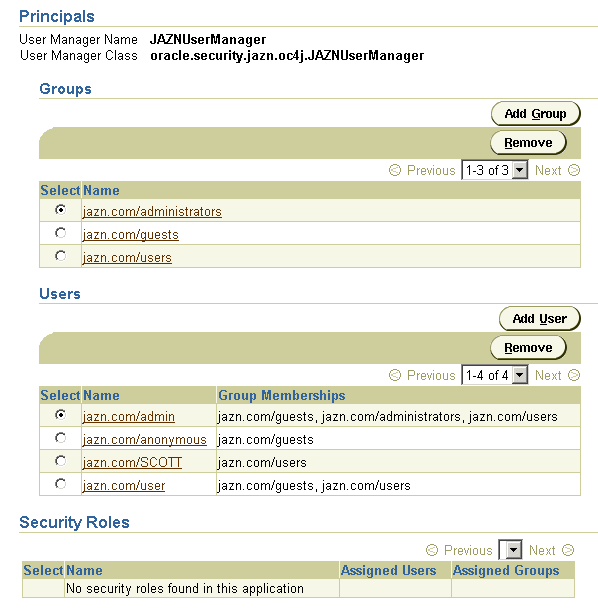
The default User Manager is the JAZN User Manager. However, you can also assign a separate User Manager for each application.
See Chapter 8, "Security" and Oracle9iAS Containers for J2EE Services Guide for a discussion of how to configure your security.
To configure the UDDI Registry, scroll down to the Administration section of the OC4J Home Page. Select the UDDI Registry in the Related Links column.
In OC4J version 1.0.2.2, you configured the OC4J server and all deployed application parameters through XML files. Since the OC4J server existed on a single node and did not need high availability and clustering management, this worked well. However, with the integration of OC4J with Oracle9iAS, increased enterprise management abilities with clustering and high availability options, all configuration must be accomplished through Enterprise Manager.
For those developers who are used to working with the OC4J XML files and wish to continue to do so, the Advanced Properties section allows you to continue this ability.
There are four groups of XML files located within Enterprise Manager:
server.xml, global-web-application.xml, rmi.xml, jms.xml, http-web-site.xml, and default-web-site.xml. Modify any of these XML files in the Advanced Properties page off of the OC4J Home Page.
application.xml, data-sources.xml, jazn-data.xml and oc4j-connectors.xml. To modify these XML files, choose default under Default Application on the OC4J Home Page. On the default application page, scroll down to the Administration section and choose Advanced Properties.
data-sources.xml, jazn-data.xml, and orion-application.xml. To modify these files, drill down to the specific application. On the application screen, scroll down to the Administration section and choose Advanced Properties.
web.xml, orion-web.xml, ejb-jar.xml, and orion-ejb-jar.xml. You can modify parameters only in the OC4J-specific (orion-xxx.xml) XML files. You cannot modify the J2EE XML files, such as web.xml or ejb-jar.xml. For more information on modifying these XML files, see "Modifying XML Files Included in the Deployed Application EAR File".
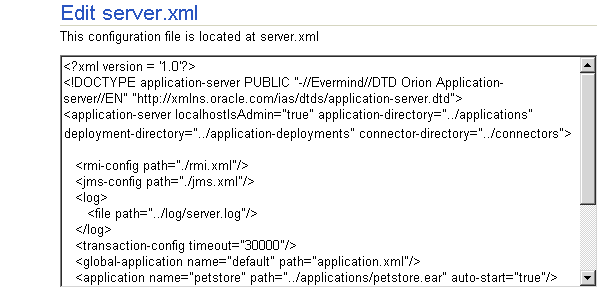
As an example, the server.xml page is shown. Notice that you can hand edit the XML elements.
If you do not understand the OC4J XML files, see "Overview of OC4J and J2EE XML Files" for a discussion of these files and their relation to each other. Other books in the OC4J documentation set describe the elements within each of these files.
Once you have deployed your application, you can modify most of the parameters for this application. To configure application-specific parameters, do the following:
This page is the initiating point for changing general application configuration as well as configuration specific to a certain part of your deployed application, such as a WAR file.
The following sections provide a brief overview of these configuration options:
If you scroll down to the Administration section and select the General link, you can configure a multitude of application details, as follows:
As described in "Configure Data Sources" and "Configure Security", you can configure data sources and security either for all deployed applications (global) or only for a specific application (local). See these sections for directions on how to configure your J2EE services for your application.
You can modify only the OC4J-specific XML files of your application after deployment. This includes orion-ejb-jar.xml, orion-web.xml, and orion-application-client.xml. You cannot modify the J2EE XML files, such as web.xml, ejb-jar.xml, and application-client.xml.
In order to modify the OC4J-specific XML files, do the following:
orion-ejb-jar.xml, orion-web.xml, and orion-application-client.xml.
This section contains the following topics:
Each XML file within OC4J exists to satisfy a certain role; thus, if you have need of that role, you will understand which XML file to modify and maintain.
Figure 3-7 illustrates all the OC4J XML files and their respective roles.
These files configure the OC4J server and point to other key configuration files. The settings in the OC4J configuration files are not related to the deployed J2EE applications directly, but to the server itself.
orion-" prefix. In addition, the following are global configuration files for all components in the application:
application.xml as the global application configuration file that contains common settings for all applications in this OC4J instance.
orion-application.xml file contains OC4J-specific global application information for all applications in this OC4J instance.
global-web-application.xml file contains OC4J-specific global Web application configuration information that contains common settings for all Web modules in this OC4J instance.
oc4j-connectors.xml file contains global connector configuration information.
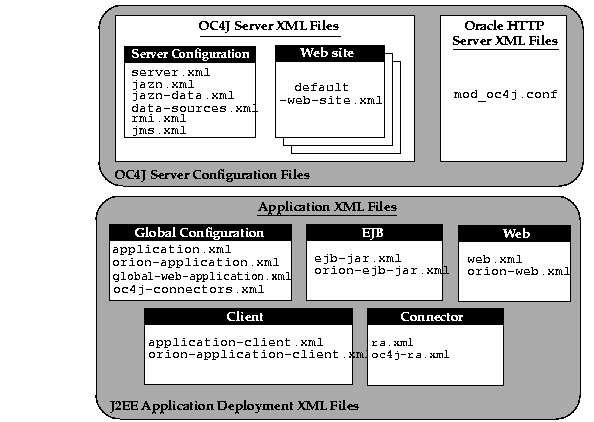
Table 3-1 describes the role and function for each XML file that was displayed in the preceding figure.
Some of these XML files are interrelated. That is, some of these XML files reference other XML files--both OC4J configuration and J2EE application (see Figure 3-9).
Here are the interrelated files:
server.xml--contains references to the following:
web-site.xml files for each Web site for this OC4J server
jazn-data.xml and data-sources.xml which are defined in the global application.xml, shown in Figure 3-7
application.xml file for each J2EE application that has been deployed in OC4J
web-site.xml--references applications by name, as defined in the server.xml file. And this file references an application-specific EAR file.
application.xml--contains references to the jazn-data.xml and data-sources.xml files.
The server.xml file is the keystone that contains references to most of the files used within the OC4J server. Figure 3-8 shows the XML files that can be referenced in the server.xml file:

Figure 3-9 demonstrates how the server.xml points to other XML configuration files. For each XML file, the location can be the full path or a path relative to the location of where the server.xml file exists. In addition, the name of the XML file can be any name, as long as the contents of the file conform to the appropriate DTD.
<rmi-config> tag denotes the name and location of the rmi.xml file.
<jms-config> tag denotes the name and location of the jms.xml file.
<global-application> tag denotes the name and location of the global application.xml file.
<global-web-app-config> tag denotes the name and location of the global-web-application.xml file.
<web-site> tag denotes the name and location of one *-web-site.xml file. Since you can have multiple Web sites, you can have multiple <web-site> entries.
In addition to pointing to the OC4J server configuration files, the server.xml file describes the applications that have been deployed to this OC4J server. Each deployed application is denoted by the <application> tag.
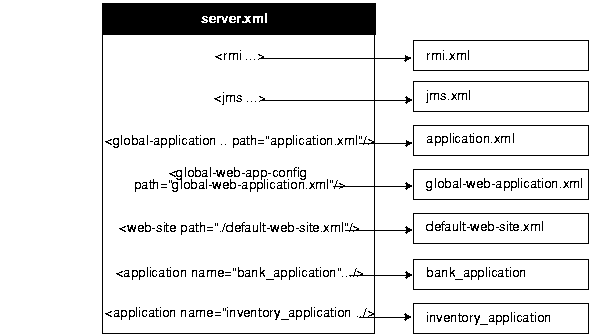
Other tags for server.xml are described in "Elements in the server.xml File".
When you become more proficient with OC4J and deploying applications, you should acquaint yourself with what OC4J does for you. The following sections help you understand these tasks:
When you deploy your application, the following occurs:
OC4J opens the EAR file and reads the descriptors.
application.xml that exists in the EAR file. The application.xml file lists all of the modules contained within the EAR file. OC4J notes these modules and initializes the EAR environment.
application-deployments/ directory. These are the descriptors that OC4J uses when starting and restarting your application. But do not modify these descriptors. Always change your deployment descriptors in the "master" location.
applications/ directory. You can change the "master" directory in the Server Properties page off of the OC4J Home Page. In the General section, modify the Application Directory field to the new location of the "master" directory. The location of the directory is relative to /j2ee/home/config.
server.xml file with the notation that this application has been deployed.
After deployment, you can see your application configuration in the server.xml and web-site.xml files, as follows:
server.xml, each existing application contains a line with an <application name=... path=... auto-start="true" /> entry. The auto-start attribute designates that you want this application automatically started when OC4J starts.
web-site.xml, a <web-app...> entry exists for each Web application that is bound to the Web site upon OC4J startup. Because the name attribute is the WAR filename (without the .WAR extension), there is one line for each WAR file included in your J2EE application.
For each Web application binding included in a WAR file, the following line has been added:
<web-app application="myapp" name="/private/myapp-web" root="/myapp"
/>
application attribute is the name provided in the server.xml as the application name.
name attribute is the name of the WAR file, without the .WAR extension.
root attribute defines the root context for the application off of the Web site. For example, if you defined your Web site as "http://<ohs_host>:7777/j2ee", then to initiate the application, point your browser at "http://<ohs_host>:7777/j2ee/myapp".
Incoming client requests use one of three protocols: AJP, HTTP, or RMI. AJP and HTTP are used for HTTP requests. AJP is used between the OHS and OC4J components. HTTP is used for HTTP requests directed past OHS to OC4J. RMI is used for incoming EJB requests.
All HTTP requests, whether through OHS or directly to OC4J, must have a listener configured in an OC4J Web site. You can have two Web sites for each OC4J instance: one for each protocol type. That is, one Web site is only for AJP requests and the other is for HTTP requests. You cannot have one Web site listen for both types of protocols. Thus, OC4J provides two Web site configuration files:
default-web-site.xml--This is the AJP protocol listener and the default for most HTTP requests that use Oracle9iAS. After installation, the Oracle HTTP Server front-end forwards incoming HTTP requests over the AJP port. The OC4J Web server configuration file (default-web-site.xml) indicates the AJP listener port. The default-web-site.xml file defines the default AJP port as zero. This enables OC4J and the Oracle HTTP Server to negotiate a port upon startup. The range of port values that the AJP port can be is configured in the OPMN configuration. See the High Availability chapter in the Oracle9i Application Server Administrator's Guide for more information on OPMN.
The following shows the entry in the default-web-site.xml for the default AJP listener:
<web-site host="oc4j_host" port="0" protocol="ajp13"

    display-name="Default OC4J WebSite">
You can configure the AJP default Web site protocol in two places: Website Properties or Advanced Properties off of the OC4J Home Page.
http-web-site.xml--This is the HTTP protocol listener. If you want to bypass OHS and go directly to OC4J, you use the port number defined in this file. However, you must be careful. The AJP port is chosen at random every time OC4J is started. If it chooses the same port number that is hard-coded in this XML file, there will be a conflict. If you use this method for incoming requests, verify that the port number you choose is outside of the range for AJP port numbers, which is defined in the OPMN configuration.
The default HTTP port is 7777. The following shows the entry in the http-web-site.xml for an HTTP listener with a port number of 7777:
<web-site host="oc4j_host" port="7777" protocol="http"

    display-name="HTTP OC4J WebSite">
You access the http-web-site.xml file only in the Advanced Properties on the OC4J Home Page.
RMI protocol listener is set up in the RMI configuration--rmi.xml. It is separate from the Web site configuration. EJB clients and the OC4J tools access the OC4J server through a configured RMI port. The default RMI port is 23791. The following shows the default RMI port number configured in the rmi.xml file:
<rmi-server port="23791" >
You can modify the rmi.xml file only in the Advanced Properties on the OC4J Home Page.
The mod_oc4j module in the Oracle HTTP Server is configured at install time to direct all j2ee/ context bound applications to the OC4J server. If you want to use a different context, such as pubs/, you can add another mount for this context in the mod_oc4j.conf configuration file.
To modify this file, drill down to the Oracle HTTP Server Page and select mod_oc4j.conf. The file is presented for edits in the right-hand frame.
Oc4jMount /j2ee/* OC4Jworker
OC4Jworker, then both lines would be as follows:
Oc4jMount /j2ee/* OC4Jworker
Oc4jMount /pubs/* OC4Jworker
Then all incoming requests for the pubs/ context will be directed to the OC4J server. Note that when you deploy an application using the deployment wizard, the wizard automatically adds a mount point as described here for your URL mapping.
See the Oracle HTTP Server Administration Guide for complete details on the mod_oc4j module configuration.
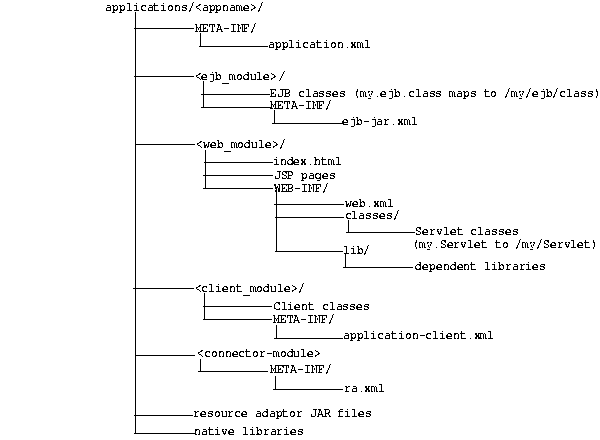
When developing applications, you want to quickly modify, compile, and execute your classes. OC4J can automatically deploy your applications as you are developing them within an expanded directory format. OC4J automatically deploys applications if the timestamp of the top directory, noted by <appname> in Figure 3-10, changes. This is the directory that server.xml knows as the "master" location. Normally, you develop under the j2ee/home/applications directory.
The application must be placed in the "master" directory in the same hierarchical format as necessary for JAR, WAR, and EAR files. For example, if <appname> is the directory where your J2EE application resides, Figure 3-10 displays the necessary directory structure.
To deploy EJB or complex J2EE applications in an expanded directory format, complete the following steps:
j2ee/home/applications/<appname>/. The directory structure below <appname> is similar to that used within an EAR file, as follows:
<ejb_module>/, <web_module>/, <client_module>/, and <connector_module>/.
server.xml, applications.xml, and *-web-site.xml files as follows:
server.xml, add a new or modify the existing <application name=... path=... auto-start="true" /> element for each J2EE application. The path points to the "master" application directory. In Figure 3-10, this is j2ee/home/applications/<appname>/.
You can specify the path in one of two manners:
In the example in Figure 3-10, if <appname> is "myapp", then the fully-qualified path is as follows:
<application_name="myapp"
    path="/private/j2ee/home/applications/myapp"
    auto-start="true" />
server.xml file exists to where the parent directory lives.
In the example in Figure 3-10, if <appname> is "myapp", then the relative path is as follows:
<application_name="myapp" path="../myapp" auto-start="true"
/>
application.xml, modify the <module> elements to contain the directory names for each module--not JAR or WAR files. You must modify the <web-uri>, the <ejb>, and the <client> elements in the application.xml file to designate the directories where these modules exist. The path included in these elements should be relative to the "master" directory and the parent of the WEB-INF or META-INF directories in each of these application types.
For example, if the <web_module>/ directory in Figure 3-10 was "myapp-web/", then the following example designates this as the Web module directory within the <web-uri> element as follows:
<module>
  <web>
    <web-uri>myapp-web</web-uri>
  </web>
</module>
*-web-site.xml file, add a <web-app...> element for each Web application. This is important, because it binds the Web application within the Web site. The application attribute value should be the same value as that provided in the server.xml file. The name attribute should be the directory for the Web application. Note that the directory path given in the name element follows the same rules as for the path in the <web-uri> element in the application.xml file.
To bind the"myapp" Web application, add the following:
<web-app application="myapp" name="myapp/myapp-web" root="/myapp"
/>
|
|
 Copyright © 2002 Oracle Corporation. All Rights Reserved. |
|