1
Oracle9iAS Wireless Quick Start
This document gets you started using Oracle9iAS Wireless without spending time researching new information. Each section of this document presents a different topic. These sections include:
Note:
This Quick Start is intended for advanced users who are familiar with principles and technologies for developing applications and with Oracle9iAS Wireless.
|
1.1 Getting Started with Oracle9iAS Wireless
This document provides you with the information you need to start using Oracle9iAS Wireless to create and test your first wireless applications.
1.1.1 Before You Begin
To use this walkthrough or configure the modules, you must be granted either the Administrator role or the Service Designer, Content Manager, and Helpdesk roles so that you can access the tools needed to build and configure wireless applications.
1.1.2 Logging into Oracle9iAS Wireless Webtool as an Administrator
To log into the Webtool:
- Access the login page through the following URL:
http://hostname:7777/webtool/login.uix
Note:
7777 is the default port number for Oracle9iAS Wireless. The port number range is 7777 to 7877. To ensure that you are using the correct port number, check the port number for Oracle9iAS Wireless stored in [Oracle home]/install/portlist.ini. For more information on port usage, see Oracle9i Application Server Installation Guide and the Oracle9i Application Server Administrator's Guide.
|
- Enter your user name and then enter your password. If you are an administrator, enter orcladmin as your user name. (The password is set during installation, but can be changed with the User Manager.)
1.2 Creating Your First Oracle9iAS Wireless Applications
These walkthroughs acquaint you with the Service Designer by showing you how to build a Wireless service. You can apply these walkthroughs to your own projects which deploy mobile applications using Oracle9iAS Wireless services.
1.2.1 Creating the HttpAdapter Master Service, HelloMS
This walkthrough gives you an overview of theWireless Webtool, Wireless Customization, and the Wireless Web Server by creating a wireless application, HelloMS. In creating this application, you create a master service using the HttpAdapter, set the the HttpAdapter URL prefix and then test HelloMS. In addition, you use the User Manager to create a group and a user and then publish HelloMS to a user group as a service (Hello Service).
This walkthrough also guides you through configuring and starting a Wireless Web Server process, emulating the user experience by invoking the service from a device and view the both the system log and the service performance data.
1.2.1.1 Before You Begin
Before you access the Webtool, you must create the HelloMS and the HelloReplyMS JavaServer Pages.
1.2.1.2 Creating the HelloMS JavaServer Page Application
Using any editor, enter HelloMS.jsp as follows:
<?xml version = "1.0" encoding = "ISO-8859-1"?>
 <%@ page contentType="text/vnd.oracle.mobilexml; charset=ISO-8859-1" %>
<SimpleResult>
   <SimpleContainer>
      <SimpleForm title="NameForm" target="reply/HelloReplyMS.jsp"
method="POST">
	   <SimpleFormItem name="UserName" title="Name:" />
      </SimpleForm>
   </SimpleContainer>
</SimpleResult>
1.2.1.3 Creating the HelloReplyMS JavaServer Page
Enter the HelloReplyMS.jsp as follows:
<?xml version = "1.0" encoding = "ISO-8859-1"?>
<%@ page contentType="text/vnd.oracle.mobilexml; charset=ISO-8859-1" %>
<%
   String name = request.getParameter("UserName");
%>
<SimpleResult>
   <SimpleContainer>
      <SimpleText>
         <SimpleTextItem>Oracle9iAS Wireless says hello
<%=name%></SimpleTextItem>
      </SimpleText>
   </SimpleContainer>
</SimpleResult>
After you create the .jsps, you then place them in folders. Under a running Web servlet container file, create a files for the .jsps as follows:
- Create a subfolder entitled app under $ORACLE_HOME/j2ee/OC4J_Wireless/applications/examples/examples_web/
- Copy HelloMS.jsp to the app folder.
- Create a subfolder under the app folder entitled reply.
- Copy HelloReplyMS.jsp to the reply folder.
Note:
These .jsps must be accessed from a Web browser. For example, the app folder is created under an OC4J application, examples, which runs at localhost port 7777 and in a browser. You access the .jsps by entering the following URLs:
- http://localhost:7777/examples/app/HelloMS.jsp
- http://localhost:7777/examples/app/reply/HelloReplyMS.jsp
|
1.2.1.4 Step 1: Creating the Master Service with the Service Designer
This step leads you through creating an HttpAdapter service and its attribute settings. To create this service, you must access Wireless Webtool as follows:
- Log into the Wireless Webtool using orcladmin as your user name and manager as your password.
- From the Wireless Webtool, select the Service Designer tab. The Browse Folders screen of the Service Designer appears.
Creating a Folder for the Master Service
You can use folders to organize your master services.
To create a folder:
- Click Add Subfolder. The Create Folder screen appears.
- Complete the Create Folder screen as follows:
- Enter TestMSFolder in the Folder Name field. This is a required field.
- Select Valid so that this folder can be published to user groups by the Content Manager.
- Click Create. The folder, TestMSFolder appears in the Browse Folder screen.
Creating a Master Service
Next, you add a master service to TestMSFolder.
To create a master service:
- From the Browse Folders screen, click TestMsFolder.
- Click Create Master Service. The Master Service Creation Wizard appears, displaying the Basic Info. screen, the first screen of the master service creation sequence.
- Complete the Basic Info. screen as follows:
- Enter HelloMS in the Name field. This is a required field.
- In the Description field, enter Testing Master Service.
- From the drop-down list of adapters, select HttpAdapter. This is a required field.
- Select Valid so that the Content Manager can publish this master service to user groups (and edit its values, if needed).
Note:
Leave the Modulable and Location-Dependent check boxes clear. Also, you do not have to enter any values for the Menu Icon URI, Title Icon URI, Menu Audio URI, or Title Audio URI fields for this walkthrough.
|
- Click Next. The Caching screen appears.
Setting the Caching for the Master Service
The Caching screen enables you to cache the master service pages in the Web Cache Server.
To set the caching options:
- Select the Cacheable check box if you would like to cache the master service with the Web Cache Server. Leave the check box clear if you do not want to cache this master service.
- If you want to cache the master service, set the frequency of the invalidation.
- Click Next. The Init Parameters screen appears.
Note:
Cacheable is an optional field, one that can be left unselected.
|
Setting the Init Parameters
Do not enter any values into the HttpAdapterInvokerListener field.
If you want to plug a listener in for such purposes as debugging, specify the listener class in the HttpAdapterInvokeListener field. These listener methods are called at the following times:
- When the HttpAdapter invocation starts.
- Before the connection to a remote .jsp
- After the connection to the remote .jsp
- At the end of the HttpAdapter invocation
- When errors occur.
Note:
The HttpAdapterInvokeListener field is optional. You can leave it clear. If you specify a listener, you must specify the classpath in the @ORACLE_HOME/j2ee/OC4J_Wireless /config/application.xml file or you must copy the .jar file to $ORACLE_HOME/j2ee/OC4J_Wireless /lib.
|
Entering the Input Parameters
Click Next. The Input Parameters screen appears.
- Complete the input parameters screen as follows:
- In the URL field, enter http://hostname:7777/examples/app/HelloMS.jsp.
- In the REPACE_URL field, set True to enable the server to replace the relative URL in the .jsp with the entire URL. For example, the server replaces reply/HelloReplyMS.jsp as http://hostname:7777/examples/app/reply/HelloReplyMS.jsp. If you set the REPLACE_URL field to False as the the default setting, then Wireless does not replace the relative URLs. The default value is True.
- In the FORM_METHOD field, enter POST as the form method used between the Wireless Web server and the remote .jsp.
- Leave the INPUT_ENCODING field clear. If you specify an encoding, then the encoding you choose is used between the Wireless server and the .jsp.
- Click Next. The Async Agent screen appears. Do not select the Async-Enabled check box.
- Click Next. The Result Transformer screen appears. For this walkthrough, you do not have to specify a result transformer.
To complete the master service, click Finish. The master service, HelloMS appears in the Browse Folders screen under TestMSFolder.
1.2.1.5 Step 2: Using the Webtool Simulator to Test and Debug HelloMS
The Webtool simulator enables you to simultaneously view a master service on a phone simulator and its immediate XML results. In this step, you use the Webtool's Service Designer to search for HelloMS, view and debug HelloMS.
Logging into the Webtool
To test HelloMS on the Webtool simulator:
- Log into the Webtool using orcladmin as your user name and welcome as your password. The Webtool appears.
- Select the Service Designer tab. The Browse Folder screen appears.
Searching for HelloMS
To find HelloMS:
- Enter Hel* in the Name field.
- From the drop-down menu, select Any Master Service.
- Click Go.
- The Search Results screen appears, displaying HelloMS. In the Full Path column, select the link TestMSFolder, which represents the folder containing HelloMS. The Browse Folder screen displays TestMSFolder as the current folder.
Viewing HelloMS on a Phone Simulator
To view HelloMS on a phone simulator:
- Click the PhoneTest icon in the Test column. The phone simulator appears, displaying the page generated by HelloMS.jsp.
- Enter your name (for example, Scott) in the Name field.
- Click Submit. The next page, generated by HelloReplyMS.jsp, appears, displaying "Oracle9i Application Server Wireless Edition says hello Scott."
Debugging HelloMS
In this step, you use the debugging tool to view the Wireless XML result of HelloMS.
To view the Wireless XML result of HelloMS:
- Select HelloMS in the Browse Folder screen.
- Click Debug.
- In the Debug screen, do the following:
- Select View Wireless XML Result.
- Click Set Parameters
- Click Run Service. The phone simulator appears, displaying the first page of HelloMS, which is generated by HelloMS.jsp. The Service Result section of the screen displays the intermediate result in Wireless XML, enabling you to see if this is the result that you want to generate.
- On the phone simulator, enter your name and then click Submit. The Service Result section of the screen displays the Wireless XML for the second page, which is generated by HelloReplyMS.jsp.
Viewing Another Device Result of HelloMS
If you want to see a device result other than Wireless XML for HelloMS:
- In the Debug Parameter section, select View Device Result.
- From the drop-down list, select a device result type, such as WML11. Click Set Parameters.
- To view the device results for HelloMS, follow the steps 3c and 3d in Debugging HelloMS.
Viewing the System Log File
The System Log section enables you to view the number of lines from the end of the system log file (sys_panama.log)
- To view a selected number of lines from the logging file:
- Enter the number of lines you want to display in the System Log section. For example, enter 100.
- Click Refresh Log. The designated number of lines of the logging file display.
1.2.1.6 Step 3: Creating a User and User Group
In this section, you create a user account and then assign the user to a user group. Log into the Webtool using orcladmin as your user name and welcome as your password. The Webtool appears.
Creating a User Group
You first create a user group:
- Select the User Manager tab.
- Select the Groups tab. The Groups screen appears, displaying the current user groups.
- In the Create New Group section, enter TestGroup in the Group Name field.
- Click Create. TestGroup appears in the Group Name section.
1.2.1.7 Creating a User
Next, you create a user for TestGroup.
To create a user:
- Click the User tab. The User screen appears, displaying the current users.
- In the Users screen, click Create. The Create a New User screen appears.
- Complete the basic information for the new user by entering the following values:
- In the User Name field, enter TestUser
- Enter Test User in the Display Name field.
- In the Password field, enter 1234.
- Enter 1234 once more in the Password Confirmation field.
- Enter My Birthday in the Password Hint field.
- Enter 01/01/1960 in the Password Answer field.
- Enter 12345 in the Account Number field. Having an account number enables Test User to access services from a hand-held device more easily than by entering an name.
- Enter 1234 as the PIN for the account number.
- Enter 1234 again in the PIN Confirmation field.
- Select male as the gender of the user.
- From the drop-down list, select Registered User.
- In the Date of Birth field, enter 01/01/1960.
- Select Enabled so that Test User can log in.
- Complete the User Preference section as follows:
- From the Language drop-down list, select English.
- Select Pacific Standard Time from the Time Zone drop-down list.
- Select User Home from the User Home Root drop-down list.
- Select Disclose Identity to External Application to disclose your identity to a third-party application.
- Select Disclose Location to an external application to disclose your current location to third-party application.
- Complete the Group and Role sections as follows:
- From the Group list, select Test Group and then use the Select arrow (>).
- Do not assign any roles.
- Click Finish. The User screen reappears, displaying Test User.
1.2.1.8 Step 4: Publishing HelloMS to TestGroup as a Service
You publish a master service to a user group by creating a service. A service is based on a master service and inherits its values. Services enable you to specialize a master service by modifying its values.
In this section, you use the Content Manager to create a folder and then a service. You then publish the folder and the service to the user group, TestGroup.
To access the Content Manager, you must log into the Webtool using orcladmin as your user name and welcome as your password. The Webtool appears.
Creating a Folder
To create a folder:
- Select the Content Manager tab. The service browse screen appears.
- Click Add Folder. The General page of the New Folder screen appears.
- Complete the general parameters of the folder as follows:
- Enter TestFolder in the Name field.
- In the Description field, enter TestFolder.
- Enter zero (0) in the Sequence field.
- Select System from the Renderer Type drop-down list. The System option sorts folders by sequence number, then by name.
- Select Personalizable so that you can reorder, hide, or show this folder.
- Click Continue. The Rendering screen appears. From the drop-down list, select Name Ascend.
- Click Finish the Service Browse screen reappears, displaying TestFolder. click Test Folder. Service Browse screen for Test Folder appears. Because Test Folder is new, the Browse Service screen for Test Folder displays no services.
Creating a Service
In this step, you use the Content Manager's Service Creation Wizard to create a service based on the master service, HelloMS. Because you create this service in the browse service screen of Test Folder, this service resides in Test Folder.
Entering the General Information for a Service
To create a service:
- From the Browse Service screen of Test Folder, click Add Service. The General screen of the Service Creation Wizard appears.
- Complete the General screen as follows. You need only to complete the fields noted here.
- Enter HelloService in the Service Name field.
- Enter Test Hello Service in the Description field.
- Enter zero (0) in the Sequence field.
- Enter zero (0) in the Cost field.
- Select the Visible check box to make this service visible to Test User.
- Select the Personalizable check box to enable you to reorder, or hide or show this service.
- Select Normal Service.
- Select Next. The Master Service screen appears.
Basing Hello Service on a Master Service (HelloMS)
- Click TestMSFolder.
- Select HelloMS using the radio button.
- Click Next. The Input Parameters screen appears.
Setting the Input Parameters for HelloService
The Input parameters screen displays the input parameters that you set for Hello MS using the Service Designer. You do not have to change the input parameters. Click Next. The Async Services screen screen appears.
Setting the Async Services Parameters
The Async Services screen enables you to set the parameters for an async service. Since the master services, HelloMS is not async-enabled, you do not have to enter any values in this screen. Click Submit to complete Hello Service.
The Browse Service screen for TestFolder reappears, displaying HelloService.
Assigning Hello Service to a Group
In this section, you use the Content Manager to assign HelloService to a user group, TestGroup, which you created with the User Manager.
- Click the Groups Tab. The Groups List screen appears.
- Use the radio box to select TestGroup.
- Click Assign Services. The Service Content screen for TestFolder appears. The screen includes two tables: services accessible to the Test Group and the Available Services table, which lists services that currently exist in the repository.
- Using the Select check box, select TestFolder from the Available Services table.
- Click Add to Group. Test Folder appears in the available services for Test Group.
- Click Finish. The Group List screen reappears.
1.2.1.9 Step 5: Running HelloService in the Wireless Web Server
Running Hello Service from Wireless Web Server enables you to see the device-level view of the service.
- In the login page for Wireless Web server, enter TestUser and then 1234 as your password. Your home page appears, displaying the default settings.
- Click Test Folder. Hello Service appears.
- Click Hello Service.
Enter your name and then click Submit. The phone simulator displays "Oracle9i Application Server Wireless Edition says hello (your name )".
1.2.2 Creating a Wireless JavaServer Page Application
For this walkthrough, you create Wireless applications using the Hello.jsp and Apps.jsp samples. To complete this walkthrough, you must load these .jsps onto a server.
- Login to Wireless with your administrator name and password.
- Select the Service Designer. The Browse Folders and Services screen appears.
- Create a Master Service as follows:
- From the Browse Folders and Services screen, click Create Master Service. The master service creation wizard's Basic Info. screen appears.
- Enter the Basic Information for the Master Service.
- Enter a name for the application, such as SampleJSPApp.
- Select Valid to publish the application to the Content Manager.
- Choose Http Adapter from the drop-down list of adapters.
- Click Next until you reach the Input Parameters screen.
- Enter the Input Parameters as follows:
- In the Default Value field for the URL parameter, enter the URL for HelloName.jsp. For example, enter http://localhost/HelloName.jsp.
- Click Next until you reach the final screen of the master service creation wizard, the Result Transformer screen. Click Finish to complete the master service. The master service appears in the Browse Folders screen.
- To view the master service on a phone simulator, click Test.
1.2.3 Creating a Database Query Application
- Login to Wireless with your administrator name and password.
- Select the Service Designer tab. The Browse Folders screen appears.
- From the Browse Folder screen, click the Create Master Service button. The Basic Info. screen of the Master Service Creation Wizard appears.
- Complete the Basic Info. screen as follows:
- For the Name field, enter SQL Time.
- Select the Valid check box to enable the master service.
- From the drop-down list, select SQLAdapter.
- Click Next until you reach the Init Parameters screen.
- Complete the Init Parameters screen as follows:
- Enter the following information into the fields.
- For the JDBC_CONNECT_STRING, enter the JDBC connect string for the database on which to query, as follows. (Be sure to insert all colons; for example,
thin:@host.)
jdbc:oracle:thin:@host_name:port:SID
- For the Password and User Name fields, type the password and user name. For example, enter 1234 for both the user name and password.
- Under Type of Statement, enter Query.
- For the STATEMENT, enter
select sysdate from dual
- Click Next. The Input Parameters screen appears. You do not need to modify any of the input parameters.
- Click Next to go to the Output Parameters screen. The Output parameters screen is populated with the output parameters for the SQL adapter. You do not need to modify any of the output parameters.
- Click Next to go to the Result Transformer Screen. You do not need to modify this screen. Continue to click Next until you come to the end of the master service creation sequence.
- Click Finish. The Browse Folders screen reappears. You have created the master service, SQL Time.
1.2.4 Creating Module Services
In this section, you learn how to create and run SMS and email services by configuring the Wireless PIM (personal information management) module services. The PIM module services, which require little or no configuration, enable customers to integrate corporate email, directory, address book, calendaring, and instant messaging applications into their mobile enterprise portals.
1.2.4.1 Sending a SMS Message
The short messaging module enables users to send short messages by entering the address of the recipient and the subject and body text of the message. For this walkthrough, you do not have to configure the SMS module, which provides "out-of-the-box" functionality. For more information on the SMS module, see the Oracle9iAS Developer's Guide.
To send a SMS message:
- Login to Wireless with your administrator name and password.
- Select Service Designer. The Browse screen appears.
- Select the modules folder. The Wireless modules appear.
- Select PIM and then select Short Messaging.
- Click the phone icon in the Test column. The phone simulator appears, displaying the inputting interface for the short messaging module.
- In the short messaging interface:
- Select Email as the type of message.
- In the Subject field, enter Testing.
- In the Body field, enter This is a test.
- Enter the address of the recipient, such as scott.tiger@oracle.com.
- Click Send.
Figure 1-1 Partial View of the Short Messaging Service Module Inputting Interface
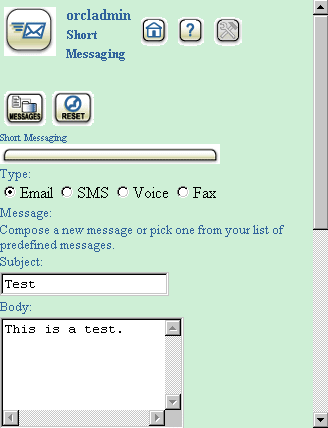
Text description of the illustration pag_smsi.gif
1.2.4.2 Accessing Email from a Mobile Device
For this walkthrough, you create a service that enables you to access your email from a mobile device by using the Service Designer to configure the Mobile Email Client service. This PIM module enables you to access email on an IMAP or POP3 server from any mobile device.
Step 1: Configuring the Mobile Email Client
To configure the Mobile Email Client:
- Login to Wireless with your administrator name and password.
- Select Service Designer. The Browse Services screen appears.
- Select the PIM Folder.
- Select Mail and then click Edit. The Edit Service screen appears.
- From the left menu select Input Parameters. The Edit Input Parameters screen appears.
- In the Edit Input Parameters screen, set the default values for the following input parameters. If you set default values, then Wireless does not ask the end user for an input value.
- Enter the mail protocol (either POP3 or IMAP) as the default value for ORACLE_SERVICES_PIM_MAIL_SERVICE.
- Enter the full host name of the mail server name as the default value for ORACLE_SERVICES_PIM_MAIL_SERVER_NAME. For example, enter mailserver.oraclemobile.com.
- Enter the port number for the the mail server on the host as the default value for ORACLE_SERVICES_PIM_MAIL_SERVER_PORT. For IMAP, the default value is 143; for POP3, the default value is 110.
- Enter the full host name SMTP (outgoing) mail server on the host as the default value for ORACLE_SERVICES_PIM_MAIL_SMTP_SERVER_NAME. For example, enter smtp.oraclemobile.com.
- Enter the SMTP port number on the host as the default value for ORACLE_SERVICES_PIM_MAIL_SMTP_SERVER_PORT. The default is 25.
- Enter the login name for the SMTP server, such as john.doe@mycomp.com, as the value for ORACLE_SERVICES_PIM_MAIL_SMTP_SERVER_LOGIN. If login for SMTP is not required, then this value is null or an empty # string ("");otherwise, Wireless uses this value for SMTP login.
If you do not specify the domain, then Wireless appends the value set for ORACLE_SERVICES_PIM_MAIL_AUTODOMAIN. If you do not specify that value, then Wireless uses the value set for ORACLE_SERVICES_PIM_MAIL_DEFAULT_EMAILDOMAIN.
- Enter the domain, such as mycomp.com, to be appended to any email addresses lacking a domain name as the value for ORACLE_SERVICES_PIM_MAIL_AUTODOMAIN. The default value is localhost.
- For ORACLE_SERVICES_PIM_MAIL_FOLDER_INBOX, enter the name of the inbox folder on the mail server. The default value is INBOX.
- Enter the name of the Sent folder as the value for ORACLE_SERVICES_PIM_MAIL_FOLDER_SENT. For example, enter Sent, or SentItems. The default value is Sent.
- For ORACLE_SERVICES_PIM_MAIL_DEFAULT_EMAILDOMAIN, enter the default email domain for sending emails, such as mycomp.com. When sending emails, if the email domain is not specified, then the default email domain will be appended to the username. For example, if the default domain is mycomp.com, and a user sends an email to the user "john.doe", the email will be sent to john.doe@mycomp.com The default value is localhost.
- Enter the maximum number of messages returned for one request as the value for ORACLE_SERVICES_PIM_MAIL_MSGFETCH_SETSIZE. For example, if a folder has 300 messages, only the first 200 will be returned for the first request. The default value is 200.
- Enter the connection timeout, in milleseconds, as the value for ORACLE_SERVICES_PIM_MAIL_SERVER_CONNECT_TIMEOUT. The default value is 2000.
- To enable advanced configuration, such as selecting a mail server host name based on runtime information, enter a configuration class as the value for ORACLE_SERVICES_PIM_MAIL_CONFIG_CLASS. For example, enter oracle.panama.module.pim.mail.util.Config or mycomp.mail.config.MailConfig. The default value is oracle.panama.module.pim.mail.util.Config.
- Enter the temporary directory for downloading messages or attachements as the value for ORACLE_SERVICES_PIM_MAIL_TEMP_DIR. For example, enter /home/9iasuser/temp, D:\9iasuser\temp. The default value is /temp.
- For ORACLE_SERVICES_PIM_MAIL_AUDIO_TMP_DIR, enter the temporary directory which stores the temporary audio files, such as the .wav files that are generated when a user replies to an email in the voice-enabled version of the application. For example, enter /home/9iasuser/iaswv20/modules/modules-web/pim/mail/audiotemp. The default value is /modules/modules-web/pim/mail/audiotemp. This directory should be accessible through the Web.
- Enter the URL for the temporary audio files directory as thevalue for ORACLE_SERVICES_PIM_MAIL_AUDIO_TMP_URL. For example, enter http://localhost/modules/pim/mail/audiotemp. The default value is http://localhost/modules/pim/mail/audiotemp.
- Enter the encoding (such as UTF-8, Shift_JIS, Big5) that is used when sending an email as the value for ORACLE_SERVICES_PIM_MAIL_MESSAGE_ENCODING. If you do not enter a value into this field, then Wireless uses the default value, UTF-8.
- Click Apply.
- Return to the PIM folder either by using your browser's back button or by Selecting the PIM hyperlink at the top of the Edit Master Service screen.
Step 2: Testing the Mail Service on a Phone Simulator
To view the mail module on a phone simulator:
- From the PIM folder in the Browse screen for masters services, select Mail.
- Select the phone icon in the Test column. The login screen of the email module appears.
Figure 1-2 The Login Screen of the Email Module
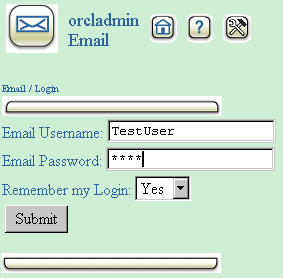
Text description of the illustration pag_mall.gif
- Enter the username and password specific to your email server.
- Click Submit. You can now access your email account.
