Oracle8i Application Developer's Guide - XML
Release 3 (8.1.7)

Part Number A86030-01

Library

Solution Area

Contents

Index

Go to previous page Go to beginning of chapter Go to next page

Customizing Discoverer 3i Viewer with XSL, 8 of 9


Discoverer 3i Viewer: Customization Example Using XML and XSL

You can use the XML and XSL fragments below to experiment with customization in a Web Browser.

Step 1: The XML File

The data is a standard XML file, similar to the previous "Discoverer XML Example 1":

<?xml version="1.0" encoding="UTF-8"?>
<?xml-stylesheet type="text/xsl" href="example1.xsl"?>
<discoverer version="3.5.8.12" login_method="discoverer">
 <account name="myname@mydatabase" ref="MYNAME%40mydatabase">
  <user>MYNAME</user>
   <database>mydatabase</database>
   <eul default="true" name="myeul">
   <workbook name="Store and Band Analysis" ref="Store~20and~20Band~20Analysis">
      <description>Shows sales by Store, broken into sales bands</description>
   </workbook>
   <workbook name="Video Sales Analysis" ref="Video~20Sales~20Analysis">
      <description>General purpose analysis of the business</description>
   </workbook>
   <workbook name="Annual Sales Report" ref="Annual~20Sales~20Report">
      <description>Shows yearly and quarterly sales of products</description>
   </workbook>
   </eul>
 </account>
</discoverer>

The XML file starts by specifying the XML version. The 2nd line specifies the XSL file to be applied to process the data, "example1.xsl" and the rest of the file is generated from the Discoverer 3i Viewer.

The first two lines have been added here so that you can type the text into a file using a text editor and then open it in a Web Browser to see the results visually as the XSL is changed. Save the file with the extension "xml" if you want to try this.

Step 2: XSL File, example1.xsl

XSL file, "example1.xsl", looks like this :

<?xml version="1.0" encoding="UTF-8"?>
<xsl:stylesheet version="1.0" xmlns:xsl="http://www.w3.org/TR/WD-xsl">
<xsl:template match="/">
  <html>
    <body bgcolor="#ffffff" link="#663300" text="#000000">
       <b><i>Choose a Workbook:</i></b>
       <br/>
       <table border="2">
         <xsl:for-each select="/discoverer/account/eul/workbook">
          <tr>
            <td width="242">
              <font face="sans-serif">
                <xsl:value-of select="@name"/>
              </font>
            </td>
            <td>
               <xsl:value-of select="description"/>
            </td>
          </tr>
        </xsl:for-each>
       </table>
    </body>
  </html>
</xsl:template>
</xsl:stylesheet>

Step 3: XML+XSL = HTML

Figure 11-2 shows what you see on a Browser when the XML file is opened in the Browser, the Browser reads in the XSL stylesheet (example1.xsl), and generates HTML.

Figure 11-2 List of Workbooks Viewed on Browser, XML+ example1.xsl=HTML -- Before Modification


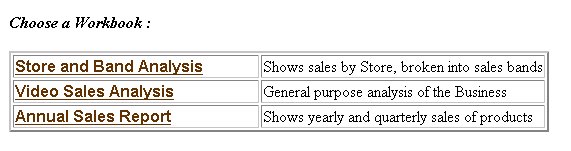
Table 11-1 examines the XSL file, example1.xsl, from line 5. It describes how the HTML is generated. The file starts by specifying the XML version. The 2nd line says that this file is a stylesheet. The HTML template starts with the <HTML> tag on line 4.


Table 11-1 Explaining example1.xsl  -- Before Modifying the XSL File  
example1.xsl code  The code means ... 

<body bgcolor="#ffffff" link="#663300" text="#000000"> 

This line defines the colors to be used 

<b><i>Choose a Workbook :</i></b> 

This is just more HTML. It sets a bold italic font and inserts the text "Choose a workbook :" 

<table border="2"> 

An HTML table is started, with a 2 line border.  

<xsl:for-each select="discoverer/account/eul/workbook"> 

This is the first real XSL code. It means :

Go through the XML data file and for each workbookinfo tag perform all the following steps until you reach the end tag : </xsl:for-each>.

So for every workbook that appears in the XML file the following XSL is processed, and a row is inserted into the HTML table for every workbook found : 

<tr>

<td width="242">

<font face="sans-serif">

<xsl:value-of select="@name"/>

</font>

</td> 

<tr> starts a new row in the table

<td> defines the table data to be inserted for the first column. The width of the column is set to 242 pixels and the font is set to sans-serif.

The XSL line inserts the text from the XML file for the <NAME> tag under each workbookinfo section.  

<td>

<xsl:value-of select="description"/>

</td>

</tr> 

These lines define the 2nd column in the HTML table and insert the text for the workbook description using the <DESCRIPTION> tab in the XML file. So each row in the HTML table will contain the workbook name, made into a link to click on, and the workbook description as text. Since there are three workbooks in the XML file, there will be three rows in the table. 


Note:
  • This example is not exactly how the Discoverer 3i Viewer shows the list of workbooks. It has been simplified here for clarity, but it illustrates how the XSL stylesheet controls the appearance of the output. See

  • Figure 11-4 for a more typical rendition.

  • In Discoverer 3i Viewer, the XML and XSL are combined in the XSL-T Processor on the middle tier, and not in the Web Browser.


Step 4: Customizing the XSL Stylesheet (example2.xsl)

The XSL stylesheet is modified as follows:

<?xml version="1.0" encoding="UTF-8"?>
<xsl:stylesheet version="1.0" xmlns:xsl="http://www.w3.org/TR/WD-xsl">
<xsl:template match="/">
 <html>
  <body bgcolor="#ffffff" link="#663300" text="#000000">
   <table border="0">
      <tr>
        <td>width="500" height="100" background="disco_banner.gif">
          <font face="sans-serif">
            <b>Performance Reports</b>
          </font>
        </td>
      </tr>
   </table>
   <table border="0">
      <xsl:for-each select="/discoverer/account/eul/workbook">
         <tr>
           <td>
             <font face="sans-serif">
               <b>
                 <a href="link.htm">
                    <img src="button2.gif">
                      <xsl:attribute name="alt">
                      <xsl:value-of select="description"/>
                      </xsl:attribute>
                    </img>
                 </a>
               </b>
             </font>
           </td>
           <td>
             <font face="sans-serif">
                <xsl:value-of select="@name"/>
             </font>
           </td>
         </tr>
      </xsl:for-each>
   </table>
  </body>
</html>
</xsl:template>
</xsl:stylesheet>

When this is combined with the same XML, it appears as shown in Figure 11-3.

Figure 11-3 Displayed Workbook List Using Same XML with a Modified XSL Stylesheet


Now the appearance of the User Interface is completely different, as it takes on a more graphical look and feel. Instead of text links there are graphical buttons for running the reports, each with a dynamic `tool tip' that pops up when you position the mouse over the button.

The modified XSL file is described in Table 11-2.

Figure 11-4 shows a typical web-based rendition of this sample application.


Table 11-2 Explaining example2.xsl -- After Modifying the XSL File
example2.xsl code  The code means ... 

<table border="0">

<tr>

<td width="500" height="100" background="disco_banner.gif">

<font face="sans-serif">

<b>Performance reports</b></font>

</font>

</td>

</tr>

</table> 

These lines create a table and insert a graphic and the heading "Performance Reports" 

<table border="0">

<xsl:for-each select="discoverer/account/eul/workbook"> 

This starts the main table that the workbook names will be displayed in, as before, but now there is no border around the table and the rows are defined differently: 

<tr>

<td>

<font face = "sans-serif">

<b>

<a href = "link.htm">

<img src="button2.gif">

<xsl:attribute name="alt">

<xsl:value-of select="description"/>

</xsl:attribute>

</img>

</a>

</b>

</font> 

The first table data column is defined as a hyperlink again, but this time with the image "button2.gif" as an image, rather than a text link. The font used is "sans-serif".

To get a "tooltip" to appear over an image the HTML "alt" attribute is used.

Normally the alt attribute is used with a simple text string :

<img src="button2.gif" alt="Tooltip text to appear when a mouse is over the image">

but since we want the tool tip to be dynamic we generate the alt tag by getting the text from the <description> tab in the XML file. The <xsl:attribute> tag does this.

<xsl:value-of select="description"/> The second data column selects the name of the workbook to display, by using XSL to get it from the XML file as before. 

Figure 11-4 Discoverer 3i Viewer. Typical Web-Based Rendition as a Business Solution


Go to previous page Go to beginning of chapter Go to next page
Oracle
Copyright © 1996-2000, Oracle Corporation.

All Rights Reserved.

Library

Solution Area

Contents

Index