Release 4.1 for Windows NT/2000
A90287-01
Library |
Solution Area |
Contents |
Index |
| Oracle9iAS Discoverer Plus and Viewer Configuration Guide Release 4.1 for Windows NT/2000 A90287-01 |
|
This chapter explains how to configure Discoverer Plus and Discoverer Viewer to work with the Secure Sockets Layer (SSL) protocol.
The topics include:
This chapter contains edited extracts from the Visibroker SSL Pack 3.3 Programmer's Guide.
For more information about Visibroker's SSL features, refer to the Borland Inprise Corporation Internet site at:
Discoverer Plus and Discoverer Viewer can be configured to use the SSL protocol:
The SSL (Secure Sockets Layer) protocol is an industry standard protocol to establish secure connections between clients and servers. The SSL protocol enables sensitive data to be transmitted over an insecure network, such as the Internet, by providing the following security features:
When SSL is enabled, a closed padlock ( ) or other equivalent symbol (browser dependent) appears in the browser's status bar, and the web page's URL starts with "https://" instead of "http://".
SSL provides a secure communications channel between two parties by providing several security services at the transport layer level using a combination of public key and symmetric key technology. Usually these parties are a web browser and a web (HTTP) server. However, since SSL operates at the transport layer, it is application independent. Protocols such as Telnet, FTP (File Transfer Protocol) and HTTP (HyperText Transfer Protocol) can therefore be layered on top of it.
Public key encryption uses two different keys to encrypt and decrypt messages, a public key and a (secret) private key. The two keys are used such that a message encrypted with a private key can only be decrypted with the corresponding public key, and a message encrypted with a public key can only be decrypted with the corresponding private key.
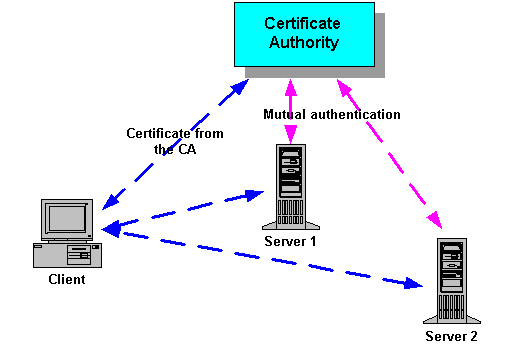
Before establishing a secure connection, the server (and optionally the client) is authenticated. This is to make sure that one is communicating with the correct server. Authentication is done through digital certificates, or public-key certificates. Certificates used in SSL are defined by an ITU (International Telecommunications Union) standard called X.509, (see figure below).
To prove that the server is the legitimate owner of the certificate, SSL requires that certificates are digitally signed by a trusted Certificate Authority (CA), for example VeriSign, Inc. You can think of a certificate as a passport and the Certificate Authority as a government passport office. You trust that the government passport office has verified the identity of the passport holder before issuing a passport to him or her.

Note: Discoverer Viewer uses HTTP and HTTPS protocols that are firewall compliant and do not require Visibroker Gatekeeper.
To provide support for SSL, Discoverer Plus uses Visibroker Gatekeeper (for more information about Visibroker Gatekeeper, refer to Section 7.5.1, "What is Visibroker Gatekeeper?").
Discoverer Plus supports the SSL mode of communication only for clients that are outside the server's firewall and therefore connect to Discoverer Server components through Visibroker Gatekeeper. Clients in the intranet (i.e. inside the Server's firewall) do not use SSL when communicating with the Discoverer Server components.
You have to configure Visibroker Gatekeeper to use SSL with Discoverer Plus.
To configure Visibroker Gatekeeper to use SSL, follow these steps:
If you have already obtained certificates for your enterprise or organization, these can be reused with Visibroker Gatekeeper.
NOTE: If you have SSL certificates installed on your Gatekeeper, you cannot use the URL parameter ORBalwaysTunnel=yes, (see also "How to use a specific connection method").
SSL support in Discoverer works through single and multiple firewalls.
NOTE: If you by running Visibroker Gatekeeper on port 443, (by convention, the standard SSL port), SSL proxies must only allow communication to port 443 also.
To enable SSL in Discoverer, you must configure Visibroker Gatekeeper to use SSL. When configuring Visibroker Gatekeeper, you have two options:
See Section 7.10.2, "Running Visibroker Gatekeeper on the HTTP Server" and Section 7.10.5, "Changing the default Visibroker Gatekeeper port".
See Section 7.10.3, "Running Visibroker Gatekeeper on a different Server" and Section 7.10.5, "Changing the default Visibroker Gatekeeper port".
NOTE: You can omit this step if you already have SSL certificates for your enterprise.
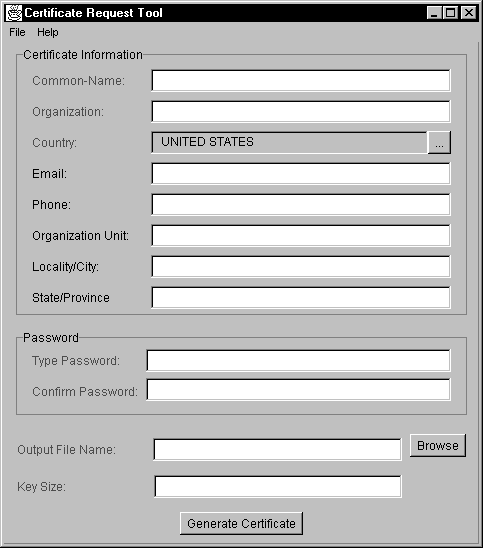
Discoverer Plus provides the vbcertrq tool to automate the certificate request process. After specifying the required information, the vbcertrq tool generates three files:
After you have generated the files, you should submit the certificate request to a Certificate Authority (CA). The procedure for submitting your certificate request to a CA is determined by the certificate authority you are using. If you are using a CA that is internal to your organization, contact your system administrator for instructions. If you are using a commercial CA, contact them for instructions on submitting your certificate request.
To run the vbcertrq tool:
The Certificate Request Tool dialog appears.

The certificate information is used to create your unique name. Required information is shown in red in the vbcertrq tool dialog. Specify the following information:
You are required to specify a password that will be used to encrypt your private key. You will need to supply this password before you use your private key. The password prevents unauthorized use of your private key.
Your password is case-sensitive and can contain any character you can type on a keyboard. The password can be from six to 99 characters long. As with all passwords, avoid choosing common words that are susceptible to dictionary-style attacks. Passwords that contain numbers, blanks, and other characters are more secure than common words or phrases.
To specify the private key password, fill in the following fields:
The names of the three files generated by the vbcertrq tool are based on what you specify in the Output File Name field. For example, if you specify mycertreq in the file, the following files are created:
You can specify the number of bits your key will contain in the Key Size field. The greater the number of bits in your private key, the greater the security of your encrypted data. You can specify any size between 360 and 2048 bits.
NOTE: United States federal export regulations limit keys that are used in exported software to 512 bits.
Certificate authorities are able to provide your certificate chain in a number of formats. Visibroker Gatekeeper expects the commonly used format of separate X.509 certificates. If you have a certificate chain in an S/MIME (PKCS #7) format, you must separate the certificates before they can be used with Visibroker Gatekeeper.
To separate S/MIME certificates:
> ssleay pkcs7 -print_certs -inform DER -in cert-chain-file -out cert-file
The output file contains a list of one or more certificates and your private key. Each certificate is delimited with the following statements:
-----BEGIN CERTIFICATE-----
-----END CERTIFICATE-----
If there is more than one certificate, the first one is yours and each subsequent certificate represents a certificate authority up to a root (such as Thawte).
When you have all the necessary certificates, you need to install the certificates (starting with your certificate to the root certificate authority) on Visibroker Gatekeeper.

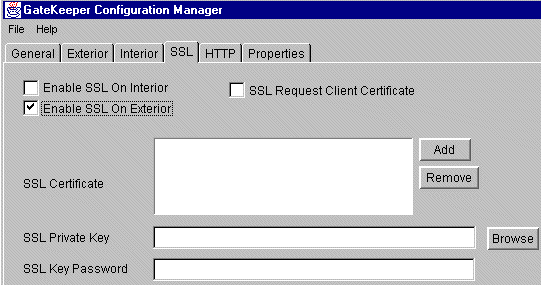
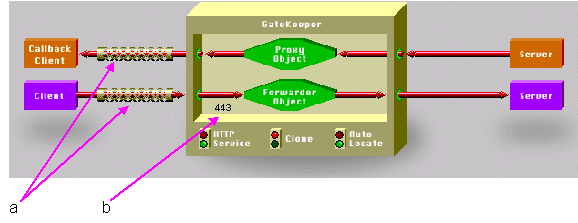
The SSL Certificate, SSL Private Key, and SSL Key Password properties become active, and SSL active indicators (also known as "mufflers") on the Visibroker Gatekeeper configuration model show where SSL is enabled, (see Figure 6-4 below).

Key to Figure 6-4.
a - SSL active indicators on the exterior connection indicating where SSL is enabled.
b - Note also that the Exterior Port (configured on the Exterior tab in the Gatekeeper Configuration Manager) has been set to 443, which is the standard SSL port.
An Open dialog box appears.
The full path name of the file appears in the SSL Certificate box.
You can specify one or more certificate files. There is one certificate per file. However, you can specify a list of certificate files. The list acts as a chain of certificates. You must start the chain with Visibroker Gatekeeper's certificate followed by the issuer's certificate and continue, if there are more, up to the root.
An Open dialog box appears.
An Open dialog box appears.
The full path name for the file appears in the SSL Private Key box, setting the private key for the exterior SSL adapters.
If your SSL private key is encrypted, enter a password for the private key for the exterior and interior SSL adapters. If you used the vbcertreq tool to generate a certificate request, you specified this password there.
An asterisk appears for each character of the password you enter. The password itself does not appear in the SSL Key Password box.
Note: SSL key passwords are stored in plain text in the file gatekeeper.properties. Therefore, this file should only be accessible to authorized users.
To use SSL, Discoverer client machines must have the jar file x509cert.jar installed.
To install x509cert.jar on Windows NT clients, follow these steps:
Note that you can download the above file from http://server.com/discwb4/util/x509cert.jar.
To install x509cert.jar on UNIX clients, follow these steps:
Note that you can download the above file from http://server.com/discwb4/util/x509cert.jar.
To use an SSL enabled ORB on Windows NT clients, client machines must have the DLL files vbj30ssl.dll and/or vbrnissl.dll installed. To install the DLL files, follow these steps:
To use an SSL enabled ORB on UNIX clients, client machines must have the file libvbj30ssl.so. To install this file, follow these steps:
Note that you can download the above files from http://server.com/discwb4/util/vbj30ssl.dll and http://server.com/discwb4/util/vbrnissl.dll respectively.
To enable SSL in a Discoverer start page, add the following URL parameter to the URL for the start page:
ORBenableSSL=yes
For example:
http://server.com/discwb4/html/english/welcome.htm?ORBenableSSL=yes
NOTE: If you have multiple URL parameters in the same URL, separate the URL parameters with the ampersand character `&'.
For example:
http://server.com/discwb4/html/english/welcome.htm?ORBenableSSL=yes&ORBalway
sProxy=yes
NOTE: You cannot use the URL parameters ORBenableSSL and ORBalwaysTunnel at the same time.
By default, SSL support works only for clients outside your firewall. You can enable SSL inside firewalls by setting these URL parameters as follows:
NOTE: When using SSL inside firewalls, there is no restriction on the SSL port.
To make sure that your Discoverer Viewer documents are secure, and to get your browser to acknowledge a "secure" page, follow these steps:
Make changes to the httpd.conf file as follows:
The httpd.conf file is located in <iSUITES_HOME>\apache\apache\conf.
Alias /disco4ivfiles/ "<iSUITES_HOME>\apache\apache\htdocs\disco4iv/"
where:
For example:
(httpd.conf)
# Aliases: Add here as many aliases as you need (with no limit). The format is
# Alias fakename realname
#
# Note that if you include a trailing / on fakename then the server will
# require it to be present in the URL.  So "/icons" isn't aliased in this
# example, only "/icons/"..
#
Alias /icons/ "D:\apache\icons/"

Alias /disco4ivfiles/ "D:\iAS_Home\apache\apache\htdocs\disco4iv/"
Make changes to the disco4iviewer.properties file as follows:
The disco4iviewer.properties file is located in <iSUITES_HOME>\apache\jserv\servlets.
For example:
(disco4iviewer.properties - Before change)
servlet.Viewer.initArgs=config=http://mywebserver.company.com/disco4iv/html/disco4iv.xml
servlet.viewer.initArgs=config=http://mywebserver.company.com/disco4iv/html/disco4iv.xml
servlet.Viewer.initArgs=config=file:///D:\iAS_Home\apache\apache\htdocs\disco4iv\html\disco4iv.xml
servlet.viewer.initArgs=config=file:///D:\iAS_Home\apache\apache\htdocs\disco4iv\html\disco4iv.xml
Make changes to the disco4iv.xml file as follows:
The disco4iv.xml file is located in <iSUITES_HOME>\apache\apache\htdocs\disco4iv\html.
NOTE: When determining the xsl_path argument, the FILE protocol not the HTTPS protocol is used (see example below).
For example:
(disco4iv.xml - Before change)
<argument name="xsl_path" type="href">disco4iv.xsl</argument>
<argument name="xsl_path" type="href">file:///D:\iAS_Home\apache\apache\htdocs\disco4iv\html\disco4iv.xsl
</argument>
Make changes to the viewer_config.xml file as follows:
The viewer_config.xml file is located in <iSUITES_HOME>\apache\apache\htdocs\disco4iv\html.
For example:
(viewer_config.xml - Before change)
<configuration application="discoverer_viewer"
base_dir="." image_dir="images">
<configuration application="discoverer_viewer"
base_dir="https://mywebserver.company.com/disco4ivfiles/html/"
image_dir="images">
To enable SSL in Discoverer Viewer URLs, prefix URLs with https, rather than http.
For example:
|
|
 Copyright © 2001 Oracle Corporation. All Rights Reserved. |
|