9
Walkthroughs
This document describes how to create Oracle9i Application Server Wireless Edition services. Each section of this document presents a different topic. These sections include:
- Section 9.1, "Purpose"
- Section 9.2, "Before You Begin"
- Section 9.3, "Creating a SQL Service"
- Section 9.4, "Creating a PL/SQL Service"
- Section 9.5, "Creating a Master Service Using the URL Adapter"
- Section 9.6, "Creating Location-Based Services"
- Section 9.7, "Creating the Spatial Adapters"
- Section 9.8, "Creating a Master Service Using the Web Integration Adapter"
- Section 9.9, "Creating Chained Services Using the Web Integration Developer"
- Section 9.10, "Creating External Links Using the Service Designer"
9.1 Purpose
The following walkthroughs provide step-by-step instructions for creating and distributing mobile services with the Wireless Edition. In these walkthroughs, you create services based on the Wireless Edition adapters. At the end of each walkthrough, you test your development using a device emulator.
These walkthroughs familiarize you with the Wireless Edition tools, including the Personalization Portal, the Master Service Creation Wizard, the Service Designer, and the Web Integration Developer and how they enable you to create mobile services.
9.2 Before You Begin
Before you begin the walkthroughs, make sure that you correctly install and configure the Wireless Edition server. Also, you must complete the client installation on your development environment.
Start the Service Designer
To start the Wireless Edition Service Designer, from the Start menu, point to the Oracle for Windows NT menu item. Click Wireless Edition, then Service Designer.
Connect to the Wireless Edition Repository
When the Service Designer starts, the Log In dialog appears. Use the Log In dialog to connect the Service Designer to the Wireless Edition repository that you want to develop. The Log In dialog enables you to select a server name that you have already used, or to enter a new server name.
To connect to the Wireless Edition repository from the Log In dialog:
- In the location field, enter the name of the Wireless Edition server. Then enter Administrator as the user name and manager as the password.
Note:
Both user name and password are case-sensitive.
|
- Click OK. The Wireless Edition server objects appear in the tree view on the left.
Note:
The Service Designer displays an Error dialog for invalid entries. By clicking the Show Details button, you can view the Java runtime exception details.
|
Each section of the walkthrough describes a task needed to complete the creation of a service. These sections include:
9.2.1 Creating a User Group and a User
In this step, you create a user group and then a user. Using the Service Designer, you create an overall folder which will later contain a unique "root folder" for each user that you create. Each "root folder" will have the same name that you used to name the user. You can call the overall folder anything you like that is meaningful to you, keeping in mind that this folder will contain the root folders for all the users. In our example, the overall folder is called "Users Home." Create this folder in the Service Trees node of the repository tree in the left frame.
The root folder of a particular user contains the services (including aliases, master services, and folders) which the specified user can access.
One benefit is that if you have many users, you can create an overall folder for each grouping of users. For example, using the label "Users Home" as an illustration, you can create "Users Home A" for all users whose name starts with A, "Users Home B" for users whose name starts with B, and so on. In this fashion, grouping the users' root folders within higher-level folders minimizes the number of objects that are displayed in the Service Designer's tree view. (For performance reasons, the default view in the Service Designer's tree view does not display more than 100 objects of any type.)
Second, you use the Personalization Portal to create a both user group and a user
Create the Overall Folder for the Users' Root Folders
To create the overall folder for the users' root folders (using "Users Home" as an example):
- Start the Service Designer.
- Right-click Service Trees in the repository tree view.
- Click Create New Folder to display the Create New Folder form.
- Complete this form as follows:
- In the Name field, enter Users Home.
- Select the Valid check box.
- Select the Visible check box.
- Click Finish.
The folder named "Users Home" now appears under Service Trees in the repository tree.
Create the User Group
To create a user group:
- Access the Personalization Portal using a Web browser.
Note:
The default Personalization Portal URL is http://9iASWEServer.domain/portal/Login.jsp.
|
- Enter Administrator as the user name, then enter manager as the password. Both the user name and password are case-sensitive. The Administration tab appears.
- Select the Groups page.
- In the Create a Group portion of the Groups page, enter MySampleGroup in the New Group Name field.
- Click Create. The new group appears in the Group Name section.
Create the User
To create the user:
- From the Administrator tab in the Personalization Portal, select the New User page.
- Configure the user as follows:
- In the Name field, type 1234.
- For the Display Name, type 1234.
- For the Password, type 1234.
- For the Password Hint, type 1234.
- Click the down arrow on the list box for the list of groups and select MySampleGroup, which you had created earlier.
- Select English from the list box in the Language field.
- Select United States from the list box in the Country field.
- Select the Enabled check box.
- Click create to complete the creation of the user. The User page of the Administration tab reappears.
- Confirm that you have created a user by entering 1234 in the Find User field and click Search.
Once you have created both the group and the user, you are ready to create service using the Wireless Edition adapters.
9.3 Creating a SQL Service
In this walkthrough, you use the Master Service Creation Wizard to create a Wireless Edition service based on the SQL adapter. You create a service that checks the current time from the system database and displays it to the user.
Before you begin the walkthrough, make sure you can access a Wireless Edition server from your development environment running the Service Designer.
9.3.1 Task 1: Using the Master Service Creation Wizard
Start the Service Designer and follow these steps:
- Click the Tools menu in the Service Designer and select Master Service Creation Wizard. The Introduction screen of the Master Service Creation Wizard appears which lists the necessary steps for the creation of a master service. Click Next to go to the Selecting or Creating a Service Folder screen.
- Select the Create a New Service Folder radio button.
- Click Next. The Creating Folder screen appears. Enter the following information in the In the New Folder Info section:
- For the Name field, enter Database Services.
- Select the Valid check box.
- Select the Visible check box.
- Enter a description of the service that is meaningful to you, such as System Time.
- Click Next. The Selecting or Creating a Service Folder screen reappears. Click the Database Services folder and click Next. The Setting the Master Service Properties screen appears. Enter the following information in the Master Service Info section:
- For the Name field, enter SQL Time.
- Select the Valid check box.
- Select the Visible check box.
- Click Next. The Selecting an Adapter screen appears.
- Select SQLAdapter from the list of adapters and click Next. The screen for Setting the Init Parameters appears. Enter the following information into the fields.
- For the JDBC_CONNECT_STRING, enter the JDBC connect string for the database on which to query, as follows:
jdbc:oracle:thin:@host_name:port:SID


Note:


Be sure to insert all colons (for example, thin:@host).
|
- For the JDBC Driver, enter the Java DriverClass name (for example, Oracle thin driver,
Oracle.jdbc.driver.oracle.driver)
- For the PASSWORD and USERNAME, type the password and user name of any database user. You can use the sample user 1234 with the password 1234.
- Under Type of Statement, enter
Query.
- For the STATEMENT, type:
select sysdate from dual;
- Click Apply. The Setting the Input Parameters screen appears. The Input parameters screen is populated with the input parameters for the SQL adapter. You do not need to modify any of the input parameters.
- Click Next to go to the Setting the Output Parameters screen. The Output parameters screen is also populated with the output parameters for the SQL adapter. You do not need to modify any of the output parameters.
- Click Finish. You have created a master service.
9.3.2 Task 3: Creating an Alias that Points to SQL Time
Using the Service Designer, you can make a master service accessible to a user by placing it in a service tree that a user owns or can access.
- Right-click Users Home in the Service Designer repository tree.
- Click Create New Alias to display the Create New Alias form.
- Complete this form as follows:
- In the Name field, enter My Database Services.
- Click the Browse button next to the Service field. A Browse Services dialog appears. Expand the Master Services folder within the Browse Services dialog and select SQL TIME. Click OK.
- Select the Valid check box.
- Select the Visible check box.
- Click Finish.
- Click the Input Parameters tab in the right frame and select the User Customizable check box for SQL TIME
.
This creates an alias object in the Wireless Edition repository. Aliases, like master services, have input parameters. You can use the input parameters of an alias to override any input values specified by the master service. For this walkthrough, you use the default settings provided by the master service.
9.3.3 Task 4: Making SQL Time Available to a Group
You use the Service Designer to make the service you created available to a group of users:
- Expand the Groups folder in the Wireless Edition repository tree view.
- Click MySampleGroup. The parameters for the group appear in the right frame.
- Click the Service Folders tab in the right frame to display the Service Folders panel. The Service Folders panel includes two fields, Service Folders and Selected Service Folders.
- Under Service Folders, expand the Services folder.
- Click Database Services.
- Click the right arrow (>) button to move SQL Time to the Selected Folders field.
- Click Apply.
- Click Yes in the Confirm Apply Changes dialog.
This makes the service available to all users in the group MySampleGroup. In Section 9.3.4, you test this service as the user 1234.
9.3.4 Task 5: Testing SQL Time
In this walkthrough, you test the Wireless Edition service, SQL Time, using a browser and a phone simulator. Testing the service on a browser gives you a similar result to testing it on the phone simulator.
Testing the Service on a Browser
Log on to a browser to view the service you created. To access the browser:
- From a Web browser, enter the following URL:
http://9iASWEServer.domain/ptg/rm
Note:
The default listener port for the Oracle9i Application Server is 7777. The URL for this port is http://9iASWEServer.domain:7777. Refer to the Oracle9i Application Server documentation to change the HTTP listener to port 80.
|
- In the browser, enter 1234 for the user name and 1234 for the user password. The services available to user 1234 appear in the left frame.
- Click Database Services, then My Database Services.
- Click SQL TIME.
The Wireless Edition retrieves and displays the current system time.
Testing the SQL Time on a Phone Simulator
You can use any phone simulator (for example, WML, HDML, CHTML) to test SQL Time. If you do not already have one, download and install a simulator. If you are working behind a firewall, you must configure the proxy server settings in the simulator before using it to access external sites.
Follow these steps to test the service from a phone simulator.
- Start the simulator.
- Enter the following URL in the Go window:
http://9iASWEServer.domain/ptg/rm
This is the URL of the device portal for your Wireless Edition installation.
Note:
The default port is 7777. The URL for this port is http://9iASWEServer.domain:7777/ptg/rm.
|
- Log in using 1234 as the user name and password. The preconfigured Wireless Edition services for user 1234 appear.
- Select Database Services, then My Database Services.
- Click SQL TIME.
The Wireless Edition retrieves and displays the current system time.
9.4 Creating a PL/SQL Service
Now that you have created a simple service, you can extend the functionality of the SQL adapter by creating a PL/SQL service. This walkthrough demonstrates how to pass parameters with PL/SQL using the Wireless Edition variables. Specifically, you use the sample PL/SQL package, demo_proc.sql (see Section 9.4.1), to create a service that allows you to enter a manager ID (the input_manager_id function in the demo_proc.sql package) that gets passed to the PL/SQL package's employee_list function using the Wireless Edition variables p_manager_id, p_empno, and p_serv.
After you have created this service, you then make it available to a group by creating an alias. Lastly, you test this service using the Personalization Portal and a phone simulator.
9.4.1 Task 1: Loading the PL/SQL Package, demo_proc.sql
Before you begin this walkthrough, you must load the following PL/SQL package, demo_proc.sql using such database tools as SQL*Plus. For example, you use the SQL*Plus command to load the package:
sqlplus demo/demo
SQL>@demo_proc
SQL>
The demo_proc.sql package is as follows:
CREATE OR REPLACE PROCEDURE demo_proc
   p_serv       IN INTEGER        DEFAULT 0,
   p_empno      IN INTEGER        DEFAULT 0,
p_manager_id IN INTEGER DEFAULT 0) AS
v_first_name employee.first_name%TYPE;
v_last_name employee.last_name%TYPE;
v_manager_id employee.manager_id%TYPE;
v_employee_id employee.employee_id%TYPE;
BEGIN
dbms_output.enable(20000);
IF (p_serv = 0)
    THEN GOTO input_manager_id;
  elsif (p_serv = 10)
    THEN GOTO employee_list;
  elsif (p_serv = 20)
    THEN GOTO options;
  elsif (p_serv = 30)
    then goto job_id;
  elsif (p_serv = 40)
    then goto manager_id;
  END IF;
<<input_manager_id>>
dbms_output.put_line('<SimpleResult><SimpleContainer>');
dbms_output.put_line('<SimpleForm target="___REQUEST_NAME__?PAoid=__PAoid__
&p_serv=10">');
dbms_output.put_line('<SimpleFormItem name="p_manager_id" title="Enter ID"
format="N*M">Enter ID:</SimpleFormItem>');
dbms_output.put_line('</SimpleForm>');
dbms_output.put_line('</SimpleContainer></SimpleResult>');
GOTO fin;
<<employee_list>>
select employee.first_name, employee.last_name INTO v_first_name, v_last_name
FROM employee where employee.manager_id = p_manager_id;
dbms_output.put_line('<SimpleResult><SimpleContainer>');
dbms_output.put_line('<SimpleMenu title="EmpID First Last">');
FOR i IN (select employee_id, first_name, last_name from employee where manager_
id = p_manager_id)
LOOP
dbms_output.put_line('<SimpleMenuItem title="Employees" target="___REQUEST_
NAME__?PAoid=__PAoid__&p_serv=20&p_empno='||to_char(i.employee_
id)||'">Employee '||i.employee_id||' is '||v_first_name||' '||v_last_name||'
</SimpleMenuItem>');
END LOOP;
dbms_output.put_line('</SimpleMenu>');
dbms_output.put_line('</SimpleContainer></SimpleResult>');
GOTO fin;
<<options>>
dbms_output.put_line('<SimpleResult><SimpleContainer>');
dbms_output.put_line('<SimpleMenu title="Request '||p_empno||'">');
dbms_output.put_line('<SimpleMenuItem target="___REQUEST_NAME__?PAoid=__PAoid_
_&p_serv=30&p_empno='||p_empno||'">Update Salary</SimpleMenuItem>');
dbms_output.put_line('<SimpleMenuItem target="___REQUEST_NAME__?PAoid=__PAoid_
_&p_serv=40&p_empno='||p_empno||'">Update Manager ID</SimpleMenuItem>');
dbms_output.put_line('</SimpleMenu>');
dbms_output.put_line('</SimpleContainer></SimpleResult>');
GOTO fin;
<<job_id>>
select employee.last_name INTO v_last_name FROM employee where employee_id = p_
empno;
update employee set salary = 100 where employee_id = p_empno;
commit;
dbms_output.put_line('<SimpleResult><SimpleContainer>');
dbms_output.put_line('<SimpleText wrapit="true" title="Changed to 100">');
dbms_output.put_line('<SimpleTextItem>Employee '||p_empno||' '||v_last_name||'
salary changed </SimpleTextItem>');
dbms_output.put_line('</SimpleText>');
dbms_output.put_line('<SimpleHref type="options" title="Prev" target="___
REQUEST_NAME__?PAoid=__PAoid__"/>');
dbms_output.put_line('</SimpleContainer></SimpleResult>');
GOTO fin;
<<manager_id>>
dbms_output.put_line('<SimpleResult><SimpleContainer>');
dbms_output.put_line('<SimpleText wrapit="true" title="Changed to 7788">');
dbms_output.put_line('<SimpleTextItem>Employee '||p_empno||' manager changed
</SimpleTextItem>');
dbms_output.put_line('</SimpleText>');
dbms_output.put_line('<SimpleHref type="options" title="Prev" target="___
REQUEST_NAME__?PAoid=__PAoid__"/>');
dbms_output.put_line('</SimpleContainer></SimpleResult>');
GOTO fin;
<<fin>>
null;
END demo_proc;
/
show errors;
9.4.1.1 Sample Code Explanation
The PL/SQL package, demo_proc.sql, shows how the Wireless Edition, using PL/SQL, passes variables to update a table.
Sample Scenario
Using a mobile phone, a manager accesses a list of employees and then updates the salary of an individual employee. To begin the process, the manager requests the service on the mobile phone. (The service is the name of the Wireless Edition alias created using the Service Designer. For more information, see Section 9.4.3.)
The first screen of the service requests the manager's ID. After the manager enters this value, the service presents the manager with a screen that lists the employees that report to the manager.
The manager selects Employee List and the manager ID queries the database for all employees who report to that manager (for example, employees who have been assigned that manager ID). The service retrieves a list of employees. The manager then selects an individual employee from this list. A screen then appears, presenting the manager with a menu with options to update the employees's salary or the manager's ID. The manager then chooses the option to update the employee's salary. The manager decides to increase the selected employee's salary by $100 and enters 100.
Defining PL/SQL Variables
In demo_proc.sql, Wireless Edition defines the user-input variables as p_serv, p_empno, and p_manager as follows.
CREATE OR REPLACE PROCEDURE demo_proc
p_serv IN INTEGER DEFAULT 0,
p_empno IN INTEGER DEFAULT 0,
p_manager_id IN INTEGER DEFAULT 0)
These variables are defined using the Master Service Creation Wizard. For more information, see Step 3e under Section 9.4.2. The variable p_serv defines the code branches in this PL/SQL package as follows:
IF (p_serv = 0)
THEN GOTO input_manager_id;
elsif (p_serv = 10)
THEN GOTO employee_list;
elsif (p_serv = 20)
THEN GOTO options;
elsif (p_serv = 30)
then goto job_id;
elsif (p_serv = 40)
then goto manager_id;
END IF;
The variable p_serv navigates the above menu list by invoking the URL appropriate to the input value. For example, when a user selects the employee list, p_serv is passed in as 10, which invokes the URL containing the list of employees through the following function, which defines the target URL.
target="___REQUEST_NAME__?PAoid=__PAoid__&p_serv=10">'
Note:
Three separate underscore marks (_ _ _) must both precede and follow the REQUEST_NAME function. The function is also case-sensitive.
|
The target URL function passes variables from one page or screen to another from one page or screen to the next using &, the equivalent to the "&" in the URL.
Defining the Output
The following string is an example of how to write the Wireless Edition XML document from PL*SQL.
dbms_output.put_line('<SimpleResult><SimpleContainer>');
For more information on the Wireless Edition DTD (SimpleResult DTD), see the Oracle9i Application Server Wireless Edition Developer's Guide.
9.4.2 Task 2: Creating the Master Service
Invoke the Master Service Creation Tool as you did in Section 9.3.1, "Task 1: Using the Master Service Creation Wizard".
- From the Select or Create a New Service Folder screen (Step 1), select the Database Services folder you created in Section 9.3.1. The Setting the Master Service Properties screen appears. Enter the following information in the Master Service Info section:
- For the Name field, enter PLSQL Test.
- Select the Valid check box.
- Select the Visible check box.
- Click Next. The Selecting an Adapter screen appears.
- Select SQL adapter from the list of adapters and click Next. The screen for Setting the Init Parameters appears. Enter the following information into the fields.
- For the JDBC_CONNECT_STRING, enter the JDBC connect string for the database on which to query, as follows:
jdbc:oracle:thin:@host_name:port:SID


Note:


Be sure to insert all colons (for example, thin:@host).
|
- For the JDBC Driver, enter the Java DriverClass name (for example, Oracle thin driver,
Oracle.jdbc.driver.oracle.driver)
- For the PASSWORD and USERNAME, type the password and user name of any database user. For example, You can use the sample user demo with the password demo.
Note:
This is a database user.
|
- Under Type of Statement, select
PL/SQL from the drop-down menu.
- For the STATEMENT, type:
BEGIN demo_proc(:p_serv, :p_empno, :p_manager_id);END;
Figure 9-1 The Init Parameters screen for the SQL Adapter
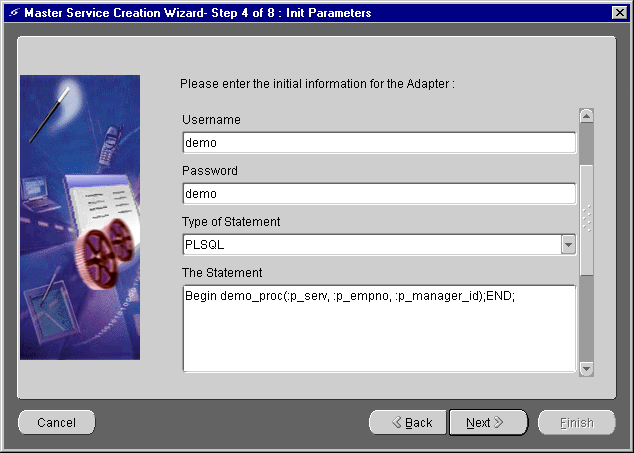
Text description of the illustration wal_sqip.gif
- Click Apply. The Setting the Input Parameters screen appears. The Input parameters screen is populated with the input parameters for the SQL adapter.
Note:
The Value field in the Input Parameters screen sets default parameters such as 0. For example, setting p_serv equal to 0 results in a service that starts with 0 until it is changed by users.
|
- Click Next to go to the Setting the Output Parameters screen. Click Next.
- Click Finish. You have created the master service, PLSQL.
9.4.3 Task 3: Creating an Alias that Points to PLSQL Test
Next you can make a master service accessible to a user by placing it in a service tree that a user owns or can access.
- Right-click the folder, PLSQL Test in the Wireless Edition repository tree.
- Click Create New Alias to display the Create New Alias form.
- Complete this form as follows:
- In the Name field, enter PLSQL Test Service.
- Click the Browse button next to the Service field. A Browse Services dialog appears. Expand the Master Services folder within the Browse Services dialog and select PLSQL Test. Click OK.
- Select the Valid check box.
- Select the Visible check box.
- Click Finish.
Click the Input Parameters tab in the right frame and select the User Customizable check box for PLSQL Test.
9.4.4 Task 4: Making PLSQL Test Available to a Group
To make PLSQL Test available to a group:
- Expand the Groups folder in the Wireless Edition repository tree view.
- Click MySampleGroup. The parameters for the group appear in the right frame.
- Click the Service Folders tab in the right frame to display the Service Folders panel. The Service Folders panel includes two fields, Service Folders and Selected Service Folders.
- Under Service Folders, expand the Services folder.
- Click Database Services.
- Click the right arrow (>) button to move PLSQL Test to the Selected Folders field.
- Click Apply.
- Click Yes in the Confirm Apply Changes dialog.
This makes the service available to all users in the group MySampleGroup.
9.4.5 Task 5: Testing PLSQL Test
In this walkthrough, you test the Wireless Edition service, PLSQL Test, using a browser and a phone simulator. Testing the service on a browser will produce the same results as testing it using a phone simulator.
Testing PLSQL Test on a Browser
Log on to the Personalization Portal to view PLSQL Test. To access the browser:
- From a Web browser, enter the following URL:
http://9iASWEServer.domain/ptg/rm
Note:
The default listener port for the Oracle9i Application Server is 7777. The URL for this port is http://hostname.domain:7777. Refer to the Oracle9i Application Server documentation to change the HTTP listener to port 80.
|
- In the browser, enter 1234 for the user name and 1234 for the user password. The services available to user 1234 appear in the left frame.
- Click Database Services, then My Database Services.
- Click PLSQL Test.
- Enter Manager ID.
Testing PLSQL Test on a Phone Simulator
You can use any phone simulator (for example, WML, HDML, CHTML) to test PLSQL Test. If you do not already have one, download and install a simulator. If you are working behind a firewall, you must configure the proxy server settings in the simulator before using it to access external sites.
Follow these steps to test the service from a phone simulator.
- Start the simulator.
- Enter the following URL in the Go window:
http://9iASWEServer.domain/ptg/rm
This is the URL of the device portal for your Wireless Edition installation.
Note:
The default port is 7777. The URL for this port is http://9iASWEServer.domain:7777/ptg/rm.
|
- Log in using 1234 as the user name and password. The preconfigured Wireless Edition services for user 1234 appear.
- Select Database Services, then My Database Services.
Note:
If the phone simulator returns an HTTP error, you should refresh the cookie cache and source cache. Go to the phone simulator install directory and refresh (or delete) the files CookieCache and SourceCache.
|
- Click PLSQL Test.
- Enter Manager ID.
9.5 Creating a Master Service Using the URL Adapter
In this walkthrough, you create a Wireless Edition service based on the URL adapter, which allows applications to invoke other URLs and pass in arguments. In addition the URL adapter enables the following functions:
- Integration with existing Java, JSP, or XML applications.
- Parameterization and cookie management, enabling remote applications to become wirelessly available.
The URL adapter is well suited for developers wishing to build a wireless Web site or internet application using only Java servlets and JavaServer Pages (JSPs).
This walkthrough uses a sample Java package that shows how to embed SimpleResult DTD. The JAVA program in the section is an example.
Note:
The URL adapter requires input to be formatted as SimpleResult.
|
9.5.1 Task 1: Building the Java Program
Before you create the master service, you must build the following JAVA program.
import javax.servlet.*;
import javax.servlet.http.*;
import java.io.*;
import java.util.Enumeration;
import java.util.StringTokenizer;
import java.util.Properties;
import java.util.Date;
public class
CompanionServer
extends HttpServlet
{
String directory = "";
static String version = "v1.0";
static String servletname = "/cmp/go";
Properties properties;
public void
init (ServletConfig config)
throws ServletException
{
super.init(config);
return;
}
public void
doGet (HttpServletRequest req,
HttpServletResponse res)
throws ServletException, IOException
{
String state = req.getParameter("state");
PrintWriter o = res.getWriter();
if (state == null)
{
res.setContentType("text/xml");
print_default(req, res, o);
}
else if (state.equals("menu"))
{
res.setContentType("text/xml");
print_menu(req, res, o);
}
else if (state.equals("form"))
{
res.setContentType("text/xml");
print_form(req, res, o);
}
else if (state.equals("text"))
{
res.setContentType("text/xml");
print_text(req, res, o);
}
else if (state.equals("test"))
{
res.setContentType("text/xml");
print_test(req, res, o);
}
else if (state.equals("param"))
{
res.setContentType("text/xml");
print_parameters(req, res, o);
}
else
{
res.setContentType("text/xml");
// ERROR: unknown application state
print_error(o, "unknown application state [get]["+state+"]");
}
return;
}
void
print_default (HttpServletRequest req,
HttpServletResponse res,
PrintWriter o)
throws ServletException, IOException
{
String server = req.getServerName();
int port = req.getServerPort();
print_header(o);
o.println ("<SimpleText><SimpleTextItem>Click GO! to
Start</SimpleTextItem></SimpleText>");
o.println ("<SimpleHref target=\"___REQUEST_NAME__?PAoid=__PAoid__
&URL=http://" + server + ":" + port + servletname + "?state=menu\"
title=\"GO!\" type=\"accept\"/>");
print_footer(o);
return;
}
void
print_parameters (HttpServletRequest req,
HttpServletResponse res,
PrintWriter o)
throws ServletException, IOException
{
print_header(o);
{
Enumeration e = req.getParameterNames();
while (e.hasMoreElements())
{
String name = (String) e.nextElement();
String[] value = req.getParameterValues(name);
for (int i = 0; i < value.length; i++)
{
o.println ("<SimpleText>");
o.println ("<SimpleTextItem title=\"" + name + "\">");
o.println (value[i]);
o.println ("</SimpleTextItem>");
o.println ("</SimpleText>");
}
}
}
print_footer(o);
return;
}
void
print_header(PrintWriter o)
throws ServletException, IOException
{
o.println ("<SimpleResult><SimpleContainer>");
return;
}
void
print_footer(PrintWriter o)
throws ServletException, IOException
{
o.println ("</SimpleContainer></SimpleResult>");
return;
}
void
print_error(PrintWriter o, String e)
throws ServletException, IOException
{
print_header(o);
o.println ("<SimpleText><SimpleTextItem title=\"Error\">");
o.println (e);
o.println ("</SimpleTextItem></SimpleText>");
print_footer(o);
return;
}
void
print_menu (HttpServletRequest req,
HttpServletResponse res,
PrintWriter o)
throws ServletException, IOException
{
String server = req.getServerName();
int port = req.getServerPort();
print_header(o);
o.println ("<SimpleMenu title=\"Menu\">");
o.println ("<SimpleMenuItem target=\"___REQUEST_NAME__?PAoid=__PAoid__
&URL=http://" + server + ":" + port + servletname +
"?state=text&item=ONE\">");
o.println ("Choice 1");
o.println ("</SimpleMenuItem>");
o.println ("<SimpleMenuItem target=\"___REQUEST_NAME__?PAoid=__PAoid__
&URL=http://" + server + ":" + port + servletname +
"?state=text&item=TWO\">");
o.println ("Choice 2");
o.println ("</SimpleMenuItem>");
o.println ("<SimpleMenuItem target=\"___REQUEST_NAME__?PAoid=__PAoid__
&URL=http://" + server + ":" + port + servletname +
"?state=text&item=THREE\">");
o.println ("Choice 3");
o.println ("</SimpleMenuItem>");
o.println ("</SimpleMenu>");
print_footer(o);
return;
}
}
void
print_text (HttpServletRequest req,
HttpServletResponse res,
PrintWriter o)
throws ServletException, IOException
{
String sitem = req.getParameter("item");
String server = req.getServerName();
int port = req.getServerPort();
print_header(o);
o.println("<SimpleText title=\"Result\">");
o.println("<SimpleTextItem>" + sitem + "</SimpleTextItem>");
o.println("</SimpleText>");
o.println ("<SimpleHref target=\"___REQUEST_NAME__?PAoid=__PAoid__
&URL=http://" + server + ":" + port + servletname + "?state=menu\"
title=\"Menu\" type=\"accept\"/>");
print_footer(o);
return;
}
}
9.5.1.1 Java Example Overview
The example presents URLs as menu items using Wireless Edition DTD, enabling users to select another URL or application. The target URL, defined by the following function, is the entry point to call the servlet.
target=\"___REQUEST_NAME__?PAoid=__PAoid__&URL=http://" + server + ":" +
port + servletname + "?state=menu\">Menu</SimpleHref>"
The target URL function allows applications to invoke a URL. In addition, the target URL function passes arguments from one URL or application to another using the &, the equivalent to the "&" in the URL.
The o.println function defines the output as SimpleResult DTD as follows:
o.println ( <SimpleText><SimpleTextItem>Click GO! to
start</SimpleTextItem></SimpleText>");
9.5.1.2 Running the Java Example
To run the Java example with your web server:
- Open the jserv.conf file
- In the Mount section, add ApJServMount /cmp /companion
- In the jserv.properties file, add companion to the servlet zones, root, stock, and companion.
- Add the following reference to the companion zone configuration file:
companion.properties=C:\Apache\ JServ 1.1.1\servlets\companion.properties
Note:
Unlike normal Java properties, JServ configurations have some important extentions:
- Commas are used as token separators.
- Multiple definitions of the same key are concatenated in a comma-separated list.
|
- Add the following to the companion.properties file:
Table 9-1 Configuration Parameters
Table 9-2 Servlet Parameters
9.5.2 Task 2: Creating the Master Service
Invoke the Master Service Creation Tool as you did in Section 9.3.1, "Task 1: Using the Master Service Creation Wizard".
- Select the Create a New Service Folder radio button in the Selecting or Creating a Service Folder screen.
- Click Next. The Creating Folder screen appears. Enter the following information in the In the New Folder Info section:
- For the Name field, enter URL Services.
- Select the Valid check box.
- Select the Visible check box.
- Enter a description of the service that is meaningful to you.
- Click Next. The Selecting or Creating a Service Folder screen reappears. Click the URL Service folder and click Next. The Setting the Master Service Properties screen appears. Enter the following information in the Master Service Info section:
- For the Name field, enter URL Example.
- Select the Valid check box.
- Select the Visible check box.
- Click Next. The Selecting an Adapter screen appears.
- Select URLAdapter from the list of adapters and click Next.
- Continue clicking the Next button until you complete the Master Service Creation Wizard Sequence.
Note:
The URL of the XML document that is retrieved by the URL Adapter. The XML document should conform to the SimpleResult DTD.
For example, if the URL parameter is file:///d:/SimpleResultExample1.xml, then the adapter gets the file d:/SimpleResultExample1.xml from the hard drive on the local machine. If the URL parameter is http://ptg1.oracle.com/SimpleResultExamle2.xml, then the adapter gets the file SimpleResultExamle2.xml from the host ptg1.oracle.com.
|
9.5.3 Task 3: Creating an Alias that Points to URL Adapter
Next you can make a master service accessible to a user by placing it in a service tree that a user owns or can access.
- Right-click the folder, URL Services in the Wireless Edition repository tree.
- Click Create New Alias to display the Create New Alias form.
- Complete this form as follows:
- In the Name field, enter My URL Services.
- Click the Browse button next to the Service field. A Browse Services dialog appears. Expand the Master Services folder within the Browse Services dialog and select URL Example. Click OK.
- Select the Valid check box.
- Select the Visible check box.
- Click Finish.
9.5.4 Task 4: Making URL Example Available to a Group
To make URL Example available to a group:
- Expand the Groups folder in the Wireless Edition repository tree view.
- Click MySampleGroup. The parameters for the group appear in the right frame.
- Click the Service Folders tab in the right frame to display the Service Folders panel. The Service Folders panel includes two fields, Service Folders and Selected Service Folders.
- Under Service Folders, expand the Services folder.
- Click URL Services.
- Click the right arrow (>) button to move URL Services to the Selected Folders field.
- Click Apply.
- Click Yes in the Confirm Apply Changes dialog.
This makes the service available to all users in the group MySampleGroup.
9.5.5 Task 5: Testing URL Example
In this walkthrough, you test the Wireless Edition service, URL Example, using a browser and a phone simulator.
Testing the Service on a Browser
Log on to a browser to view URL Example. To access the service:
- From a Web browser, enter the following URL:
http://9iASWEServer.domain/ptg/rm
Note:
The default listener port for the Oracle9i Application Server is 7777. The URL for this port is http://hostname.domain:7777. Refer to the Oracle9i Application Server documentation to change the HTTP listener to port 80.
|
- In the browser, enter 1234 for the user name and enter 1234 for the password. The services available to user 1234 appear in the left frame.
- Click URL Services, then My URL Services.
Testing Geocoder on a Phone Simulator
You can use any phone simulator (for example, WML, HDML, CHTML) to test Geocoder. If you do not already have one, download and install a simulator. If you are working behind a firewall, you must configure the proxy server settings in the simulator before using it to access external sites.
Follow these steps to test the service from a phone simulator.
- Start the simulator.
- Enter the following URL in the Go window:
http://9iASWEServer.domain/ptg/rm
This is the URL of the device portal for your Wireless Edition installation.
Note:
The default port is 7777. The URL for this port is http://9iASWEServer.domain:7777/ptg/rm.
|
- Log in using 1234 as the user name and password. The preconfigured Wireless Edition services for user 1234 appear.
- Select URL Services, then My URL Services.
9.6 Creating Location-Based Services
In this walkthrough, you create a Wireless Edition service based on a spatial adapter, the Geocoder. In addition, you make this service location-dependent using the Region Modeling Tool.
9.6.1 Task 1: Creating the Location-Dependent Master Service
Invoke the Master Service Creation Tool as you did in Section 9.3.1, "Task 1: Using the Master Service Creation Wizard".
Create a New Folder
- Select the Create a New Service Folder radio button in the Selecting or Creating a Service Folder screen.
- Click Next. The Creating Folder screen appears.
- Enter the following information in the In the New Folder Info section:
- For the Name field, enter Spatial Services.
- Select the Valid check box.
- Select the Visible check box.
- Enter a description of the service that is meaningful to you.
- Click Next. The Select or Create a New Service Folder reappears.
Creating the Master Service
- From the Select or Create a New Service Folder screen, select the Spatial Services folder you created in Section 9.3.1. The Setting the Master Service Properties screen appears.
- Enter the following information in the Master Service Info section:
- For the Name field, enter Geocoder.
- Select the Valid check box.
- Select the Visible check box.
- Enter a name for the Service that is meaningful to you.
Creating the User-Defined Region
- Click the Location Dependent check box. The Browse button appears.
- Click the Browse button. The Region Modeling Tool appears.
- From the Region menu of the Region Modeling Tool, select Create From Address. The Create from Address screen appears.
- In the Location Name field, enter Oracle.
- In Line 1 of the Address section, enter 500 Oracle Parkway
- In the City field, enter Redwood City.
- In the State field, enter CA.
- In the Postal Code field, enter 94065.
- In the Country field, enter United States.
- Select the Point at Address radio box in the Type of Region section.
- Click Finish to complete the creation of a UDR from an address. The Oracle URD appears in the left frame of the Region Modeling Tool.
Assigning the User-Defined Region to the Master Service
- In the left frame of the Region Modeling Tool, right click Oracle node.
- Click Select. The Creating Folder screen reappears, showing the Area ID of the selected node. The Geocoder service is now only available at 500 Oracle Parkway, Redwood City, California.
- Click Next. The Selecting an Adapter screen appears.
- Select Geocoder from the list of adapters and click Next.
- Continue clicking the Next button until you reach the confirmation screen.
9.6.2 Task 2: Creating an Alias that Points to Geocoder
Next you can make a master service accessible to a user by placing it in a service tree that a user owns or can access.
- Right-click the folder, Geocoder in the Wireless Edition repository tree.
- Click Create New Alias to display the Create New Alias form.
- Complete this form as follows:
- In the Name field, enter MyGeocoder.
- Click the Browse button next to the Service field. A Browse Services dialog appears. Expand the Master Services folder within the Browse Services dialog and select Geocoder. Click OK.
- Select the Valid check box.
- Select the Visible check box.
- Click Finish.
9.6.3 Task 3: Making Geocoder Available to a Group
To make Geocoder available to a group:
- Expand the Groups folder in the Wireless Edition repository tree view.
- Click MySampleGroup. The parameters for the group appear in the right frame.
- Click the Service Folders tab in the right frame to display the Service Folders panel. The Service Folders panel includes two fields, Service Folders and Selected Service Folders.
- Under Service Folders, expand the Services folder.
- Click Spatial Services.
- Click the right arrow (>) button to move Spatial Services to the Selected Folders field.
- Click Apply.
- Click Yes in the Confirm Apply Changes dialog.
This makes the service available to all users in the group MySampleGroup.
9.6.4 Task 4: Testing the Geocoder
In this walkthrough, you test the Wireless Edition service, Geocoder, using a Web browser and a phone simulator.
Testing the Service on a Browser
Log on to a browser to test the Geocoder service. To access the URL:
- From a Web browser, enter the following URL:
http://9iASWEServer.domain/ptg/rm
Note:
The default listener port for the Oracle9i Application Server is 7777. The URL for this port is http://hostname.domain:7777. Refer to the Oracle9i Application Server documentation to change the HTTP listener to port 80.
|
- In the browser, enter 1234 for the user name and enter 1234 for the password. The services available to user 1234 appear in the left frame.
- Click Spatial Services, then My Geocoder Services.
- Click Geocoder. The Geocoder form appears.
- Complete the Geocoder form as follows:
- Type 500 Oracle Parkway in Address Line 1.
- In the City field, type Redwood City.
- Type CA in the State field
- Type 94065 in the Postal Code field
- Type United States in the Country field.
- Click Submit. A Map pin-pointing the address displays.
Testing Geocoder on a Phone Simulator
You can use any phone simulator (for example, WML, HDML, CHTML) to test Geocoder. If you do not already have one, download and install a simulator. If you are working behind a firewall, you must configure the proxy server settings in the simulator before using it to access external sites.
Follow these steps to test the service from a phone simulator.
- Start the simulator.
- Enter the following URL in the Go window:
http://9iASWEServer.domain/ptg/rm
This is the URL of the device portal for your Wireless Edition installation.
Note:
The default port is 7777. The URL for this port is http://9iASWEServer.domain:7777/ptg/rm.
|
- Log in using 1234 as the user name and password. The preconfigured Wireless Edition services for user 1234 appear.
- Select Database Services, then My Database Services.
Note:
If the phone simulator returns an HTTP error, you should refresh the cookie cache and source cache. Go to the phone simulator install directory and refresh (or delete) the files CookieCache and SourceCache.
|
- Click Geocoder.
- Enter the address as you did in Section 9.6.4.
9.7 Creating the Spatial Adapters
You can create your own spatial adapters using the Service Designer.
- From the Repository Tree, right-click Adapters. The Create New Adapter form appears.
- Complete the Create New Adapter form as follows:
- Enter Geocoder in the Name field.
- select the Valid check box.
- enter the following in the Class Name field:
sampleadapter.spatial.geocoder.SampleGeocoder
- Click Finish to complete creation of the Adapter.
Note:
You can create another spatial adapter, such as the yellow page adapter, by following the steps described in this section.
|
9.8 Creating a Master Service Using the Web Integration Adapter
In this walkthrough, you create a Wireless Edition Web service. First, you use the Web Integration Developer to map the elements of a sample Web page, quote.yahoo.com, to input and output parameters. You then use the Service Designer to create a Oracle9i Application Server Wireless Edition service that retrieves stock quotes based on the mapping.
For more information on using the Web Integration Developer, see the Oracle9i Application Server Wireless Edition Developers's Guide.
This walkthrough devotes a section to each task associated with creating a master service. These sections include:
9.8.1 Task 1: Creating the WIDL File in the Web Integration Developer
Follow these steps to create a Web page mapping, or Web Integration Definition Language (WIDL) file, using the Web Integration Developer.
Start the Web Integration Developer
- Click Start on the Windows NT desktop and point to Programs.
- From the Programs menu, select Oracle for Windows NT.
- Select Wireless Edition, then select Web Integration Developer. The Web Integration Developer appears.
Open the Source Page
Open the source page in the Web Integration Developer as follows:
- Select Open URL from the File menu or toolbar.
- In the Open URL dialog box, type the following URL:
http://quote.yahoo.com
Note:


Go to the Configure menu and set proxy to go through the firewall.
|
- Click OK.
The Web Integration Developer retrieves the page, parses it, and adds it to the Document Browser (in the left frame). For this example, the Document Browser shows the following items:
- The first item (http://quote.yahoo.com) identifies the open document.
- The second item (the Document node) represents the contents of the HTML document: paragraphs, images, links, lists, and tables.
- The third item (the FirstForm node) represents the form in this document. When you open a page that contains forms, the Web Integration Developer creates a form node for each form in the document.
Generate a WIDL File
Next, generate a WIDL file from the source page as follows:
- Select FirstForm in the left frame.
- Select WIDL from the Generate menu.
- Complete the New Service dialog as follows:
Table 9-3 Parameters for the New Service Dialog
|
In this Field... |
Type... |
|---|
|
Interface |
StockInfo |
|
Service |
QuoteYahoo_GetQuote |
- Click OK.
- In the Generate New WIDL for Service dialog, type
ORCL.
- Click the Submit button.
Edit the Input Binding of the WIDL File
The input variables defined in this WIDL service have the same names as those specified in the HTML form. You can edit the input binding to make these names more meaningful as follows:
- Expand the Bindings folder in the left frame.
- Click the QuoteYahoo_GetQuoteInput binding.
- Click the variable "d" in the variable list in the right frame. In the Name field, type
ReportType and press Enter.
- Click the variable "s" in the variable list. In the Name field, type
CoSymbol and press Enter.
Edit the Output Binding of the WIDL File
The output defined by this service extracts all elements from the document returned by the Web page. To extract just the stock quotes to pass back to the client application, you can edit the output binding:
- Select the QuoteYahoo_GetQuoteOutput binding in the left frame.
- In the right frame, scroll through the variable list until you reach the table variables.
- Click the variable table8. Make sure the content of this variable is the stock price of ORCL. If not, click the variable whose content is ORCL's stock price.
- On the Sample tab, select the cell that contains the current stock price.
- Click the right mouse button and select Create New Variable From Selection from the pop-up menu.
- Type
CurrentPrice in the New Variable dialog and click OK. The CurrentPrice variable now appears in the variable list.
- Delete all other variables from the variable list.
- Save the WIDL file.
Test the WIDL File
To test the WIDL file in the Web Integration Developer:
- Click QuoteYahoo_GetQuote in the Services folder in the left frame.
- Select Test Service from the Tools menu.
- Type any valid stock symbol in the CoSymbol field.
9.8.2 Task 2: Publishing the WIDL Interface to the Web Integration Server
Publishing a WIDL interface makes it accessible to Web Integration services that you create in the Service Designer.
You must have administrator authority on the Web Integration Server to perform this procedure. When you publish an interface, the services in that interface are added to those already on the Web Integration Server. If you create a service with the same name as an existing service, the existing service is overwritten.
Follow these steps to publish your WIDL file (StockInfo) to the Web Integration Server.
- Select StockInfo in the left frame.
- From the File menu, select Publishing, then Publish Interface.
- In the Specify Server field in the Publish Interface dialog, type the name of the Web Integration Server to which you want to publish this interface. Specify the server name using the format:
host_name:port
- The Web Integration Server uses packages to organize services. You can click Update Packages to view a list of packages on the specified server, then add the service to a specific package. In this case, however, you can add the sample service to the Default package. Click OK.
- If the User Name and Password dialog appears, enter a user name and password for the selected server. This user must have administrative privileges. Click OK.
The Web Integration Developer copies the interface to the selected package on the Web Integration Server and notifies you that the interface is successfully published. Assuming the package is enabled, the services in this interface are immediately available for execution.
9.8.3 Task 3: Using the Service Designer
After creating the WIDL service, you create a master service based on the WIDL service. You can create Wireless Edition services using the Service Designer. The Service Designer is a visual tool for creating and managing Wireless Edition objects.
Start the Service Designer
To start the Service Designer, from the Start menu, point to the Oracle for Windows NT menu item. Click Wireless Edition, then Service Designer.
Connect to the Wireless Edition Repository
When the Service Designer starts, the Log In dialog appears. Use the Log In dialog to connect the Service Designer to the Wireless Edition repository that you want to develop. The Log In dialog enables you to select a server name that you have already used, or to enter a new server name.
To connect to the Wireless Edition repository from the Log In dialog:
- In the location field, enter the name of the Wireless Edition server. Then enter Administrator as the user name and manager as the password.
Note:
Both user name and password as case-sensitive.
|
- Click OK. The Wireless Edition server objects appear in the tree view on the left.
Note:
The Service Designer displays an Error dialog for invalid entries. By clicking the Show Details button, you can view the Java runtime exception details.
|
9.8.4 Task 4: Creating the Master Service
In this walkthrough, you use the Master Service Creation Wizard to create a Wireless Edition service StockInfo WIDL based on the Web integration adapter. You create a service that displays the current stock price after you enter a valid stock ticker symbol (for example, ORCL).
Before you begin the walkthrough, make sure you can access a Wireless Edition server from your development environment running the Service Designer.
Using the Master Service Creation Wizard
Start the Service Designer and follow these steps:
- Click the Tools menu in the Service Designer and select Master Service Creation Wizard. The Welcome screen of the Master Service Creation Wizard appears which lists the necessary steps for the creation of a master service. Click Next to go to the Selecting or Creating a New Service Folder screen.
- Select the Create a New Service Folder radio button.
- Click Next. The Creating Folder screen appears. Enter the following information in the In the New Folder Info section:
- For the Name field, enter My Folder.
- Select the Valid check box.
- Select the Visible check box.
- Enter a description of the service that is meaningful to you, such as Stock Prices.
- Click Next. The Selecting or Creating a Service Folder screen reappears. Click My Folder and click Next. The Setting the Master Service Properties screen appears. Enter the following information in the Master Service Info section:
- For the Name field, enter Stock Quotes.
- Select the Valid check box.
- Select the Visible check box.
- Click Next. The Selecting an Adapter screen appears. Select WebIntegrationAdapter from the list of adapters and
- Click Next. The screen for Setting the Init Parameters appears. Enter the following information into the fields.
- For the Web Integration Server, type the machine name of the Web Integration Server in the format: host_name.domain:port
- For the Interface field, type
StockInfo. This is the name of the WIDL interface you created in Section 9.8.1
- Do not supply a value for the WIDL_FILE parameter.
- Click Apply. The Setting the Input Parameters screen appears. The Input parameters screen is populated with the input parameters for the WebIntegrationAdapter. Select the User Customizable check box for the
CoSymbol parameter.
- Click Next to go to the Setting the Output Parameters screen. The Output parameters screen is also populated with the output parameters for the WebIntegrationAdapter. You do not need to modify any of the output parameters.
- Click Finish. You have created a master service.
This creates the master service Stock Quotes in the Oracle9i Application Server Wireless Edition repository. You can now create aliases to make the master service available to users, assign the service to the group, and test it.
9.8.5 Task 5: Creating an Alias that Points to Stock Quotes
Using the Service Designer, you can make a master service accessible to a user by placing it in a service tree that a user owns or can access. To create an alias for the service Stock Quotes:
- Right-click My Folder.
- Click Create New Alias to display the Create New Alias form.
- Complete this form as follows:
- In the Name field, enter My Services.
- Click the Browse button next to the Service field. A Browse Services dialog appears. Expand the Master Services folder within the Browse Services dialog and select Stock Quotes. Click OK.
- Select the Valid check box.
- Select the Visible check box.
- Click Finish.
- Click the Input Parameters tab in the right frame and select the User Customizable check box for CoSymbol
.
This creates an alias object in the Wireless Edition repository. Aliases, like master services, have input parameters. You can use the input parameters of an alias to override any input values specified by the master service. For this walkthrough, you use the default settings provided by the master service.
9.8.6 Task 6: Making Stock Quotes Available to a Group
You use the Service Designer to make the service you created available to a group of users:
- Expand the Groups folder in the Wireless Edition repository tree view.
- Click MySampleGroup. The parameters for the group appear in the right frame.
- Click the Service Folders tab in the right frame to display the Service Folders panel. The Service Folders panel includes two fields, Service Folders and Selected Service Folders.
- Under Service Folders, expand the Services folder.
- Click My Folder.
- Click the right arrow (>) button to move Stock Quotes to the Selected Folders field.
- Click Apply.
- Click Yes in the Confirm Apply Changes dialog.
This makes the service available to all users in the group MySampleGroup. In Section 9.8.7, you test this service as the user 1234.
9.8.7 Task 7: Testing Stock Quotes
In this walkthrough, you test the Wireless Edition service, Stock Quotes, using a browser and a phone simulator.
Testing the Service on a Browser
Log on to a browser to test the service. To access the URL:
- From a Web browser, enter the following URL:
http://9iASWEServer.domain/ptg/rm
Note:
The default listener port for the Oracle9i Application Server is 7777. The URL for this port is http://9iASWEServer.domain:7777. Refer to the Oracle9i Application Server documentation to change the HTTP listener to port 80.
|
- Enter 1234 for the user name and enter 1234 for the password. The services available to user 1234 appear in the left frame.
- Click My Folder, then My Services.
- Click QuoteYahoo GetQuote
- Enter a valid stock symbol and click submit.
The Wireless Edition retrieves and displays the current stock price.
Testing Stock Quotes on a Phone Simulator
You can use any phone simulator (for example, WML, HDML, CHTML) to test Stock Quotes. If you do not already have one, download and install a simulator. If you are working behind a firewall, you must configure the proxy server settings in the simulator before using it to access external sites.
Follow these steps to test the service from a phone simulator.
- Start the simulator.
- Enter the following URL in the Go window:
http://9iASWEServer.domain/ptg/rm
This is the URL of the device portal for your Wireless Edition installation.
Note:
The default port is 7777. The URL for this port is http://9iASWEServer.domain:7777/ptg/rm.
|
- Log in using 1234 as the user name and password. The preconfigured Wireless Edition services for user 1234 appear.
- Select My Folder, then My Services.
Note:
If the phone simulator returns an HTTP error, you should refresh the cookie cache and source cache. Go to the phone simulator install directory and refresh (or delete) the files CookieCache and SourceCache.
|
- Enter a valid stock ticker symbol (for example, ORCL) and click OK.
The Wireless Edition retrieves and displays the current price of the stock.
9.9 Creating Chained Services Using the Web Integration Developer
Chained services link services to each other in a sequential way so that each chained service is dependent for input on the service that immediately precedes it. Chained services are needed for Web sites which require the user to interact with a Web page to access the rest of the content on the Web site. For example, the first Web page prompts the user for a user name and password before the user can access the form on the second page, which then produces the information on the third page. Chaining one service (Service A) to another service (Service B) works in such a way that when the Output Binding of Service A completes successfully, it chains to the Input Binding of Service B.
The chained service you build in this walkthrough illustrates a typical use of chained services. Based on the Yahoo finance site, the chained service you build in this section allows the user to enter a stock ticker symbol, receive the current stock quote, select details, and receive detailed information about the stock, such as a chart. The first service requests that the user enter a stock ticker symbol. It returns the current quote for that stock. When the user clicks on Details and selects Charts, the second service returns the chart for that stock.
You should become familiar with a site you want to base a service on by first opening it in a browser. Opening the site and viewing its HTML source code lets you become familiar with the structure of a site. In a browser, open the Yahoo site for getting stock quotes:
http://quote.yahoo.com
The query form on this page takes a stock's ticker symbol. It returns that stock's current quote.
This walkthrough assumes that you are familiar with the basic steps required to create a Web service in the Oracle Web Integration Developer. If you are not, complete the Web Integration walkthrough before attempting to follow this walkthrough.
This walkthrough does not include error checking. Usually, you would add error catching logic to the service.
9.9.1 Task 1: Creating the First Service in the Chain
The overall interface name for the chained services in this walkthrough is YahooFinance. The first service in the chain sequence is called Quote. This service prompts the user for a stock ticker symbol (such as, ORCL) and returns the stock quote. The following steps provide a basic method for creating the first service in the chain.
Generate the WIDL File and Edit the Input Binding
- In the Oracle Web Integration Developer, open the following URL:
http://quote.yahoo.com
Two nodes appear in the document browser, Document and FirstForm.
- Highlight the FirstForm node and click Generate, then WIDL. Complete the New Service dialog as follows and click OK:
Table 9-4 Parameters of the New Service Dialog
|
In this Field... |
Type... |
|---|
|
Interface |
YahooFinance |
|
Service |
Quote |
- In the Generate a New Widl for Service "Quote" dialog box, enter the stock symbol ORCL. Click Submit.
- Expand the bindings node and highlight the QuoteInput binding by selecting it. The variables in the Quote service's input binding appear in the edit pane of the Variables tab.
- Rename the variable s to s1, and d to d1.
Edit the Output Binding of the WIDL File
- Select the QuoteOutput binding. In the variables list, highlight the row for table4 by clicking on it. The Sample tab shows the values in table4. You can create new variables based on these values.
- In the Sample tab, highlight the ORCL cell. Right click. Select Create new variable from Selection. Name the new variable symbol.
- Similarly, highlight the cell that shows the ORCL stock price (in the table4 sample result). Right click. Select Create new variable from Selection. Name the new variable price.
- Follow the same procedure as in the above two steps to create the new variable change from the cell that shows the value for change.
- Delete all output variables from QuoteOutput, except for the three new output variables (symbol, price, change) that you just created in steps 7, 8, and 9 above.
- Save the WIDL file.
- Test the first service, Quote, with other stock symbols.
9.9.2 Task 2: Creating the Second Service in the Chain
This walkthrough takes you through the steps to build the second service, named Detail, in the chained service YahooFinance. While you can create chained services using separate interfaces, in this walkthrough you add the second service to the YahooFinance interface.
The Detail service takes the stock quote as input and returns stock charts.
Create the second service as follows:
Open the Source Page for the Second Service
- Open the following page in a browser:
http://finance.yahoo.com
- Enter ORCL as the quote symbol and select Chart as the type of search (instead of Basic).
- Click Search. As you see, a chart search returns more information than a basic search. The second service in the chain returns this detailed information.
- Select the URL in your browser's Location field, http://finance.yahoo.com/q?s=orcl&d=b, and open this URL in the Web Integration Developer.
Generate the WIDL for the Second Service
- Select FirstForm in the left frame.
- Select WIDL from the Generate menu.
- Complete the New Service dialog as follows:
Table 9-5 Parameters for the New Service Dialog
|
In this Field... |
Type... |
|---|
|
Interface |
YahooFinance |
|
Service |
Detail |
- Click OK.
- In the Generate a New Widl for Service "Detail" dialog box, enter the stock symbol ORCL. Click the Submit button.
Edit the Input and Output Binding of the WIDL File
- Expand the Bindings folder in the left frame.
- Select DetailInput. Rename the variable s to s2, and d to d2.
- Select DetailOutput. In the variables list, highlight table4.
- Find the cell with the Open price. Highlight the cell, right click and create a new variable from selection. Name the new variable opened.
- From the day's range cell, create a new variable named range.
- Similarly, from the cell showing volume, create a new variable named volume.
- From the cell showing the 52-week range, create a new variable named annualrange.
- Create a new variable named pe from the cell that shows the P/E value.
- Create a new variable named mktcap from the cell that says Mkt cap.
- Delete all variables other than the ones that you just created in steps 9 to 14 above.
Edit the URL of the Second Service
- Highlight Detail under the Services node.
- Remove q?s=orcl&d=b from the Source URL.
- Save the WIDL file.
Publish the Service
Publish the new service to the WIDL server, as described in Section 9.8.2
9.9.3 Adding the Service to the Wireless Edition Repository
The new Master Service is YahooFinance. It points to the interface YahooFinance; it includes the two chained services Quote and Detail. To add this service to the Wireless Edition repository, start the Service Designer and follow these steps:
Using the Master Service Creation Wizard
Start the Service Designer and follow these steps:
- Click the Tools menu in the Service Designer and select Master Service Creation Wizard. The Welcome screen of the Master Service Creation Wizard appears. Click Next to go to the Selecting or Creating a New Service Folder screen.
- From the Selecting or Creating a New Service Folder screen, select My Folder, which you created in Section 9.8.4.
- Click Next. The Setting the Master Service Properties screen appears. Enter the following information in the Master Service Info section:
- For the Name field, enter YahooFinance.
- Select the Valid check box.
- Select the Visible check box.
- Click Next. The Selecting an Adapter screen appears. Select WebIntegration Adapter and then click Next. The Screen for setting the Init Parameters appears. Enter the following information:
- For the Web Integration Server, type the machine name of the Web Integration Server in the format: host_name.domain:port
- For the Interface field, type YahooFinance.
- Click Apply. The Setting Input Parameters screen appears, populated with the input parameters for the WebIntegrationAdapter. Complete the screen as follows:
- Select the User Customizable check box for s1.
- Click the Value field of the PAsection variable. Select Quote from the drop-down menu.
- For the variable OutputType, set a value of RawResult.
- Click the Add button. Click in the Name field of the new input variable and type PAdebug. Set the value to 1.
- Deselect the User Customizable check box for PAsection, if set.
- Click Next. The Setting the Output parameters screen appears, populated by the output parameters of the WebIntegrationAdapter.
- Click the Add button. In the Name field, delete the default name, and enter Quote.
- Click Next. The Creating the Result Transformer screen appears. Paste the following style sheet in the XSL Editor window and click Next. Be sure to replace the existing template text in the window.
<xsl:stylesheet version="1.0" xmlns:xsl="http://www.w3.org/1999/XSL/Transform">
<xsl:template match="/">
<xsl:apply-templates
select="ServiceRequest/Result/AdapterResult"></xsl:apply-templates>
</xsl:template>
<xsl:template match="AdapterResult">
<SimpleResult>
<SimpleMenu>
<SimpleMenuItem>
<xsl:attribute
name="target">___REQUEST_NAME__?PAservicepath=___SERVICE_URL_ENC__
&PAsection=Detail&s2=<xsl:value-of
select="symbol"></xsl:value-of></xsl:attribute>
<xsl:value-of select="symbol"></xsl:value-of>
<!-- this xsl:text is just for beautifying the output -->
<xsl:text> - </xsl:text>
<xsl:value-of select="price"></xsl:value-of>
<!-- this xsl:text is just for beautifying the output -->
<xsl:text> - </xsl:text>
<xsl:value-of select="change"></xsl:value-of>
</SimpleMenuItem>
</SimpleMenu>
</SimpleResult>
</xsl:template>
</xsl:stylesheet>
- Click the Add button. A name field for a new stylesheet appears with a default name.
- Replace the default name with Detail. Click the Edit button.
- Replace the existing template with the following and click OK:
<xsl:stylesheet version ="1.0" xmlns:xsl="http://www.w3.org/1999/XSL/Transform">
   <xsl:template match="/">
      <xsl:apply-templates
select="ServiceRequest/Result/AdapterResult"></xsl:apply-templates>
   </xsl:template>
   <xsl:template match="AdapterResult">
      <SimpleResult>
         <SimpleContainer>
            <SimpleText>
               <SimpleTextItem>
                  <xsl:value-of select="opened"></xsl:value-of>
               </SimpleTextItem>
               <SimpleTextItem>
                  <xsl:value-of select="range"></xsl:value-of>
               </SimpleTextItem>
               <SimpleTextItem>
                  <xsl:value-of select="volume"></xsl:value-of>
               </SimpleTextItem>
               <SimpleTextItem>
                  <xsl:value-of select="annualrange"></xsl:value-of>
               </SimpleTextItem>
               <SimpleTextItem>
                  <xsl:value-of select="pe"></xsl:value-of>
               </SimpleTextItem>
               <SimpleTextItem>
                  <xsl:value-of select="mktcap"></xsl:value-of>
               </SimpleTextItem>
            </SimpleText>
         </SimpleContainer>
      </SimpleResult>
   </xsl:template>
</xsl:stylesheet>
9.9.4 Creating a User and an Alias and Test the Service
- Create a new user and a new alias as described Section 9.8.5.
- Test the service from the Personalization portal as described in Section 9.8.7
9.10 Creating External Links Using the Service Designer
An External Link is a Wireless Edition service that points to an external resource. The external resource is typically a Web page that serves content in a format supported by the target device. When an end user sets an external link, it appears as a menu selection in the device portal.
The Wireless Edition does not process the content of the external link target. As a result, external link services are not available to all targeted devices, as are other Wireless Edition services.
In this walkthrough, you will create an external link using the Service Designer.
To create an external link in the Service Designer:
- Highlight and right-click Database Services in the Wireless Edition repository tree.
- Click Create New Bookmark. The Create New Bookmark form appears.
Figure 9-2 The Create New Bookmark Form
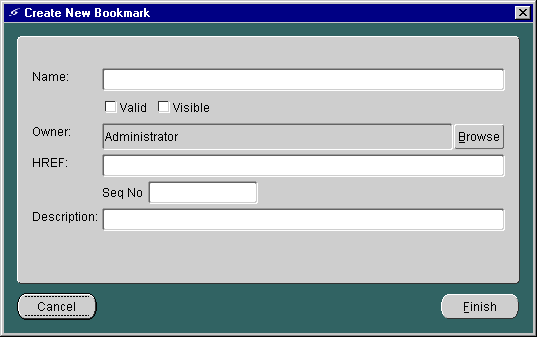
Text description of the illustration wal_cnbk.gif
- Complete the Create New Bookmark form as follows:
- In the Name field, enter My Oracle.
Note:
The name of the bookmark must be unique within its parent folder.
|
- Select the Valid check box.
- Select the Visible check box.
- Click Browse to select user 1234 as the owner of the external link.
- Enter http://www.oracle.com as the HREF.
- Enter a description that is meaningful to you and the external link's user.
- Click Finish. The external link, My Oracle, appears in the Wireless Edition repository tree under the Database Services folder.
