7
Personalization from a Device
This document describes personalization from a device interface for customizing and assigning Wireless Edition mobile services. Each section of this document presents a different topic. These sections include:
- Section 7.1, "Overview"
- Section 7.2, "Device Personalization"
- Section 7.3, "Logging in to the Portal"
- Section 7.4, "Creating a Folder"
- Section 7.5, "Creating a Bookmark"
- Section 7.6, "Reordering Objects"
- Section 7.7, "Renaming a Folder"
- Section 7.8, "Showing or Hiding Objects"
- Section 7.9, "Deleting a Folder"
- Section 7.10, "Editing a User Profile"
- Section 7.11, "Creating a LocationMark"
- Section 7.12, "Logging Off"
7.1 Overview
The Wireless Edition portal can be personalized from a device, allowing a user to create the objects that Wireless Edition uses to perform its function.
All features of the Personalization Portal operate on a folder model. For example:
- A group is a folder containing users and services.
- A user is a folder containing sub-folders, services, location marks, bookmarks, and alerts.
- A service is an alias for a master service created using Service Designer.
User can create such objects as users, alerts, and locationmarks. In addition, the Personalization Portal enables users to perform service assignment, subfolder creation, and URL bookmark association, and manipulation of other Wireless Edition repository objects.
7.2 Device Personalization
The device-based Personalization Portal provides a subset of the current browser-based functionality to perform some user administration functions from a wireless device. For more information on the browser-based functionality of the Personalization Portal, see Chapter 5, "Managing Users and Groups" and Chapter 6, "Personalization from Desktops".
Note:
The user's group must have access to the Personalization and UserAdmin adapters, or their equivalent, in order to utilize the Personalization Portal capabilities.
|
Figure 7-1 Home Screen for Device User
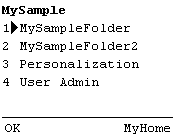
Text description of the illustration pal_homp.gif
7.2.1 Navigation and Data Entry
You use the device's up- and down-arrow keys to scroll through the lists. The current selection is indicated with the '>' symbol, or by using the number key which appears next to the item you wish to select. The key used to make the selection active varies from device to device. This document refers to the OK key for this function. It may be a single key used to accept selections, or one of two keys which correspond to an "OK" and "MyHome" text displayed in the corners of your device's screen. Pressing the button which appears under MyHome returns you to the root level of the portal menu. Pressing the OK button accepts the selection. Pressing the MyHome button cancels any operation and returns to the top level display.
In order to begin using personalization options, you must select the Personalization folder. The Personalization folder houses most of the personalization options.
7.3 Logging in to the Portal
Logging in to the portal starts from the login screen. Your administrator provides you with a phone number or URL for this purpose. After you have connected, you must perform the following tasks:
- Enter the user name and then press the OK key.
- Enter the password and then press the OK key.
- If you have entered something incorrectly, you are returned to that step to correct the error, otherwise you are logged in.
When you log in, your device displays the services enabled for your use. These may be services enabled by you using a browser to access the portal, or these may be services that your administrator has assigned to your group. Personalization is the name of the service that allows you to personalize the portal from a device.
The main level of the device portal is called "MyHome". You start at this level to perform any personalization or use any service. The MyHome folder can be restored at any time without harming any of the existing Personalization Portal settings.
7.4 Creating a Folder
Folders can store objects such as services, bookmarks, location marks, and services. To create a folder:
- Select the [.]Home option.
- Select the Add Folder option with the arrow keys, and then press the OK key to activate it.
Figure 7-2 Adding a Folder

Text description of the illustration pal_adfo.gif
- Using the device text entry keys, enter the name of the folder and press the OK key to submit the folder to the portal.
- Wireless Edition creates the folder and returns to the [.]Home screen for the folder you started from.
- Select the new folder and press OK. Notice that this folder is called [.]Folder_Name with Folder_Name being the name you gave your folder. Select the [.]Folder_Name option and press OK. Notice that you have many of the same options within this branch as in the root folder.
7.5 Creating a Bookmark
A bookmark is a link to a URL. To create a bookmark:
- Select the [.]Home option.
- Select the Add Bookmark option with the arrow keys, and press the OK key to activate it.
- You are prompted to name the bookmark, then press OK.
- The next screen prompts you for a URL.
- Press OK to submit the bookmark to the portal.
- Wireless Edition creates the bookmark and returns to the [.]Home screen for the folder you started from.
7.6 Reordering Objects
Once you have more than one service or folder, you may wish to rearrange the order in which they appear on the screen. To reorder objects:
Figure 7-3 Reordering Objects
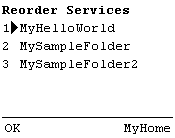
Text description of the illustration pal_reor.gif
- Select the [.]Home option at the folder level where the folders and services you are rearranging reside.
- Scroll down and select the reorder option. The folders and services are displayed as they are currently organized. Items in this list are reordered upwards.
- Scroll to the item you wish to move to select it and press OK. The list is rearranged with your selection moved up one level.
7.7 Renaming a Folder
To rename a folder:
- Select the [.]Folder_Name option in the folder to be renamed. You are prompted to enter the new name.
- Press OK to submit the new name to the portal.
- Wireless Edition renames the folder and returns to the [.]Folder_Name screen for the folder from which you started.
7.8 Showing or Hiding Objects
When an object is first created it is hidden from view in the top-level screen, but is visible in the Personalization screen. Hidden folders are indicated by an asterisk (*). For example, in Figure 7-4, *MyHelloWorld and *Oracle are both hidden.
Figure 7-4 Hidden Objects
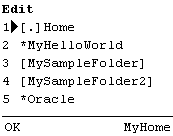
Text description of the illustration pal_hide.gif
To hide or show an object:
- Select the [.]Folder_Name option for the folder you wish to Hide or Show.
- The list displays the state to be selected, for example, if the list says 'Hide' the folder is currently displayed but will become hidden if that option is selected.
Figure 7-5 Hide / Show State
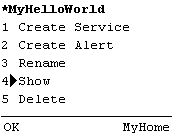
Text description of the illustration pal_hish.gif
- Scroll to the Show/Hide line, or press the appropriate number key. The folders state is changed, and is displayed, or not, when you return to the MyHome level.
7.9 Deleting a Folder
To delete a folder:
- Select the [.]Folder_Name option in the folder to be removed.
- Select the Delete option and press OK.
- A warning appears before you can accept the deletion. Once deleted, that folder and all of its contents are erased from the Personalization Portal.
7.10 Editing a User Profile
At the Personalization folder level, there are two other options. The first of these is the User Profile option. Selecting this option displays two other options.
Figure 7-6 The User Profile Screen
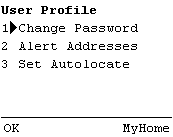
Text description of the illustration pal_edus.gif
- Change Password allows you to change the user password from your device.
- Alert Addresses allows you to create an Alert Address.
- Set Autolocate makes Wireless Edition's autolocate active or inactive.
7.10.1 Change Password
To change a password:
- Select the Change Password option and press the OK key.
- You are prompted to enter the Old Password.
- You are prompted to enter the New Password.
- You are prompted to Confirm Password.
- If the Old Password does not match, then the process must be restarted from MyHome. If the Old Password matches, the password is changed and you are returned to the User Profile screen.
7.10.2 Assigning an Alert Address
An alert address defines how and where alerts are sent. Alerts can be sent as email format or short message service (SMS) format. While it is possible to add alert addresses from a device, it is much simpler to do so from the Personalization Portal Web browser interface. For more information on creating an alert using a browser interface, see Section 6.9, "Managing Alert Addresses" in Chapter 6, "Personalization from Desktops".
Figure 7-7 Creating an Alert Address
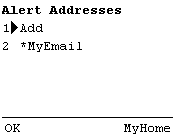
Text description of the illustration pal_cral.gif
To create an alert address:
- Select the Alert Address option and press OK.
- You are prompted for the name that identifies the Alert Address.
- You are prompted for the URL for the address.
- Press the OK key to submit it to Wireless Edition.
7.10.3 Activating Autolocate
This option either activates or deactivates the Wireless Edition's autolocate feature. This feature queries your device for its current real location to use when providing location-based service information.
To manage the autolcation feature:
- Autolocation is off by default, so the option visible in the display reads Autolocate On.
- Select the Autolocate On to make active.
- If Autolocate is active, the display selection to deactivate it reads Autolocate Off.
7.11 Creating a LocationMark
Locationmarks are a means of creating an alias for a location useful to the user. These can be added from a device using the LocationMark option. While it is possible to add locationmarks from a device, it is much simpler to do so from the Personalization Portal Web interface. For more information on creating a locationmark from the Web browser interface, see Section 6.10, "Creating a LocationMark" in Chapter 6, "Personalization from Desktops".
To create a Locationmark:
- At the Personalization folder level, select the LocationMark option.
- Select the Add option. All entries below Add are existing locationmarks.
Figure 7-8 Adding a LocationMark
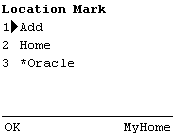
Text description of the illustration pal_lcmk.gif
- You are prompted first for a Name. This name becomes the alias for the geographical data for this location.
- You are prompted on sequentially displayed screens, for up to two address lines, city, county, state, and country information.
- The locationmark is submitted to the portal. If it is accepted, you return to the locationmark screen, otherwise an error message is displayed.
7.12 Logging Off
The fastest way to log out of the Personalization Portal is to terminate the call or browser session.
