Release 3.3.57
A87361-01
Contents |
| Oracle Discoverer 3i Viewer Configuration Guide for Oracle9i Application Server for Windows Release 3.3.57 A87361-01 |
|
![]()
![]()
This chapter explains how to run and maintain Discoverer 3i Viewer.
The topics include:
Once you have completed the Oracle9i Application Server installation (see the Oracle9i Application Server Installation Guide) you can run Discoverer 3i Viewer.
To run Discoverer 3i Viewer complete the following steps:
http://hostname.domain/servlets/discoservlet
Where hostname.domain represents the Web server machine that the HTTP server is installed on. You must replace this with its fully qualified host name. For example:
http://machinename.oracle.com/servlets/discoservlet
This will start Oracle Discoverer 3i Viewer and you will see the following login screen:
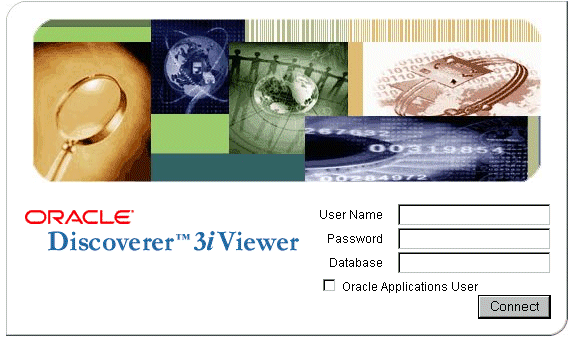
You are now running Oracle Discoverer 3i Viewer.
An NT Service is a special process that NT can start automatically at startup. Typical NT Services start various computer operations, such as networking and remote access procedures, server operations, and telephony processes.
When you install Discoverer, the Discoverer NT service is created as an automatic NT Service called "OracleDiscoverer3i". The Discoverer NT service automatically starts the Discoverer Services Locator component and the CORBA services whenever the NT machine is started. Using the Discoverer NT service, you can also stop all of these components by simply stopping the service from running.
A key benefit of having Discoverer Services Locator component and the CORBA services components started as a single NT service is that you do not need to remain logged onto a machine for the service (and therefore the Locator and the CORBA services) to stay running. If you launched each component individually on each machine, you would need to stay logged onto the machine(s) as the administrator. Logging off would automatically stop the components.
The Discoverer NT service runs the appropriate components based on the type of server you selected when installing Discoverer. The following table shows the components started by the Discoverer NT service for the servers.
| Server | Locator | CORBA services | OAD |
|---|---|---|---|
|
Master Discoverer Server |
|
X |
X |
|
HTTP Server |
X |
X |
|
|
Additional Discoverer Server |
|
X |
X |
|
Single Machine Installation |
X |
X |
X |
When you install Discoverer, the Discoverer NT service's Startup property is set to Automatic. In other words, the service starts automatically whenever the machine is started. However, once the service has started automatically you can subsequently stop it and restart it manually.
For a custom installation, the Discoverer NT service automatically starts the Locator and Smart Agent (OSAgent) on machines where you installed the Locator. On machines where you installed the Session and Preferences components, the Discoverer NT service automatically starts the CORBA services.
You can also change the Discoverer NT service's Startup property to Manual. In other words, the service does not automatically start when the computer is started. This may be useful if your network requires special services that have to start and stop in a particular sequence. You can start the other services, and then manually start the Discoverer NT service at the appropriate time.
The Services dialog box contains OracleDiscoverer3i.
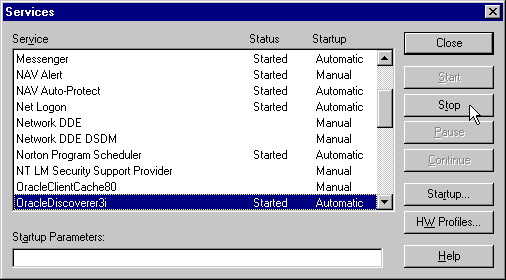
Status--shows if the service is started and running. If the service has not been started, the status column is blank.
Startup--shows how the service is started, either manually or automatically. The Discoverer NT service is set to start automatically.
Note: If your end users run Discoverer against an Oracle Application, always shut down the Listener before you start the Locator.
The Services dialog box appears.
The Service dialog box for the OracleDiscoverer3i appears.
The NT Event Log displays any errors that occur during startup of the Discoverer NT service. To see the NT Event Log, choose Start | Programs | Administrative Tools (Common) | Event Viewer.
Discoverer also keeps an internal log of errors that may occur when running the Locator on an HTTP Server. To see a list of Locator errors, open the Locator.log file in the <iSUITES_HOME>\apache\apache\htdocs\DISCWB33\applet directory in the HTTP Server's root directory (or other directory if you installed the Discoverer client in some other directory).
The Discoverer Services components must be registered with the Visibroker OAD (Object Activation Daemon). The components are registered during installation. If you remove or shut down a machine, you should unregister Discoverer Services components.
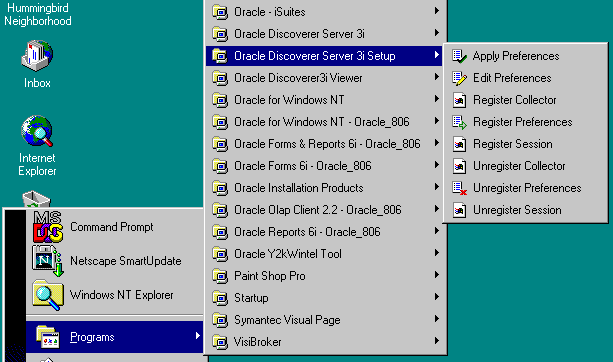
You can register and unregister components using the Windows Start menu or using the command line.
You can view the registered components for one machine or for the entire network.
To register and unregister components (and to view registered components), the VisiBroker OAD must be running and responding.
If you are not sure whether the OAD is running:
If the OAD is not running:
If the OAD is running but not responding
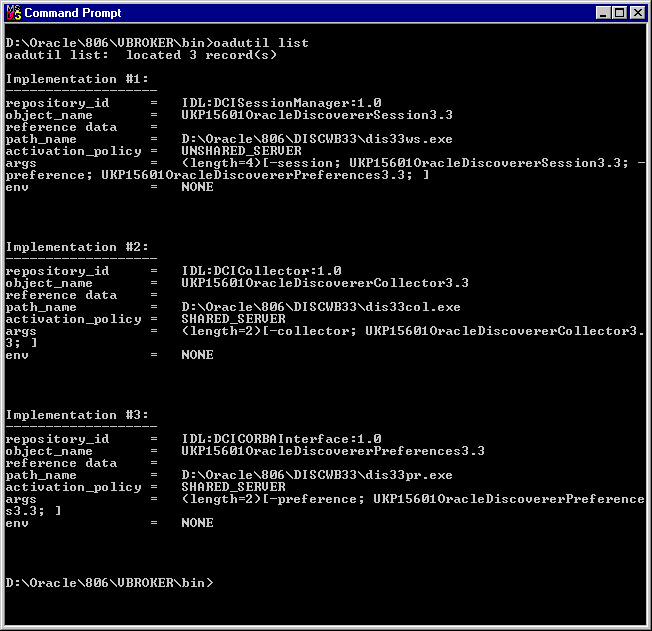
oadutil list and press return.
|
Note: Running the oadutil command displays only the list of components registered on the machine. It does not display all the components registered on the network of Discoverer machines. |
In this example, the components are registered with the Discoverer Instance name of "UKP15601." Two components are registered on the machine:
A Collector file for logging events is also registered, (-collector; UKP15601OracleDiscovererCollector3.3).
If you used the command on one of the Other Discoverer Servers, only the Session component would be registered.
osfind and press return.
A list shows all of the components running on the network.
On the machine where you want to register or unregister components:
A confirmation screen appears.
Use the Run dialog box from the Windows Start menu. You can register components using batch scripts. The batch scripts are located in the <ORACLE_806_HOME>\Discwb33\util directory of the machine where the components are installed.
The Preferences and Session components must be registered with the OAD. The OAD will start a new session per connection of the client. For your convenience, scripts are available to help you with registering the Preference and Session components with the OAD.
The scripts are named:
To register the Session from the command line:
> registerSession.bat
To register the Preferences from the command line:
> registerPreference.bat
For your convenience, scripts are available to help you with unregistering the Preference and Session components with the OAD.
The scripts are named:
To unregister the Preferences component from the OAD:
> unRegisterPreference.bat
To unregister the Session component from the OAD:
> unRegisterSession.bat
The End User Preferences control default Oracle Discoverer behavior.
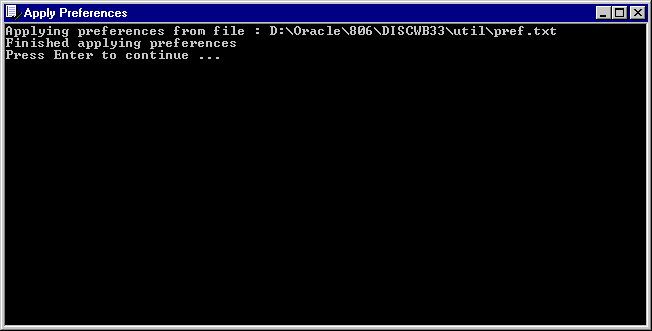
The Preferences file (pref.txt) controls default settings that apply to all end users. When a new session starts, the settings in the pref.txt file take affect.
In some cases, end users can override these settings from the Discoverer Plus Options dialog. Individual preferences are stored for each user as a unique combination of database and userid, and loaded whenever the user starts a new session. Therefore, users can log on from different client machines and still have their individual settings take effect. You can view the individual end user preference settings from within the Windows NT Registry Editor.
Also see the "Discoverer Administration Edition Administration Guide" for more information.
A confirmation window shows that the new preferences have been saved. If you suspect that the file contains errors, check the error.txt file in the current directory.
The Preferences are updated in the Windows NT Registry. Preferences are now set for the Discoverer Services.
The following table shows the items in the pref.txt file
If you need to perform maintenance, change hardware settings, or perform any other tasks, you should take the server machine off line while working. This prevents users from starting sessions on that server while you work. You can shut down Discoverer in two ways:
A reminder: You do not need to shut down to edit Discoverer Preferences.
If the machine you want to shut down runs the Discoverer Services Locator component or Preferences component, you need to shut down the entire Discoverer system. These components are used to create a session, regardless of which server the Session component is on. Therefore, stopping any of these components affects the entire Discoverer system.
You can shut down a server in two ways:
Shutting down a server gradually enables you to prevent new sessions from starting but allow current users to complete their sessions.
The Services dialog box appears.
Stopping the Oracle Discoverer NT service stops the CORBA services and the Locator component, which prevents any new sessions from being started on this machine. Sessions in progress are not affected by shutting down the Oracle Discoverer NT service. Thus, users will not be interrupted while working.
After all the current users have disconnected from their sessions, you can perform your maintenance tasks. If you want to register or unregister components, the Oracle Discoverer NT service must first be restarted.
To check that all users have disconnected, open the Windows Task Manager and be sure no instances of the Session executable (dis33ws.exe) are running.
An immediate shut down stops new user sessions from starting and stops the current sessions. To do this, you stop the Oracle Discoverer NT service on the machine (to prevent new sessions from being started) and then you stop the sessions currently running.
The Services dialog box appears.
To shut down the entire Discoverer system, you shut down individual machines in a specific order.
You can shut down the entire Discoverer system in two ways:
Shutting down the Discoverer system gradually enables you to prevent new sessions from starting but allow current users to complete their sessions. To shut down gradually, you stop the Oracle Discoverer NT service on each server and then let users finish their sessions.
Stopping the Oracle Discoverer NT service stops the CORBA services and the Locator component, which prevents any new sessions from being started on this machine. Sessions in progress are not affected by shutting down the Oracle Discoverer NT service. Thus, users will not be interrupted while working.
You now shut down the Preferences component.
Warning: Do not shut down the Preferences component until all sessions are stopped. Shutting down the Preferences component while sessions are active can cause problems with active sessions.
When all of the current users have completed their sessions, the Discoverer system shuts down.
An immediate shut down stops new user sessions from starting and stops the current sessions. To perform an immediate shut down, you:
You can add or remove server machines from your Discoverer system at any time.
Follow the instructions in Chapter 3, "Installing Oracle Discoverer 3i Viewer on multiple machines" to add a new server machine to the Discoverer system.
Disabling the Discoverer NT service or changing its Startup property to Manual effectively removes an Additional Discoverer Server machine from the Discoverer system. You do not have to uninstall any software. However, you must also edit the pref.txt file on the Master Discoverer Server machine to remove the Additional Discoverer Server machine's IP address from it.
The pref.txt file opens in Notepad.
The components to select depends on the server you want to remove:
The Services dialog box appears.
The Service dialog box appears.
Now, the server machine will not automatically start the Discoverer NT service and therefore will not be part of the Discoverer system.
To ensure that your entire discoverer document is secure and to get your browser to acknowledge a "secure" page, it is necessary to make a minor adjustment to the disco3iv.xml file.
Make changes as follows:
Below is an example of the change:
disco3iv.xml - Before change
<argument name="help_path" type="href">help</argument>

<argument name="image_path" type="href"> images</argument>

<argument name="show_login_method_control">true</argument>

</document>

</disco_config>
<argument name="help_path" type="href">help</argument>

<argument name="image_path" type="href">https://mywebserver.company.com/
disco3ivfiles/images</argument>

<argument name="show_login_method_control">true</argument>

								</document>

</disco_config>
What environment variables are set?
During installation, two environment variables are set for the VisiBroker products:
VBROKER_JAVAVM = <ORACLE_806_HOME>\jre11728o\bin\jre
VBROKER_TAG = -D
The CLASSPATH variable is not modified.
The PATH variable is updated with:
PATH = <iSUITES_HOME>\bin;<ORACLE_806_HOME>\vbroker\bin;<ORACLE_806_HOME>\bin; <iSUITES_HOME>\Apache\Perl\5.00503\bin\mswin32-x86;%PATH%
This minimizes any conflict with other products.
What happens if the Locator or Preferences components stop running?
If the Locator component goes down, no more users can log in to the system until it comes back up. Existing sessions are not affected.
The Locator component is designed so that it does not need to be shut down even when you edit the pref.txt file. By default the Locator component will pick up the edited values when the next client is connected.
Similarly, if the Preferences component goes down, the Locator component will continue to function and sessions already in progress are not affected. When the Preferences component is brought back up, the Locator component will bind to the Preferences component again.
What do I need to do if I get a network error?
If Discoverer 3i Viewer receives a network exception during login, check the following:
What do I need to do when I get ORA-12154 TNS: Could not resolve service name?
This is an Oracle error that appears when the session cannot connect to the database alias specified in the Connect field. Check that the:
Hint: If you have SQL*Plus (or any other Oracle product) running on that machine, try connecting to the database with that product.
What do I need to do when I get a message that the Locator component cannot bind to the Preferences component?
If the Locator component cannot bind to the Preferences component, check the following:
osfind. Note that the agents are listed first. If the SmartAgent is not running, see Section 2.2, "Using the Discoverer NT Service" to restart it.
osfind. Note that the agents are listed first. The Preferences component must be installed on the same subnet.
If the session runs correctly, the original pref.txt file was probably corrupted.
|
|
 Copyright © 2000 Oracle Corporation. All Rights Reserved. |
|