Release 3.0
Part Number A86188-02
Library |
Service |
Contents |
Index |
| Oracle Portal Tutorial Release 3.0 Part Number A86188-02 |
|
![]()
![]()
Estimated completion time: 50 minutes
This chapter shows you how to build Oracle Portal application components (forms, reports, charts, links, etc.).
To familiarize you with Oracle Portal's component building capabilities, this chapter leads you though the steps of creating components in a simple human resources application for a fictitious company named Healthy Living Wholesalers. You should complete the exercises in this chapter if you are responsible for creating application components within your organization.
This chapter includes the following sections:
| Section | |
|---|---|
|
Section 5.3, "Controlling Access to an Application Component" |
|
To complete the exercises in this chapter you must have Manage privileges on the Tutorial30 Application. Instructions for granting users these privileges are provided in Section A.6, "Granting a User Manage Privileges on the Tutorial Application".
You must start and log on to Oracle Portal. For instructions on how to do this, see "Starting and Logging on to Oracle Portal".
Components are Web pages with content based on data stored in the database. Some components, such as reports, display data in a graphical format. Others, such as forms, provide interfaces that users can use to change data. You can create the following components in Oracle Portal:
There is a separate component build wizard for each type of component. Each wizard creates PL/SQL stored procedures. When executed, the stored procedures dynamically create the HTML and JavaScript code to display the component.
You are a member of the Healthy Living IT department, and have been asked to create several components for the Human Resources department that enable HR staff to maintain information about the company's employees.
The first component you have been asked to include in your application is a form for updating existing employees' personal information, such as their address and telephone number.
 .
.
Note: If you cannot see this application, notify your portal administrator.
Note: If you cannot see the Form link, you probably do not have Manage privileges on TUTORIAL30_APPLICATION. Ask your portal administrator to grant you these privileges. Instructions for doing this are provided in Section A.6, "Granting a User Manage Privileges on the Tutorial Application".
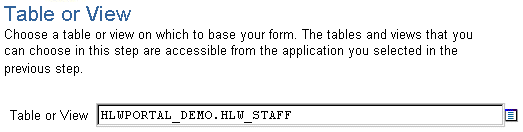
HR staff will use our form for updating data that is contained in a single table (the HLW_STAFF table), so click Form based on table or view.
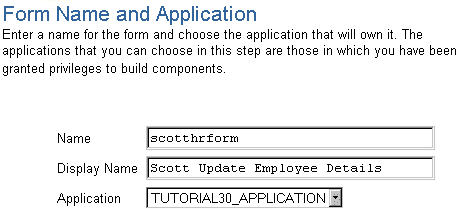
<YourName>hrform.
Note: Throughout this tutorial you add your user name to the beginning of names and display names to make sure that the object you are creating is unique, and is easy to find later.
<YourName> Update Employee Details.
<demo_schema>.hlw_staff, where demo_schema is the name of the schema where the Oracle Portal demos are installed.
Note: If you are not sure of the name of the demo schema contact your portal administrator.
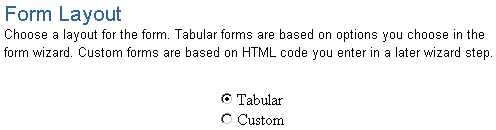
A tabular layout allows you to define the layout of the form using options in the wizard. A custom layout lets you write your own HTML code to control the layout of the form yourself.
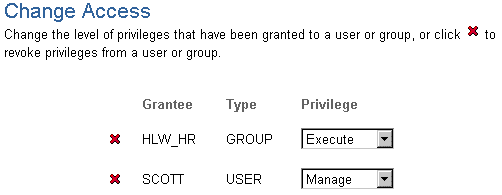
The Manage Component page displays, where you can perform any task on your component that you might need, such as editing, deleting, copying (from the Manage tab), and defining access (from the Access tab).
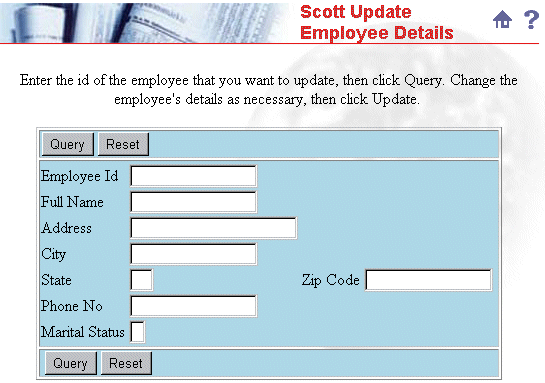
The form doesn't look too bad, but it could use some improvement. For example, our form is for querying and updating data only, but there is still an Insert button displayed at the top and bottom of the form; there are far more fields included than we really need; and the field labels aren't particularly user-friendly. So let's edit the form and make some changes.
In the left frame, click
 , then click OK to remove the following buttons from the form:
Note: This removes the fields based on the columns from the form; it does not delete the columns from the underlying table.
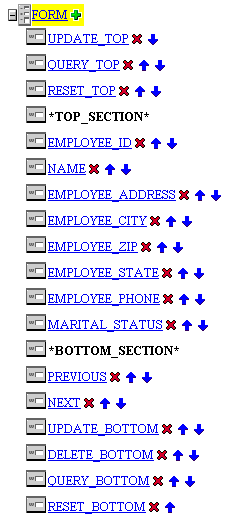
In the left frame, click EMPLOYEE_ID.
Employee Id.

| Old field label | New field label |
|---|---|
|
Name |
Full Name |
|
Employeeaddress |
Address |
|
Employeecity |
City |
|
Employeezip |
Zip Code |
|
Employeestate |
State |
|
Employeephone |
Phone No |
|
Maritalstatus |
Marital Status |
In the left frame, next to EMPLOYEE_STATE, click
 to move the State field above Zip Code.
In the left frame, click EMPLOYEE_ZIP.
You can also change other field properties. For example, you might want to change the Input Width of the Address field to 20 to allow users more space to enter the address.
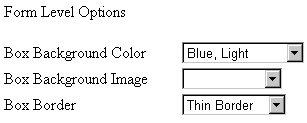
In the left frame, click FORM. This lets you change the properties of the overall form, rather than the individual fields.
Click the
 (Form Text) tab.
Enter the id of the employee that you want to update, then click Query.
Change the employee's details as necessary, then click Update.
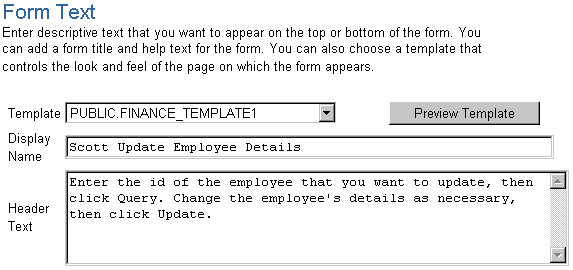
You can also use this tab to change the template used by your form. Templates are shared components that determine the appearance of the page on which a component is displayed, and help you to provide a consistent look across all your components. Oracle Portal is shipped with several templates to start you off, but you can create your own to match your particular organization's standards.
Note: For information about creating templates, visit the Oracle Portal Online Help. In the Search field, enter template, and click Go.
Of course, there are many more things you can do with Oracle Portal forms, for example, you can add JavaScript form- and field-level validation, or specify PL/SQL code to execute at different points during the execution of the form.
Note: For more information about JavaScript in Oracle Portal, visit the Oracle Portal Online Help. In the Search field, enter javascript, and click Go.
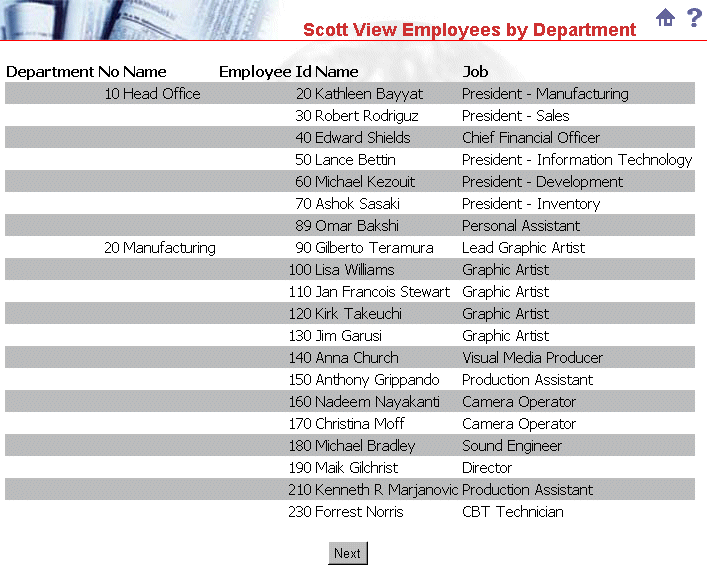
The HR department has also requested that they be able to find out which employees are members of which departments. The best way to provide this information is by creating a report that lists employees by department. Let's create that report now.
Our report is for viewing data only, and requires a simple query, so click Reports From Query Wizard.
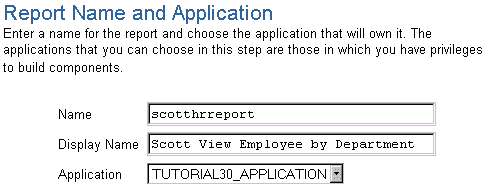
<YourName>hrreport.
<YourName> View Employees by Department.
In the Tables or Views field, enter <demo_schema>.hlw_staff.
In the Tables or Views field, enter <demo_schema>.hlw_departments.
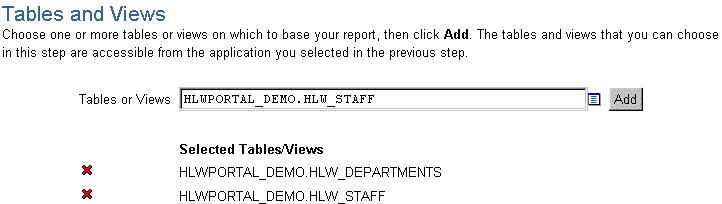
For the report to work correctly, this relationship needs to be specified in the report query as a join condition.
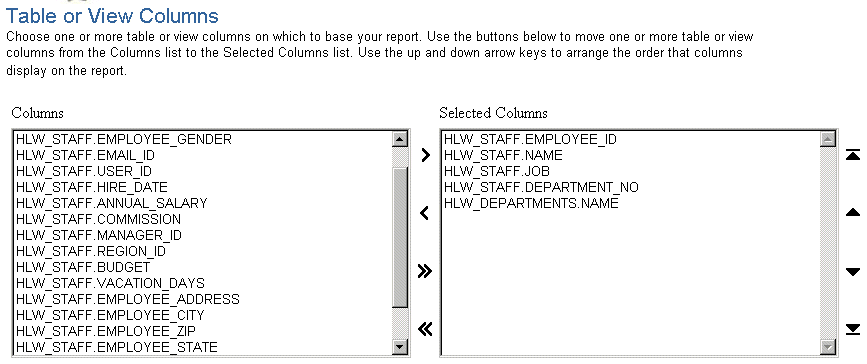
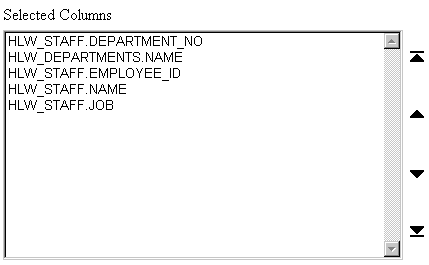
In the first left Column list, choose HLW_STAFF.DEPARTMENT_NO.

In the Available Columns list select the following columns, then click
 :
:
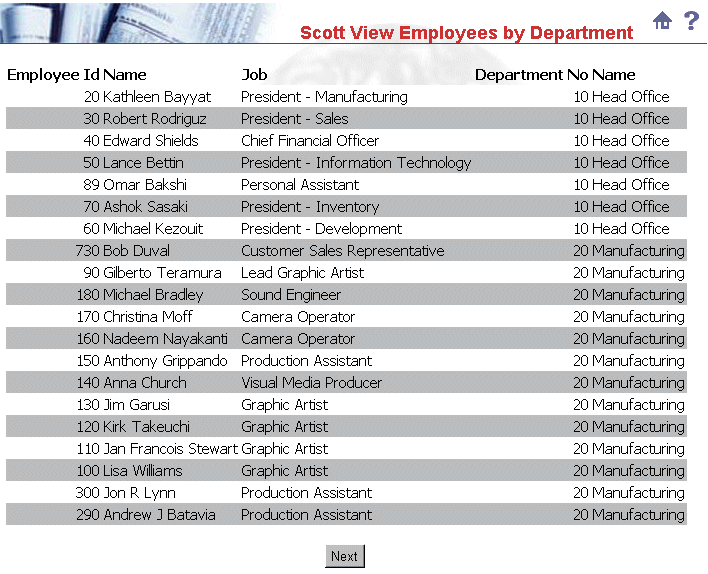
As with the form, this first attempt at creating the report doesn't look too bad, but it could also use some improvement. For example, the department number and name do not need to be repeated for each row, and the order of the columns and rows should probably be rearranged slightly to make it easier for users to find the information they want. So let's edit the report and make some changes.
Click the
 (Table or View Columns) tab.
 and
and
 buttons to reorder the columns as follows:
Click the
 (Display Options) tab.
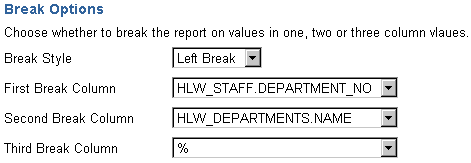
In the Order by list, choose HLW_STAFF.DEPARTMENT_NO.
In the second then by list, choose HLW_STAFF.EMPLOYEE_ID.
Oracle Portal offers many more report features, for example, you can apply formatting conditions to change the appearance of information in your report based on the values of data, or add a customization form, which allows users to restrict the query results to meet their own specific requirements.
Note: For more information about building reports, visit the Oracle Portal Online Help. In the Search field, enter report, and click Go.
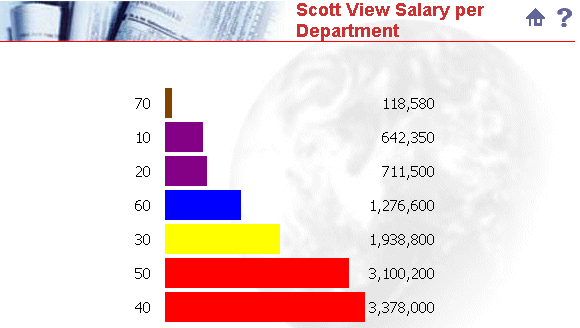
The final request the HR department has made, is for a component to show how much each department spends on salaries. This kind of information is perfect for displaying in a chart.
Our chart requires a simple query, so click Charts From Query Wizard.
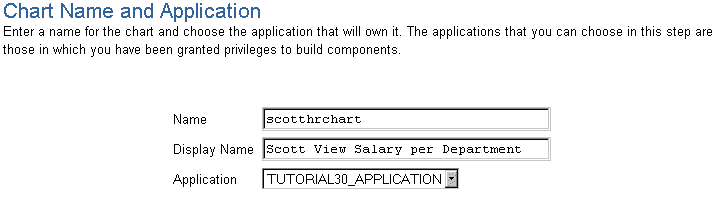
<YourName>hrchart.
<YourName> View Salary per Department.
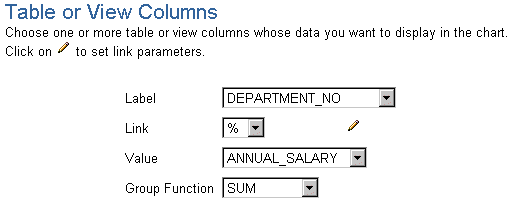
<demo_schema>.hlw_staff.

The values of the column specified in the Label field are displayed along the axis of the chart.
The values of the column specified in the Value field are used to calculate the size of the bars in the chart.
A group function groups the Value column values by unique Label column values, and performs an operation on each group of values. In this case, the group function provides the total salary for each department.
If you wanted, you could now go back and edit the chart to make changes such as ordering the bars in the chart by the Label column rather than Value column, or add a customization form.
Note: For more information about building charts, visit the Oracle Portal Online Help. In the Search field, enter chart, and click Go.
Now that you have created your components, you need to allow other users to access and interact with them.
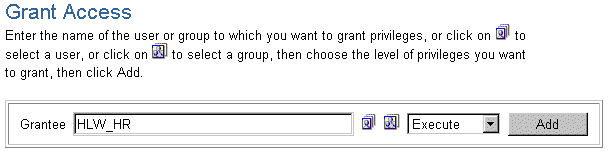
The salary information provided by the View Salary per Department chart you created is of a particularly sensitive nature. Only members of the HR department should be able to access that information, so let's make sure only members of the HLW_HR group can run the chart.
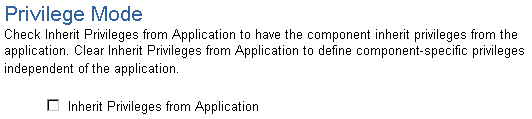
In the Grantee field, enter HLW_HR.
Congratulations! You have created an application, and given users access to it. You now know how to:
For more advanced examples of what you can do with Oracle Portal application components, see the Oracle Portal Building Advanced Portals manual.
For any other information about building application components, see the Oracle Portal Online Help.
|
|
 Copyright © 2000 Oracle Corporation. All Rights Reserved. |
|