Release 1.0
A83544-01
Product |
Contents |
Index |
| Oracle8i Cache Concepts and Administration Guide Release 1.0 A83544-01 |
|
To set up Oracle8i Cache, you use Cache Manager, a component of Oracle DBA Studio. Cache Manager is an easy-to-use, Java-based interface that helps you to set up the middle-tier caches, specify the data to be cached in each, and specify the synchronization policy of each table in each cache.
To set up Oracle8i Cache, you take the following general steps:
Before you begin setting up Oracle8i Cache, take time to design your Oracle8i Cache environment. In doing so, you gather the following information:
When you have answered these questions, you will have the necessary information to set up and deploy Oracle8i Cache.
The first step in designing your Oracle8i Cache environment is determining which data you should cache. To that end, answer the following questions:
Because Oracle8i Cache routes only read requests to the cache, you get the greatest benefit when most of the requests for the data are read-only.
Your Web sites or applications may have one query that is executed very often or they may have several queries in this category. Before you set up your caches, you can use Oracle Performance Manager or SQL Analyze to help you determine which queries are executed most frequently. Alternatively, you can set up a cache and monitor the queries that are executed by viewing the Hit/Miss Statistics page of Cache Manager (see "Monitoring Hit and Miss Statistics").
If the data resides in more than one database, which database contains most of the frequently accessed, read-only data? For this release, you can cache data from only one origin database.
Each query may access data in one or more tables in a database.
That is, does it matter if there is a delay between when new data is entered into the origin database and when that data in the caches is synchronized with the origin database? If a delay is acceptable, then the data is well suited to be cached.
Read/write transactions may generate some inconsistencies. For example, if a transaction contains a query, then an UPDATE statement for the same table, and subsequently another query of the same data, the data that is returned for the second query will not contain the updated data. The updated data is written to the origin database; the query is executed by the cache. To ensure consistency of read/write transactions, you can put the statements executed during a transaction into a PL/SQL statement. Oracle8i Cache routes PL/SQL statements directly to the origin database.
If the data is updated constantly and extensively and the read-only applications must have current data, you will have to synchronize the data at frequent intervals. See "Deciding Synchronization Policies" for information about synchronizing data.
Now you have identified the data to be cached. Oracle8i Cache caches and manages data in entities called data sets. A data set is any collection of data items that can be expressed using a SQL statement. A data set can be a table, any subset of a table, or data from more than one table.
As an example, after answering the preceding questions, you determine that your company Web site, GreatStore.com, has several frequently requested queries:
In this example, you decide that you need to cache the BOOKS_ORDERED and NYT_BEST tables from the BOOKS database and the SOFT_SPEC table from the SOFTWARE database. Each table to be cached is a data set.
Using Oracle8i Cache, you cache the data in a cache on a middle-tier node.
In most cases, a company may have several middle-tier servers, such as Web servers or application servers, that handle all requests. If the data is stored in only one origin database, you can cache the same data on all middle-tier servers. That is, you can have identical caches on all nodes.
In some cases, a company may have several middle-tier servers, but it routes different types of requests to different Web servers. For example, Web servers A and B are responsible for requests for the weather information; Web servers C and D are responsible for requests for sports information. In this situation, you cache different data on Web servers A and B than on C and D.
Using the GreatStore.com scenario described in the previous section, you must cache your data on at least two different middle-tier nodes because your data resides in two separate origin databases. You decide to cache data about books in the caches on several middle-tier nodes. You cache identical data sets in these caches. Then, you decide to cache data about computer software in the caches located on several other middle-tier nodes. You cache identical data about computer software in these caches.
When you synchronize data, you make the data in the cache consistent with the data in the origin database by refreshing the cache with the current data from the origin database. The synchronization policy establishes how and how often the data in the cache is refreshed from the origin database. You can specify different synchronization policies for each data set.
You can choose incremental or complete synchronization:
Use this option when only a portion of the data changes.
Use this option when a large percentage of your data changes at the same time, as when the batch updates are loaded into the origin database.
If there is a large amount of data in the data set, a complete synchronization can take considerably more time than an incremental synchronization. However, if a large percentage of data in a data set changes, a complete synchronization is more efficient than an incremental synchronization.
For either of these types of synchronization, you can schedule synchronization at specified intervals or you can use the Cache Manager to synchronize the data at any point in time.
When you can predict how often the data needs to be synchronized, schedule the synchronization to occur at specified intervals.
For example, your Web site may list the 100 books that are the top sellers on your Web site. The results of such a query change quite frequently, so you decide to synchronize the data once each hour.
In setting the interval, consider the frequency of updates to the data in the origin database. In addition, consider your environment's tolerance for stale data. If there is low tolerance, synchronize often; if there is high tolerance, synchronize less often.
If you cannot predict how often the data needs to be synchronized, or if you want to synchronize the data at a time other than the scheduled time, you can use Cache Manager to synchronize the data.
For example, a Web site for ordering sporting goods contains a catalog of items. New items are added to the catalog at irregular intervals, making it difficult to predict a schedule for synchronization. In this case, you can synchronize the data when the changes in data in the origin database necessitate it.
When you plan the synchronization of your data, consider carefully how you want the data to be refreshed throughout your Oracle8i Cache environment. You may want to schedule synchronization at a time of day when connectivity is guaranteed or when communication costs are lowest. If your caches or origin database experiences a high volume of transactions during the business day, consider scheduling the synchronization during off-peak hours. Furthermore, you might want to stagger the synchronization to distribute the load on the origin database over time, rather than scheduling the synchronization of many caches at the same time.
If the synchronization intervals are very short or the data changes rapidly, you may see an effect on performance because of the processing required to keep the middle-tier cache synchronized with the origin database.
If the synchronization takes longer than the interval specified, the table will be continually refreshed. For example, if you specify an interval of 5 minutes, but the synchronization takes 6 minutes to complete, the next scheduled synchronization will start immediately after the first one completes.
If two or more requests to synchronize a particular table are issued simultaneously, one of the requests will succeed. The other requests will fail with an error.
Note that while you can easily change the synchronization policy from scheduled to not scheduled, changing the policy from Complete to Incremental or Incremental to Complete consumes more resources and may take considerable time if the table is very large.
You install Oracle8i Cache on all nodes in the middle tier where you want to cache data. When you install Oracle8i Cache, you specify which Oracle database you want to use as the origin database. The installation procedure creates a cache on the Oracle8i Cache node and prepares the origin database for use by Oracle8i Cache.
In addition, you install Oracle Enterprise Manager, including DBA Studio. Cache Manager is a component of DBA Studio.
For more information about how to install Oracle8i Cache, see the installation guide.
Oracle DBA Studio is a Java-based interface that you use to manage your Oracle environment. Cache Manager, a component of DBA Studio, provides the interface to manage your Oracle8i Cache environment and provides wizards that take you through the process of setting up and deploying your Oracle8i Cache environment.
You can start DBA Studio through the Oracle Enterprise Manager console or as a standalone application.
To invoke the Oracle Enterprise Manager console on Windows NT systems, from the Windows NT Start menu, select Programs -> Oracle_home_name -> Oracle Enterprise Manager -> Console.
To invoke the Oracle Enterprise Manager console on UNIX systems, such as Sun Solaris, enter the following command:
oemapp console
Then, from the console, select Tools -> Database Applications -> DBA Studio or select the Database Applications icon from the toolbar and then select the DBA Studio icon.
Note that Oracle8i Cache does not support the jobs and events subsystem or discovery of cache nodes.
To start DBA Studio as a standalone application on UNIX systems, such as Sun Solaris, enter the following command:
oemapp dbastudio
To start DBA Studio as a standalone application on Windows NT systems, from the Windows NT Start menu, select Programs -> Oracle_home_name -> DBA Management Pack -> DBA Studio.
When you invoke DBA Studio, it displays the Oracle Enterprise Manager Login dialog box:

Select Launch DBA Studio standalone. Click OK.
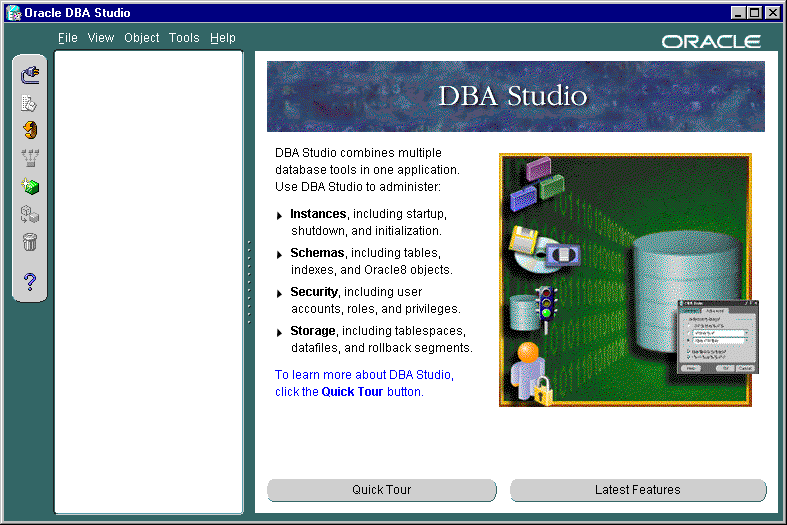
When you log in successfully, DBA Studio is displayed:

Before you can connect to an origin database, you must add it to the list in the Navigator tree. Take the following steps:
Alternatively, if the origin database is listed in the local tnsnames.ora file, it is displayed in the Service Name list. In this case, you can select Add selected databases from your local tnsnames file. Then, select the database service name.
DBA Studio lists the origin database in the Navigator tree. When you log in to DBA Studio in the future, the database will be listed in the tree.
To connect to the database, take the following steps:
DBA Studio authenticates the user, checking that the user is a valid user with the requisite privileges in the origin database. When you log in successfully, DBA Studio expands the database in the Navigator tree.
To manage your Oracle8i Cache environment, select the Caches folder from the Navigator tree. DBA Studio displays information about Cache Manager and a button to view the Oracle8i Cache Quick Tour.
Expand Caches to see the caches associated with the origin database. Oracle8i Cache attempts to attach to the associated caches. The icons for each cache show the state of the cache.

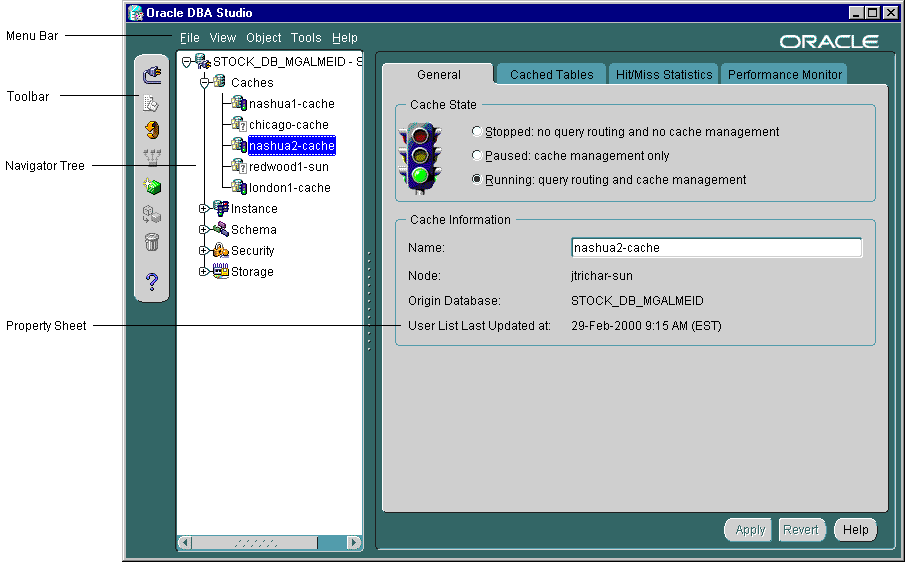
Now, select a cache from the Navigator tree to see information about that cache:

The preceding illustration points out some of the features of DBA Studio and Cache Manager:
When you select a cache, the General property page is displayed, along with tabs for other property pages. If the cache is stopped, only the General page is displayed. If Oracle8i Cache is not running on the node or the node is not reachable, the General property page will appear dimmed and no other property pages will be shown.
For detailed information about each property page, dialog box, and wizard, see the online Help.
The caches were created when you installed Oracle8i Cache. Now, you use Cache Manager to specify which data is cached in which middle-tier caches and the synchronization policy for each table in the caches.
Cache Manager provides the Add Tables Wizard, which lets you set up and populate one or more caches at the same time. With the wizard, you can add tables to one or more caches and specify the synchronization policy for each table.
When you are setting up your Oracle8i Cache environment for the first time, consider using the Add Tables Wizard to set up one cache. Then, verify and test that you set up the cache in the best way for your environment. When you are satisfied with the setup, you can easily copy it to other caches. The following sections describe how to use this method.
If you accepted the default value for the amount of disk space allocated to the cache, you should consider increasing the amount of disk space before you add tables to the caches. The following section describes how to add disk space.
If you accepted the default value for the amount of disk space allocated to the cache and you plan to cache a large amount of data, you may need to increase the disk space allocated to the cache.
You can increase the amount of disk space available for a cache in the following ways:
Note that performance improves if you allocate the disk space in large amounts. That is, performance is better if you allocate disk space using a few large files rather than many smaller files.
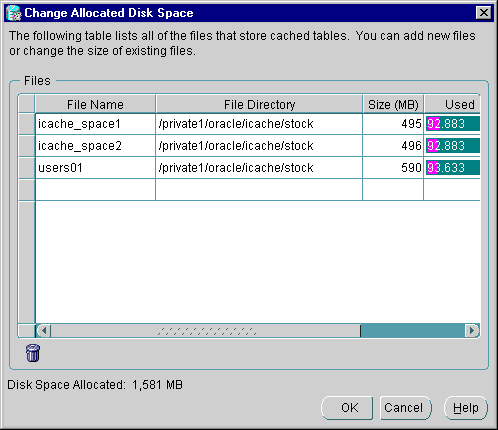
To modify the amount of disk space allocated to a cache, take the following steps to invoke the Change Allocated Disk Space dialog box:
To increase the amount of disk space allocated to a cache by adding a new file, take the following steps:
To increase the amount of disk space allocated to a cache by increasing the size of an existing file, take the following steps:
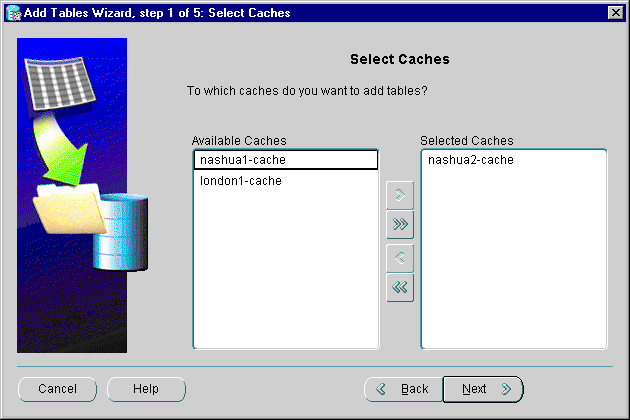
To invoke the Add Tables Wizard, select the Caches folder from the Navigator tree and choose Object -> Add Tables to Caches. Then, take the following steps:
To cache tables in particular caches, select the caches in which you want to cache tables and click the right arrow (>) to move them from the Available Caches list to the Selected Caches list. To remove caches in which you do not want to cache tables from the Selected Caches list, select the caches and click the left arrow (<).

From the Available Tables list, select the tables that you want to include in the caches. Click the right arrow (>) to move the tables to the Selected Tables list.

To specify the same synchronization policy for all tables, select Yes, use the same policy for every table. If any caches contain any of the tables you selected on the previous page, the wizard will not add those particular tables to those caches and will not change the synchronization policies of those tables on those caches.
If you want to specify different synchronization policies for one or more tables, select No, let me set a different policy for some tables.

See "Deciding Synchronization Policies" for more information about synchronization policies.
You can choose one of the following:
If you choose this option, you specify the start time and the interval between synchronizations:
If you selected No, let me set a different policy for some tables, Cache Manager displays the next page, Synchronization Policy for Tables.

For those tables for which you want a different synchronization policy, take these steps:
Oracle8i Cache adds the tables, their data, and their dependent objects to the caches. The wizard displays a progress box that shows each operation as it completes. If an operation results in an error, the wizard displays an error in the progress box and displays the warning when it completes all operations.
Now you can verify that the caches are set up correctly.
To verify that you set up your cache correctly, select the cache from the Navigator tree. Cache Manager displays the property sheet for the cache. Then, take the following steps:
If you selected Incremental, Scheduled, or Complete, Scheduled, select a Synchronization Start Time. Then, enter a Synchronization Interval and select a Synchronization Unit, such as minutes, hours, days, or weeks.
To increase the disk space by increasing the size of a particular file, enter the increased size in the Size column.

"Modifying the Disk Space Allocated to a Cache" provides more information about increasing or decreasing the disk space allocated.
If the cache is set up correctly, you can enable caching and test the cache.
To enable caching on a middle-tier cache, take the following steps:
Oracle8i Cache starts the middle-tier cache and enables caching.
Now you can test the cache to see that you cached the appropriate tables and that you specified appropriate amounts of disk and memory. For information about monitoring caches, see Chapter 3.
If the cache is set up correctly, you can copy the setup to other middle-tier caches.
If you have set up one cache and want to duplicate those cache settings to other nodes, you can easily do so using the Copy Cached Tables dialog box:
Repeat the steps outlined in "Verifying Your Cache Setup" to verify that these caches are set up correctly.
To configure your application environment to use Oracle8i Cache, you must set the environment variable ORA_OCI_CACHE and you must ensure that your applications are using the Oracle home in which Oracle8i Cache is installed.
You set the environment variable ORA_OCI_CACHE to the value "1" in the environment from which your application is invoked. All applications invoked from this environment take advantage of Oracle8i Cache.
For example, on Solaris, you use a shell environment variable.
If ORA_OCI_CACHE is not set, applications will not use Oracle8i Cache. (Note, for this release, if you set the environment variable to a value other than "1", caching will be enabled, although only the value "1" will be supported in future releases.)
See "Controlling Which Applications Use Oracle8i Cache" if you use applications that directly call OCI functions and you want to exercise greater control over which applications use Oracle8i Cache.
You must also make sure that your applications are using the Oracle home in which Oracle8i Cache is installed, including OCI libraries from that Oracle home. For example, on Sun Solaris, set the value of the environment variable ORACLE_HOME to the Oracle home for Oracle8i Cache. Set the value of the environment variable LD_LIBRARY_PATH so that the Oracle8i Cache library directory ($ORACLE_HOME/lib) precedes other Oracle library directories. For more information about using the Oracle home and libraries for Oracle8i Cache, see the installation guide.
|
|
 Copyright © 2000 Oracle Corporation. All Rights Reserved. |
|