Release 2 (9.2)
Part Number A96573-01
 Home |
 Book List |
 Contents |
 Index |
 Master Index |
 Feedback |
| Oracle Advanced Security Administrator's Guide Release 2 (9.2) Part Number A96573-01 |
|
This chapter describes how to configure and use Entrust-enabled Oracle Advanced Security for Secure Socket Layer (SSL) authentication. It contains the following topics:
A public key infrastructure (PKI) includes various elements, such as a public key, bound into a digital certificate, a private key, and certain other security credentials. These credentials can be used for secure authentication over a Secure Sockets Layer (SSL) connection, to establish a secure communication channel, and to generate and process digital certificates--including digital signatures. A complete PKI includes the following:
This section describes the PKI implementation provided by the following:
Oracle Advanced Security includes elements of a PKI, such as Oracle Wallet Manager, which creates and securely stores a user's public/private key pair, as well as the trust points (the list of root certificates the user trusts). The user's PKI credentials, stored in Oracle Wallet Manager, can be used to create a secure, authenticated session over SSL. However, Oracle Advanced Security does not provide certificate creation or certificate revocation status checking, which are important elements of a complete PKI.
For example, although Oracle Wallet Manager can generate a PKCS#10 certificate signing request, users must obtain certificate fulfillment from a certificate authority and load the resulting certificate into an Oracle wallet. Oracle wallets only support authentication to Oracle applications.
Entrust/PKI is a PKI product provided by Entrust Technologies, Inc., that provides certificate generation, certificate revocation, and key and certificate management.
The integration of Oracle Advanced Security with Entrust/PKI enables users of both Entrust and Oracle to utilize the extensive PKI capabilities of Entrust to enhance the security of their Oracle environment.
Entrust-enabled Oracle Advanced Security provides:
|
Note:
|
Entrust-enabled Oracle Advanced Security supports the use of Entrust credentials for X.509-based authentication and single sign-on. Instead of using an Oracle wallet to hold user PKI credentials, Oracle Advanced Security can access PKI credentials that are created by Entrust/Authority and held in an Entrust profile (a .epf file). Users who have deployed Entrust software within their enterprise are thus able to use it for authentication and single sign-on to Oracle9i.
Entrust-enabled Oracle Advanced Security uses the extensive key management and rollover functionality provided by Entrust/PKI, which shields users from the complexity of a PKI deployment. For example, users are automatically notified when their certificates are expiring, and certificates are reissued according to preferences that administrators can configure.
Entrust provides a certificate authority component, which natively checks certificate revocation status and enables the revocation of certificates.
Users using Entrust credentials for authentication to Oracle are assured that the revocation status of the certificate is checked, and connections are prevented if the certificate is revoked.
This section describes the system components required for using Entrust-enabled Oracle Advanced Security:
Entrust/PKI 6.0 for Oracle can be downloaded from the Entrust Web site:
http://www.entrust.com
Entrust/Toolkit Server Login and Entrust IPSEC Negotiator Toolkit can be downloaded from the Entrust Developer Network by registered members. Users can register for membership and download these products at the following Web address:
http://www.entrust.com/developer/memberships/registration.htm
Entrust/PKI 6.0 for Oracle requires a database for storing information about Entrust users and the infastructure, and a Lightweight Directory Access Protocol (LDAP)-compliant directory for information such as user names, public certificates, and certificate revocation lists.
Entrust/PKI 6.0 for Oracle is comprised of the following software components:
Entrust/Authority is the centerpiece of Entrust/PKI. It performs core certificate authority, certificate, and user management functions, such as creating users and user profiles containing the user's credentials.
|
Note: Oracle Corporation only supports the use of Entrust-enabled Oracle Advanced Security with versions of Entrust/Authority that run on Oracle9i. |
| See Also:
Chapter 7, Configuring Secure Sockets Layer Authentication, for information about certificate authorities. |
Entrust/Authority supports unattended login, also called Server Login, which eliminates the need for a Database Administrator (DBA) to repeatedly enter a password for the Entrust profile on the server. With unattended login, the DBA need only enter a password once to open the Entrust profile for the server to authenticate itself to multiple incoming connections.
Entrust/RA is the administrator's secure interface to Entrust/Authority.
Entrust/Entelligence provides support for user key management and single sign-on functionality on both clients and server by enabling Oracle9i server process access to incoming SSL connections.
|
Note: Do not install Entrust/Entelligence on the server computer if it is running on a Windows platform. |
Entrust/Toolkit Server Login Toolkit Release 6.0 is required for single sign-on functionality on servers operating on UNIX platforms.
Entrust/Server Login Toolkit provides single sign-on by enabling Oracle9i server process access to incoming SSL connections. Without this capability, a database administrator or other privileged user would have to enter the password for the Entrust profile on the server for every incoming connection.
You can download Entrust/Toolkit Server Login from the Entrust Web site:
http://www.entrust.com/developer/software/files/desc_serverlogin.cfm
The Entrust IPSEC Negotiator Toolkit Release 6.0 is required on both clients and servers for integrating the Oracle Advanced Security SSL stack with Entrust/PKI, enabling SSL authentication to use Entrust profiles.
You can download the IPSEC Negotiator Toolkit from the Entrust Web site:
http://www.entrust.com/developer/software/index.htm
Figure 8-1 illustrates the following Entrust authentication process:
|
Note: Figure 8-1 does not include client and server profiles creation, which is presumed. |
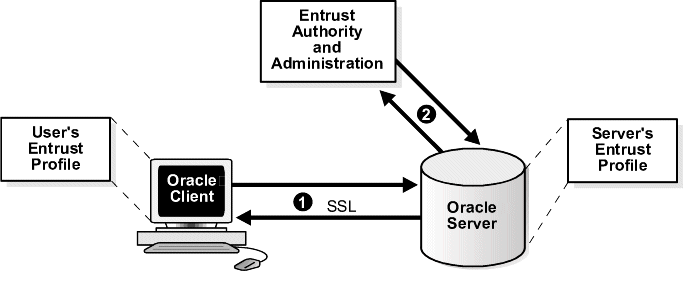
Text description of the illustration asoag025.gif
This section describes the following tasks that enable Entrust-enabled Oracle Advanced Security SSL authentication:
This section describes how to create Entrust profiles. Entrust profiles can be created by either administrators or users. On UNIX platforms, administrators create the Entrust profiles for all clients. On Windows platforms, users can be permitted to create their own Entrust profiles.
Administrators create Entrust profiles as follows:
.epf file.Entrust users create their own Entrust profiles as follows:
Start > Programs > Entrust > Entrust Profiles > Create Entrust Profiles
.epf file, and the Entrust initialization file.For Oracle Advanced Security Release 2 (9.2), Entrust support installs in Typical mode. A single Oracle installation supports the use of both Oracle Wallets and Entrust Profiles.
|
Notes:
|
Configure SSL on the client and server.
| See Also:
Chapter 7, Configuring Secure Sockets Layer Authentication, for information about configuring SSL on the client and server; skip the section that describes the Oracle wallet location. |
The steps for configuring Entrust on the client vary according to the type of platform:
If the client resides on a non-Windows platform, perform the following steps:
JAVA_HOME variable to JDK or JRE location.
For example:
>setenv JAVA_HOME $ORACLE_HOME/JRE
WALLET_LOCATION in the sqlnet.ora file.
For example:
WALLET_LOCATION=(SOURCE=(METHOD=entr)(METHOD_DATA =(PROFILE=profile_location)(INIFILE=initialization_file_location)))
If the client resides on a Windows platform, ensure that the Entrust/Entelligence component is installed on the client and perform the following steps to set up the Entrust credentials.
WALLET_LOCATION parameter in the sqlnet.ora file.
For example:
WALLET_LOCATION=(SOURCE=(METHOD=entr)(METHOD_DATA=(INIFILE=initialization_file_location)))
where initialization_file_location is the path to the .ini file.
The steps for configuring Entrust on the server vary according to the type of platform:
If the server is a UNIX platform, ensure that the Entrust/Server Login Toolkit component is installed on the server and perform the following steps:
| See Also:
System Components for information about downloading the Entrust/Toolkit Server Login. |
WALLET_LOCATION parameter in the sqlnet.ora and listener.ora files to specify the paths to the server's profile and the Entrust initialization file:
WALLET_LOCATION =(SOURCE =(METHOD = ENTR)(METHOD_DATA =(PROFILE =profile_location)(INIFILE =initialization_file_location)))
CLASSPATH environment variable to include the following paths:
$ORACLE_HOME/JRE/lib/rt.jar
$ORACLE_HOME/JRE/lib/i18n.jar
$ORACLE_HOME/jlib/ewt*.jar
$ORACLE_HOME/jlib/help*.jar
$ORACLE_HOME/jlib/share*.jar
$ORACLE_HOME/jlib/swingall*.jar
$ORACLE_HOME/network/jlib/netentrust.jar
etbinder command to create unattended login credentials, or.ual files by using the following steps:
PATH environment variable to include the path to the etbinder command, which is located in the /bin directory where the Server Login Toolkit is installed.LD_LIBRARY_PATH to include the path to the Entrust libraries.SSL_ENTRUST_INI environment variable to include the full path to the Entrust initialization file.etbinder
A message displays indicating that the credentials file (filename.ual) has been created.
If the server is on a Windows platform, perform the following steps:
| See Also:
System Components for information about downloading Entrust/Entelligence. |
WALLET_LOCATION parameter in the sqlnet.ora and listener.ora files to specify the paths to the server's profile and the Entrust initialization file:
WALLET_LOCATION =(SOURCE =(METHOD = ENTR)(METHOD_DATA =(PROFILE =profile_location)(INIFILE =initialization_file_location)))
.ual extension. Ensure that the owner of the .ual file is the same as the owner of the Oracle service.
To run the binder command choose
Start > Programs > Entrust Toolkit > Server Login > Entrust Binder
Enter the path to the profile, the password, and the path to the Entrust initialization file. A message informs you that you have successfully created a credential file.
Create global users in the database based on the distinguished name (DN) of each Entrust user.
For example:
SQL> create user jdoe identified globally as 'cn=jdoe,o=oracle,c=us';
where "cn=jdoe, o=oracle, c=us" is the Entrust distinguished name of the user.
sqlplus /@tns_service_name
where tns_service_name is the service name of the Oracle instance.
The Entrust_Login dialog box appears.
WALLET_LOCATION parameter, you are prompted to enter the path to the Entrust initialization file.
An application must be specifically modified to work with Entrust. If a product is designated as Entrust-ready, then it has been integrated with Entrust by using an Entrust toolkit.
For example, Oracle has modified its SSL libraries to access an Entrust profile instead of an Oracle wallet. Accordingly, the Entrust profile is not accessible from standard SSL libraries.
In addition, the following restrictions apply:
This section describes how to diagnose errors returned from Entrust to Oracle Advanced Security users.
You may encounter the following error messages regardless of what platform you are running Entrust on.
Cause: SQL*Plus login on an Entrust-enabled Oracle client errors out with this generic error message. This error can be caused by a number of problems, including the following causes:
Action: To get more detail on the Entrust error, turn on tracing for SQL*Plus and the trace output should indicate the Entrust failure code. Enable tracing by specifying the following parameters in the sqlnet.ora file:
On the client:
TRACE_LEVEL_CLIENT=16TRACE_DIRECTORY_CLIENT=<valid_client_directory_name>TRACE_FILE_CLIENT=clientTRACE_UNIQUE_CLIENT=ONOn the server:
TRACE_LEVEL_SERVER=16TRACE_DIRECTORY_SERVER=<valid_server_directory name>TRACE_FILE_SERVER=serverTRACE_UNIQUE_SERVER=ONSearch for and locate the string IKMP in the generated trace file. Adjacent to this string, error messages are listed that provide details about the problem you are encountering. This detailed error code information is returned by the Entrust API.
Cause: The WALLET_LOCATION parameter does not specify the Entrust initialization file location in the client side slqnet.ora file.
Action: Ensure that the location of the Entrust initialization file is specified in the WALLET_LOCATION parameter in the sqlnet.ora file on the client.
You may encounter the following error messages if you are running Entrust on a Windows platform.
Cause: Due to a known FIPS mode incompatibility, Entrust logins may fail and return this error message.
Action: Contact Entrust support to resolve this issue.
Cause: Due to a known symbol conflict between Entrust and Oracle libraries, Entrust login may fail and return this error message.
Action: Contact Entrust support to resolve this issue.
This error may occur in the listener.log file on the server when you attempt to log in to Entrust.
Cause: If you configure the client by making the following recommended changes:
.ual fileSSL_ENTRUST_INI_FILE parameter in the client sqlnet.ora filethen the server may not be able to authenticate the client when you enter the following command:
sqlplus/@tns_service_name
Action: Perform the following tasks to enable tracing on the server:
> Services..ual file. Click OK to make the change and you are returned to the Services dialog box.
In the Services dialog box, make the same changes for OracleService.
listener.ora file:
TCPS as the PROTOCOL in the listener ADDRESS. For example, change all of the PROTOCOL definitions to TCPS as follows:
listener_name=
   (DESCRIPTION=
      (ADDRESS=(PROTOCOL=TCPS) (KEY=extproc0))
      (ADDRESS=(PROTOCOL=TCPS) (HOST=sales-pc) (PORT=1521)))
Bringing up the listener only using TCPS will show whether there is a problem accessing the Entrust profile when you turn on tracing.
SSL_CLIENT_AUTHENTICATION parameter to FALSE as follows:
SSL_CLIENT_AUTHENTICATION=FALSE
TRACE_LEVEL_LISTENER=16
TRACE_DIRECTORY_LISTENER=C:\temp
The trace file is created in the C:\temp directory.
TRACE_LEVEL_SERVER=16
TRACE_DIRECTORY_SERVER=C:\temp
The trace file is created in the C:\temp directory.
Search for and locate the string "fail" or "ntz*" function calls. Adjacent to these, error messages are listed that provide details about the problem you are encountering.
The following items apply to all platforms:
.ual file is generated. These files are created for unattended login credentials.
IdentityLibrary=location
The full path to the location of the libidapi.so file should be specified in the IdentityLibrary parameter. This parameter setting enables generating a .ual file on the server.
SQLNET.AUTHENTICATION_SERVICES parameter in the sqlnet.ora file as shown in the following example:
SQLNET.AUTHENTICATION_SERVICES=(tcps,authentication_type1,authentication_ type2)
The following checklist items apply only to Entrust installations on the Windows NT platform.
> Control Panel > Services to confirm that the Entrust Login Interface service has started and is running.SSL_ENTRUST_INI_FILE parameter of the sqlnet.ora file. However, if you choose not to specify the location there, then the Entrust initialization file must reside in c:\WINNT..ual file, which enables unattended login, is required.
| See Also:
Step 4 of "Configuring Entrust on a Windows Server" for information about creating a |
IdentityLibrary = location
where location is the location of libidapi.so, including the file name.
|
 Copyright © 1996, 2002 Oracle Corporation. All Rights Reserved. |
|

