Release 2 (9.0.3)
Part Number B10062-01
Core |
Platform |
Contents |
Index |
| Oracle9iAS TopLink Tutorials Release 2 (9.0.3) Part Number B10062-01 |
|
In this advanced tutorial, we will improve the ACME Employment Management System (built in the introductory tutorial) to manage additional information. You will update the introductory application with new project information and reuse existing components from previous applications.
You will also learn how to:
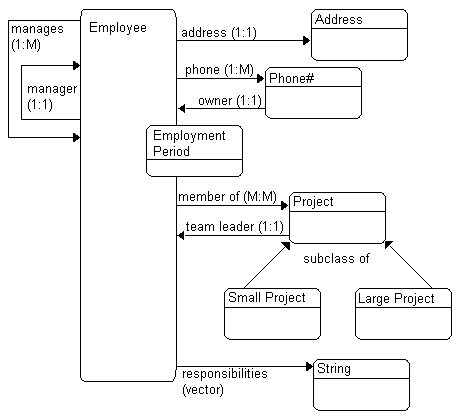
This advanced tutorial will add the ability to track employees' current projects, managers, and contract period. You will reuse components from the introductory tutorial.
In addition to the Employee, Address, and PhoneNumber classes from the introductory tutorial (see "Overview"), the advanced tutorial uses these classes:
Employee class has an EmploymentPeriod.
Employee has a collection of text that describes the employee's job.
Project - Maintains information about a particular project and the people working on it. The Project class contains two subclasses: LargeProject and SmallProject. Each Employee can be involved in more than one project.
Project can have a team leader (the Employee responsible for the project.
Employee may have a manager and a collection of managed employees.
Figure 2-1 illustrates the object model for the advanced tutorial.
The advanced ACME employee system stores the employee data in the following database tables. To use this tutorial, create these tables in your database application. Table 2-9 describes how each class relates to the database tables.
The column types listed here are generic; the actual column types depend on the database used.
| Column name | Column type | Details |
|---|---|---|
|
EMP_ID |
NUMERIC(15) |
Primary key |
|
SALARY |
NUMERIC(10) |
|
| Column name | Column type | Details |
|---|---|---|
|
ADDRESS_ID |
NUMERIC(15) |
Primary key |
|
COUNTRY |
VARCHAR(80) |
|
|
STREET |
VARCHAR(80) |
|
|
CITY |
VARCHAR(80) |
|
|
PROVINCE |
VARCHAR(80) |
|
|
P_CODE |
VARCHAR(20) |
|
| Column name | Column type | Details |
|---|---|---|
|
EMP_ID |
NUMERIC(15) |
Primary key |
|
AREA_CODE |
CHAR(3) |
|
|
P_NUMBER |
CHAR(7) |
|
|
TYPE |
VARCHAR(15) |
Primary key |
| Column name | Column type | Details |
|---|---|---|
|
PROJ_ID |
NUMERIC(15) |
Primary key |
|
DESCRIP |
VARCHAR(200) |
|
|
PROJ_NAME |
VARCHAR(30) |
|
|
PROJ_TYPE |
CHAR(1) |
|
|
LEADER_ID |
NUMERIC(15) |
|
|
VERSION |
NUMERIC(15) |
|
| Column name | Column type | Details |
|---|---|---|
|
PROJ_ID |
NUMERIC(15) |
Primary key |
|
BUDGET |
NUMERIC(10,2) |
|
|
MILESTONE |
TIMESTAMP |
|
| Column name | Column type | Details |
|---|---|---|
|
EMP_ID |
NUMERIC(15) |
Primary key |
|
DESCRIP |
VARCHAR(200) |
|
| Column name | Column type | Details |
|---|---|---|
|
EMP_ID |
NUMERIC(15) |
Primary key |
|
PROJ_ID |
NUMERIC(15) |
Primary key |
oracle.toplink.tutorials.advanced package. See "Setting the Project's Classpath".
oracle.toplink.tutorials.employee package and generate a TopLink descriptor for each Java class as described in "Generating the Class Definitions":
Table 2-9 shows how the classes relate to the database tables.
Select one of the following methods to add database information:
Refer to Table 2-1 through Table 2-8 for complete database information.
Map the each Java class in the Advanced tutorial to a database table as described in "Mapping Classes to Tables".
| Map this class... | To this database table... |
|---|---|
|
Address |
ADDRESS |
|
Employee |
EMPLOYEE |
|
LargeProject |
LPROJECT |
|
PhoneNumber |
PHONENUMBER |
|
Project |
PROJECT |
Ensure that the primary keys are correctly indicated, as specified in Table 2-1 through Table 2-8.
TopLink can automatically map class attributes to similarly named database. This Automap function only creates mappings for unmapped attributes - it does not change previously defined mappings.
You can automap classes for an entire project or for specific tables.
Address class in the Project Tree pane and click on the Descriptor Info tab in the Properties pane.
You must associate the class with a table before using the Automap tool.
Address class in the Project Tree pane and select Automap from the pop-up menu.
You can also automap descriptors by selecting Selected > Automap from the menu.
The system automatically maps each attribute to the appropriate database table. Do not Automap any other classes. You will manually map these classes later in this tutorial.
Indirection allows you to retrieve objects from the database as needed.
Using indirection can be a great performance benefit and is strongly recommended. See the Oracle9iAS TopLink Mapping Workbench Reference Guide for more information.
To prepare your object model for indirection, you must alter the application slightly:
ValueHolderInterface. This interface is located in the oracle.toplink.indirection package and allows for indirection to be used.
get methods for these variables to extract the value from the value holder.
set methods for these variables to insert the value into the value holder.
Indirection can be implemented using direct access or method access.
get and set methods that provide access to the value holders.
get and set methods are not required.
If the instance variable returns a Vector instead of an object then the value holder should be defined in the constructor as follows:
addresses = new ValueHolder(new Vector());
In the following examples, the Employee class uses indirection with method access for its one-to-one mapping to Address. The class definition is modified so that the address attribute of Employee is a ValueHolderInterface instead of an Address. In both examples, the application uses the getAddress() and setAddress() methods to access the Address object.
The following example illustrates code before using indirection.
protected Address address;
   public Employee() {
      address = null;
   }
   public Address getAddress() {
      return address;
   }
   public void setAddress(Address address) {
      this.address = address;
   }
The following example illustrates the same code after using indirection.
protected ValueHolderInterface address;
   public Employee() {
      address = new ValueHolder();
   }
   public Address getAddress() {
      return (Address)address.getValue();
   }
   public void setAddress(Address address) {
      this.address.setValue(address);
   }
The indirection example could also use method access instead of direct access. This would be implemented by adding getAddressValueHolder() and setAddressValueHolder() methods.
After modifying the code, update the TopLink Mapping Workbench descriptors to use indirection.
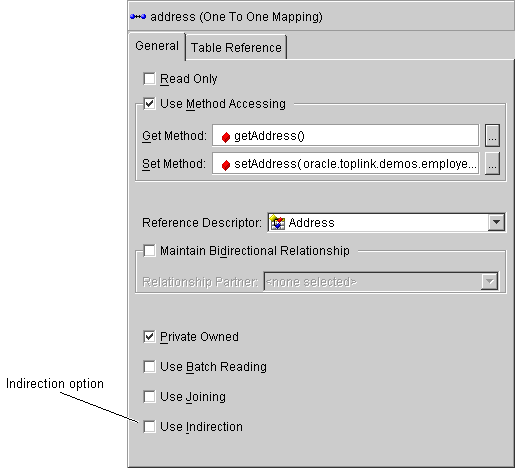
The following attributes in the Advanced tutorial sample code have been implemented using ValueHolderInterfaces:
Employee
PhoneNumber
Project
When you create mappings for these attributes, be sure to enable the Use Indirection option.
Some object models require a class to reference another instance of the same class. In the advanced tutorial, the Manager attribute in the Employee class references another employee (see Figure 2-1).
manager attribute in the Project Tree pane, then click the One-to-one mapping button
 in the mapping toolbar.
The Properties pane displays the appropriate information for a one-to-one relationship to be specified.
Employee as the reference descriptor.
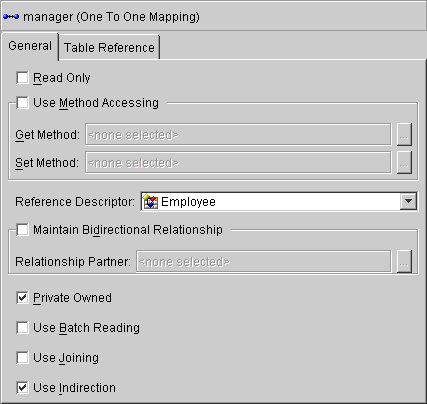
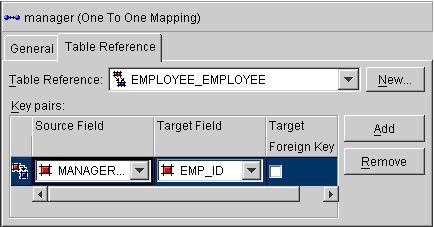
EMPLOYEE_EMPLOYEE (created in step 5 from the Table Reference drop-down list.
 in the toolbar or select File > Save Project to save the project.
The Advanced tutorial also includes a one-to-one mapping for the following attributes:
address attribute in the Employee descriptor
owner attribute in the PhoneNumber descriptor
teamLeader attribute in the Project descriptor
Create these mappings as shown in "Creating One-to-one Mappings Between Objects". Refer to Table 2-9 for the correct relationships. Enable indirection for each of these mappings, as indicated in "Implementing Indirection in the Tutorial".
Some object models require a class to reference another instance of the same class. In the advanced tutorial, a manager can have a collection of managed employees (see Figure 2-1).
managedEmployees attribute in the Project Tree pane, then click the One-to-many mapping button
 in the mapping toolbar.
The Properties pane displays the appropriate information for a one-to-many relationship to be specified.
Employee.
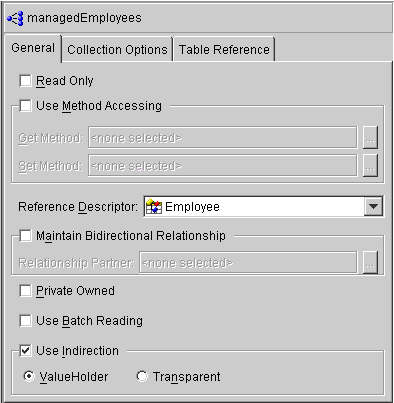
 in the toolbar or select File > Save Project to save the project.
The Advanced tutorial also includes a one-to-many mapping for the phoneNumbers attribute in the Employee descriptor. Create this mapping as shown in "Creating One-to-many Mappings". Refer to Table 2-9 for the correct relationship.
Enable indirection for this mapping, as indicated in "Implementing Indirection in the Tutorial".
In TopLink, it is possible to spread classes across two or more tables. In the advanced tutorial, the Employee class is stored in multiple tables: although most information is in the EMPLOYEE table, salary information is stored in the SALARY table.
Employee descriptor in the Project Tree pane.
If the Multi-table info tab is not visible, right-click on the Employee descriptor and select Set Advanced Properties > Multi-table Info from the pop-up menu.
SALARY table.
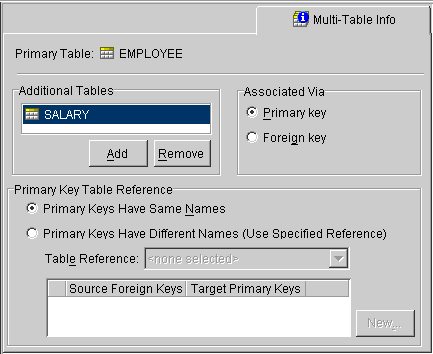
 in the toolbar or select File > Save Project to save the project.
In TopLink, you can match a fixed number of database values to Java objects through object type mappings. In the advanced tutorial, each employee's gender is stored as a single letter in the database field (i.e., M or F), but the value is the full name (i.e., Male or Female).
Employee descriptor in the Project Tree pane.
gender attribute and click on the Object-type Mapping button
 in the mapping toolbar.
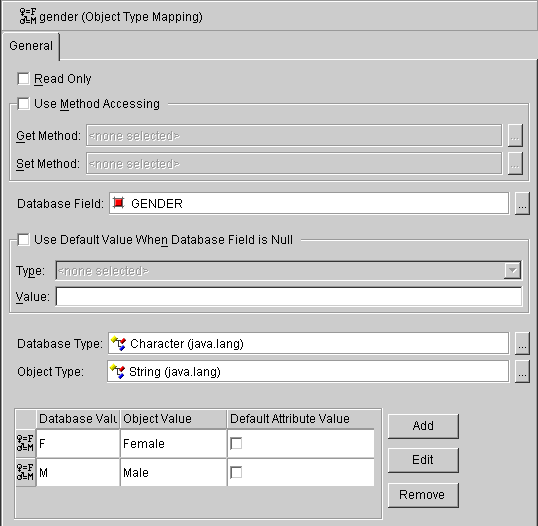
| Database Value | Object Value |
|---|---|
|
|
|
|
|
|
 in the toolbar or select File > Save Project to save the project.
In TopLink, two objects are related by aggregation if there is one-to-one relationship between the objects and all the attributes of the second object can be retrieved from the same table(s) as the owning object. In the advanced tutorial, the EmploymentPeriod is an aggregate descriptor and the period attribute is an aggregate object.
EmploymentPeriod descriptor in the Project Tree pane.
 in the mapping toolbar. The descriptor's icon in the Project Tree pane changes to an aggregate descriptor
 .
.
startDate and EndDate attributes of the EmploymentPeriod as direct-to-field mappings.
period attribute of the Employee descriptor.
 in the mapping toolbar.
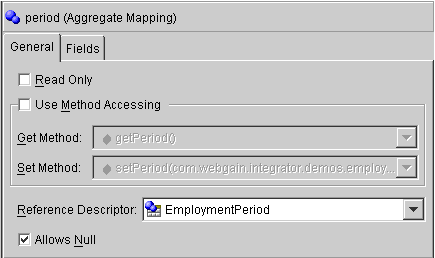
EmploymentPeriod aggregate descriptor.
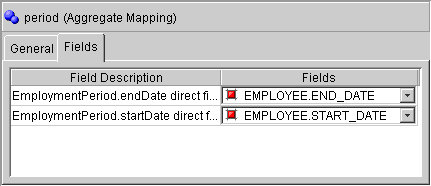
 in the toolbar or select File > Save Project to save the project.
Direct collection mappings store collections of Java objects that are not TopLink-enabled. In the advanced tutorial, the responsibilitiesList attribute is a direct collection.
Employee descriptor in the Project Tree pane.
responsibilitiesList attribute of the Employee descriptor.
 in the mapping toolbar.
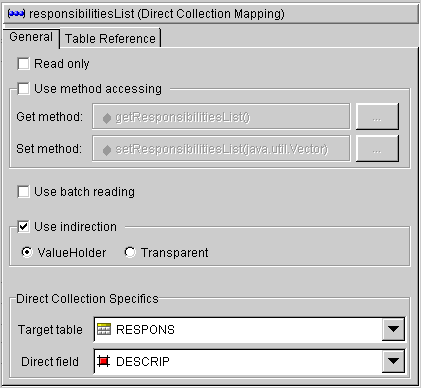
RESPONS_EMPLOYEE, with a source table of RESPONS and target table of EMPLOYEE and click OK.
RESPONS_EMPLOYEE.
EMP_ID (from the RESPONS table).
EMP_ID (from the EMPLOYEE table).
 in the toolbar or select File > Save Project to save the project.
Many-to-many mappings represent relationships between a collection of source objects and a collection of target objects. In the advanced tutorial, the projects attribute uses a many-to-many-mapping (for example, many employees can have many projects).
Employee descriptor in the Project Tree pane.
projects attribute of the Employee descriptor.
 in the mapping toolbar.
Project descriptor.
PROJ_EMP table (the class to map to).
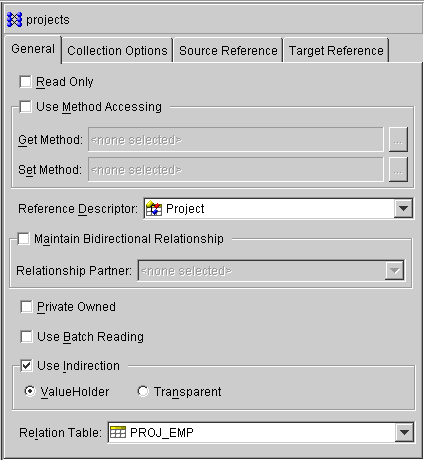
PROJ_EMP_EMPLOYEE, with a source table of PROJE_EMP and target table of EMPLOYEE, and click OK.
PROJ_EMP_EMPLOYEE reference.
EMP_ID (from the PROJ_EMP table).
EMP_ID (from the EMPLOYEE table).
 in the toolbar or select File > Save Project to save the project.
Inheritance describes how a child class inherits the characteristics of its parent class. TopLink uses multiple implementations to support database inheritance.
In the advanced tutorial, the LargeProject and SmallProject classes inherit the characteristics of the Project class. Use the following procedures to set the Project descriptor to implement inheritance, then enable the two subclasses.
Project descriptor in the Project Tree pane.
If the Inheritance tab is not visible, right-click on the Project descriptor and select Advanced Properties > Inheritance from the pop-up menu or Selected > Advanced Properties > Inheritance from the menu.
PROJ_TYPE.
SmallProject descriptor in the Project Tree pane.
If the Inheritance tab is not visible, right-click on the Project descriptor and select Advanced Properties > Inheritance from the pop-up menu or Selected > Advanced Properties > Inheritance from the menu.
Project class.
 in the toolbar or select File > Save Project to save the project.
Repeat this procedure for the LargeProject descriptor.
Project descriptor in the Project Tree pane.
Use transformation mappings for specialized translations between how a value is represented in Java and in the database. The method takes a database row as an argument and are called whenever an object is written to the database. The method returns the value from the object that should be written to the field.
In the advanced tutorial, the transformation method corresponds to a single argument method on the Employee class and extracts the values from the fields and places them into the NormalHours array.
Employee descriptor in the Project Tree pane.
normalHours attribute of the Employee descriptor.
 in the mapping toolbar.
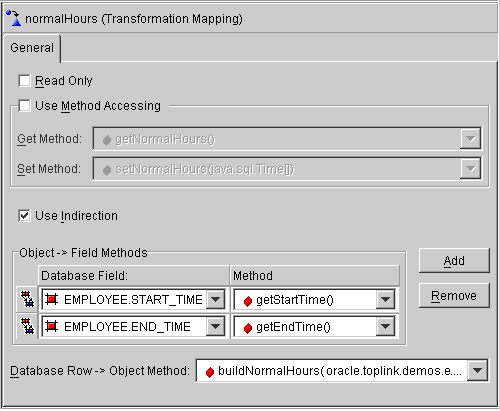
 in the toolbar or select File > Save Project to save the project.
The remaining attributes for each descriptor are simple direct-to-field mappings. Use Table 2-9 to map each attribute.
To use your project with the Foundation Library, you must either generate deployment XML or export the project to Java source code.
In this tutorial, we will create a deployment XML file that can be read in at runtime. The code generator creates a single subclass that can be used instead of reading directly from the files.
You can also export the project by selecting File > Export to Java Source or Selected > Export to Java Source from the menu.
.java) and click OK.
Congratulations! You have completed the Advanced Tutorial and are now familiar with the TopLink's advanced topics and functions.
A completed version of this tutorial is included with a standard installation of TopLink in the following directory:
<INSTALL_DIR>\workbench\demos\employee\EmployeeDemo.mwp
|
|
 Copyright © 2002 Oracle Corporation. All Rights Reserved. |
|