18
Publishing workbooks to OracleAS Portal
Publishing workbooks to OracleAS Portal
This chapter explains how to publish workbooks and worksheets to organization-wide portals using OracleAS Portal, and contains the following topics:
What is OracleAS Portal?
OracleAS Portal enables non-technical business users to create enterprise information portals (EIPs). EIPs are internet or intranet sites that provide a personalized, single point of interaction with a company's suite of applications.
EIPs also enable you to provide a consistent look and feel to users. EIPs are specifically designed for easy access to different information providers, the presentation of which can be tailored to individual users' requirements. In the example below, the portal contains a portlet called 'Results set' that contains a Discoverer worksheet called 'Analysis of Video Rentals and Video Sales'.
Figure 18-1 An enterprise information portal developed using OracleAS Portal 3.0
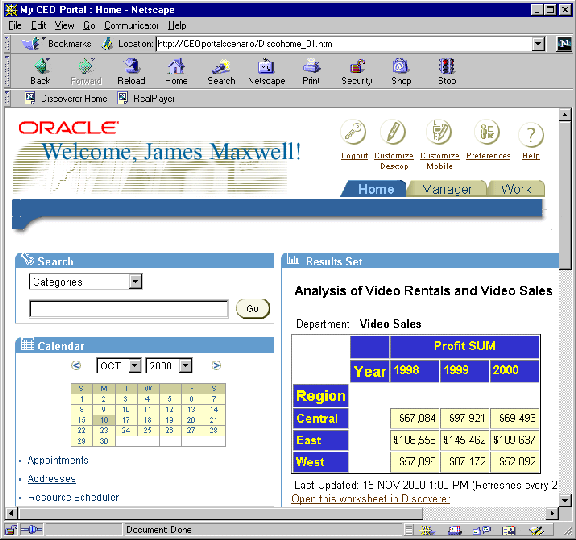
Text description of the illustration portal_7.gif
About OracleAS Portal
OracleAS Portal provides an easy-to-use framework for creating and maintaining EIPs. Using OracleAS Portal, you define business portals consisting of a number of different areas (known as portlets). You can customize the presentation of portlets on a per user and/or per group basis.
If you have created a Discoverer worksheet in Discoverer Plus, OracleAS Portal makes it easy to publish the worksheet to a portal community.
For example, the example below shows a business intelligence (BI) portlet in an EIP. The BI portlet (called Analyze Sales Reports) contains links to three Discoverer workbooks (called Video Analysis, Regional Analysis, and Mike's sales areas). Users see different BI applications depending on their requirements.
Figure 18-2 An example EIP containing a Business Intelligence portlet
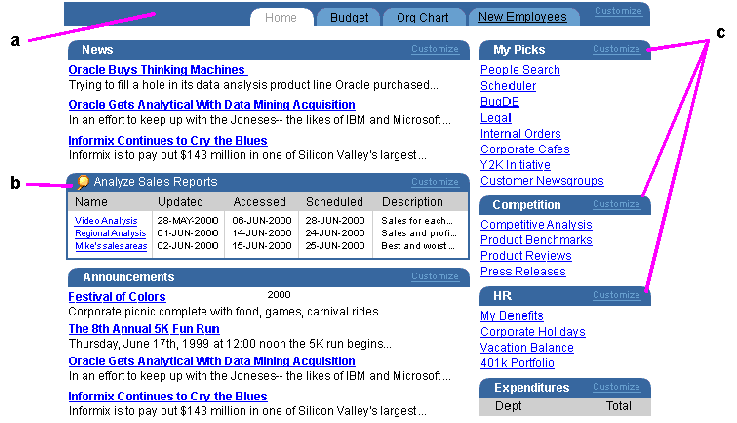
Text description of the illustration portal_1.gif
Key to figure:
- An EIP page.
- A Business Intelligence portlet containing links to Discoverer workbooks.
- Examples of other portlets for different information providers. For example, commonly used applications (My Picks), competitor analysis (Competition), and human resources (HR).
What you need to publish Discoverer content in OracleAS Portal
To publish Discoverer content in OracleAS Portal, you need:
- to register Discoverer as an OracleAS Portal - see the Oracle Application Server Discoverer Configuration Guide for more information.
- a Discoverer database account
- authentication as an OracleAS Portal user - i.e. you must login to OracleAS Portal
- privileges to create or customize pages in OracleAS Portal, to enable you to add portlets to a portal page or customize portlets in a portal page
Notes
Contact the OracleAS Portal Administrator if you require create or edit page privileges.
About publishing Discoverer content in OracleAS Portal
When you use OracleAS Portal in conjunction with OracleAS Discoverer to publish workbooks and worksheets, you use the following security mechanisms to determine which OracleAS Portal users have access to data:
For example, you might have four database users: PETE, NICK, ANDY, and a fourth TEMP, which is used for PUBLIC connections (see figure below).
User PETE creates workbook 'Workbook_A' and uses Discoverer Plus to explicitly share Workbook_A with user NICK and user TEMP.
Figure 18-3 Sharing workbooks example
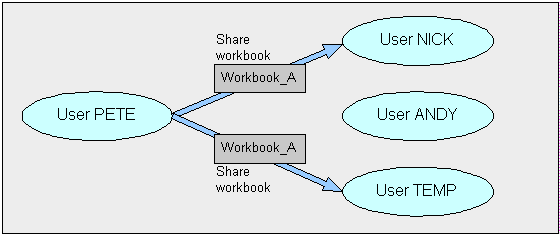
Text description of the illustration port.gif
Note: User PETE does not share Workbook_A with user ANDY.
When user PETE publishes the workbook to OracleAS Portal using the Discoverer Portlet Provider, the following options are available:
- For users that are authenticated by single sign-on, he can:
- give OracleAS Portal users access using the publisher's connection (i.e. user NICK and user ANDY can access Workbook_A in OracleAS Portal)
- give OracleAS Portal users access using a public connection (i.e. user NICK and user ANDY can access the WB in OracleAS Portal)
- give OracleAS Portal users access using their own (private) connection (i.e. user NICK can access Workbook_A in OracleAS Portal, not user ANDY)
- For users that are NOT authenticated by single sign-on, he can:
- give OracleAS Portal users access using the publisher's connection (i.e. user NICK and user ANDY can access Workbook_A in OracleAS Portal)
- give OracleAS Portal users access using a public connection (i.e. NICK and ANDY can access Workbook_A in OracleAS Portal)
- prevent access to non-authenticated OracleAS Portal users (i.e. no OracleAS Portal users can access Workbook_A unless logged in)
About portlet types available in Discoverer
Discoverer users can create two types of portlet for Discoverer content:
Discoverer content is generated when it is first published and optionally refreshed on a regular schedule.
About the List of database workbooks portlet
A List of database workbooks portlet contains URL links to Discoverer workbooks. When you click a URL link in a workbook portlet, you open the selected workbook in Discoverer Viewer. When you in Discoverer Viewer, you can use Discoverer's powerful analytic features such as pivot, drill etc.
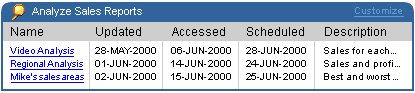
In the figure below, the Analyze Sales Reports portlet contains three URL links, to 'Video Analysis', 'Regional Analysis', and 'Mike's sales areas'.
Figure 18-4 A workbook portlet in an OracleAS Portal page
Text description of the illustration portal_4.gif
About the Worksheet portlet
A Worksheet portlet contains Discoverer worksheets and graphs.
Note: A link is provided to enable users to open the worksheet in Discoverer Viewer for further analysis (e.g. drill, pivot, etc.).
In the figure below, the worksheet portlet contains a Discoverer worksheet for analyzing profit figures for regions across two years.
Figure 18-5 A worksheet portlet in an OracleAS Portal page
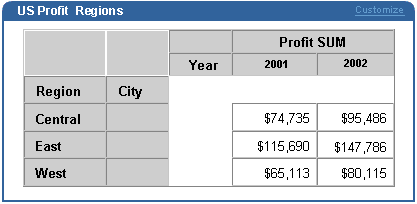
Text description of the illustration portal_5.gif
About adding portlets
When you create Discoverer portlets, you create a blank portlet with default settings, then you edit the portlet to suit your needs and publish the results to portal users.
Notes
- Refer to the OracleAS Portal Online Help for information about using the OracleAS Portal toolbars and wizards.
- When you edit portlet pages, the Edit defaults options differs from the Customize option as follows:
- Edit defaults - in this mode, changes that you make are visible to all users of the page.
- Customize - in this mode, changes that you make are visible only to yourself.
How to add a list of database workbooks portlet
You add a list of database workbooks portlet when you want to provide Discoverer workbook links to a page in OracleAS Portal. For example, to publish a link for a sales workbook to colleagues in a sales department.
For more information, see:
"About the List of database workbooks portlet"
To add a List of database workbooks portlet:
- Start an internet browser.
- Display the portal page to which you want to add a Discoverer portlet.
- If you are not already logged in, click Login and enter your portal login details.
- Click Edit to display the "Page Edit Mode: Layout View" page.
- Select the Layout link from the Editing Views area at the top of the page.
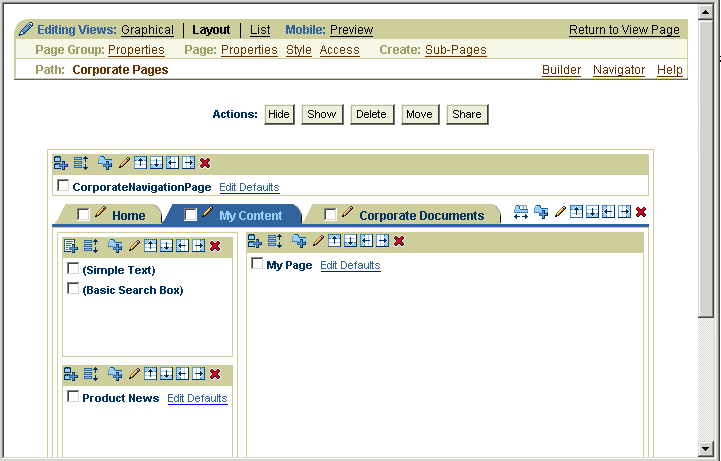
Text description of the illustration portal_2.gif
- Click the Add Portlets icon to display the "Add Portlets to Region" page.
To add portlets, you move portlets from the Available Portlets list to the Selected Portlets list.
- In the Available Portlets area, choose Discoverer or navigate to where the Discoverer portlets are located.
Hint: If you are using a new OracleAS install, the Discoverer portlets might be in the New folder.
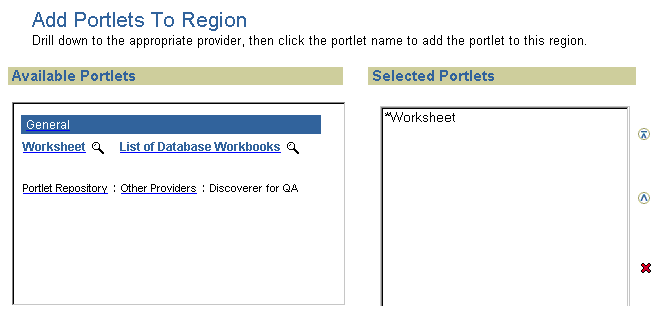
Text description of the illustration portal_3.gif
The two Discoverer portlet types (Worksheet and List of Database Workbooks) are displayed.
- Select the List of Database Workbooks link to add the portlet to the Selected Portlets list.
- Click OK to close the "Add Portlets to Region" page.
Having added a portlet, you now edit the portlet to suit your needs.
- Select the Edit Defaults link next to the portlet that you have just created to start the portlet wizard.
Hint: If you cannot see an Edit Defaults link next to the portlet that you have just created, select the Layout link from the Editing Views area at the top of the page.
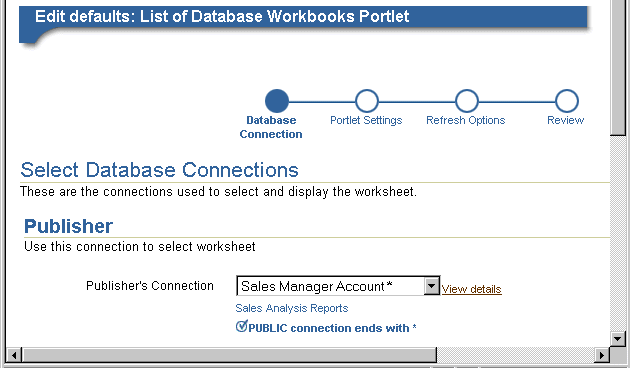
Text description of the illustration portal_8.gif
- Use the Select Database Connections page to specify how portal users can access the portlet.
- Use the Portlet Settings page to specify the portlet name, the order of workbooks, and the maximum number of workbooks to display. For example, you might want to display a maximum of ten workbooks in alphabetical order.
- Use the Refresh Options page to specify when the workbook list is refreshed.
- Use the Review page to check that you have selected the correct portlet options.
- Select the Finish link to save the defaults.
You can now view the Discoverer worksheet in the portlet. It might take a few moments for the portlet to retrieve its content for the first time.
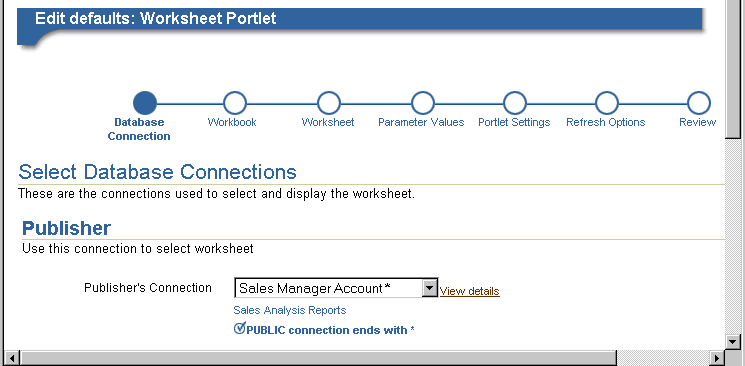
How to add a worksheet portlet
You add a Worksheet portlet when you want to add Discoverer worksheet data to a page in OracleAS Portal. For example, to publish a sales report to everyone in a sales department.
For more information, see:
"About the Worksheet portlet"
To add a Worksheet portlet:
- Start an internet browser.
- Display the portal page to which you want to add a Discoverer portlet.
- If you are not already logged in, click Login and enter your portal login details.
- Click Edit to display the "Page Edit Mode: Layout View" page.
- Select the Layout link from the Editing Views area at the top of the page.
Text description of the illustration portal_2.gif
- Click the Add Portlets icon to display the "Add Portlets to Region" page.
To add portlets, you move portlets from the Available Portlets list to the Selected Portlets list.
- In the Available Portlets area, choose Discoverer or navigate to where the Discoverer portlets are located.
The two Discoverer portlet types (Worksheet and List of Database Workbooks) are displayed.
Text description of the illustration portal_3.gif
- Select the Worksheet link to add a portlet to the Selected Portlets list.
- Click OK to close the Add Portlets to Region page.
Having added a portlet, you now edit the portlet to suit your needs.
- Select the Edit Defaults link next to the portlet that you have just created to start the portlet wizard.
Hint: If you cannot see an Edit Defaults link next to the portlet that you have just created, select the Layout link from the Editing Views area at the top of the page.
Text description of the illustration portal_9.gif
- Use the "Database Connections page" to specify how portal users can access the portlet.
- Use the "Select Workbook page" to specify the workbook in which the worksheet is stored.
- Use the "Select Worksheet page" to specify which worksheet you want to publish to the portal.
- (optional) If parameters are defined for the worksheet, use the "Edit Parameters page" to specify parameter values. Parameter values are used to provide dynamic input to worksheets. For example, to focus on specific information, or provide input to calculations.
- Use the "Portlet Settings page" to specify what parts of the worksheet to publish. For example, you might want to publish the worksheet data only, the worksheet's graph only, or worksheet data and a worksheet's graph.
- Use the "Refresh Options page" to specify when the worksheet data is refreshed.
- Use the "Review page" to check that you have selected the correct portlet options.
- Select the Finish link to save the defaults.
You can now view the Discoverer worksheet in the portlet. It might take a few moments for the portlet to retrieve its content for the first time.
How to edit a Discoverer portlet
You edit a Discoverer portlet when you want to change how a portlet is displayed to portal users.
To edit a Discoverer portlet:
- Start an internet browser.
- Display the portal page containing the Discoverer portlet that you want to edit.
- If you are not already logged in, click Login and enter your portal login details.
- Click Edit to display the "Page Edit Mode: Layout View" page.
- Select the Layout link from the Editing Views area at the top of the page.
Text description of the illustration portal_2.gif
- Select the Edit Defaults link next to the portlet that you want to edit to start the portlet wizard for that style of portlet (List of Database Workbooks or Worksheet).
Hint: If you cannot see an Edit Defaults link next to the portlet that you have just created, select the Layout link from the Editing Views area at the top of the page.
- Follow the steps in the portlet wizard.
- Select the Finish link to save changes to the portlet.
You can now view the updated Discoverer worksheet in the portlet.
