Skip Headers

Oracle® Application Server Integration Adapter for CICS Installation and User's Guide
10g (9.0.4)

Part Number B10301-01
Go To Documentation Library
Home
Go To Product List
Solution Area
Go To Table Of Contents
Contents
Go To Index
Index

Go to previous page Go to next page

2
Installing the Oracle Application Server Integration Adapter for CICS

This chapter explains how to install Oracle Connect for CICS and Oracle Studio software from the distribution CD-ROM.


Note:

In addition to the installation procedures described in this chapter, the CICS adapter component of the Oracle Application Server Integration Adapter for CICS software must be installed with Oracle Application Server ProcessConnect. Installing the CICS adapter component is described in the Oracle Application Server ProcessConnect Installation Guide.


This chapter includes the following sections:

Before You Begin

Confirm that you have met all hardware and software requirements. Refer to the following sections:

Determining the Hardware and Software Requirements for the OS/390

This section describes the following requirements for installing Oracle Connect for CICS:

Hardware Requirements

The following table summarizes the hardware requirements for Oracle Connect for CICS.

Hardware Component Requirements

Processor

IBM S/390 machine

Memory

The minimum requirement is 1MB per user. The actual memory requirement depends on the size of the CICS COMMAREA used.

CD-ROM Drive

An internal or external CD-ROM drive

Disk Space (3380 and 3390 disks)

150 cylinders

Software Requirements

The system software configuration described in this section is supported by Oracle Corporation as long as the underlying system software products are supported by their respective vendors. Verify the latest support status with your system software vendors.

The following table summarizes the software requirements for Oracle Connect for CICS.

Software Component Requirements

Operating System

IBM OS/390 V2R5 and up or z/OS series

CICS TP Monitor

V4R1 and up (recommended to use CICS V6R1 and up)

CICS EXCI support must be installed and IRCSTRT=YES must be specified in the CICS initialization parameters, so that the IRC (Inter Region Communication) starts.

You can also set the IRC to open by issuing the following command: CEMT SET IRC OPEN. Also the IBM group DFH$EXCI (or an equivalent user-defined group) must be installed in the CICS region - using the CEDA RDO facility.

Oracle Application Server ProcessConnect

Oracle Application Server 10g (9.0.4)

Oracle Application Server ProcessConnect can reside on any supported platform

Determining the Hardware and Software Requirements for Windows

This section describes the following requirements for installing Oracle Studio:

Hardware Requirements

The following table summarizes the hardware requirements for Oracle Studio.

Hardware Component Requirements

Processor

An Intel or 100% compatible personal computer (PC), based on a Pentium processor

Memory

128 MB of RAM

CD-ROM Drive

An internal or external CD-ROM drive

Disk Space

75MB of free disk space

Software Requirements

The system software configuration described in this section is supported by Oracle Corporation as long as the underlying system software products are supported by their respective vendors. Verify the latest support status with your system software vendors.

The following table summarizes the software requirements for Oracle Studio.

Software Component Requirements

Operating System

Microsoft Windows NT Server Version 4.0 with service pack 5 or higher, Microsoft Windows 2000 with service pack 2 or higher, or Microsoft Windows XP

Microsoft

Network transport protocol software, TCP/IP, included with Microsoft Windows

Installing Oracle Connect for CICS on an OS/390 Platform


Note:

If you have an Oracle Connect Legacy Adapter already installed on the OS/390 machine, follow the instructions described in "Updating Oracle Connect with CICS".

The other legacy adapters that run on an OS/390 machine are:

  • Oracle Application Server Integration Adapter for IMS/DB

  • Oracle Application Server Integration Adapter for IMS/TM

  • Oracle Application Server Integration Adapter for VSAM


This section explains how to install Oracle Connect for CICS software from the distribution CD-ROM. This section includes the following:

Installation Worksheet

Verify that you have all the information detailed in the following installation worksheets, so you can refer to it during the configuration process.

Table 2-1  Preinstallation Information
Topic Required Information Default Comment

General

Operating system

-

OS/390 V2R5 and up (including z/OS)

-

Disk space

-

150 cylinders

-

Memory

-

Minimum 1MB per user

-

Installation high-level qualifier

OCL904

-

-

Volume

-

-

-

Unit

3390

SMS only: unit where SMS resides.

-

Output class

A

-

-

JCL job card

-

An optional card (up to 6 lines) to replace the prefix job (entered as it will appear in the job)

-

ISPF load library name

ISP.SISPLOAD

-

CICS

CICS EXCI load library name

CICS.CICS.SDFHEXCL

-

Table 2-2  Required Permissions
Permission

Permission to define an APF-authorized library

Permission to write to an active proclib (such as user.proclib)

Permission to read the CICS EXCI library

Permission to update the security manager (such as RACF)

Optionally, permission to specify an output class for Oracle Connect for CICS output

Table 2-3  Installation Checklist
Step Comment/Outputs

tso profile prefix

Ensures that the user name is not used as part of the dataset name allocated in the next steps

Allocate dataset: {HLQ}.TRANSMIT.KIT

130 tracks (3390), format=FB, record length=80, block size=3120

Allocate dataset: {HLQ}.TRANSMIT.LOAD

420 tracks (3390), format=FB, record length=80, block size=3120

FTP files to OS/390 (or z/OS)

FTP using binary mode

RECEIVE INDSNAME('{HLQ}.TRANSMIT.KIT')

-

da('{HLQ}.TRANSMIT.LIB') UNIT(unit) VOLUME(volume)

-

EX {HLQ}.TRANSMIT.LIB(PREPARE)

Successful MAXCC is 0, 4 or 8

BUILDKIT.SRC and BUILDKIT.LOAD created

EX {HLQ}.BUILDKIT.SRC(NAVINST)

Successful MAXCC is 0 or 4

Preinstallation Instructions

Before starting the installation, make sure that you have the following information available:

Before starting the installation, make sure that you have the following permissions:

Oracle Connect for CICS software for the IBM OS/390 machine is contained in the following datasets:

These datasets are provided on a CD-ROM in the directory Oracle_Connect\CICS_Legacy_Adapter.

Installing the Kit on the Mainframe

  1. On the mainframe, run the following command:

    tso profile noprefix
    
    
  2. The user name will not be used as part of the dataset name. On some systems this is the default.

  3. On the mainframe, allocate datasets with the following space for each of these files:

    • OCL904.TRANSMIT.KIT = 130 tracks (3380 and 3390 disks)

    • OCL904.TRANSMIT.LOAD = 420 tracks (3380 and 3390 disks)

    For each dataset: RECFM=FB and LRECL=80. The block size is 3120.

  4. Using FTP, copy OCL904.TRANSMIT.KIT and OCL904.TRANSMIT.LOAD in binary mode from the installation CD to the mainframe. You can replace the OCL904 high-level qualifier to any qualifier you want.

Installation Instructions

Complete the following steps to install Oracle Connect for CICS:

  1. From within TSO, run the following command at the TSO prompt:

    RECEIVE INDSNAME('nnn.TRANSMIT.KIT')


    where nnn represents the high-level qualifier you want to assign for the Oracle Connect for CICS installation. Assign the high-level qualifier you specified in step 7 of the preinstallation. The default value is OCL904.


    Note:

    You can use more than one high-level qualifier (such as ACME.DEV.OCL904) with the following conditions:

    • The total length must be less than or equal to twenty characters

    • The words "transmit" and "buildkit" cannot be used as high-level qualifiers


  2. Enter the following when prompted for the restore parameters:

    da('nnn.TRANSMIT.LIB') [UNIT(unit) VOLUME(volume)]


    This extracts the nnn.TRANSMIT.LIB library from the nnn.TRANSMIT.KIT kit to the specified unit and volume. If a unit and volume are not specified the library is extracted to the current unit and volume.

  3. Execute the PREPARE member of the nn.TRANSMIT.LIB library:

    ex PREPARE


    Follow the instructions in the Response column in Table 2-4 for each entry in the Screen column.

    Table 2-4  Installation Prepare Job Prompts and Responses
    Screen Response

    DO YOU WANT TO USE SMS MANAGED STORAGE FOR THIS INSTALLATION Y/N [N] :

    If you want to manage the storage using SMS, answer Y, otherwise answer N.

    ENTER THE STORCLASS FOR INSTALLATION TEMP DATASETS [ ] :

    This prompt is displayed only if SMS is used to manage the installation (you answered Y to the first prompt).

    Enter the storage class

    ENTER THE UNIT NAME FOR INSTALLATION TEMP DATASETS [3390] :

    If a storage class is not specified, enter the unit name for temporary datasets used during the installation procedure

    ENTER THE VOLUME NAME FOR INSTALLATION TEMP DATASETS :

    This prompt is displayed only if SMS is not used to manage the installation (you answered N to the first prompt).

    The volume name for temporary datasets used during the installation procedure

    ENTER THE OUTPUT CLASS FOR INSTALLATION OUTPUT [A] :

    Enter the output class only if you do not want the default class used (the default is A)

    DO YOU WANT TO USE THE DEFAULT JOB CARD Y/N [Y]

    A job card is displayed. If you want to use a replacement card, it must be entered as it will appear in the job. You can enter up to six lines. Enter a blank line to end input.

    If you do not enter a card, the Oracle Connect for CICS default card is used.

    DO YOU WANT TO PERFORM A MANUAL (M) OR AUTOMATIC (A) INSTALLATION [A] :

    If you want to review the JCL used to install Oracle Connect for CICS, before it is submitted, respond M for a manual installation.

    PLEASE REVIEW AND SUBMIT FOR EXECUTION THE HLQ.TRANSMIT.LIB(INSTJO)

    This prompt is displayed only if a manual installation is requested (you answered M to the previous prompt).

    The following libraries are generated:

    nnn.BUILDKIT.LOAD
    nnn.BUILDKIT.SRC
    nnn.BUILDKIT.GENDEMO


    Where nnn is the high-level qualifiers you assigned in step 1.

  4. In the nnn.BUILDKIT.SRC library, execute the NAVINST member:

    ex NAVINST


    Follow the instructions in the Response column in Table 2-5 for each entry in the Screen column.

    Table 2-5  Installation Prompts and Responses
    Screen Response

    DO YOU WANT TO USE SMS MANAGED STORAGE FOR THIS INSTALLATION Y/N [N] :

    If you want to manage the storage using SMS, answer Y, otherwise answer N.

    THE SOFTWARE WILL BE INSTALLED UNDER THE HIGH LEVEL QUALIFIER THAT YOU WILL CHOOSE.

    ENTER THE HIGH LEVEL QUALIFIER ["QUALIFIER"] :

    The high-level qualifier for the installation (referred to as INSTROOT throughout this guide)

    You can use more than one high-level qualifier (such as ACME.DEV.VA10). The total length must be less than or equal to twenty characters. The qualifiers can be the same as the ones used for the installation (step 1).

    The words "transmit" and "buildkit" cannot be used as high-level qualifiers.

    ENTER THE STORCLASS FOR TEMP DATASETS ['STORCLASS'] :

    This prompt is displayed only if SMS is used to manage the installation (you answered Y to the first prompt).

    Enter the storage class

    ENTER THE UNIT NAME FOR INSTALLATION TEMP DATASETS [3390] :

    The unit name for temporary datasets used during the installation procedure.

    ENTER THE VOLUME NAME FOR INSTALLATION TEMP DATASETS :

    This prompt is displayed only if SMS is not used to manage the installation (you answered N to the first prompt).

    The volume name for temporary datasets used during the installation procedure

    PLEASE CONFIRM (YES/NO/QUIT) [YES] :

    Confirm the entered details

    ENTER THE OUTPUT CLASS FOR INSTALLATION OUTPUT [A] :

    Enter the output class for Oracle Connect for CICS output. Assigning a device which is set on HOLD prevents the loss of log information when the Oracle Connect for CICS started tasks finish (the default is A).

    DO YOU WANT TO USE THE DEFAULT JOB CARD Y/N [Y]

    A job card is displayed. If you want to use a replacement card, it must be entered as it will appear in the job. You can enter up to six lines. Enter a blank line to end input.

    If you do not enter a card, the Oracle Connect for CICS default card is used.

    ADDING AND UPDATING ORACLE CONNECT FOR CICS CONFIGURATION ON THIS MACHINE, FROM A REMOTE ORACLE ADMINISTRATION CONSOLE, CAN ONLY BE DONE BY SOMEONE DEFINED AS AN ADMINISTRATOR FOR ORACLE CONNECT ON THIS MACHINE.

    ENTER A VALID USER NAME FOR AN ORACLE CONNECT ADMINISTRATOR [ALL]:

    In order to manage Oracle Connect on this machine from Oracle Studio, you need to enter a user account of a user who will have administrative authorization, or press Enter to enable any user to administer Oracle Connect on this machine. The administrative rights can be changed from within Oracle Studio after the installation.

    DO YOU WANT TO PERFORM A MANUAL (M) OR AUTOMATIC (A) INSTALLATION [A] :

    If you want to review the JCL used to install Oracle Connect for CICS, before it is submitted, respond M for a manual installation.

    PLEASE REVIEW AND SUBMIT FOR EXECUTION THE DSN1 (INSTJBOR)

    This prompt is displayed only if a manual installation is requested (you answered M to the previous prompt).

    DSN1 is the dataset name where INSTJBOR is located.

  5. In the nnn.BUILDKIT.SRC library, execute the CICS member:

    ex CICS


    Follow the instructions in the Response column in Table 2-6 for each entry in the Screen column.

    Table 2-6  CICS Adapter-Specific Installation Prompts and Responses
    Screen Response

    ENTER THE CICS EXCI LOAD LIBRARY NAME [CICSTS13.CICS.SDFHEXCI] :

    Enter the CICS EXCI load library name only if you do not want the default

    PLEASE CONFIRM (YES/NO/QUIT) [YES] :

    Confirm the entered details

    ENTER THE ISPF LOAD LIBRARY NAME [ISP.SISPLOAD] :

    Enter the ISPF load library name only if you do not want the default

    PLEASE CONFIRM (YES/NO/QUIT) [YES] :

    Confirm the entered details

    ENTER THE OUTPUT CLASS FOR INSTALLATION OUTPUT [A] :

    Enter the output class for Oracle Connect for CICS output. Assigning a device which is set on HOLD prevents the loss of log information when the Oracle Connect for CICS started tasks finish (the default is A).

    DO YOU WANT TO USE THE DEFAULT JOB CARD Y/N [Y]

    A job card is displayed. If you want to use a replacement card, it must be entered as it will appear in the job. You can enter up to six lines. Enter a blank line to end input.

    If you do not enter a card, the Oracle Connect for CICS default card is used.

The installation is completed. All JCL jobs and REXX procedures are written to the INSTROOT.USERLIB library. INSTROOT is the high-level qualifier for the installation.

Postinstallation Instructions

The following postinstallation tasks must be done to work with Oracle Connect for CICS:

General Postinstallation Procedures

Perform the following procedures after completing the installation, to configure Oracle Connect for CICS.

Starting the Daemon

Activate INSTROOT.USERLIB(ATTDAEMN) as a started task to invoke the daemon. For example, in the SDSF screen enter the following:

'/s ATTDAEMN'

INSTROOT is the high-level qualifier where Oracle Connect for CICS is installed.

To submit the daemon as a job, uncomment the first two lines of the ATTDAEMN JCL, change the PARM line as described above, and run the job using the sub command. The ATTDAEMN JCL is similar to the following:

//*ATTDAEMN JOB 'RR','TTT',MSGLEVEL=(1,1),CLASS=A,
//* MSGCLASS=A,NOTIFY=&SYSUID,REGION=8M
//STEP1 EXEC PGM=IRPCD,
// PARM='-B  START IRPCDINI'
//* PARM='-B -L :8883 START'
//STEPLIB DD DSN=INSTROOT.LOADAUT,DISP=SHR
//SYSPRINT DD SYSOUT=A
//GBLPARMS DD DSN=INSTROOT.DEF.GBLPARMS,DISP=SHR
// EXEC PGM=IRPCD,COND=((1,EQ,STEP1),(2,EQ,STEP1)),
// PARM='-KATTDAEMN START ''INSTROOT.DEF.IRPCDINI'''
//STEPLIB DD DSN=INSTROOT.LOADAUT,DISP=SHR
//SYSPRINT DD SYSOUT=A
//GBLPARMS DD DSN=INSTROOT.DEF.GBLPARMS,DISP=SHR
//SYSDUMP DD DUMMY

Setting Up Oracle Connect for CICS for Reentrancy

To set up Oracle Connect for CICS to be reentrant, move INSTROOT.LOAD to the Link Pack Area (LPA).

INSTROOT is the high-level qualifier where Oracle Connect for CICS is installed.

Using the LPA reduces real storage usage (because everyone shares the LPA copy) and fetch time.


Note:

If you intend using impersonation, so that you can run in a security context that is different than the context of the process that owns the server, do the following:

  • Place the INSTROOT.LOAD(ATYSVCW) member in an APF-authorized library outside the LPA.

  • Change the ATTSRVR member (located in the active proclib), by adding the following to the STEPLIB list:

// DD DSN=apf_library,DISP=SHR

Where apf_library is the APF-authorized library outside the LPA where the ATYSCVW member was moved.


Updating Oracle Connect with CICS

Verify that you have all the information detailed in the following installation worksheets, so you can refer to it during the configuration process.

Table 2-7  Preinstallation Information
Topic Required Information Default Comment

CICS

CICS EXCI load library name

CICS.CICS.SDFHEXCL

-

Table 2-8  Required Permissions
Permission

Permission to read the CICS EXCI library

In the nnn.BUILDKIT.SRC library, execute the CUSTOCL member:

ex CUSTOCL

Follow the instructions in the Response column in Table 2-9 for each entry in the Screen column.

Table 2-9  CICS Adapter Installation Prompts and Responses
Screen Response

DO YOU WANT ORACLE CONNECT FOR LEGACY ADAPTER TO WORK WITH IMS/DB (YES/NO) [YES] :

Answer YES to this prompt if you have Oracle Connect for IMS/DB already installed.

ENTER DBD LIBRARY NAME [IMS.DBDLIB] :

If you responded YES to working with IMS/DB, enter the library where database definition (DBD) files are located.

ENTER PSB LIBRARY NAME [IMS.PSBLIB] :

If you responded YES to working with IMS/DB, enter the library where Program Specification Blocks (PSBs) are located.

ENTER YOUR PSB NAME [HOSPPSB] :

If you responded YES to working with IMS/DB, enter the name of the PSB file to use.

PLEASE CONFIRM (YES/NO/QUIT) [YES] :

If you responded YES to working with IMS/DB, confirm the entered details.

DO YOU WANT ORACLE CONNECT FOR LEGACY ADAPTER TO WORK WITH IMS/DB UNDER CICS (YES/NO) [NO] :

If you want to access IMS/DB data under CICS, using the Oracle Application Server Integration Adapter for IMS/DB, respond YES.

ENTER THE CICS EXCI LOAD LIBRARY NAME [CICSTS13.CICS.SDFHEXCI] :

If you responded YES to working with IMS/DB under CICS, enter the CICS EXCI load library name only if you do not want the default.

PLEASE CONFIRM (YES/NO/QUIT) [YES] :

If you responded YES to working with IMS/DB under CICS, confirm the entered details.

DO YOU WANT ORACLE CONNECT FOR LEGACY ADAPTER TO WORK WITH CICS APP ADAPTER (YES/NO) [YES] :

Answer YES to this prompt

ENTER THE CICS EXCI LOAD LIBRARY NAME [CICSTS13.CICS.SDFHEXCI] :

Enter the CICS EXCI load library name only if you do not want the default.

PLEASE CONFIRM (YES/NO/QUIT) [YES] :

Confirm the entered details

THE VSAM DRIVER IS INSTALLED AUTOMATICALLY. DO YOU ALSO WANT ORACLE CONNECT FOR LEGACY ADAPTER TO WORK WITH VSAM UNDER CICS (YES/NO) [NO] :

Answer YES to this prompt if you have Oracle Connect for VSAM already installed and you want to access VSAM data under CICS.

ENTER THE CICS EXCI LOAD LIBRARY NAME [CICSTS13.CICS.SDFHEXCI] :

If you responded YES to working with VSAM under CICS, enter the CICS EXCI load library name only if you do not want the default.

PLEASE CONFIRM (YES/NO/QUIT) [YES] :

If you responded YES to working with VSAM under CICS, confirm the entered details.

ENTER THE ISPF LOAD LIBRARY NAME [ISP.SISPLOAD] :

Enter the ISPF load library name only if you do not want the default.

PLEASE CONFIRM (YES/NO/QUIT) [YES] :

Confirm the entered details

ENTER THE OUTPUT CLASS FOR INSTALLATION OUTPUT [A] :

Enter the output class for Oracle Connect output. Assigning a device which is set on HOLD prevents the loss of log information when the Oracle Connect started tasks finish (the default is A).

DO YOU WANT TO USE THE DEFAULT JOB CARD Y/N [Y]

A job card is displayed. If you want to use a replacement card, it must be entered as it will appear in the job. You can enter up to six lines. Enter a blank line to end input.

If you do not enter a card, the Oracle Connect default card is used.

The installation is completed. All JCL jobs and REXX procedures are written to the INSTROOT.USERLIB library. INSTROOT is the high-level qualifier for the installation.

After completing the installation, perform postinstallation tasks, as described in "Postinstallation Instructions", as required.

Installing Oracle Studio


Note:

If you have Oracle Studio already installed because you are also using another legacy adapter, you do not need to reinstall it.

The other legacy adapters are:

  • Oracle Application Server Integration Adapter for IMS/DB

  • Oracle Application Server Integration Adapter for IMS/TM

  • Oracle Application Server Integration Adapter for Tuxedo

  • Oracle Application Server Integration Adapter for VSAM


This section explains how to install Oracle Studio software from the distribution CD-ROM.

Installing Oracle Studio from the CD-ROM

Assuming that the CD-ROM drive is D:, the installation file is located in the D:\Oracle_Studio directory. Install the software from the CD-ROM by running the self-extracting executable installation file, OSL904-win32.exe, either using the Run option in the Windows Start menu or through Windows Explorer.


Caution:

If you are installing Oracle Studio on a Windows XP machine, you cannot specify a logical drive as the Destination folder for the installation.


Configuring Oracle Connect for CICS

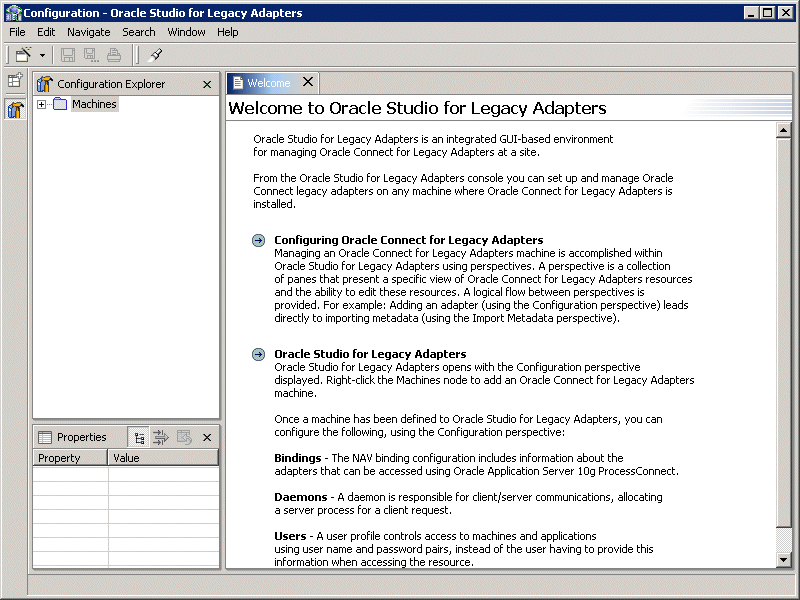
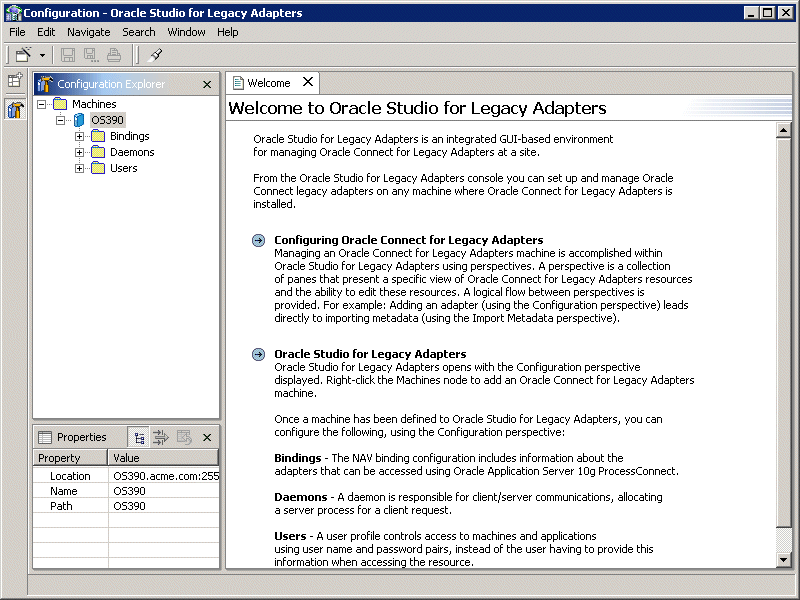
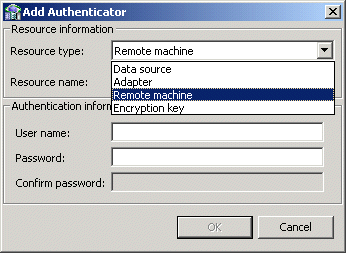
All modeling of Oracle Connect for CICS is performed using Oracle Studio. To use Oracle Studio you first configure it to enable access to the IBM OS/390 machine.


Note:

The following tasks assume you have permission to access the IBM OS/390 machine under CICS and that the Oracle Connect for CICS daemon is running on this machine.

Check with the system administrator to ensure these requirements are fulfilled.


Task: Setting Up the IBM OS/390 Machine

  1. On the machine where Oracle Studio is installed, from the Start menu, choose Start > Programs > Oracle > Studio > Studio. Oracle Studio opens, displaying the Configuration perspective.

    Text description of 1.gif follows.

    Text description of the illustration 1.gif

  2. Right-click Machines in the Configuration Explorer and choose Add Machine from the popup menu.

    The Add Machine window appears.

    Text description of 3.gif follows.

    Text description of the illustration 3.gif

  3. In the Add Machine window, uncheck the Default port check box and enter 2552 as the port number.

  4. Enter the name of the machine you want to connect to, or click Browse to choose the machine from the list of machines that is displayed.

  5. Specify the username and password of the user who was specified as the administrator when Oracle Connect for CICS was installed.


    Note:

    Checking the Anonymous connection checkbox enables anyone having access to the machine to be an administrator, if this was defined for the machine.


  6. Click Finish. The machine is displayed in the Configuration Explorer.

    Text description of 4.gif follows.

    Text description of the illustration 4.gif

Securing Access to Oracle Connect for CICS

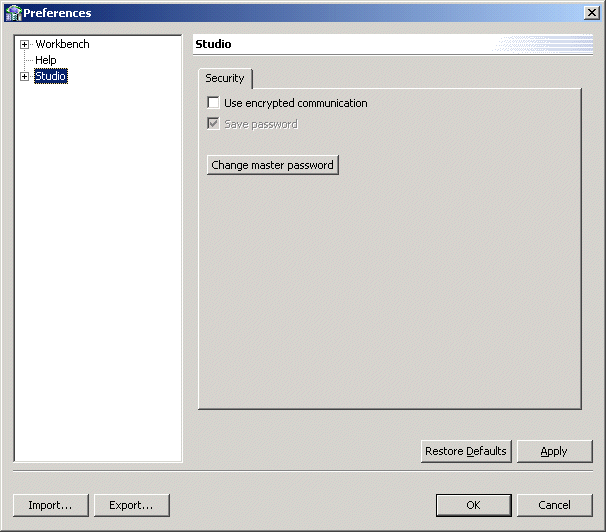
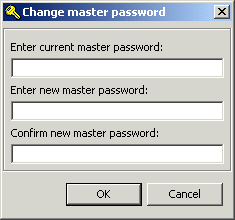
Oracle Studio includes mechanisms to secure access to Oracle Connect for CICS both during modeling and at runtime.

During modeling the following security mechanisms can be applied:

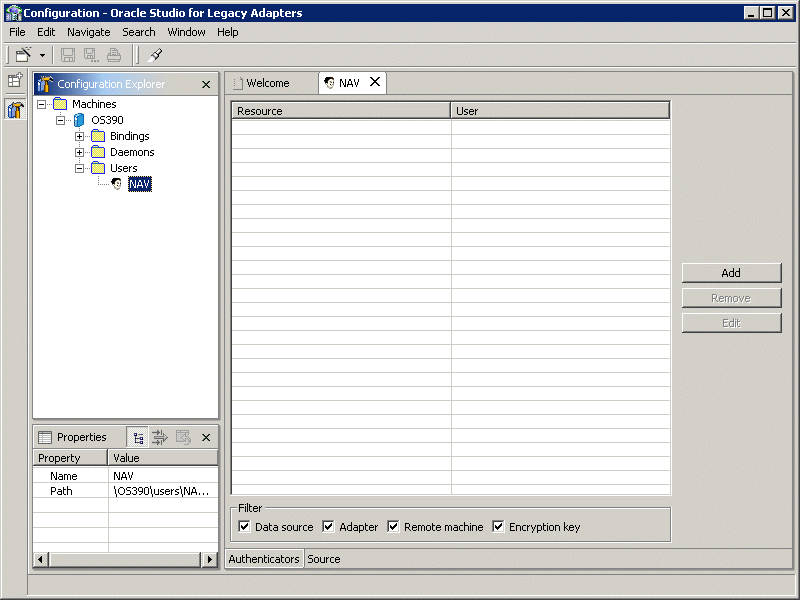
At runtime client access to the Oracle Connect for CICS backend adapter is provided by the user profile:

Setting Password Access to Oracle Studio

Initially, any operation performed using Oracle Studio does not require a password. You can set a password so that the first operation that involves accessing the server from Oracle Studio requires a password to be entered.

Task: Setting Up a Master Password to Access Oracle Studio

  1. On the machine where Oracle Studio is installed, from the Start menu, choose Start > Programs > Oracle > Studio > Studio. Oracle Studio opens.

  2. Choose Window > Preferences from the menu bar. to open the Preferences window.

  3. Select the Studio node.

    Text description of sec1.gif follows.

    Text description of the illustration sec1.gif


    Note:

    The Save password checkbox is for future use.


  4. Click Change master password to open the Change master password window.

    Text description of sec2.gif follows.

    Text description of the illustration sec2.gif

  5. Leave the Enter current master password field empty and type a new master password.

  6. Confirm the password.

  7. Click OK.

Specifying Users with Administrative Rights

By default, only the user who was specified during the installation as an administrator has the authorization to modify settings on that machine from Oracle Studio. This user can then authorize other users to make changes or to view the definitions for a selected machine. Adding a machine to Oracle Studio is described in "Task: Setting Up the IBM OS/390 Machine".


Note:

The default during installation is to enable all users to be administrators.


Task: Setting Administrative Rights to a Machine

  1. On the machine where Oracle Studio is installed, from the Start menu, choose Start > Programs > Oracle > Studio > Studio. Oracle Studio opens, displaying the Configuration perspective.

  2. Right-click the machine in the Configuration Explorer and choose Administration Authorization from the popup menu.

    The Administration Authorization window opens.

    Text description of sec4.gif follows.

    Text description of the illustration sec4.gif

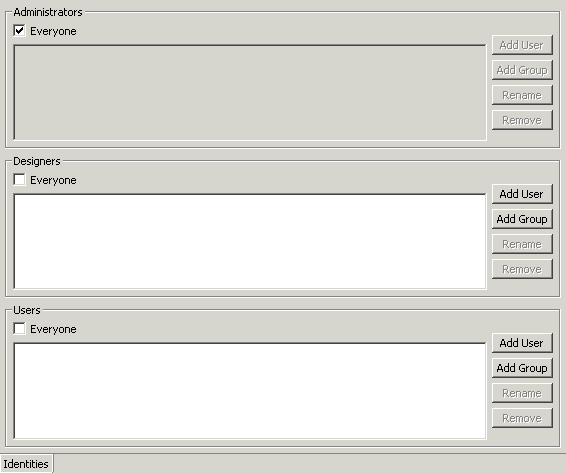
    The window has three sections:

    Administrators - Administrators can view and modify all the definitions in Oracle Studio for the selected machine. On initial entry to Oracle Studio, every user is defined as a system administrator.

    Designers - Designers can view all the definitions for the machine in Oracle Studio and can modify any of the definitions under the Bindings and Users nodes for the selected machine. For example, Oracle Studio database administrator can add new data sources and adapters and can change metadata definitions for a table in a data source.

    Users - Users can view all the definitions for the machine in Oracle Studio for the selected machine. Regular users cannot modify any of the definitions.

  3. Add users or groups of users by clicking Add User or Add Group for the relevant sections.

    The user or group that is added must be recognized as a valid user or group for the machine.

    Once a name has been added to a section, only the user or group who logs on with that user name has the relevant authorization.

Setting Up Runtime User Access to the IBM OS/390 Machine

At runtime, client access to the Oracle Connect for CICS backend adapter is provided by the user profile. A user profile contains name and password pairs that are used to access a machine, data source or application at runtime, when anonymous access is not allowed.

  1. In the Configuration Explorer, click the + next to the machine node of the machine for which you want to set the user name and password.

  2. Click the + next to the Users node.

  3. Right-click the NAV user profile and choose Edit User.


    Caution:

    You must not delete the NAV user profile since it also contains Oracle Connect for CICS system settings.


    Text description of 5.gif follows.

    Text description of the illustration 5.gif

  4. In the User editor, click Add to open the Add authenticator window.

  5. Select the Remote Machine resource type.

    Text description of 7.gif follows.

    Text description of the illustration 7.gif

  6. Enter the name of the IBM OS/390 machine defined in the previous task.

  7. Enter the name and password used to access the machine and confirm the password.

  8. Click OK.


Go to previous page Go to next page
Oracle
Copyright © 2003 Oracle Corporation.

All Rights Reserved.
Go To Documentation Library
Home
Go To Product List
Solution Area
Go To Table Of Contents
Contents
Go To Index
Index