10g (9.0.4)
Part Number B10663-01
Home |
Solution Area |
Contents |
Index |
| Oracle® Application Server Certificate Authority Administrator's Guide 10g (9.0.4) Part Number B10663-01 |
|
The term "end-users" includes persons, of course, but also server entities that acquire certificates to facilitate authentication among servers and applications.
Oracle Certificate Authority has separate HTML interfaces for end-user and administrator interaction with the Oracle Application Server Certificate Authority server. Using these HTML forms, end-users can perform personal certificate-related operations and the administrator can perform certificate administration and management.
This chapter describes the end-user interface, in the following sections:
Both Netscape and Internet Explorer are supported.
To access the home page for the end-user interface to Oracle Application Server Certificate Authority, launch your web browser and enter the URL and port number of the administration server as they were displayed at the end of installation. For example:
https://Oracle_HTTP_host:ssl_port/oca/user
The Oracle Application Server Certificate Authority user home page appears:
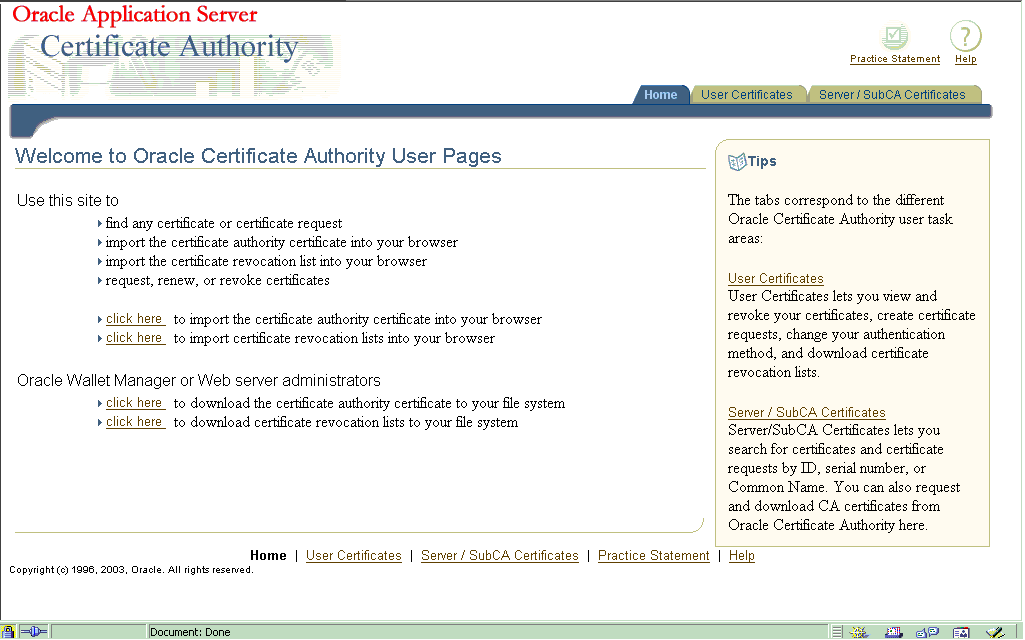
Text description of the illustration userfrontpage071603.gif
As the page itself explains, you can use this web interface to request, renew, revoke, or find any certificate or certificate request. To access these capabilities, you can click either the User Certificates tab or the Server/SubCA Certificates tab.
You can also use the click here links to import into your browser the Certificate Authority's certificate or the latest certificate revocation list (CRL).
Similarly, administrators can use their click here links to download the CA certificate or CRL into their file system for additional uses.
The Oracle Application Server Certificate Authority web interface enables two types of end-user interaction with Certificate Authority, as represented by the two tabs:
From the User Certificates tab you can
Table 7-1 lists the types of certificates that Oracle Application Server Certificate Authority supports and provides a brief explanation for each.
From the Server/SubCA Certificates tab, you can
Upon first entering this tab, you see the Authentication page, which allows you to select how you intend to authenticate yourself to Oracle Application Server Certificate Authority.
Table 7-2 lists the available types and methods:
|
See:
Chapter 2, "Identity Management and OracleAS Certificate Authority Features" about authentication. |
These types and methods are explained in greater detail in the following sections:
The following steps enable SSO users to get a certificate automatically, or to manage their certificates, by supplying the required SSO authentication information, such as username and password:
The User Certificates - SSO form appears, showing your valid certificates and enabling you to do the following tasks:
To get a certificate, do steps 3 through 5:
After you submit the filled-out form, the Certificate form appears, showing the information recorded on the certificate.
If you click OK instead of Import to Browser, your certificate is created, stored in the OCA repository, and published to the Oracle Internet Directory. However, your browser cannot supply it to a server until you import it. See Importing a Certificate to Your Browser
Note:
For this certificate to be trusted, you need to edit the CA certificate's uses, specifying that you trust certificates issued by this Certificate Authority for network sites, email users, software developers, or all three. Checkboxes for these choices are reached through the Security choice on Netscape's menu bar: see Trusting a Certificate Issuer in Netscape.
Note:
This process is slightly different in Netscape and Internet Explorer.
When you import a certificate using Internet Explorer, it asks whether you wish to add that certificate to the Root Store:
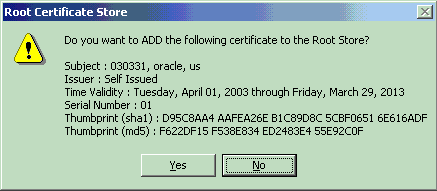
Text description of the illustration inttexplstorecertdb.gif
Clicking Yes imports the certificate and sets the issuer as "trusted." You can view your certificates by selecting the menu choices "Tools - Internet Options - Content - Certificates." The four tabs then shown enable you to see your own certificates, those supplied by others to authenticate them to you, intermediate certificate authorities who have supplied certificates to you, and the root certificate authorities you have chosen to trust.
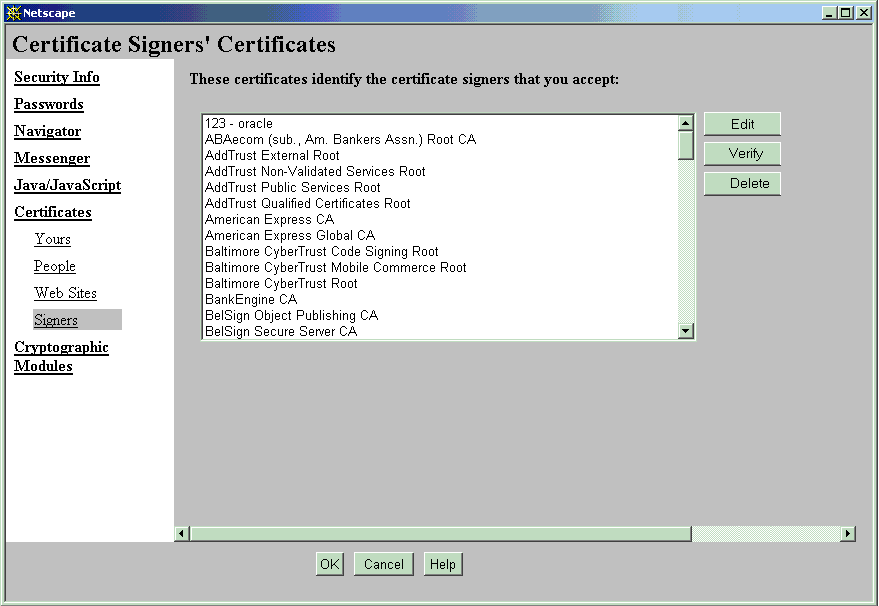
When you import a certificate using Netscape, it imports both the certificate you requested and the certificate representing the certificate authority that signed and issued your new CA certificate. The only notification you get is the message "Document Done" in the lower-left status-bar area of your browser. However, your new certificate is not trusted until you have explicitly identified for Netscape those activities for which you want to trust the signer's certificate.
You do so by the following steps:
Text description of the illustration netscapesecinfoscreen.gif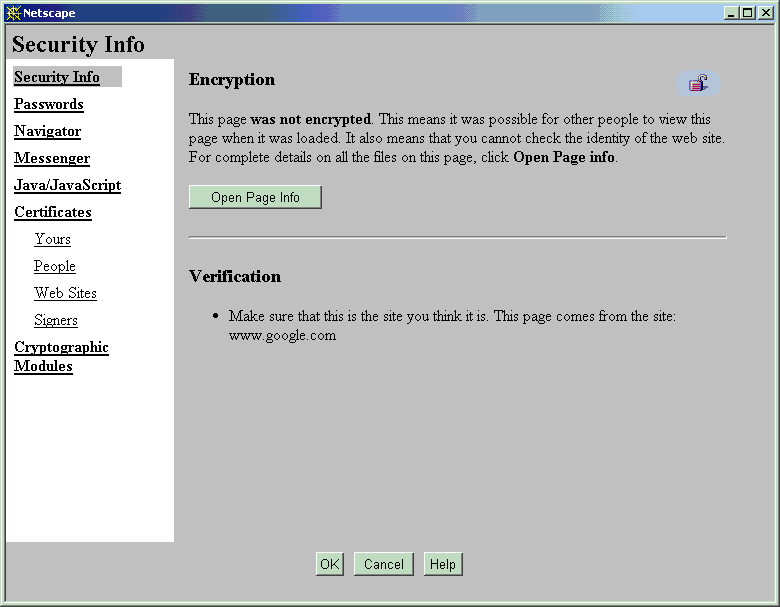
Text description of the illustration netscapecacheckboxes.gif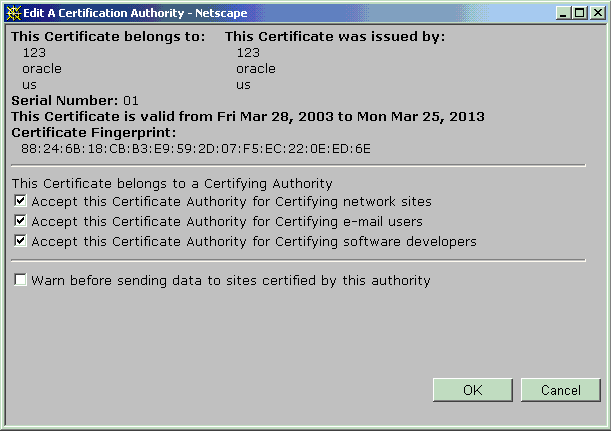
The CA certificate is now trusted to verify the certificates of network sites this browser connects to, of signed or encrypted messages received, or of signed software.
If you already have an SSL certificate from the Certificate Authority, you can obtain an Oracle Application Server Certificate Authority certificate for future authentication purposes by using the current SSL certificate as identification, as follows:
To get a certificate, do steps 2 through 5:
After you submit the filled-out form, the Certificate form appears, showing the information recorded on the certificate.
To obtain a certificate using manual authentication, perform the following steps:
A Request ID is allocated, specific to this user request, which you use to locate the certificate once it is approved.
The certificate becomes available only after receiving the administrator's approval.
Once the administrator communicates that the certificate is approved, go to the Certificate Retrieval form, search for your certificate using your Request ID or DN, and import the certificate.
After a certificate request is approved, the issued certificate can be retrieved for review and importation. Use the same machine and browser as when you requested the certificate.
After an SSO- or SSL-certificate has been in use for a period, it can be renewed during a configurable time-window around its expiration date.
An issued certificate can be revoked if it is, for some reason upon review, incorrect or inappropriate or no longer valid for its intended user or activities.
These certificate operations are described in the following sections:
After you receive notification that your manual-authentication certificate request is approved, you need to review the certificate and import it. You can find your certificate by entering the serial number from that notification into the search field on the User Certificates page. After it is found and you select it by clicking the radio button next to the serial number, you can click View Details to review the data used in generating it. Then you can import it as described in Importing a Certificate to Your Browser.
If, for a particular certificate, these data are not correct, then that certificate should be revoked and replaced by applying for a new certificate.
SSO and SSL certificate users can renew their certificates
A user can renew such a certificate within a certain period of days before and after a certificate is due to expire. By default, this period is 10 days before and 10 days after the certificate's expiration date. However, the administrator can alter this period by using the Configuration tab in the administration web interface. Users can select a certificate, click on View Details, and then renew the certificate.
SSO and SSL certificate users can revoke certificates.
If errors or problems are found with a certificate, or if a private key is stolen, etc., the certificate should be revoked. The user can supply correct information for a new certificate. Using the new certificate should cancel out whatever issues were associated with the earlier one.
Revoking a certificate will mark it as revoked in OCA repositories and it will be added to the CRL the next time the CRL is generated. However, revoked certificates are not removed automatically from your browser database. You should remove them manually. In Netscape, you click the Security icon on the browser, click the Yours choice under Certificates, select the revoked certificate from the list displayed, and click Delete.
An administrator for any server can obtain a server certificate enabling PKI authentication for that server with other servers or users. To do so, a PKCS#10 request form is needed, which can be generated using Oracle Wallet Manager (or an equivalent third-party tool). See the Oracle Wallet Manager chapter in the Oracle Application Server 10g Security Guide.
From the Server Certificates tab page, use the following steps:
The server administrator obtains authentication only after the administrator approves this request.
In circumstances where a single CA is impractical, such as separate continental divisions in a single company, multiple CAs can be maintained within the PKI structure. In a hierarchical PKI, the root CA is the single CA trusted by all users. The root CA's public key is what serves as the beginning of the trust path for a security domain.
Oracle Application Server Certificate Authority can be a root CA or it can obtain a Subordinate CA certificate from a third-party CA. Oracle Application Server Certificate Authority can certify the certificate signature of another CA, thereby creating a subordinate CA. The subordinate CA may in turn issue certificates to even lower-level CAs, creating what is called a certificate chain. An individual certificate signed by one of the subordinate CAs must present the certificates of all CAs up to the root. Because each authority's certificate is signed by a higher CA, a user can verify the validity of a particular certificate by tracing the certificate authority path back to the root CA.
To obtain a subordinate CA certificate, perform the following steps:
The requester obtains a certificate only after the administrator approves this request.
In Netscape, after you click Request a Certificate, Oracle Application Server Certificate Authority presents a sequence of dialog boxes. These dialogs describe the operations that need to happen in order to accept the OCA certificate. Click Next on each dialog box as it is presented, and Finish on the last one. Your CA certificate will be automatically downloaded into your browser.
For Internet Explorer, you are asked simply to accept or reject the CA Certificate import. You may wish to do so simply to trust servers whose certificates are issued by this CA, even if you do not want to get a certificate from it. The browser will ask whether you want to save the certificate or open it from the current location. To import the CA certificate into your browser, you select Open the file from its current location and click OK. In the next window that opens, choose Install Certificate and accept the certificate import to place the CA certificate into the browser's repository.
Importing a certificate revocation list (CRL) into your browser enables it to warn you if an incoming certificate offered by an individual or company has been revoked. Use of a revoked certificate could indicate a possible problem with impersonation or with a product being offered or used. Being warned can help you avoid potentially inappropriate interactions.
This operation requires different actions in different browsers:
From the User Certificates tab of Oracle Application Server Certificate Authority, do the following tasks:
The CRL can be seen under, Security-> Signer's-> View / Edit CRL.
If you already have the CRL and it has the same or later validity of the CRL being downloaded, a small dialog box informs you that the CRL you are attempting to download is not later than one already in your browser.
You can also
In IE, the CRL is not directly imported into the browser. As in the case of importing a CA Certificate, IE asks the question Save to Disk or Open from the Current Location. In the latter case, the CRL is not imported. If Save to Disk is chosen, you then do the following actions:
This procedure will then show the message "CRL Imported."
Downloading a certificate revocation list (CRL) into your file system enables other programs to use it to detect revoked or expired certificates offered by an individual or a company. Avoiding the use of such a certificate can protect your resources and applications from inappropriate or unauthorized uses.
To download a CRL, follow these steps:
After your request for a certificate is approved,Oracle Application Server Certificate Authority displays its details for you in a new window so that you can check that the details match what you intended. Check that the name, validity period, and other attributes on the certificate are as they should be. If those details include any serious error, you should revoke this certificate and apply for a new one, specifying on the request form all the correct information.
When you are satisfied, click the Import Certificate button to import a copy of the certificate into your browser. You will see the message "Document Done" in the lower-left status-bar area of your browser. You can then click OK.
If you were to simply click OK without clicking Import Certificate, the server would have a copy of your certificate but your browser would not. It could not then supply the certificate when needed for authentication to an application, a directory, or another server.
The action of importing the certificate also imports the chain of CAs up to the root CA. However, the CA certificate imported along with the user certificate is not automatically trusted in Netscape. You need to establish the trust, as follows:
This process establishes the desirable trust relationships, so that when you try to establish an SSL session, the Netscape browser will trust the certificates issued by this importing certificate.
You can (and should) export your wallet to your file system for safekeeping, so that you can restore them after any possible disruption to your system or your browser. The wallet contains your certificate, private key, and the chain of certificates for the trusted Certificate Authority that issued your certificate.
In Netscape, use the following steps:
A window opens showing your choices for reviewing security information.
A subordinate window opens showing the names of your certificates.
As usual, you must remember this password in order to retrieve and reinstall this certificate. Without the password, it will not be usable.
A message appears saying "Your certificates have been successfully exported."
In Internet Explorer, use the following steps:
A window opens showing six tabs you can choose from.
The Certificate Manager window opens, with four tabs enabling you to see your personal certificates, those of other people, plus the names and expiration dates for trusted and intermediate issuers of certificates.
As usual, you must remember this password in order to retrieve and reuse this private key. Without the password, it will not be usable.
A message appears saying "The export was completed successfully."
You can import a certificate into your browser from a file stored on your file system. The file must be of type pkcs12, with extension .p12. You will need to know the password that was used to encrypt that wallet. The steps are as follows:
In Netscape, use the following steps:
A dialog box will ask you for the wallet's password.
In Internet Explorer (IE), use the following steps:
A window opens showing six tabs you can choose from.
If the certificate store being used by IE does not yet contain the certificate of the the CA who issued your certificate, a dialog box will appear asking if you want to add it to that store.
IE displays a dialog box telling you the import was successful.
|
|
 Copyright © 2002, 2003 Oracle Corporation. All Rights Reserved. |
|