10g (9.0.4)
Part Number B10851-01
Home |
Solution Area |
Contents |
Index |
| Oracle® Application Server Single Sign-On Administrator's Guide 10g (9.0.4) Part Number B10851-01 |
|
This chapter introduces you to the single sign-on administrator and acquaints you with basic administrative tasks. The chapter contains the following topics:
When the single sign-on server is accessed for the first time, only one single sign-on administrator exists: orcladmin, the OracleAS super user. The person installing OracleAS selects the password for this user at install time. The orcladmin account is used to create other accounts, including accounts for iASAdmins, the group that administers single sign-on.
As a single sign-on administrator, you have full privileges for the single sign-on server. Using the administration pages, you can do the following:
To exercise your privileges as a single sign-on administrator, you must be a member of the administrative group iASAdmins. This means that an existing member of this group must add you to it. The single sign-on server becomes a member of iASAdmins when the server is installed.
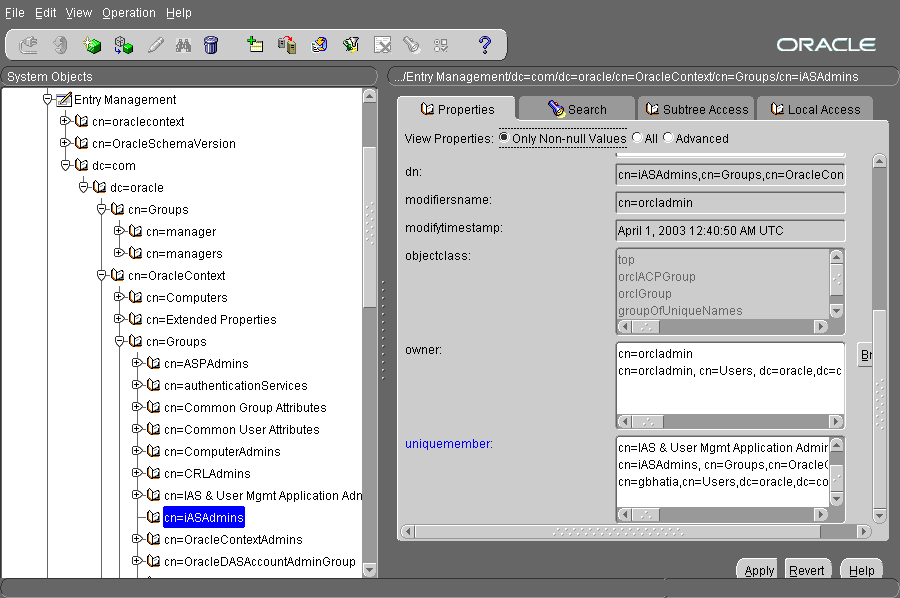
To assign a user to iASAdmins:
cn=orcladmin, the directory super user. You must use the password that was assigned to this user when Oracle Internet Directory was installed.
For example:
cn=iASAdmins,cn=Groups,cn=OracleContext,dc=oracle,dc=com
Where dc=oracle,dc=com is the default identity management realm. In reality, the default is likely the domain name of your installation.
uniquemembers is an attribute of the entry iASAdmins. As such it defines members of the group iASAdmins.
Figure 2-1 reproduces the interface for granting administrative privileges.

To create new users, use Oracle Delegated Administration Services. See Oracle Internet Directory Administrator's Guide to learn how to use this tool.
policy.properties is a multipurpose configuration file for OracleAS Single Sign-On. This file contains basic parameters required by the single sign-on server. The default values of these parameters are adequate for most installations. Hence the file requires no modification out of the box.
policy.properties is also used to implement advanced single sign-on features such as multilevel authentication. Appendix C contains a copy of the file. policy.properties is also in the single sign-on configuration directory at $ORACLE_HOME/sso/conf.
You can issue separate commands to stop and start just the Oracle HTTP Server or the entire single sign-on middle tier. Another command stops and starts just the OC4J_SECURITY instance. Still another command stops and starts all infrastructure components.
Issue these two commands to stop and then start the Oracle HTTP Server:
$ORACLE_HOME/opmn/bin/opmnctl stopproc type=ohs
$ORACLE_HOME/opmn/bin/opmnctl startproc type=ohs
You can also stop and start the server by issuing this command:
$ORACLE_HOME/opmn/bin/opmnctl restartproc type=ohs
Issue these two commands to stop and then start the OC4J_SECURITY instance:
$ORACLE_HOME/opmn/bin/opmnctl stopproc process-type=OC4J_SECURITY
$ORACLE_HOME/opmn/bin/opmnctl startproc process-type=OC4J_SECURITY
You can also stop and start the OC4J_SECURITY instance by issuing this command:
$ORACLE_HOME/opmn/bin/opmnctl restartproc process-type=OC4J_SECURITY
To stop and then start the single sign-on middle tier, stop and start both the Oracle HTTP Server and the OC4J_SECURITY instance:
$ORACLE_HOME/opmn/bin/opmnctl stopproc type=ohs
$ORACLE_HOME/opmn/bin/opmnctl startproc type=ohs

$ORACLE_HOME/opmn/bin/opmnctl stopproc process-type=OC4J_SECURITY
$ORACLE_HOME/opmn/bin/opmnctl startproc process-type=OC4J_SECURITY
Issue the following commands to stop and then start the Oracle HTTP Server, the single sign-on server, OC4J, and Oracle Internet Directory:
$ORACLE_HOME/opmn/bin/opmnctl stopall
$ORACLE_HOME/opmn/bin/opmnctl startall
This command assumes that infrastructure components are all in the same Oracle home.
Logging in and out of OracleAS Single Sign-On successfully requires that the following browser settings be in place:
To enable the correct cache settings:
To ensure that images are automatically loaded:
You can use the administration pages within the single sign-on UI to set the single sign-on session length and to enable the server to verify IP addresses. You can also use these pages to administer partner applications and external applications.
To access the administration pages:
http://host:port/pls/single_sign_on_DAD
where host is the name of computer on which the server is located, port is the port number of the server, and single_sign_On_DAD is the database access descriptor for the single sign-on schema. The default DAD is orasso.
The Access Partner Applications page appears.
The login page appears.
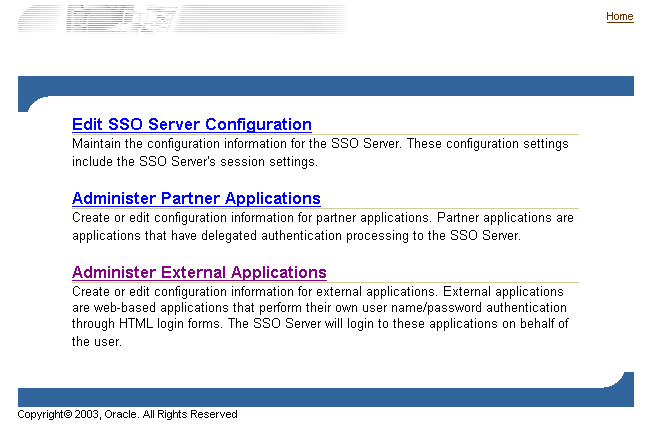
Figure 2-2 reproduces the SSO Server Administration page.

Use the Edit SSO Server page to fix the length of single sign-on sessions and to verify IP addresses. To access the Edit SSO Server page, click Edit SSO Server Configuration on the SSO Server Administration page.
The Edit SSO Server page contains the following heading and fields:
You can enable the single sign-on UI to be rendered in any language that the user's browser is configured for. English and the language of the operating system are installed when OracleAS is installed. To install additional languages, click the Product Languages button on the Select a Product to Install screen. If you forget to install additional languages during the installation of OracleAS, you can still enable the single sign-on UI for additional languages by running the ossoca.jar tool.
To enable the single sign-on server for additional languages after installation:
cp REPCD_HOME/portal/admin/plsql/nlsres/ctl/lang/*.* ORACLE_
HOME/sso/nlsres/ctl/lang/
where lang is the desired language code. For example, this value would be ja for Japanese. Note that you must create the lang directory in the single sign-on home before running ossoca.jar.
$ORACLE_HOME/jdk/bin/java -jar $ORACLE_HOME/sso/lib/ossoca.jar langinst lang
make_lang_avail $ORACLE_HOME
For the variable lang, substitute the code for the language to be installed. For the variable make_lang_avail, substitute 1 if you want to make the language available. Substitute 0 if you want to make the language unavailable.
In the following example, the Korean language is installed:
$ORACLE_HOME/jdk/bin/java -jar $ORACLE_HOME/sso/lib/ossoca.jar langinst ko 1
$ORACLE_HOME
For a complete list of the language codes supported, see Appendix A in Oracle Application Server 10g Globalization Guide.
Before reading this section, read "Global User Inactivity Timeout" in Chapter 1, "Components and Processes: an Overview."
The global user inactivity timeout is applicable to one domain only. This means that computers enabled for the timeout must reside within the same cookie domain. The applications on these computers use the domain cookie to track user activity. If, for example, you use login.acme.com for the single sign on server, other computers in the system must have the .acme.com domain in their host name. One of these computers might be host1.acme.com. Another might be host2.acme.com. In addition, clocks on all of these computers, including the single sign-on server computer, must be synchronized with one another.
The global user inactivity timeout is not configured by default. You must enable it by running the ssogito.sql script, located at $ORACLE_HOME/sso/admin/ plsql/sso. The steps that follow include an example of ssogito.sql.
To configure the global user inactivity timeout:
orasso. To obtain the password, see Appendix B.
SQL> @ssogito.sql
A list of fields appears.
Once you have completed a transaction, the script provides you with a summary of the new timeout settings. Here is an example of ssogito.sql:
SQL> @ssogito
=============================================
SSO Server Inactivity Timeout Configuration
=============================================
Timeout          : DISABLED
Cookie name      : OSSO_USER_CTX
Cookie domain    :
Inactivity period: 15 minutes
Encryption key   : 093D678526DAA66D
Note: timeout cookie domain will be defaulted
to the SSO Server hostname
-------------------------------------------
To disable timeout set inactivity period to 0, (zero)
Press return key twice if you do not want
to change timeout configuration.

PL/SQL procedure successfully completed.

Enter value for timeout_cookie_domain: .oracle.com
Enter value for inactivity_period: 15
Timeout                  : ENABLED
New timeout cookie domain: .oracle.com
New inactivity period    : 15 minutes

PL/SQL procedure successfully completed.

No errors.
OssoIdleTimeout parameter exists and that it is set to on. The file is in $ORACLE_HOME/Apache/Apache/conf. Here is an example file with the correct setting:
LoadModule osso_module libsexec/mod_osso.so
<IfModule mod_osso.c>
  OssoIpCheck off
  OssoIdleTimeout on
  OssoConfigFile /u01/oracleas10g/Apache/Apache/conf/osso/osso.conf
#
#Insert Protected Resources
#
.
.
.
</IfModule>
If Oracle Delegated Administration Services and the single sign-on server are located on the same middle tier, and you want the global user inactivity timeout to apply to the former, perform steps eight and nine on the single sign-on middle tier.
The ipassample.jar file contains sample code for single sign-on features such as certificate-enabled sign-on and deployment-specific pages. Use this command to extract the file:
$ORACLE_HOME/jdk/bin/jar -xvf $ORACLE_HOME/sso/lib/ipassample.jar
|
|
 Copyright © 1996, 2003 Oracle Corporation. All Rights Reserved. |
|