Managing Access Control by Using Oracle Directory Manager
You can view and modify access control information within ACPs by using either Oracle Directory Manager or command-line tools. This section explains how to accomplish these tasks by using Oracle Directory Manager.
This section contains these topics:
Configuring Oracle Directory Manager for Access Control Management
You can configure how Oracle Directory Manager displays ACPs, and how it performs searches for ACPs.
Configuring the Display of ACPs in Oracle Directory Manager
Oracle Directory Manager enables you to determine whether the navigator pane displays all ACPs automatically or only as the result of a search. If you have a large number of ACPs, you may want to display them only as the result of a search.
To configure the display of ACPs:
- In the navigator pane, expand Oracle Internet Directory Servers and select the server you want to configure.
- On the toolbar, click User Preferences. The User Preferences dialog box appears.
- Select the Configure Access Control Policy Management tab page.
- Select either:
- Always display all ACPs
- Only display ACPs based on search request
- Choose OK.
- To effect your changes, restart Oracle Directory Manager.
Configuring Searches for ACPs When Using Oracle Directory Manager
For ACP searches, Oracle Directory Manager enables you to specify:
- The root of the search
- The maximum number of entries retrieved
- The time limit of the search
- The search depth
To configure searches for ACP entries:
- In the navigator pane, expand Oracle Internet Directory Servers and select the directory server instance.
- On the toolbar, choose User Preferences. The User Preferences dialog box appears.
- Select the Configure Entry Management tab.
- In the field labeled Maximum number of one-level subtree entries, enter the number of entries you want ACP searches to retrieve.
- In the Search Time Limit field, enter the maximum number of seconds for the duration of the search.
- Choose OK. A notice window displays the message "You need to restart Oracle Directory Manager to view ACP Management Changes."
- Choose OK for the Notice window.
- To view the latest Access Control Management entries, disconnect and immediately reconnect Oracle Directory Manager.
Viewing an ACP by Using Oracle Directory Manager
If you configured Oracle Directory Manager always to display ACPs, as described in "Configuring the Display of ACPs in Oracle Directory Manager", then you can locate and view an ACP as follows:
- In the navigator pane, expand in succession Oracle Internet Directory Servers, directory server instance, Access Control Management. All of the defined ACPs appear in the navigator pane below the Access Control Management node.
- In the navigator pane, under Access Control Management, select an ACP to display its information in the right pane. The fields in the Access Control Management pane are described in Table C-1.
If you configured Oracle Directory Manager to display ACPs only as the result of a search, as described in "Configuring the Display of ACPs in Oracle Directory Manager", then you can locate and view an ACP as follows:
- Expand in succession Oracle Internet Directory Servers, directory server instance, then select Entry Management.
- Perform a search for the entry designated as an ACP. The search result appears in the Distinguished Name box in the lower half of the right pane.
- In the Distinguished Name box, double-click the entry. The corresponding Entry dialog box appears.
- To view subtree access controls for this ACP, select the Subtree Access tab.
To view entry level access controls for this ACP, select the Local Access tab.
Adding an ACP by Using Oracle Directory Manager
ACPs are entries that contain prescriptive, that is, inheritable, access control information. This information affects the entry itself and all entries below it. You will most likely create ACPs to broadcast large-scale access control throughout a subtree.
Adding an ACP by using Oracle Directory Manager involves three tasks:
- Task 1: Specify the entry that will be the ACP.
- Task 2: Configure structural access items--that is, ACIs that pertain to entries.
- Task 3: Configure content access items--that is, ACIs that pertain to attributes.
Task 1: Specify the Entry That Will Be the ACP
- If you configured Oracle Directory Manager always to display ACPs, as described in "Configuring the Display of ACPs in Oracle Directory Manager", then begin as follows:
- In the navigator pane, expand in succession Oracle Internet Directory Servers, directory server instance.
- Select Access Control Management, and go to step 2.
If you configured Oracle Directory Manager to display ACPs only as the result of a search, as described in "Configuring the Display of ACPs in Oracle Directory Manager", then begin as follows:
- In the navigator pane, expand in succession Oracle Internet Directory Servers, directory server instance, Access Control Management.
- Select a node where you want the ACP to reside. If there are no ACPs yet configured, then you may select ACPs under "DSE Root".
- On the toolbar, choose Create. A New Access Control Point dialog box appears.
- In the Path to Entry field, enter the distinguished name (DN) of the entry that will be the ACP. You can alternatively find the DN by choosing Browse to the right of the Path to Entry field.
Task 2: Configure Structural Access Items
- To define structural access items, that is, ACIs that pertain to entries, just below the Structural Access Items window, choose Create. The Structural Access Item dialog box appears. It has four tabs: Entry Filter, Added Object Filter, By Whom, and Access Rights.
- In an ACP, the access rights defined apply to the entry and all its subentries unless other filters restrict access further.
If you want all entries below the ACP to be governed by the ACP, then you do not need to enter anything on the Entry Filter tab page; simply proceed to the next step. Otherwise, perform this step.
If appropriate, use the Entry Filters tab page to identify the entries to which you are specifying access.
You might restrict access to an entry based on one or more of that entry's attributes. For example, you might choose to restrict access to all entries in which the title is manager and in which the organization unit is Americas.
To identify an entry to which you are specifying access:
- From the menu at the left end of the search criteria bar, select an attribute type.
- From the menu in the middle of the bar, select one of the filter options. These options are described in Table C-37.
- In the text box at the right end of the search criteria bar, type the value for the attribute you selected.
- Select the Added Object Filter tab page.
You can specify ACIs to restrict the kind of entries a user can add. For example, you can specify an ACI in the DSE root entry that allows users to add only entries with objectclass=country. The directory server then verifies that any new entry complies with the constraints in this filter.
To restrict the kind of entries a user can add:
- From the menu at the left end of the search criteria bar, select an attribute type.
- From the menu in the middle of the bar, select one of the filter options. These options are described in Table C-37.
- In the text box at the right of the search criteria bar, type the value for the attribute you selected.
- Select the By Whom tab page.
- From the Authentication Choice list, select the type of authentication to be used by the subject (that is, the entity that seeks access). The options are described in Table C-2.
If you do not choose an authentication method, then any kind of authentication is accepted. The authentication method specified on one node should match the one specified on the node it is communicating with.
From the Encryption Choice list, select the type of encryption to be used. The options are described in Table C-3.
- Specify the entity or entities to whom you are granting access. The options are described in Table C-4.
- Select the Access Rights tab page.
- Specify what kinds of rights are granted:
- Browse--Allows the subject to see the entry
- Add--Allows the subject to add other entries below this entry
- Delete--Allows the subject to delete the entry
- Proxy--Allows the subject to impersonate another user
- Click OK.
Task 3: Configure Content Access Items
- To define content access items, that is, ACIs that pertain to attributes, just below the Content Access Items window, choose Create. The Content Access Item dialog box appears. Each tab page contains items you can modify.
- If you want all entries below the ACP to be governed by the ACP, then you do not need to enter anything on Entry Filter tab page; simply proceed to Step 3. Otherwise, perform this step.
In an ACP, the access rights defined apply to the entry and all its subentries unless other filters restrict access further. If appropriate, use the Entry Filters tab page to identify the entries to which you are specifying access.
You might restrict access to an entry based on one or more of that entry's attributes. For example, you might choose to restrict access to all entries in which the title is manager and in which the organization unit is Americas.
To identify an entry to which you are specifying access:
- From the menu at the left end of the search criteria bar, select an attribute type.
- From the menu in the middle of the bar, select one of the filter options. These are described in Table C-37.
- In the text box at the right end of the search criteria bar, type the value for the attribute you selected.
- Select the By Whom tab page.
- From the Authentication Choice list, select the type of authentication to be used by the subject (that is, the entity that seeks access). The options are described in Table C-2.
If you do not choose an authentication method, then any kind of authentication is accepted. The authentication method specified on one node should match the one specified on the node it is communicating with.
From the Encryption Choice list, select the type of encryption to be used. The options are described in Table C-3.
- Specify the entity or entities to whom you are granting access. The options are described in Table C-4.
- Select the Attribute tab page.
- From the right menu, select the attribute to which you want to grant or deny access.
- From the left menu, select the matching operation to be performed against the attribute. Choices are EQ (Equal (=)) and NEQ (Not Equal (!=)).
For example, if you select EQ and cn, then the access rights you grant apply to the cn attribute. If you select NEQ and cn, then the access rights you grant do not apply to the cn attribute.
- Select the Access Rights tab page and specify the privileges. These are described in Table C-5.
- Click OK to close this dialog box and return to the main Oracle Directory Manager dialog box.
Adding an ACP by Using the ACP Creation Wizard of Oracle Directory Manager
The ACP Creation Wizard guides you through the tasks involved in adding an ACP. These tasks are:
- Task 1: Specify the entry that will be the ACP.
- Task 2: Configure structural access items--that is, ACIs that pertain to entries.
- Task 3: Configure content access items--that is, ACIs that pertain to attributes.
Task 1: Specify the Entry That Will Be the ACP
- If you configured Oracle Directory Manager always to display ACPs, as described in "Configuring the Display of ACPs in Oracle Directory Manager", then begin as follows:
- In the navigator pane, expand in succession Oracle Internet Directory Servers and directory server instance.
- In the navigator pane, select Access Control Management, and go to step 2.
If you configured Oracle Directory Manager to display ACPs only as the result of a search, as described in "Configuring the Display of ACPs in Oracle Directory Manager", then begin as follows:
- In the navigator pane, expand in succession Oracle Internet Directory Servers, directory server instance, Access Control Management.
- In the navigator pane, select a node where you want the ACP to reside. If there are no ACPs yet configured, you may select ACPs under "DSE Root".
- On the toolbar, click Create. A New Access Control Point dialog box appears.
- In the Path to Entry field, enter the distinguished name (DN) of the entry that will be the ACP. You can alternatively find the DN by looking in the navigator pane under Entry Management or by clicking Browse.
In an ACP, the access rights defined apply either to the entry and all its subentries or to a specific entry only. The next sections tell you how to configure an ACP for either option.
Task 2: Configure Structural Access Items by Using the ACP Creation Wizard
- To define structural access items, that is, ACIs that pertain to entries, just below the Structural Access Items window, click Create via Wizard. The first Structural Access Item dialog box appears.
- If you specify prescriptive structural access items, then all entries below the ACP are governed by that ACP. If you want prescriptive structural access items, then you do not need to enter anything on this first Structural Access Item dialog box.
Alternatively, if you want to grant access to a specific entry, then, in this first Structural Access Item dialog box, do the following:
- From the menu at the left of the search criteria bar, select an attribute type.
- From the menu in the middle of the bar, select one of the filter options. These are described in Table C-37.
- In the text box at the right end of the search criteria bar, type the value for the attribute you selected.
- Click Next. A second Structural Access Item dialog box prompts you to specify any ACI's to restrict the kind of entries a user can add.
- You can specify ACIs to restrict the kind of entries a user can add. For example, you can specify an ACI in the DSE root entry that allows users to add only entries with
objectclass=country. The directory server then verifies that any new entry complies with the constraints in this filter.
To restrict the kind of entries a user can add:
- From the menu at the left end of the search criteria bar, select an attribute type.
- From the menu in the middle of the bar, select one of the filter options. These are described in Table C-37.
- In the text box at the right end of the search criteria bar, type the value for the attribute you selected.
- Choose Next. The wizard prompts you to choose the authentication and encryption methods, and the subject to whom you are granting access.
- Specifying the authentication method is optional. If you do not set an authentication method, then any kind of authentication is accepted. The authentication method specified on one node must match the bind mode specified on the node it is communicating with.
- To specify the type of authentication, from the Authentication Choice list, select the type of authentication to be used by the subject (that is, the entity that seeks access). The options are described in Table C-2.
- To specify the type of encryption, from the Encryption Choice list, choose an encryption method. The options are described in Table C-3.
- Specify the entity or entities to whom you are granting access. Options are described in Table C-4.
- Click Next. A Structural Access Item dialog box prompts you for access rights information.
- Specify what kinds of rights are granted:
- Browse: Allows the subject to see the entry
- Add: Allows the subject to add other entries below this entry
- Delete: Allows the subject to delete the entry
- Proxy: Allows impersonating an entity without providing its password
- Click Finish.
Task 3: Configure Content Access Items by Using the ACP Creation Wizard
- To define content access items, that is, ACIs that pertain to attributes, just below the Content Access Items window, click Create via Wizard. The first Content Access Item dialog box appears.
- If you specify prescriptive content access items, then all entries below the ACP are governed by that ACP. If you want prescriptive content access items, then you do not need to enter anything on this first Content Access Item dialog box.
Alternatively, to identify an attribute to which you are specifying access:
- From the menu at the left end of the search criteria bar, select an attribute type.
- From the menu in the middle of the bar, select one of the filter options. These are described in Table C-25.
- In the text box at the right end of the search criteria bar, type the value for the attribute you selected.
- Click Next. A second Content Access Item dialog box prompts you to specify to whom you are granting access.
- Choose Next. The wizard prompts you to choose the authentication and encryption methods, and the subject to whom you are granting access.
- Specifying the authentication method is optional. If you do not set an authentication method, then any kind of authentication is accepted. The authentication method specified on one node must match the bind mode specified on the node it is communicating with.
- To specify the type of authentication, from the Authentication Choice list, select the type of authentication to be used by the subject (that is, the entity that seeks access). The options are described in Table C-2.
- To specify the type of encryption, from the Encryption Choice list, choose an encryption method. The options are described in Table C-3.
- Specify the entity or entities to whom you are granting access. Options are described in Table C-4.
- Click Next. A Content Access Item dialog box prompts you to select an attribute and the matching operation to be performed against it.
- To select an attribute and the matching operation to be performed against it:
- In the Attribute field of the Content Access Item dialog box, from the right list, select the attribute to which you want to grant or deny access.
- From the left list, select the matching operation to be performed against the attribute. Choices are EQ (Equal (=)) and NEQ (Not Equal (!=)).
- Click Next. A Content Access Item dialog box prompts you to specify access rights.
- Specify what kinds of rights are granted. These are described in Table C-5.
- Click Finish.
Modifying an ACP by Using Oracle Directory Manager
Modifying ACPs by using Oracle Directory Manager involves three tasks:
- Task 1: Specify the entry that you want to modify.
- Task 2: Modify structural access items--that is, ACIs that pertain to entries.
- Task 3: Modify content access items--that is, ACIs that pertain to attributes.
Task 1: Specify the Entry That You Want to Modify
- If you configured Oracle Directory Manager always to display ACPs, as described in "Configuring the Display of ACPs in Oracle Directory Manager", then begin as follows:
- In the navigator pane, expand Oracle Internet Directory Servers, directory server instance, and Access Control Management. Select Access Control Management. All of the defined Access Control Policy Points (ACPs) appear in a list below Access Control Management in the navigator pane. They also appear in the right pane.
- Under Access Control Management, select the ACP you want to modify. The information for that ACP is displayed in the right pane. Alternatively, you can double-click an ACP in the right pane to display the data in a separate dialog box.
If you configured Oracle Directory Manager to display ACPs only as the result of a search, as described in "Configuring the Display of ACPs in Oracle Directory Manager", then begin as follows:
- In the navigator pane, expand in succession Oracle Internet Directory Servers, directory server instance, and Access Control Management.
- Select the ACP you want to modify. The information for that ACP is displayed in the right pane.
Task 2: Modify Structural Access Items
You can add new structural access items, or modify existing ones.
To modify structural access items:
- In the Structural Access Items window, select the item you want to modify, and, just below the Structural Access Items window, click Edit. The Structural Access Item dialog box appears.
- Use the Entry Filters tab page to narrow the set of entries to which you are granting access. If you want all entries below the ACP to be governed by the ACP, proceed to the next step.
You might choose an entry based on one or more attributes. For example, you might choose to search for all those whose title is secretary, or for all those whose title is manager and whose organization unit is Americas.
In the Criteria window of the Entry Filters tab page, use the search criteria bar to select an attribute, enter a value for that attribute, and specify a filter for matching the specified attribute with the value you entered. To do this:
- From the menu at the left end of the search criteria bar, select an attribute.
- From the menu in the middle of the bar, select one of the filter options. These are described in Table C-25.
- In the text box at the right end of the search criteria bar, type the value for the attribute you selected.
- Use the Added Object Filter tab page to specify ACIs restricting the kind of entries a user can add. For example, you can specify an ACI in the DSE root entry that allows users to add only entries with
objectclass=country. The directory server then verifies that any new entry complies with the constraints in this filter.
To restrict the kind of entries a user can add:
- From the menu at the left end of the search criteria bar, select an attribute type.
- From the menu in the middle of the bar, select one of the filter options. These are described in Table C-37.
- In the text box at the right end of the search criteria bar, type the value for the attribute you selected.
- Use the By Whom tab page to specify the authentication and encryption methods, and the subject of the ACI (that is, the entity that seeks access).
Specifying the authentication method is optional. If you do not set an authentication method, then any kind of authentication is accepted. The authentication method specified on one node must match the bind mode specified on the node it is communicating with.
- To specify the type of authentication, from the Authentication Choice list, select the type of authentication to be used by the subject (that is, the entity that seeks access). The options are described in Table C-2.
- To specify the type of encryption, from the Encryption Choice list, choose an encryption method. The options are described in Table C-3.
- Specify the entity or entities to whom you are granting access. The options are described in Table C-4.
- Select the Access Rights tab page.
- Determine what kinds of rights are granted:
- Click OK.
Task 3: Modify Content Access Items
You can add new content access items, or modify existing ones.
To modify content access items:
- In the Content Access Items box, select the content access item you want to modify, then, just below the Content Access Items box, click Edit. The Content Access Items dialog box appears. Each tab page contains items you can modify.
- If you want all entries below the ACP to be governed by the ACP, then you do not need to enter anything on Entry Filter tab page; simply proceed to the next step.
In an ACP, the access rights defined apply to the entry and all its subentries unless other filters restrict access further. If appropriate, use the Entry Filters tab page to identify the entries to which you are specifying access.
You might restrict access to an entry based on one or more of that entry's attributes. For example, you might choose to restrict access to all entries in which the title is manager and in which the organization unit is Americas.
To identify an entry to which you are specifying access:
- From the menu at the left end of the search criteria bar, select an attribute type.
- From the menu in the middle of the bar, select one of the filter options. These are described in Table C-37.
- In the text box at the right end of the search criteria bar, type the value for the attribute you selected.
- Use the By Whom tab page to specify the authentication and encryption methods, and the subject of the ACI (that is, the entity that seeks access).
Specifying the authentication method is optional. If you do not set an authentication method, then any kind of authentication is accepted. The authentication method specified on one node must match the bind mode specified on the node it is communicating with.
- To specify the type of authentication, from the Authentication Choice list, select the type of authentication to be used by the subject (that is, the entity that seeks access). The options are described in Table C-2.
- To specify the type of encryption, from the Encryption Choice list, choose an encryption method. The options are described in Table C-3.
- Specify the entity or entities to whom you are granting access. The options are described in Table C-4.
- Select the Attribute tab page.
- From the right menu, select the attribute to which you want to grant or deny access.
- From the left menu, select the matching operation to be performed against the attribute. Choices are EQ (Equal (=)) and NEQ (Not Equal (!=)).
For example, if you select EQ and cn, then the access rights you grant apply to the cn attribute. If you select NEQ and cn, then the access rights you grant do not apply to the cn attribute.
- Select the Access Rights tab page and specify the privileges. These are described in Table C-5.
- Click OK.
Granting Entry-Level Access by Using Oracle Directory Manager
To grant entry-level access by using Oracle Directory Manager:
- In the navigator pane, expand in succession Oracle Internet Directory Servers, directory server instance, Entry Management. You may either:
- In the navigator pane, select the entry to display its properties in the right pane
- In the right pane, search for the entry, then double-click the entry to open the Entry dialog box.
- Select the Local Access tab page, then create and edit local ACIs in the Structural Access Item and Content Access Item boxes as described in "Modifying an ACP by Using Oracle Directory Manager".
- Once you have made the changes, click Apply.
Note:
You must click Apply to send the information you just entered to the directory server. Otherwise, the information is simply held in the Oracle Directory Manager cache.
|
Example: Managing ACPs by Using Oracle Directory Manager
This example illustrates how to use Oracle Directory Manager to create a new ACP that has ACIs within it. Suppose you are an administrator in a large company, and you want to limit access to user passwords, so that everyone can compare a password, but only the owner of each password, that is, the user, can read the password or modify it.
In this example, we create a new ACP and populate it with four ACIs that set the following permissions:
- Limited access to a
userpassword attribute by everyone
- Open access to the same
userpassword attribute by the user himself
- Open access to all attributes except
userpassword to everyone
- Open access to all attributes to everyone
Create a New ACP
- In the navigator pane, expand in succession Oracle Internet Directory Servers, directory server instance.
- Select Access Control Management. A list of ACPs appears in the right pane.
- At the bottom of the right pane, click Create. A New Access Control Point dialog box appears.
- In the Path to Entry field, enter the DN where you want the ACP. The ACIs within the ACP will apply to all entries below and including that DN.
Configure Structural Access Items
To set the access rights for an entry:
- Just below the Structural Access Items box, click Create. A Structural Access Items dialog box appears. It contains these tabs: Entry Filter, Added Object Filter, By Whom, and Access Rights.
Because you want the ACIs to apply to all entries under the ACP, do not use the Entry Filter tab page.
- Select the Added Object Filter tab page.
You can specify ACIs to restrict the kind of entries a user can add. For example, you can specify an ACI in the DSE root entry that allows users to add only entries with objectclass=country. The directory server then verifies that any new entry complies with the constraints in this filter.
To restrict the kind of entries a user can add:
- From the menu at the left end of the search criteria bar, select the
objectclass attribute type.
- From the menu in the middle of the bar, select Exact Match.
- In the text box at the right of the search criteria bar, enter
country.
The Added Object Filter tab page should now look like Figure 14-1.
Figure 14-1 Structural Access Item: Added Object Filter Tab Page
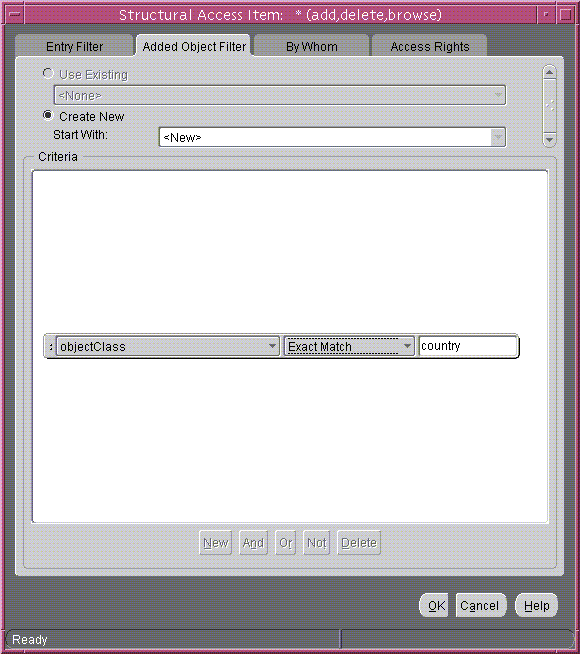
Text description of the illustration added_ob.gif
- Select the By Whom tab page.
- From the Authentication Choice list, select MD5Digest.
- From the Encryption Choice list, choose SASL.
- To create access rights for everyone, select Everyone. The By Whom tab page should look like Figure 14-2.
Figure 14-2 Structural Access Item: By Whom Tab Page
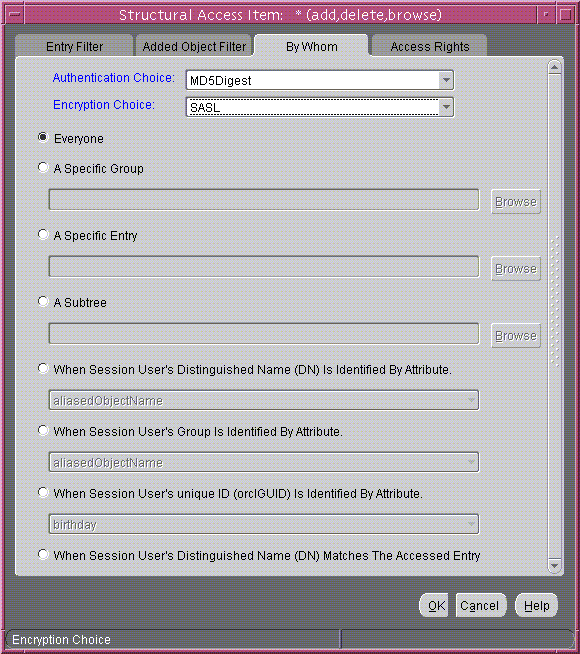
Text description of the illustration bywhom1.gif
- Select the Access Rights tab page. By default, all rights--browse, add, and delete--are granted. Proxy is unspecified.
- Change the access rights so that everyone can browse all entries, but cannot add or delete them. The Access Rights tab page should look like Figure 14-3.
Figure 14-3 Example: Structural Access Item: Access Rights Tab Page
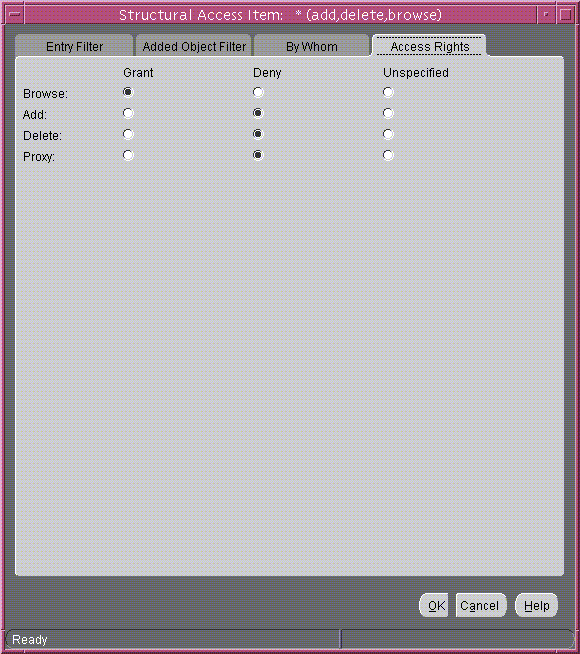
Text description of the illustration access1.gif
- Click OK.
Configure Content Access Items
The four ACIs in this example use the same structural access item information. They differ only in the content access they allow. The rest of this section describes how to create the content access for the ACIs.
To define the content access items:
- Below the Content Access Items box, click Create. The Content Access Items dialog box appears.
Because you want this ACI to apply to all entries under the ACP, do not use the Entry Filter tab page.
- Select the By Whom tab page.
- From the Authentication Choice list, select MD5Digest.
- From the Encryption Choice list, choose SASL.
- To create access rights for everyone, select Everyone. The By Whom tab page should look like Figure 14-4.
Figure 14-4 Content Access Item: By Whom Tab Page
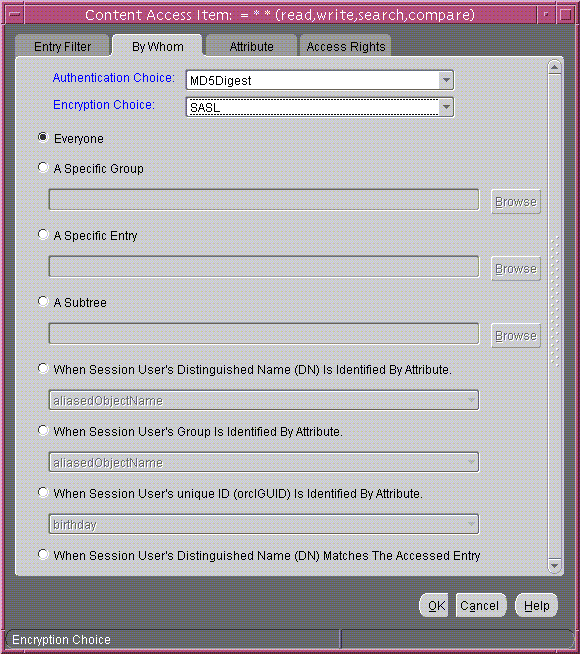
Text description of the illustration bywhom2.gif
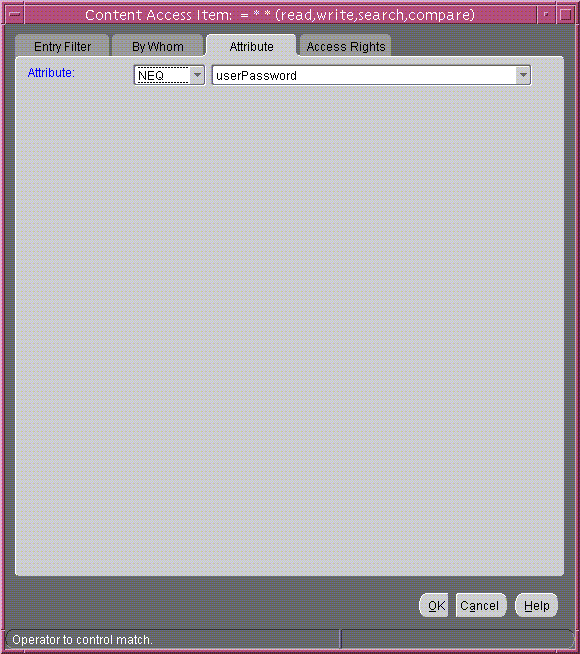
- Select the Attribute tab page. This page has two fields. The first has two choices: EQ (equals) and NEQ (not equals). The second sets the attribute.
Select EQ and select userPassword. The Attribute tab page should look like Content Access Item: Attribute Tab PageFigure 14-5.
Figure 14-5 Content Access Item: Attribute Tab Page
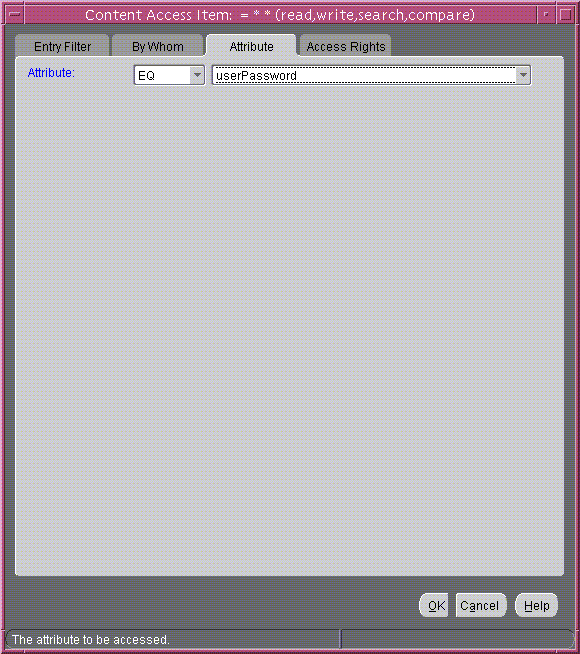
Text description of the illustration attr_tab.gif
- Select the Access Rights tab page. By default, all permissions are granted. Change the permissions so that read, search, write, and compare are denied. The Access Rights tab page should look like Figure 14-6.
Figure 14-6 Content Access Item: Access Rights Tab Page
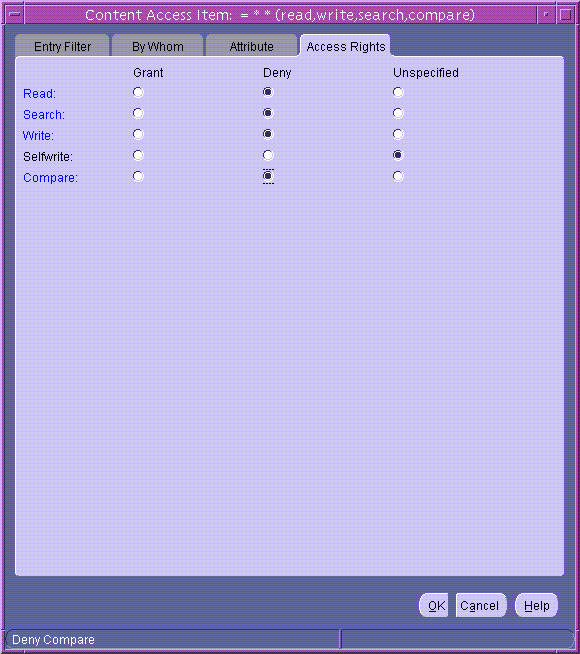
Text description of the illustration access_r.gif
- Click OK.
You have completed one ACI.
Create Another ACI
Create another ACI that allows a user to read, write, search, and compare his own password.
- Under the Content Access Items box, click Create. The Content Access Items dialog box appears.
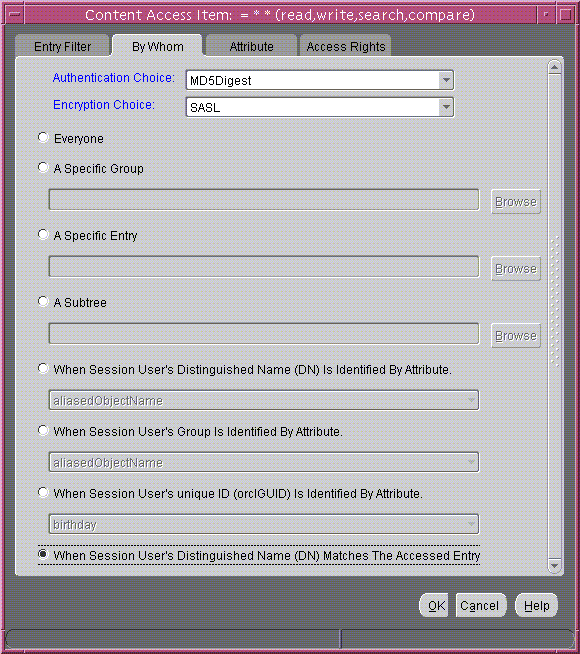
- Select the By Whom tab page.
- From the Authentication Choice list, select MD5Digest.
- From the Encryption Choice list, choose SASL.
- To create access rights for everyone, select When Session User's Distinguished Name (DN) Matches the Accessed Entry. The By Whom tab page should look like Figure 14-7.
Figure 14-7 Content Access Item: By Whom Tab Page
Text description of the illustration bywhom3.gif
- Select the Attribute tab page. This tab page has two lists.The first has two choices: EQ (equals) and NEQ (not equals). The second sets the attribute.
Select EQ and userPassword. The Attribute tab page should look like Figure 14-8.
Figure 14-8 Content Access Item: Attribute Tab Page
Text description of the illustration attr_tab.gif
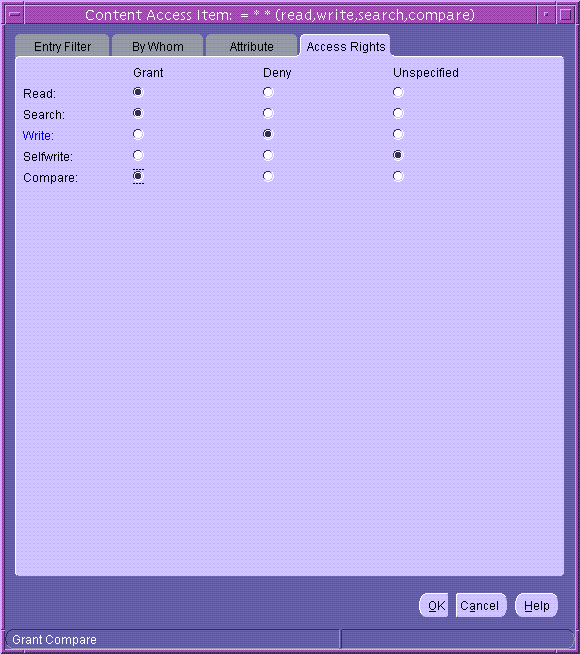
- Select the Access Rights tab page.
Grant access to read, search, write, and compare. Leave selfwrite unspecified. The Access Rights tab page should look like Figure 14-9.
Figure 14-9 Content Access Item: Access Rights Tab Page
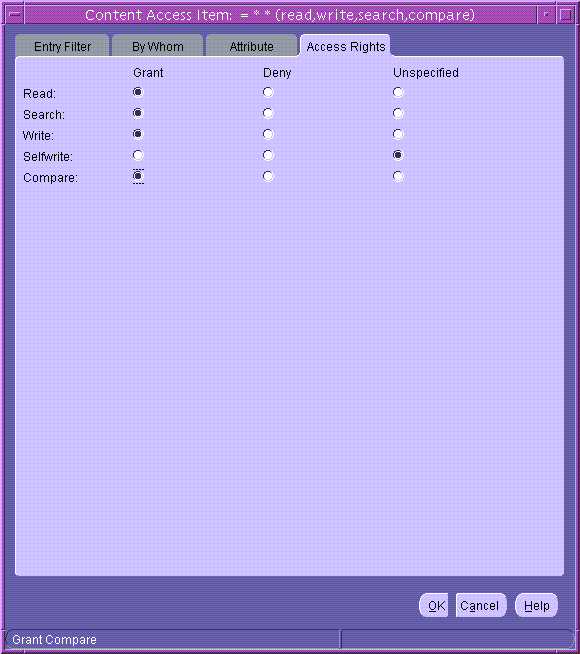
Text description of the illustration access_c.gif
- Click OK.
You have now created two ACIs. One denies Everyone read, search, write, and compare access to the userPassword attribute. The second allows the owner of the password to read, search, write, and compare that attribute.
Create a Third ACI
The next ACI grants access to Everyone to read, search, and compare all attributes except userPassword. It denies write access.
- Under the Content Access Items box, click Create to display the Content Access Items dialog box.
- Select the By Whom tab page.
- From the Authentication Choice list, select MD5Digest.
- From the Encryption Choice list, choose SASL.
- To create access rights for everyone, select Everyone. The By Whom tab page should look like Figure 14-10.
Figure 14-10 Content Access Item: By Whom Tab Page
Text description of the illustration bywhom2.gif
- Select the Attribute tab page.
Select NEQ and userPassword.
This combination means that any attribute that is not equal to userpassword is the object of the permissions in this ACI. The Attribute tab page should look like Figure 14-11.
Figure 14-11 Content Access Item: Attribute Tab Page
Text description of the illustration attr_taa.gif
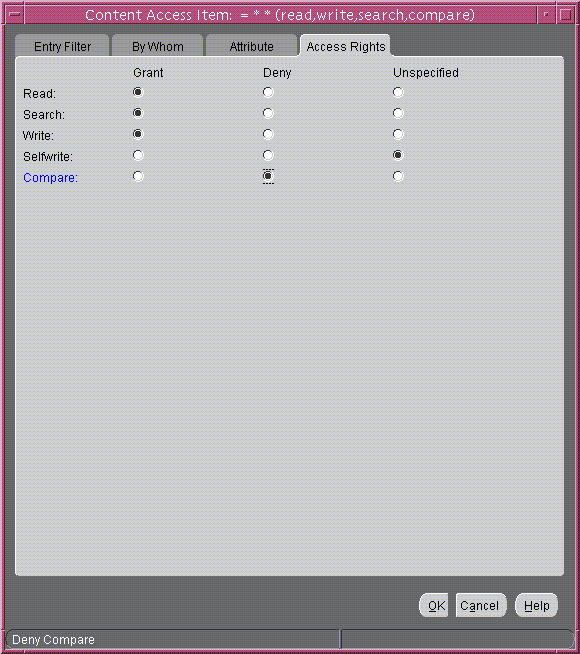
- Select the Access Rights tab page.
Grant access to read, search, and compare. Deny write access. Leave selfwrite unspecified. The Access Rights tab page should look like Figure 14-12.
Figure 14-12 Content Access Item: Access Rights Tab Page
Text description of the illustration access_a.gif
- Click OK to apply these permissions and close the dialog box.
Create a Fourth ACI
The next ACI grants access to Self to read, browse, and write all attributes except userpassword. Including this ACI avoids any ambiguity about whether Self has the same access permissions as Everyone to attributes other than userPassword.
- Under the Content Access Items box, click Create to display the Content Access Items dialog box.
- Select the By Whom tab page.
- From the Authentication Choice list, select MD5Digest.
- From the Encryption Choice list, choose SASL.
- To create access rights for everyone, select When Session User's Distinguished Name (DN) Matches the Accessed Entry. The By Whom tab page should look like Figure 14-13.
Figure 14-13 Content Access Item: By Whom Tab Page
Text description of the illustration bywhom3.gif
- Select the Attribute tab page.
From the lists, select NEQ and userPassword. This combination means that any attribute that is not equal to userPassword is the object of the permissions in this ACI. The Attribute tab page should look like Figure 14-14.
Figure 14-14 Content Access Item: Attribute Tab Page
Text description of the illustration attr_taa.gif
- Select the Access Rights tab page.
Grant access to read, search, and write. Leave selfwrite unspecified. The Access Rights tab page should look like Figure 14-15
Figure 14-15 Access Rights Tab Page
Text description of the illustration access_b.gif
- Click OK to apply these permissions and close the dialog box.
